| Author |
 Topic Search Topic Search  Topic Options Topic Options
|
DMiller 
Orange Level Access

Joined: 14 Sep 2009
Location: Hermann, Mo
Points: 30638
|
 Post Options Post Options
") Thanks(0) Thanks(0)
 Quote Quote  Reply Reply
 Posted: 01 Jun 2024 at 3:55pm Posted: 01 Jun 2024 at 3:55pm |
Last barge of month loaded yesterday, will be building stockpiles back up after rains calm back again. So today, a day with the wife, Grocer, a breakfast stop and a quick tour of a few goings on have been watching. Then finished cleanoff of Left fender, is currently curing two part epoxy primer., R Fender scuffed for the paint attempt tomorrow as well the R Rr cab corner. Will mask it again in morning. IF all goes well and paint does not lift, will be applying Clear to those mid afternoon. Otherwise may end up towed to body shop and leave them do their magic, at a price.
|
 |
|
Sponsored Links
|
|
|
DMiller
Orange Level Access
Joined: 14 Sep 2009
Location: Hermann, Mo
Points: 30638
|
Post Options
Thanks(0)
Quote Reply
Posted: 02 Jun 2024 at 4:29pm |
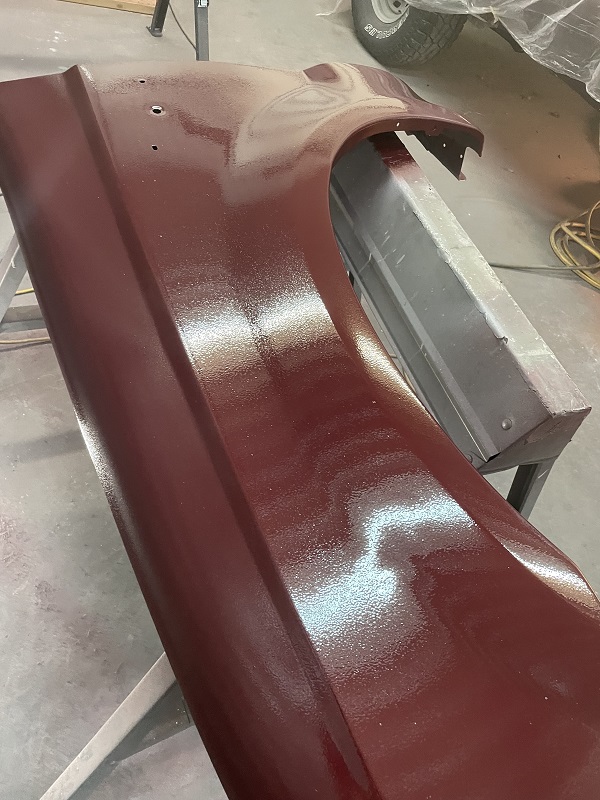
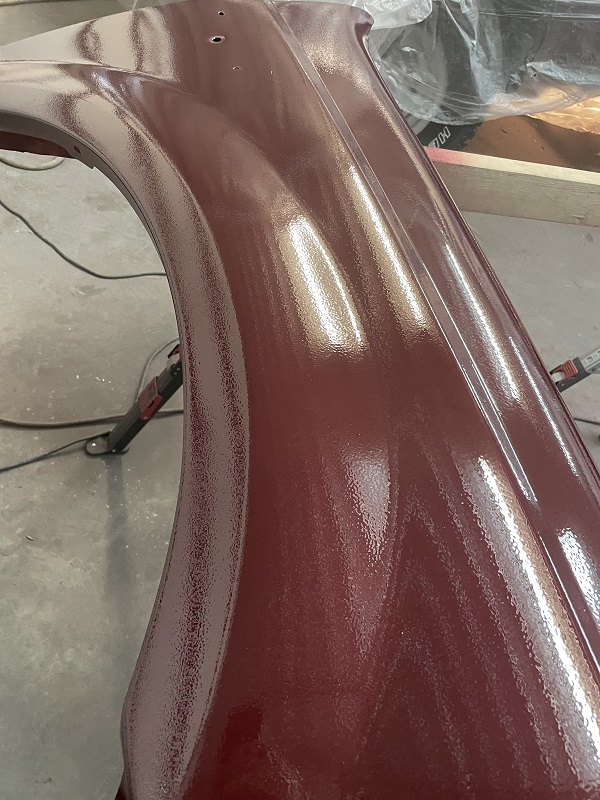
Feeling a LOAD better today. After speaking with a PP rep and the guys here at the Body Shop that supplied my materials, for the last few days been hacking at the Left fender clearing off all the Crazed Paint, yesterday got that complete and sealed it back up with an epoxy primer. Today I set to fixing the Lifted areas on Rt Fender the Cab Corner and repaint the Left Fender. Used NO Reducer, per the PPG Rep. Straight Paint thru my HVLP Gun, Same for clear once color was back on, NO reducing agents.
What went wrong was I have NO paint Booth, the materials are designed such that they are Used INSIDE a Controlled Climate Booth, Fixed Temp, Semi Fixed Humidity and Constant Filtered Airflow. Same issue had painting the KW.
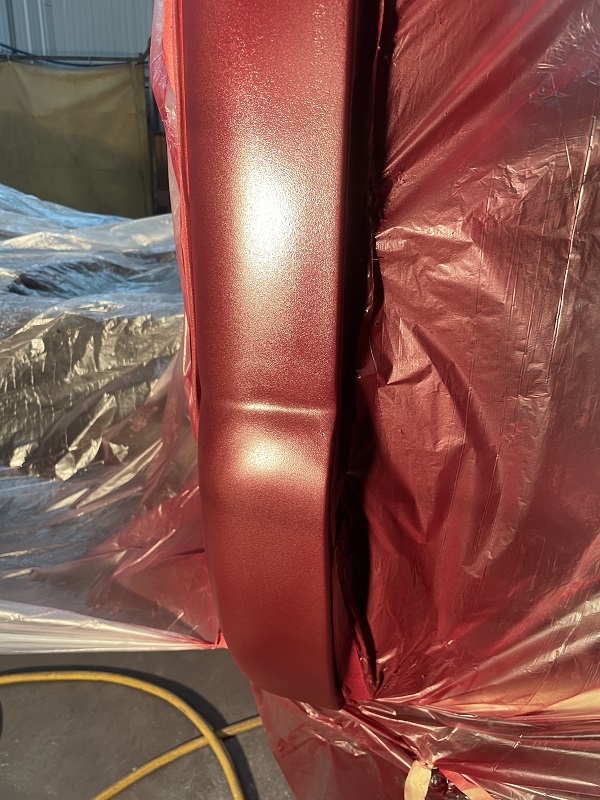
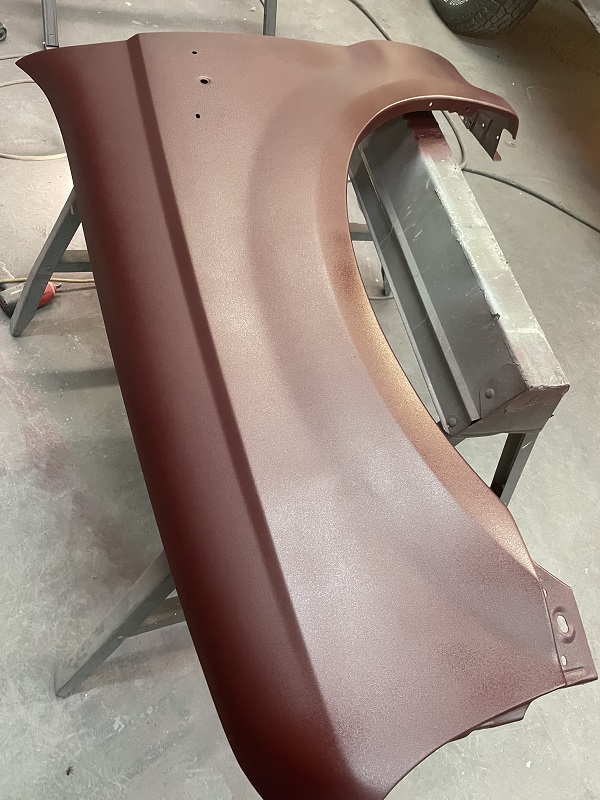
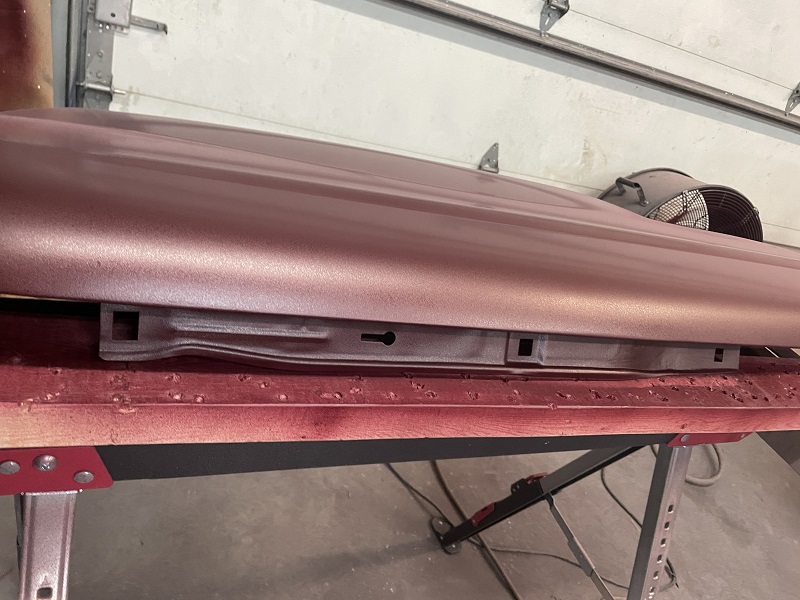
Today's results. Cab Corner
Left Fender
right fender Hood line edge repaint
Edited by DMiller - 02 Jun 2024 at 4:31pm
|
|
DMiller
Orange Level Access
Joined: 14 Sep 2009
Location: Hermann, Mo
Points: 30638
|
Post Options
Thanks(0)
Quote Reply
Posted: 02 Jun 2024 at 4:34pm |
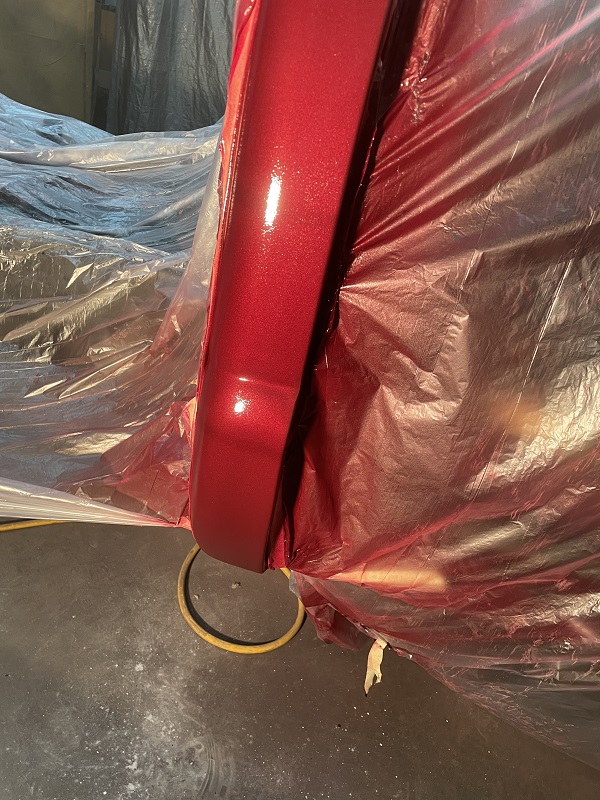
As soon as had the Second coat of Clear on
Allowed to Sit for an Hour, applied Third Clear WET Coat, pulled wrappings. No Lifts, No separations, just DONE!!! Corner is Artificially Bright as the Lighting I was using to actually SEE the work being laid down!!
Now can get back to Cut and Buff.
Edited by DMiller - 02 Jun 2024 at 4:38pm
|
|
AllisFreak MN
Orange Level Access

Joined: 07 Dec 2009
Location: Minnesota
Points: 1538
|
Post Options
Thanks(1)
Quote Reply
Posted: 02 Jun 2024 at 4:36pm |
|
It's good to see you're back on track.
|
|
'49 A-C WD, '51 A-C WD, '63 A-C D17 Series III, 1968 A-C One-Seventy, '82 A-C 6060, '75 A-C 7040, A-C #3 sickle mower, 2 A-C 701 wagons, '78 Gleaner M2
|
|
steve(ill)
Orange Level Access

Joined: 11 Sep 2009
Location: illinois
Points: 80112
|
Post Options
Thanks(0)
Quote Reply
Posted: 02 Jun 2024 at 5:20pm |
Looks great... never heard the " no reducer" story before ....... ???
i know they use slow, medium and fast evaporating reduces for various outside temps..
Edited by steve(ill) - 02 Jun 2024 at 5:22pm
|
|
Like them all, but love the "B"s.
|
|
DMiller
Orange Level Access
Joined: 14 Sep 2009
Location: Hermann, Mo
Points: 30638
|
Post Options
Thanks(0)
Quote Reply
Posted: 02 Jun 2024 at 5:49pm |
The rep noted the Solvent paints formulas today differ from even ten years ago, most shops still have booths even for large trucks so can get away with Medium to slow Reducers. Open Shops, Barns or sheds as I have are NOT conducive to paint work by his acclaim, even trying to limit dust or floating debris is about useless in my setting.
Showed him the paint Pops, he knew right off, Solvent Pop, noted with paint I received to Over Spray a repair area on fresh lain material(Under 2 months), NO reducer unless over 85 degrees otherwise the paint itself would flash far too fast. Not having painted more than a few Lacquer jobs in the 70s then IMRON in the late 70s/80s into more enamel bases in the 90s, and this my first contacts with a HVLP for the KW and this I am completely out of touch.
|
|
DMiller
Orange Level Access
Joined: 14 Sep 2009
Location: Hermann, Mo
Points: 30638
|
Post Options
Thanks(0)
Quote Reply
Posted: 08 Jun 2024 at 2:31pm |
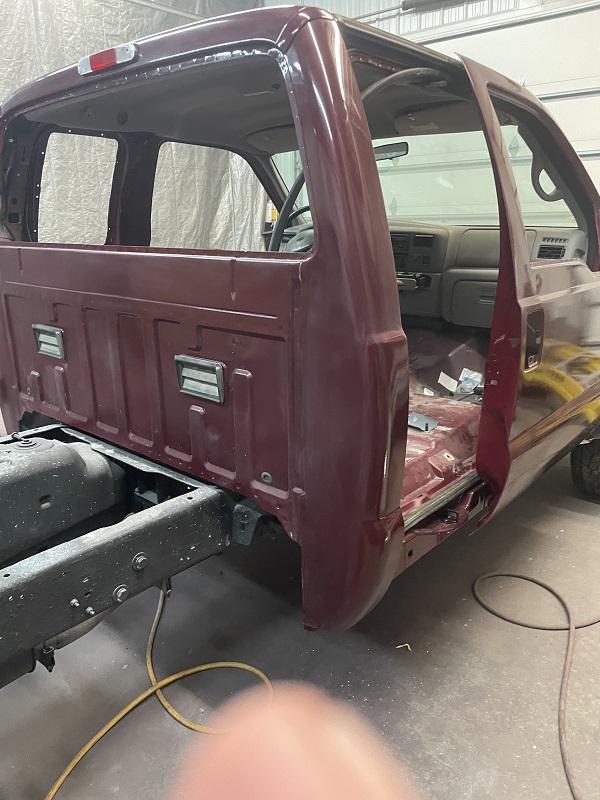
Worked all week, back at the pickup today EARLY.
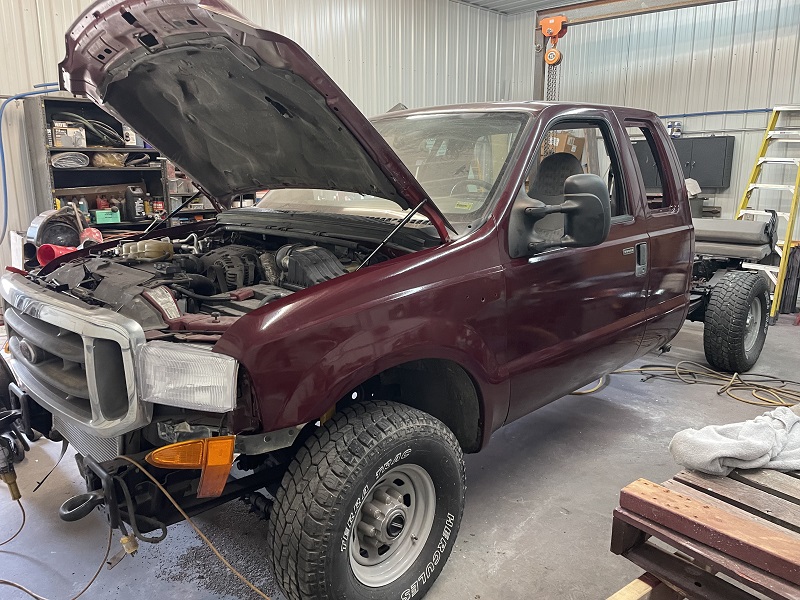
Managed to Blend Buff RRr Corner then hung RRr door, adjusted on doors and installed latch works and hardware, BUNCHES of bump or scratch touchups ALL morning as nicked or caught a edge with pieces. Had to run to town and get new hood prop cylinders, the Originals FINALLY said had enough. Tomorrow more sand and buff spots, then install front door glass and operators, finish installing door speakers then Lower door panels the little pieces of Door splash seals on door bottoms and the between door seals and mirrors. IF feel good of it may sand and buff on front fenders ready those to go on along with front bumper.
Still have seats to clean, floor covering to install and all the inside trim panels in back. And as yet not ordered rear glass and the sealant for the Rear Side glasses.
|
|
DMiller
Orange Level Access
Joined: 14 Sep 2009
Location: Hermann, Mo
Points: 30638
|
Post Options
Thanks(0)
Quote Reply
Posted: 09 Jun 2024 at 6:16pm |
|
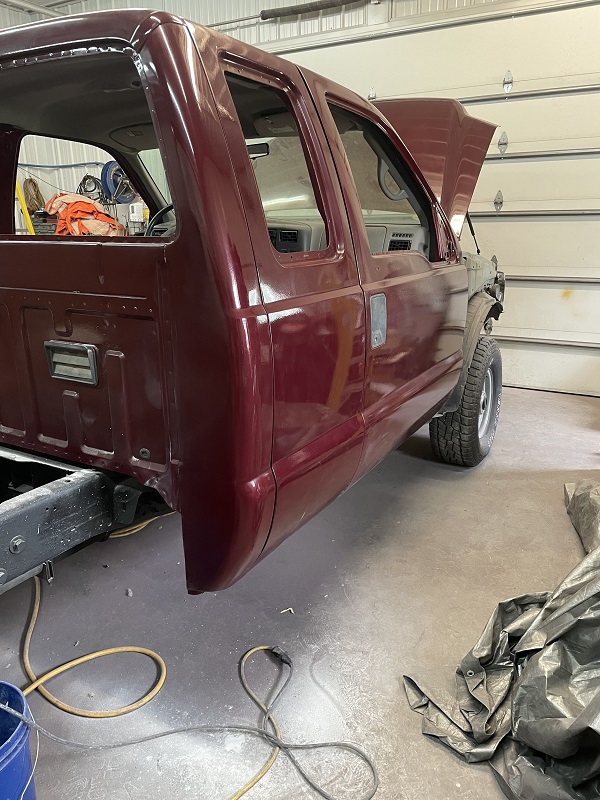
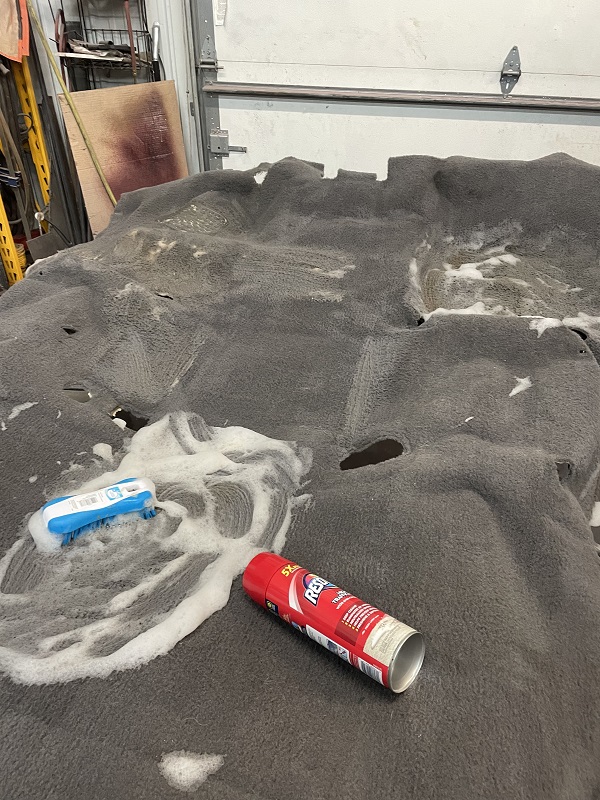
Spent the morning cleaning, Seats, old Carpet assembly, as the new floor mat is Not Worthy to go in. May use it for something else but is just tacky. Did assemble all the front door hardware, windows and operators, speakers, mirrors. Got a little more cut and buff completed until shoulder said WHOA. Carpet is down, started adding trim panels in front section. Rearranged shop to situate the fenders on a pallet on sawhorses to cut and buff, easier on me!!.
|
|
DMiller
Orange Level Access
Joined: 14 Sep 2009
Location: Hermann, Mo
Points: 30638
|
Post Options
Thanks(0)
Quote Reply
Posted: 16 Jun 2024 at 3:43pm |
Entire last post disappeared, Started OVER!!
Last week a bust, Wife's Birthday and our 38th anniversary, Dinner yesterday at White Mule Rosebud MO.
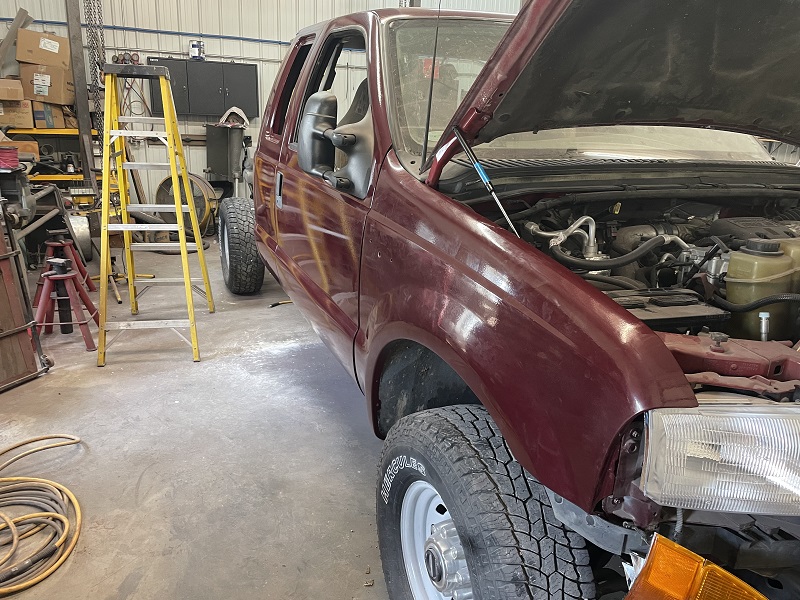
Today back at truck, seats in, Fenders buffed as far as could tolerate on sawhorses, installed those where will go back sand and buff rough spots all around. Added photo of Carpet Cleaning for last post.
Have had to order a bunch of small schtuff missed on previous inspects, small install grommets for T/S being some of that. Fenders are mounted, need to massage those into better align next round. Glass will get ordered for rear window tomorrow, may have install done as off next Monday for Doc day.
Edited by DMiller - 16 Jun 2024 at 3:52pm
|
|
DMiller
Orange Level Access
Joined: 14 Sep 2009
Location: Hermann, Mo
Points: 30638
|
Post Options
Thanks(0)
Quote Reply
Posted: 17 Jun 2024 at 3:55am |
Was inspecting the replacement cab step boards, mounts will cover the tear drop and small rectangle holes at three of the four locations against birds and mice just not for wasps and mud dobbers. Thinking will install the Aluminum tape I have and use for welding over those holes, maybe even cut up an old inner tube as a backing insulator. Need to keep the vermin out and there is a fourth hole that I will need come up with some kind of covering.
Small round and ovals can use commercial plugs |
|
DMiller
Orange Level Access
Joined: 14 Sep 2009
Location: Hermann, Mo
Points: 30638
|
Post Options
Thanks(0)
Quote Reply
Posted: 28 Jun 2024 at 4:33am |
|
Closing in on the finale! Rear glass went in yesterday, I received the Butyl Rope to seal/bed the rear door glasses so will install tonight after work. Wife and I got brakes bled last night, another event. And Wednesday as was off due to rain went down to trailer sales lot bought my new truck bed. Is a Hillsboro SLT 8’ SRW adjustable width under frame flatbed. Has stake pockets, a chain/rub rail, forward bulkhead, rear splash shield and all lighting. They had a premade wiring harness for the Ford and LED Resistor packs to make the flasher work more normal. Also purchased a side undermount tool box for the right side. Should have it here Saturday but on my trailer as still have work to do on the chassis. Just at $4000 with taxes.
Do need to pickup different steel support square pipes for install, should have already ought but was uncertain the height requirement to clear the on chassis assemblies and attain the deck height I will require. Looking at 2 1/2-3” off frame. Will also need to construct fuel filler support and potential under skirt at L Fr corner. Will be installing splash apron under the bed for rear tires and mud flaps.
Edited by DMiller - 28 Jun 2024 at 4:39am
|
|
AllisFreak MN
Orange Level Access
Joined: 07 Dec 2009
Location: Minnesota
Points: 1538
|
Post Options
Thanks(0)
Quote Reply
Posted: 28 Jun 2024 at 9:21pm |
Keep us posted on the progress. I feel like I have a vested interest in this truck now after following this thread all this time. 
|
|
'49 A-C WD, '51 A-C WD, '63 A-C D17 Series III, 1968 A-C One-Seventy, '82 A-C 6060, '75 A-C 7040, A-C #3 sickle mower, 2 A-C 701 wagons, '78 Gleaner M2
|
|
DMiller
Orange Level Access
Joined: 14 Sep 2009
Location: Hermann, Mo
Points: 30638
|
Post Options
Thanks(0)
Quote Reply
Posted: 29 Jun 2024 at 12:08pm |
Front Mud Flaps on, Hatefully Amazon supplied but only wanted fronts and they the only listing Just Fronts. This morning made up Bed support Box Tube crossmembers, 3" Square to gain Fuel Filler clearance, should work Just Fine. Then Off to Sales yard and picked up the new bed I bought last Wednesday. Changes the Look of the old gal quite a LOT!! Also with bed got a plug and play Wire Connector harness with two additional Tail Lamp resistor units, suspect will need at least Two more to achieve Flasher function.
 
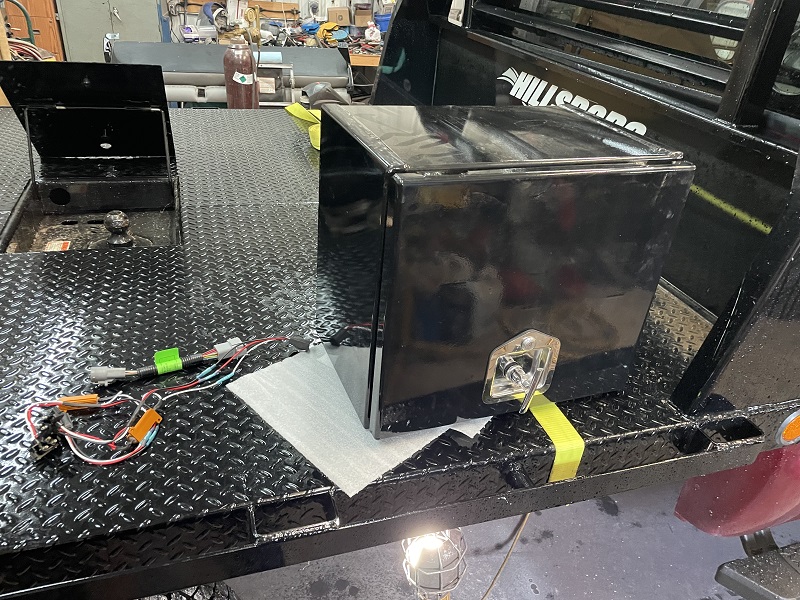
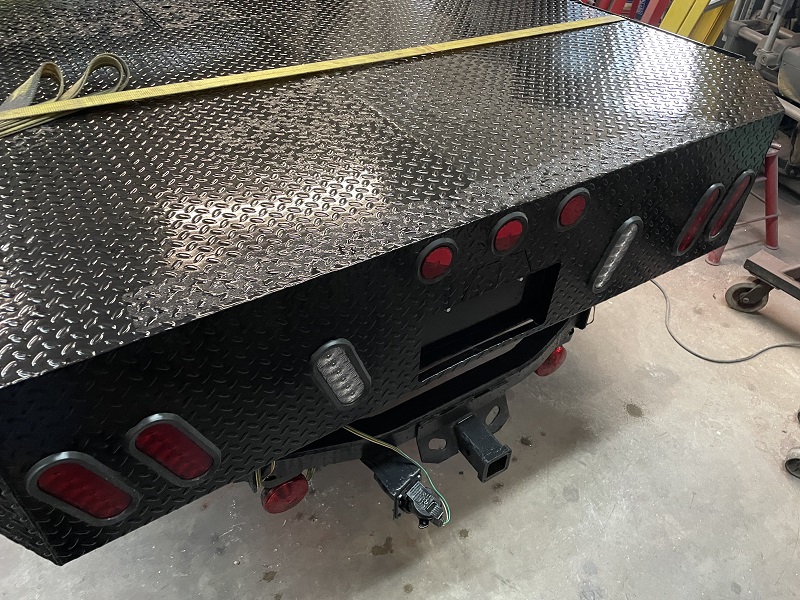
Currently awaiting Dry Off as EVERYTHING is Dripping, then will complete the bed install. Have to adjust Under floor Bed Rails(Are Slotted Adjustable for width) then connect the wiring, install four Counter Angles to the REESE Hitch Angles on the frame and set the bed to those., needs to move Rearward about an inch or so to get it away from cab. My Magnet Implement Tail Lights were to go get the bed and worked just fine!!! Little Tool box will be Ditch Side, MAY just add a Second on Fuel Filler side as should Not interfere.
Edited by DMiller - 29 Jun 2024 at 12:09pm
|
|
DMiller
Orange Level Access
Joined: 14 Sep 2009
Location: Hermann, Mo
Points: 30638
|
Post Options
Thanks(0)
Quote Reply
Posted: 30 Jun 2024 at 5:30pm |
This morning, Bed came off with Aframe, rear crossmember removed and built new one from 3" to 2 1/2" and added 1" Angle to top of Front Crossmember to make a better stop, got all the under work done reset bed, the Off Angle is pretty well gone Cab to Bed.. Made Angle Iron attachments to the old Reese Hitch points, rear mount is 2x2 1/4" angle bolt to frame welded to bed. Lights all functional but will add more resistors to the Taillights for TS to slower flash. Interior is all back together, AC been evacuated over three hours and recharged, seems to be working fine. Made up a Fuel Fill pipe support so that is done. Still need to set Mudflaps, the right tool box and a few odds and ends as Side Boards but it is essentially Completed enough to use again.
|
|
plummerscarin
Orange Level Access
Joined: 22 Jun 2015
Location: ia
Points: 3364
|
Post Options
Thanks(1)
Quote Reply
Posted: 30 Jun 2024 at 7:47pm |
|
That looks really good. Nice work
|
|
steve(ill)
Orange Level Access
Joined: 11 Sep 2009
Location: illinois
Points: 80112
|
Post Options
Thanks(1)
Quote Reply
Posted: 30 Jun 2024 at 8:08pm |
|
been a LONG 6 months !!...... how did the $$$ end up ?
|
|
Like them all, but love the "B"s.
|
|
Alberta Phil
Orange Level

Joined: 13 Sep 2009
Location: Alberta, Canada
Points: 3719
|
Post Options
Thanks(1)
Quote Reply
Posted: 30 Jun 2024 at 8:12pm |
|
Looks good!! I like it!
|
|
AllisFreak MN
Orange Level Access
Joined: 07 Dec 2009
Location: Minnesota
Points: 1538
|
Post Options
Thanks(1)
Quote Reply
Posted: 30 Jun 2024 at 8:16pm |
|
Looks great! It has to be a good feeling after all the work you put into it.
|
|
'49 A-C WD, '51 A-C WD, '63 A-C D17 Series III, 1968 A-C One-Seventy, '82 A-C 6060, '75 A-C 7040, A-C #3 sickle mower, 2 A-C 701 wagons, '78 Gleaner M2
|
|
DMiller
Orange Level Access
Joined: 14 Sep 2009
Location: Hermann, Mo
Points: 30638
|
Post Options
Thanks(0)
Quote Reply
Posted: 01 Jul 2024 at 2:59am |
|
Just under $15,000 as to investment. Still cannot/could not buy a replacement for what is in it and could barely make a down for a new one at that much. Extra cash on extra paint materials, bed prices moved up, a few more components in cab and engine compartment otherwise held to what planned to do.
|
|
DMiller
Orange Level Access
Joined: 14 Sep 2009
Location: Hermann, Mo
Points: 30638
|
Post Options
Thanks(0)
Quote Reply
Posted: 01 Jul 2024 at 3:00am |
|
Still surprising is how much Quieter the interior is as to closing off all the rust holes. Not new but quiet enough to be.
|
|
ihc pickups
Bronze Level Access

Joined: 04 Apr 2017
Location: NE KS.
Points: 120
|
Post Options
Thanks(1)
Quote Reply
Posted: 01 Jul 2024 at 5:42pm |
|
Excellent job on the restoration.
|
|
Mike
|
|
tadams(OH)
Orange Level Access

Joined: 17 Sep 2009
Location: Jeromesville, O
Points: 10010
|
Post Options
Thanks(1)
Quote Reply
Posted: 02 Jul 2024 at 10:18am |
|
Everything is looking great.
|
|
DMiller
Orange Level Access
Joined: 14 Sep 2009
Location: Hermann, Mo
Points: 30638
|
Post Options
Thanks(0)
Quote Reply
Posted: 10 Jul 2024 at 4:27am |
|
Currently building Stake Sides for the back, have added mudflaps and thinking may buy another tool box but are pricey, added resistors did arrive and are installed where TS are responding normal speed. Also hung Spare off rack on 1" Square Tube support for easier access. Final Pics in a few days as sides come together.
|
|
GeneD14
Silver Level

Joined: 17 Sep 2009
Location: TN
Points: 244
|
Post Options
Thanks(0)
Quote Reply
Posted: 10 Jul 2024 at 10:32am |
Truck looks super! You did a nice job!
|
|
DMiller
Orange Level Access
Joined: 14 Sep 2009
Location: Hermann, Mo
Points: 30638
|
Post Options
Thanks(0)
Quote Reply
Posted: 10 Jul 2024 at 4:37pm |
Have not built a tail or intermediate board set yet but working on how to accomplish as inexpensively as possible. These are final results. Spare Support
Bed Side Boards Those include Fuel Filler bracket and the four Mudflaps. Still need to Enganear a Rear Step but working on it. Then one of Four Resistor sets
Old truck is working out pretty well, know a yard that just bought a Service Truck for their mechanics to replace a over 25 year old unit, 14 years old, a lot of miles and a Duramax GM, $18,000. I am in this so far for Less than $15,000.
|
|
plummerscarin
Orange Level Access
Joined: 22 Jun 2015
Location: ia
Points: 3364
|
Post Options
Thanks(1)
Quote Reply
Posted: 10 Jul 2024 at 6:27pm |
|
That looks really good. Nice work
|
|
AllisFreak MN
Orange Level Access
Joined: 07 Dec 2009
Location: Minnesota
Points: 1538
|
Post Options
Thanks(1)
Quote Reply
Posted: 10 Jul 2024 at 6:33pm |
|
I'm a GM kinda guy but it has been fun watching this Ford get restored, especially by a guy in his own home shop. Not many people would take that job on. I know I wouldn't. Looks good!
|
|
'49 A-C WD, '51 A-C WD, '63 A-C D17 Series III, 1968 A-C One-Seventy, '82 A-C 6060, '75 A-C 7040, A-C #3 sickle mower, 2 A-C 701 wagons, '78 Gleaner M2
|
|
DMiller
Orange Level Access
Joined: 14 Sep 2009
Location: Hermann, Mo
Points: 30638
|
Post Options
Thanks(0)
Quote Reply
Posted: 11 Jul 2024 at 4:00am |
|
Thanks Guys, wish it had been a restoration, just a mass repair to keep it functional, if had not noticed already Baptized with mud from Barn/Feed Lot. Scratches will continue!
Edited by DMiller - 11 Jul 2024 at 5:02pm
|
|
plummerscarin
Orange Level Access
Joined: 22 Jun 2015
Location: ia
Points: 3364
|
Post Options
Thanks(1)
Quote Reply
Posted: 11 Jul 2024 at 6:30am |
|
Well, it is a truck after all
|
|