| Author |
 Topic Search Topic Search  Topic Options Topic Options
|
Mikez 
Orange Level Access


Joined: 16 Jan 2013
Location: Usa
Points: 8151
|
 Post Options Post Options
") Thanks(0) Thanks(0)
 Quote Quote  Reply Reply
 Posted: 13 Apr 2021 at 8:04pm Posted: 13 Apr 2021 at 8:04pm |
|
can you put pictures of air ride seat on here. Thanks
|
 |
|
Sponsored Links
|
|
|
PAFarmer
Bronze Level


Joined: 06 Oct 2020
Location: Pennsylvania
Points: 114
|
Post Options
Thanks(0)
Quote Reply
Posted: 13 Apr 2021 at 3:15pm |
 AC7060IL wrote: AC7060IL wrote:
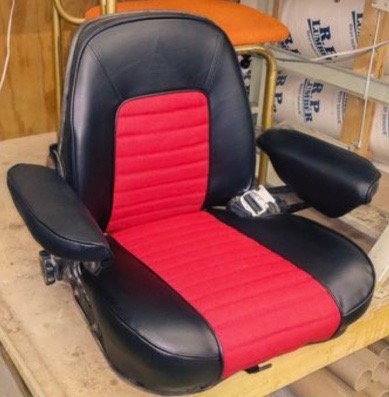
PAfarmer, I'm enjoying your 8070's restoration pictures. You do great work! Thanks for sharing. If you haven't already, you might try taking your 8070's seat to a local upholstery shop for restoration. Some local shops can do great restoration at a reasonable rate. For $375, Austin at AlphaOmega Taylorville, IL restored my AC 7040's seat pictured above. It received new foam, vinyl, red fabric inserts, & AC imprint. Austin fabricated a metal AC stamp to recreate the AC imprint in it's upper backrest vinyl. Here's their weblink: http://www.alphaomegataylorville.com/gallery |
Thanks! Glad you're enjoying the pictures. I'm enjoying the project for sure.
Wow!! Your seat turned out really nice. Forgive my ignorance, but did the 7040 have that red insert from the factory? It's really sharp looking.
I took the seat from the 8070 to a local shop to get recovered. I found a post on here that had a link to an Etsy shop that has fabric with a really close pattern to the original. It'll be awhile till I see it back though as they do a lot of work on boats and this is their busy season.
We treated ourselves to a Grammer air ride setup and new seat in our 8010, so I have the old seat out of it that I'm going to use temporarily. I cleaned up the stock suspension from the 8070, but I'm thinking it's going to get a air ride as well. Spent a few hours in the 8010 the other day and it's worth it!
Edited by PAFarmer - 13 Apr 2021 at 9:17pm
|
|
AC7060IL
Orange Level
Joined: 19 Aug 2012
Location: central IL
Points: 3208
|
Post Options
Thanks(0)
Quote Reply
Posted: 13 Apr 2021 at 11:21am |
PAfarmer, I'm enjoying your 8070's restoration pictures. You do great work! Thanks for sharing. If you haven't already, you might try taking your 8070's seat to a local upholstery shop for restoration. Some local shops can do great restoration at a reasonable rate. For $375, Austin at AlphaOmega Taylorville, IL restored my AC 7040's seat pictured above. It received new foam, vinyl, red fabric inserts, & AC imprint. Austin fabricated a metal AC stamp to recreate the AC imprint in it's upper backrest vinyl. Here's their weblink: http://www.alphaomegataylorville.com/gallery
Edited by AC7060IL - 13 Apr 2021 at 11:23am
|
|
PAFarmer
Bronze Level
Joined: 06 Oct 2020
Location: Pennsylvania
Points: 114
|
Post Options
Thanks(0)
Quote Reply
Posted: 11 Apr 2021 at 9:30pm |
Thanks, It's been a fun project. I've been pushing to get it done in time to hook to the no-till drill for sowing beans. Looks like I might just make it.
lol! I'd love to help you out, but I think I'm booked on work for the foreseeable future.  I'm going to give our 8010 a good going over this winter, although it is in way better condition than the 8070 was. Our 8010 has been stored indoors from the day it was new, so it just needs a head liner and some other small touch ups from a interior perspective. I want to paint the exterior, but we'll see if that's in the cards or not. It's at just over 10k hours now and the 301 is starting to show some blow-by and the front main is leaking far more than I'd like. So it'll get a full out of frame while I'm at it.
The acquisition of the 8070 will let the 8010 retire to a hay making tractor for the most part. It's earned it.
Edited by PAFarmer - 11 Apr 2021 at 9:30pm
|
|
Mikez
Orange Level Access
Joined: 16 Jan 2013
Location: Usa
Points: 8151
|
Post Options
Thanks(1)
Quote Reply
Posted: 11 Apr 2021 at 8:59pm |
|
wow that is looking really nice. Could you come do mine
|
|
PAFarmer
Bronze Level
Joined: 06 Oct 2020
Location: Pennsylvania
Points: 114
|
Post Options
Thanks(0)
Quote Reply
Posted: 11 Apr 2021 at 6:46pm |
So it's been a few days since I've posted an update. Progress has been slow but steady. Trying to squeeze the 8070 restoration in between getting planters and hay equipment ready. But we've finally got everything field ready and I spent the day putting the interior back together! It's turning out better than I hoped. Still waiting on a few odds and ends, the black screw caps, the decal for around the head light and turn switch and the new fuel/temp gauge cluster. Also waiting on some new speakers and a stereo. Have to hand paint the silver trim on the dash also that goes around the gauges and the AC logo.
The cables aren't hooked up in the right hand console either because it will make my life way easier to mask the outside of the cab with them removed.
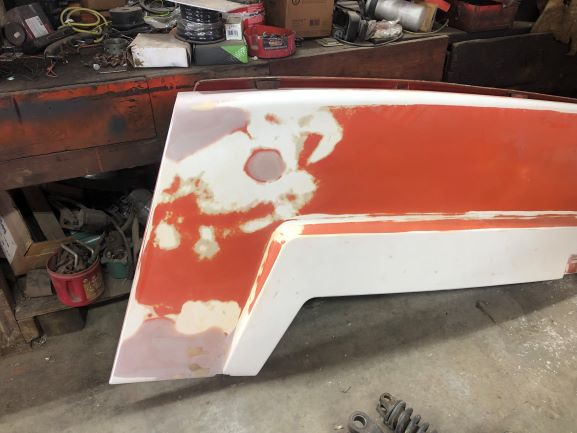
The exterior has made some progress as well. I sand blasted the wheels, the roof and the front weights and bracket. My dad finished the cab corner and fixed the left side hood that had a few cracks in it.
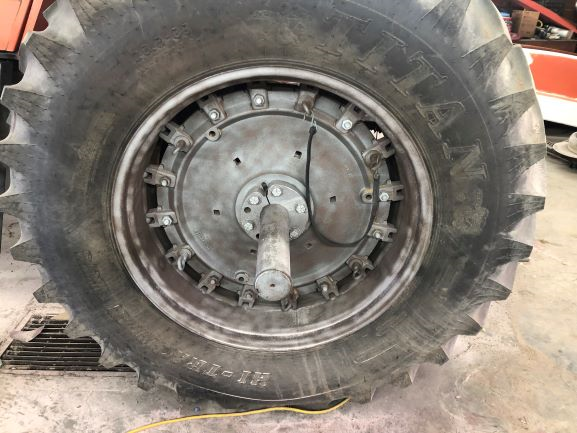
The plan is to sand and paint the orange bits this week with PPG Omni and then the hard work begins which will be painting the wheels and the black underbelly. The back tires are filled with RV antifreeze and we're going to take them off the centers so we can paint them properly. That's gonna be a heavy job.
Edited by PAFarmer - 11 Apr 2021 at 6:50pm
|
|
PAFarmer
Bronze Level
Joined: 06 Oct 2020
Location: Pennsylvania
Points: 114
|
Post Options
Thanks(0)
Quote Reply
Posted: 11 Apr 2021 at 6:26pm |
dpower wrote:
To get new plastic caps for the interior pieces i go through pro-dec.com. I ordered all the brown/tan colored caps to see which one matched the best. I believe the color teak matches the best for my interior. hope that helps so you dont have to search around. When i got them through agco the color was way too dark FYI |
Thanks for the advice. I had got the brown ones from agco and they matched perfect. But they don't have the black ones anymore, so I'll check that out for sure to get them!
|
|
dpower
Orange Level
Joined: 11 Sep 2009
Location: Madison Ne
Points: 1575
|
Post Options
Thanks(1)
Quote Reply
Posted: 03 Apr 2021 at 7:13am |
|
To get new plastic caps for the interior pieces i go through pro-dec.com. I ordered all the brown/tan colored caps to see which one matched the best. I believe the color teak matches the best for my interior. hope that helps so you dont have to search around. When i got them through agco the color was way too dark FYI
Edited by dpower - 03 Apr 2021 at 7:15am
|
|
EPALLIS
Orange Level
Joined: 12 Sep 2009
Location: Illinois
Points: 1113
|
Post Options
Thanks(1)
Quote Reply
Posted: 02 Apr 2021 at 10:13pm |
|
Thanks for saving another A-C. That always makes me happy!!
|
|
PAFarmer
Bronze Level
Joined: 06 Oct 2020
Location: Pennsylvania
Points: 114
|
Post Options
Thanks(0)
Quote Reply
Posted: 02 Apr 2021 at 9:24pm |
There's a lot of Allis in this area still. I'm not aware of any other 8070 FWA, but I know of a few 8000 series FWA running around. A couple 8030s and an 8050 that I can think of. A good number of 2WDs also.
The 8070 will certainly be plenty big for us, but not too big.
|
|
AC720Man
Orange Level

Joined: 10 Oct 2016
Location: Shenandoah, Va
Points: 4646
|
Post Options
Thanks(0)
Quote Reply
Posted: 02 Apr 2021 at 8:40pm |
|
Good one to save, FWA 8070. You don't see any of those around in my area. Had a 8070 2 WD a mile away. I did the maintenance on it one summer. He sold it to a collector in NC after realizing it was too large of a tractor for what he needed on his farm.
|
|
1968 B-208, 1976 720 (2 of them)Danco brush hog, single bottom plow,52" snow thrower, belly mower,rear tine tiller, rear blade, front blade, 57"sickle bar,1983 917 hydro, 1968 7hp sno-bee, 1968 190XTD
|
|
PAFarmer
Bronze Level
Joined: 06 Oct 2020
Location: Pennsylvania
Points: 114
|
Post Options
Thanks(0)
Quote Reply
Posted: 01 Apr 2021 at 8:31am |
Thanks! I'm going to get it as close to "factory" as reasonable for a working tractor! I wanted to pull the cab, but time is not gonna permit that I don't think. My biggest concern is the back of the cab behind the remote valves and things. I think I can paint it reasonably well with a detail gun though.
Spent a solid 4 hours last night sanding the interior and that job is mostly complete. There's still some hand work to get done in the corners and things. Also have to hit some places with the handheld sand blaster.
I need to pull the steering column today, get it prepped and painted. I've been putting that off incase I needed to move the tractor out of the shop, but it's time to bite that bullet.
|
|
AC7060IL
Orange Level
Joined: 19 Aug 2012
Location: central IL
Points: 3208
|
Post Options
Thanks(0)
Quote Reply
Posted: 01 Apr 2021 at 7:08am |
|
Congrats on your 8070 Fwd acquisition. Thanks for sharing your photos of your restoration. Its great to see the "old girl" come back to production year quality, probably better?
|
|
plummerscarin
Orange Level Access
Joined: 22 Jun 2015
Location: ia
Points: 3154
|
Post Options
Thanks(1)
Quote Reply
Posted: 31 Mar 2021 at 6:58am |
|
Liking your progress. Keep up the good work
|
|
PAFarmer
Bronze Level
Joined: 06 Oct 2020
Location: Pennsylvania
Points: 114
|
Post Options
Thanks(0)
Quote Reply
Posted: 30 Mar 2021 at 10:50pm |
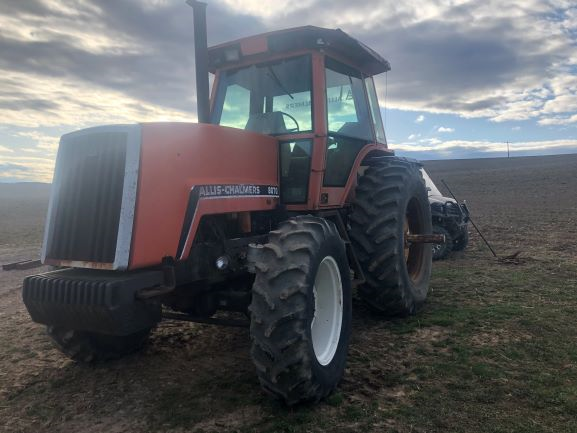
So, update on the 8070 restoration progress. It's been steady progress. First step was to take those ugly duals off. I hate they way the look, its a matter of personal preference. More practically, they take up way too much room in the shop.
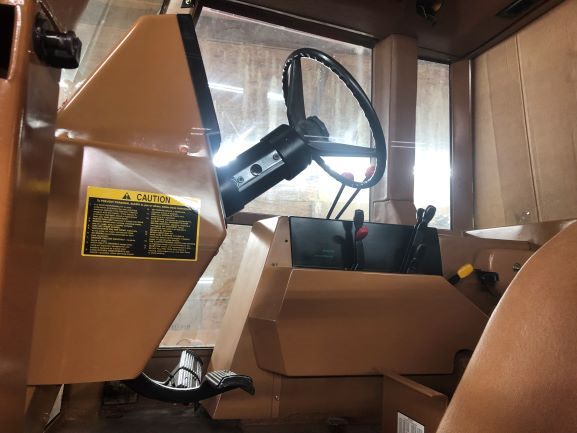
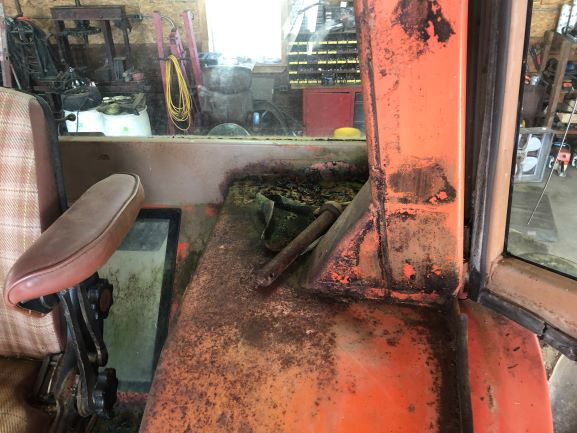
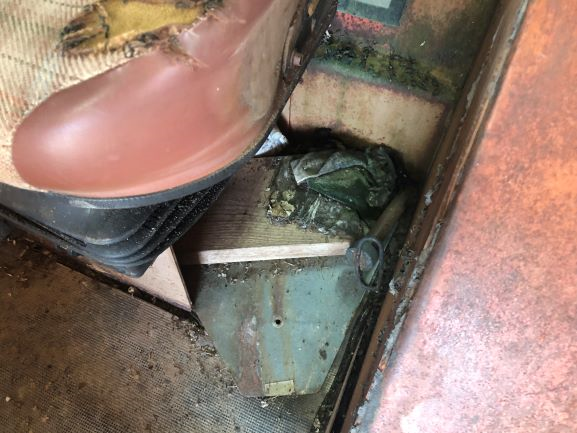
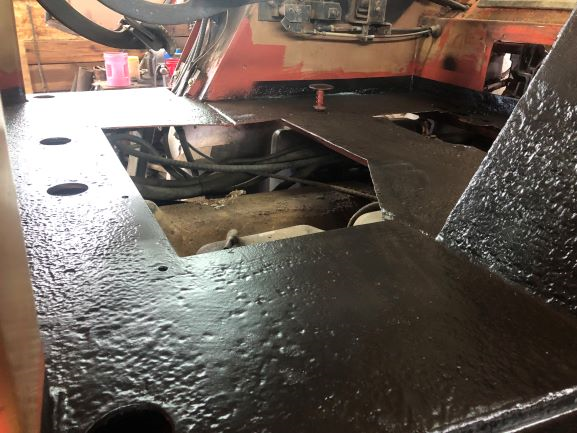
I've totally stripped the interior out at this point. Man, was the floor crispy. Super rusted and pitted with a hole rusted thru in the back under the remote flow adjustment panel. Here are some before shots of the interior.
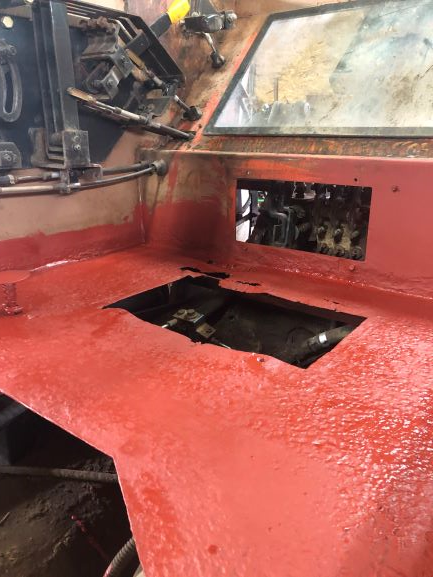
So after several hours of work and about half a dozen flap wheels on the grinder, I got the floor and most of the interior cleaned up. Then I put down a thick layer of Rustoleum red oxide primer. I hate applying that stuff, but you could pave a road with it and it does produce nice results. After the primer, I put down a good coat of rubberized truck bed liner to try and keep the moisture away from the floor.
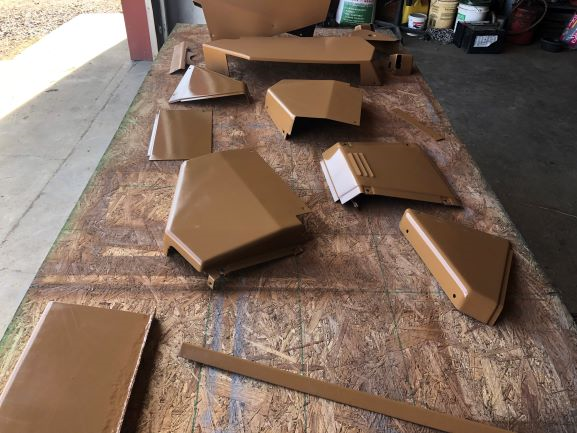
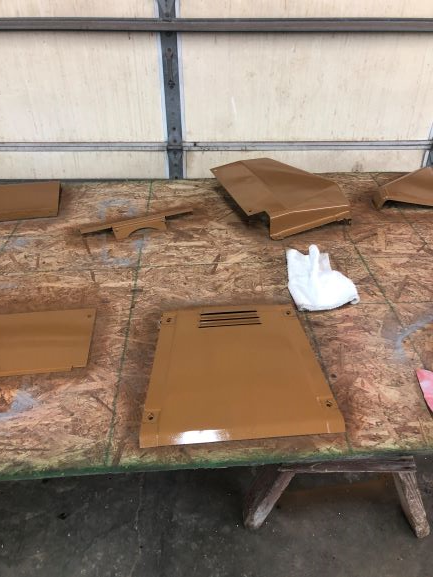
Next step was to track down a paint to repaint the saddle brown. I decided the easiest way to do this was to borrow the traction booster cover from our 8010, which isn't faded at all, and take it to the local Car Quest. They scanned the inside of the cover with their color matching tool. They mixed me several spray cans of SEM acrylic enamel so today I prepped and primed the interior parts that I could remove from the cab. I used adhesion promoter before applying to the plastic parts. I'm really, really pleased with the way it turned out!
Tonight I took the rear glass out and took the doors off then masked the glass in the cab. Next step is to prep and paint the interior of the cab. The plan is to paint the non-visible stuff with POR-15 and the visible stuff with the same paint as the others.
I've managed to amass all the decals, upholstery, headliner and floor mat. I also took the seat to a local shop to get re-covered. I'll post more once I've finished the interior. Hope to have that done by no later than mid next week.
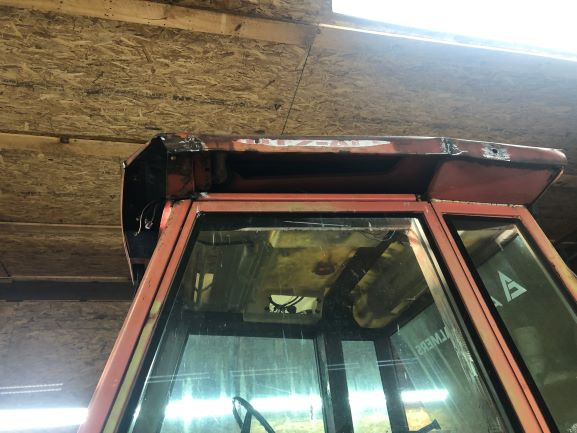
On an exterior note, my dad fixed up the corner of the cab that had been accidently used by the previous owner to support the roof of an old barn in a wind storm. For what my dad had to work with, it turned out really great. To get it much better, we would have ended up cutting the side of the roof off of the cab and fabricating all new and that's just not an option for this project. I'll do some smoothing with a very thin layer of bondo and it will look really good when shiny orange again.
Edited by PAFarmer - 30 Mar 2021 at 10:57pm
|
|
Steve in NJ
Orange Level Access

Joined: 12 Sep 2009
Location: Andover, NJ
Points: 11561
|
Post Options
Thanks(0)
Quote Reply
Posted: 28 Mar 2021 at 8:12am |
I was going to mention the SEM paint for the knobs also. Does a good job on knobs in gerneral. I use the SEM paint to clean up the knobs on the 3 position Headlight/Charging switches I rebuild for the early Tractors. Cleans em' up nice with a little work.....
Steve@B&B
|
|
39'RC, 43'WC, 48'B, 49'G, 50'WF, 65 Big 10, 67'B-110, 75'716H, 2-620's, & a Motorhead wife
|
|
Wispitfiremike
Bronze Level
Joined: 28 Mar 2017
Location: Milwaukee, WI
Points: 178
|
Post Options
Thanks(0)
Quote Reply
Posted: 26 Mar 2021 at 9:37pm |
|
Well done sir. Looks new!
|
|
Transaxial
Bronze Level
Joined: 19 Apr 2014
Location: Tofield,Alberta
Points: 96
|
Post Options
Thanks(0)
Quote Reply
Posted: 26 Mar 2021 at 10:54am |
PAFarmer wrote:
Looks sharp! What kind of paint did you use on the exterior? |
We have Cloverdale Paint in Canada and they have been very good at mixing a color that works for old Allis 8070, 8550 and IH 1206. The hood on my 1206 is original paint and decals and the paint on the rest of the tractor matches that very well. I could get you number codes if you can use them.
|
|
PAFarmer
Bronze Level
Joined: 06 Oct 2020
Location: Pennsylvania
Points: 114
|
Post Options
Thanks(0)
Quote Reply
Posted: 26 Mar 2021 at 10:15am |
|
Looks sharp! What kind of paint did you use on the exterior?
|
|
Transaxial
Bronze Level
Joined: 19 Apr 2014
Location: Tofield,Alberta
Points: 96
|
Post Options
Thanks(0)
Quote Reply
Posted: 25 Mar 2021 at 2:42pm |
steve(ill) wrote:
Barry, down load your photo to your computer. Open with PAINT or similar program. Scale it to 800 x 600 pixels ( or about). then save it to your desktop.... Then go to this site and download it..
Most new cameras are taking photos that are 5000 pixels wide and several MegaBites in size... This site wants a 800 pixel photo with 100 KB size. ( approx).
If your doing everything on a cell phone, then see if you can change the size of pictures it takes ( before you take it, not after)... Most cameras have 5-6 different SIZEs that you can use.. dont know if cell phone can do that or not... Smaller size = more photos per disc.
|
Thanks Steve. I will try posting my restored 8070 just for fun. This computer stuff is about as clear as mud! Sorry, can't get it sized right.  [ 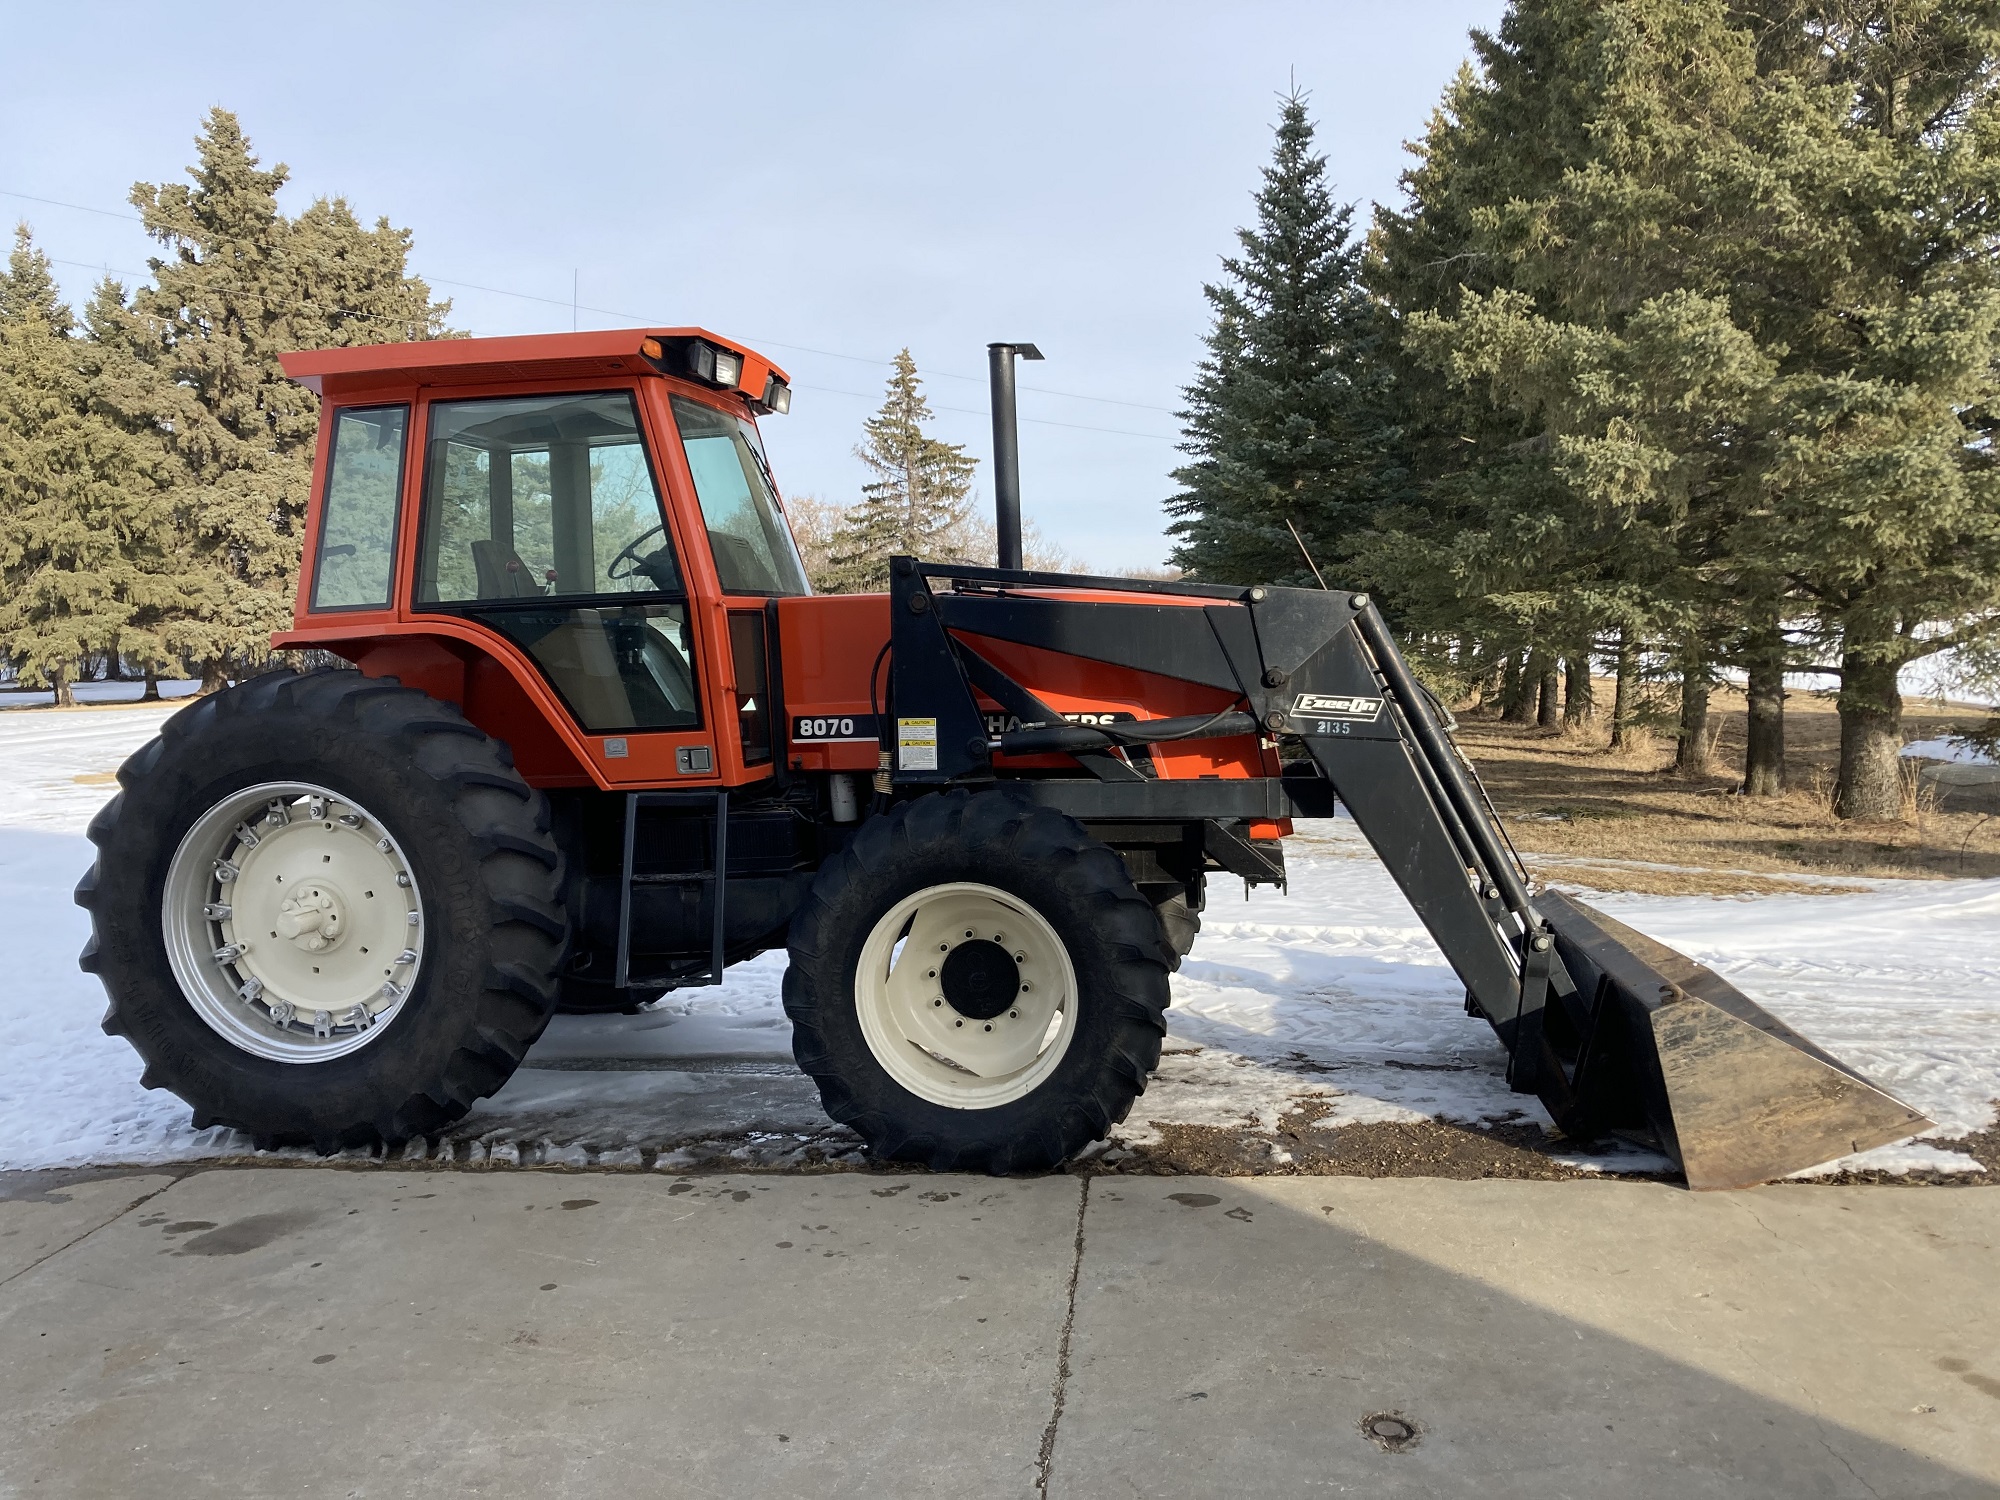
|
|
PAFarmer
Bronze Level
Joined: 06 Oct 2020
Location: Pennsylvania
Points: 114
|
Post Options
Thanks(0)
Quote Reply
Posted: 25 Mar 2021 at 8:09am |
Transaxial wrote:
PAFarmer wrote:
Well, it's officially done. I own the 8070 and I'm going to get it home tomorrow. Here's a photo. Will start on the resto this weekend.
|
Congrats on the 8070! They are cool tractors. How did you get your picture to post? It tells me my file size is too big to load. |
Thanks!
Regarding the photo, I used the "Photos" program in Windows 10. There is a resize option in there that lets you downscale. I just selected the smallest size.
|
|
PAFarmer
Bronze Level
Joined: 06 Oct 2020
Location: Pennsylvania
Points: 114
|
Post Options
Thanks(0)
Quote Reply
Posted: 25 Mar 2021 at 8:07am |
So I found the 70270999 and 70264914 NOS at an AGCO dealer. So that's the last of my decal needs! I got the speed/shift instructions decals from member Gary(WI) on here and they are excellent. While I was at it, I had him make me one for our 8010 as well.
The final things on my list are trying out a couple different paint options for the tan color on the interior and then deciding what paint to use for the exterior. I've been told to use Durathane from PPG. Does anyone have any suggestions?
|
|
xbk9576
Bronze Level
Joined: 16 Jun 2016
Location: iowa
Points: 20
|
Post Options
Thanks(0)
Quote Reply
Posted: 25 Mar 2021 at 7:38am |
70264914 prior sn 1711 $41.78 70270999 eff sn1711 discontinued 70264915 eff sn1711 $52.95 all from AGCO
|
|
steve(ill)
Orange Level Access

Joined: 11 Sep 2009
Location: illinois
Points: 77933
|
Post Options
Thanks(0)
Quote Reply
Posted: 24 Mar 2021 at 4:31pm |
Barry, down load your photo to your computer. Open with PAINT or similar program. Scale it to 800 x 600 pixels ( or about). then save it to your desktop.... Then go to this site and download it..
Most new cameras are taking photos that are 5000 pixels wide and several MegaBites in size... This site wants a 800 pixel photo with 100 KB size. ( approx).
If your doing everything on a cell phone, then see if you can change the size of pictures it takes ( before you take it, not after)... Most cameras have 5-6 different SIZEs that you can use.. dont know if cell phone can do that or not... Smaller size = more photos per disc.
Edited by steve(ill) - 24 Mar 2021 at 4:34pm
|
|
Like them all, but love the "B"s.
|
|
Transaxial
Bronze Level
Joined: 19 Apr 2014
Location: Tofield,Alberta
Points: 96
|
Post Options
Thanks(0)
Quote Reply
Posted: 24 Mar 2021 at 3:50pm |
PAFarmer wrote:
Well, it's officially done. I own the 8070 and I'm going to get it home tomorrow. Here's a photo. Will start on the resto this weekend.
|
Congrats on the 8070! They are cool tractors. How did you get your picture to post? It tells me my file size is too big to load.
|
|
Transaxial
Bronze Level
Joined: 19 Apr 2014
Location: Tofield,Alberta
Points: 96
|
Post Options
Thanks(0)
Quote Reply
Posted: 24 Mar 2021 at 3:45pm |
PAFarmer wrote:
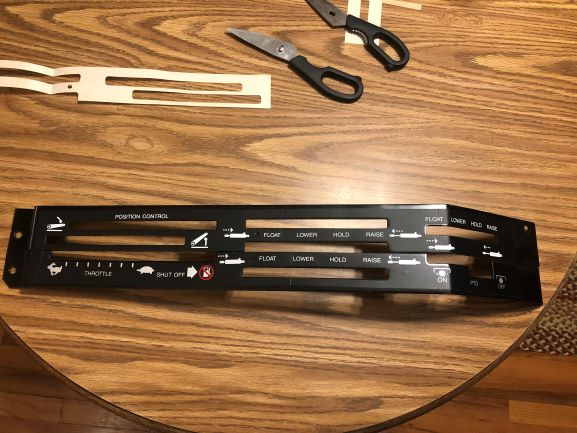
One thing I can't seem to track down is the decal that goes around the hydraulic, throttle, PTO, etc. Other than finding one laying around NOS at a dealer, would anyone know where I could source one?
|
I did what Daehler did and it works out very well. If you get a good straight on picture of what you want in a decal a decal shop can make new ones almost as good as OEM. If you get a good side to side and up/down measurement of the actual decal you want made, they can scale it to proper size
|
|
Daehler
Orange Level Access
Joined: 23 Nov 2010
Location: Lexington MO
Points: 1153
|
Post Options
Thanks(0)
Quote Reply
Posted: 24 Mar 2021 at 12:22pm |
PAFarmer wrote:
One thing I can't seem to track down is the decal that goes around the hydraulic, throttle, PTO, etc. Other than finding one laying around NOS at a dealer, would anyone know where I could source one?
|
I have decal shop that does excellent work. I'm going to have a complete set of decals for 8000s made up this spring. I'll get pictures of the speed charts they've done for me.
|
|
8070FWA,7080 BlackBelly, 7045,2 200s,D19,D17,G, WD,45,UC,7 AC mowers and lots more!
"IT TAKES 3 JD's TO OUT DO AN ALLIS, 2 TO MATCH IT IN THE FIELD AND 1 FOR PARTS!"
|
|
PAFarmer
Bronze Level
Joined: 06 Oct 2020
Location: Pennsylvania
Points: 114
|
Post Options
Thanks(0)
Quote Reply
Posted: 24 Mar 2021 at 10:30am |
One thing I can't seem to track down is the decal that goes around the hydraulic, throttle, PTO, etc. Other than finding one laying around NOS at a dealer, would anyone know where I could source one?
|
|
xbk9576
Bronze Level
Joined: 16 Jun 2016
Location: iowa
Points: 20
|
Post Options
Thanks(1)
Quote Reply
Posted: 24 Mar 2021 at 10:21am |
|
gauge you still can get from agoc 70277453v $173.00
|
|
PAFarmer
Bronze Level
Joined: 06 Oct 2020
Location: Pennsylvania
Points: 114
|
Post Options
Thanks(0)
Quote Reply
Posted: 23 Mar 2021 at 9:19pm |
AC720Man wrote:
Congratulations on a 8070FWA!!! A little confused so please correct me. You said a full restoration, do you mean cab? Tractor is good to go? That would be great if its just a cab restoration. |
Thanks! I'm excited to get her back to her former glory and back in the field. Back when I said "full restoration" I was thinking I was dealing with a 13,000+ hour tractor and I was planning on a full overhaul of the engine as well as a full cosmetic restoration. As I looked into the tractor a bit more, I realized it was just under 3400 hours. So my current plans are to fix the cab where it is damaged, then do a full cosmetic restore on the cab interior and the tractor exterior.
Also going to install the 540/1000 PTO while I have all the fluids drained.
Edited by PAFarmer - 23 Mar 2021 at 9:20pm
|
|