This site is not affiliated with AGCO Inc., Duluth GA., Allis-Chalmers Co., Milwaukee, WI., or any surviving or related corporate entity. All trademarks remain the property of their respective owners. All information presented herein should be considered the result of an un-moderated public forum with no responsibility for its accuracy or usability assumed by the users and sponsors of this site or any corporate entity.
The Forum Parts and Services Unofficial Allis Store Tractor Shows Serial Numbers History
Forum Home Forum Home > Allis Chalmers > Farm Equipment
  New Posts New Posts
  FAQ FAQ  Forum Search   Events   Register Register  Login Login


D17 S1 split at torque housing (Power Director)

 Post Reply Post Reply
Author
Message
ACthunder View Drop Down
Silver Level
Silver Level


Joined: 07 Oct 2009
Location: Wentzville, MO
Points: 79
Post Options Post Options   Thanks (0) Thanks(0)   Quote ACthunder Quote  Post ReplyReply Direct Link To This Post Topic: D17 S1 split at torque housing (Power Director)
    Posted: 06 Apr 2017 at 11:12pm
D17 S1 split at torque housing (Power Director

Bought and used my tractor for the first time last summer. Did about 25 hours of brush hogging over the summer and the D17 did great I thought. One thing I wanted to look into over the winter (just now getting to it) was that I really had to slam the PD (power director) lever forward to get it to engage in high range. (it would always stay in high once there) No trouble in low range.

I do have the shop and operators manual so that is a good start but have never worked on a tractor before...

So, I now have the tractor split apart in my 2 car garage and have taken some measurements and noticed some things.

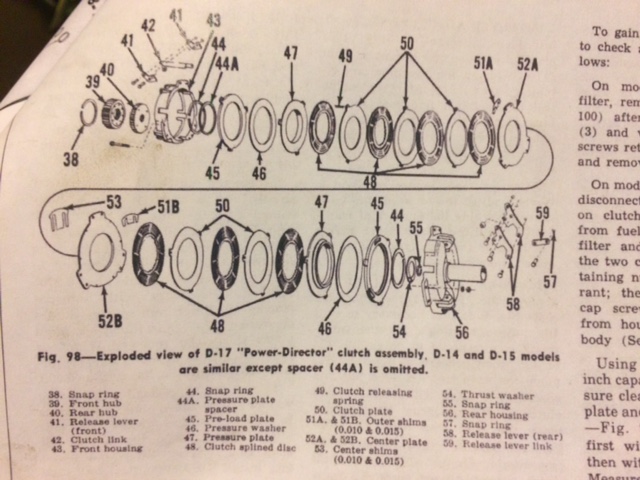
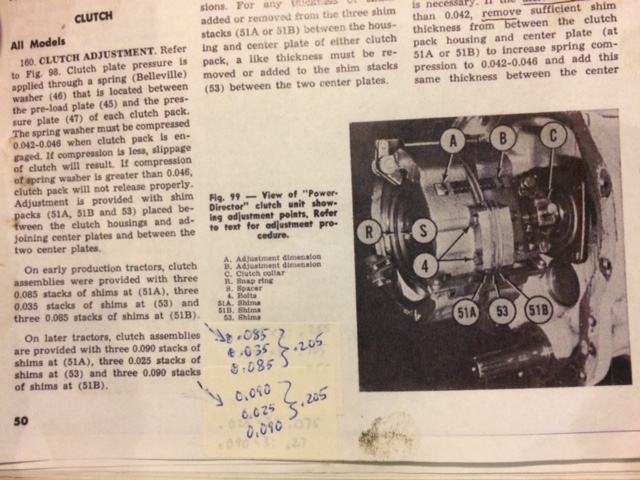
1. measurement of (B in the pic) - (between pre-load plate and pressure plate) average difference between engaged and disengaged was:
FRONT (low range)- .010 (supposed to be between .042 and .046)
REAR (high range)- .028 (supposed to be between .042 and .046)

2. I then loosened the bolts (#4 in the pic) and carefully took out each set of shims and cleaned and wrote down the size of each one before putting them back in the precise order and this is how things stack up..
REAR shims- (3x .012) = .036
MIDDLE shims- (6x .012 + 3x .010) = .102
FRONT shims- (2x .012 + 1x .010) = .034
For a total of .172
Per the manual the total measurement of shims should be .205 so I am short .033

I think my plan should be to add shims to the MIDDLE shims to get the total thickness to .205 and then take my engaged/disengaged measurements again...

Am I on the right track here?

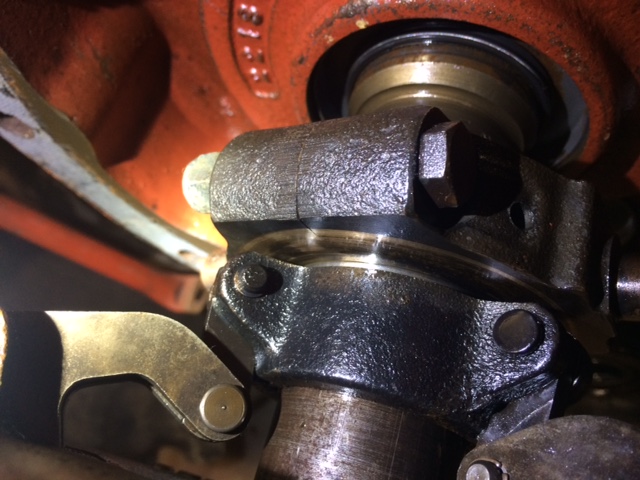
Also, one thing I noticed that seems a little sloppy is the collar assy goes back and forth aprox 3/32" (pic below at the furthest point, then goes forward and touches (to push) the shifter.

This tractor sat for 7 years without moving before I bought it so I guess the PD was out of the oil and rusted the top 1/4.. should I do anything here besides wire brush carefully?

Thanks,


Back to Top
Sponsored Links


Back to Top
MACK View Drop Down
Orange Level
Orange Level


Joined: 17 Nov 2009
Points: 7664
Post Options Post Options   Thanks (0) Thanks(0)   Quote MACK Quote  Post ReplyReply Direct Link To This Post Posted: 07 Apr 2017 at 6:09am
Adjusting shim won't help your problem. Replace the two plates where the rollers go into the three detects. Also check rollers for flat spots or broken ears on rollers.      MACK
Back to Top
Lonn View Drop Down
Orange Level
Orange Level
Avatar

Joined: 16 Sep 2009
Location: Назарово,Russia
Points: 29782
Post Options Post Options   Thanks (0) Thanks(0)   Quote Lonn Quote  Post ReplyReply Direct Link To This Post Posted: 07 Apr 2017 at 6:44am
Wouldn't that be true Mack if it was popping out of high range? It sounds like it stays in high range but is just very hard to push the lever into high range.

Myself I think you are on the right track in getting the correct shims in first and then go from there. I'm no expert though and it's been a very long time since I've been into these. I'd also take a look at what Mack said since you are there and I'm probably not seeing what Mack is getting at.
-- --- .... .- -- -- .- -.. / .-- .- ... / .- / -- ..- .-. -.. . .-. .. -. --. / -.-. .... .. .-.. -.. / .-. .- .--. .. ... -
Wink
I am a Russian Bot
Back to Top
DonDittmar View Drop Down
Orange Level
Orange Level
Avatar

Joined: 15 Sep 2009
Location: MIllersburg, MI
Points: 2484
Post Options Post Options   Thanks (0) Thanks(0)   Quote DonDittmar Quote  Post ReplyReply Direct Link To This Post Posted: 07 Apr 2017 at 7:44pm
Unless you made some shims, factory shims are sold in .005 increments. You are probably mistaking the stamped "5" for a "2". I can see how this can happen, its kind of funky looking, but I think you have .015 shims NOT .012.

You are correct in your assumption. Assuming you have the clutch pack sections shimmed properly you would add to the long center shims to get a total of .205 in each of the three shim locations

http://www.allischalmers.com/forum/forum_posts.asp?TID=41617&title=mechanical-power-director-adjustment-video
Experience is a fancy name for past mistakes. "Great moments are born from great opportunity"

1968 D15D,1962 D19D
Also 1965 Cub Loboy and 1958 JD 720 Diesel Pony Start
Back to Top
MACK View Drop Down
Orange Level
Orange Level


Joined: 17 Nov 2009
Points: 7664
Post Options Post Options   Thanks (0) Thanks(0)   Quote MACK Quote  Post ReplyReply Direct Link To This Post Posted: 07 Apr 2017 at 9:26pm
Guess I didn't under stand post. Check stop bolt for hi side. Lever may be hitting it before it is engaged. I would still check over center plates.       MACK
Back to Top
ACthunder View Drop Down
Silver Level
Silver Level


Joined: 07 Oct 2009
Location: Wentzville, MO
Points: 79
Post Options Post Options   Thanks (0) Thanks(0)   Quote ACthunder Quote  Post ReplyReply Direct Link To This Post Posted: 08 Apr 2017 at 7:04pm
The stop bolt on the lever for the high side is screwed all the way in to allow the lever to go as far forward as possible.

I am such a novice, you guys are right on the shims, they are .015... if you flip them over they look like .012, I measured them and they are for sure .015... DUH I should have noticed that.


Back to Top
ACthunder View Drop Down
Silver Level
Silver Level


Joined: 07 Oct 2009
Location: Wentzville, MO
Points: 79
Post Options Post Options   Thanks (0) Thanks(0)   Quote ACthunder Quote  Post ReplyReply Direct Link To This Post Posted: 08 Apr 2017 at 7:07pm
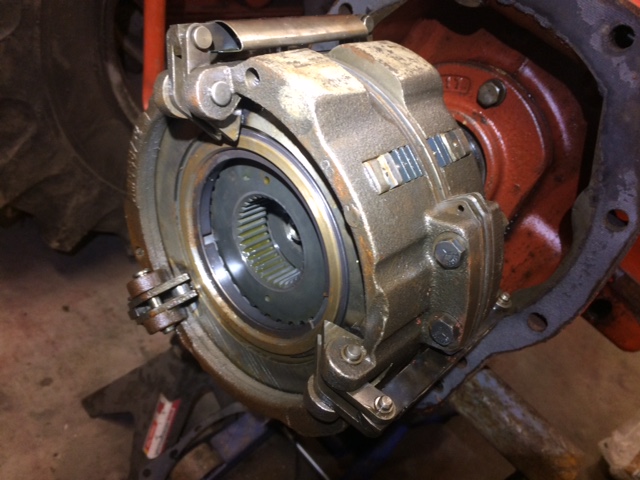
Is the power director hard to take apart and put back together to get a look at the wear on the preload plates and rollers? Looks like the whole thing is put together with snap rings...
Back to Top
MACK View Drop Down
Orange Level
Orange Level


Joined: 17 Nov 2009
Points: 7664
Post Options Post Options   Thanks (0) Thanks(0)   Quote MACK Quote  Post ReplyReply Direct Link To This Post Posted: 08 Apr 2017 at 10:03pm
Unpin long straps at back then remove 6 5/16 bolts holding the two housing togather. Separate the two housings and take them apart.    MACK
Back to Top
ACthunder View Drop Down
Silver Level
Silver Level


Joined: 07 Oct 2009
Location: Wentzville, MO
Points: 79
Post Options Post Options   Thanks (0) Thanks(0)   Quote ACthunder Quote  Post ReplyReply Direct Link To This Post Posted: 09 Apr 2017 at 5:42am
Ok, now knowing I have .015 shims instead of .012 shims my shim totals are up to spec (thickness wise)
REAR shims- (3x .015) = .045
MIDDLE shims- (6x .015 + 3x .010 (one of the .010 is a short outer shim) = .120
FRONT shims- (2x .015 + 1x .010) = .040
For a total of .205

So, I remeasured my engaged and disengaged measurements and see I have compression of:
Rear: .034 (spec .042-.046) need to take out .010 and add to center
Front: .010 (spec .042-.046) need to take out .034 and add to center

So if I take out the above I will have:
Rear shims- .030
Middle shims- .165
Front shims- .010

Having only .010 shim left on the Front (low range) makes me think the clutch discs are probably about worn out right?
Back to Top
ACthunder View Drop Down
Silver Level
Silver Level


Joined: 07 Oct 2009
Location: Wentzville, MO
Points: 79
Post Options Post Options   Thanks (0) Thanks(0)   Quote ACthunder Quote  Post ReplyReply Direct Link To This Post Posted: 09 Apr 2017 at 7:25am
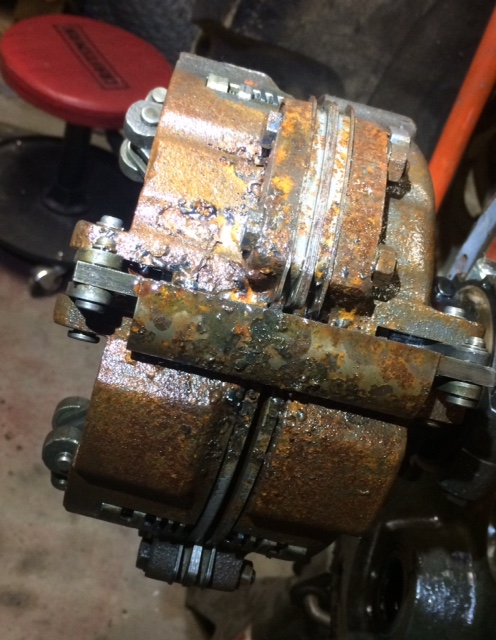
Here is the rear (high range) preload plate. The wear doesn't look bad, but do you think it is enough to effect things?

Could I just use brake cleaner to clean everything up?


Back to Top
ACthunder View Drop Down
Silver Level
Silver Level


Joined: 07 Oct 2009
Location: Wentzville, MO
Points: 79
Post Options Post Options   Thanks (0) Thanks(0)   Quote ACthunder Quote  Post ReplyReply Direct Link To This Post Posted: 09 Apr 2017 at 7:26am
Rollers and ears looked in pretty good shape, nothing broken and no serious flat spots I could see.
Back to Top
MACK View Drop Down
Orange Level
Orange Level


Joined: 17 Nov 2009
Points: 7664
Post Options Post Options   Thanks (0) Thanks(0)   Quote MACK Quote  Post ReplyReply Direct Link To This Post Posted: 09 Apr 2017 at 9:50pm
Yes, they look pretty good. They ware where the rollers role out of valley and on top of plate. That small, flat area will allow roller to fall back into valley if it gets tapered off. Hope every thing goes well for you.       MACK

Back to Top
 Post Reply Post Reply
  Share Topic   

Forum Jump Forum Permissions View Drop Down

Forum Software by Web Wiz Forums® version 11.10
Copyright ©2001-2017 Web Wiz Ltd.

This page was generated in 0.078 seconds.


Help Support the
Unofficial Allis Forum