| Author |
 Topic Search Topic Search  Topic Options Topic Options
|
ACD19farmboy 
Bronze Level

Joined: 11 Sep 2009
Location: Missouri
Points: 162
|
 Post Options Post Options
 Thanks(0) Thanks(0)
 Quote Quote  Reply Reply
 Topic: Gleaner L3 beans wrapping Topic: Gleaner L3 beans wrapping
Posted: 03 Oct 2019 at 10:17am |
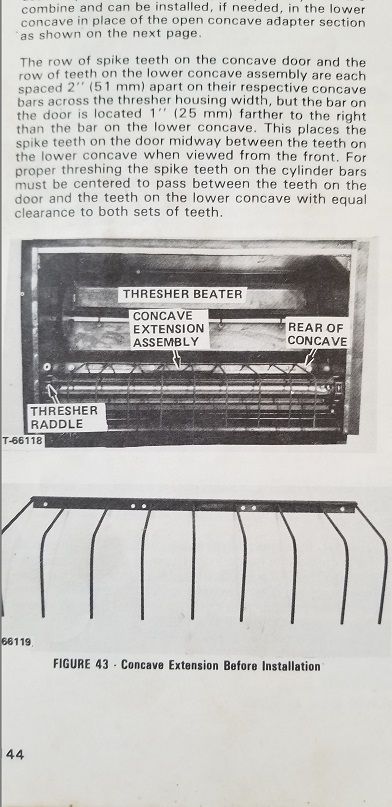
Hello, I cant quite remember if I have asked this question on here before. I have an L3 that keeps having issues trying to wrap beans back around on the bottom/return side of the first set of rattle chains. so bad that i could only go about 50 feet in tall 60 bushel beans last year, pulled my hair out enough i finished with my old F on the 11th of January right before that big snow storm hit us in northeast MO. I've researched and also realized my combine does NOT currently have this "Concave Extension" the book says its good for wet stems, and the last two years have been pretty moist harvests. I also came across a chat on the Combine Forum where someone said to take that concave extension OUT for green stems.. Pretty confused on what to do. This will be my third harvest with it this year. I am going to build one of these if you all think it will help, looking at the picture it HAS to help. Looking for experienced input on the matter using beans, also opinion on that door that swings down right after this, mine is in the fully up position.(I've crawled in on my head dozens of times too many the last two years to dig the stems out!! HELP!! lol) Thank you
|
 |
|
Sponsored Links
|
|
 |
DrAllis 
Orange Level Access

Joined: 12 Sep 2009
Points: 22140
|
 Post Options Post Options
 Thanks(0) Thanks(0)
 Quote Quote  Reply Reply
 Posted: 03 Oct 2019 at 10:28am Posted: 03 Oct 2019 at 10:28am |
|
In the Fall of 1998, I removed one of those in the field because the Customer was having constant plugging/wrapping issues. Problem immediately went away. You need to install a speed-up sprocket on the left side of the cylinder that drives the thresher beater. You also need good sharp cylinder bars and set the cylinder down tighter to chew up the tough bean straw better. You also need to remove (or tie up) the swinging steel curtain above the rear raddle. This is important !! Tie up or better yet remove that steel curtain !!!!
|
 |
SteveM C/IL 
Orange Level Access

Joined: 12 Sep 2009
Location: Shelbyville IL
Points: 8678
|
 Post Options Post Options
 Thanks(0) Thanks(0)
 Quote Quote  Reply Reply
 Posted: 03 Oct 2019 at 12:29pm Posted: 03 Oct 2019 at 12:29pm |
|
Agree with Doc....probably the thing hurting most is that beater behind cylinder running too slow. Makes a HUGE difference!Keep sprocket if you need to run wheat.
|
 |
ACD19farmboy 
Bronze Level


Joined: 11 Sep 2009
Location: Missouri
Points: 162
|
 Post Options Post Options
 Thanks(0) Thanks(0)
 Quote Quote  Reply Reply
 Posted: 03 Oct 2019 at 2:46pm Posted: 03 Oct 2019 at 2:46pm |
So the faster thresher beater should throw it further so it wont land on the first set of chains? I put new cylinder bars from Abilene Machine in last year and have ran maybe 80 acres through it was all. Do you happen to know the part number for the speed up sprocket? (I have a parts catalog for an L but lots of differences i guess to an L3) I'm willing to try anything at this point. Think I am going to get new :Lower rattle Chain :Rattle chain slip clutch :Speed up sprocket for thresher beater :Thresher beater slip clutch Hopefully these and properly adjusted will work. Now my only issue is my beans are late and i plan on custom cutting for a neighbor so test run will be in his field when its already GO TIME!
|
 |
DrAllis 
Orange Level Access

Joined: 12 Sep 2009
Points: 22140
|
 Post Options Post Options
 Thanks(0) Thanks(0)
 Quote Quote  Reply Reply
 Posted: 03 Oct 2019 at 4:17pm Posted: 03 Oct 2019 at 4:17pm |
|
Standard drive sprocket is 18 teeth. Speed-up sprocket is 25 teeth and p/n is 71132389. Don't be afraid to set the cylinder down a little tighter and run the speed fast enough you see cracked beans, then slow it down a little from that point.
|
 |
MACK 
Orange Level

Joined: 17 Nov 2009
Points: 7664
|
 Post Options Post Options
 Thanks(0) Thanks(0)
 Quote Quote  Reply Reply
 Posted: 03 Oct 2019 at 8:57pm Posted: 03 Oct 2019 at 8:57pm |
|
Make sure torque sincere is in good shape and greased on cylinder belt. A little slippage on cylinder belt will cause same problem. MACK
|
 |
ACD19farmboy 
Bronze Level


Joined: 11 Sep 2009
Location: Missouri
Points: 162
|
 Post Options Post Options
 Thanks(0) Thanks(0)
 Quote Quote  Reply Reply
 Posted: 04 Oct 2019 at 3:18pm Posted: 04 Oct 2019 at 3:18pm |
I counted the teeth and it already has a 25 tooth speed up sprocket, I entered that part number and found on another website of a 30 and 35 teeth sprockets, would those be too fast? I'm beginning to wonder if my cylinder is slowing down like you say MACK, the combine always seems to act like it builds up a bunch, then bunch gets pulled through and under load at once... Something isn't quite right and I'm not familiar enough yet to figure it out! a really big farmer used to own this combine back in the day and I've herd stories of this machine cutting green stemmed beans and the ground looking like a freshly mowed yard behind it.
|
 |
DrAllis 
Orange Level Access

Joined: 12 Sep 2009
Points: 22140
|
 Post Options Post Options
 Thanks(0) Thanks(0)
 Quote Quote  Reply Reply
 Posted: 04 Oct 2019 at 3:22pm Posted: 04 Oct 2019 at 3:22pm |
|
Watch your tachometer for the cylinder speed. It will stay steady or actually gain a bit under load if the torque sensor sheaves are working properly with NO GREASE film on the belt or pulleys.
Belt on the cylinder must have 1/8" between all spring coils on the tensioner !!!!!
Edited by DrAllis - 04 Oct 2019 at 3:23pm
|
 |
MACK 
Orange Level

Joined: 17 Nov 2009
Points: 7664
|
 Post Options Post Options
 Thanks(0) Thanks(0)
 Quote Quote  Reply Reply
 Posted: 04 Oct 2019 at 9:24pm Posted: 04 Oct 2019 at 9:24pm |
|
Make sure you are counting teeth on cylinder sprocket not beater sprocket. MACK
|
 |
gleaner1 
Silver Level


Joined: 17 Dec 2009
Points: 225
|
 Post Options Post Options
 Thanks(0) Thanks(0)
 Quote Quote  Reply Reply
 Posted: 05 Oct 2019 at 7:32am Posted: 05 Oct 2019 at 7:32am |
|
Iast season my L3 had wrapping issues as well. Although it was the first time doing beans. Was wrapping around the beater itself. So much that it would bend the heck out of the stripper plate between it and the cylinder. Well I reinforced the heck out of that. My L3 does not have chain and sprockets driving the beater. It’s twin belts. I believe it’s a late 1983.
|
|
ALLIS CHALMERS "The color is orange"
|
 |
tomNE 
Orange Level


Joined: 13 Sep 2009
Location: dorchester, ne
Points: 1225
|
 Post Options Post Options
 Thanks(0) Thanks(0)
 Quote Quote  Reply Reply
 Posted: 05 Oct 2019 at 11:21pm Posted: 05 Oct 2019 at 11:21pm |
|
tie up the swinging curtain. i drill a hole to put a long bolt in backwards with a nut or inside and one on outside. installed it when curtain was up. cured my problems but agree about speeding up the feeder beater!
|
|
AC from the start of my families farming career till the end!
|
 |
gleaner1 
Silver Level


Joined: 17 Dec 2009
Points: 225
|
 Post Options Post Options
 Thanks(0) Thanks(0)
 Quote Quote  Reply Reply
 Posted: 06 Oct 2019 at 11:34am Posted: 06 Oct 2019 at 11:34am |
|
All along we’ve been told according to the gleaner manuals to only raise curtain for corn only?
|
|
ALLIS CHALMERS "The color is orange"
|
 |
DrAllis 
Orange Level Access

Joined: 12 Sep 2009
Points: 22140
|
 Post Options Post Options
 Thanks(0) Thanks(0)
 Quote Quote  Reply Reply
 Posted: 06 Oct 2019 at 11:42am Posted: 06 Oct 2019 at 11:42am |
|
Corn for sure and tough soybeans. In my area where there are no oats or wheat and only corn/beans, they are all REMOVED. Adverse conditions sometimes require different settings/adjustments.
|
 |
ACD19farmboy 
Bronze Level


Joined: 11 Sep 2009
Location: Missouri
Points: 162
|
 Post Options Post Options
 Thanks(0) Thanks(0)
 Quote Quote  Reply Reply
 Posted: 08 Oct 2019 at 9:31am Posted: 08 Oct 2019 at 9:31am |
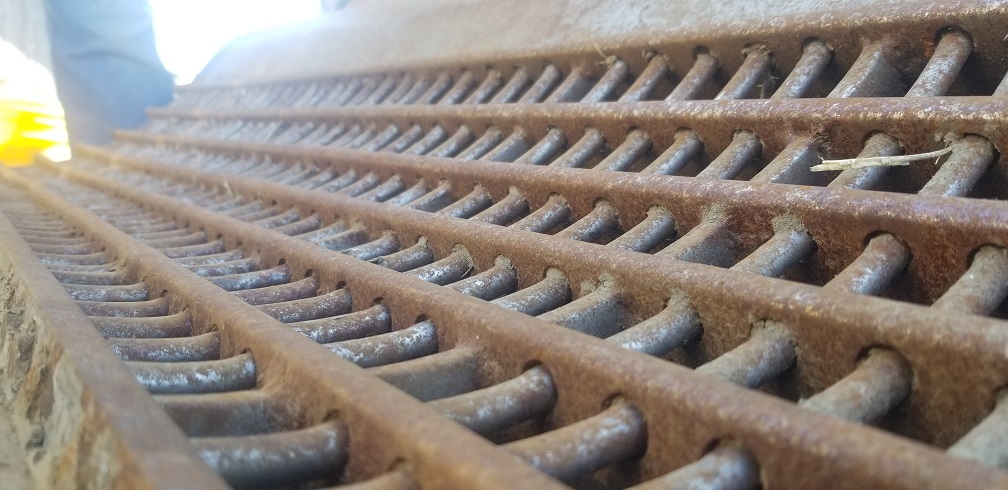 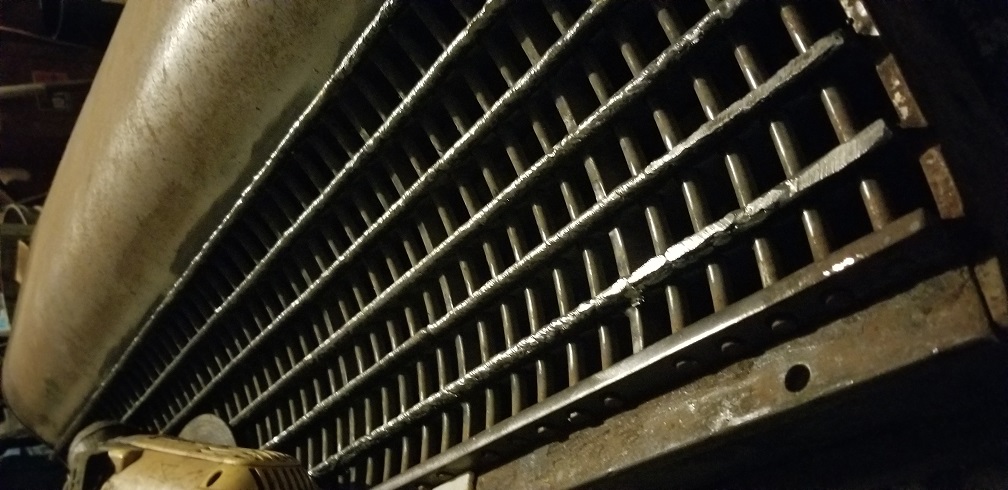
I was counting the correct sprocket, and the steel curtain was already bolted up when i bought the combine. I have new raddle chain on the way, and a 30T sprocket on the way as well. I also dropped the concave out and it looked to be pretty worn, this years budget wouldn't allow me to purchase a new one so i am welding it up myself and grinding the face and top back smooth. Spent about 6 hours welding yesterday and plan to do more then lots of grinding. Hoping for good results in the field
|
 |
DrAllis 
Orange Level Access

Joined: 12 Sep 2009
Points: 22140
|
 Post Options Post Options
 Thanks(0) Thanks(0)
 Quote Quote  Reply Reply
 Posted: 08 Oct 2019 at 9:35am Posted: 08 Oct 2019 at 9:35am |
|
Be careful doing that !! You might have it bowed when you get done !! All that weld may pull it low in the center.
|
 |
ACD19farmboy 
Bronze Level


Joined: 11 Sep 2009
Location: Missouri
Points: 162
|
 Post Options Post Options
 Thanks(0) Thanks(0)
 Quote Quote  Reply Reply
 Posted: 08 Oct 2019 at 9:49am Posted: 08 Oct 2019 at 9:49am |
|
I have only been welding one bar and beed at a time and by the time i start over i can touch it with my bare hand. I've also been using a straight edge because the center was much lower then the outter edges, bringing the center back up to the edges is all i am doing then grinding it smooth.
|
 |
Lonn 
Orange Level


Joined: 16 Sep 2009
Location: Назарово,Russia
Points: 29817
|
 Post Options Post Options
 Thanks(0) Thanks(0)
 Quote Quote  Reply Reply
 Posted: 08 Oct 2019 at 12:00pm Posted: 08 Oct 2019 at 12:00pm |
|
Make sure that the gauges on the side of cylinder housing are accurate. Get the cylinder down til it ticks when turning by hand. Set gauges at zero. Double check by actually measuring both sides and middle clearance. Run 1/4 inch clearance, around 700 rpm give or take maybe even faster if needed, fan nearly wide open and in beans I set the chaffer and sieve pretty close to book settings. I also put new springs in feeder beater slip clutch and added two more. Had 4 springs to start and there is room for 8 but 6 worked good for me.
|
|
-- --- .... .- -- -- .- -.. / .-- .- ... / .- / -- ..- .-. -.. . .-. .. -. --. / -.-. .... .. .-.. -.. / .-. .- .--. .. ... -
Wink
I am a Russian Bot
|
 |
FREEDGUY 
Orange Level Access


Joined: 15 Apr 2017
Location: South West Mich
Points: 5396
|
 Post Options Post Options
 Thanks(0) Thanks(0)
 Quote Quote  Reply Reply
 Posted: 08 Oct 2019 at 6:38pm Posted: 08 Oct 2019 at 6:38pm |
 DrAllis wrote: DrAllis wrote:
Be careful doing that !! You might have it bowed when you get done !! All that weld may pull it low in the center. |
Dr, I am only familiar with an "A", "f" and "F2" series, the OP posted a picture of something I am unfamiliar with pertaining to his "L" series. Is the threshing area between the F series and the M/L series a completely different "animal" ? Sorry for my ignorance 
|
 |
SteveM C/IL 
Orange Level Access

Joined: 12 Sep 2009
Location: Shelbyville IL
Points: 8678
|
 Post Options Post Options
 Thanks(0) Thanks(0)
 Quote Quote  Reply Reply
 Posted: 08 Oct 2019 at 7:11pm Posted: 08 Oct 2019 at 7:11pm |
|
Open concave on L &M. Look in parts book
|
 |
CrestonM 
Orange Level

Joined: 08 Sep 2014
Location: Oklahoma
Points: 8457
|
 Post Options Post Options
 Thanks(0) Thanks(0)
 Quote Quote  Reply Reply
 Posted: 08 Oct 2019 at 7:21pm Posted: 08 Oct 2019 at 7:21pm |
As was said, L & M have an open concave with a raddle underneath. That's what gives them their exclusive "3 stage separation". Gives a little more capacity, since threshed grain is able to fall through the concave. What the original poster is trying to do is keep beans from wrapping around the under side of that first raddle. That "comb-like" extension bolts to the back of the concave, and covers the raddle, so they are less inclined to wrap. Someone correct me if I'm wrong there. Note the photo. You can also see another view of the cylinder/raddle at the top of the photo, in the yellow box, although it's hard to read.
The A-F3 had the closed concave of the original Baldwin Brothers design. No raddle under the cylinder.
Edited by CrestonM - 08 Oct 2019 at 7:30pm
|
 |
FREEDGUY 
Orange Level Access


Joined: 15 Apr 2017
Location: South West Mich
Points: 5396
|
 Post Options Post Options
 Thanks(0) Thanks(0)
 Quote Quote  Reply Reply
 Posted: 08 Oct 2019 at 8:02pm Posted: 08 Oct 2019 at 8:02pm |
|
Thank you Creston, I had often heard of 2 raddle chains on the larger machines but really had no idea of what was being talked about. Are there "concave" bars in the L/M's like the smaller units? I can't tell/see in the picture. Thanks again for the info.
|
 |
CrestonM 
Orange Level


Joined: 08 Sep 2014
Location: Oklahoma
Points: 8457
|
 Post Options Post Options
 Thanks(0) Thanks(0)
 Quote Quote  Reply Reply
 Posted: 08 Oct 2019 at 8:30pm Posted: 08 Oct 2019 at 8:30pm |
|
I'm not sure how similar the concave bars are, never looked inside anything but an L/M. I believe the concave on an L/M starts out closed, and has the open section in the rear portion of the concave, so the front bars may be similar?
|
 |
ACD19farmboy 
Bronze Level


Joined: 11 Sep 2009
Location: Missouri
Points: 162
|
 Post Options Post Options
 Thanks(0) Thanks(0)
 Quote Quote  Reply Reply
 Posted: 06 Nov 2019 at 10:29am Posted: 06 Nov 2019 at 10:29am |
WOW!! What a difference. After a month of gritting my teeth my beans were finally ready and got to test out the L3 after these maintenance projects. The adjustable guages were WAAYYY off, (That alone might have solved all my issues) I put my welded up concave in and new bar channel. I dropped the cylinder down till it evenly barely "ticked" when turned and zeroed them out then brought it back up to a quarter inch. Its like a whole new machine. Ill be returning the rattle chain after inspecting mine more thoroughly and realizing that its good. I thank you all for the good input and friendly help. Now my head that has never feed evenly is my next headache. It builds up then all of a sudden grabs them all at once (evey time it did this before it would plug) but now the machine just grunts and takes it. i know something isn't quite right there. Any suggestions there? its a 320 model.
|
 |
ACD19farmboy 
Bronze Level


Joined: 11 Sep 2009
Location: Missouri
Points: 162
|
 Post Options Post Options
 Thanks(0) Thanks(0)
 Quote Quote  Reply Reply
 Posted: 06 Nov 2019 at 10:31am Posted: 06 Nov 2019 at 10:31am |
|
Oh and i also built a 30T sprocket from Orschlins for the thresher beater speed up. Also sped up cylinder speed to 650rpm.
|
 |
Tbone95 
Orange Level Access

Joined: 31 Aug 2012
Location: Michigan
Points: 12246
|
 Post Options Post Options
 Thanks(0) Thanks(0)
 Quote Quote  Reply Reply
 Posted: 06 Nov 2019 at 12:50pm Posted: 06 Nov 2019 at 12:50pm |
 ACD19farmboy wrote: ACD19farmboy wrote:
WOW!! What a difference. After a month of gritting my teeth my beans were finally ready and got to test out the L3 after these maintenance projects. The adjustable guages were WAAYYY off, (That alone might have solved all my issues) I put my welded up concave in and new bar channel. I dropped the cylinder down till it evenly barely "ticked" when turned and zeroed them out then brought it back up to a quarter inch. Its like a whole new machine. Ill be returning the rattle chain after inspecting mine more thoroughly and realizing that its good. I thank you all for the good input and friendly help. Now my head that has never feed evenly is my next headache. It builds up then all of a sudden grabs them all at once (evey time it did this before it would plug) but now the machine just grunts and takes it. i know something isn't quite right there. Any suggestions there? its a 320 model. |
Drive at an angle to the rows.
|
 |
SteveM C/IL 
Orange Level Access

Joined: 12 Sep 2009
Location: Shelbyville IL
Points: 8678
|
 Post Options Post Options
 Thanks(0) Thanks(0)
 Quote Quote  Reply Reply
 Posted: 06 Nov 2019 at 1:06pm Posted: 06 Nov 2019 at 1:06pm |
|
Like Tbone says....easiest way to promote feeding. You'll knock some over but pick most up on return trip.
|
 |
DrAllis 
Orange Level Access

Joined: 12 Sep 2009
Points: 22140
|
 Post Options Post Options
 Thanks(0) Thanks(0)
 Quote Quote  Reply Reply
 Posted: 06 Nov 2019 at 5:42pm Posted: 06 Nov 2019 at 5:42pm |
|
If you move the header cross auger clear forward in the adjustment slots and raise it up off of the table floor to at least 3/4" clearance, that will greatly improve the feeding for soybeans. You will have to add a couple of half links to the drive chain, but the time spent is worth it. Reel needs to be back to the point it almost hits the auger.
|
 |
farmboy520 
Orange Level Access


Joined: 22 Jun 2016
Location: Beason, IL
Points: 553
|
 Post Options Post Options
 Thanks(0) Thanks(0)
 Quote Quote  Reply Reply
 Posted: 06 Nov 2019 at 6:07pm Posted: 06 Nov 2019 at 6:07pm |
|
I did as the Dr. suggested on my 520 and it really helped
|
|
On the farm: Agco Allis 9695, 7060, 7010, R66, Farmall H, and Farmall F20 (Great Grandpa's)
|
 |
MACK 
Orange Level

Joined: 17 Nov 2009
Points: 7664
|
 Post Options Post Options
 Thanks(0) Thanks(0)
 Quote Quote  Reply Reply
 Posted: 06 Nov 2019 at 7:44pm Posted: 06 Nov 2019 at 7:44pm |
|
A piece of 4" drain tile just behind guards will raise the beans enough for reel to kick them in, plus keep beans from rolling off sickle. MACK
|
 |
cabinhollow 
Orange Level

Joined: 24 Mar 2018
Location: SEKY
Points: 327
|
 Post Options Post Options
 Thanks(0) Thanks(0)
 Quote Quote  Reply Reply
 Posted: 07 Nov 2019 at 7:03am Posted: 07 Nov 2019 at 7:03am |
|
"Now my head that has never feed evenly is my next headache. It builds up
then all of a sudden grabs them all at once (evey time it did this
before it would plug)"
My uni was doing that in corn.
The rubber flappers at the center of the header cross auger were worn down 1"+ below the auger. I replace them with ones that were 1" above the auger. Then all the rubber on the feeder chains were worn down 3/4" to 1". I replace all 20 of them.
Last year it would plug up 4-6 times per ac, this year not one plug up. Plus I was able to speed up by 20%.
I had hay roller belting that work, plus a easy way to cut it to fit. Just had to deal with 200+ bolts.
|
 |


 Topic Options

 Post Options
 Thanks(0)


 DrAllis wrote:

