| Author |
 Topic Search Topic Search  Topic Options Topic Options
|
Butch(OH) 
Orange Level

Joined: 11 Sep 2009
Location: Lucerne Ohio
Points: 3842
|
 Post Options Post Options
") Thanks(0) Thanks(0)
") Quote Quote  Reply Reply
 Posted: 23 Aug 2010 at 8:43pm Posted: 23 Aug 2010 at 8:43pm |
Jeff, Here is a picture of our #73 plow behind our D-19. This picture shows what I mean by being "up on the points" The left side of the frame is just a tad lower than the right hand side. If you look at Don's pic he has his plow upon the points a bit too. I all but the nicest conditons with pefect wear parts those old mounted plows will do a nicer job and stay in the ground better when set up like this. The later plows also had an extra hole in standards for the top of the frog so you could tip the entire bottom forwards for deeper suck. Sent a PM about the other things you asked about/
|
 |
|
Sponsored Links
|
|
|
Jeff(WC)(MI)
Orange Level
Joined: 12 Sep 2009
Location: S.E. Michigan
Points: 376
|
Post Options
Thanks(0)
Quote Reply
Posted: 23 Aug 2010 at 8:44pm |
|
thanks for the info and pic Don...do you have anymore pics by any chance? i am trying to scarf all the info i can and absorb as much as possible. I can;t move the set screws on the pull bar until the plow gets some "shop time" the right one doesn;t have a locknut and it's welded
|
|
Jeff(WC)(MI)
Orange Level
Joined: 12 Sep 2009
Location: S.E. Michigan
Points: 376
|
Post Options
Thanks(0)
Quote Reply
Posted: 23 Aug 2010 at 8:47pm |
|
thanks Butch for the pic and the info...wish i could get mine to plow like those two pictures...i will send ya a PM back
|
|
Jeff(WC)(MI)
Orange Level
Joined: 12 Sep 2009
Location: S.E. Michigan
Points: 376
|
Post Options
Thanks(0)
Quote Reply
Posted: 23 Aug 2010 at 9:05pm |
Butch-
Heres the pics I told you I would post. See how the coulter arm would hold the coulter out about an inch to an inch and a half if it were to follow straight? but the plow seems to kick to the left and cause the moldboard to ride underneath the coulter.
|
|
Jeff(WC)(MI)
Orange Level
Joined: 12 Sep 2009
Location: S.E. Michigan
Points: 376
|
Post Options
Thanks(0)
Quote Reply
Posted: 23 Aug 2010 at 9:12pm |
also can anyone tell what bottoms these are? i looked on the backs and can;t find anything...is it stamped underneath the frog maybe? or i seen some of the newer ones with decals..maybe they are painted over? if thats the case how do i tell what i have?
|
|
Butch(OH)
Orange Level
Joined: 11 Sep 2009
Location: Lucerne Ohio
Points: 3842
|
Post Options
Thanks(0)
Quote Reply
Posted: 23 Aug 2010 at 9:14pm |
|
Move that coulter on out an inch, if that doesnt make the furrow stand up move it out another inch. You can also see in that pic tha your front bottom is cutting about 2/3 what it should be cutting, move that furrow wheel out one hole.
Edited by Butch(OH) - 23 Aug 2010 at 9:16pm
|
|
E Clark
Bronze Level


Joined: 15 Mar 2010
Location: Remington In.
Points: 26
|
Post Options
Thanks(0)
Quote Reply
Posted: 23 Aug 2010 at 10:15pm |
Jeff, I don't mean this in a bad way but I'm glad someone else is having the same problem I'm having. But I think I have figured out my problem.was ready to sell my plow. I'll give it another try.
Thanks Eric
|
|
Jeff(WC)(MI)
Orange Level
Joined: 12 Sep 2009
Location: S.E. Michigan
Points: 376
|
Post Options
Thanks(0)
Quote Reply
Posted: 23 Aug 2010 at 10:27pm |
glad to help, i guess. LOL
good luck and post pics plowing!
|
|
E Clark
Bronze Level
Joined: 15 Mar 2010
Location: Remington In.
Points: 26
|
Post Options
Thanks(0)
Quote Reply
Posted: 23 Aug 2010 at 10:40pm |
the plows hard enough to figure out,and now you want pics what ever.we did plow Sat I will try to post this week.got high school football Tues night and I need him to post pics. good luck to you also
|
|
Gerald J.
Orange Level
Joined: 12 Sep 2009
Location: Hamilton Co, IA
Points: 5636
|
Post Options
Thanks(0)
Quote Reply
Posted: 23 Aug 2010 at 10:48pm |
|
Not scouring to the top of the moldboard shows its not cutting full width.
It has a shin separate from the moldboard. That rules out 24, 25, 26, and 54. 124 has a shin shaped about like that one. The bottoms book doesn't show the face view of the moldboard. There are more distinctive details shown of the frog in a bottom view though. 325 doesn't have a shin. 331, 332, and 333 have a shin and that wide slip heel on the landside. My bottoms book groups those together and I don't instantly see how to tell those bottoms apart without a part number for moldboard. They share frogs, blades (or shares), landsides, and shins. A picture with the plow laying on the left side might help match the details of the frog, but that still won't tell which moldboard it has.
Gerald J.
|
|
Jeff(WC)(MI)
Orange Level
Joined: 12 Sep 2009
Location: S.E. Michigan
Points: 376
|
Post Options
Thanks(0)
Quote Reply
Posted: 24 Aug 2010 at 6:24am |

this probably won;t help but i did take an underside pic.....so the moldboard should have a number stamped in it? if there is it must be under the frog somewhere then.....i was just curious to see if i could still get shares and shins for it
|
|
Steve M C/IL
Orange Level
Joined: 01 Jul 2010
Location: shelbyville IL
Points: 691
|
Post Options
Thanks(0)
Quote Reply
Posted: 24 Aug 2010 at 9:39am |
|
Dads old 4bottom had those style moldboards but I don't know the #.My 70's have 375 bottoms and are stubbier but really turn the dirt.I don't think there are #'s stamped.I think they had a thin metal tag bolted to the backside with the #.Most rotted off years ago.You have to adjust the coulters by watching where they run in the ground.They will likley look wrong when out of ground.You want them just far enough to the left that the leading edge of shin isn't having to peel uncut dirt.....but not too far .LOL!
|
|
Gerald J.
Orange Level
Joined: 12 Sep 2009
Location: Hamilton Co, IA
Points: 5636
|
Post Options
Thanks(0)
Quote Reply
Posted: 24 Aug 2010 at 10:55am |
Here's the picture I have. Can't say its not of the 331, 332, 333 family. 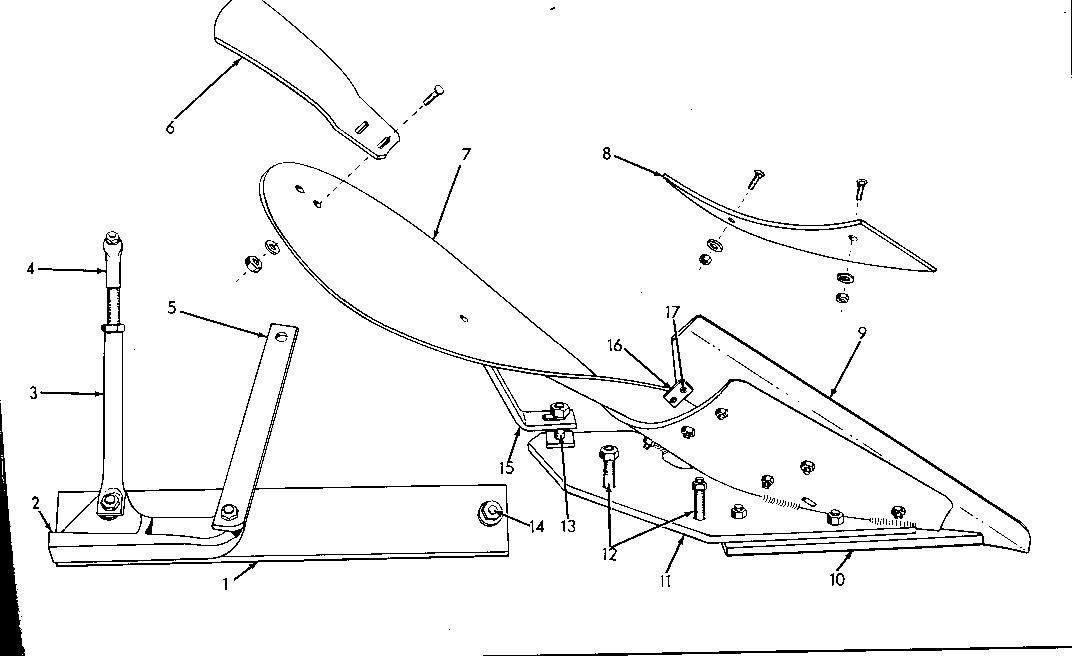 That tab 16 is only used on the 16" bottoms. Shins and "blades" are the same for all the family, only the moldboards are different. The shin for RH bottom is 324940. Also fits 361, 362, 363, 371, 372, and 373 bottoms. You said 3x14. The regular bullet blade (or share) is 325614. Also fits 361, 362, and 363 bottoms. The heavy duty blade is 326082. Also fits 361, 362, and 363 bottoms. Gerald J.
|
|
Jeff(WC)(MI)
Orange Level
Joined: 12 Sep 2009
Location: S.E. Michigan
Points: 376
|
Post Options
Thanks(0)
Quote Reply
Posted: 24 Aug 2010 at 11:06am |
|
thanks Gerald....i have the volume 1,2, and 3 plow frame and moldboard parts books, i'll look this stuff up tonight..thanks again
|
|
R Aiken
Orange Level
Joined: 11 Sep 2009
Location: wc Ohio
Points: 1370
|
Post Options
Thanks(0)
Quote Reply
Posted: 24 Aug 2010 at 11:22am |
|
Jeff, If you cant get that plow to work right, bring it back and get a different one. Richard
|
|
Jeff(WC)(MI)
Orange Level
Joined: 12 Sep 2009
Location: S.E. Michigan
Points: 376
|
Post Options
Thanks(0)
Quote Reply
Posted: 24 Aug 2010 at 12:15pm |
|
i'm not giving up yet Rich.....but thanks for the offer i'll keep it in mind if it comes down to that....might have to find something else i need at your place to and make my trip worth while!
|
|
Jeff(WC)(MI)
Orange Level
Joined: 12 Sep 2009
Location: S.E. Michigan
Points: 376
|
Post Options
Thanks(0)
Quote Reply
Posted: 27 Aug 2010 at 9:07pm |
|
|
|
BrettPhillips
Orange Level

Joined: 11 Sep 2009
Location: Strasburg, VA
Points: 808
|
Post Options
Thanks(0)
Quote Reply
Posted: 27 Aug 2010 at 9:25pm |
|
Remember that the plow can be slid left and right on the cross bar to make fine adjustments to the width of the front furrow. Wheel tread is the "coarse adjustment", and the crossbar will get you the rest of the way.
|
|
Roddo
Orange Level
Joined: 16 Jul 2010
Location: Brant, Ontario
Points: 466
|
Post Options
Thanks(0)
Quote Reply
Posted: 27 Aug 2010 at 10:10pm |
 BrettPhillips wrote: BrettPhillips wrote:
Remember that the plow can be slid left and right on the cross bar to make fine adjustments to the width of the front furrow. Wheel tread is the "coarse adjustment", and the crossbar will get you the rest of the way.
|
It does look like it is set pretty far to the left. if you slide the whole shooting match over it'll fill in that gap for sure. I know my plow is set a lot further to the left than that and it works pretty good.
|
|
ALinIL
Orange Level
Joined: 20 Sep 2009
Location: Frankfort, IL
Points: 316
|
Post Options
Thanks(0)
Quote Reply
Posted: 27 Aug 2010 at 10:47pm |
jeff - I have looked at your last post. You need to move the plow to the left. Your plow is not running straight. Look at the lift links. Adjust the beam screws. Adj the left one out .5 to 1 turn and adj the right one in(cw). This will straighten out the plow and make the front bottom cut a wider furrow. Leave the wheels alone. You need to get the plow hitch point at the correct position with regard to the tractor. The Beam screws are what accomplishes this. I have a 2 bottom mtd behind 45 with the wheels set out one notch and have no problem with it. But I have adjusted the beam screws so the plow pulls straight. You are getting close on adjustments and once you make this adjustment you will see a large improvement on getting the plow to run straight and cut the correct width with the right bottom. As always make all adjustments without TB. Hope this helps. - AL
|
|
wjohn
Orange Level

Joined: 19 Jan 2010
Location: KS
Points: 2256
|
Post Options
Thanks(0)
Quote Reply
Posted: 27 Aug 2010 at 11:02pm |
What a wealth of knowledge on this site! I never would have even known about half of these adjustments. This post (and all of the replies) is great and will sure help me out in the future when I attempt to learn how to plow.
I do see a lot of improvement in the plowing pictures. Keep at it and eventually you'll get it.
|
|
1939 B, 1940 B, 1941 WC, 1951 WD, 1952 CA, 1956 WD-45
|
|
Gerald J.
Orange Level
Joined: 12 Sep 2009
Location: Hamilton Co, IA
Points: 5636
|
Post Options
Thanks(0)
Quote Reply
Posted: 28 Aug 2010 at 2:26am |
|
And your tires are wider than the 12" furrow from the JD and so are smashing it wider and harder to fill. On one of your earlier pictures, the right half of the RR tire is painted with that turned dirt.
Gerald J.
|
|
Jeff(WC)(MI)
Orange Level
Joined: 12 Sep 2009
Location: S.E. Michigan
Points: 376
|
Post Options
Thanks(0)
Quote Reply
Posted: 28 Aug 2010 at 7:12am |
Gerald J. wrote:
And your tires are wider than the 12" furrow from the JD and so are smashing it wider and harder to fill. On one of your earlier pictures, the right half of the RR tire is painted with that turned dirt.
Gerald J.
|
i see that now....i am going to make a few rounds today before he drops in....but last night was the first time i followed him..before that in most of the pics i was plowing by myself
|
|
Jeff(WC)(MI)
Orange Level
Joined: 12 Sep 2009
Location: S.E. Michigan
Points: 376
|
Post Options
Thanks(0)
Quote Reply
Posted: 28 Aug 2010 at 7:14am |
ALinIL wrote:
jeff - I have looked at your last post. You need to move the plow to the left. Your plow is not running straight. Look at the lift links. Adjust the beam screws. Adj the left one out .5 to 1 turn and adj the right one in(cw). This will straighten out the plow and make the front bottom cut a wider furrow. Leave the wheels alone. You need to get the plow hitch point at the correct position with regard to the tractor. The Beam screws are what accomplishes this. I have a 2 bottom mtd behind 45 with the wheels set out one notch and have no problem with it. But I have adjusted the beam screws so the plow pulls straight. You are getting close on adjustments and once you make this adjustment you will see a large improvement on getting the plow to run straight and cut the correct width with the right bottom. As always make all adjustments without TB. Hope this helps. - AL
|
by adjusting beaming screws you mean the lift links? my beaming screw is almost bottomed out on the depth adjustment. so turn the left one out 1/2 to a full turn making it longer and turn the right side in..whats cw? and make all adjustments without TB..whats TB? forgive me if this is obvious. lol!
|
|
steelwheelAcjim
Orange Level

Joined: 06 Dec 2009
Location: Blissfield,Mi
Points: 1257
|
Post Options
Thanks(0)
Quote Reply
Posted: 28 Aug 2010 at 7:22am |
|
My guess Is TRACTION BOOSTER. ????????????
|
|
Roddo
Orange Level
Joined: 16 Jul 2010
Location: Brant, Ontario
Points: 466
|
Post Options
Thanks(0)
Quote Reply
Posted: 28 Aug 2010 at 7:42am |
The lift links wont cause it to swing left or right. They are for setting the entire plow frame level. So when the tractor is lopsided due to being in the dead furrow the plow sits level in the ground. I think you already have a good grasp on that. There are clamps on the front of the plow where the round pull frame bar goes through, and on the pull frame itself if memeory serves. You can loosen them and shift the whole plow and pull frame side to side. You can see yours is set quite a ways to the left (looking at it from the rear) Moving it to the right will get it over enough to cover that dead furrow in. I circled them in the picture of your plow. You can see in the picture there is room to slide it towards the right hand lift link. 
Edited by Roddo - 28 Aug 2010 at 7:43am
|
|
Don(MO)
Orange Level
Joined: 12 Sep 2009
Location: Bates City MO.
Points: 6862
|
Post Options
Thanks(0)
Quote Reply
Posted: 28 Aug 2010 at 8:53am |
Jeff, Just load-up your WD45 and plow and come down to my fall plow day in OCT.
We can help you get it plowing again.
Don
|
|
3 WD45's with power steering,G,D15 fork lift,D19, W-Speed Patrol, "A" Gleaner with a 330 corn head,"66" combine,roto-baler, and lots of Snap Coupler implements to make them work for their keep.
|
|
Jeff(WC)(MI)
Orange Level
Joined: 12 Sep 2009
Location: S.E. Michigan
Points: 376
|
Post Options
Thanks(0)
Quote Reply
Posted: 28 Aug 2010 at 9:03am |
|
thanks for the invite Don but thats quite a ways to go!
|
|
ALinIL
Orange Level
Joined: 20 Sep 2009
Location: Frankfort, IL
Points: 316
|
Post Options
Thanks(0)
Quote Reply
Posted: 28 Aug 2010 at 9:04am |
|
Hi again jeff. You DO NOT need to move the lift link adjustments. You need to adjust the beam adjustment screws. These are the square setscrews at the base of the triangle shaped structure that has the depth crank. Also cw means to turn clockwise. - AL
|
|
Jeff(WC)(MI)
Orange Level
Joined: 12 Sep 2009
Location: S.E. Michigan
Points: 376
|
Post Options
Thanks(0)
Quote Reply
Posted: 28 Aug 2010 at 9:45am |
|
those are the set screws that are welded in place
|
|


