adjusting 53 plow
Printed From: Unofficial Allis
Category: Allis Chalmers
Forum Name: Farm Equipment
Forum Description: everything about Allis-Chalmers farm equipment
URL: https://www.allischalmers.com/forum/forum_posts.asp?TID=16874
Printed Date: 02 Feb 2026 at 1:51pm
Software Version: Web Wiz Forums 11.10 - http://www.webwizforums.com
Topic: adjusting 53 plow
Posted By: Jeff(WC)(MI)
Subject: adjusting 53 plow
Date Posted: 19 Aug 2010 at 10:28pm
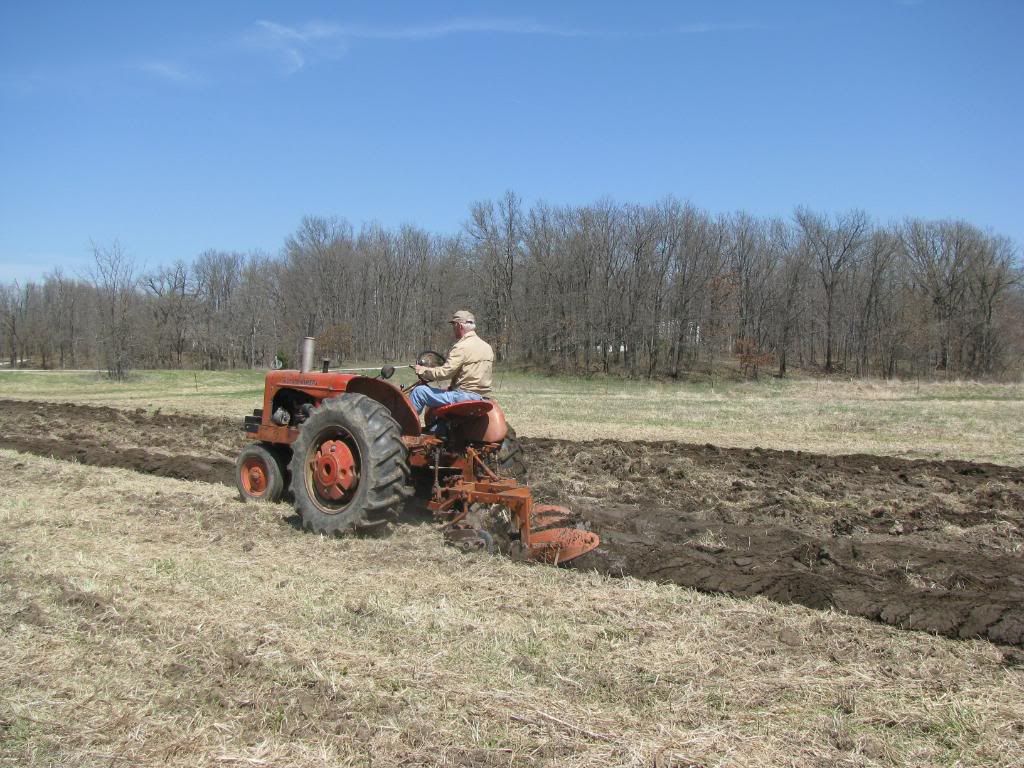
ok before anyone really tears into me, i am a city boy who when old enough to choose, fled to the country......now with that said this is my first experience with a mounted plow, we are making headway adjusting it but i have some questions....i actually just got a 52-53 manual tonight and it has tons of good info in it for adjusting that takes some of the guesswork out. But here goes. We went from plwoing about 3 inches, to now around 8. The rear bottom seems to plow deeper and more consistantly than the front....2 and 3 have always plowed deeper ever since i got the plow home...but #1 is still shallower than the others...can;t quite seem to make it dig in....points are in very good shape...also having trouble completely filling in last furrow, i suspect from lack of depth on front bottom....plow seems to be running fairly level when in the ground...i was also having trouble with a trashy furrow...some of that has went away when we got our depth down because now the coulter is slicing better, but it's still trashy, and it comes from both the land side and up and over the last bottom....and lastly for now...i have the tractor booster set correctly on the pump and it works like a charm...in this configuration when plowing is the proper lever placement on the quadrant in the full down position?? thanks for any help guys..and heres a few pics "before" we got it down to around 8 inches on the rear bottom
    |
Replies:
Posted By: Gerald J.
Date Posted: 20 Aug 2010 at 9:45am
|
First pass is different from the rest. You tip it forward with the top link (on a three point, here with the beaming screw) to make it dig in, or you put on a deep suck plow share. Then you level it side to side with the lift links to make all bottoms dig the same. The first furrow the tractor is level. After that you have to take a plow depth off the right lift link to get the plow back level because the tractor tilted. You can make a long point normal plow share into a deep suck by having a blacksmith bend the long tip down a bit. Gerald J. |
Posted By: Butch(OH)
Date Posted: 20 Aug 2010 at 10:09am
| Heck I have seen people who claimed to know what they were doing do a whole lot worse job of plowing than that, dont be so hard on yourself! It is a whole lot easier to diagnose problems in the field with the plow. About all the depth problems I see at plow days and shows are caused by worn out wear parts. Those old plows are hard to get working right in dry hard ground unless every wear part is just right so you have a big strike against you trying to plow this time of year. If you have the old type bottoms with "fitted" or "blacksmith" type points you need to get some suck in them as Gerald said this is done by knocking the points down or welding on new points. We have knocked our points down in a pinch when we needed some more suck by setting the plow down on a 4x4 under the share and hitting the points with a big sledge, this wont work with chilled points. If you have throw away type points you need to make sure they are not worn out. Once all that is done the handle on top of the plow is your beeming screw that adjusts the depth. in is deeper. If screwing it in does not cause the plow to go into the ground then you have plow point or ground hardness issues that need fixed. As I said hard to tell from pictures but looks like bottom #1 is cutting too wide also? this is fixed by running the furrow wheel all the way in or moving the lift crossbar. Looks also like you could run the righthand side of the plow deeper. This is done with the lift links, RH longer or LH shorter. |
Posted By: wfmurray
Date Posted: 20 Aug 2010 at 10:34am
| From what i can see from picture it looks like the front plow is taken to wide of with.As for as different points its hog wash. First round front furrow is shallow after that it levels out .Refer to manul. |
Posted By: Bill Long
Date Posted: 20 Aug 2010 at 10:55am
|
Jeff, Listen closely to what is said above. You have some of our resident plow experts giving you extremely good advice.
As Butch says remember you are dealing with close to a 50 year old plow. Things get changed a little and parts are very hard to come by.
However, looks like you are doing a good job to me.
You know, I cannot get over the BLACK EARTH that shows up in these plow pictures.
Wish we had it in Maryland - we had red clay rocky ground.
Good Luck!
Bill Long
|
Posted By: Brian F(IL)
Date Posted: 20 Aug 2010 at 11:21am
| For the correct wheel width settings (at least for a #73 plow and WD-45) you need to have the rear wheels at a 66" center-center setting (I'm doing this from memory but I believe that's right). Your right rear tractor wheel will be set out one hole on the power-adjust rims. I can't tell from the pictures if you've done that or not. Good luck. |
Posted By: Jeff(WC)(MI)
Date Posted: 20 Aug 2010 at 12:25pm
| in the manual for the 53 it said for 3-14's the wheel spacing needed to be at a certain width..can't remember but it was both wheels all the way in...thats where they are at....as for the points...like i said for a city boy they appear good..slight downward slope at the end..still mostly squared off....i have seen some bad ones and these looked good. The pictures above are not how it's plowing now...when i get back out to my buddies house i will take some more pics, and closer ones of it in the ground and go from there....like i said last night we got it measured i was cutting an 8in furrow....but last night, before i got the manual i also lengthened the RH(short) lift link thinking it would make the front go in further and now i read in the manual it needs to be winged to the left for faster/better suction so i will turn that back in a few revolutions which will wing it a little more to the left....thanks for the help guys when i get back out there i will make a few adjustments, take some pics and post em up |
Posted By: Jeff(WC)(MI)
Date Posted: 20 Aug 2010 at 12:27pm
|
Butch-
I just re-read what you posted....you said to lengthen right hand or shorten left hand to run #1 deeper...this is what i thought also but reading the manual said the opposite....said to wing it further to the left to make it dig deeper/faster...now i'm confused....and when i turned the right hand arm out a few turns before i started last night it actually made the plowing worse, so when i read that in the manual i thought i had it all figured out
|
Posted By: Gerald J.
Date Posted: 20 Aug 2010 at 12:42pm
|
To dig deeper you need to tip the plow foward. That raises the back (left side) bottom, so you have to tip it left by shortening the right lift link. Gerald J. |
Posted By: Jeff(WC)(MI)
Date Posted: 20 Aug 2010 at 1:15pm
| ok...that makes sense...i lengthened the right lift link thinking it would make it go down further...just the opposite....wow these things will take all your logical thinking and throw her out the window! |
Posted By: Jeff(WC)(MI)
Date Posted: 20 Aug 2010 at 1:16pm
| should my hyd lever be all the way at the bottom of the quadrant at all times? |
Posted By: Mike(SEIN)
Date Posted: 20 Aug 2010 at 2:51pm
| To make the traction booster work, raise the lift lever a little bit at a time, if the plow starts to raise then move the lever back down a little and thats where you want your lever when your plowing. |
Posted By: Chris (swIA)
Date Posted: 20 Aug 2010 at 3:04pm
| For the traction booster to work the pump needs to be set for it. Turn both the thumbscrew on the bottom where the drawbar linkage connects and the thumbscrew on the hold valve out. Then raise the lever on the quadrent until you take the slack out on the lift links. |
Posted By: Butch(OH)
Date Posted: 20 Aug 2010 at 4:16pm
| OK, all things being as they should be, meaning the wear parts and slip heal are in good shape the back end of an Allis Chalmers snap coupler mounted plow follows the front and the entire plow runs at X depth. Thats why to set the depth you need only to mess with one adjustment, the beaming screw. Screwing it in tips all the points down until it reaches X depth and then because it is being lead by the hitching point the points level out and it doesnt go deeper. This is why you can let all the hydraulic pressure off a snap coupler plow (traction booster of) and it doesnt go to China like a 3 point plow does. NOW, when things are wearing or worn out or in real hard ground the plow doest want to go in the ground like it should so when you shorten the beaming screw it raises the rear of the plow out of the ground, you then have to lengthen the left hand lift link to level the plow back out frount to rear but it also causes the LH side (viewed from the rear) to be lower than the RH side. This is what we used to call running the plow "up on the points" Looking at a plow so set up from the rear the left side of the frame is lower than the right. In the opposate condition, real soft ground like peat the rear of the plow will try to bury itself and you have to run it "over on the heal" to stop it. A plow set up like this viewed from the rear will show the RH side to be lower. You seldom see this condition today, always the first one. Given that the plow will go into the ground like it should the lift links are used to level the plow from side to side and thus to set the RH side deeper you lengthen the RH side or shorten the LH, simple as that. Now WHEN your plow is working at its best dueto above mentioned copnditions and you have to run it up on the points to force it into the ground you then must put the rear into the ground by legnthening the LH side. Clear as mud ? I know, but as clear as I can make it sitting here and your plowing there. Those plows are very darned hard to make run right plowing in August in wheat stubble unles EVERYTHING is new or up to spec, including the points, landside, AND slip heal a part of the plow that most people dont even realize has anything to due with the plow working correctly. Good luck and put some suck into those shares and most of your problems will go away. |
Posted By: Jeff(WC)(MI)
Date Posted: 20 Aug 2010 at 9:00pm
| thanks for the info Butch...will check it out further in a few days and take some better pictures |
Posted By: Steve M C/IL
Date Posted: 20 Aug 2010 at 9:33pm
| Jeff;my experience with T/B on WD&WD45 was that if if wasn't pulling hard you could run the lever all the way down.By the same token you run it up an inch or so and it never operated because the "pull" wasn't enough to engage it however it was ready when that tuff spot snuck up on ya.I always dropped the plow with lever at bottom and then raised it a thumbs width on the quadrant.If that ain't enough you'll know it when it just wants to spin...give 'er a little more.The shims in the bolts that compress the big pull spring for drawbar will effect the sensativity of T/B.I had to remove some(squeeze spring more) when I started pulling 4 bttms 'cause T/B wouldn't let the plow stay in the ground with lever all the way down.The thumbs width allows you to work after dark.LOL |
Posted By: Jeff(WC)(MI)
Date Posted: 20 Aug 2010 at 9:43pm
| well i run the lever all the way down currently...and i am not slipping any wheels..but i can hear the engine working and i see the traction booster gauge working....i was plowing 3-14's 8 inches deep with unloaded tires and 1 set of wheel weights...it must be working! |
Posted By: Jeff(WC)(MI)
Date Posted: 22 Aug 2010 at 8:58pm
ok...went back out plowing today...took tons of pictures...i will only post two right now, if anyone wants to see something specific to try and help, let me know i probably have it...plow in the ground, out of the ground...on the ground not dug in...all the points, all the boards...lift link arms in and out of ground, etc so just let me know i didn;t want to go and post all of them....heres two...first round starting out, the ground in this field goes from harsd clay, to loamy ground then to sand and right back to clay....still not having any trouble with traction with unloaded tires and one set of wheel weights...plow still seems to be running shallow on the front bottom and dug deep on the back bottom....one other thing we noticed tonight. i got a manual and was reading it and checking things...manual says on initial setup the beaming screw plates in the center should measure 11 inches from there to left lift link...i only got 9...and for a 14" plow it says from left beaming plate to left frame u bolt should be 5 inches..i only got 2.5.....then we measured how much the front bottom is actually cutting...looks to be only about 12 inches....so maybe my 2nd and 3rd bottoms are taking full widths and my front is taking only a part and thats why i get an unfilled furrow and my plowing looks like it slopes downhill from left to right? we also noticed we think that the plow is running a little crooked....a little to the left....if you look down and over your left shoulder when plowing it appears the plow is kicking a little to the left side, maybe thats why the furrow is ragged in the clay because the moldboard is kicking up under the coulter a little? we are also plowing out there with a ford and a 3 bottom 3 point plow that ALWAYS makes a clean furrow, even though it has worn points and jumps out of the ground in the hard clay
  |
Posted By: Jeff(WC)(MI)
Date Posted: 22 Aug 2010 at 9:01pm
|
it's funny, my buddy who farms this ground doesn;t seem to mind that this plow is driving me nuts, i almost got the field done! LOL i told you i would do it Jim |
Posted By: Gerald J.
Date Posted: 22 Aug 2010 at 11:53pm
|
The plow naturally kicks to the left turning dirt to the right. The landsides take up most of that side thrust. Gerald J. |
Posted By: Jeff(WC)(MI)
Date Posted: 23 Aug 2010 at 12:09pm

 a couple more
|
Posted By: Gerald J.
Date Posted: 23 Aug 2010 at 12:17pm
|
That right bottom is cutting narrow. Need to move the wheel out or the plow to the left. You can judge width of cut by looking how high the slice rides up the moldboard. Gerald J. |
Posted By: Jeff(WC)(MI)
Date Posted: 23 Aug 2010 at 1:11pm
| i'm thinking plow needs to go left...judging by the lift arms hanging slanted...shouldn;t these run straight up and down? |
Posted By: Steve M C/IL
Date Posted: 23 Aug 2010 at 1:40pm
| They don't run straight up and down as such.That last picture makes it look like the plow is tipped too much to the left which on it's own would make rear bottom run deeper if front isn't in deep enough.Plow frame should be level across top left to right and front to rear when in the ground.Keep shorting up that beaming screw til you get that front bottom in deeper.Something odd here.The rear shouldn't run any deeper than the front because of the beaming screw....I don't know if too much tilt to the left would cause that. With it raised up,sight down the points and bottoms and see if they are all in line with each other.Could have a bolt partially sheared making one dip down on the point. Have had some "tweaked" vertical beams that had to be shimmed on one side of mounting bolts to turn them back in line.In theory,it should be able to run even depth front to rear and side to side with no lift applied from TB.It shouldn't dig in or ride out and to change depth you raise it out or lower it by turing the beaming screw. The beaming screw setting will be different between a narrow front and a wide front because of the angle the tractor runs uphill. |
Posted By: Jeff(WC)(MI)
Date Posted: 23 Aug 2010 at 2:36pm
|
Steve-
maybe it was just hpw the [icture was taken to make it look that way? look at the two pics i posted above this..you can see from behind it doesn;t seem to be tilted left much...maybe it was picture angle?
|
Posted By: Jeff(WC)(MI)
Date Posted: 23 Aug 2010 at 2:39pm
| also does wheel size matter? the tires are 14.9x28's....also we measured wheel spacing last night..center to center is 61"....which i thought i had them in the narrowest spot which per the manual would be 56"....i might have done the power adjust wong and be out to far..would this make a difference? |
Posted By: Gerald J.
Date Posted: 23 Aug 2010 at 2:55pm
|
Too close. Not too far. Right wheel needs to be out further, so its inside sidewall is a bottom width from the landside of the right/front bottom. Gerald J. |
Posted By: Jeff(WC)(MI)
Date Posted: 23 Aug 2010 at 5:24pm
ok i will measure and move the wheel accordingly...i really think per the manual and my measurements that the plow lift bar and plow frames need to be slid to the left 2 inches..which would give me the two inches i am missing on my first cut...but i will have to take it into the shop and free more stuff up and clean off built up paint to do that...for now i will spin the right wheel out a tad and see what happens....heres a few more pics
 #1 see how it won;t scour at the top..either not in deep enough or not taking a full cut...maybe both?
   the last two pics are from the lighter ground where it cuts a better furrow....heal pressure seems good it makes a mark in the bottom of the furrow....but some spots it won;t make a nice furrow to save my life
 |
Posted By: CJohnS MI
Date Posted: 23 Aug 2010 at 5:41pm
...only to tractors of the opposite sex, Jeff. BTW, plows look so much better with the paint scrubbed off. |
(MI)") Jeff(WC)(MI) wrote:
Jeff(WC)(MI) wrote:Posted By: Don(MO)
Date Posted: 23 Aug 2010 at 7:54pm
|
I need to put my two cents in on this to, So here go's. LOL
Look at a pic of one of my 53's it's sitting level front to back and side to side.
level the plow up first, then adjust the pull bar set screws #20 (on page 10 FIG #10 of your #53 plow book) It looks like rear of the plow is runnig off to left side, so adjust set screw out 1/2 turn and then turn the right set screw in 1/2 turn.
Please take the PTO shaft out before it gets bent, set the wheels all the way in to get your 56" setting if you have 12" or 14" bottoms on the plow
(the 61" setting is for a #53 with 16" bottoms)
set your Hdyraulic system to draw bar control like on page #4 of your plow book
Get the plow running level and strate behind the tractor and then do the fine settings on depth.
Here's how the plow needs to look running in ground. Don
 ------------- 3 WD45's with power steering,G,D15 fork lift,D19, W-Speed Patrol, "A" Gleaner with a 330 corn head,"66" combine,roto-baler, and lots of Snap Coupler implements to make them work for their keep. |
Posted By: Butch(OH)
Date Posted: 23 Aug 2010 at 8:43pm
Jeff, Here is a picture of our #73 plow behind our D-19. This picture shows what I mean by being "up on the points" The left side of the frame is just a tad lower than the right hand side. If you look at Don's pic he has his plow upon the points a bit too. I all but the nicest conditons with pefect wear parts those old mounted plows will do a nicer job and stay in the ground better when set up like this. The later plows also had an extra hole in standards for the top of the frog so you could tip the entire bottom forwards for deeper suck. Sent a PM about the other things you asked about/
 |
Posted By: Jeff(WC)(MI)
Date Posted: 23 Aug 2010 at 8:44pm
| thanks for the info and pic Don...do you have anymore pics by any chance? i am trying to scarf all the info i can and absorb as much as possible. I can;t move the set screws on the pull bar until the plow gets some "shop time" the right one doesn;t have a locknut and it's welded |
Posted By: Jeff(WC)(MI)
Date Posted: 23 Aug 2010 at 8:47pm
| thanks Butch for the pic and the info...wish i could get mine to plow like those two pictures...i will send ya a PM back |
Posted By: Jeff(WC)(MI)
Date Posted: 23 Aug 2010 at 9:05pm
|
Butch-
Heres the pics I told you I would post. See how the coulter arm would hold the coulter out about an inch to an inch and a half if it were to follow straight? but the plow seems to kick to the left and cause the moldboard to ride underneath the coulter.
  |
Posted By: Jeff(WC)(MI)
Date Posted: 23 Aug 2010 at 9:12pm
also can anyone tell what bottoms these are? i looked on the backs and can;t find anything...is it stamped underneath the frog maybe? or i seen some of the newer ones with decals..maybe they are painted over? if thats the case how do i tell what i have?
 |
Posted By: Butch(OH)
Date Posted: 23 Aug 2010 at 9:14pm
| Move that coulter on out an inch, if that doesnt make the furrow stand up move it out another inch. You can also see in that pic tha your front bottom is cutting about 2/3 what it should be cutting, move that furrow wheel out one hole. |
Posted By: E Clark
Date Posted: 23 Aug 2010 at 10:15pm
|
Jeff, I don't mean this in a bad way but I'm glad someone else is having the same problem I'm having. But I think I have figured out my problem.was ready to sell my plow. I'll give it another try. Thanks Eric
|
Posted By: Jeff(WC)(MI)
Date Posted: 23 Aug 2010 at 10:27pm
|
glad to help, i guess. LOL
good luck and post pics plowing!
|
Posted By: E Clark
Date Posted: 23 Aug 2010 at 10:40pm
|
the plows hard enough to figure out,and now you want pics what ever.we did plow Sat I will try to post this week.got high school football Tues night and I need him to post pics. good luck to you also |
Posted By: Gerald J.
Date Posted: 23 Aug 2010 at 10:48pm
|
Not scouring to the top of the moldboard shows its not cutting full width. It has a shin separate from the moldboard. That rules out 24, 25, 26, and 54. 124 has a shin shaped about like that one. The bottoms book doesn't show the face view of the moldboard. There are more distinctive details shown of the frog in a bottom view though. 325 doesn't have a shin. 331, 332, and 333 have a shin and that wide slip heel on the landside. My bottoms book groups those together and I don't instantly see how to tell those bottoms apart without a part number for moldboard. They share frogs, blades (or shares), landsides, and shins. A picture with the plow laying on the left side might help match the details of the frog, but that still won't tell which moldboard it has. Gerald J. |
Posted By: Jeff(WC)(MI)
Date Posted: 24 Aug 2010 at 6:24am
 this probably won;t help but i did take an underside pic.....so the moldboard should have a number stamped in it? if there is it must be under the frog somewhere then.....i was just curious to see if i could still get shares and shins for it
|
Posted By: Steve M C/IL
Date Posted: 24 Aug 2010 at 9:39am
| Dads old 4bottom had those style moldboards but I don't know the #.My 70's have 375 bottoms and are stubbier but really turn the dirt.I don't think there are #'s stamped.I think they had a thin metal tag bolted to the backside with the #.Most rotted off years ago.You have to adjust the coulters by watching where they run in the ground.They will likley look wrong when out of ground.You want them just far enough to the left that the leading edge of shin isn't having to peel uncut dirt.....but not too far .LOL! |
Posted By: Gerald J.
Date Posted: 24 Aug 2010 at 10:55am
Here's the picture I have. Can't say its not of the 331, 332, 333 family.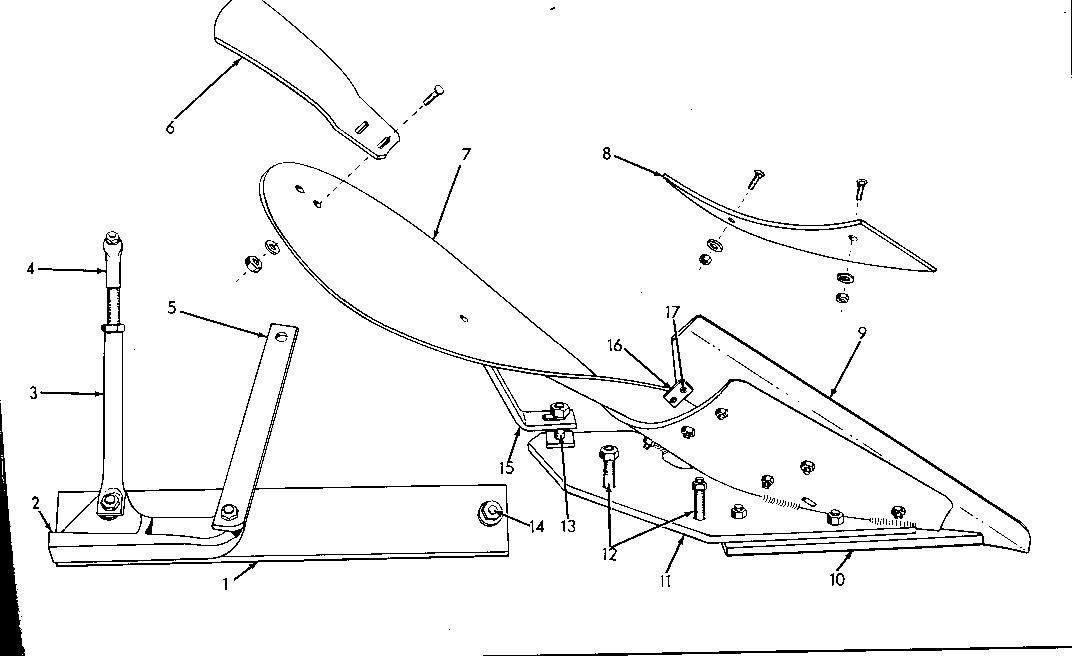 That tab 16 is only used on the 16" bottoms. Shins and "blades" are the same for all the family, only the moldboards are different. The shin for RH bottom is 324940. Also fits 361, 362, 363, 371, 372, and 373 bottoms. You said 3x14. The regular bullet blade (or share) is 325614. Also fits 361, 362, and 363 bottoms. The heavy duty blade is 326082. Also fits 361, 362, and 363 bottoms. Gerald J. |
Posted By: Jeff(WC)(MI)
Date Posted: 24 Aug 2010 at 11:06am
| thanks Gerald....i have the volume 1,2, and 3 plow frame and moldboard parts books, i'll look this stuff up tonight..thanks again |
Posted By: R Aiken
Date Posted: 24 Aug 2010 at 11:22am
| Jeff, If you cant get that plow to work right, bring it back and get a different one. Richard |
Posted By: Jeff(WC)(MI)
Date Posted: 24 Aug 2010 at 12:15pm
| i'm not giving up yet Rich.....but thanks for the offer i'll keep it in mind if it comes down to that....might have to find something else i need at your place to and make my trip worth while! |
Posted By: Jeff(WC)(MI)
Date Posted: 27 Aug 2010 at 9:07pm
ok here goes. i adjusted the rear coulter after the first 4 daylight pics...it now leaves a good furrow wall....that problem is solved as soon as i can get the swing limiter collar free to get it where it's supposed to be but the arm is swung out and it leaves a nice furrow wall just doesn;t track quite straight....now...i moved the right wheel out to the next notch....remember i didn;t start in the narrowest setting...i was at a width of 61" when i started this whole thing....so i moved the right wheel out one hole on the slide out rim....seemed to have a negative effect...i think it was taking to much with the front bottom and it wasn;t cutting all of it...i would look down under my right arm and see it shoving land to the side and then rolling some on top of it....the first four pics are with the wheel set out the extra notch...first two are in harder clay ground...second two are in lighter ground.......still can;t get that front bottom to dig like it should....i am following my dad and he's running a JD A with a 2-12 intl plow and it burns me how well it does but i still can;t even fill his furrow....in fact with the wheel spaced out i think it did worse because it couldn;t flip it far enough to the right....the last two pictures are just how the plow and tractor set right now, literally i ran out of gas...city farmers anyhow! but thats with the right wheel moved all the way in as far as it will go...so front bottom is not taking a full width i don;t think...still can;t fill the furrow and it won;t dig good....still leaving the ground uneven after i plow it with a trench where i couldn;t fill the furrow..but with the wheel in the inner most setting on the right side the lift arms hang pretty straight while plowing...maybe this ex-city boy should hang up my plow shares? i should go to discing!
      |
Posted By: BrettPhillips
Date Posted: 27 Aug 2010 at 9:25pm
| Remember that the plow can be slid left and right on the cross bar to make fine adjustments to the width of the front furrow. Wheel tread is the "coarse adjustment", and the crossbar will get you the rest of the way. |
Posted By: Roddo
Date Posted: 27 Aug 2010 at 10:10pm
It does look like it is set pretty far to the left. if you slide the whole shooting match over it'll fill in that gap for sure. I know my plow is set a lot further to the left than that and it works pretty good. |
Posted By: ALinIL
Date Posted: 27 Aug 2010 at 10:47pm
|
jeff - I have looked at your last post. You need to move the plow to the left. Your plow is not running straight. Look at the lift links. Adjust the beam screws. Adj the left one out .5 to 1 turn and adj the right one in(cw). This will straighten out the plow and make the front bottom cut a wider furrow. Leave the wheels alone. You need to get the plow hitch point at the correct position with regard to the tractor. The Beam screws are what accomplishes this. I have a 2 bottom mtd behind 45 with the wheels set out one notch and have no problem with it. But I have adjusted the beam screws so the plow pulls straight. You are getting close on adjustments and once you make this adjustment you will see a large improvement on getting the plow to run straight and cut the correct width with the right bottom. As always make all adjustments without TB. Hope this helps. - AL
|
Posted By: wjohn
Date Posted: 27 Aug 2010 at 11:02pm
|
What a wealth of knowledge on this site! I never would have even known about half of these adjustments. This post (and all of the replies) is great and will sure help me out in the future when I attempt to learn how to plow. I do see a lot of improvement in the plowing pictures. Keep at it and eventually you'll get it.
------------- 1939 B, 1940 B, 1941 WC, 1951 WD, 1952 CA, 1956 WD-45 |
Posted By: Gerald J.
Date Posted: 28 Aug 2010 at 2:26am
|
And your tires are wider than the 12" furrow from the JD and so are smashing it wider and harder to fill. On one of your earlier pictures, the right half of the RR tire is painted with that turned dirt. Gerald J. |
Posted By: Jeff(WC)(MI)
Date Posted: 28 Aug 2010 at 7:12am
|
Posted By: Jeff(WC)(MI)
Date Posted: 28 Aug 2010 at 7:14am
|
Posted By: steelwheelAcjim
Date Posted: 28 Aug 2010 at 7:22am
| My guess Is TRACTION BOOSTER. ???????????? |
Posted By: Roddo
Date Posted: 28 Aug 2010 at 7:42am
|
The lift links wont cause it to swing left or right. They are for setting the entire plow frame level. So when the tractor is lopsided due to being in the dead furrow the plow sits level in the ground. I think you already have a good grasp on that. There are clamps on the front of the plow where the round pull frame bar goes through, and on the pull frame itself if memeory serves. You can loosen them and shift the whole plow and pull frame side to side. You can see yours is set quite a ways to the left (looking at it from the rear) Moving it to the right will get it over enough to cover that dead furrow in. I circled them in the picture of your plow. You can see in the picture there is room to slide it towards the right hand lift link.  |
Posted By: Don(MO)
Date Posted: 28 Aug 2010 at 8:53am
|
Jeff, Just load-up your WD45 and plow and come down to my fall plow day in OCT.
We can help you get it plowing again.
Don ------------- 3 WD45's with power steering,G,D15 fork lift,D19, W-Speed Patrol, "A" Gleaner with a 330 corn head,"66" combine,roto-baler, and lots of Snap Coupler implements to make them work for their keep. |
Posted By: Jeff(WC)(MI)
Date Posted: 28 Aug 2010 at 9:03am
| thanks for the invite Don but thats quite a ways to go! |
Posted By: ALinIL
Date Posted: 28 Aug 2010 at 9:04am
| Hi again jeff. You DO NOT need to move the lift link adjustments. You need to adjust the beam adjustment screws. These are the square setscrews at the base of the triangle shaped structure that has the depth crank. Also cw means to turn clockwise. - AL |
Posted By: Jeff(WC)(MI)
Date Posted: 28 Aug 2010 at 9:45am
| those are the set screws that are welded in place |
Posted By: ALinIL
Date Posted: 28 Aug 2010 at 9:56am
Jeff - beam screw adjustments(black arrows)
 |
Posted By: Jeff(WC)(MI)
Date Posted: 28 Aug 2010 at 10:02am
| yep...welded |
Posted By: Don(MO)
Date Posted: 28 Aug 2010 at 10:19am
That is what Al and I are talking about, If they are welded then you need to get them to adjust. Don
 ------------- 3 WD45's with power steering,G,D15 fork lift,D19, W-Speed Patrol, "A" Gleaner with a 330 corn head,"66" combine,roto-baler, and lots of Snap Coupler implements to make them work for their keep. |
Posted By: Jeff(WC)(MI)
Date Posted: 28 Aug 2010 at 10:47am
| if that U bracket that those set screws go in to is the threaded portion...a buddy has a junk plow that just has the frame left i could just replace that U shaped piece and new set screws...is that whats threaded or is it the triangle beaming plates that are threaded? |
Posted By: ALinIL
Date Posted: 28 Aug 2010 at 11:03am
| Jeff - Not certain if "U" bracket or plates threaded. There are lock nuts to keep the setscrews from moving once adjusted. Suggest heat and "panther juice" to get them to turn. - AL |
Posted By: Jeff(WC)(MI)
Date Posted: 28 Aug 2010 at 11:05am
| well the left set screw still has the jam nut on it...the right one the jam nut is gone and the set screw is welded right to the U bracket |
Posted By: ALinIL
Date Posted: 28 Aug 2010 at 11:42am
Jeff - I would try to get a cutter wheel and try to cut the weld. You might then be able to get the screw loose. I realize its not easy. Also here is a diagram I made a few years ago to help with the plow hitch point.
 |
Posted By: Jeff(WC)(MI)
Date Posted: 28 Aug 2010 at 1:21pm
| thanks! i will work on it some in a few days when i get it back home |
Posted By: wfmurray
Date Posted: 28 Aug 2010 at 1:57pm
| Jeff just a crazy idea but change sides with lifting links .My book on a 62 shows adjusting on right side but it has a different link on left . |
Posted By: BobH
Date Posted: 28 Aug 2010 at 2:26pm
| Long link goes on left side,short link on right,one of your first pics.plow looks high on right side,lengthen right link. |
Posted By: Jeff(WC)(MI)
Date Posted: 28 Aug 2010 at 8:19pm
| well i plowed the way it is tonight....and then unhooked plow and loaded everything up and brought it home...got a few things to do to the tractor before i take it acrossed the mighty mac in a few weeks....gonna work on freeing things and loosening things on the plow also in the meantime.....thanks everyone for your help....and i am sure when i get the plow all freed up and going again i will be back with more pictures!! |
Posted By: steelwheelAcjim
Date Posted: 28 Aug 2010 at 8:45pm
|
First of all, I would like to thank Jeff for plowing my field for me! Aside from the plow being out of adjustment a little, he's turned himself into quite an experienced plowman. He left the field for home tonight with my thanks, BUT is considering trading the WD-45 for something different. Folks, we need your help in changing Jeff's mind so he doesn't stray away from the persian orange paint. gottcha Jeff!!!!!!! |
Posted By: Jeff(WC)(MI)
Date Posted: 28 Aug 2010 at 8:51pm
| let the burning at the stake commence, thanks Jim! |
Posted By: steelwheelAcjim
Date Posted: 28 Aug 2010 at 8:58pm
|
Not from me, all of the tractors ran out of gas, can't find anything to light you up with!!! lol |
Posted By: Jeff(WC)(MI)
Date Posted: 28 Aug 2010 at 9:06pm
| now now Jim you've said enough! LOL |
Posted By: BrettPhillips
Date Posted: 28 Aug 2010 at 9:20pm
| Jeff: Repeat after me: "Three Point Hitch is a Communist Plot" Just say no... Once you have the SC plow dialed in, it will be a thing of beauty that others just can't duplicate. Very few hitching systems other than Snap Coupler allow the adjustments to stay with the plow (or other implement) and let you hitch up and go plow without going through what you've been doing EVERY TIME you use the implement. Al and Don are right, the beam adjustment set screws need to be dialed in to get the plow running straight before you make any other changes. |
Posted By: Jeff(WC)(MI)
Date Posted: 28 Aug 2010 at 9:26pm
| i was wondering though...who used these plows before? if the adjustments stay with the implement...how the heck did they use these when they are this far out of whack? we hooked one of steelwheelacjim's 3-16's to my tractor and that thing was so horrible we unhooked and went back to mine |
Posted By: DREAM
Date Posted: 28 Aug 2010 at 10:49pm
| Let me save you some un-needed heartache that you will ALWAYS regret! Stay with the WD and the Snap-Coupler plow. I have tried to plow with my cousins' JD2040 and 3 bottom MF(Technically it is a Massey plow, but the MF stands for something else, same as the tractors to me!LOL!) When you have to (attempt to) plow with something like that, you will appreciate a plow that has been designed with some actual forethought to getting good performance out of it, and not just having the lowest price at the dealers lot. The MF plow that I used had none of the adjustments that your plow has, and it needed them. It showed in the mediocre job that it did. Looked much worse than the pics of your first attempts. Don't get frustrated. You know as well as the rest of us that your plow needed some more work to be just right. The previous owners may have welded the beaming screws in place on purpose, to keep it from moving once they got it set for their tractor. Once you get it right, you will probably want to weld all of the adjustments in place too. LOL! Don'tv give up on it just because that green machine looked like it was doing better. You don't know how many years it took to get that thing to work right. |
Posted By: steelwheelAcjim
Date Posted: 29 Aug 2010 at 9:15am
| Just for the record, I had no problem with the way the plow performed. I know Jeff wanted it to plow a little deeper, but in the type of ground I farm, I do not believe in deep plowing. The farm was wheat stubble that I wanted to just roll over. The field we plowed last year I planted soybeans in this year. They are chest high to a 6ft tall person( just ask Jeff). Any little screw-ups we made I'll just disc up later this fall when I level the field up. Jeff's dad plowing, well, that's another story for another forum! |
Posted By: Don(MO)
Date Posted: 29 Aug 2010 at 9:36am
|
Jeff, Please don't take my help as a rock being thrown at you . the #53 plow and WD45 make a great unit plowing after you get them setup. I have plowed with John Deere, IHC tractors and plows and they are not in the same league as the setup you have. Some day you will look back at the old #53 plowing deep and throwing the dirt and think back to the first time trying to get her setup and laugh about it. My Dad was a great teacher!
Hang in there, Don ------------- 3 WD45's with power steering,G,D15 fork lift,D19, W-Speed Patrol, "A" Gleaner with a 330 corn head,"66" combine,roto-baler, and lots of Snap Coupler implements to make them work for their keep. |
Posted By: JoeO(CMO)
Date Posted: 29 Aug 2010 at 9:37am
|
-from where I'm sitting(in my recliner in medium cruise position), looking at the pictures and from the comments and measurements you have posted, I would;
1st-most important; replace plow shares, they look to be the rebuild type and look totally worn, thus you have to sit the plow on it's nose to penetrate
move plow frame to the left on the round shaft---or---move furrow wheel out one notch=2-1/2 inches-this will help first bottom cut
set the lift links as - left 1-1/2 inches longer than the right as a starting point, then tweak to level along with depth, but you will need new shares to make any of these work.
We had a plow like yours on a WD(one year old) and another on a new D14 w/ new plow, and they will plow ground like yours and leave it level and when speed is up, very difficult to distinguish each furrow.
We also had to change shares a number of times each plowing season to keep the plow in the ground.
As a foot note; The new D14 and new 3-14 plow were set up by the dealer-(I was driving) and they would not leave it until the plow had the right draft which was when the right front wheel would lightly drift against the furrow wall(not into it hard, just enough to guide), in other words, hands free(well almost) plowing. ------------- |
Posted By: Jeff(WC)(MI)
Date Posted: 29 Aug 2010 at 9:52am
| well i'm not ready to give up....but everytime i drive a different tractor, i realize how uncomfortable those Allis's really are for a 6ft tall large framed guy. and the shorter tires in the back provide more bouncing around and makes you feel like you have less control.....now on the other hand i was following my dad with a 3-14 little genius plow thats worn out and converted from rope trip to hyd lift and we couldn;t get it set right and it left a crappy furrow and he was digging up Chinamen! he thinks hes going to send that plow down the road to a different zip code! so thats where the basis of my frustration started, and, I hate to say it, everyone stay in there seats, i was plowing with dads 1936 JD A, and a 2-12 intl plow...that plow should be bronzed(just ask Jim), it cuts even, goes in everytime and stays in and pulls straight, and i had room on the JD to turn part of the way around, rest my arm on the backrest and just chug along with little effort from me. thats where the frustration came from....i had to get that story out before Jim let the cat out of the bag so you got the "real" story. LOL |
Posted By: Jeff(WC)(MI)
Date Posted: 29 Aug 2010 at 9:53am
| but i can;t stand the sound of that damn green machine! |
Posted By: ALinIL
Date Posted: 29 Aug 2010 at 12:27pm
|
Jeff - Just a final note. I believe you are on the right track to getting the plow adjusted.
Get all the adjustments to work and go back and retry. As for how it was adjusted before, It probably wasnt. The fellow probably found the loose beam screw and decided to just weld it. It happens! I bought a CA and the hand clutch didn't work. Found out the guy just welded it together rether than repair. I had to cut apart and rebuild. Works fine now. - AL
|