| Author |
 Topic Search Topic Search  Topic Options Topic Options
|
Jeff(WC)(MI) 
Orange Level

Joined: 12 Sep 2009
Location: S.E. Michigan
Points: 376
|
 Post Options Post Options
") Thanks(0) Thanks(0)
(MI)") Quote Quote  Reply Reply
 Topic: adjusting 53 plow Topic: adjusting 53 plow
Posted: 19 Aug 2010 at 10:28pm |
|
|
 |
|
Sponsored Links
|
|
|
Gerald J.
Orange Level
Joined: 12 Sep 2009
Location: Hamilton Co, IA
Points: 5636
|
Post Options
Thanks(0)
Quote Reply
Posted: 20 Aug 2010 at 9:45am |
|
First pass is different from the rest. You tip it forward with the top link (on a three point, here with the beaming screw) to make it dig in, or you put on a deep suck plow share. Then you level it side to side with the lift links to make all bottoms dig the same. The first furrow the tractor is level. After that you have to take a plow depth off the right lift link to get the plow back level because the tractor tilted.
You can make a long point normal plow share into a deep suck by having a blacksmith bend the long tip down a bit.
Gerald J.
|
|
Butch(OH)
Orange Level
Joined: 11 Sep 2009
Location: Lucerne Ohio
Points: 3842
|
Post Options
Thanks(0)
Quote Reply
Posted: 20 Aug 2010 at 10:09am |
|
Heck I have seen people who claimed to know what they were doing do a whole lot worse job of plowing than that, dont be so hard on yourself! It is a whole lot easier to diagnose problems in the field with the plow. About all the depth problems I see at plow days and shows are caused by worn out wear parts. Those old plows are hard to get working right in dry hard ground unless every wear part is just right so you have a big strike against you trying to plow this time of year. If you have the old type bottoms with "fitted" or "blacksmith" type points you need to get some suck in them as Gerald said this is done by knocking the points down or welding on new points. We have knocked our points down in a pinch when we needed some more suck by setting the plow down on a 4x4 under the share and hitting the points with a big sledge, this wont work with chilled points. If you have throw away type points you need to make sure they are not worn out. Once all that is done the handle on top of the plow is your beeming screw that adjusts the depth. in is deeper. If screwing it in does not cause the plow to go into the ground then you have plow point or ground hardness issues that need fixed. As I said hard to tell from pictures but looks like bottom #1 is cutting too wide also? this is fixed by running the furrow wheel all the way in or moving the lift crossbar. Looks also like you could run the righthand side of the plow deeper. This is done with the lift links, RH longer or LH shorter.
|
|
wfmurray
Orange Level
Joined: 13 Sep 2009
Location: Bostic NC
Points: 1225
|
Post Options
Thanks(0)
Quote Reply
Posted: 20 Aug 2010 at 10:34am |
|
From what i can see from picture it looks like the front plow is taken to wide of with.As for as different points its hog wash. First round front furrow is shallow after that it levels out .Refer to manul.
|
|
Bill Long
Orange Level
Joined: 12 Sep 2009
Location: Bel Air, MD
Points: 4556
|
Post Options
Thanks(0)
Quote Reply
Posted: 20 Aug 2010 at 10:55am |
Jeff, Listen closely to what is said above. You have some of our resident plow experts giving you extremely good advice.
As Butch says remember you are dealing with close to a 50 year old plow. Things get changed a little and parts are very hard to come by.
However, looks like you are doing a good job to me.
You know, I cannot get over the BLACK EARTH that shows up in these plow pictures.
Wish we had it in Maryland - we had red clay rocky ground.
Good Luck!
Bill Long
|
|
Brian F(IL)
Orange Level Access
Joined: 14 Sep 2009
Location: Paxton, IL
Points: 2719
|
Post Options
Thanks(0)
Quote Reply
Posted: 20 Aug 2010 at 11:21am |
|
For the correct wheel width settings (at least for a #73 plow and WD-45) you need to have the rear wheels at a 66" center-center setting (I'm doing this from memory but I believe that's right). Your right rear tractor wheel will be set out one hole on the power-adjust rims. I can't tell from the pictures if you've done that or not. Good luck.
|
|
Jeff(WC)(MI)
Orange Level
Joined: 12 Sep 2009
Location: S.E. Michigan
Points: 376
|
Post Options
Thanks(0)
Quote Reply
Posted: 20 Aug 2010 at 12:25pm |
|
in the manual for the 53 it said for 3-14's the wheel spacing needed to be at a certain width..can't remember but it was both wheels all the way in...thats where they are at....as for the points...like i said for a city boy they appear good..slight downward slope at the end..still mostly squared off....i have seen some bad ones and these looked good. The pictures above are not how it's plowing now...when i get back out to my buddies house i will take some more pics, and closer ones of it in the ground and go from there....like i said last night we got it measured i was cutting an 8in furrow....but last night, before i got the manual i also lengthened the RH(short) lift link thinking it would make the front go in further and now i read in the manual it needs to be winged to the left for faster/better suction so i will turn that back in a few revolutions which will wing it a little more to the left....thanks for the help guys when i get back out there i will make a few adjustments, take some pics and post em up
|
|
Jeff(WC)(MI)
Orange Level
Joined: 12 Sep 2009
Location: S.E. Michigan
Points: 376
|
Post Options
Thanks(0)
Quote Reply
Posted: 20 Aug 2010 at 12:27pm |
Butch-
I just re-read what you posted....you said to lengthen right hand or shorten left hand to run #1 deeper...this is what i thought also but reading the manual said the opposite....said to wing it further to the left to make it dig deeper/faster...now i'm confused....and when i turned the right hand arm out a few turns before i started last night it actually made the plowing worse, so when i read that in the manual i thought i had it all figured out
|
|
Gerald J.
Orange Level
Joined: 12 Sep 2009
Location: Hamilton Co, IA
Points: 5636
|
Post Options
Thanks(0)
Quote Reply
Posted: 20 Aug 2010 at 12:42pm |
|
To dig deeper you need to tip the plow foward. That raises the back (left side) bottom, so you have to tip it left by shortening the right lift link.
Gerald J.
|
|
Jeff(WC)(MI)
Orange Level
Joined: 12 Sep 2009
Location: S.E. Michigan
Points: 376
|
Post Options
Thanks(0)
Quote Reply
Posted: 20 Aug 2010 at 1:15pm |
|
ok...that makes sense...i lengthened the right lift link thinking it would make it go down further...just the opposite....wow these things will take all your logical thinking and throw her out the window!
|
|
Jeff(WC)(MI)
Orange Level
Joined: 12 Sep 2009
Location: S.E. Michigan
Points: 376
|
Post Options
Thanks(0)
Quote Reply
Posted: 20 Aug 2010 at 1:16pm |
|
should my hyd lever be all the way at the bottom of the quadrant at all times?
|
|
Mike(SEIN)
Silver Level


Joined: 12 Sep 2009
Location: RUSH County IN.
Points: 143
|
Post Options
Thanks(0)
Quote Reply
Posted: 20 Aug 2010 at 2:51pm |
|
To make the traction booster work, raise the lift lever a little bit at a time, if the plow starts to raise then move the lever back down a little and thats where you want your lever when your plowing.
|
|
Chris (swIA)
Orange Level

Joined: 13 Sep 2009
Location: Prescott, IA
Points: 319
|
Post Options
Thanks(0)
Quote Reply
Posted: 20 Aug 2010 at 3:04pm |
|
For the traction booster to work the pump needs to be set for it. Turn both the thumbscrew on the bottom where the drawbar linkage connects and the thumbscrew on the hold valve out. Then raise the lever on the quadrent until you take the slack out on the lift links.
|
|
Butch(OH)
Orange Level
Joined: 11 Sep 2009
Location: Lucerne Ohio
Points: 3842
|
Post Options
Thanks(0)
Quote Reply
Posted: 20 Aug 2010 at 4:16pm |
|
OK, all things being as they should be, meaning the wear parts and slip heal are in good shape the back end of an Allis Chalmers snap coupler mounted plow follows the front and the entire plow runs at X depth. Thats why to set the depth you need only to mess with one adjustment, the beaming screw. Screwing it in tips all the points down until it reaches X depth and then because it is being lead by the hitching point the points level out and it doesnt go deeper. This is why you can let all the hydraulic pressure off a snap coupler plow (traction booster of) and it doesnt go to China like a 3 point plow does. NOW, when things are wearing or worn out or in real hard ground the plow doest want to go in the ground like it should so when you shorten the beaming screw it raises the rear of the plow out of the ground, you then have to lengthen the left hand lift link to level the plow back out frount to rear but it also causes the LH side (viewed from the rear) to be lower than the RH side. This is what we used to call running the plow "up on the points" Looking at a plow so set up from the rear the left side of the frame is lower than the right. In the opposate condition, real soft ground like peat the rear of the plow will try to bury itself and you have to run it "over on the heal" to stop it. A plow set up like this viewed from the rear will show the RH side to be lower. You seldom see this condition today, always the first one. Given that the plow will go into the ground like it should the lift links are used to level the plow from side to side and thus to set the RH side deeper you lengthen the RH side or shorten the LH, simple as that. Now WHEN your plow is working at its best dueto above mentioned copnditions and you have to run it up on the points to force it into the ground you then must put the rear into the ground by legnthening the LH side. Clear as mud ? I know, but as clear as I can make it sitting here and your plowing there. Those plows are very darned hard to make run right plowing in August in wheat stubble unles EVERYTHING is new or up to spec, including the points, landside, AND slip heal a part of the plow that most people dont even realize has anything to due with the plow working correctly. Good luck and put some suck into those shares and most of your problems will go away.
Edited by Butch(OH) - 20 Aug 2010 at 4:26pm
|
|
Jeff(WC)(MI)
Orange Level
Joined: 12 Sep 2009
Location: S.E. Michigan
Points: 376
|
Post Options
Thanks(0)
Quote Reply
Posted: 20 Aug 2010 at 9:00pm |
|
thanks for the info Butch...will check it out further in a few days and take some better pictures
|
|
Steve M C/IL
Orange Level
Joined: 01 Jul 2010
Location: shelbyville IL
Points: 691
|
Post Options
Thanks(0)
Quote Reply
Posted: 20 Aug 2010 at 9:33pm |
|
Jeff;my experience with T/B on WD&WD45 was that if if wasn't pulling hard you could run the lever all the way down.By the same token you run it up an inch or so and it never operated because the "pull" wasn't enough to engage it however it was ready when that tuff spot snuck up on ya.I always dropped the plow with lever at bottom and then raised it a thumbs width on the quadrant.If that ain't enough you'll know it when it just wants to spin...give 'er a little more.The shims in the bolts that compress the big pull spring for drawbar will effect the sensativity of T/B.I had to remove some(squeeze spring more) when I started pulling 4 bttms 'cause T/B wouldn't let the plow stay in the ground with lever all the way down.The thumbs width allows you to work after dark.LOL
|
|
Jeff(WC)(MI)
Orange Level
Joined: 12 Sep 2009
Location: S.E. Michigan
Points: 376
|
Post Options
Thanks(0)
Quote Reply
Posted: 20 Aug 2010 at 9:43pm |
|
well i run the lever all the way down currently...and i am not slipping any wheels..but i can hear the engine working and i see the traction booster gauge working....i was plowing 3-14's 8 inches deep with unloaded tires and 1 set of wheel weights...it must be working!
|
|
Jeff(WC)(MI)
Orange Level
Joined: 12 Sep 2009
Location: S.E. Michigan
Points: 376
|
Post Options
Thanks(0)
Quote Reply
Posted: 22 Aug 2010 at 8:58pm |
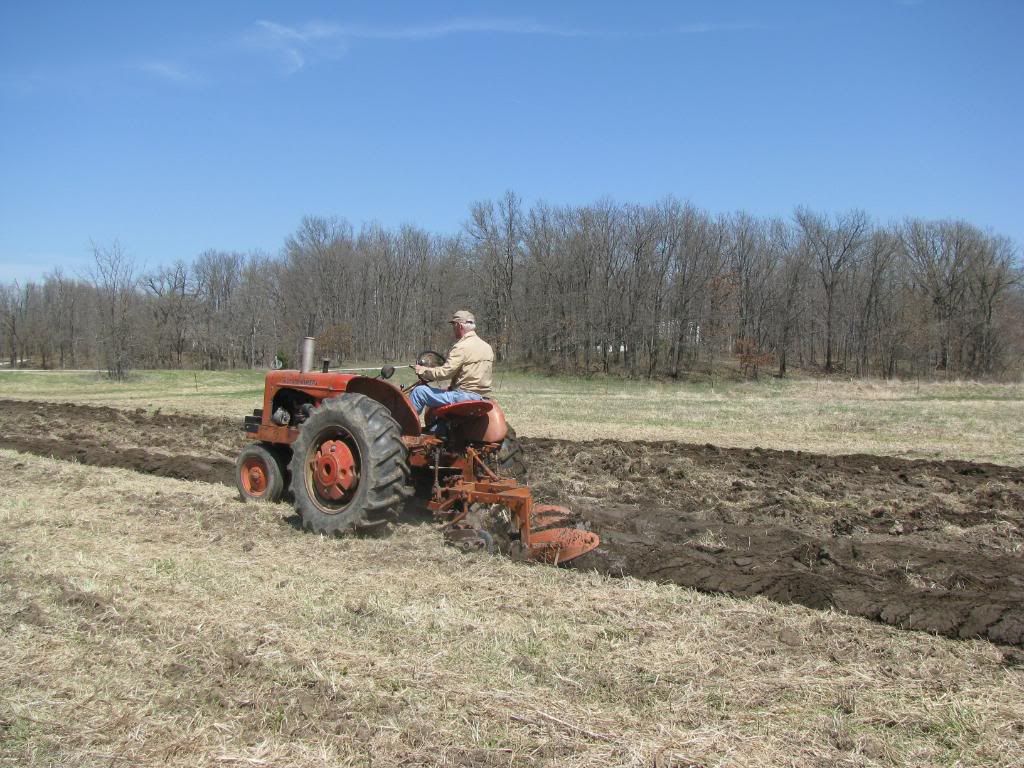
ok...went back out plowing today...took tons of pictures...i will only post two right now, if anyone wants to see something specific to try and help, let me know i probably have it...plow in the ground, out of the ground...on the ground not dug in...all the points, all the boards...lift link arms in and out of ground, etc so just let me know i didn;t want to go and post all of them....heres two...first round starting out, the ground in this field goes from harsd clay, to loamy ground then to sand and right back to clay....still not having any trouble with traction with unloaded tires and one set of wheel weights...plow still seems to be running shallow on the front bottom and dug deep on the back bottom....one other thing we noticed tonight. i got a manual and was reading it and checking things...manual says on initial setup the beaming screw plates in the center should measure 11 inches from there to left lift link...i only got 9...and for a 14" plow it says from left beaming plate to left frame u bolt should be 5 inches..i only got 2.5.....then we measured how much the front bottom is actually cutting...looks to be only about 12 inches....so maybe my 2nd and 3rd bottoms are taking full widths and my front is taking only a part and thats why i get an unfilled furrow and my plowing looks like it slopes downhill from left to right? we also noticed we think that the plow is running a little crooked....a little to the left....if you look down and over your left shoulder when plowing it appears the plow is kicking a little to the left side, maybe thats why the furrow is ragged in the clay because the moldboard is kicking up under the coulter a little? we are also plowing out there with a ford and a 3 bottom 3 point plow that ALWAYS makes a clean furrow, even though it has worn points and jumps out of the ground in the hard clay
 
|
|
Jeff(WC)(MI)
Orange Level
Joined: 12 Sep 2009
Location: S.E. Michigan
Points: 376
|
Post Options
Thanks(0)
Quote Reply
Posted: 22 Aug 2010 at 9:01pm |
it's funny, my buddy who farms this ground doesn;t seem to mind that this plow is driving me nuts, i almost got the field done! LOL
i told you i would do it Jim
|
|
Gerald J.
Orange Level
Joined: 12 Sep 2009
Location: Hamilton Co, IA
Points: 5636
|
Post Options
Thanks(0)
Quote Reply
Posted: 22 Aug 2010 at 11:53pm |
|
The plow naturally kicks to the left turning dirt to the right. The landsides take up most of that side thrust.
Gerald J.
|
|
Jeff(WC)(MI)
Orange Level
Joined: 12 Sep 2009
Location: S.E. Michigan
Points: 376
|
Post Options
Thanks(0)
Quote Reply
Posted: 23 Aug 2010 at 12:09pm |

a couple more
|
|
Gerald J.
Orange Level
Joined: 12 Sep 2009
Location: Hamilton Co, IA
Points: 5636
|
Post Options
Thanks(0)
Quote Reply
Posted: 23 Aug 2010 at 12:17pm |
|
That right bottom is cutting narrow. Need to move the wheel out or the plow to the left.
You can judge width of cut by looking how high the slice rides up the moldboard.
Gerald J.
|
|
Jeff(WC)(MI)
Orange Level
Joined: 12 Sep 2009
Location: S.E. Michigan
Points: 376
|
Post Options
Thanks(0)
Quote Reply
Posted: 23 Aug 2010 at 1:11pm |
|
i'm thinking plow needs to go left...judging by the lift arms hanging slanted...shouldn;t these run straight up and down?
|
|
Steve M C/IL
Orange Level
Joined: 01 Jul 2010
Location: shelbyville IL
Points: 691
|
Post Options
Thanks(0)
Quote Reply
Posted: 23 Aug 2010 at 1:40pm |
|
They don't run straight up and down as such.That last picture makes it look like the plow is tipped too much to the left which on it's own would make rear bottom run deeper if front isn't in deep enough.Plow frame should be level across top left to right and front to rear when in the ground.Keep shorting up that beaming screw til you get that front bottom in deeper.Something odd here.The rear shouldn't run any deeper than the front because of the beaming screw....I don't know if too much tilt to the left would cause that. With it raised up,sight down the points and bottoms and see if they are all in line with each other.Could have a bolt partially sheared making one dip down on the point. Have had some "tweaked" vertical beams that had to be shimmed on one side of mounting bolts to turn them back in line.In theory,it should be able to run even depth front to rear and side to side with no lift applied from TB.It shouldn't dig in or ride out and to change depth you raise it out or lower it by turing the beaming screw. The beaming screw setting will be different between a narrow front and a wide front because of the angle the tractor runs uphill.
Edited by Steve M C/IL - 23 Aug 2010 at 1:44pm
|
|
Jeff(WC)(MI)
Orange Level
Joined: 12 Sep 2009
Location: S.E. Michigan
Points: 376
|
Post Options
Thanks(0)
Quote Reply
Posted: 23 Aug 2010 at 2:36pm |
Steve-
maybe it was just hpw the [icture was taken to make it look that way? look at the two pics i posted above this..you can see from behind it doesn;t seem to be tilted left much...maybe it was picture angle?
|
|
Jeff(WC)(MI)
Orange Level
Joined: 12 Sep 2009
Location: S.E. Michigan
Points: 376
|
Post Options
Thanks(0)
Quote Reply
Posted: 23 Aug 2010 at 2:39pm |
|
also does wheel size matter? the tires are 14.9x28's....also we measured wheel spacing last night..center to center is 61"....which i thought i had them in the narrowest spot which per the manual would be 56"....i might have done the power adjust wong and be out to far..would this make a difference?
|
|
Gerald J.
Orange Level
Joined: 12 Sep 2009
Location: Hamilton Co, IA
Points: 5636
|
Post Options
Thanks(0)
Quote Reply
Posted: 23 Aug 2010 at 2:55pm |
|
Too close. Not too far. Right wheel needs to be out further, so its inside sidewall is a bottom width from the landside of the right/front bottom.
Gerald J.
|
|
Jeff(WC)(MI)
Orange Level
Joined: 12 Sep 2009
Location: S.E. Michigan
Points: 376
|
Post Options
Thanks(0)
Quote Reply
Posted: 23 Aug 2010 at 5:24pm |
ok i will measure and move the wheel accordingly...i really think per the manual and my measurements that the plow lift bar and plow frames need to be slid to the left 2 inches..which would give me the two inches i am missing on my first cut...but i will have to take it into the shop and free more stuff up and clean off built up paint to do that...for now i will spin the right wheel out a tad and see what happens....heres a few more pics
#1 see how it won;t scour at the top..either not in deep enough or not taking a full cut...maybe both?
the last two pics are from the lighter ground where it cuts a better furrow....heal pressure seems good it makes a mark in the bottom of the furrow....but some spots it won;t make a nice furrow to save my life
|
|
CJohnS MI
Orange Level
Joined: 27 Jun 2010
Location: Lapeer MI
Points: 326
|
Post Options
Thanks(0)
Quote Reply
Posted: 23 Aug 2010 at 5:41pm |
(MI)") Jeff(WC)(MI) wrote: Jeff(WC)(MI) wrote:
also does wheel size matter? |
...only to tractors of the opposite sex, Jeff. BTW, plows look so much better with the paint scrubbed off.
|
|
Don(MO)
Orange Level
Joined: 12 Sep 2009
Location: Bates City MO.
Points: 6862
|
Post Options
Thanks(0)
Quote Reply
Posted: 23 Aug 2010 at 7:54pm |
I need to put my two cents in on this to, So here go's. LOL
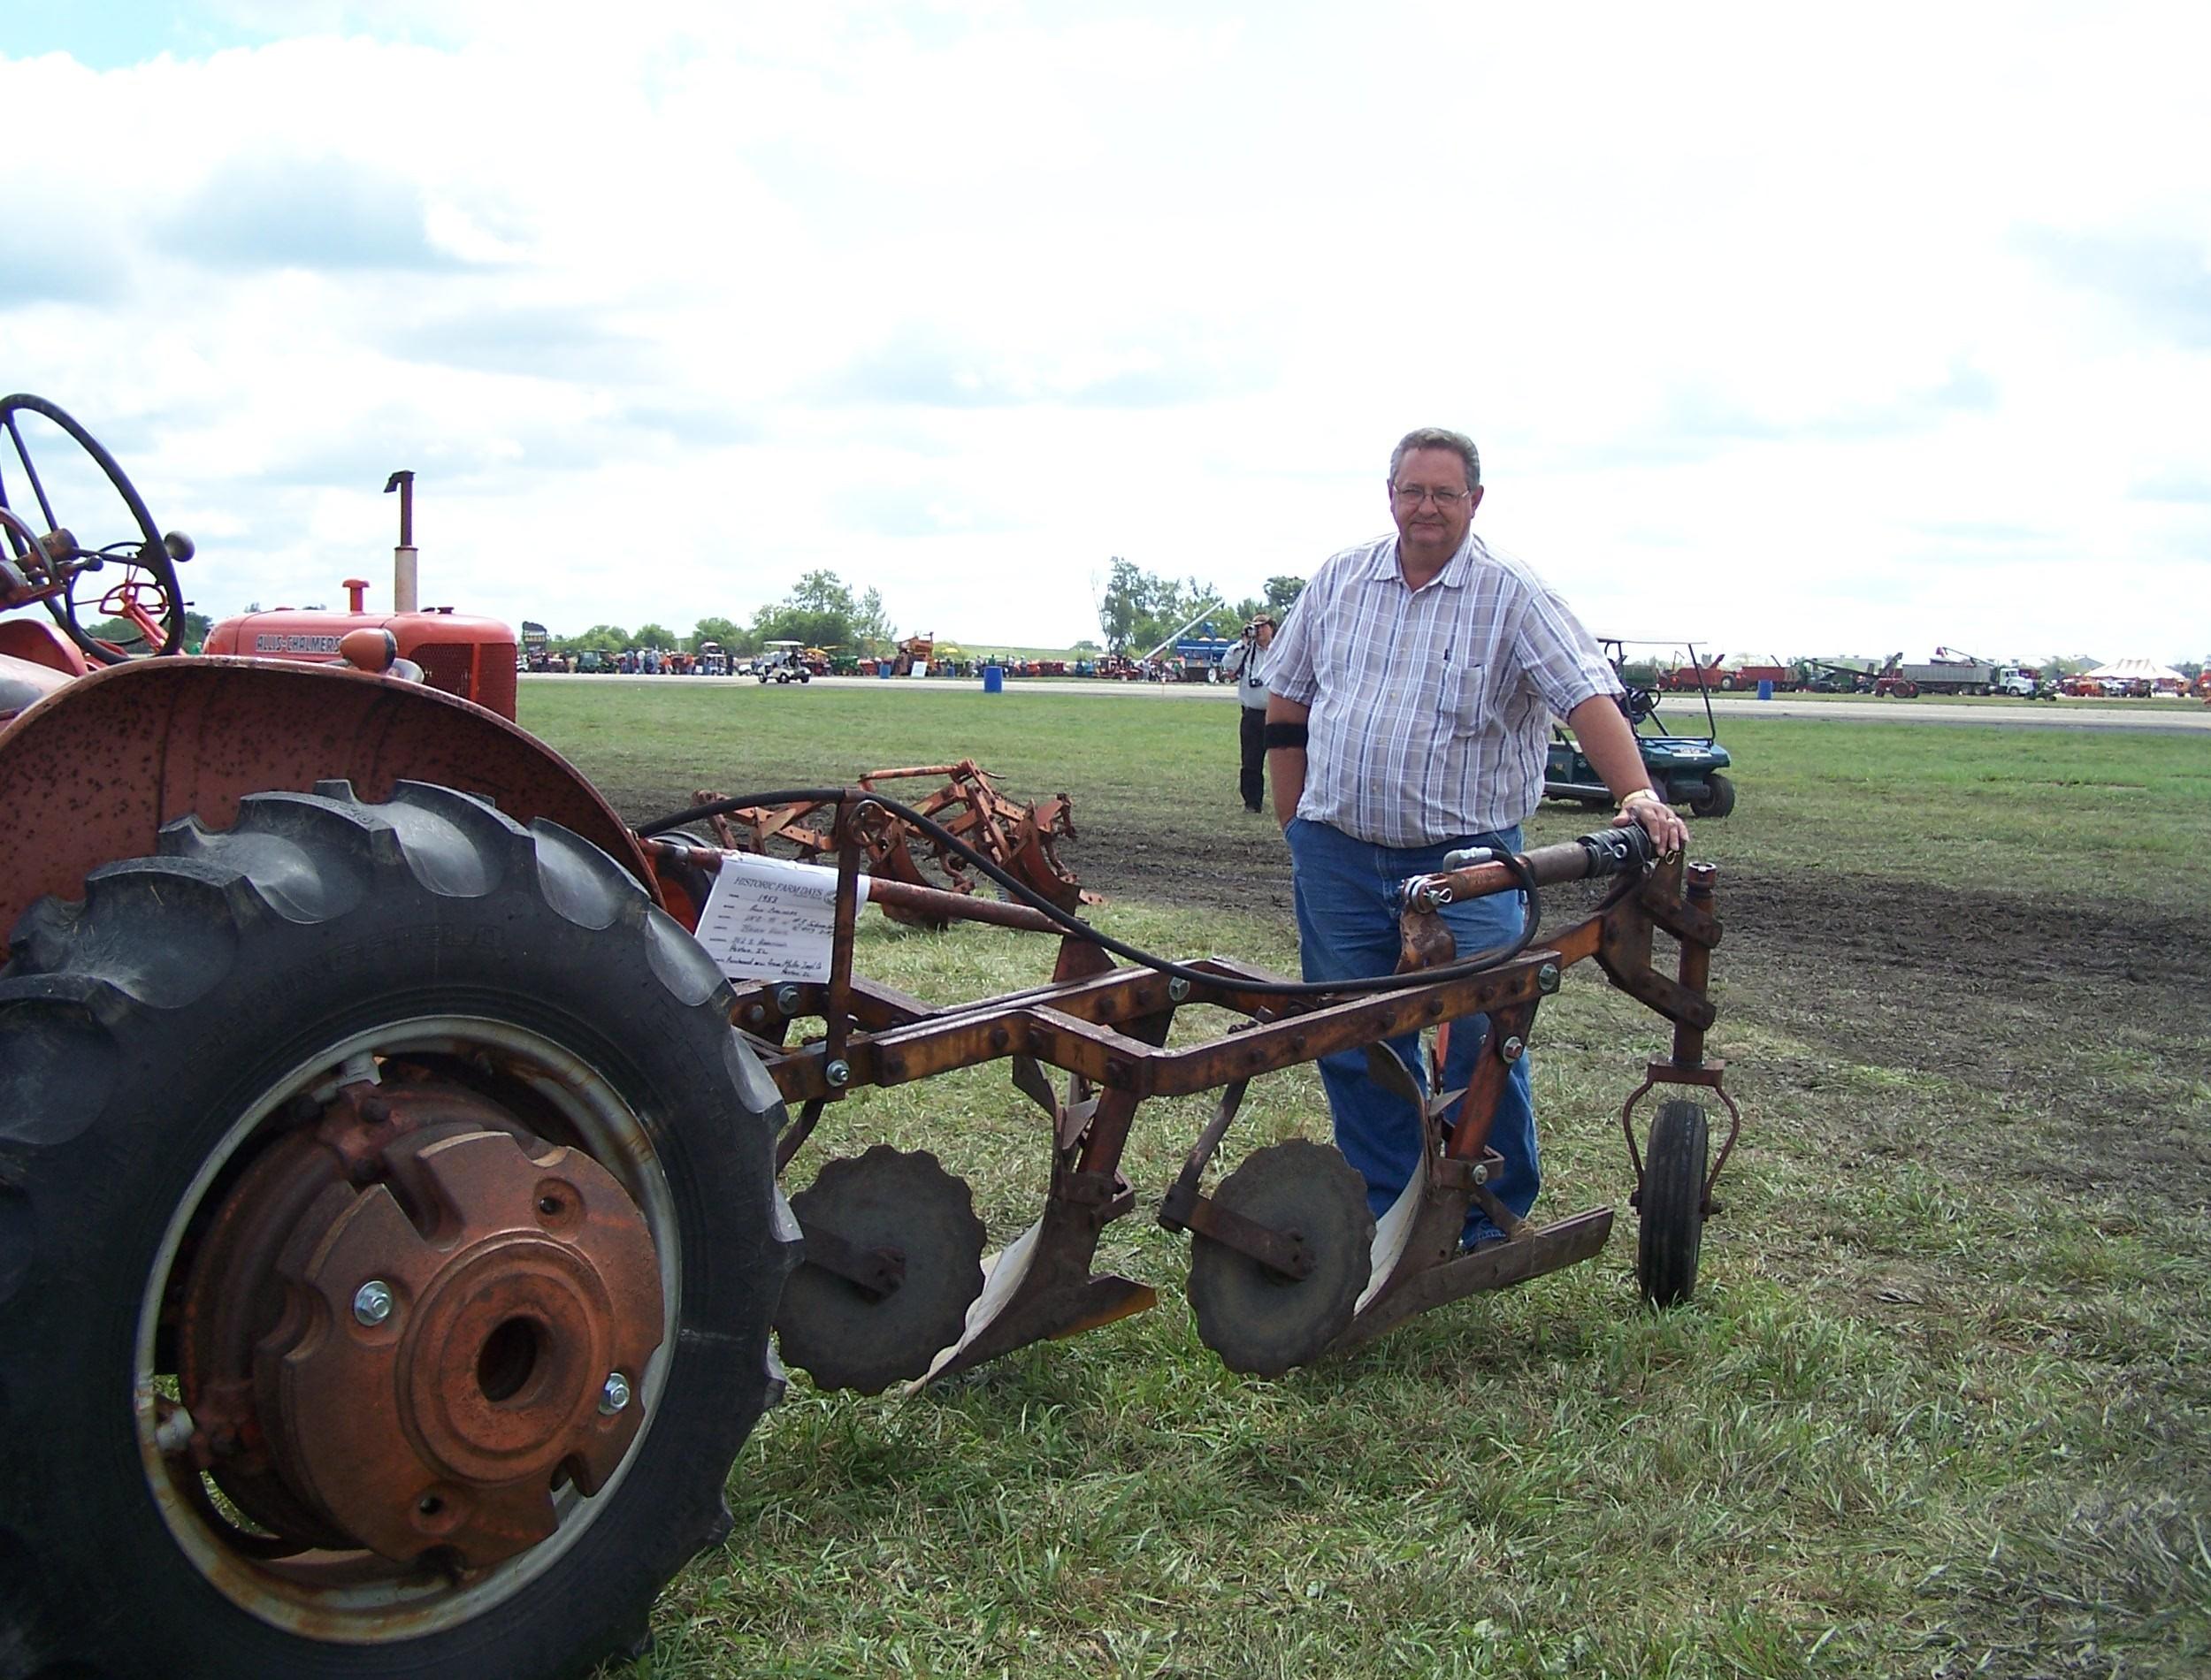
Look at a pic of one of my 53's it's sitting level front to back and side to side.
level the plow up first, then adjust the pull bar set screws #20 (on page 10 FIG #10 of your #53 plow book) It looks like rear of the plow is runnig off to left side, so adjust set screw out 1/2 turn and then turn the right set screw in 1/2 turn.
Please take the PTO shaft out before it gets bent, set the wheels all the way in to get your 56" setting if you have 12" or 14" bottoms on the plow
(the 61" setting is for a #53 with 16" bottoms)
set your Hdyraulic system to draw bar control like on page #4 of your plow book
Get the plow running level and strate behind the tractor and then do the fine settings on depth.
Here's how the plow needs to look running in ground. Don
|
|
3 WD45's with power steering,G,D15 fork lift,D19, W-Speed Patrol, "A" Gleaner with a 330 corn head,"66" combine,roto-baler, and lots of Snap Coupler implements to make them work for their keep.
|
|