| Author |
 Topic Search Topic Search  Topic Options Topic Options
|
ac55tractor 
Silver Level

Joined: 20 Oct 2012
Location: Raymond, Maine
Points: 240
|
 Post Options Post Options
") Thanks(0) Thanks(0)
 Quote Quote  Reply Reply
 Posted: 15 Jan 2022 at 4:31pm Posted: 15 Jan 2022 at 4:31pm |
Thanks Brian I am lapping the lifters on a sheet of 220 grit, then to 400 grit, with penetrating oil against a flat plate. I plan on using Permatex Ultra Slick Engine Assembly Lube. I have been wondering about what to use for break in oil in the crank case at start up. Any suggestions, would be appreciated. Thanks again Steve (inME.)
|
 |
|
Sponsored Links
|
|
|
ac55tractor
Silver Level
Joined: 20 Oct 2012
Location: Raymond, Maine
Points: 240
|
Post Options
Thanks(0)
Quote Reply
Posted: 18 Jan 2022 at 6:49pm |
|
|
|
ac55tractor
Silver Level
Joined: 20 Oct 2012
Location: Raymond, Maine
Points: 240
|
Post Options
Thanks(0)
Quote Reply
Posted: 18 Jan 2022 at 6:49pm |
|
|
|
ac55tractor
Silver Level
Joined: 20 Oct 2012
Location: Raymond, Maine
Points: 240
|
Post Options
Thanks(0)
Quote Reply
Posted: 18 Jan 2022 at 6:50pm |
|
|
|
ac55tractor
Silver Level
Joined: 20 Oct 2012
Location: Raymond, Maine
Points: 240
|
Post Options
Thanks(0)
Quote Reply
Posted: 18 Jan 2022 at 6:55pm |
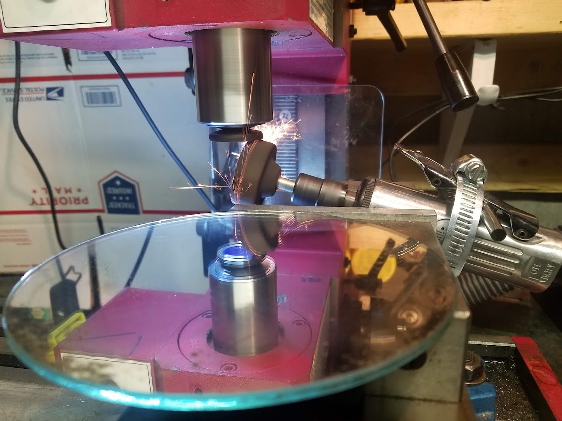
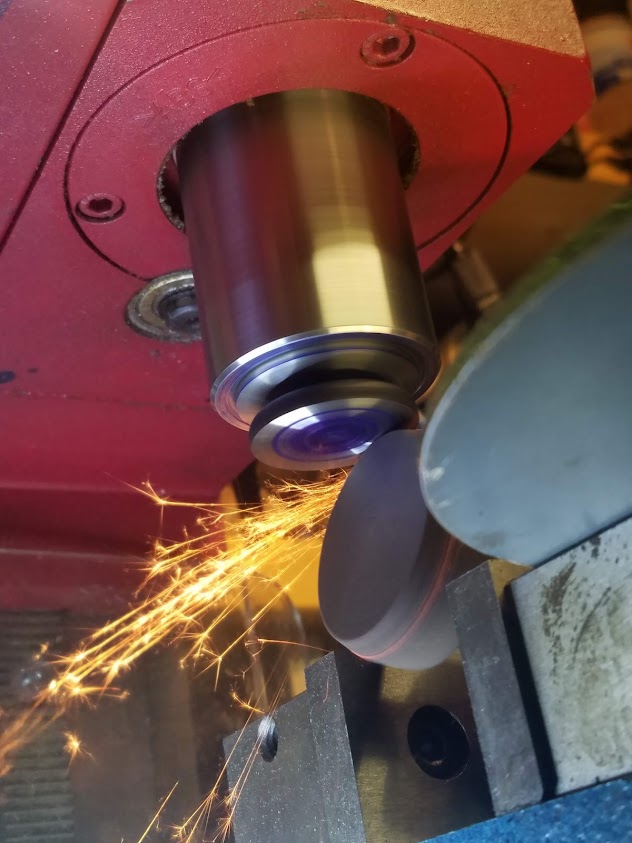
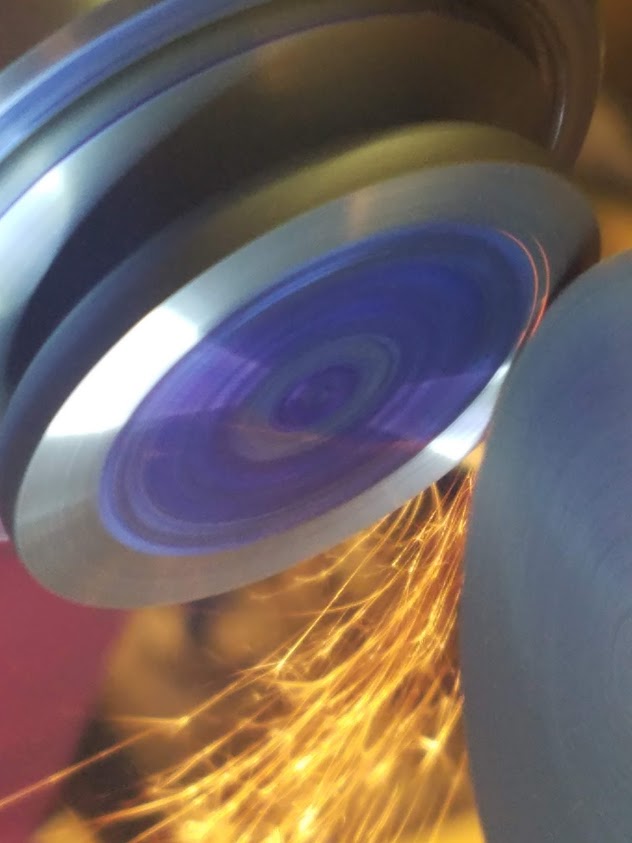
8 more horsepower Steve? I don't think so.
I did have to remove almost 1/32 to get this one to clean. Some of the others weren't so bad.
|
|
BrianC
Orange Level Access

Joined: 16 Jun 2011
Location: New York
Points: 1619
|
Post Options
Thanks(0)
Quote Reply
Posted: 18 Jan 2022 at 8:19pm |
I used to have a tool post grinder for my lathe. Someone walked away with it. Step by step, keep it up.
|
|
SteveM C/IL
Orange Level Access
Joined: 12 Sep 2009
Location: Shelbyville IL
Points: 8681
|
Post Options
Thanks(0)
Quote Reply
Posted: 18 Jan 2022 at 9:33pm |
|
If they were hard faced to begin with,that is long gone on that one so even a soft face in good shape should be better on the cam.
|
|
ac55tractor
Silver Level
Joined: 20 Oct 2012
Location: Raymond, Maine
Points: 240
|
Post Options
Thanks(0)
Quote Reply
Posted: 18 Jan 2022 at 10:26pm |
Thanks Brian, Man that's too bad. A tool post grinder can be really handy with machining hardened parts on a lathe.
I used to work in an electric motor repair shop. BIG electric motors for the paper mills.
|
|
ac55tractor
Silver Level
Joined: 20 Oct 2012
Location: Raymond, Maine
Points: 240
|
Post Options
Thanks(0)
Quote Reply
Posted: 18 Jan 2022 at 10:26pm |
That is a good point Steve. I would like to think that they are hardened throughout.
If
it is hard faced, you are right, it wouldn't be like the others. I
watched for the spark to change color, it stayed the same. I know that
doesn't mean much, but what is there should still hard.
How deep the hardness goes in these parts? That's beyond me.
I appreciate the input.
Steve
|
|
ac55tractor
Silver Level
Joined: 20 Oct 2012
Location: Raymond, Maine
Points: 240
|
Post Options
Thanks(0)
Quote Reply
Posted: 18 Jan 2022 at 11:02pm |
For a little bit of clarity. For those who might not know, that is a tool post grinder that I am standing next to.
Steve (inME)
|
|
BrianC
Orange Level Access
Joined: 16 Jun 2011
Location: New York
Points: 1619
|
Post Options
Thanks(0)
Quote Reply
Posted: 19 Jan 2022 at 7:59am |
You could do a hardness test in the area where the lobe don't touch. A comparative test vs. another lifter that only needed touch up. Maybe find another lifter in better shape.
|
|
ac55tractor
Silver Level
Joined: 20 Oct 2012
Location: Raymond, Maine
Points: 240
|
Post Options
Thanks(0)
Quote Reply
Posted: 19 Jan 2022 at 8:52am |
If you go back to page 3, you will see a post from
wjohn. There is a link there to another post. In that other post it says,
") Jacob (WI,ND) wrote: Jacob (WI,ND) wrote:
There are a lot of variables, but I'll give you my two cents from my experience. On
my 20-35 rebuild, we originally used the original worn cam, with
resurfaced lifters. That is what people told us we should do, and we
didn't know any better, so we did just that. That was NOT the thing to do! After
minimal running we pulled the engine side covers to inspect, to find
the edges of several of the lifters chipped up and you can guess where
those chips go. Long story short, we SHOULD have had the cam
ground as well as the lifters. The old funny worn cam was putting
pressure on the edges of the new lifters and making them fail. Maybe it
was a fluke, but I don't think so. Tore the engine all back down to have the cam ground, and new lifters AGAIN. Clean out entire engine. Very frustrating. Take
the time and $ and have both reground. It really doesn't cost that
much compared to fixing the carnage when something goes wrong. Now you
know how I know. |
In my opinion, the lifters are made from an "oil hard" tool steel.
Don't get
confused with the word "oil hard" that's just a process they use to heat
treat.
If they were hard faced or "case hardened" his lifters would not have chipped up and broke into pieces.
|
|
ac55tractor
Silver Level
Joined: 20 Oct 2012
Location: Raymond, Maine
Points: 240
|
Post Options
Thanks(0)
Quote Reply
Posted: 19 Jan 2022 at 11:30am |
I just got a replacement lifter from eBay. After thinking about what Brian said, replacing the#8 lifter is the way to go. Taking the chance, after all that work, I'm sure that you will all agree that's not a good idea. I chose one that looked as if it didn't have very much wear.
No doubt, I would have been lost without the forum.
Steve (inME)
|
|
IBWD MIke
Orange Level

Joined: 08 Apr 2012
Location: Newton Ia.
Points: 4136
|
Post Options
Thanks(0)
Quote Reply
Posted: 19 Jan 2022 at 11:46am |
|
It would be interesting to know exactly what steel they are made of. Lots of oil-hard types out there.
|
|
ac55tractor
Silver Level
Joined: 20 Oct 2012
Location: Raymond, Maine
Points: 240
|
Post Options
Thanks(0)
Quote Reply
Posted: 19 Jan 2022 at 11:50am |
|
Yea, it would, I also was concerned that after removing 1/32 of of the face of that lifter, there may not be very much adjustment left at the rocker arm.
|
|
IBWD MIke
Orange Level
Joined: 08 Apr 2012
Location: Newton Ia.
Points: 4136
|
Post Options
Thanks(0)
Quote Reply
Posted: 19 Jan 2022 at 11:57am |
I doubt if you will have trouble with running out of adjustment.
FWIW, pretty sure AGCO still sells new ones, not that expensive as I remember. having said that, the ones I bought for a 45 project were pretty rough on the bottom so I stayed with the used ones. They could probably be lapped to make them smoother. Maybe wouldn't have hurt anything and I was just anal about it.
|
|
ac55tractor
Silver Level
Joined: 20 Oct 2012
Location: Raymond, Maine
Points: 240
|
Post Options
Thanks(0)
Quote Reply
Posted: 19 Jan 2022 at 4:19pm |
I found new lifters roughly $28.00 each.
|
|
IBWD MIke
Orange Level
Joined: 08 Apr 2012
Location: Newton Ia.
Points: 4136
|
Post Options
Thanks(0)
Quote Reply
Posted: 19 Jan 2022 at 5:29pm |
ac55tractor wrote:
I found new lifters roughly $28.00 each.
I don't remember how much I paid but no where near that much! Wow, my butt cheeks would still be puckered just from hearing the asking price! I should still have a set around here somewhere. For a WD or 45, wouldn't be surprised if they are the same as B,C,&CA's. AC was very good about parts commonality.
|
|
|
ac55tractor
Silver Level
Joined: 20 Oct 2012
Location: Raymond, Maine
Points: 240
|
Post Options
Thanks(0)
Quote Reply
Posted: 19 Jan 2022 at 5:35pm |
Here are the dimensions for the lifter that I have.
The shaft diameter is 9/16. Overall height is 2 inches. The lifter face is 5/8 diameter.
|
|
ac55tractor
Silver Level
Joined: 20 Oct 2012
Location: Raymond, Maine
Points: 240
|
Post Options
Thanks(0)
Quote Reply
Posted: 20 Jan 2022 at 12:20pm |
|
"TYPO" the diameter of the face is 1 1/8
|
|
wjohn
Orange Level

Joined: 19 Jan 2010
Location: KS
Points: 2263
|
Post Options
Thanks(0)
Quote Reply
Posted: 21 Jan 2022 at 12:56pm |
The WC/WD/WD-45 lifters were something like $50/ea. last time I had checked a year or so ago, which is why I ended up resurfacing all of mine. Hard to drop $400 just on the lifters. Sounds like the B/C/CA are at least slightly more affordable.
I do think the only risk is the hardness. I'm not too worried about it but it would be great if there were a way to verify that they weren't case hardened to a minimal depth that we may be grinding through. To be fair, Jacob's unit is a much older and different engine design than the B/C/CA or WC/WD/WD-45 so his mention of chipping may or may not apply to our lifters.
We have certainly derailed from the original topic of connecting rod rework and I'll take some blame for that. Hopefully you don't mind ac55tractor!
|
|
1939 B, 1940 B, 1941 WC, 1951 WD, 1952 CA, 1956 WD-45
|
|
ac55tractor
Silver Level
Joined: 20 Oct 2012
Location: Raymond, Maine
Points: 240
|
Post Options
Thanks(0)
Quote Reply
Posted: 21 Jan 2022 at 2:03pm |
I'm with you wjohn, I'm not too worried about it ether.
I have done a lot of heat treating and annealing. Whether it was done in a heat treat oven or with a torch and a temperature stick. I'm sure that most of you know if you take a hand file to a spot that won't be damaged and if the file slides off of the part without a scratch, chances are it's hard.
The point that I want to make is that "if" the lifters were case hardened, due to the Kasinite powder that the parts are "soaked" in, while they are heated, once cooled, you will see in the places that were not finish ground, a spotted finish from where the carbon has flaked off from being cooled quickly in the water bath.
I would bet that the lifters are made from oil hard tool steel, no doubt grade "O1", that has been in use since 1905. They were no doubt heated with an induction coil, and dropped into an oil bath and hardened throughout. Take it or leave it, but in my honest opinion, any other way is really not an economical way to produce hundreds of lifters.
As far as going off topic. I really wasn't clear about the proper website etiquette.
Not a joke. If I was supposed to start another post, I didn't know. I have more pictures to add. Someone please advise. Thanks
Steve (inME)
|
|
wjohn
Orange Level
Joined: 19 Jan 2010
Location: KS
Points: 2263
|
Post Options
Thanks(0)
Quote Reply
Posted: 21 Jan 2022 at 6:11pm |
ac55tractor wrote:
As far as going off topic. I really wasn't clear about the proper website etiquette. Not a joke. If I was supposed to start another post, I didn't know. I have more pictures to add. Someone please advise. Thanks
Steve (inME) |
Generally, you start a topic/thread on a subject (connecting rods, in this case) and that is what you try to keep it focused on. However... I don't think anyone cares if you sidetrack/derail your own thread, only if you try to do that on someone else's thread. So, in my humble opinion I'd say you're good. It's your thread and you can take it down whatever turns you want.
Some of us make multiple page long threads that cover an entire engine or tractor rebuild from start to finish and keep most questions/pictures/random items posted in there - sort of a general thread, like on my unfinished WD rebuild. However, you'll usually get more and better answers when you start individual threads about specific things - short and focused.
|
|
1939 B, 1940 B, 1941 WC, 1951 WD, 1952 CA, 1956 WD-45
|
|
steve(ill)
Orange Level Access

Joined: 11 Sep 2009
Location: illinois
Points: 88584
|
Post Options
Thanks(0)
Quote Reply
Posted: 21 Jan 2022 at 6:18pm |
For an " on going" motor inspection/ overhaul, i would leave everything together... Now when you start assembly , if you have problems, you might start a different thread.
I would agree with your "heat treated" analysis... I think you are trying to OVER THINK this.. Resurfacing your followers is normally a good idea and works out great.
|
|
Like them all, but love the "B"s.
|
|
ac55tractor
Silver Level
Joined: 20 Oct 2012
Location: Raymond, Maine
Points: 240
|
Post Options
Thanks(0)
Quote Reply
Posted: 21 Jan 2022 at 6:36pm |
|
|
|
ac55tractor
Silver Level
Joined: 20 Oct 2012
Location: Raymond, Maine
Points: 240
|
Post Options
Thanks(0)
Quote Reply
Posted: 21 Jan 2022 at 9:04pm |
I started assembly today.
I cleaned everything in and around where
the cylinder sleeves go into the block. I coated the O ring area on the
sleeves with Dawn dish liquid. I installed the O rings onto the sleeves.
I added a little more dish liquid to the O rings. They pressed in by hand
with a faint click, right into place. I measured the height. They measure .002 - .004 out of the block.
I moved onto the crankshaft. After I did the
math. I realized that I didn't have to modify anything. I
used the same shims that were there at disassembly, bolted the caps down just snug to
set the bearings into place, and then released the caps. I set the crankshaft into the block bearings, I set a piece of
Plastigage on each journal, and this was the similar result on all of the caps. 
|
|
ac55tractor
Silver Level
Joined: 20 Oct 2012
Location: Raymond, Maine
Points: 240
|
Post Options
Thanks(0)
Quote Reply
Posted: 10 Mar 2022 at 8:28am |
Due to an illness, I have had to put my engine rebuild aside for now. I really have not felt well since the beginning of the year. They found a tumor the size of a tangerine in my abdomen and they have to take my Gaul bladder. I feel that I really had no business posting here at the forum in all that time. I think that it started with the typos that I made. I also feel that I have had no patience, and that I have been insensitive to others.
For that I am sorry.
I have to clear somethings up so others that are following this post won't make the same mistakes that I did.
Lapping the bearings to height in the caps and rods on emery cloth was a mistake for me. I guess I did not hold them flat. I hit the parting lines of the caps and rods and they came out crooked. I know that on page 20 of the I&T manual it calls it out as a way to go. If you choose to go that way. Just be careful, or hand file them.
The other thing that I need to clear up is, when I cut the bores on the milling machine / rotary table. I only hand tightened the caps to the rods. I should have torqued them to 35lbs. first. After releasing the caps and set the bearings in, they did not hold the size that I cut. I ended up re qualifying the parting lines that I lapped crooked, and re cutting the bores. I was just not feeling well. I was not focusing on the machine, I did not lock the machine table and I cut one rod bore oversize . So, I have walked away from the rebuild until I am feeling better.
Best to you all.
Steve (inME)
|
|
steve(ill)
Orange Level Access
Joined: 11 Sep 2009
Location: illinois
Points: 88584
|
Post Options
Thanks(0)
Quote Reply
Posted: 10 Mar 2022 at 8:39am |
Sorry to hear about your illness. Hope everything works out...... I would not worry one bit about the past discussions and anything that was said. Everyone makes mistakes, thats how we learn. We all get a little testy when we dont agree on something. There are a dozen ways to do many things. That dont make one of the wrong, just different..
Good luck..
|
|
Like them all, but love the "B"s.
|
|
plummerscarin
Orange Level Access
Joined: 22 Jun 2015
Location: ia
Points: 3983
|
Post Options
Thanks(0)
Quote Reply
Posted: 10 Mar 2022 at 1:31pm |
|
Has been an interesting read.
Hope you get to feeling better
|
|
ac55tractor
Silver Level
Joined: 20 Oct 2012
Location: Raymond, Maine
Points: 240
|
Post Options
Thanks(0)
Quote Reply
Posted: 10 Mar 2022 at 1:45pm |
Thanks I try to do a little bit every day. Today I am cleaning parts with a brush and some dish liquid in a plastic storage bin. Getting ready to sand blast some parts in the booth. I have to stay away from the milling machine until I have a clear head and can focus on the job at hand. It's for my own good really. Lets say my better half is keeping an eye on me. You know what I mean? It's all good. I will drop in with my progress when I can.
Steve (inMe)
|
|