| Author |
 Topic Search Topic Search  Topic Options Topic Options
|
theropod 
Orange Level


Joined: 28 Sep 2017
Location: Arkansas USA
Points: 217
|
 Post Options Post Options
") Thanks(0) Thanks(0)
 Quote Quote  Reply Reply
 Posted: 06 Oct 2017 at 7:22pm Posted: 06 Oct 2017 at 7:22pm |
Saving that to the hard drive! Thanks a bunch Gerald!
Today I finished up the electrolysis on the tank and I think I am done. The inside of the tank is flat black everywhere! Video will soon be posted, but I ran out of daylight today. Near the end the amp meter went up and the anodes stopped growing gunk. After reading everything I can find that black stuff is magnetite and is asbout as inert as can be. The notion of copper plating the inside was just that, and after looking into it far more trouble than it's worth. With a couple hours of sunlight to dry the tank out tomorrow as coating of diesel will follow. Apparently the tumbling of the tank helped remove all the surface rust as the water/electrolyte was just dingy when I drained it (saved to be used again). Neither did my efforts produce that mound of floating scum. Only flakes and pieces circulated around as the electrolysis was churning away.
The carb rebuild kit came in the mail and I almost have that ready to go back together. A little rust lives in the dark passages here and there, and that needs to go before reassembly. I am thinking of naval jelly for that as I can brush it where it needs to go and not eat up the brass jets that are welded in place. If I could get new jets I would drill out the old ones, but those seem to be unavailable.
By this time next week the old AC should be startable again! Then I can concentrate on wheels and tires so it actually rolls.
Roger
|
 |
|
Sponsored Links
|
|
|
Sugarmaker
Orange Level

Joined: 12 Jul 2013
Location: Albion PA
Points: 8661
|
Post Options
Thanks(1)
Quote Reply
Posted: 07 Oct 2017 at 11:10pm |
|
Roger,
Good work on the tank.
Once you get it started and back on its feet it will be a big accomplishment!
regards,
Chris
|
|
D17 1958 (NFE), WD45 1954 (NFE), WD 1952 (NFE), WD 1950 (WFE), Allis F-40 forklift, Allis CA, Allis D14, Ford Jubilee, Many IH Cub Cadets, 32 Ford Dump, 65 Comet, 66 F100.
|
|
theropod
Orange Level
Joined: 28 Sep 2017
Location: Arkansas USA
Points: 217
|
Post Options
Thanks(0)
Quote Reply
Posted: 08 Oct 2017 at 10:51am |
The gas tank electrolysis process is done and the link below documents the way I did it. I must say this worked out much better than I imagined. I did put a couple hundred steel BB's in and a drop or two of Dawn dishwashing detergent and give it a good shaking. This removed the excess magnetite and left the steel pretty darn clean. One final rinse with hot water left the tank in great shape. I feel the tumbling I did prior to starting the electrolysis helped a great deal by getting rid of the loose rust, and sped up the process. So far no flash rust has reformed, but a wetting down with diesel will stiffle that. All in all I estimate the process took about 16 hours. Now I am planning a big vat to accept fenders and other large parts. Electrolysis just works!
Roger
|
|
Chalmersbob
Orange Level
Joined: 11 Sep 2009
Location: Pennsylvania
Points: 2122
|
Post Options
Thanks(1)
Quote Reply
Posted: 08 Oct 2017 at 12:12pm |
|
Looks like you are doing a great job.
I use a 3/8" nipple and a cap to plug the hole in the bottom of the gas tank before I pour in the tank coating. This allows you to remove the cap to drain the remaining coating without messing up the threads in the tank.
I used a plug 1 time and had to clean the threads to get the valve back in. Bob
|
|
4 B's, 1 C's,3 CA's, 2 G's WD, D14, D15, B-1, B10, B12, 712S,
|
|
theropod
Orange Level
Joined: 28 Sep 2017
Location: Arkansas USA
Points: 217
|
Post Options
Thanks(0)
Quote Reply
Posted: 08 Oct 2017 at 1:10pm |
 Chalmersbob wrote: Chalmersbob wrote:
Looks like you are doing a great job.
I use a 3/8" nipple and a cap to plug the hole in the bottom of the gas tank before I pour in the tank coating. This allows you to remove the cap to drain the remaining coating without messing up the threads in the tank.
I used a plug 1 time and had to clean the threads to get the valve back in. Bob |
I am not sure I will use a tank coating. I think killing the rust was enough as some of the zinc galvanized surface showed up after I was done. Seasoning the tank with diesel and letting the sun cook the metal should/will end it once and for all. If not I can drain the tank and apply the coating later. My goal for this fall is to get the old tractor running and rolling. Our rainy season will soon start and I want to be able to move it to a protected space before those rains start. If the rolling running condition is reached I can then keep the tank full of real gasoline (100%) and rust shouldn't be an issue.
Roger
|
|
theropod
Orange Level
Joined: 28 Sep 2017
Location: Arkansas USA
Points: 217
|
Post Options
Thanks(0)
Quote Reply
Posted: 11 Oct 2017 at 6:05pm |
Just to see if it would I spent a couple hours try to get my B to run today. No joy. All it will do is pop now and then. This tractor has an automotive 12 volt coil with a resistor and uses a battery instead of relying on the magneto. In a testing mode I yanked the #1 plug and put the spark plug ignition lead on the coil high voltage plugin, and then opened and closed the points with a screw driver. The spark was yellowish white and is barely audible. I bypassed the resistor and the spark quality barely changed if it did. I know the battery I used is fully charged. In my experience that spark should be bright blue and crack like a little lightening bolt. So my next step is to measure the resistance in the primary and secondary windings of the coil, which I suspect is weak. If the coil passes the resistance testing the old condenser may be leaky. I am seriously considering either rebuilding the magneto myself or buying a rebuilt unit. I could then eliminate the coil, resistor and battery. If I retain the current setup I will need to hang an alternator, add a keyed switch (it has a single pole single throw alternating current house light switch now) and supply the tractor with its own battery. For a tractor without a starter this seems far more trouble than its worth. A magneto should be more reliable anyway.
In a semi related matter I finished rebuilding the Zeinth carb after giving it a short electrolysis session (obviously now reattached to the tractor). While making sure all the passages were open I discovered the bore in the float bowl segment that connects to the main jet adjustment on the bottom of the carb, and the main nozzle, was plugged solid. So solid in fact I had to use a drill bit and apply serious pressure with my drill to clear it. Luckily I had the exact right size bit for this task, and no damage was done to the carb itself. Some seriously hard black gunk stuck to the flutes! This inspired me to double check all the other passages and the carb is now as clean as a whistle. I add this to inform you readers that the carb isn't likely the problem with the no start condition. I pulled the #1 plug, after an especially long cranking session, and the cylinder definitely had gas fumes inside, but the plug wasn't wet.
Just thought I would share these efforts both to document my struggles and seek opinions about my obstacles. Thanks all.
Roger
Edit to add: Just did a quick resistance test on the coil, and the primary reads 1.2 kilohms, and the secondary reads 1750 ohms. So apparently that coil has died, or is very close.
Edited by theropod - 11 Oct 2017 at 7:18pm
|
|
Sugarmaker
Orange Level
Joined: 12 Jul 2013
Location: Albion PA
Points: 8661
|
Post Options
Thanks(1)
Quote Reply
Posted: 11 Oct 2017 at 7:24pm |
|
Roger,
Gas, spark, and compression. It should run. Maybe not god but should run.
Your almost there!
Glad the Electrolysis process is working for you. It has cleaned hundreds of parts for me. Including smalls and big items like hoods and fenders too.
Regards,
Chris
|
|
D17 1958 (NFE), WD45 1954 (NFE), WD 1952 (NFE), WD 1950 (WFE), Allis F-40 forklift, Allis CA, Allis D14, Ford Jubilee, Many IH Cub Cadets, 32 Ford Dump, 65 Comet, 66 F100.
|
|
Ken in Texas
Orange Level
Joined: 11 Sep 2009
Location: Henderson, TX
Points: 5919
|
Post Options
Thanks(1)
Quote Reply
Posted: 11 Oct 2017 at 8:02pm |
Theropod Close to the beginning of this thread you had a Question on using 4 loop replacement rear rims. Bear this in mind. 4 loop rims are Farmall Type. Your bolts if vintage 1938 are 3/4 inch. 2 plain and 2 eccentric. The wheel centers if 1938 have 4- 3/4 holes close to the edge. Bolt the 4 loop rims to the wheel centers with plain 3/4 bolts of the appropriate length Like a Farmall does. Sometime in mid or late 1939 a new and final rim to wheel attachment using 4 bump rims with 5/8 bolts. 2 plain and 2 eccentric became standard. I can't tell from your pics if your 38 has been converted to the latest 5/8 bolt design. a full conversion would consist of wheel centers with 5/8 bolt holes and all the latest lock blocks and 4 bump rims.
Edited by Ken in Texas - 11 Oct 2017 at 8:08pm
|
|
steve(ill)
Orange Level Access

Joined: 11 Sep 2009
Location: illinois
Points: 90826
|
Post Options
Thanks(1)
Quote Reply
Posted: 11 Oct 2017 at 8:32pm |
Just to see if it would I spent a couple hours try to get my B to run today. No joy. All it will do is pop now and then. This tractor has an automotive 12 volt coil with a resistor and uses a battery instead of relying on the magneto. That is a cobbled up mess as you said. Your further ahead to buy a $50. coil for the mag and install that. Do the condenser and point while you are in it. That should FIX it forever.
|
|
Like them all, but love the "B"s.
|
|
theropod
Orange Level
Joined: 28 Sep 2017
Location: Arkansas USA
Points: 217
|
Post Options
Thanks(0)
Quote Reply
Posted: 11 Oct 2017 at 8:44pm |
Ken in Texas wrote:
Theropod Close to the beginning of this thread you had a Question on using 4 loop replacement rear rims. Bear this in mind. 4 loop rims are Farmall Type. Your bolts if vintage 1938 are 3/4 inch. 2 plain and 2 eccentric. The wheel centers if 1938 have 4- 3/4 holes close to the edge. Bolt the 4 loop rims to the wheel centers with plain 3/4 bolts of the appropriate length Like a Farmall does. Sometime in mid or late 1939 a new and final rim to wheel attachment using 4 bump rims with 5/8 bolts. 2 plain and 2 eccentric became standard. I can't tell from your pics if your 38 has been converted to the latest 5/8 bolt design. a full conversion would consist of wheel centers with 5/8 bolt holes and all the latest lock blocks and 4 bump rims.
|
I am not sure what it has now. I will look closely tomorrow and post what I discover with a better picture. Either way I am going to have to replace those rear rims.
Are you saying if I went with the loop rims I would have to replace the disc mounting plates (sorry for the ignorance of what thise are called) that have the big axel nut and the mounting bolts pass through?
|
|
theropod
Orange Level
Joined: 28 Sep 2017
Location: Arkansas USA
Points: 217
|
Post Options
Thanks(0)
Quote Reply
Posted: 11 Oct 2017 at 8:50pm |
steve(ill) wrote:
Just to see if it would I spent a couple hours try to get my B to run today. No joy. All it will do is pop now and then. This tractor has an automotive 12 volt coil with a resistor and uses a battery instead of relying on the magneto. That is a cobbled up mess as you said. Your further ahead to buy a $50. coil for the mag and install that. Do the condenser and point while you are in it. That should FIX it forever. |
I am leaning that direction. I was thinking of a complete rebuild though, as no telling what else is wrong inside there. I have found several sad "modifications" that need to be addressed. The air cleaner is not stock as the outlet "pipe" doesn't even come close to aligning with the carb. I don't even think it is a B part. Someone cobbled together pedals for the brakes, and the levers are still in place. The list goes on and on. I have a multi year project on my hands. I knew this going in, so...
|
|
Ken in Texas
Orange Level
Joined: 11 Sep 2009
Location: Henderson, TX
Points: 5919
|
Post Options
Thanks(0)
Quote Reply
Posted: 12 Oct 2017 at 6:13am |
No on replacing your rear wheels. Your heavy cast wheel centers will work with new 24 inch x 8 wide 4 loop rims. Finding the correct length plain bolts to replace the old, now useless, mounting bolts is all that you will need. If for some reason the previous owner updated the 1938 wheel centers with newer centers using 5/8 eccentrics the 4 loop rims will bolt up loose. I have several spare AC Donaldson oil bath air cleaners if you need one.
Edited by Ken in Texas - 12 Oct 2017 at 6:17am
|
|
theropod
Orange Level
Joined: 28 Sep 2017
Location: Arkansas USA
Points: 217
|
Post Options
Thanks(0)
Quote Reply
Posted: 12 Oct 2017 at 7:10am |
Ken in Texas wrote:
No on replacing your rear wheels. Your heavy cast wheel centers will work with new 24 inch x 8 wide 4 loop rims. Finding the correct length plain bolts to replace the old, now useless, mounting bolts is all that you will need. If for some reason the previous owner updated the 1938 wheel centers with newer centers using 5/8 eccentrics the 4 loop rims will bolt up loose. I have several spare AC Donaldson oil bath air cleaners if you need one.
|
I am fairly confident the cast wheel centers are stock, but I will check it and get a picture today (still well before daylight here). I will measure the existing bolts as well. They look like 3/4" to me. My Father-in-law apparently just used what he could to keep the old tractor rolling, and didn't see it as the jewel I do. My wife's grandpa bought the tractor new, and he gave it to my pop-in-law.
I may just buy one of those air cleaners from you, but I have a long, and growing, list of parts I need first. No more than I plan on running it until the other issues are addressed it should be OK. The manifold is rusted through in a couple places on the exhaust sides. Right now I just want to warm it up and drain the old oil and replace the filter. Getting it rolling will allow me to protect it over the winter, as I actually expected the wheels not to collapse. Running or not I have to get it back under a roof before our horrid rainy season begins, and wheels with tires have to happen soon.
|
|
theropod
Orange Level
Joined: 28 Sep 2017
Location: Arkansas USA
Points: 217
|
Post Options
Thanks(0)
Quote Reply
Posted: 12 Oct 2017 at 10:19am |
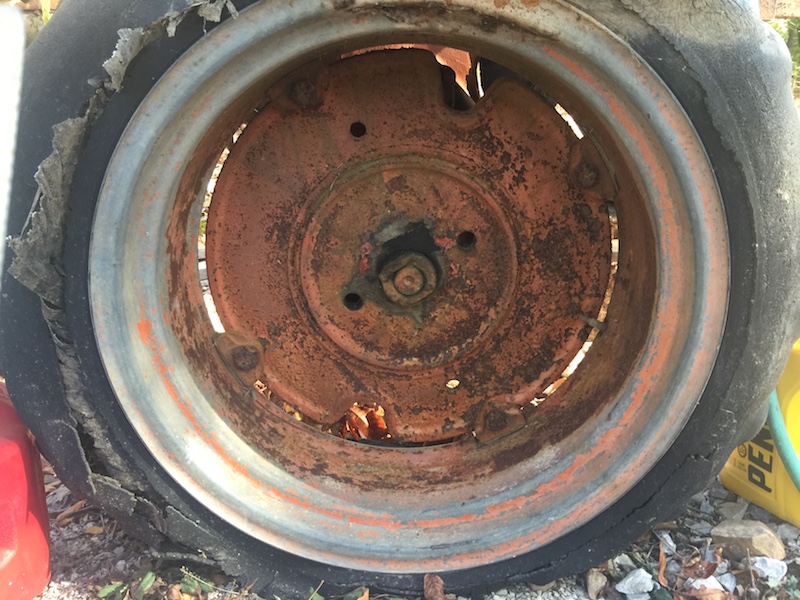 OK, here is the current rear wheel setup on the old B. As best as I can tell it has the 3/4" bolts. Note the shims under the clamps.
Edited by theropod - 12 Oct 2017 at 10:19am
|
|
Sugarmaker
Orange Level
Joined: 12 Jul 2013
Location: Albion PA
Points: 8661
|
Post Options
Thanks(1)
Quote Reply
Posted: 12 Oct 2017 at 4:56pm |
|
What I see of the rim it doesn't look too bad? Maybe the valve stem area at the top needs repairs?
Take your time this is a large project. Each step is a challenge. Pictures help us help you.
Regards,
Chris
|
|
D17 1958 (NFE), WD45 1954 (NFE), WD 1952 (NFE), WD 1950 (WFE), Allis F-40 forklift, Allis CA, Allis D14, Ford Jubilee, Many IH Cub Cadets, 32 Ford Dump, 65 Comet, 66 F100.
|
|
theropod
Orange Level
Joined: 28 Sep 2017
Location: Arkansas USA
Points: 217
|
Post Options
Thanks(0)
Quote Reply
Posted: 12 Oct 2017 at 8:08pm |
Sugarmaker wrote:
What I see of the rim it doesn't look too bad? Maybe the valve stem area at the top needs repairs?
Take your time this is a large project. Each step is a challenge. Pictures help us help you.
Regards,
Chris
|
No problem posting pictures. The tire/wheel on the other side from that picture, the on the right, rusted away until it fell off while attempting to move it. I want matching rims, and I can get a new set of the loop type with a bolt kits shipped to me for $300. The old rim in the electrolysis video has holes rusted in several spots, but may be saved. Then a set of tubes, tires and a liners would be my issue either way.
I was thinking today that I might be able to pick up the back end of the B with my Yanmar's 3 point hitch and move it where it can be kept mostly dry. I can then do more prep work, and maybe get the old rims patched up. It's not like I am going to pull logs with the antique. I need to give the old rim without a tire a shot with the electrolysis and see if the many small holes can be fixed, and get the rotten tire off the left hand rim to see how bad it really is.
Honestly the new rims are attractive just for the ease of it all. I suppose I best do the work and stop being lazy.
|
|
Ken in Texas
Orange Level
Joined: 11 Sep 2009
Location: Henderson, TX
Points: 5919
|
Post Options
Thanks(0)
Quote Reply
Posted: 12 Oct 2017 at 8:10pm |
The Wheel Centers are 1938 Vintage with 4 - 3/4 bolt holes. Pops shimmed the wheel clamps that use the 5/8 bolt to make up for the sloppy fit of a 5/8 bolt in a 3/4 hole. Ditch the rims and clamps and go with new or good used 4 loop rims with 3/4 bolts.
|
|
Ken in Texas
Orange Level
Joined: 11 Sep 2009
Location: Henderson, TX
Points: 5919
|
Post Options
Thanks(1)
Quote Reply
Posted: 12 Oct 2017 at 8:16pm |
|
??? How do I know the Wheels are 1938. The valve stem notches are half moon shape. Used in early 39s too. Later wheels had V shape notches when AC went to 5/8 bolt clamps
|
|
theropod
Orange Level
Joined: 28 Sep 2017
Location: Arkansas USA
Points: 217
|
Post Options
Thanks(0)
Quote Reply
Posted: 13 Oct 2017 at 6:51pm |
I think the magneto is going to get some new parts, and the coil/resister/battery crap is going away. I spent a couple hours going over everything and got the engine to run on it's own for about 5 seconds, and then it stalled. I think all the oil I have squirted in the spark plug holes over the last few years fouled the plugs and the carb seemed to flood out. It belched a good little cloud of blue smoke before stopping. The float seemed to be working as the drain plug would cause the level in the feed line to drop (tank not attached), but hold steady otherwise. The air from the cylinders smelled of gas when turned without the plugs.
I need to make sure the Fairbanks Morse mag model number is right before I dive in to ordering parts. After seeing some of the things done on this tractor it wouldn't surprise me if the mag is from a different model tractor. The idea of rebuilding the mag doesn't frighten me too much.
I would love to be able to pull the old beast to turn the engine over hard, which I am sure would do the trick. My old body gets to complaining after an hour or so of yanking on that crank, and it would be so much easier to just dump the clutch.
I sprayed the plugs down with carb cleaner and left the cylinders open to the air to try to dry them out, and will give it another go tomorrow. I just want to warm it up and get fresh oil in it.
This is why machines need to be run more often than every six years.
|
|
theropod
Orange Level
Joined: 28 Sep 2017
Location: Arkansas USA
Points: 217
|
Post Options
Thanks(0)
Quote Reply
Posted: 17 Oct 2017 at 2:49pm |
Frustrated!
I messed around some more to try to get the engine to fire off today, and it ran 3 different times for about 30-45 seconds. Each time the engine would run smooth and clean and then just shut down as if a key was switched off. The engine got warmed up enough to burn off the oil I have been squirting into the cylinders over the years, but wouldn't keep running. I still think the old carb is trashed. It's tough doing this by cranking that handle a hundred times! If I had a helper they could dribble gas into the throat of the carb and I could determine once and for all if it is a fuel supply issue. I don't think it is flooding out anymore, as after the last little bit of running I pulled the plugs and they are all dry as a bone. Thinking of shucking out the cash for a new carb. Yes, the float may be off, or it may be those jets I can't replace, or it may be this or that. I am sick of trying to figure out an worn out piece of junk carb far older than I am.
|
|
CrestonM
Orange Level
Joined: 08 Sep 2014
Location: Oklahoma
Points: 8479
|
Post Options
Thanks(0)
Quote Reply
Posted: 17 Oct 2017 at 3:39pm |
Before you throw in the towel, get a can of Berryman Chem-Dip carb cleaner. Take your carb apart and let everything soak in that overnight. My Super 100 combine was running like a sick dog this last July. Throttle up quick and the engine would stumble like it was falling down a flight of stairs, and sometimes it would die. It was bad. Smoked a ton, too. I just soaked it in that stuff and it ate everything off that carb and made it almost look new again. Just rinse everything off with water (per the instructions) and re-assemble. She purrs like a kitten now after that cleaning.
It really does sound like a fuel issue. A few years ago my 8N had probably 60 something years of crud in the gas tank, and I was mowing one day and it just sputtered and died. Wouldn't start. Poked around a bit trying to figure it out....wiring was good, had spark, but nothing. Waited a bit, then it fired right up and ran well. Back to mowing, then it died. Same thing...wouldn't start. I figured I had a restriction somewhere, so I gave it a minute, started it, and drove as far as I could toward the barn before it died. It was stop and go, but I eventually got there and cleaned everything out. The restriction was at the fuel bowl, so I flushed the tank, cleaned everything up, and it's ran like a champ ever since. I know that can be frustrating, but don't give up. If this 19 (Then 17) year old can do it, so can you! Just takes a little figuring out.
|
|
theropod
Orange Level
Joined: 28 Sep 2017
Location: Arkansas USA
Points: 217
|
Post Options
Thanks(0)
Quote Reply
Posted: 17 Oct 2017 at 5:09pm |
CrestonM,
I have had that carb apart and back together at least 10 times recently. There isn't enough gunk left in there to cover the head of a pin. I still think the two brass internal jets that are "welded" in place are the issue, and I cannot find replacements anywhere. I could drill them out and then use an easy out if I had replacements in hand. I will, however, follow your advice and get some of the soaking type carb cleaner.
What is killing me is the effort expended in cranking this thing. When I gave up trying today I was soaked in sweat, and it's pretty cool here. I was laid up all summer after breaking my ankle in early March, which the doctors waited 3.5 months to fix via surgery. This left me in the worst physical condition of my life. I am no where near back to fighting trim, and this is taking a toll. The ankle is all healed up now, but in my sedentary time I put on 20 pounds of blubber. It's coming off, but slowly. Being an old curmudgeon isn't helping. LOL
I am not giving up, but I am going to shift my focus to getting tires under the old beast. At least then can pull it with my Yanmar and get away from that dang crank handle. My wife is bring home a new 1/2" drive 1 3/16" socket so I can get the left rim off, and bolts from the collapsed right side. With both rims off I can make an assessment as to whether they can be repaired and put back into service. I have a feeling I can make them work. My pop-in-law had a spare rim, but it has issues too.
Sometimes it's hard not to get a little angry at my wifes dad for letting it get in this shape, but he saw it much differently than I do. To him it was just an old tractor that had paid for itself many times over. To me it is a piece of history that needs to be preserved. I'll get it back in shape, but I really want things to progess at a more brisk pace. I have never been overly patient, but the AC is teaching me how to be.
|
|
CrestonM
Orange Level
Joined: 08 Sep 2014
Location: Oklahoma
Points: 8479
|
Post Options
Thanks(1)
Quote Reply
Posted: 17 Oct 2017 at 5:30pm |
Sorry to hear about all that. Yeah, with those hand crankers I can see why you'd need to take it easy. You might give the chem-dip a try. If it works, great. If not, I have one more trick an old army guy taught me. He said when he was in the service, they'd take the carburetors off their engines and boil them hard in a pot of water for 2 hours straight. He said that would work magic, so I gave it a try on my 1951 Chevy carb. It was a mess as well, hard to start, and 11 times out of 10 it flooded when trying to start it. I boiled it and got good results, but I must warn you to only use good, soft water. Our well water is pretty hard (lots of calcium) and after boiling that thing, everything was covered in calcium deposits. Have to re-boil in some store bought water. That cleaned things up great, and it started great and ran much much better after that. Never touched a drop of carb cleaner. That's another option, if you want to try that, but I don't advise doing it in your house, as it gives off some pretty potent fumes dissolving gum and varnish.
If none of those work, you're right...you may be ahead to get a new carb, if your seats are that stuck in there.
As far as your father-in-law letting the tractor deteriorate....I know people like that. They used that equipment long ago, fighting it their whole lives day in and day out, trying to scrape together a living, and after that many years, could care less about it. I'm like you...just trying to preserve what we have left, especially family items.
|
|
theropod
Orange Level
Joined: 28 Sep 2017
Location: Arkansas USA
Points: 217
|
Post Options
Thanks(0)
Quote Reply
Posted: 17 Oct 2017 at 6:54pm |
Update:
Sigh. My loving wife brought home the 1 3/16" socket, and the bolts on the right side have 1 1/4" heads. My measurements didn't account for rounded off corners. The left side are 1 1/16" heads and I had both a box end wrench and 1/2" socket for those. So, there are two sizes of bolts, and as "Ken in Texas" mentioned earlier the left side bolts are 5/8" and the right side bolts are the correct 3/4". So now I have some decisions to make. I can either find the correct size new bolts for both sides and attempt to save my old rims, or order new rims and bolts. The good news is both rear rims are now off the tractor. I am still very very tempted to switch to the loop style rims and put this part of the job behind me. Concourse correct has never been my goal.
My next target is the front rims. Both are rusted, but not so bad as the rears. A session of electrolysis should put them right. I am going to have to come up with some sort of tank large enough to accept them, and a plastic 55 gallon drum, which I have several, just might work. If so I can use this tank for the fenders and other parts. Just about every part of the old monster is rusting.
This is the first antique machine of any kind I have actually tried to restore. I am comitted but I was really unprepared for the undertaking. It really doesn't help that the tractor was cobbled together just to keep it rolling. I understand it, but dang.
If I can't get the carb to act right I very well may try the boiling water trick. A couple gallons of distilled water should do the trick. At this point I have little to lose. We keep several gallons on hand for our off grid battery bank. (The secret to longevity in a flooded lead acid battery is keeping them charged, topped up with electrolyte and never allowed to rest discharged).
Anyway, I figured I should share these things with a community that knows exactly what I am facing, and the progress (if it can be called that) can generate valued advice.
Thanks y'all.
|
|
Sugarmaker
Orange Level
Joined: 12 Jul 2013
Location: Albion PA
Points: 8661
|
Post Options
Thanks(0)
Quote Reply
Posted: 17 Oct 2017 at 8:26pm |
Theropod, An example or two. Just about every part between the crank and the hole in the drawbar needed attention: You can do this!    Regards, Chris
|
|
D17 1958 (NFE), WD45 1954 (NFE), WD 1952 (NFE), WD 1950 (WFE), Allis F-40 forklift, Allis CA, Allis D14, Ford Jubilee, Many IH Cub Cadets, 32 Ford Dump, 65 Comet, 66 F100.
|
|
theropod
Orange Level
Joined: 28 Sep 2017
Location: Arkansas USA
Points: 217
|
Post Options
Thanks(0)
Quote Reply
Posted: 18 Oct 2017 at 7:56am |
Very nice Chris!
I just have accept it is what it is.
|
|
steve(ill)
Orange Level Access
Joined: 11 Sep 2009
Location: illinois
Points: 90826
|
Post Options
Thanks(0)
Quote Reply
Posted: 18 Oct 2017 at 12:12pm |
|
If the tractor starts and runs for 30 seconds, then dies, you are running out of gas IN THE BOWL... Maybe you suction tube in the gas tank is plugged, or the filter is plugged, or the line to the carb is plugged, or the float valve in the carb ( or elbow) is plugged.... you wait a few minutes and it fires up again for 30 seconds........... this normally means the bowlw will not refill fast enough ............... take the line off as it enters the carb and let it run into a bucket. Should get a cup full in a minute if all is OK.
|
|
Like them all, but love the "B"s.
|
|
theropod
Orange Level
Joined: 28 Sep 2017
Location: Arkansas USA
Points: 217
|
Post Options
Thanks(0)
Quote Reply
Posted: 18 Oct 2017 at 1:57pm |
steve(ill) wrote:
If the tractor starts and runs for 30 seconds, then dies, you are running out of gas IN THE BOWL... Maybe you suction tube in the gas tank is plugged, or the filter is plugged, or the line to the carb is plugged, or the float valve in the carb ( or elbow) is plugged.... you wait a few minutes and it fires up again for 30 seconds........... this normally means the bowlw will not refill fast enough ............... take the line off as it enters the carb and let it run into a bucket. Should get a cup full in a minute if all is OK. |
Yep, and I just did a similar test with the results you cite. I have a clear tube hooked to the inlet to the carb, and fill it with gas by dribbling gas into it. The tank isn’t mounted. It seems the float valve only works when it feels like it, and the carb is clean as a whistle. This leaves that needle valave as the culprit, and it is brand new!
I rechecked the float level and operation with the carb broken apart. Split apart the float valve works flawlessly. Apparently the float is touching the side of the bowl. Dang carbs, I see why they are obsolete. Looks like I will be taking the carb off for about the 50th time.
|
|
Sugarmaker
Orange Level
Joined: 12 Jul 2013
Location: Albion PA
Points: 8661
|
Post Options
Thanks(0)
Quote Reply
Posted: 18 Oct 2017 at 8:15pm |
theropod wrote:
Very nice Chris!
I just have accept it is what it is. Yep its a tractor that you can give some time dollars and attention too. it is also a family tractor that makes it special too. Hope your having fun with the restoration. On that carb I used a spray bottle with gas in it to keep a cranky tractor running. Regards, Chris
|
|
|
D17 1958 (NFE), WD45 1954 (NFE), WD 1952 (NFE), WD 1950 (WFE), Allis F-40 forklift, Allis CA, Allis D14, Ford Jubilee, Many IH Cub Cadets, 32 Ford Dump, 65 Comet, 66 F100.
|
|
theropod
Orange Level
Joined: 28 Sep 2017
Location: Arkansas USA
Points: 217
|
Post Options
Thanks(0)
Quote Reply
Posted: 08 Dec 2017 at 3:30pm |
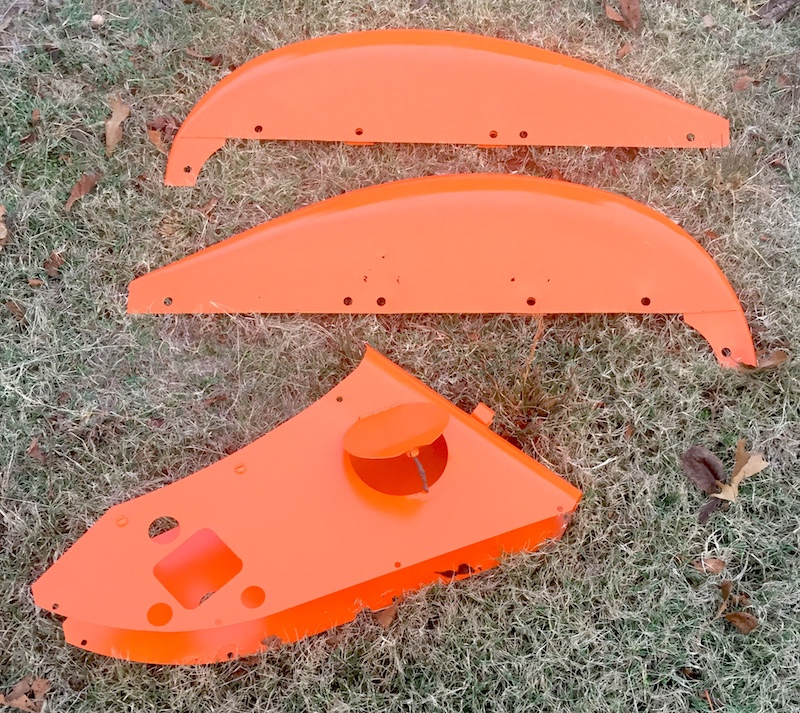 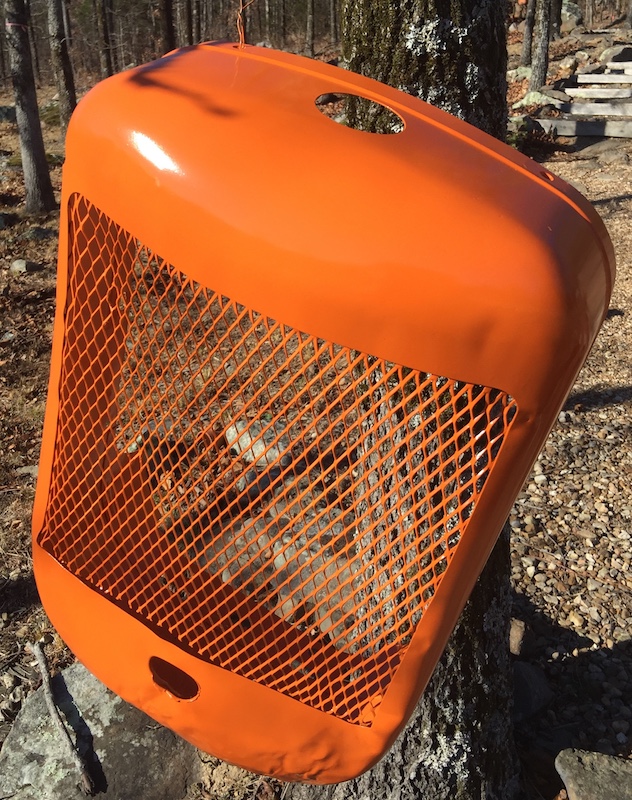 Difference in shade of paint is lighting. First photo in the shade, and the other in full sun. Here's the fenders, toolbox and radiator cover after electrolysis, angle grinder wire brushing, hot water wash with Dawn, hot water rinse, drying, sanding, dust wipe down, priming (white), sanding, dust wipe down and several coats of Krylon Pumpkin Orange. No, I did not lay them down in the grass to paint them. I just put them there for the pict. I didn't paint the radiator cover hanging from a hickory tree. This was just a good sunny place to let the paint cure. The steering column, steering spindles, links and rods, steering upright, throttle links/control, oil lines and seat bracket will be this color. I am going to have to strip my tank and hood and apply the white primer underneath this paint. The directions state that primer isn't necessary, but I have discovered the intensity of the orange is much higher with the white primer, and lays down much more smoothly. Without the primer the paint looks dead, and with it one can see the pop. I am not removing dents, or filling rusted out holes. I have made absolutely sure the rust is dead, and have taken extra care to seal the most damaged parts. I want the tractor to show its war wounds, and stand witness to surviving these many years. None of the rusted out places will effect the soundness of the tractor. If someone wants to fix these issues after I am gone they can go nuts.
Edited by theropod - 08 Dec 2017 at 3:32pm
|
|
Put the bunny back in the box!
1938 B, 1977 Yanmar YM2200
No private messages:
use email:
theropod AT yahoo DOT com
|
|


