1938 B beginning resto
Printed From: Unofficial Allis
Category: Allis Chalmers
Forum Name: Farm Equipment
Forum Description: everything about Allis-Chalmers farm equipment
URL: https://www.allischalmers.com/forum/forum_posts.asp?TID=142946
Printed Date: 18 Mar 2026 at 9:40pm
Software Version: Web Wiz Forums 11.10 - http://www.webwizforums.com
Topic: 1938 B beginning resto
Posted By: theropod
Subject: 1938 B beginning resto
Date Posted: 28 Sep 2017 at 7:57pm
|
Hey all, First off thanks so much for having me. I got lucky finding y'all. This first post will be lengthy as I feel there is no such thing as too much information. I am the proud owner of a 1937 B (serial # B4442) that is mostly original. The mag has been modified to use a 12v battery and an automotive coil with a resistor. If the tractor came with radiator shutters they are long gone. My father-in-law owned the tractor and gave it to me. The B sat in his shed for 27 years without running one time. He rebuilt the engine in either 1961 or 62. We poured gas in it and it fired off on about the third crank of the handle, and purred without a tappet rattle or rod knock. That was a little over 6 years ago. Recently I have started the restoration process. I had to replace the water pump as the original was leaking when we started it a few years back. We got lucky to make it run as the tank is rusted like mad inside. Apparently we sucked debris into the carb (Zeinth). After taking the carb apart today I found what looks like tar coating every surface with a layer of rust in the float bowl. I will need to either replace the carb or rebuild it. Attempting to start it today it would pop and try, but not take. I bent the fuel line and dribbled gas into it to fill the float bowl. Don't laugh. It worked. I will need to replace both rear rims as they are beyond all hope and rusted to nothing over huge swathes. The front rims seem sound. The seat is nonexistent, and the steering wheel is bent and the shaft doesn't seat in the down tube properly. Every inch of the sheet metal and drive train will have to be repainted. The radiator is suspect, but didn't leak during the short run we did. Here's to hoping it holds when it eventually reaches operational temperature. The crank handle burrs, or dowels, are worn and barely engaged the crank pulley. The manifold has two gapping holes in the exhaust portion, and that needs replaced before any extended run time happens. I sure don't want to warp any valves! There is no muffler now, and the pipe no longer locks into place. I have already knocked the rust and dead paint off the hood (3 hole) and repainted it with Krylon "Pumpkin Orange" which is close enough to the original color for me. A cup wire brish on an angle grinder does miracles! I have also done this with the tank, but it needs an internal rust remediation badly. My plan is a hand full of drywall screws and water, shaking, rinse and repeat until clear then a phosphoric acid treatment follwed by a neutralization and then a coating to stop further oxidation. An aftermarket inline fuel filer will be added upon remounting. I am recently retired and have far more time than money, but I have worked on every kind of gas birning engine imaginable. Aircraft engines, cars, trucks, motorcycles, outboard and inboard marine, lawn mowers and even a few glow plug kerosene burners. I am not intimidated by any part of this project, but I will no doubt have many questions along the way. I have never been too proud to ask for help, or too arrogant to assume to know all there is to know. If I could figure out how to attach an image I would, but every time I try I get a message that I am inable to place the image at the current location. Roger |
Replies:
Posted By: steve(ill)
Date Posted: 28 Sep 2017 at 8:08pm
|
you cant cut and paste to this page from your computer.... go the the "POST REPLY" button on the left side below the post and click on that........ look for the icon that looks like a green tree and click that... you can then search your computer and down load a photo from there and post......... make sure the photo is about 800 x 600 and just 2-300 kb size............. to clean the tank you might try electrolysis as another option.. all you need is a cup full of WASHING soda, 5 gallons of water, battery charger, and a couple old steel straps... will post a link you can read. ------------- Like them all, but love the "B"s. |
Posted By: steve(ill)
Date Posted: 28 Sep 2017 at 8:14pm
|
http://www.allischalmers.com/forum/electrolysis-tutorial_topic140734_post1165943.html?KW=electrolysis#1165943" rel="nofollow - http://www.allischalmers.com/forum/electrolysis-tutorial_topic140734_post1165943.html?KW=electrolysis#1165943 ------------- Like them all, but love the "B"s. |
Posted By: theropod
Date Posted: 28 Sep 2017 at 8:24pm
|
I am using my iPhone, and followed those steps to attach an image, but the error message was presented repeatedly. I will try again tomorrow from my desktop computer as it may well be an issue with the phone browser. I am anxious to share the pictoral progress from the neglected present condition to my eventual goal of restoration. Yes, I am aware of the electrolysis process, and I have an old fashioned fixed amperage battery charger, but my wife and I live off the grid (going on 18 years) and power is precious around here. Still, I very well may try this method as I have read many reports of success.
Roger |
Posted By: drobCA
Date Posted: 28 Sep 2017 at 8:48pm
|
welcome to the forum. you will find plenty of people on here with literally decades of specific experience with all Allis Chalmers models who are more than willing to help with any problem you might come across. I speak as a tractor neophyte returning to action after a 3 yr hiatus - now finally retired. Bill Long is the honorary chairman of the Allis B informal fan club, but there are many B lovers on here from Steve(ILL) - a true very knowledgeable collector - to me at the other end of the scale who is just finishing off a refurb of my 1941" birthday B". we all love pictures, so if you have continued grief posting your pictures, PM me and I'll give you an email address and resize them for you (photoshop is my area of some expertise). again - welcome - glad to have you with us.
|
Posted By: Randy MN
Date Posted: 28 Sep 2017 at 9:30pm
|
Good luck with your restoration. You can also upload pictures from your computer if you have them stored there. Need to change size to upload. R click on pic, click on OPEN WITH, move to PAINT.Top left click RESIZE, click on PIXEL. Enter 800, bottom box will fill automatically, click OK and exit PAINT. Now pic will upload small enough to the forum. On forum click POST REPLY, click TREE ICON and go to where your pic is resized. Double click on the pic and file name will appear in the browse box.Click off PLEASE BE PATIENT BOX.Click on upload and save it to your pic file and to the post where you want it. Sounds hard, but after you do it a few times it gets easier. By the way, your B would be a 1938 with serial # 4442. The 1937 B's had the Waukesha engine and 97 were built that year. Welcome to the forum! ------------- 34 WC #477, 38 B #1935, 1-116 on steel, #8 7ft dbl action disc, #9 5ft dbl action disc, 295 Chainsaw |
Posted By: Sugarmaker
Date Posted: 29 Sep 2017 at 2:02am
|
Welcome and good luck with the B restore! Regards, Chris ------------- D17 1958 (NFE), WD45 1954 (NFE), WD 1952 (NFE), WD 1950 (WFE), Allis F-40 forklift, Allis CA, Allis D14, Ford Jubilee, Many IH Cub Cadets, 32 Ford Dump, 65 Comet. |
Posted By: B26240
Date Posted: 29 Sep 2017 at 6:08am
| Welcome to the forum!! You can buy a small can of carb cleaner from NAPA or similar auto stores to clean your carb, sounds like you have the engine experience to do the job. Take your time as that Zenith has some small holes in it. As for rimes and other parts there are several good vendors who support this site. Tractor restoration is a great hobby and you have a special tractor with family conections to work on. |
Posted By: theropod
Date Posted: 29 Sep 2017 at 6:34am
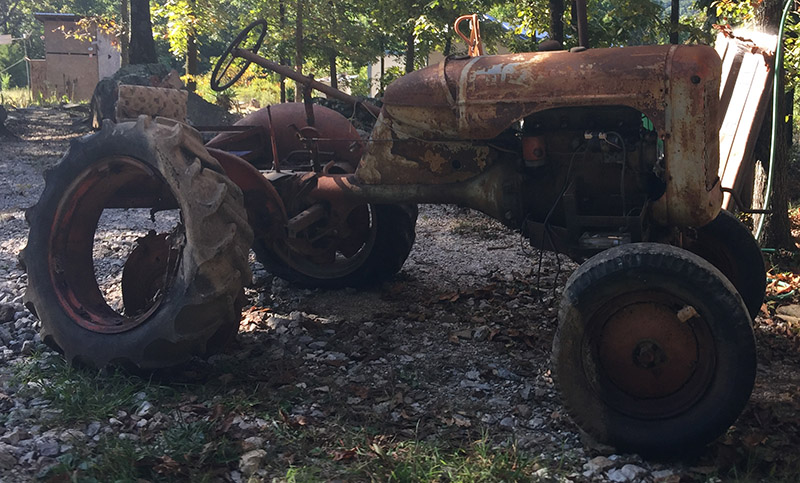 Here is the old B, which apparently is a '38. Just for the record there is an issue with uploading images to the forum, for me, from an iPhone running Firefox. I spent over 20 years as a graphic designer, and web developer, so manipulating images is nothing new to me. I use a Mac and own the latest copy of Photoshop. As rough as the old beast looks the rust on the sheet metal is limited to the surface. It is not my plan to make it as smooth as a new car. My goal is to preserve and protect from further degradation. Anything would be an improvement over the sad condition in which it now exists! 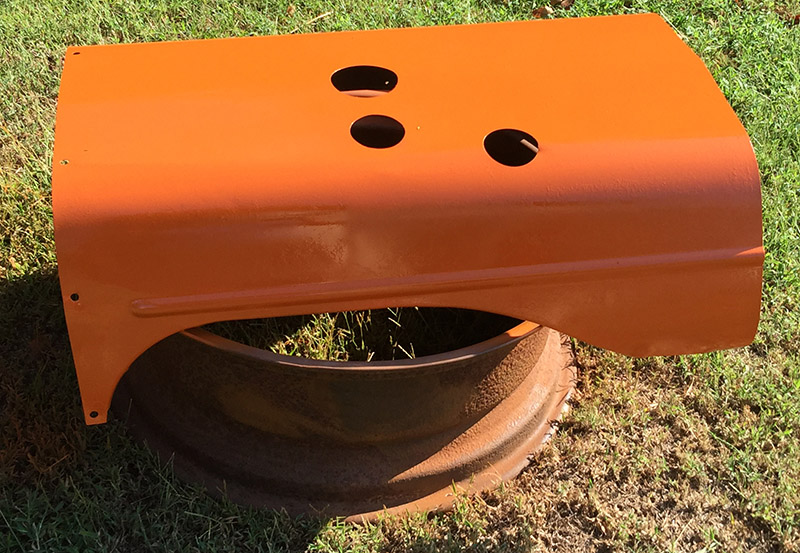 Above is the results of removing the rust, and dead paint, from the hood and with a fresh coating of paint. As one can see the rear rims are gone. When I moved-drug the tractor to this position the right rim collapsed, so until I get shoes on it here is where it will stay. A good tarp awaits wet weather. Roger Edit to add: Thanks for the warm welcome. I might actually be able to contribute a little here myself, as I have been a working class stiff my entire life, and few of my machines have ever been in the hands of a paid professional as the money was never there. One makes do with what one has. |
Posted By: corbinstein
Date Posted: 29 Sep 2017 at 6:38am
| If that engine is not stuck, it might be wise to fill the cylinders with some oil before putting that tarp on.... tarps have a tendency to trap moisture underneath. |
Posted By: theropod
Date Posted: 29 Sep 2017 at 6:51am
Yep, I understand this. One might glean that the engine isn't frozen by my comment on getting it to pop yesterday, but not take, during an extensive session of attempting to get it started. I have a squirt can with a mix of 50/50 diesel and 10-30 Pennzoil just for this purpose. A week hasn't gone by in the 6 years since it last ran when I didn't make sure the engine was turning over freely, and every couple months a small shot of my mix has been applied to the spark plug openings for each cylinder. No water has entered the engine from any opening, and condensation has been very limited. The tarp will be used only until I can get it rolling again. Had the rim not collapsed it wouldn't be out in the open now. Again, this isn't my first rodeo guys. Roger |
 corbinstein wrote:
Posted By: Ken in Texas
Date Posted: 29 Sep 2017 at 7:02am
|
Here is a photo of a Early 38 B #751 I had a hand in finding the correct vintage 1938 bits and pieces for a historically accurate restoration. Lots of what you see here became obsolete in 1939. In other words used in 1938 only. List is pretty long. My best friend lost interest after Restoring 2 AC Tractors. This 38 and a 55 IB
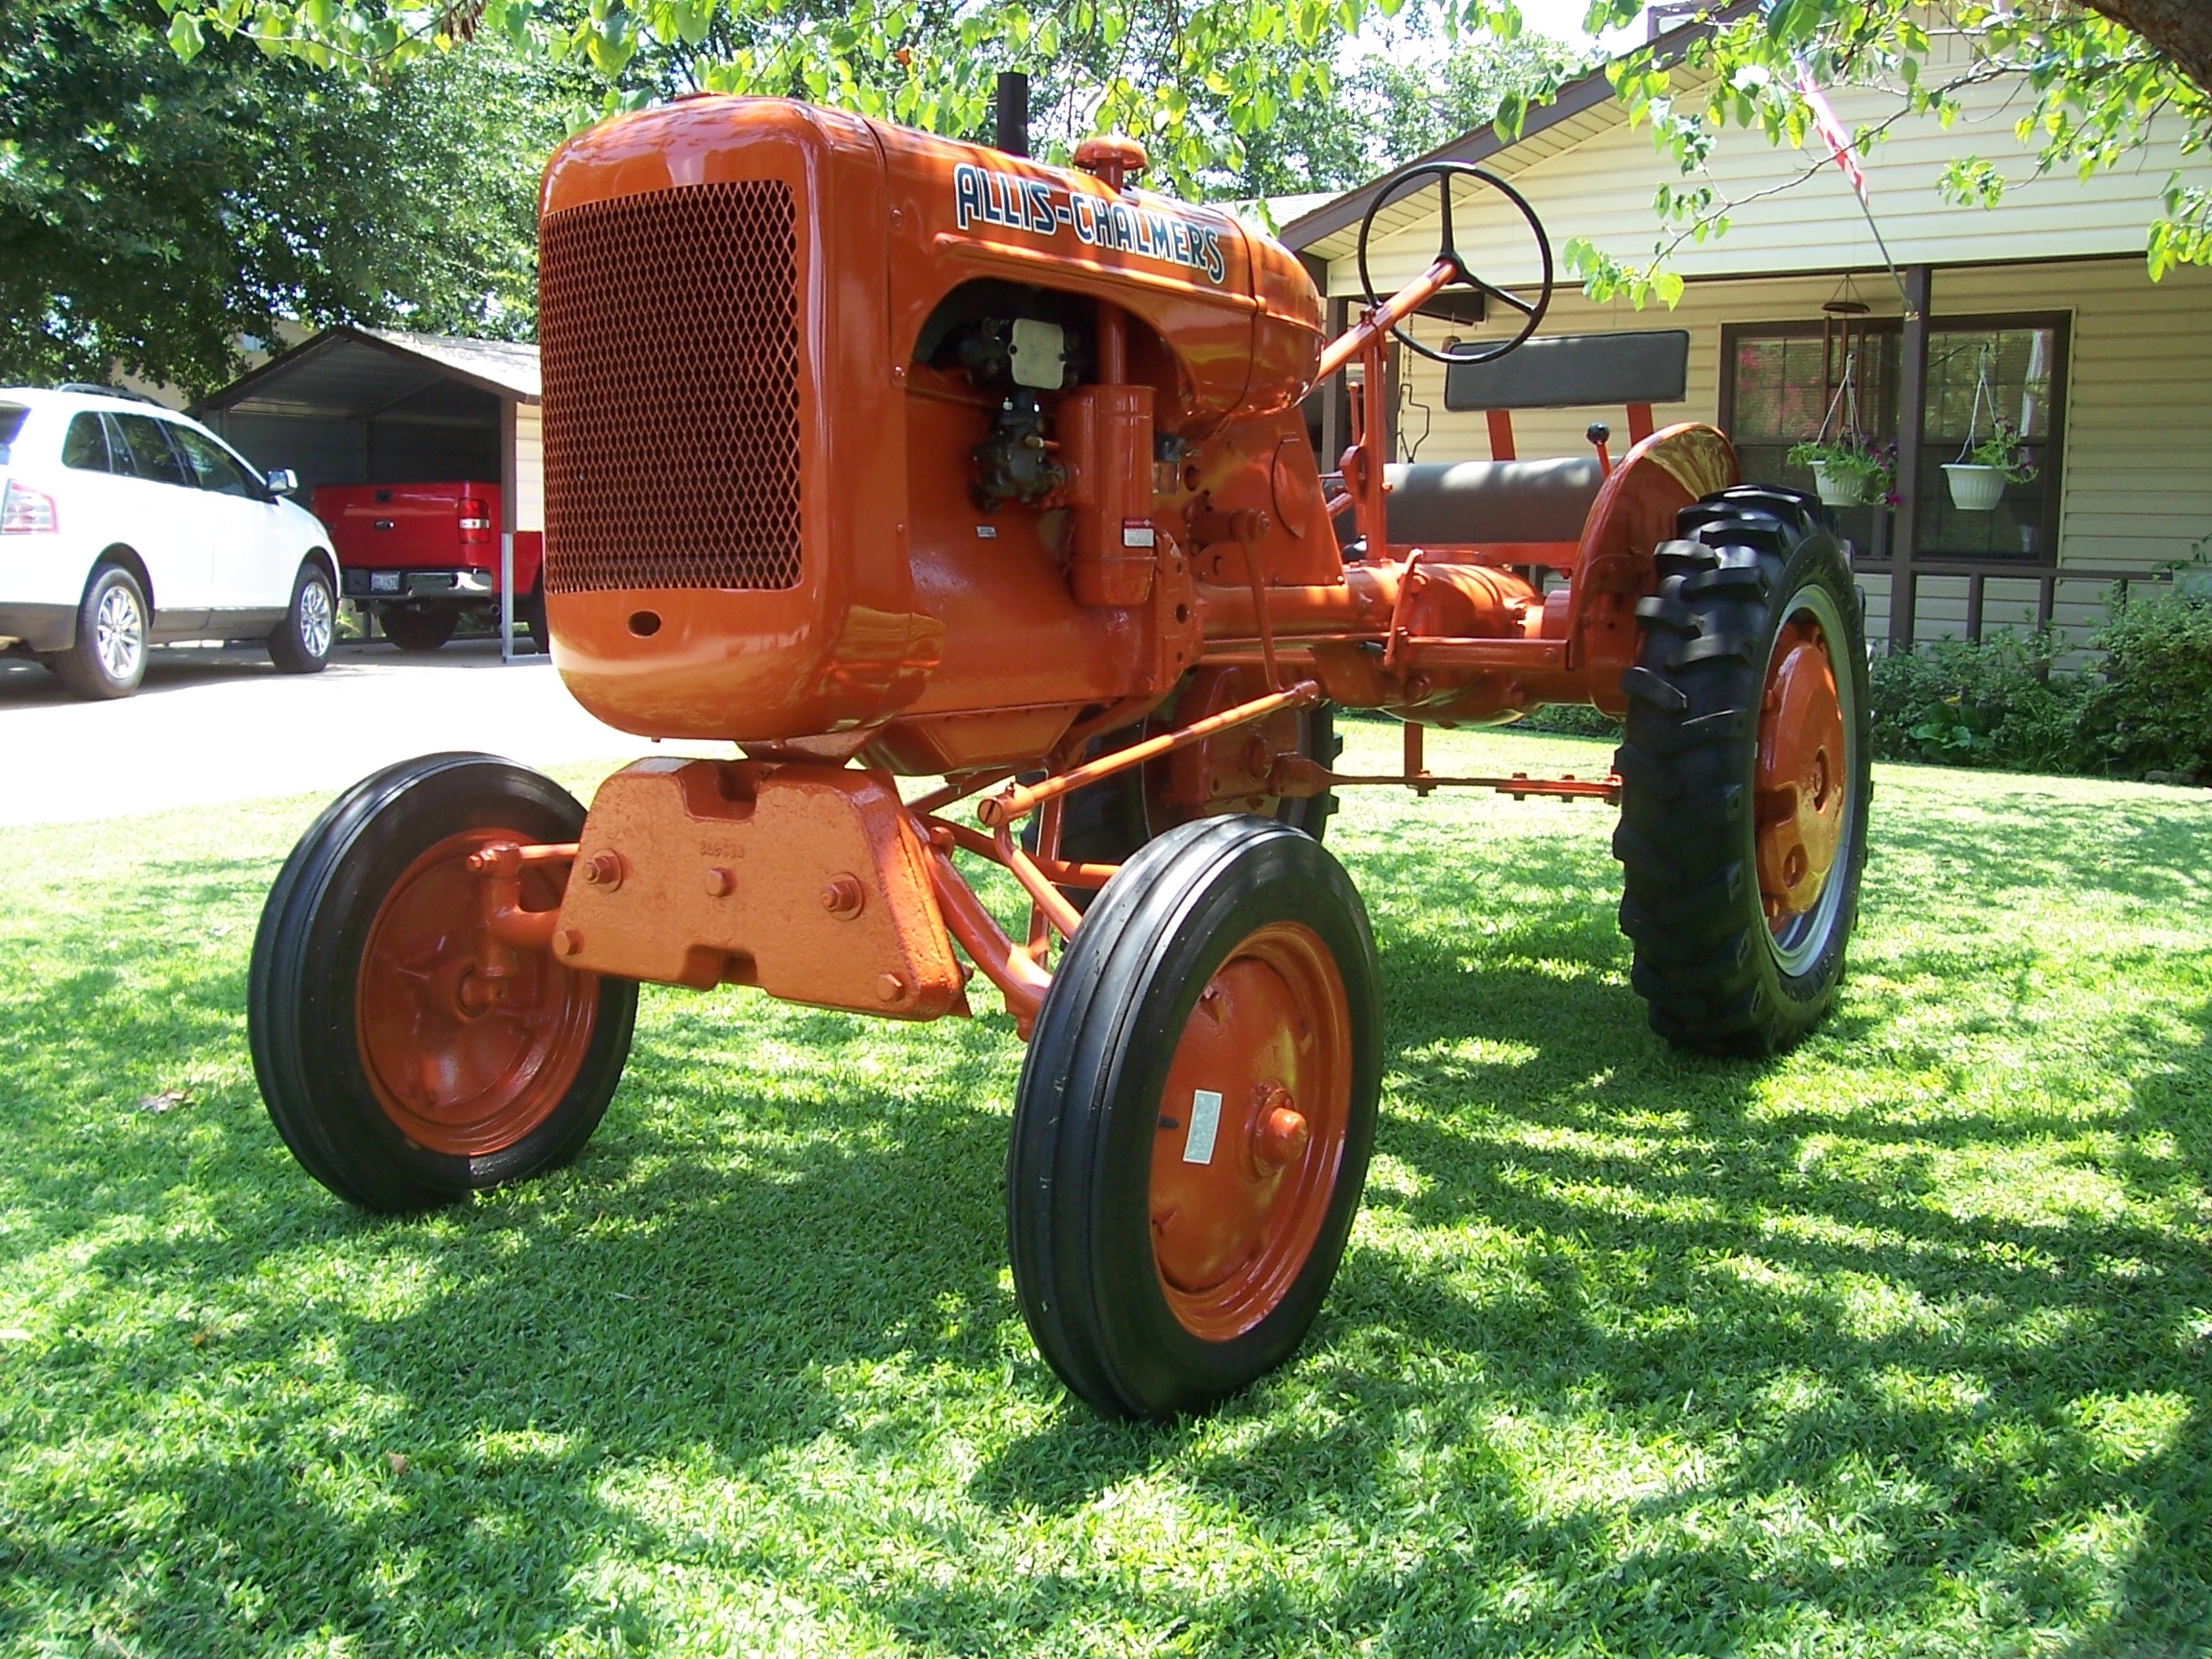 were both sold to collectors in the past year and a half. After this picture was taken a correct pair of Single Rib 5 x 15 front tires from Miller Tire replaced the Tri Ribs were both sold to collectors in the past year and a half. After this picture was taken a correct pair of Single Rib 5 x 15 front tires from Miller Tire replaced the Tri Ribs |
Posted By: davh
Date Posted: 29 Sep 2017 at 7:02am
| Will love to watch the progress!! |
Posted By: theropod
Date Posted: 29 Sep 2017 at 7:20am
|
Ken, That is an absolute cutie! I love the wheel and front end weights. The main goal for me is not to produce a show tractor, but rather to just end the downhill slide and protect it. I have a belly mower, flail mower and finger rake for it. My father-in-law has some extra parts from a newer model. One is a torque tube/bell housing with a starter allowance, which I have considered swapping out. I am hesitant to bastardize such a jewel, and probably won't mess up the antique this way. I might collect those parts, clean them up and offer them for sale to help offset the cost of the parts and supplies needed to bring my B back from the brink. Roger
|
Posted By: Stan IL&TN
Date Posted: 29 Sep 2017 at 7:31am
Welcome!! And we would love to see pictures as you get-r-done.  ------------- 1957 WD45 dad's first AC 1968 one-seventy 1956 F40 Ferguson |
Posted By: theropod
Date Posted: 29 Sep 2017 at 9:25am
|
When I do get this tractor rolling again I need to clean the greasy grime off before repainting the drive train. Would taking it to a steam cleaner be best, or would degreasing and hot pressure washing, be good enough? I realize this will not get the dead paint off, but one of these methods should get rid of the years of baked on residue. Then I should be able to get the metal prepared for paint easy enough. Of course I could just sand blast the surfaces, but I worry about getting abrasives where it shouldn't be. My plan is to remove the fenders and steering column/torque tube cover and give them the same treatment as the hood, gas tank and radiator cover. Since the steering wheel, and column, needs attention this would all work together. I can see several cans of PB Blaster being used to free some time locked threads. I know rust is living under those parts, and I want that gone! Also cleaning the torque tube without removing that cover would be a nightmare. Yes the pitman arm and steering column will have to come off to get that cover free, bit it will need to be done. Since I am not striving for a factory fresh restoration I am considering painting the drive train flat black, and everything else in the Krylon Pumpkin Orange I used on the hood and gas tank.The flat paint should hide scars and blemishes better than any gloss while protecting the surfaces from father time and the elements. Thoughts? The only new rear rims I can find are the loop type, and it appears I am going to have to use those. Has anyone experience replacing the AC eccentric locking system with the loop type, and if so are there any pitfalls I should avoid/be aware? Roger
|
Posted By: drobCA
Date Posted: 29 Sep 2017 at 10:08am
|
I've witnessed and participated in discussions in this forum and at a railroad museum where I volunteer about the relative merits of "as original" and "as used" restorations. if it's really gonna be a keep (and use?) forever tractor and not subject to the correct police, I'm of the camp that says "your tractor, your colors". If it does one day end up in the possession of a historian, repainting it to original colors will be easy enough since the tough work of de-rusting and prep has already been done. my 2 cents worth, anyway. also- I have seen some very good results from a thorough pressure wash, and a light coat of primer before painting will reveal any remaining problem areas.
|
Posted By: Bill Long
Date Posted: 29 Sep 2017 at 4:11pm
|
Tropod, Thanks for taking the challenge of restoring one of my favorite Allis Chalmers tractors. I am much too old to do restoring anymore and can only cheer from the sidelines. Keep up the good Work Good Luck! Bill Long
|
Posted By: theropod
Date Posted: 29 Sep 2017 at 6:37pm
Hey Bill, When my Father-in-law offered me the old beast I about fell over! I had lusted after the B several times when we would visit, and didn't have a clue he would be so generous. He used the tractor, and a home made cable operated front bucket, to dig the basement of his house, which is a beauty. My only condition for taking the tractor was that his bucket contraption stay at his place. It gave me chills just looking at it as the cables looked to be under extreme stress just holding the bucket off the ground. I cannot imagine, or don't want to, what a strain they experienced with a load of rock and dirt lifted in the air. It may take me a year or more to get it where I want it, but I hope to get it to the point it starts easy, drives easy and won't degrade any further. I have an affinity for old machines and own a 30's model Z Briggs and Stratton that runs like a champ. I bought it at a grain elevator sale for $5. All it needed was new points. I have put off doing this because I simply did not have time, but now that I have given working for a living the long kiss goodnight the B is getting the love it has deserved for so long. As an aside my user name, theropod, is a family if dinosaurs that were largely all meat eaters. Tyrannosaurus rex, and velociraptor, are members of this large group of dinosaurs. In a former life I was the executive director of a natural history museum that focused, and was located in, the Hell Creek formation. This world famous geologic formation represents, and preserves, the last 2-3 million years that non-avian dinosaurs were extant in western North America. We found, dug up, prepared, curated and displayed literally thousands of specimens. Some of the most rewarding work I have ever done. Certainly the most enjoyable. Roger
|
Posted By: Michael V (NM)
Date Posted: 29 Sep 2017 at 9:53pm
|
welcome theropod for cleaning,,,if you have access to the hi-pressure /hot water washer,, use some oven cleaner on the grease,let it soak awhile then hit it with the hi pressure washer,, might take a couple tries but it will work good, if ya let the oven cleaner set long enough it will also take off the paint,, it really leaves a good clean surface after a good hot pressure wash
|
Posted By: Sugarmaker
Date Posted: 29 Sep 2017 at 10:33pm
|
These projects can take on a life of there own. Since a tractor in this condition can have every part touched/worked on! I have left some crusty tractors in there work clothes, some were completed close to original condition. Either way you will learn a lot and have a pretty good time along the way too. Steve in Florida (hubNut) has done some very nice off color tractors similar to what you are planning. Its a little more work to get the dings dents and parts clean, but can be rewarding too. Your hood looks way better! Regards, Chris ------------- D17 1958 (NFE), WD45 1954 (NFE), WD 1952 (NFE), WD 1950 (WFE), Allis F-40 forklift, Allis CA, Allis D14, Ford Jubilee, Many IH Cub Cadets, 32 Ford Dump, 65 Comet. |
Posted By: steve(ill)
Date Posted: 29 Sep 2017 at 10:44pm
|
I agree with Michael--- pressure wash and oven cleaner... sometimes paint removed will etch things also. ------------- Like them all, but love the "B"s. |
Posted By: theropod
Date Posted: 30 Sep 2017 at 9:33am
|
Good stuff about the oven cleaner! I had forgotten all about it after using it to clean an old Ford 2.3 prior to rebuilding that engine. That was back in the late 70's so... Thanks guys. Roger
|
Posted By: theropod
Date Posted: 03 Oct 2017 at 5:53pm
|
After watching several videos about using the electrolysis method to kill rust I am going to give the old B tank a good mechanical cleaning and try it. If it works as advertised I may turn an old 55 gallon plastic drum into a nice large tank and attack several parts. My wife's grandpa left her some old tools that could use the attention too! Is the threaded lug in the bottom of the B gas tank 1/2" standard plumbing thread? If so I will probably get a pvc fitting to block that outlet so gunk doesn't lock the threads. After another mechanical cleaning and flushing following the rust removal what about giving the inside of the tank a copper wash? From what I understand steel is happy to take a copper plate, and this should stop rust from reforming. The product "Root Kill" made for septic/sewer drain lines is loaded with the correct chemical to apply a strong copper bond. Replacing the rust killing electrolyte sodium carbonate with the "Root Kill", and switching the anode steel to copper pipe, is supposed to apply a nice copper plating. Wouldn't this be more robust than any coating/liner?
|
Posted By: drobCA
Date Posted: 04 Oct 2017 at 8:05am
|
1. yes that's standard pipe thread. I just used a galvanized plug. 2. I'll be very curious to hear/see more about the copper lining trick.
|
Posted By: tractorman
Date Posted: 04 Oct 2017 at 9:07am
|
Welcome aboard, best of luck on your 38 B... I have owned and used mine for about forty years, from plowing to cultivating to sickle bar work. it is at rest for the moment, trying to get the plow mounted and then i will chase down why no spark . ------------- Play on 38 B 49 WF , working on D14, D15 B10, Bee 12 B110. use 185 and 190 |
Posted By: theropod
Date Posted: 04 Oct 2017 at 4:24pm
Glad to hear of your old B! I think they are as cool as can be. Get that old machine cackling again! Today I attempted to knock the loose rust inside the gas tank free in anticipation of my wife bringing some Sodium Carbonate home from work. Electrolysis is about to happen! The link below is to some video I shot today of how I used my Yanmar as a slow rotating tumbler with nails and screws inside the gas tank. A good first step, and I think will make my electric work more effective. I was as safe as could be, and the Yanmar needed to limber up anyway. https://www.youtube.com/watch?v=ami7tCdOgCA&feature=youtu.be" rel="nofollow - https://www.youtube.com/watch?v=ami7tCdOgCA&feature=youtu.be Roger
|
Posted By: theropod
Date Posted: 04 Oct 2017 at 4:44pm
Yeah, rummaging through my stuff/junk I found a brand new fitting with a plug left over from a propane flex line. Steel too. Plenty long enough to attach the negative clamp from the battery charger directly. I think I may have to saw/cut off the top of the glass sediment bowl/fuel valve as corrosion has done a number on it. If it's zinc it may have saved the tank. Thinking of threading in a copper pipe and soldering a brass sceen on top of that. Roger
|
Posted By: Sugarmaker
Date Posted: 06 Oct 2017 at 4:26am
|
Very good use of your Yanmar! Regards, Chris ------------- D17 1958 (NFE), WD45 1954 (NFE), WD 1952 (NFE), WD 1950 (WFE), Allis F-40 forklift, Allis CA, Allis D14, Ford Jubilee, Many IH Cub Cadets, 32 Ford Dump, 65 Comet. |
Posted By: Gerald J.
Date Posted: 06 Oct 2017 at 10:24am
|
The Allis G, B, C, CA shop manual should be helpful in the process. http://geraldj.networkiowa.com/Trees/Allis-Chalmers-G-B-C-CA-Service.pdf" rel="nofollow - http://geraldj.networkiowa.com/Trees/Allis-Chalmers-G-B-C-CA-Service.pdf Gerald J. |
Posted By: theropod
Date Posted: 06 Oct 2017 at 7:22pm
Saving that to the hard drive! Thanks a bunch Gerald! Today I finished up the electrolysis on the tank and I think I am done. The inside of the tank is flat black everywhere! Video will soon be posted, but I ran out of daylight today. Near the end the amp meter went up and the anodes stopped growing gunk. After reading everything I can find that black stuff is magnetite and is asbout as inert as can be. The notion of copper plating the inside was just that, and after looking into it far more trouble than it's worth. With a couple hours of sunlight to dry the tank out tomorrow as coating of diesel will follow. Apparently the tumbling of the tank helped remove all the surface rust as the water/electrolyte was just dingy when I drained it (saved to be used again). Neither did my efforts produce that mound of floating scum. Only flakes and pieces circulated around as the electrolysis was churning away. The carb rebuild kit came in the mail and I almost have that ready to go back together. A little rust lives in the dark passages here and there, and that needs to go before reassembly. I am thinking of naval jelly for that as I can brush it where it needs to go and not eat up the brass jets that are welded in place. If I could get new jets I would drill out the old ones, but those seem to be unavailable. By this time next week the old AC should be startable again! Then I can concentrate on wheels and tires so it actually rolls. Roger
|
Posted By: Sugarmaker
Date Posted: 07 Oct 2017 at 11:10pm
|
Roger, Good work on the tank. Once you get it started and back on its feet it will be a big accomplishment! regards, Chris ------------- D17 1958 (NFE), WD45 1954 (NFE), WD 1952 (NFE), WD 1950 (WFE), Allis F-40 forklift, Allis CA, Allis D14, Ford Jubilee, Many IH Cub Cadets, 32 Ford Dump, 65 Comet. |
Posted By: theropod
Date Posted: 08 Oct 2017 at 10:51am
|
The gas tank electrolysis process is done and the link below documents the way I did it. I must say this worked out much better than I imagined. I did put a couple hundred steel BB's in and a drop or two of Dawn dishwashing detergent and give it a good shaking. This removed the excess magnetite and left the steel pretty darn clean. One final rinse with hot water left the tank in great shape. I feel the tumbling I did prior to starting the electrolysis helped a great deal by getting rid of the loose rust, and sped up the process. So far no flash rust has reformed, but a wetting down with diesel will stiffle that. All in all I estimate the process took about 16 hours. Now I am planning a big vat to accept fenders and other large parts. Electrolysis just works! http://youtu.be/rs0ua7CggDk" rel="nofollow - http://youtu.be/rs0ua7CggDk Roger
|
Posted By: Chalmersbob
Date Posted: 08 Oct 2017 at 12:12pm
|
Looks like you are doing a great job. I use a 3/8" nipple and a cap to plug the hole in the bottom of the gas tank before I pour in the tank coating. This allows you to remove the cap to drain the remaining coating without messing up the threads in the tank. I used a plug 1 time and had to clean the threads to get the valve back in. Bob ------------- 4 B's, 1 C's,3 CA's, 2 G's WD, D14, D15, B-1, B10, B12, 712S, |
Posted By: theropod
Date Posted: 08 Oct 2017 at 1:10pm
I am not sure I will use a tank coating. I think killing the rust was enough as some of the zinc galvanized surface showed up after I was done. Seasoning the tank with diesel and letting the sun cook the metal should/will end it once and for all. If not I can drain the tank and apply the coating later. My goal for this fall is to get the old tractor running and rolling. Our rainy season will soon start and I want to be able to move it to a protected space before those rains start. If the rolling running condition is reached I can then keep the tank full of real gasoline (100%) and rust shouldn't be an issue. Roger
|
Posted By: theropod
Date Posted: 11 Oct 2017 at 6:05pm
|
Just to see if it would I spent a couple hours try to get my B to run today. No joy. All it will do is pop now and then. This tractor has an automotive 12 volt coil with a resistor and uses a battery instead of relying on the magneto. In a testing mode I yanked the #1 plug and put the spark plug ignition lead on the coil high voltage plugin, and then opened and closed the points with a screw driver. The spark was yellowish white and is barely audible. I bypassed the resistor and the spark quality barely changed if it did. I know the battery I used is fully charged. In my experience that spark should be bright blue and crack like a little lightening bolt. So my next step is to measure the resistance in the primary and secondary windings of the coil, which I suspect is weak. If the coil passes the resistance testing the old condenser may be leaky. I am seriously considering either rebuilding the magneto myself or buying a rebuilt unit. I could then eliminate the coil, resistor and battery. If I retain the current setup I will need to hang an alternator, add a keyed switch (it has a single pole single throw alternating current house light switch now) and supply the tractor with its own battery. For a tractor without a starter this seems far more trouble than its worth. A magneto should be more reliable anyway. In a semi related matter I finished rebuilding the Zeinth carb after giving it a short electrolysis session (obviously now reattached to the tractor). While making sure all the passages were open I discovered the bore in the float bowl segment that connects to the main jet adjustment on the bottom of the carb, and the main nozzle, was plugged solid. So solid in fact I had to use a drill bit and apply serious pressure with my drill to clear it. Luckily I had the exact right size bit for this task, and no damage was done to the carb itself. Some seriously hard black gunk stuck to the flutes! This inspired me to double check all the other passages and the carb is now as clean as a whistle. I add this to inform you readers that the carb isn't likely the problem with the no start condition. I pulled the #1 plug, after an especially long cranking session, and the cylinder definitely had gas fumes inside, but the plug wasn't wet. Just thought I would share these efforts both to document my struggles and seek opinions about my obstacles. Thanks all. Roger Edit to add: Just did a quick resistance test on the coil, and the primary reads 1.2 kilohms, and the secondary reads 1750 ohms. So apparently that coil has died, or is very close.
|
Posted By: Sugarmaker
Date Posted: 11 Oct 2017 at 7:24pm
|
Roger, Gas, spark, and compression. It should run. Maybe not god but should run. Your almost there! Glad the Electrolysis process is working for you. It has cleaned hundreds of parts for me. Including smalls and big items like hoods and fenders too. Regards, Chris ------------- D17 1958 (NFE), WD45 1954 (NFE), WD 1952 (NFE), WD 1950 (WFE), Allis F-40 forklift, Allis CA, Allis D14, Ford Jubilee, Many IH Cub Cadets, 32 Ford Dump, 65 Comet. |
Posted By: Ken in Texas
Date Posted: 11 Oct 2017 at 8:02pm
|
Theropod Close to the beginning of this thread you had a Question on using 4 loop replacement rear rims. Bear this in mind. 4 loop rims are Farmall Type. Your bolts if vintage 1938 are 3/4 inch. 2 plain and 2 eccentric. The wheel centers if 1938 have 4- 3/4 holes close to the edge. Bolt the 4 loop rims to the wheel centers with plain 3/4 bolts of the appropriate length Like a Farmall does. Sometime in mid or late 1939 a new and final rim to wheel attachment using 4 bump rims with 5/8 bolts. 2 plain and 2 eccentric became standard. I can't tell from your pics if your 38 has been converted to the latest 5/8 bolt design. a full conversion would consist of wheel centers with 5/8 bolt holes and all the latest lock blocks and 4 bump rims.
|
Posted By: steve(ill)
Date Posted: 11 Oct 2017 at 8:32pm
|
Just to see if it would I spent a couple hours try to get my B to run today. No joy. All it will do is pop now and then. This tractor has an automotive 12 volt coil with a resistor and uses a battery instead of relying on the magneto. That is a cobbled up mess as you said. Your further ahead to buy a $50. coil for the mag and install that. Do the condenser and point while you are in it. That should FIX it forever. ------------- Like them all, but love the "B"s. |
Posted By: theropod
Date Posted: 11 Oct 2017 at 8:44pm
I am not sure what it has now. I will look closely tomorrow and post what I discover with a better picture. Either way I am going to have to replace those rear rims. Are you saying if I went with the loop rims I would have to replace the disc mounting plates (sorry for the ignorance of what thise are called) that have the big axel nut and the mounting bolts pass through?
|
Posted By: theropod
Date Posted: 11 Oct 2017 at 8:50pm
I am leaning that direction. I was thinking of a complete rebuild though, as no telling what else is wrong inside there. I have found several sad "modifications" that need to be addressed. The air cleaner is not stock as the outlet "pipe" doesn't even come close to aligning with the carb. I don't even think it is a B part. Someone cobbled together pedals for the brakes, and the levers are still in place. The list goes on and on. I have a multi year project on my hands. I knew this going in, so...
|
Posted By: Ken in Texas
Date Posted: 12 Oct 2017 at 6:13am
|
No on replacing your rear wheels. Your heavy cast wheel centers will work with new 24 inch x 8 wide 4 loop rims. Finding the correct length plain bolts to replace the old, now useless, mounting bolts is all that you will need. If for some reason the previous owner updated the 1938 wheel centers with newer centers using 5/8 eccentrics the 4 loop rims will bolt up loose. I have several spare AC Donaldson oil bath air cleaners if you need one.
|
Posted By: theropod
Date Posted: 12 Oct 2017 at 7:10am
I am fairly confident the cast wheel centers are stock, but I will check it and get a picture today (still well before daylight here). I will measure the existing bolts as well. They look like 3/4" to me. My Father-in-law apparently just used what he could to keep the old tractor rolling, and didn't see it as the jewel I do. My wife's grandpa bought the tractor new, and he gave it to my pop-in-law. I may just buy one of those air cleaners from you, but I have a long, and growing, list of parts I need first. No more than I plan on running it until the other issues are addressed it should be OK. The manifold is rusted through in a couple places on the exhaust sides. Right now I just want to warm it up and drain the old oil and replace the filter. Getting it rolling will allow me to protect it over the winter, as I actually expected the wheels not to collapse. Running or not I have to get it back under a roof before our horrid rainy season begins, and wheels with tires have to happen soon.
|
Posted By: theropod
Date Posted: 12 Oct 2017 at 10:19am
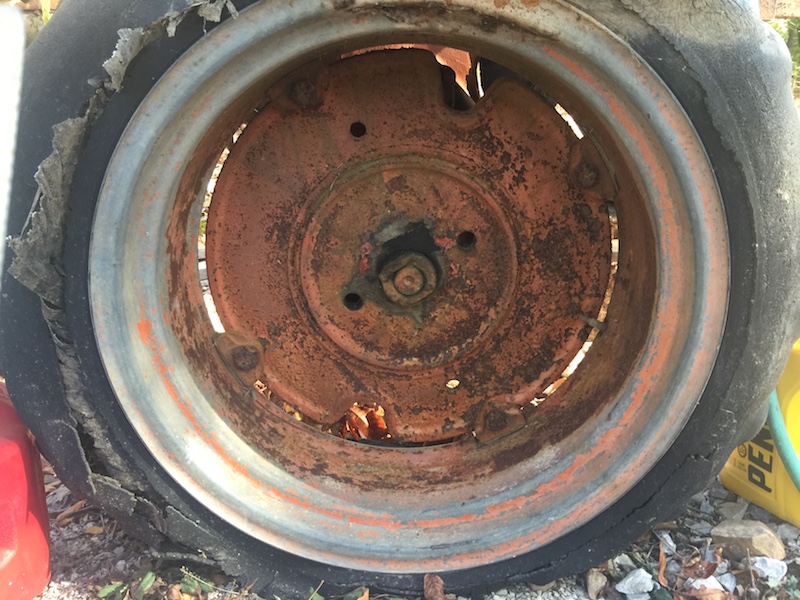 OK, here is the current rear wheel setup on the old B. As best as I can tell it has the 3/4" bolts. Note the shims under the clamps. |
Posted By: Sugarmaker
Date Posted: 12 Oct 2017 at 4:56pm
|
What I see of the rim it doesn't look too bad? Maybe the valve stem area at the top needs repairs? Take your time this is a large project. Each step is a challenge. Pictures help us help you. Regards, Chris ------------- D17 1958 (NFE), WD45 1954 (NFE), WD 1952 (NFE), WD 1950 (WFE), Allis F-40 forklift, Allis CA, Allis D14, Ford Jubilee, Many IH Cub Cadets, 32 Ford Dump, 65 Comet. |
Posted By: theropod
Date Posted: 12 Oct 2017 at 8:08pm
No problem posting pictures.
The tire/wheel on the other side from that picture, the on the right, rusted away until it fell off while attempting to move it. I want matching rims, and I can get a new set of the loop type with a bolt kits shipped to me for $300. The old rim in the electrolysis video has holes rusted in several spots, but may be saved. Then a set of tubes, tires and a liners would be my issue either way. I was thinking today that I might be able to pick up the back end of the B with my Yanmar's 3 point hitch and move it where it can be kept mostly dry. I can then do more prep work, and maybe get the old rims patched up. It's not like I am going to pull logs with the antique. I need to give the old rim without a tire a shot with the electrolysis and see if the many small holes can be fixed, and get the rotten tire off the left hand rim to see how bad it really is. Honestly the new rims are attractive just for the ease of it all. I suppose I best do the work and stop being lazy. |
Posted By: Ken in Texas
Date Posted: 12 Oct 2017 at 8:10pm
| The Wheel Centers are 1938 Vintage with 4 - 3/4 bolt holes. Pops shimmed the wheel clamps that use the 5/8 bolt to make up for the sloppy fit of a 5/8 bolt in a 3/4 hole. Ditch the rims and clamps and go with new or good used 4 loop rims with 3/4 bolts. |
Posted By: Ken in Texas
Date Posted: 12 Oct 2017 at 8:16pm
| ??? How do I know the Wheels are 1938. The valve stem notches are half moon shape. Used in early 39s too. Later wheels had V shape notches when AC went to 5/8 bolt clamps |
Posted By: theropod
Date Posted: 13 Oct 2017 at 6:51pm
|
I think the magneto is going to get some new parts, and the coil/resister/battery crap is going away. I spent a couple hours going over everything and got the engine to run on it's own for about 5 seconds, and then it stalled. I think all the oil I have squirted in the spark plug holes over the last few years fouled the plugs and the carb seemed to flood out. It belched a good little cloud of blue smoke before stopping. The float seemed to be working as the drain plug would cause the level in the feed line to drop (tank not attached), but hold steady otherwise. The air from the cylinders smelled of gas when turned without the plugs. I need to make sure the Fairbanks Morse mag model number is right before I dive in to ordering parts. After seeing some of the things done on this tractor it wouldn't surprise me if the mag is from a different model tractor. The idea of rebuilding the mag doesn't frighten me too much. I would love to be able to pull the old beast to turn the engine over hard, which I am sure would do the trick. My old body gets to complaining after an hour or so of yanking on that crank, and it would be so much easier to just dump the clutch. I sprayed the plugs down with carb cleaner and left the cylinders open to the air to try to dry them out, and will give it another go tomorrow. I just want to warm it up and get fresh oil in it. This is why machines need to be run more often than every six years.
|
Posted By: theropod
Date Posted: 17 Oct 2017 at 2:49pm
|
Frustrated! I messed around some more to try to get the engine to fire off today, and it ran 3 different times for about 30-45 seconds. Each time the engine would run smooth and clean and then just shut down as if a key was switched off. The engine got warmed up enough to burn off the oil I have been squirting into the cylinders over the years, but wouldn't keep running. I still think the old carb is trashed. It's tough doing this by cranking that handle a hundred times! If I had a helper they could dribble gas into the throat of the carb and I could determine once and for all if it is a fuel supply issue. I don't think it is flooding out anymore, as after the last little bit of running I pulled the plugs and they are all dry as a bone. Thinking of shucking out the cash for a new carb. Yes, the float may be off, or it may be those jets I can't replace, or it may be this or that. I am sick of trying to figure out an worn out piece of junk carb far older than I am.
|
Posted By: CrestonM
Date Posted: 17 Oct 2017 at 3:39pm
|
Before you throw in the towel, get a can of Berryman Chem-Dip carb cleaner. Take your carb apart and let everything soak in that overnight. My Super 100 combine was running like a sick dog this last July. Throttle up quick and the engine would stumble like it was falling down a flight of stairs, and sometimes it would die. It was bad. Smoked a ton, too. I just soaked it in that stuff and it ate everything off that carb and made it almost look new again. Just rinse everything off with water (per the instructions) and re-assemble. She purrs like a kitten now after that cleaning. It really does sound like a fuel issue. A few years ago my 8N had probably 60 something years of crud in the gas tank, and I was mowing one day and it just sputtered and died. Wouldn't start. Poked around a bit trying to figure it out....wiring was good, had spark, but nothing. Waited a bit, then it fired right up and ran well. Back to mowing, then it died. Same thing...wouldn't start. I figured I had a restriction somewhere, so I gave it a minute, started it, and drove as far as I could toward the barn before it died. It was stop and go, but I eventually got there and cleaned everything out. The restriction was at the fuel bowl, so I flushed the tank, cleaned everything up, and it's ran like a champ ever since. I know that can be frustrating, but don't give up. If this 19 (Then 17) year old can do it, so can you! Just takes a little figuring out.
|
Posted By: theropod
Date Posted: 17 Oct 2017 at 5:09pm
|
CrestonM, I have had that carb apart and back together at least 10 times recently. There isn't enough gunk left in there to cover the head of a pin. I still think the two brass internal jets that are "welded" in place are the issue, and I cannot find replacements anywhere. I could drill them out and then use an easy out if I had replacements in hand. I will, however, follow your advice and get some of the soaking type carb cleaner. What is killing me is the effort expended in cranking this thing. When I gave up trying today I was soaked in sweat, and it's pretty cool here. I was laid up all summer after breaking my ankle in early March, which the doctors waited 3.5 months to fix via surgery. This left me in the worst physical condition of my life. I am no where near back to fighting trim, and this is taking a toll. The ankle is all healed up now, but in my sedentary time I put on 20 pounds of blubber. It's coming off, but slowly. Being an old curmudgeon isn't helping. LOL I am not giving up, but I am going to shift my focus to getting tires under the old beast. At least then can pull it with my Yanmar and get away from that dang crank handle. My wife is bring home a new 1/2" drive 1 3/16" socket so I can get the left rim off, and bolts from the collapsed right side. With both rims off I can make an assessment as to whether they can be repaired and put back into service. I have a feeling I can make them work. My pop-in-law had a spare rim, but it has issues too. Sometimes it's hard not to get a little angry at my wifes dad for letting it get in this shape, but he saw it much differently than I do. To him it was just an old tractor that had paid for itself many times over. To me it is a piece of history that needs to be preserved. I'll get it back in shape, but I really want things to progess at a more brisk pace. I have never been overly patient, but the AC is teaching me how to be. |
Posted By: CrestonM
Date Posted: 17 Oct 2017 at 5:30pm
|
Sorry to hear about all that. Yeah, with those hand crankers I can see why you'd need to take it easy. You might give the chem-dip a try. If it works, great. If not, I have one more trick an old army guy taught me. He said when he was in the service, they'd take the carburetors off their engines and boil them hard in a pot of water for 2 hours straight. He said that would work magic, so I gave it a try on my 1951 Chevy carb. It was a mess as well, hard to start, and 11 times out of 10 it flooded when trying to start it. I boiled it and got good results, but I must warn you to only use good, soft water. Our well water is pretty hard (lots of calcium) and after boiling that thing, everything was covered in calcium deposits. Have to re-boil in some store bought water. That cleaned things up great, and it started great and ran much much better after that. Never touched a drop of carb cleaner. That's another option, if you want to try that, but I don't advise doing it in your house, as it gives off some pretty potent fumes dissolving gum and varnish. If none of those work, you're right...you may be ahead to get a new carb, if your seats are that stuck in there. As far as your father-in-law letting the tractor deteriorate....I know people like that. They used that equipment long ago, fighting it their whole lives day in and day out, trying to scrape together a living, and after that many years, could care less about it. I'm like you...just trying to preserve what we have left, especially family items.
|
Posted By: theropod
Date Posted: 17 Oct 2017 at 6:54pm
|
Update: Sigh. My loving wife brought home the 1 3/16" socket, and the bolts on the right side have 1 1/4" heads. My measurements didn't account for rounded off corners. The left side are 1 1/16" heads and I had both a box end wrench and 1/2" socket for those. So, there are two sizes of bolts, and as "Ken in Texas" mentioned earlier the left side bolts are 5/8" and the right side bolts are the correct 3/4". So now I have some decisions to make. I can either find the correct size new bolts for both sides and attempt to save my old rims, or order new rims and bolts. The good news is both rear rims are now off the tractor. I am still very very tempted to switch to the loop style rims and put this part of the job behind me. Concourse correct has never been my goal. My next target is the front rims. Both are rusted, but not so bad as the rears. A session of electrolysis should put them right. I am going to have to come up with some sort of tank large enough to accept them, and a plastic 55 gallon drum, which I have several, just might work. If so I can use this tank for the fenders and other parts. Just about every part of the old monster is rusting. This is the first antique machine of any kind I have actually tried to restore. I am comitted but I was really unprepared for the undertaking. It really doesn't help that the tractor was cobbled together just to keep it rolling. I understand it, but dang. If I can't get the carb to act right I very well may try the boiling water trick. A couple gallons of distilled water should do the trick. At this point I have little to lose. We keep several gallons on hand for our off grid battery bank. (The secret to longevity in a flooded lead acid battery is keeping them charged, topped up with electrolyte and never allowed to rest discharged). Anyway, I figured I should share these things with a community that knows exactly what I am facing, and the progress (if it can be called that) can generate valued advice. Thanks y'all. |
Posted By: Sugarmaker
Date Posted: 17 Oct 2017 at 8:26pm
|
Theropod, An example or two. Just about every part between the crank and the hole in the drawbar needed attention: You can do this!  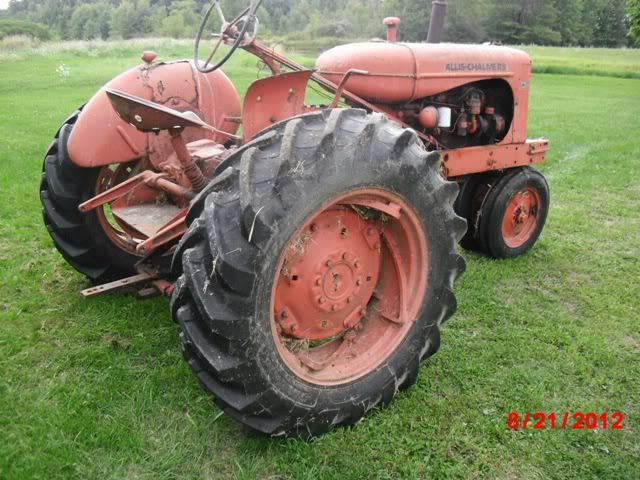 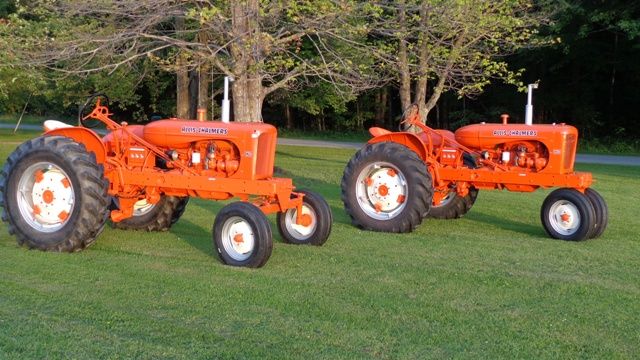 Regards, Chris ------------- D17 1958 (NFE), WD45 1954 (NFE), WD 1952 (NFE), WD 1950 (WFE), Allis F-40 forklift, Allis CA, Allis D14, Ford Jubilee, Many IH Cub Cadets, 32 Ford Dump, 65 Comet. |
Posted By: theropod
Date Posted: 18 Oct 2017 at 7:56am
|
Very nice Chris! I just have accept it is what it is.
|
Posted By: steve(ill)
Date Posted: 18 Oct 2017 at 12:12pm
|
If the tractor starts and runs for 30 seconds, then dies, you are running out of gas IN THE BOWL... Maybe you suction tube in the gas tank is plugged, or the filter is plugged, or the line to the carb is plugged, or the float valve in the carb ( or elbow) is plugged.... you wait a few minutes and it fires up again for 30 seconds........... this normally means the bowlw will not refill fast enough ............... take the line off as it enters the carb and let it run into a bucket. Should get a cup full in a minute if all is OK. ------------- Like them all, but love the "B"s. |
Posted By: theropod
Date Posted: 18 Oct 2017 at 1:57pm
Yep, and I just did a similar test with the results you cite. I have a clear tube hooked to the inlet to the carb, and fill it with gas by dribbling gas into it. The tank isn’t mounted. It seems the float valve only works when it feels like it, and the carb is clean as a whistle. This leaves that needle valave as the culprit, and it is brand new! I rechecked the float level and operation with the carb broken apart. Split apart the float valve works flawlessly. Apparently the float is touching the side of the bowl. Dang carbs, I see why they are obsolete. Looks like I will be taking the carb off for about the 50th time.
|
Posted By: Sugarmaker
Date Posted: 18 Oct 2017 at 8:15pm
------------- D17 1958 (NFE), WD45 1954 (NFE), WD 1952 (NFE), WD 1950 (WFE), Allis F-40 forklift, Allis CA, Allis D14, Ford Jubilee, Many IH Cub Cadets, 32 Ford Dump, 65 Comet. |
Posted By: theropod
Date Posted: 08 Dec 2017 at 3:30pm
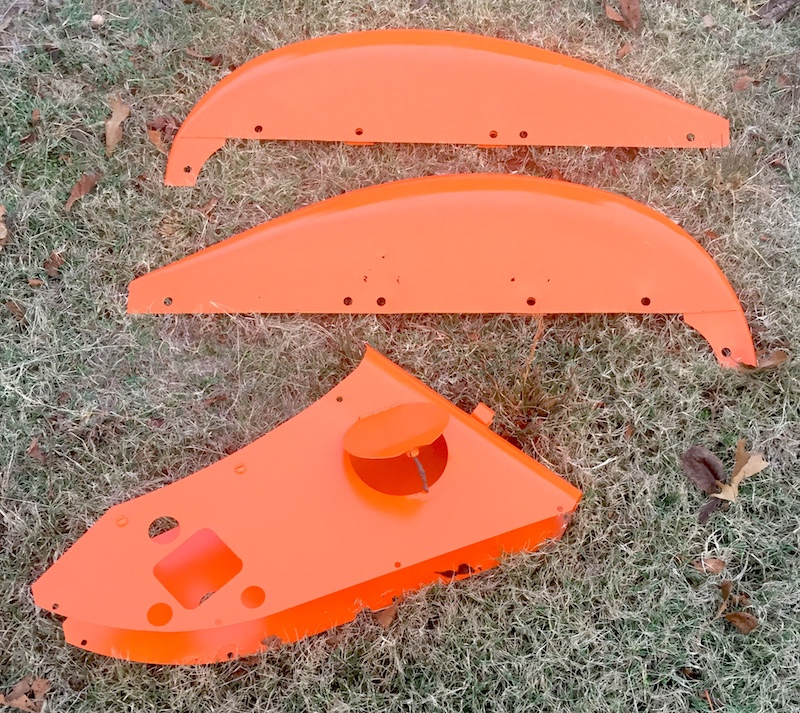 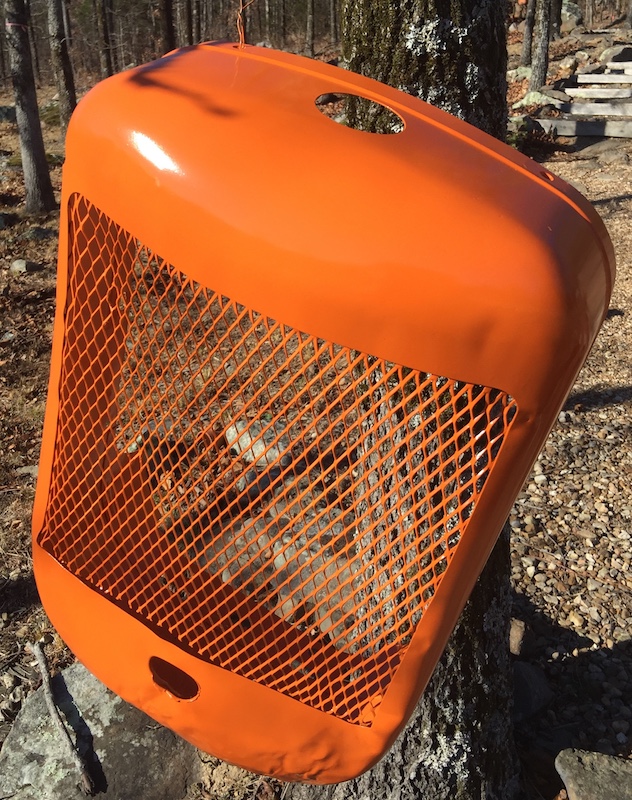 Difference in shade of paint is lighting. First photo in the shade, and the other in full sun. Here's the fenders, toolbox and radiator cover after electrolysis, angle grinder wire brushing, hot water wash with Dawn, hot water rinse, drying, sanding, dust wipe down, priming (white), sanding, dust wipe down and several coats of Krylon Pumpkin Orange. No, I did not lay them down in the grass to paint them. I just put them there for the pict. I didn't paint the radiator cover hanging from a hickory tree. This was just a good sunny place to let the paint cure. The steering column, steering spindles, links and rods, steering upright, throttle links/control, oil lines and seat bracket will be this color. I am going to have to strip my tank and hood and apply the white primer underneath this paint. The directions state that primer isn't necessary, but I have discovered the intensity of the orange is much higher with the white primer, and lays down much more smoothly. Without the primer the paint looks dead, and with it one can see the pop. I am not removing dents, or filling rusted out holes. I have made absolutely sure the rust is dead, and have taken extra care to seal the most damaged parts. I want the tractor to show its war wounds, and stand witness to surviving these many years. None of the rusted out places will effect the soundness of the tractor. If someone wants to fix these issues after I am gone they can go nuts. ------------- Put the bunny back in the box! 1938 B, 1977 Yanmar YM2200 No private messages: use email: theropod AT yahoo DOT com |
Posted By: HoughMade
Date Posted: 08 Dec 2017 at 3:38pm
|
Looking good! It's and inspiration. I envy the lid on your toolbox. I have to get one of those. ------------- 1951 B |
Posted By: theropod
Date Posted: 12 Dec 2017 at 6:57pm
|
Got out today and warmed the engine up and set the valve clearance down to 12 thousandths. That did lower some upper end noise. Not rattling but rather clicking. I figure with modern oil a couple thousandths slop would be better than a burned valve and shouldn’t cause mushrooming of the valve tips. I can’t believe how easy the old B starts now. Even after warmed up refiring it was a breeze. I cannot wait to get the media blasting done! I may have a shop lined up to apply primer and paint, which needs done very soon after stripping. ------------- Put the bunny back in the box! 1938 B, 1977 Yanmar YM2200 No private messages: use email: theropod AT yahoo DOT com |