| Author |
 Topic Search Topic Search  Topic Options Topic Options
|
CA13414 
Silver Level

Joined: 25 Feb 2024
Location: Nebraska
Points: 255
|
 Post Options Post Options
") Thanks(0) Thanks(0)
 Quote Quote  Reply Reply
 Posted: 11 Jun 2024 at 10:07pm Posted: 11 Jun 2024 at 10:07pm |
That makes sense. If it is too thick, we run the risk of a loose bearing which will not be good. With this, i think a good layer of PermaTex on all the surfaces will do the trick.
Regarding the seal, a great idea. i will look and see if I can find one. It seams like this is leaking carrier. I will drain the oil before we remove and once removed see if I can tell it is "running" or "leaking" from the seal or the carrier.
Thanks for all in insight Steve...... Much appreciated!!
|
|
Helping the aged survive and thrive! 1953 CA
|
 |
|
Sponsored Links
|
|
|
CA13414
Silver Level
Joined: 25 Feb 2024
Location: Nebraska
Points: 255
|
Post Options
Thanks(0)
Quote Reply
Posted: 12 Jun 2024 at 8:17am |
What do you think about something like this. I will get my calipers and measure the shims. If it’s approximately 1/64 would you replace the shims with this gasket? https://www.mcmaster.com/product/9402K21
|
|
Helping the aged survive and thrive! 1953 CA
|
|
steve(ill)
Orange Level Access

Joined: 11 Sep 2009
Location: illinois
Points: 79894
|
Post Options
Thanks(0)
Quote Reply
Posted: 12 Jun 2024 at 1:38pm |
|
the gasket is only 1/16 inch thick so it probably will not compress much.. But if your using 3-4 of them between all the shims, the "compression" can add up.. I still like the permatex idea better.. Compress once and your done... plus , your only putting it on 2 thousandths thick..
|
|
Like them all, but love the "B"s.
|
|
CA13414
Silver Level
Joined: 25 Feb 2024
Location: Nebraska
Points: 255
|
Post Options
Thanks(0)
Quote Reply
Posted: 12 Jun 2024 at 7:10pm |
") steve(ill) wrote: steve(ill) wrote:
the gasket is only 1/16 inch thick so it probably will not compress much.. But if your using 3-4 of them between all the shims, the "compression" can add up.. I still like the permatex idea better.. Compress once and your done... plus , your only putting it on 2 thousandths thick.. |
PermaTex it is. Thanks again for all the insight!!!
< id="idg-io-safe-browsing-enabled" ="" oninit="true">
Edited by CA13414 - 12 Jun 2024 at 7:11pm
|
|
Helping the aged survive and thrive! 1953 CA
|
|
CA13414
Silver Level
Joined: 25 Feb 2024
Location: Nebraska
Points: 255
|
Post Options
Thanks(0)
Quote Reply
Posted: 13 Jun 2024 at 8:53pm |
steve(ill) wrote:
I dont have a specific seal that is double lip.. Just know they make them.. I had a 75 year old "B" that had groove cut in the shaft and always dripped.. I got the ID and OD and bought a seal that was DOUBLE LIP and probably 1/8 inch THICKER than original and installed that..
|
Thanks Steve!
I just ordered a double lip seal that "should fit!" With PermaTex and this seal, we should be in good condition!!!
< id="idg-io-safe-browsing-enabled" ="" oninit="true">
Edited by CA13414 - 13 Jun 2024 at 9:43pm
|
|
Helping the aged survive and thrive! 1953 CA
|
|
CA13414
Silver Level
Joined: 25 Feb 2024
Location: Nebraska
Points: 255
|
Post Options
Thanks(0)
Quote Reply
Posted: 16 Jun 2024 at 10:24am |
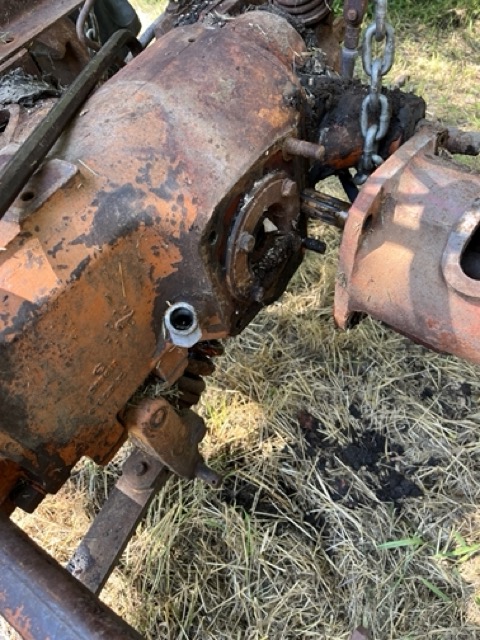
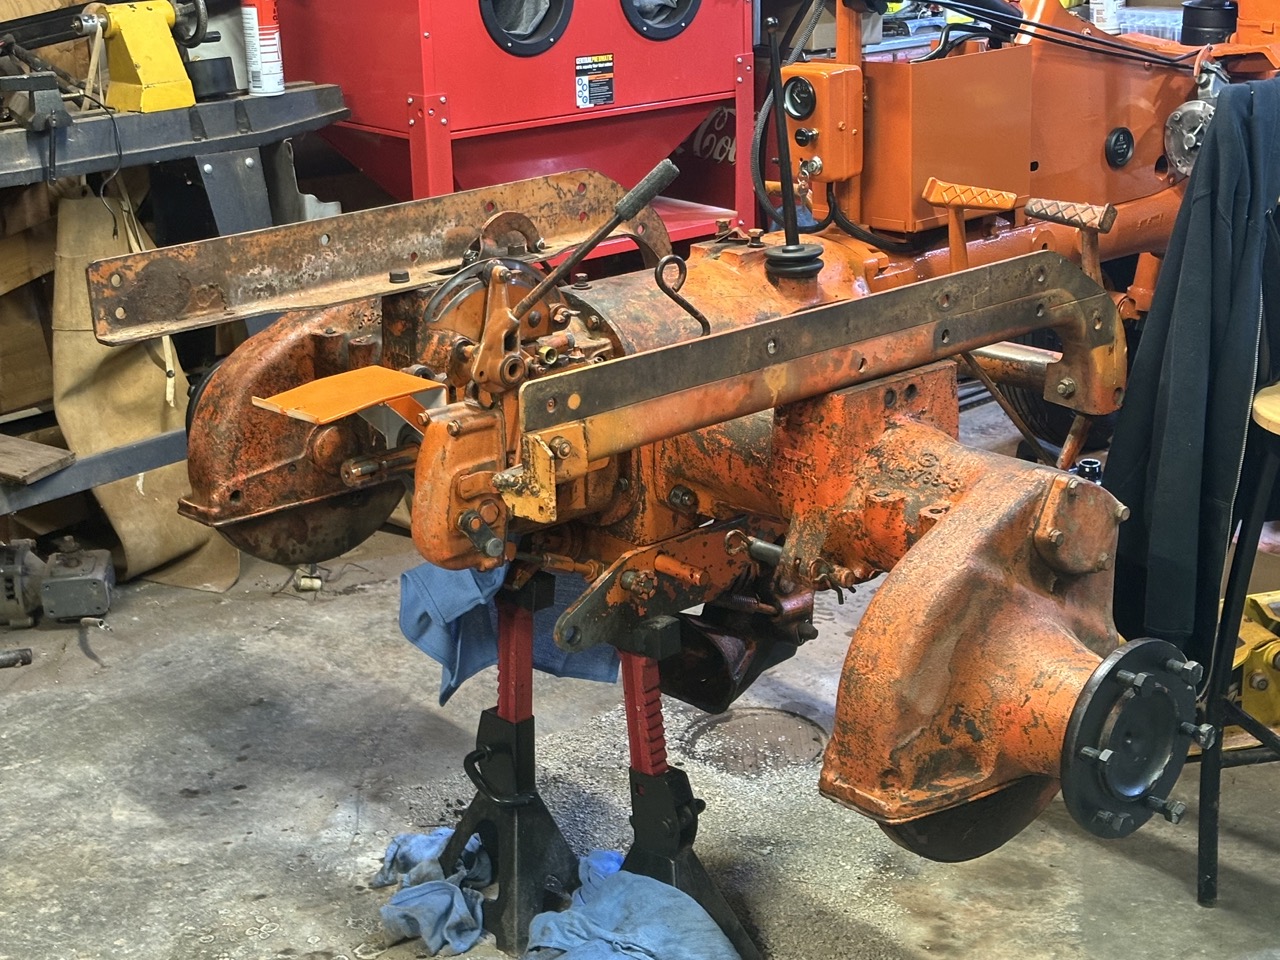
Was back at the farm this weekend with the family and my brothers, sister and I grabbed a few other pieces. Mostly interested in the differential carrier. Using the John Deere tractor loader and a chain, Milwaukee impact, we separated the final drive shaft and removed the carrier. Plan to use this in place of the one that is worn as previously post.
Just need to clean it up and exchange the bearing race.
< id="idg-io-safe-browsing-enabled" ="" oninit="true">
Edited by CA13414 - 16 Jun 2024 at 8:38pm
|
|
Helping the aged survive and thrive! 1953 CA
|
|
CA13414
Silver Level
Joined: 25 Feb 2024
Location: Nebraska
Points: 255
|
Post Options
Thanks(0)
Quote Reply
Posted: 18 Jun 2024 at 8:19pm |
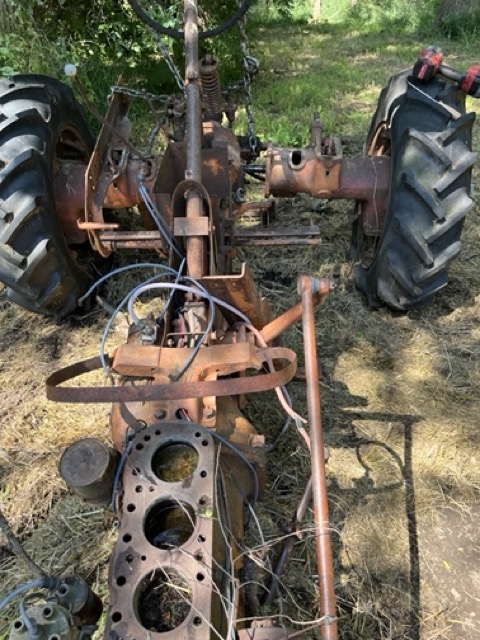
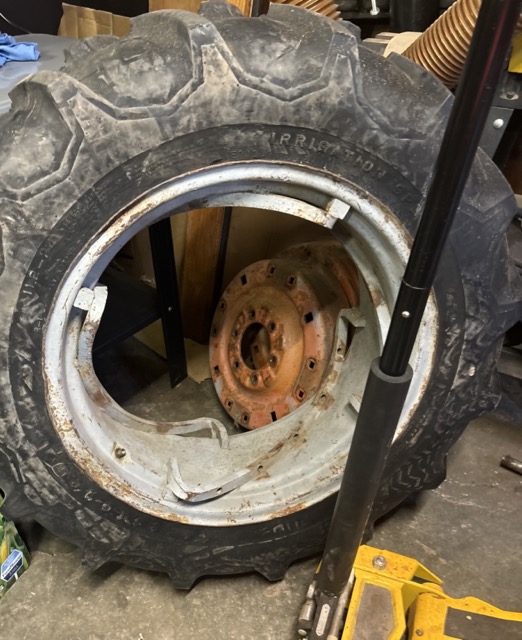
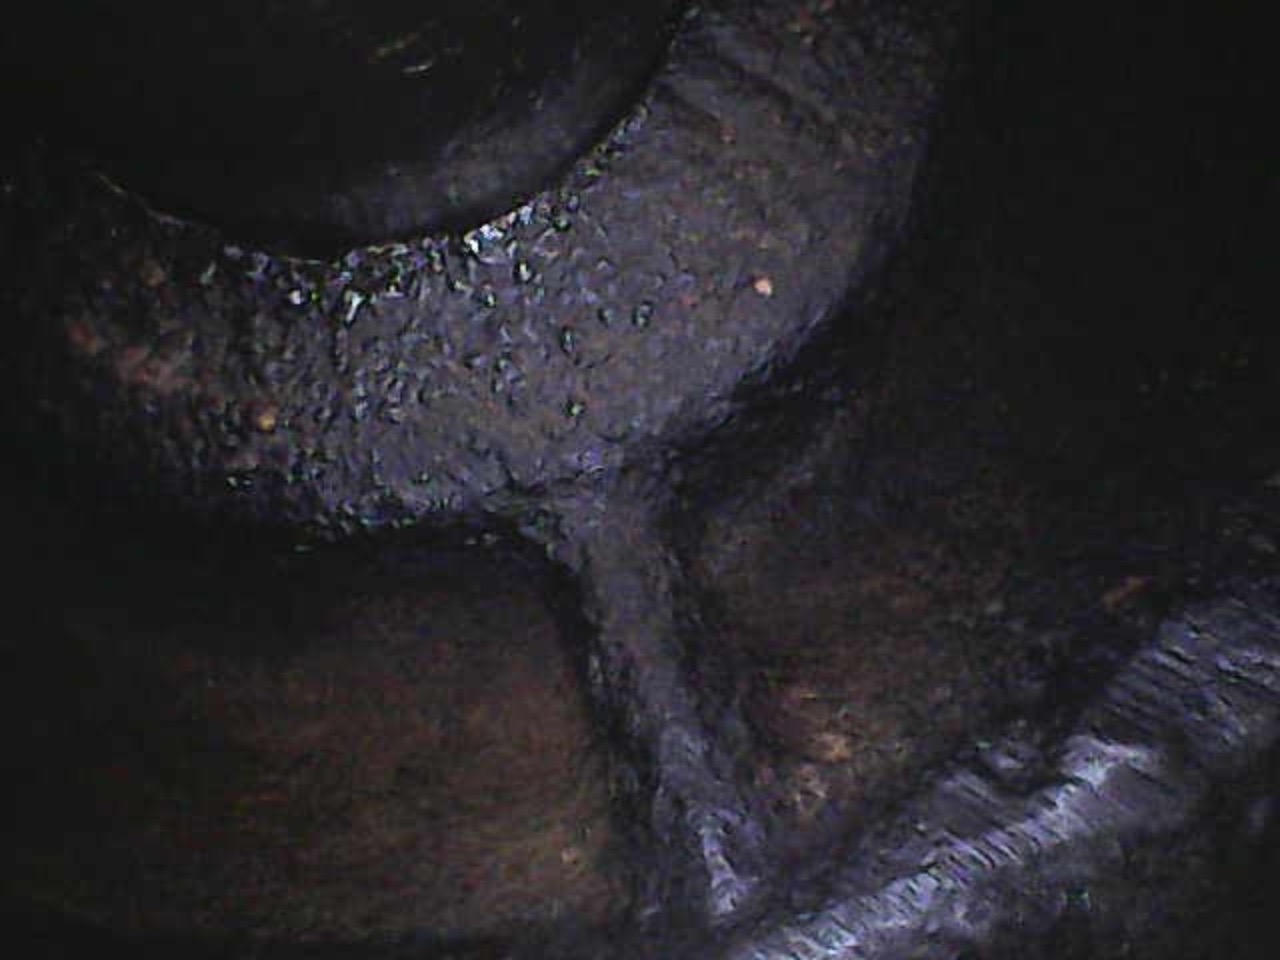
A bit more done today. Took apart the left wheel and seperated the rim and hub. Will take this to the shop to take off the tire. Will plan to sand blast these in the next weeks. Then paint the rims black and the hubs orange. Then have the new rear tires mounted.
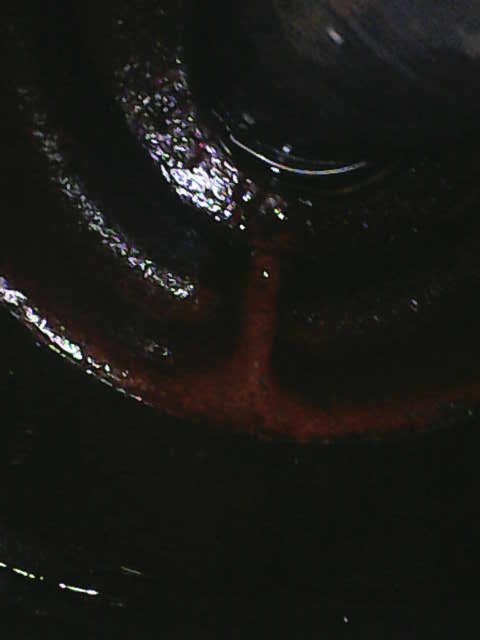
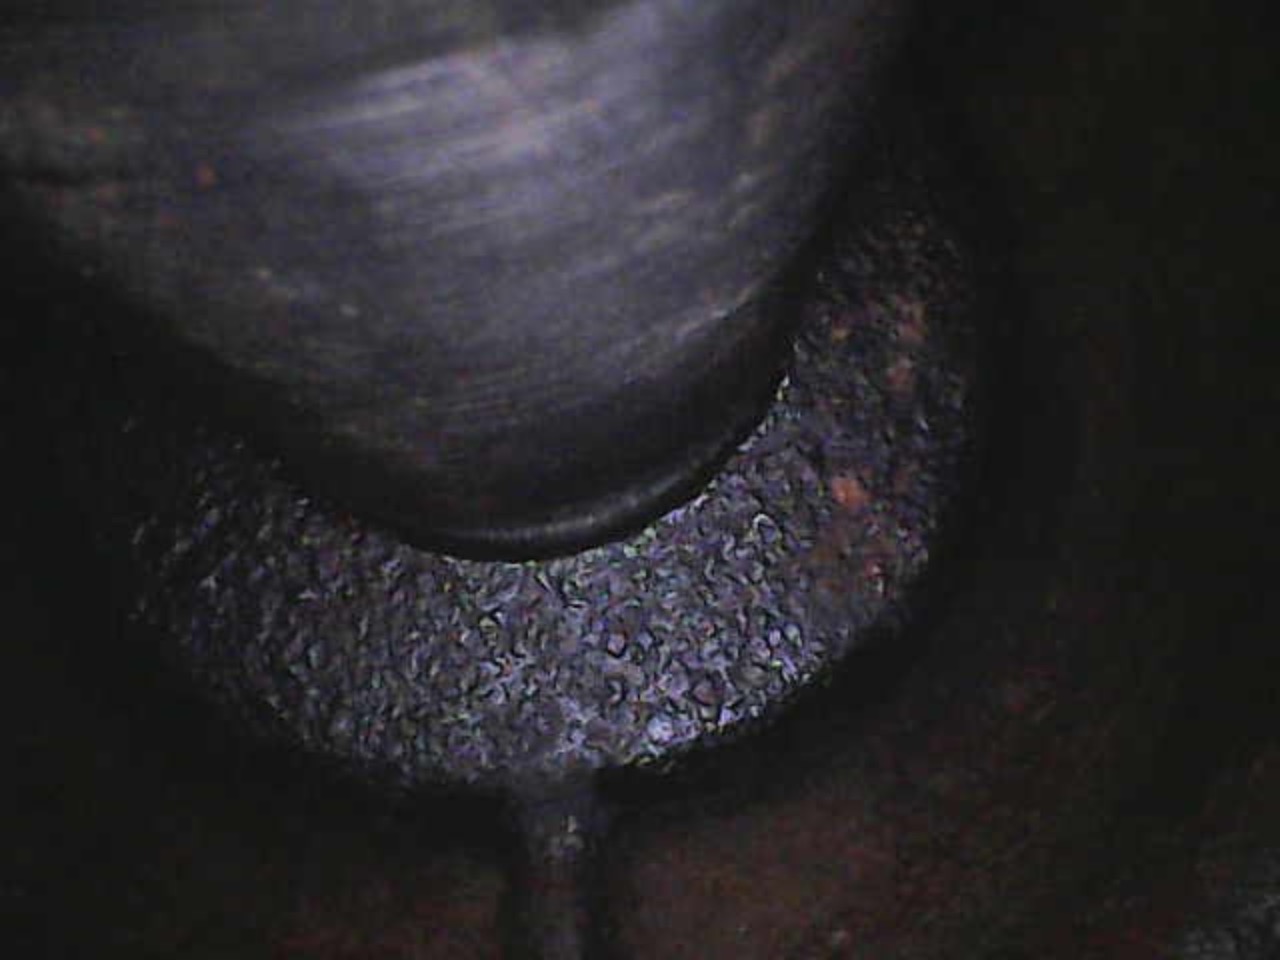
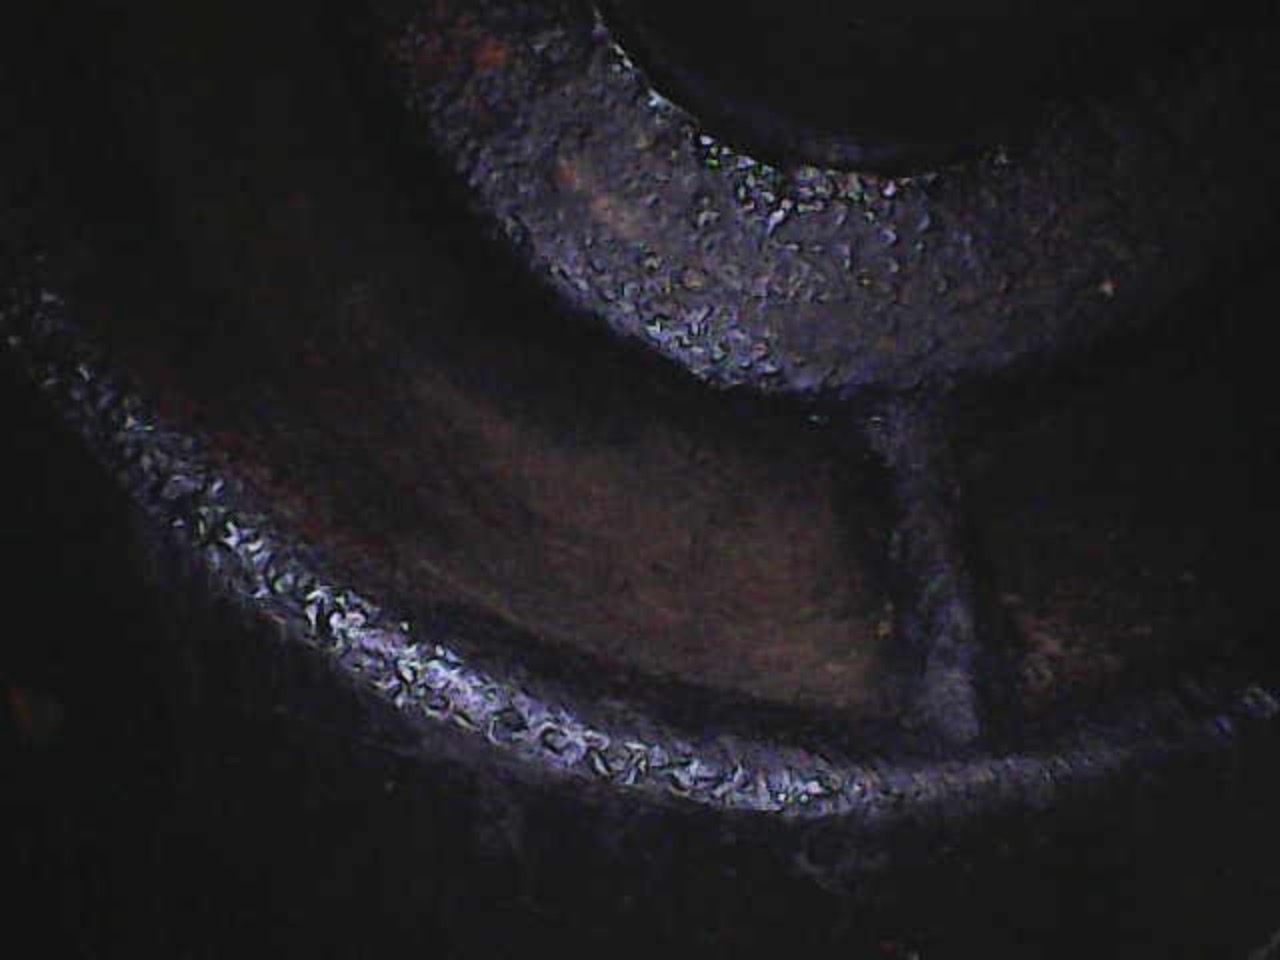
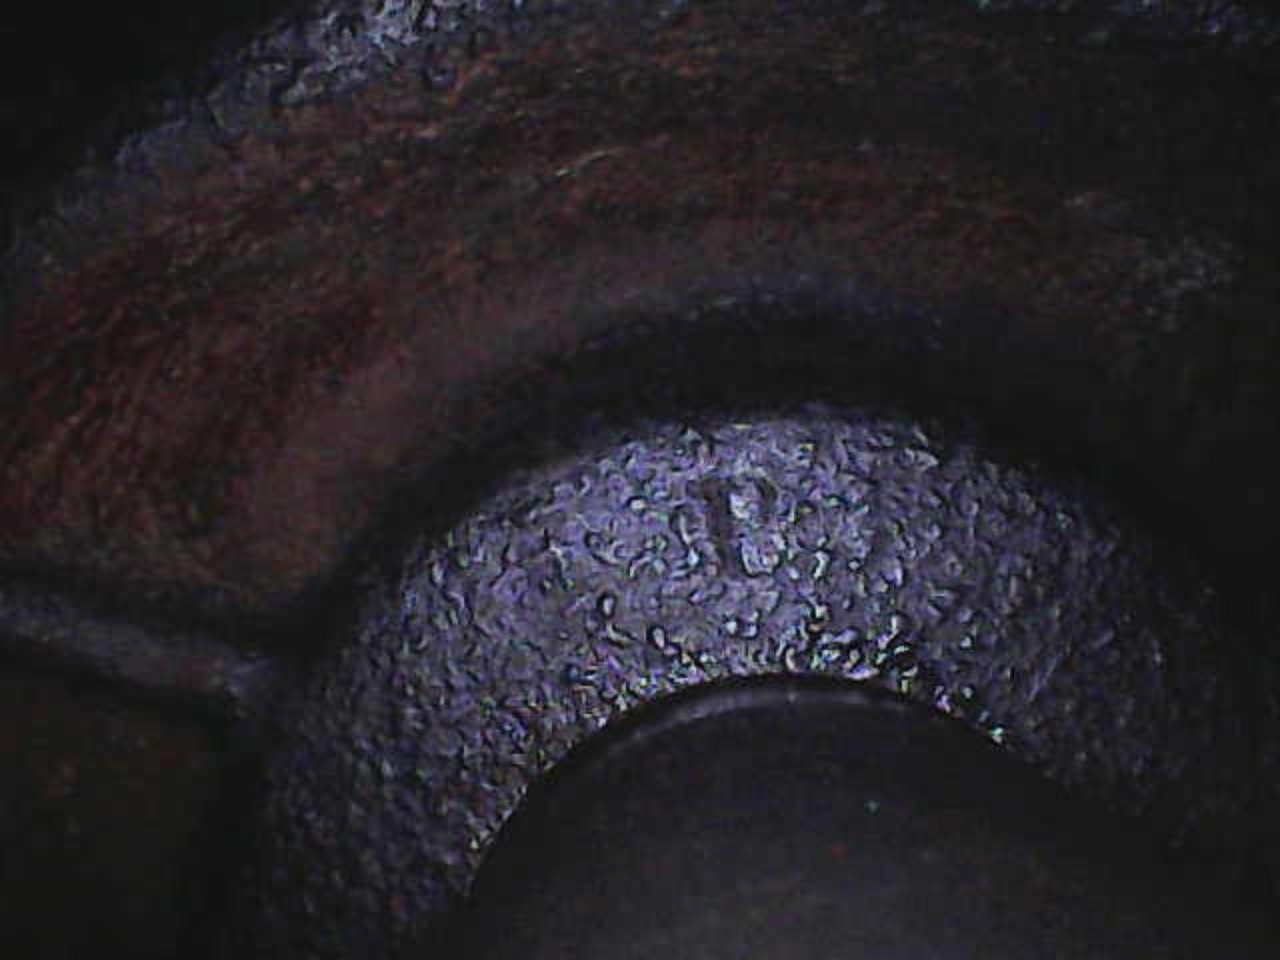
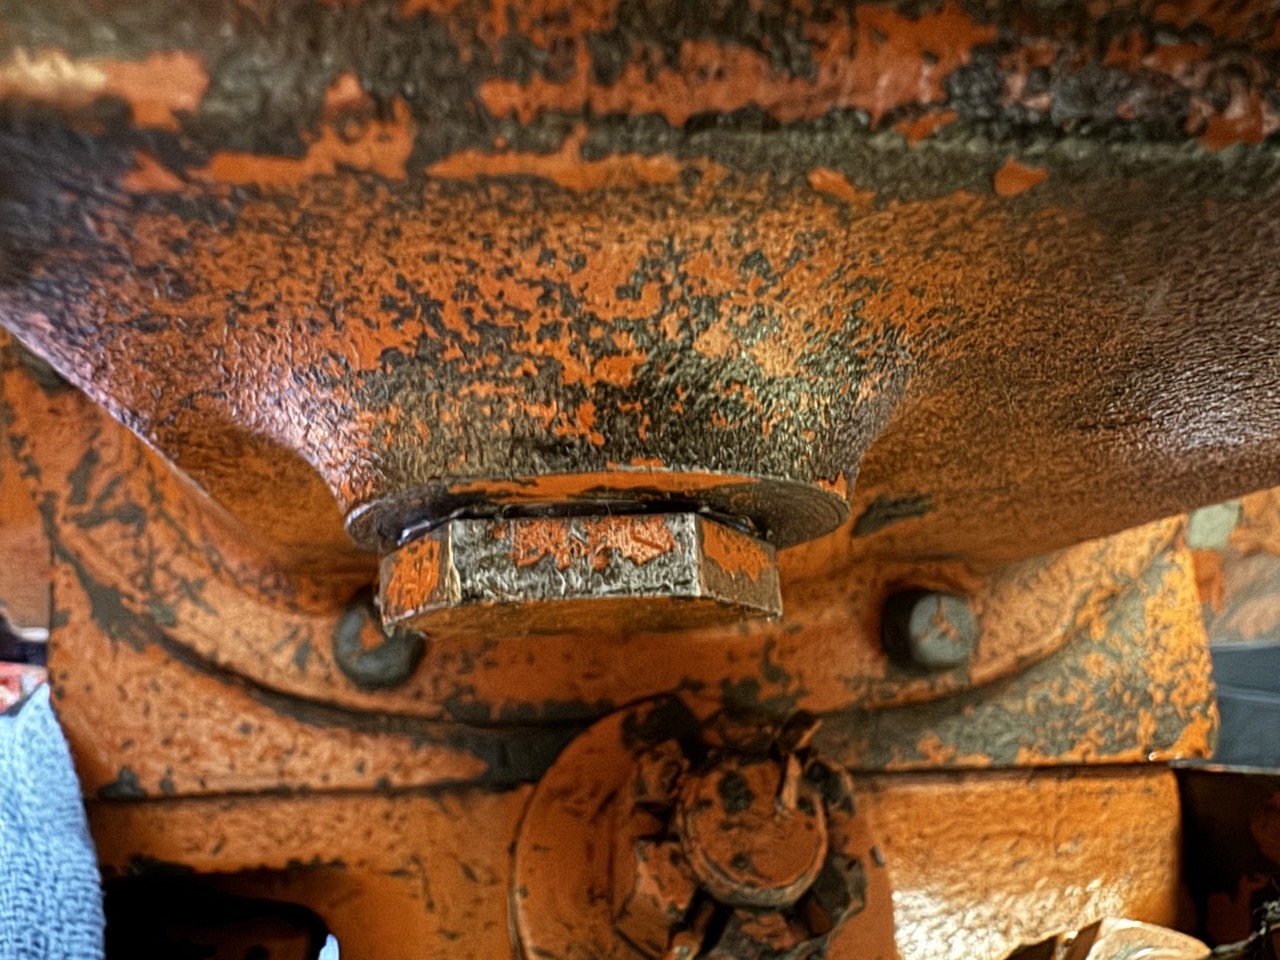
Used a fiber optic camera from Amazon to look and see where the oil was leaking from the left final axil. Camera worked awesome from my iPhone and was only about $18 after the 30% discount.
While a bit dark, despite the LED lights, was easy to see the leak on the left differential seal.
Here are a few images. Clearly the seal is leaking and not between the surface of the carrier and differential. I have to think this is where the carrier was worn and the seal did not have good seat and seal. Using JB Weld would work well here as previously noted.
You see as an example there is no leakage between the carrier and differential case.
Once we have the double lip seal, we will take this apart and reassemble with the new seal and the carrier we picked up from the farm this past weekend. < id="idg-io-safe-browsing-enabled" ="" oninit="true">
Edited by CA13414 - 18 Jun 2024 at 8:29pm
|
|
Helping the aged survive and thrive! 1953 CA
|
|
CA13414
Silver Level
Joined: 25 Feb 2024
Location: Nebraska
Points: 255
|
Post Options
Thanks(0)
Quote Reply
Posted: 19 Jun 2024 at 5:49am |
I want to replace the bearing race in the carrier from the farm since it has a few pits. I am not sure if I can change out the one in the worn differential carrier with the farm carrier without damage. I also have not yet found a new bearing race online yet
Thoughts exchanging or a place to buy an new differential bearing race/cup for the carrier
< id="idg-io-safe-browsing-enabled" ="" oninit="true">
Edited by CA13414 - 19 Jun 2024 at 5:50am
|
|
Helping the aged survive and thrive! 1953 CA
|
|
steve(ill)
Orange Level Access
Joined: 11 Sep 2009
Location: illinois
Points: 79894
|
Post Options
Thanks(0)
Quote Reply
Posted: 19 Jun 2024 at 8:16am |
This is an old list i used when i rebuilt my "B" ... should be the same.. I got the numbers off the bearings themselves..
Transmission & Differential:
Differential Carrier Seal - CR #11343, National #410163R
Differential Carrier/Bull Pinion Speedi-Sleeve - CR #99125
Differential Carrier Cup - Timken #25520
Differential Carrier Cone - Timken #25580
Input Shaft Cup - Timken #15250
Input Shaft Cone - Timken #15120
Input Shaft Seal - CR #11800, National #450162 (471765)
|
|
Like them all, but love the "B"s.
|
|
steve(ill)
Orange Level Access
Joined: 11 Sep 2009
Location: illinois
Points: 79894
|
Post Options
Thanks(0)
Quote Reply
Posted: 19 Jun 2024 at 8:20am |
You can buy CHINA versions about half the price of this......you can install a cup / cone from two different manufactures as a NOT MATCHED SET.... Can work, but can also get a little "whine" when running.. I always MATCH the cup / cone. Check size below
- Part Number: 25580/25520
- ID: 1-3/4 inch , OD: 3-17/64 inch, Width: 15/16 inch
Edited by steve(ill) - 19 Jun 2024 at 8:22am
|
|
Like them all, but love the "B"s.
|
|
CA13414
Silver Level
Joined: 25 Feb 2024
Location: Nebraska
Points: 255
|
Post Options
Thanks(0)
Quote Reply
Posted: 19 Jun 2024 at 7:22pm |
steve(ill) wrote:
You can buy CHINA versions about half the price of this......you can install a cup / cone from two different manufactures as a NOT MATCHED SET.... Can work, but can also get a little "whine" when running.. I always MATCH the cup / cone. Check size below
- Part Number: 25580/25520
- ID: 1-3/4 inch , OD: 3-17/64 inch, Width: 15/16 inch
|
Outstanding and thanks Steve!!! Just ordered this unit and will plan to use the race/cup so they match.
Much appreciated.!!
< id="idg-io-safe-browsing-enabled" ="" oninit="true">
Edited by CA13414 - 19 Jun 2024 at 7:22pm
|
|
Helping the aged survive and thrive! 1953 CA
|
|
CA13414
Silver Level
Joined: 25 Feb 2024
Location: Nebraska
Points: 255
|
Post Options
Thanks(0)
Quote Reply
Posted: 12 Jul 2024 at 6:11am |
Was off the grid for the past weeks. But it is good to be back. I am ready to finish up our CA.
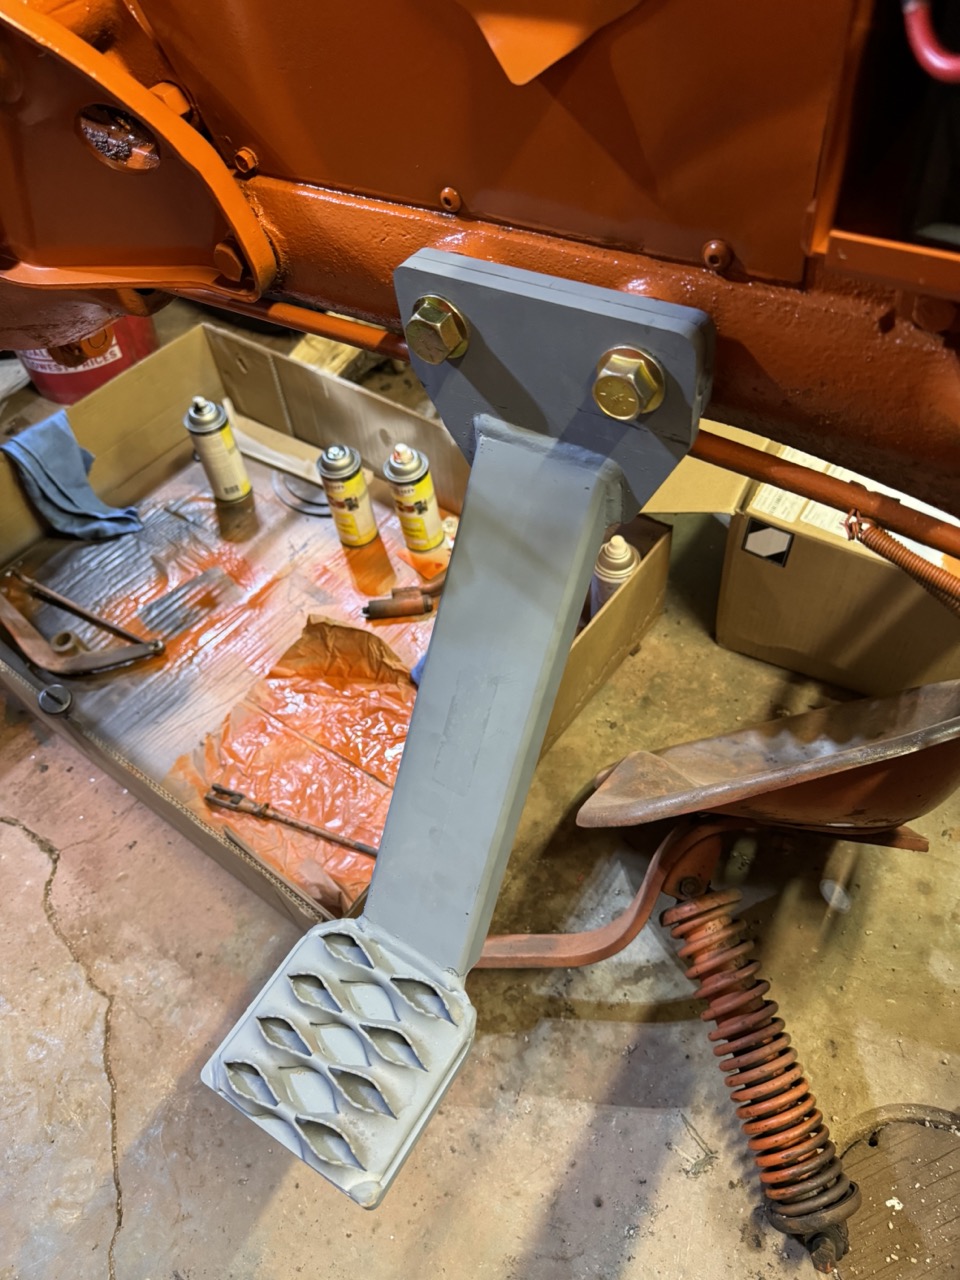
Added the new step and did hit it with a first coat of paint.
Today we will press out the old bearing race and seal from the differential carrier and press in the new ones. Plan to change this out this weekend if we have enought time.
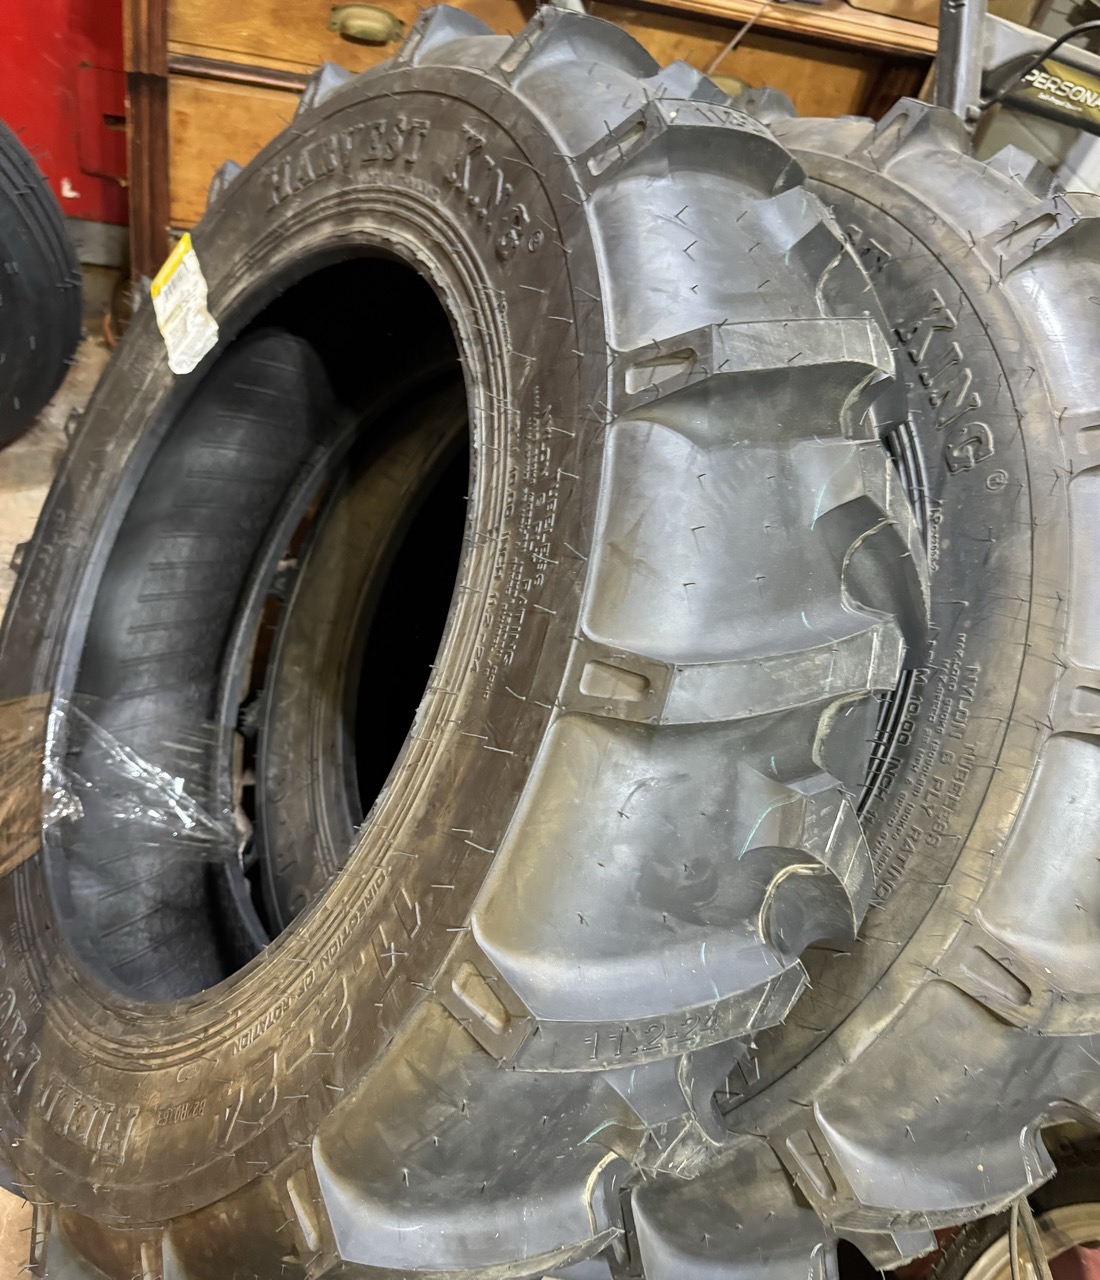
Finally did receive the new rear tires. Bought R-1 11.2X24 C tires from Walmart and with free shipping and delivery was not a bad price at $217 each.
Need to finish cleaning up the rear rims so we can mount the tires. My bothers garage is getting a bit crowded and need to move this along over the next weeks.
< id="idg-io-safe-browsing-enabled" ="" oninit="true">
Edited by CA13414 - 12 Jul 2024 at 6:18am
|
|
Helping the aged survive and thrive! 1953 CA
|
|
Ted J
Orange Level

Joined: 05 Jul 2010
Location: La Crosse, WI
Points: 18778
|
Post Options
Thanks(0)
Quote Reply
Posted: 12 Jul 2024 at 1:42pm |
Things are coming along good for you! Keep it up! Thanks for the info on the muffler and the battery. The pics probably don't do you justice as I'm sure the real thing looks even better. You and your brother should be proud. What are you using for posting pics?
|
|
"Allis-Express"
19?? WC / 1941 C / 1952 CA / 1956 WD45 / 1957 WD45 / 1958 D-17
|
|
CA13414
Silver Level
Joined: 25 Feb 2024
Location: Nebraska
Points: 255
|
Post Options
Thanks(0)
Quote Reply
Posted: 12 Jul 2024 at 6:05pm |
Ted J wrote:
Things are coming along good for you! Keep it up! Thanks for the info on the muffler and the battery. The pics probably don't do you justice as I'm sure the real thing looks even better. You and your brother should be proud. What are you using for posting pics?
|
Thank you Ted!
You are welcome and hope they work for you!! Was nice to find a battery that fit the 6-volt box.
I simply use my iPhone to take the pictures and then convert them to a lower quality JPEG via my iMac. I was converting my original (2.5MB) to low quality (42 KB) and then started converting to medium (118KB) and most recently to larger (356KB). Thus, a number my original files are low quality. Better quality from here forward. I then just upload the images via the forum file manager tools.
< id="idg-io-safe-browsing-enabled" ="" oninit="true">
Edited by CA13414 - 12 Jul 2024 at 6:07pm
|
|
Helping the aged survive and thrive! 1953 CA
|
|
CA13414
Silver Level
Joined: 25 Feb 2024
Location: Nebraska
Points: 255
|
Post Options
Thanks(0)
Quote Reply
Posted: 13 Jul 2024 at 9:00pm |
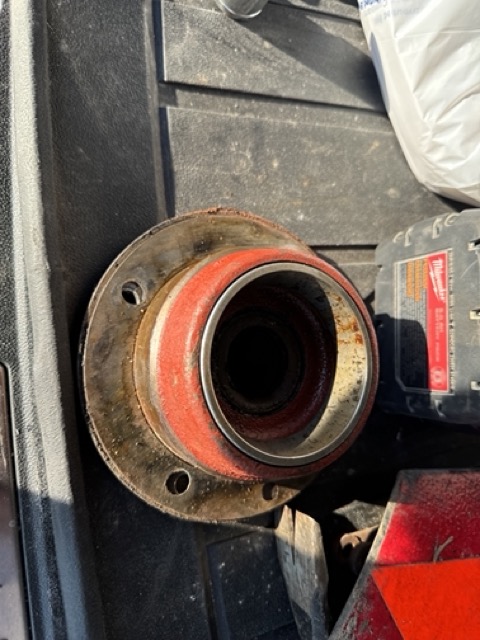
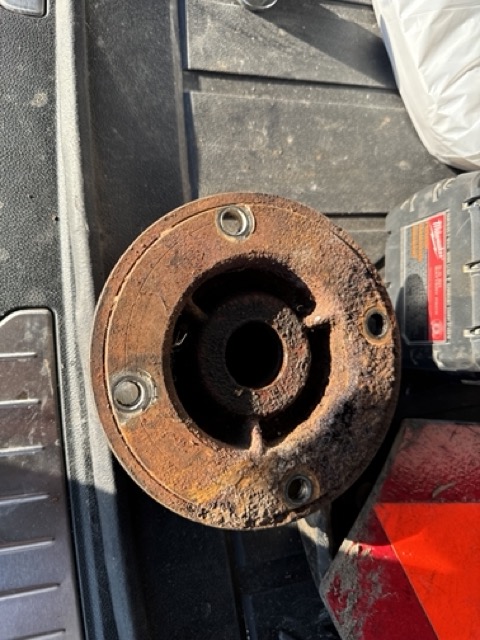
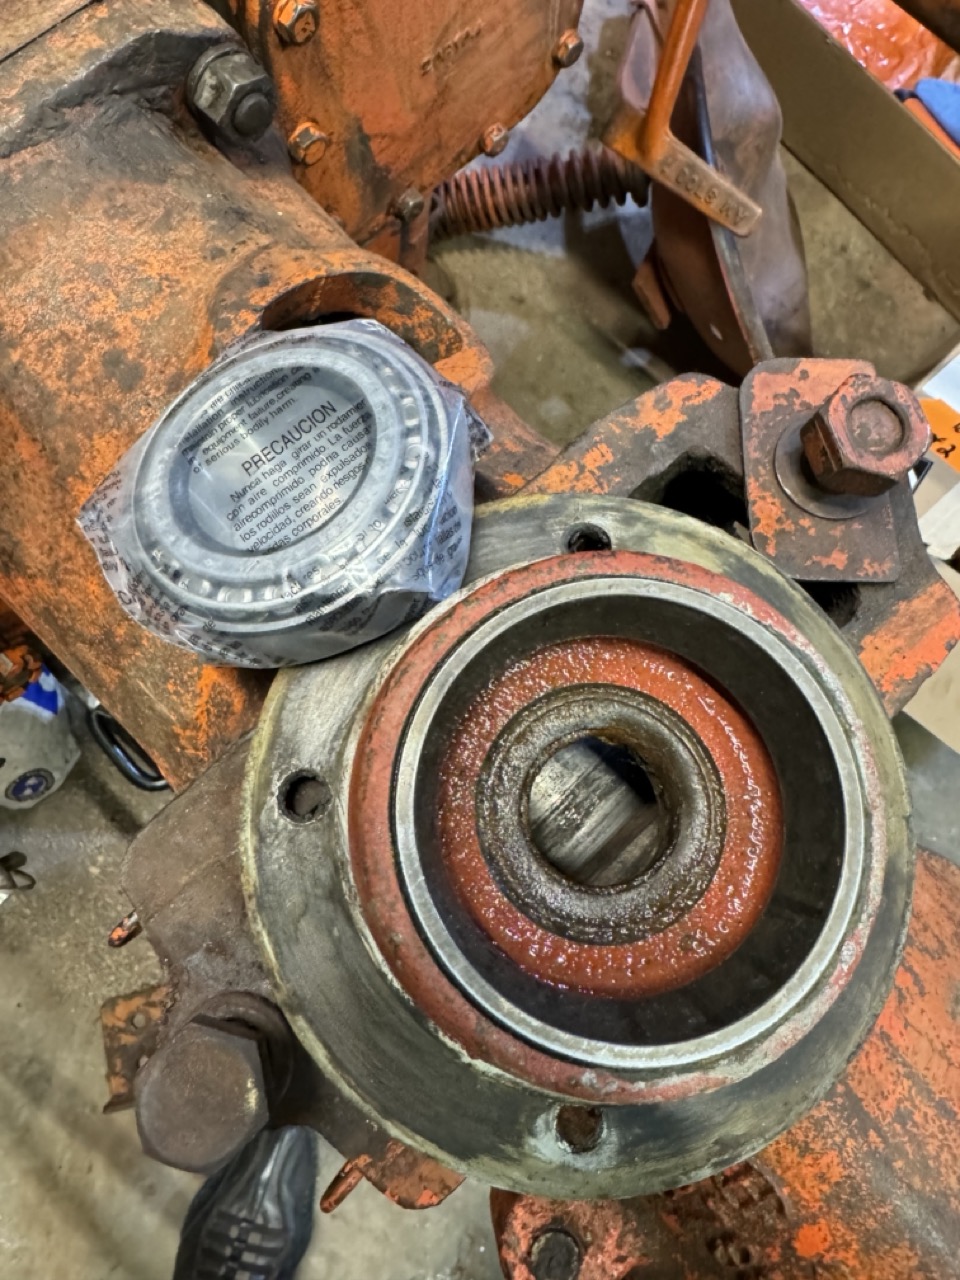
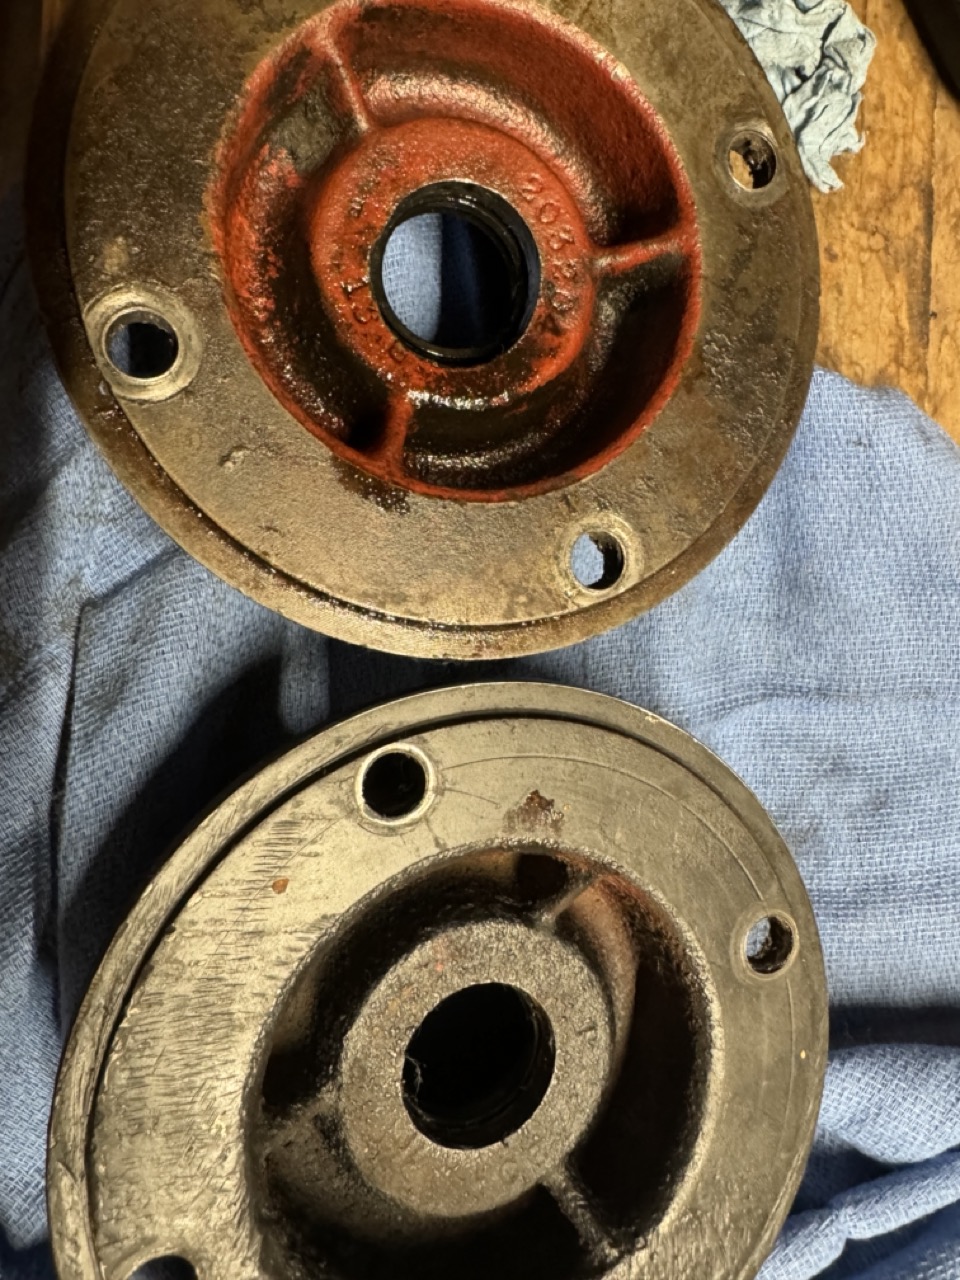
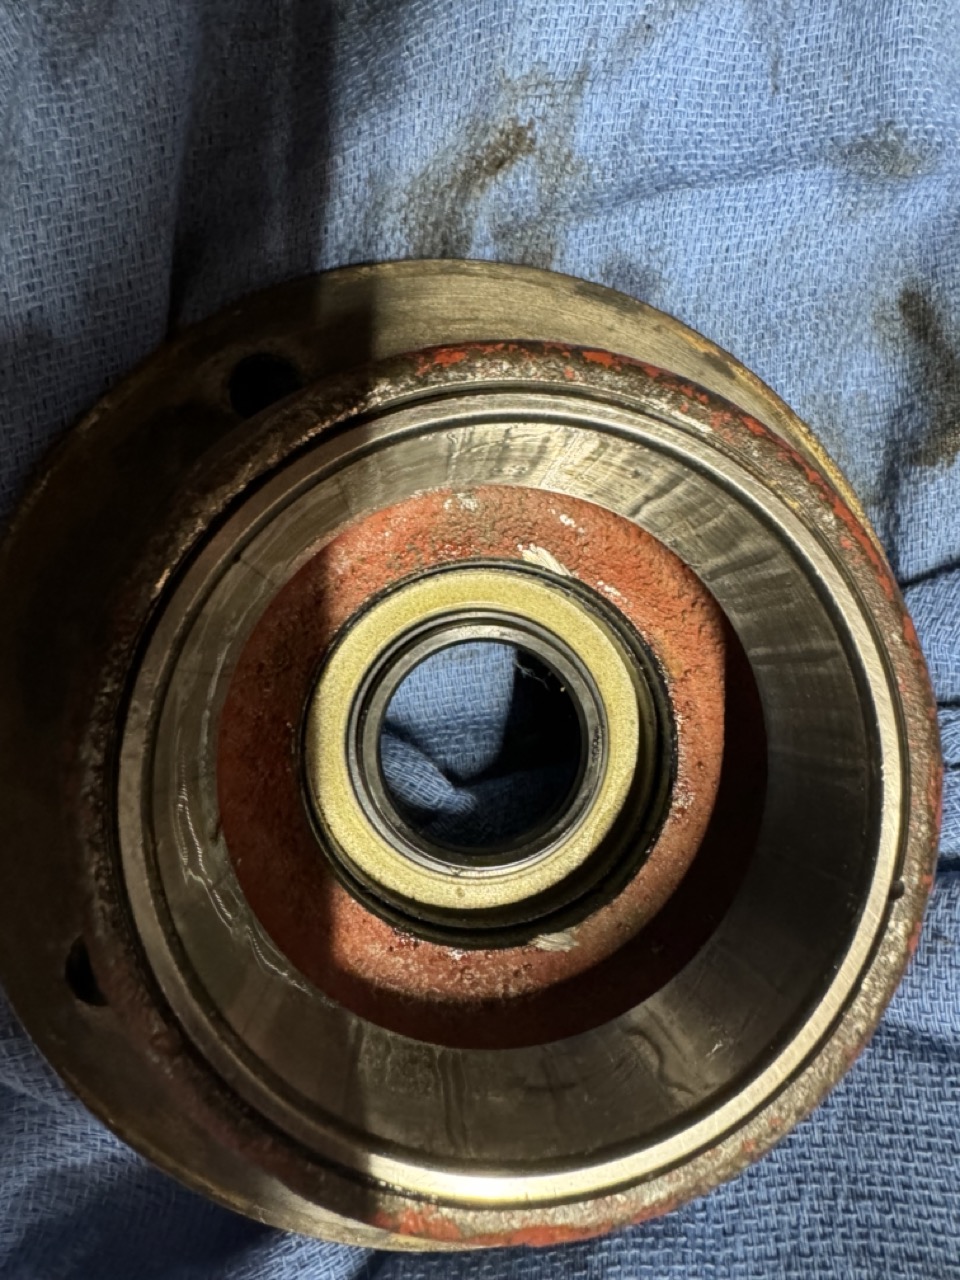
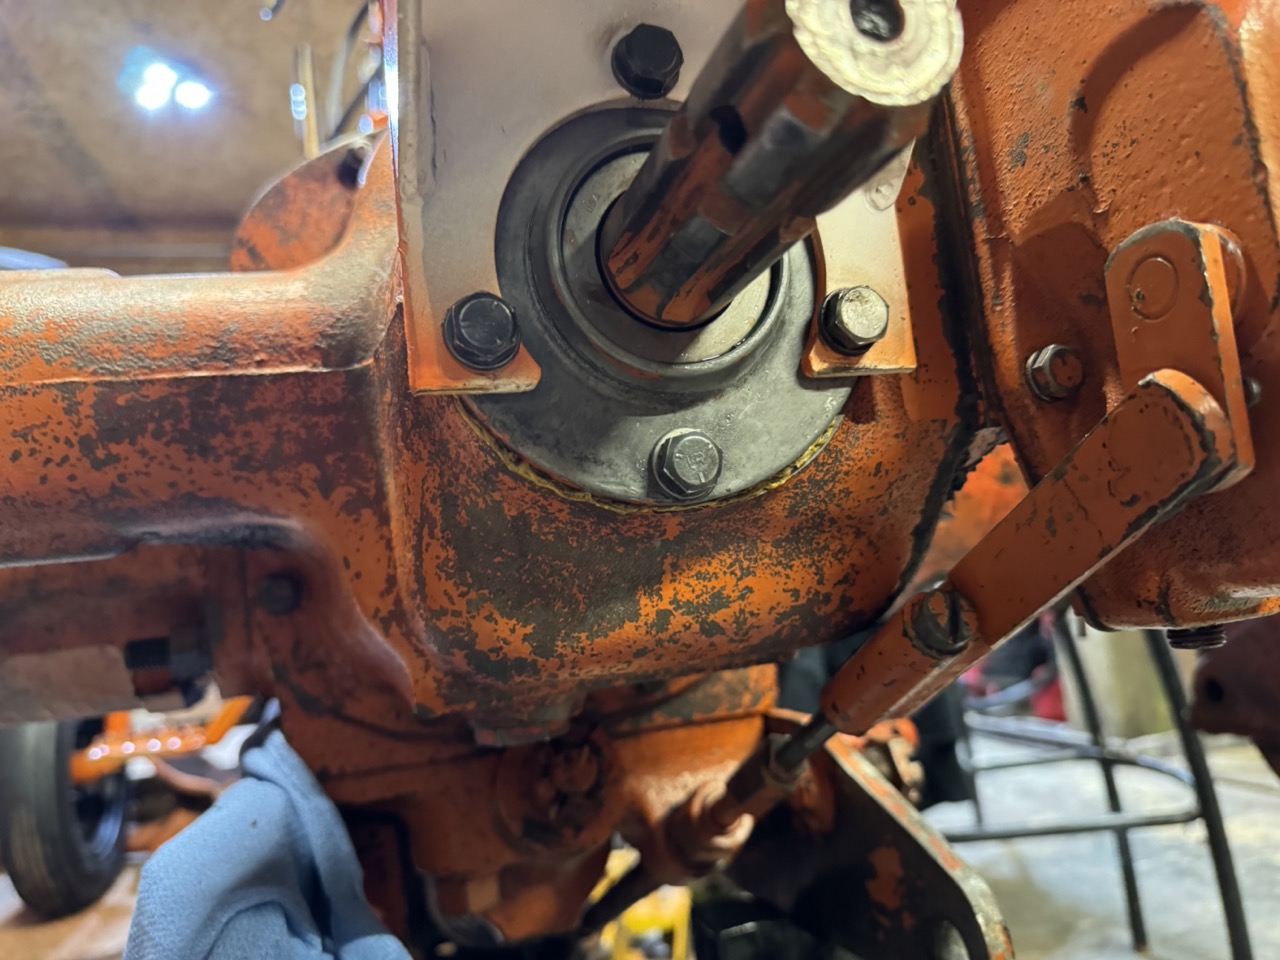
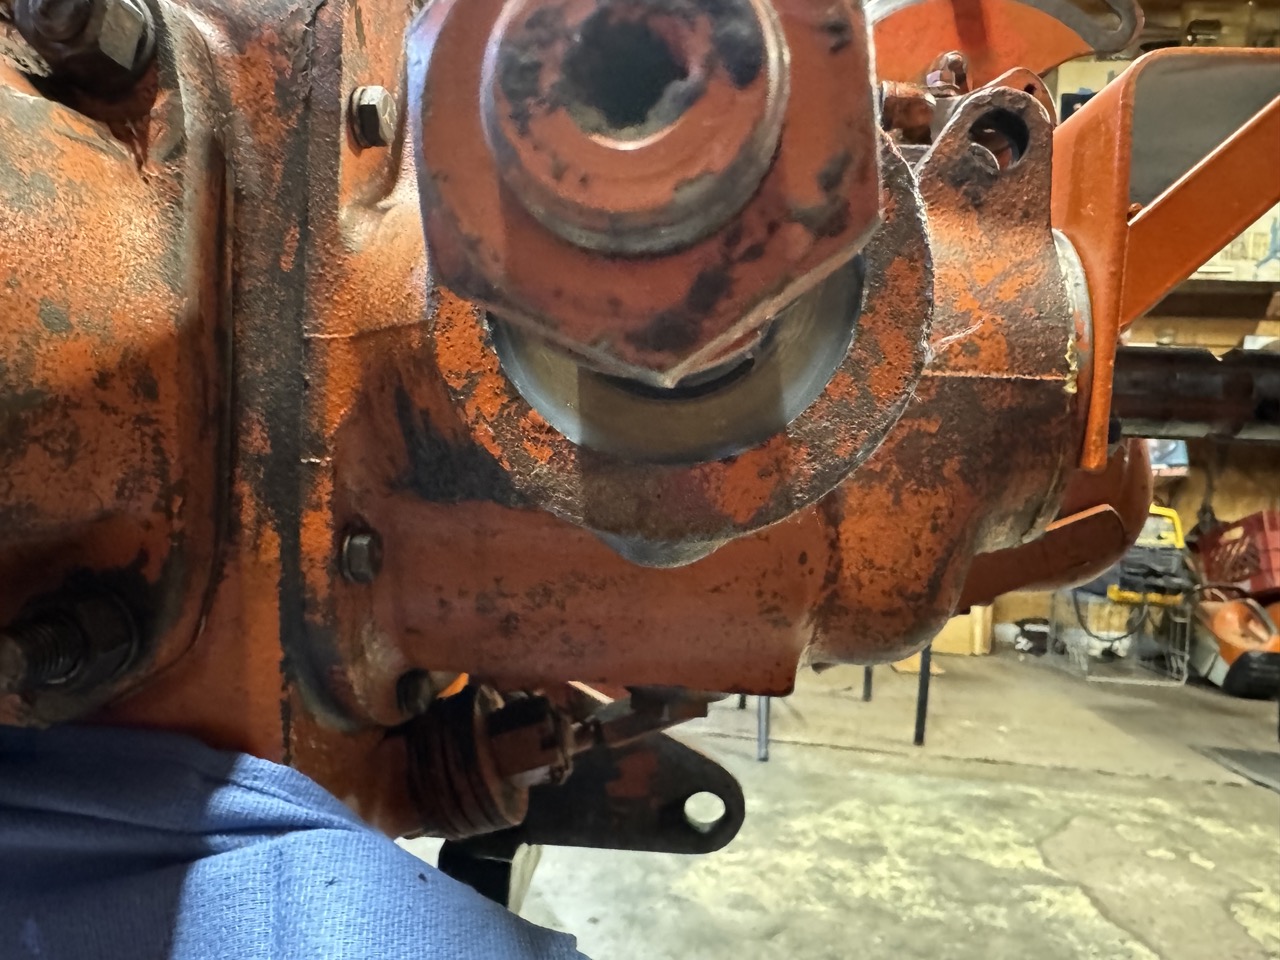
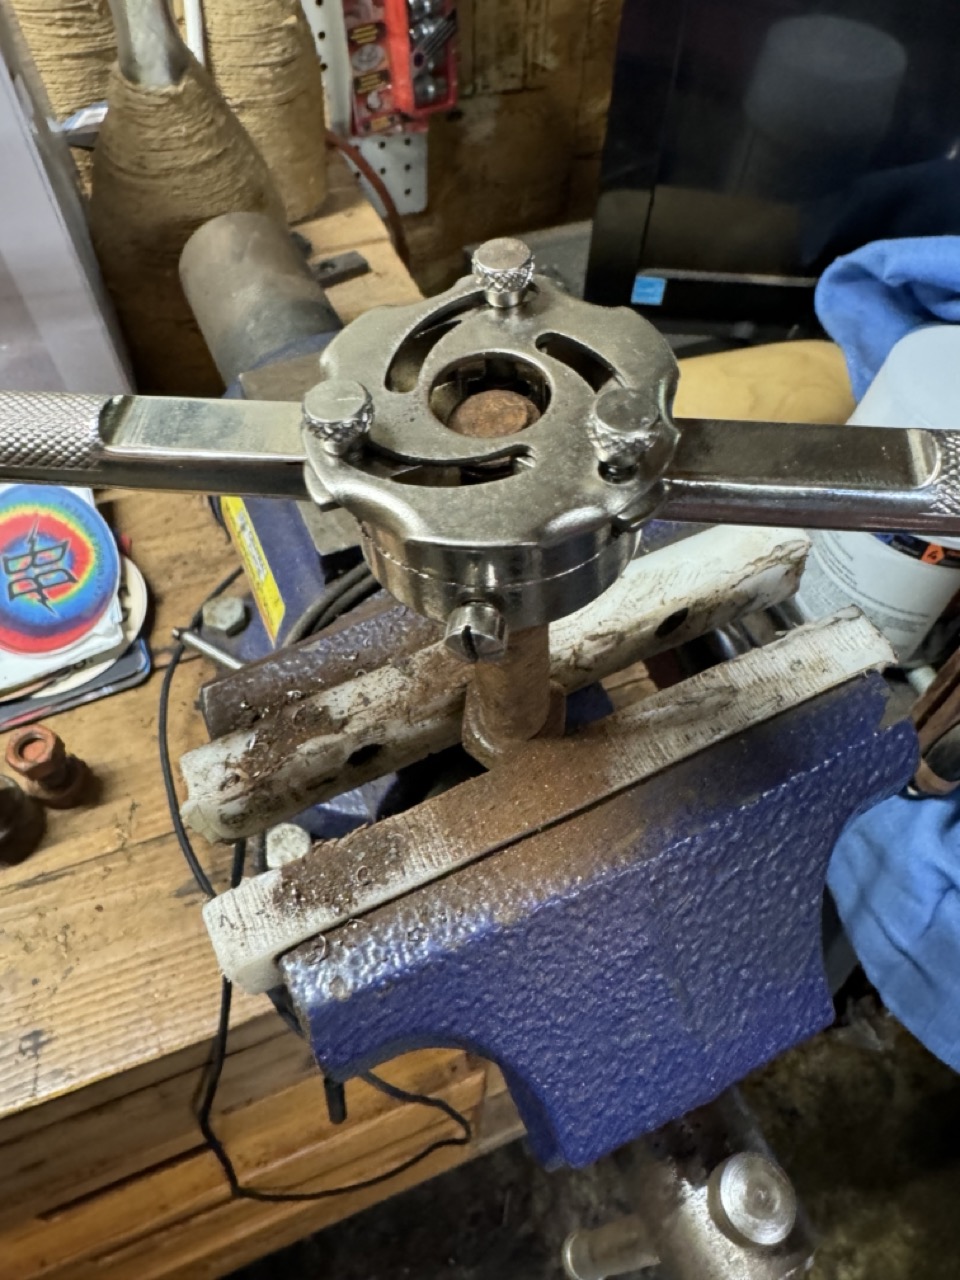
Today we took apart the left final axle and installed the new carrier, seal and bearing race. First was to clean up the carrier we took off the family CA and press the race into the carrier. Then put in a new seal.
When we removed the left axle, it was clear the leak was from the seal leaking around the seal in the carrier where it was worn.
Here is the old worn carrier on top and the one on the bottom from the family CA. Hopefully with the seal seated without the worn carrier will not leak. A little permatex also will not hurt!
The bearing fit perfectly into the race and the new seal set nicely.
Then installed new carrier and seal. Was easy with the engine lift to reinsert the final drive shaft and secure.
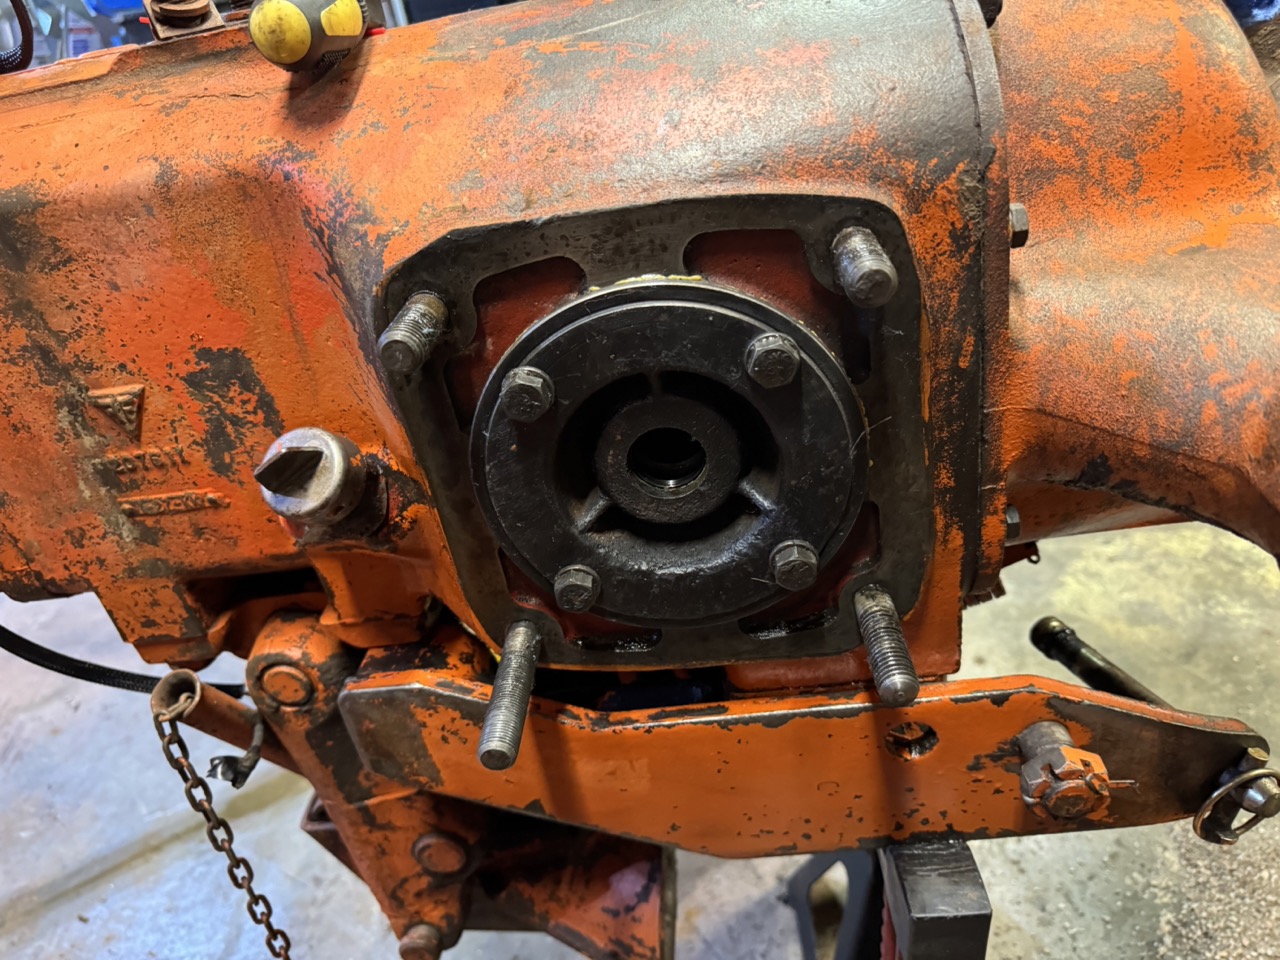
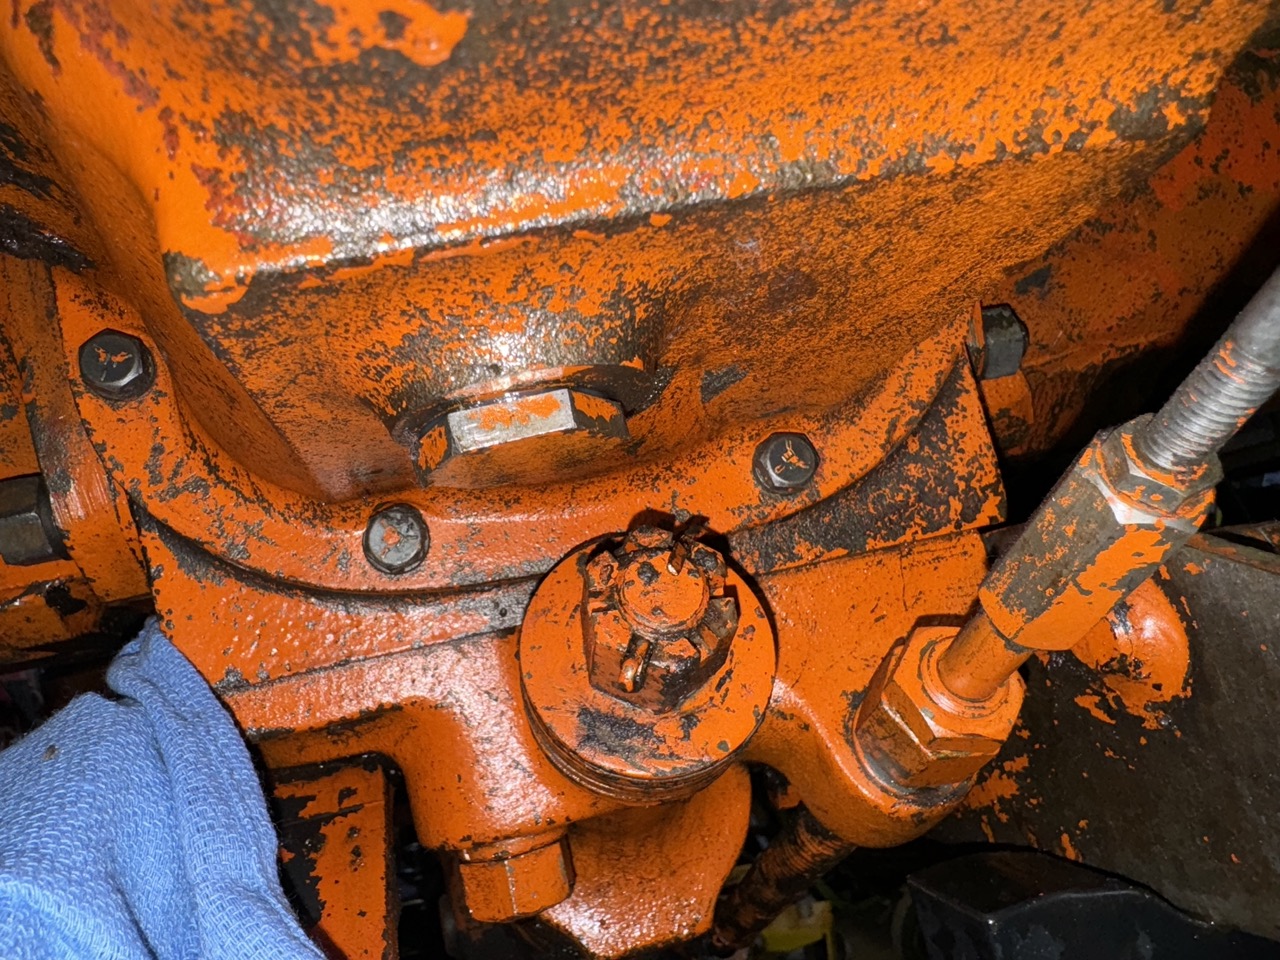
After reattaching the final axle, we did change out the pulley seal. As well took off the PTO retaining cover and shims since it was leaking oil. The seal was OK but was leaking between the shims which had quite a bit of build up. Cleaned them up and put back together with a bit of permatex.
Filled with oil and will monitor for any leaks. Thus, far it is holding well!!
< id="idg-io-safe-browsing-enabled" ="" oninit="true">
Edited by CA13414 - 13 Jul 2024 at 10:31pm
|
|
Helping the aged survive and thrive! 1953 CA
|
|
CA13414
Silver Level
Joined: 25 Feb 2024
Location: Nebraska
Points: 255
|
Post Options
Thanks(0)
Quote Reply
Posted: 13 Jul 2024 at 9:33pm |
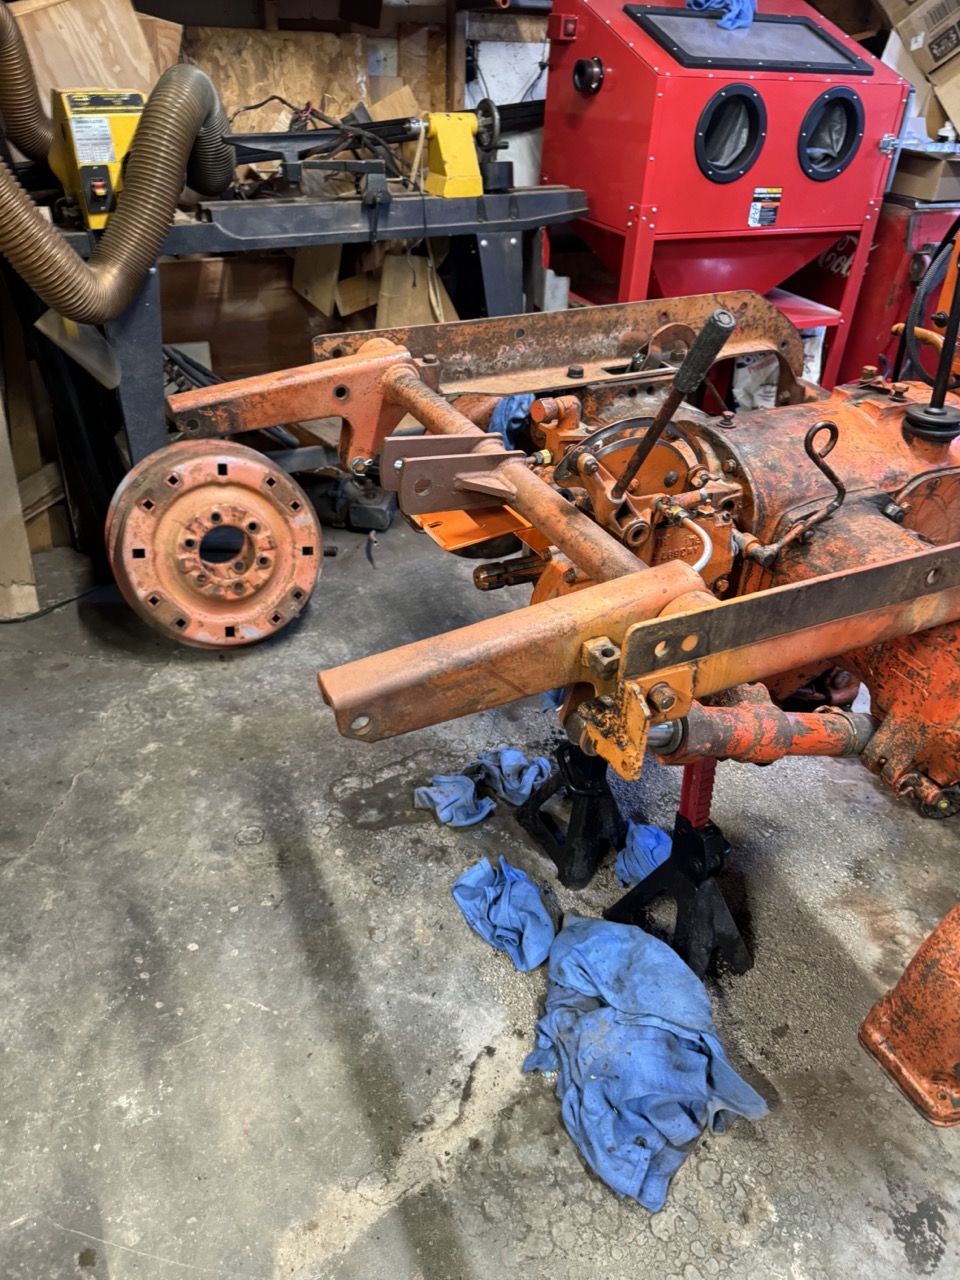
Then we installed the new brake bands. 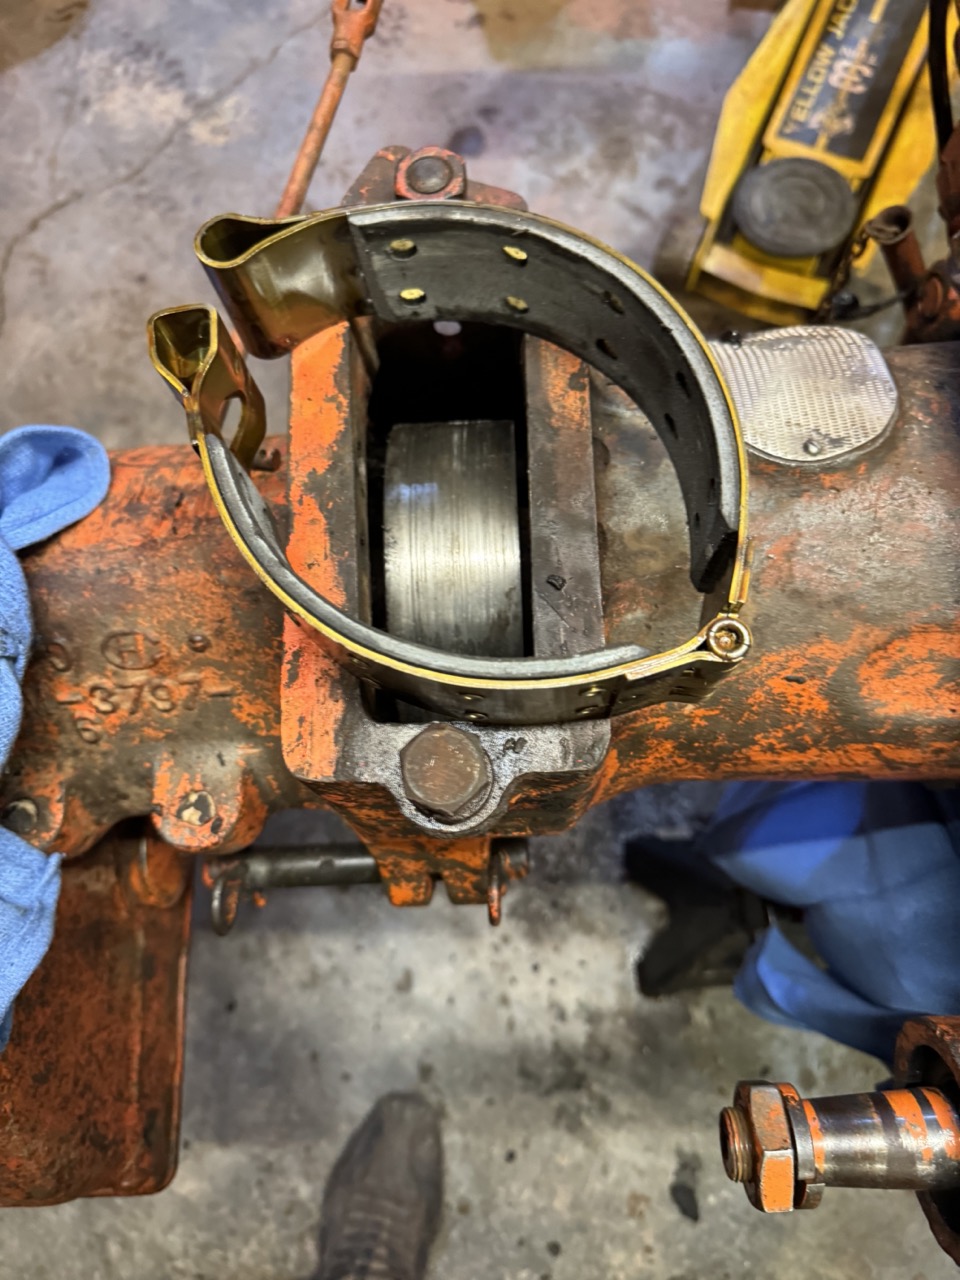
Was a bit of a pain to slip the new brake bands around the drum. Was only a problem because the new bands and specifically the loop that the toggle pins inserts into was not the same radius as the brake drum, thus bound up and prevented "slipping them" around the drum. After bending the loop end, it was easy to slip them around.
Then assembled the toggle mechanisms for both the left and right brakes. Was actually quite straight forward to do!
< id="idg-io-safe-browsing-enabled" ="" oninit="true">
Edited by CA13414 - 13 Jul 2024 at 10:17pm
|
|
Helping the aged survive and thrive! 1953 CA
|
|
steve(ill)
Orange Level Access
Joined: 11 Sep 2009
Location: illinois
Points: 79894
|
Post Options
Thanks(0)
Quote Reply
Posted: 13 Jul 2024 at 9:43pm |
glad the bearing and seal worked out.... Leaking beteen shims is not uncommon.. Permatex (VERY THIN) normally helps..
Those are good looking brake shoes !!.. Sometimes you have to put a cable around the drum and pull the shoe thru with a 1/4 ton comealong attacthed to a roof rafter..  |
|
Like them all, but love the "B"s.
|
|
CA13414
Silver Level
Joined: 25 Feb 2024
Location: Nebraska
Points: 255
|
Post Options
Thanks(0)
Quote Reply
Posted: 13 Jul 2024 at 9:45pm |
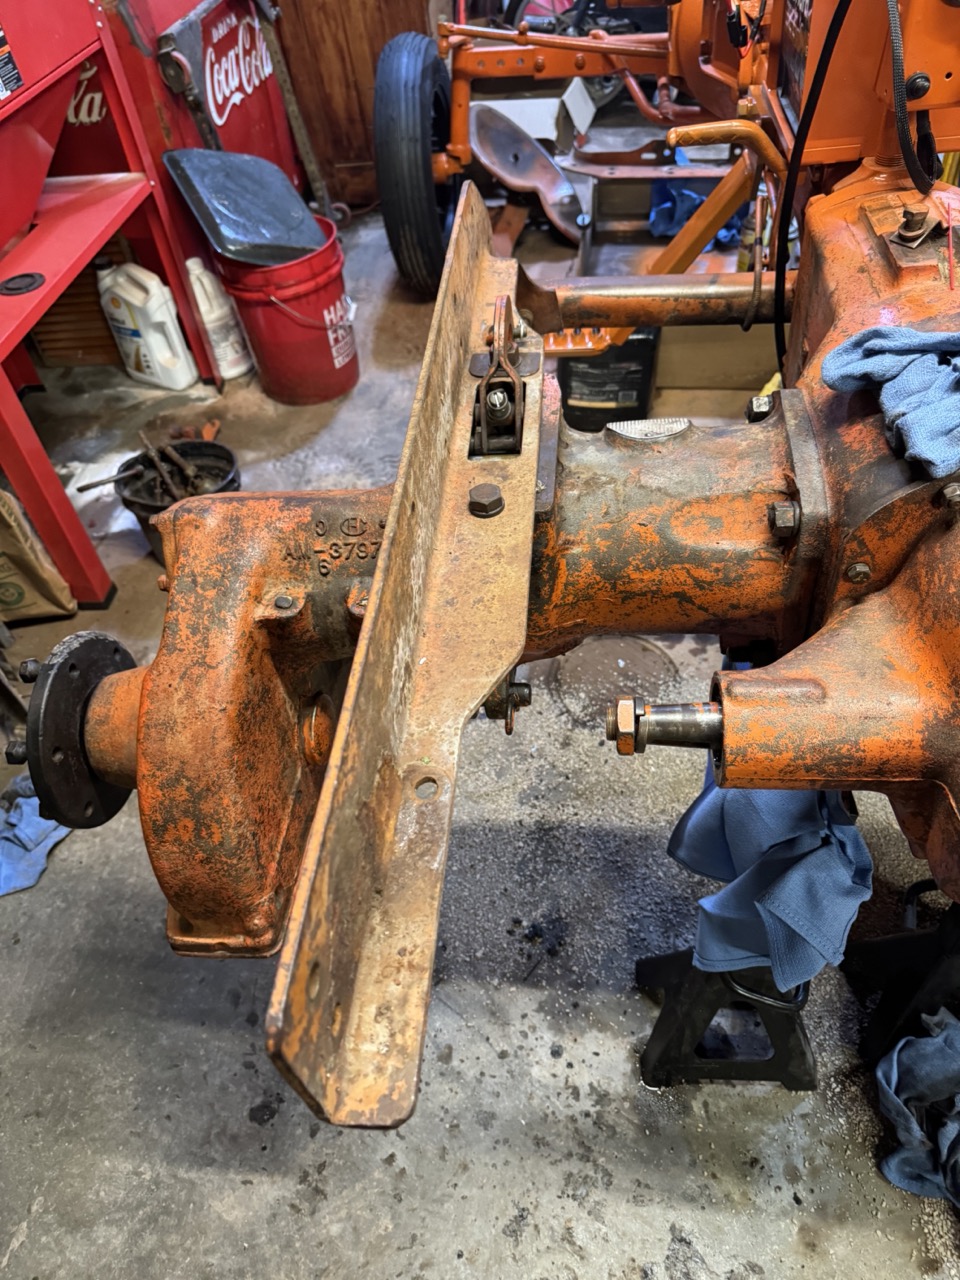
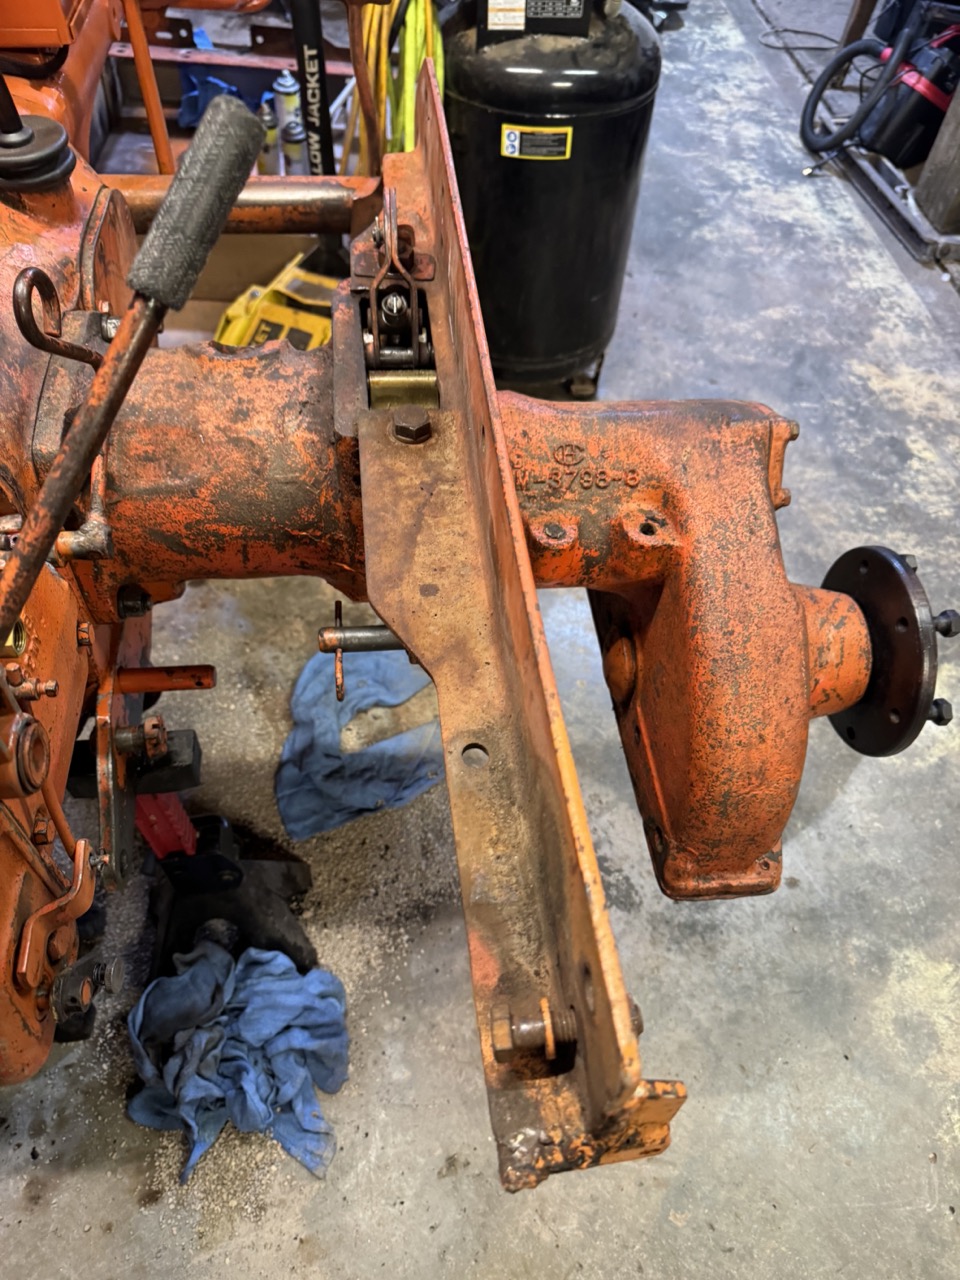
Then re-installed the left and right guard supports and attached the brake linkages.
Here are both supports attached.
Finally, with the adjusting screw adjusted the brakes!
< id="idg-io-safe-browsing-enabled" ="" oninit="true">
Edited by CA13414 - 13 Jul 2024 at 10:04pm
|
|
Helping the aged survive and thrive! 1953 CA
|
|
CA13414
Silver Level
Joined: 25 Feb 2024
Location: Nebraska
Points: 255
|
Post Options
Thanks(0)
Quote Reply
Posted: 13 Jul 2024 at 9:59pm |
3-4 hours after refilling with hydraulic-transmission oil, we used the fiber optic camera to look for any leaking at the differential carrier and seal. Nothing thus far!!!! Yay!!

< id="idg-io-safe-browsing-enabled" ="" oninit="true">
Edited by CA13414 - 13 Jul 2024 at 10:25pm
|
|
Helping the aged survive and thrive! 1953 CA
|
|
CA13414
Silver Level
Joined: 25 Feb 2024
Location: Nebraska
Points: 255
|
Post Options
Thanks(0)
Quote Reply
Posted: 13 Jul 2024 at 10:00pm |
At the end of the day here is our progress after about 6 hours of work. Was a great day!!
< id="idg-io-safe-browsing-enabled" ="" oninit="true">
Edited by CA13414 - 13 Jul 2024 at 10:37pm
|
|
Helping the aged survive and thrive! 1953 CA
|
|
CA13414
Silver Level
Joined: 25 Feb 2024
Location: Nebraska
Points: 255
|
Post Options
Thanks(0)
Quote Reply
Posted: 13 Jul 2024 at 10:21pm |
steve(ill) wrote:
glad the bearing and seal worked out.... Leaking beteen shims is not uncommon.. Permatex (VERY THIN) normally helps..
Those are good looking brake shoes !!.. Sometimes you have to put a cable around the drum and pull the shoe thru with a 1/4 ton comealong attacthed to a roof rafter.. |
LOL, that is awesome.... still laughing...the comealong is a great tool for exactly these problems!!!
As well, very much appreciate your help and insight!!!!
< id="idg-io-safe-browsing-enabled" ="" oninit="true">
Edited by CA13414 - 13 Jul 2024 at 10:36pm
|
|
Helping the aged survive and thrive! 1953 CA
|
|
1955CA
Orange Level
Joined: 10 Sep 2018
Location: Ontario, Canada
Points: 585
|
Post Options
Thanks(0)
Quote Reply
Posted: 14 Jul 2024 at 4:38am |
CA13414 wrote:
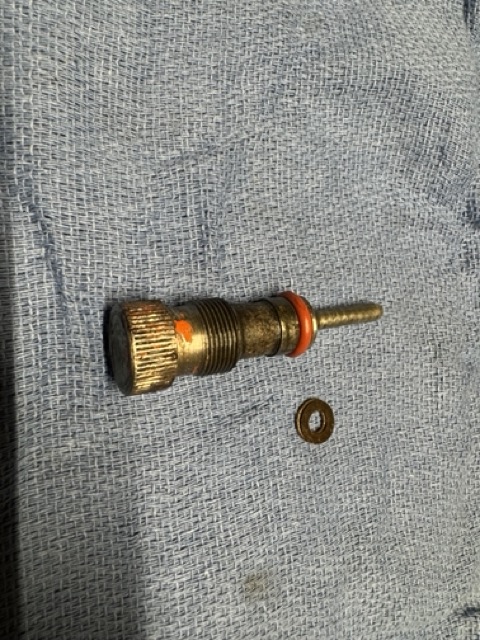
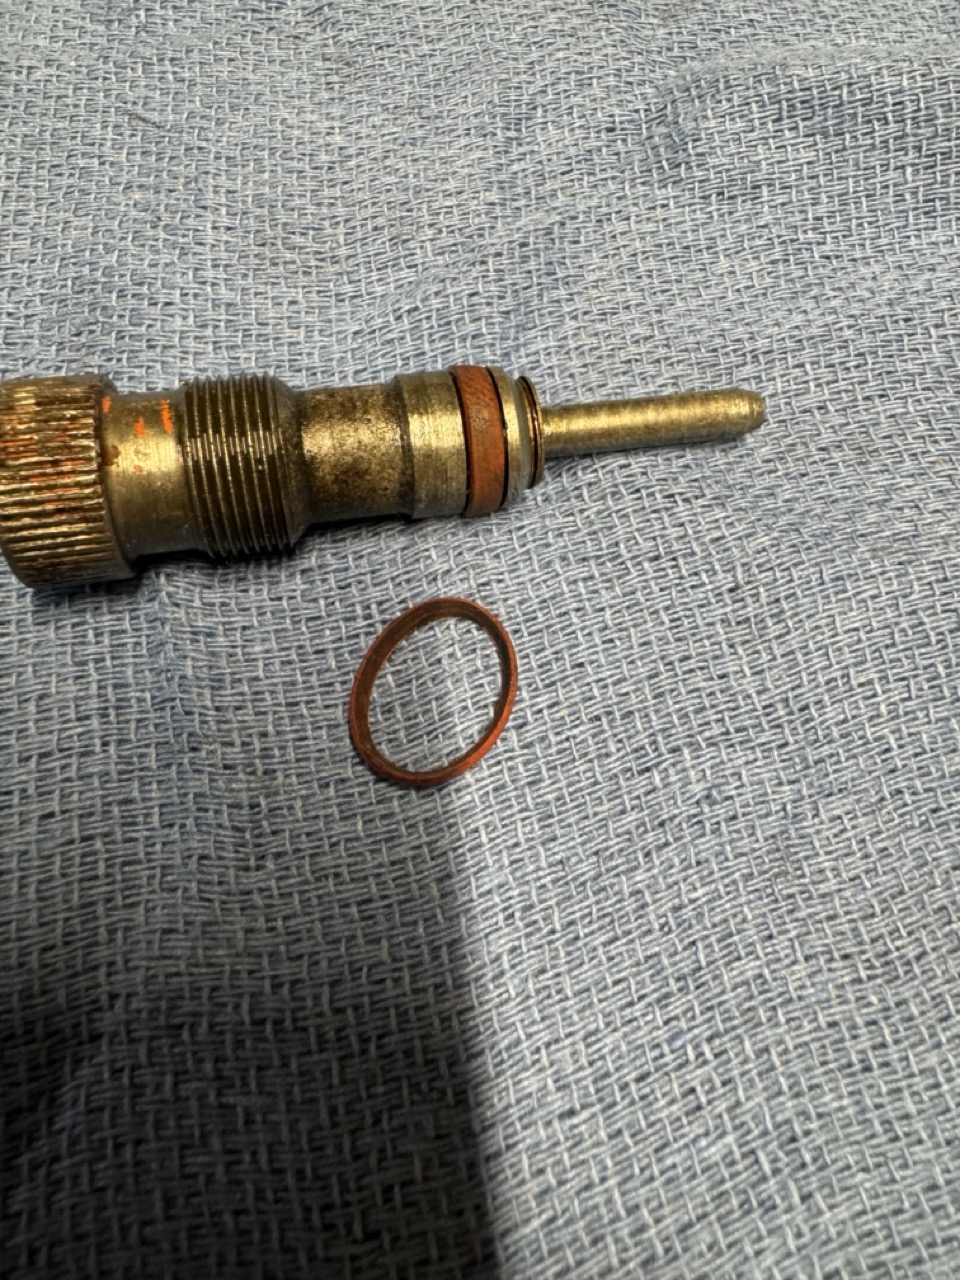
Finally added the O-ring to the hydraulic pressure control "screw C." I used a 3/8" ID and 5/8" OD ring. Was tight and actually shaved off the outer part of the O-Ring. It was still snug and I guess I will see if it leaks when there is a load.
Anyone have an idea on if this is OK or should I hunt for a different sized O-Ring.
Thank you! ....................................
Here is the O-Ring when installed on screw C
Here it is after taking it back out and you can see I shaved off the outer part of the O-Ring. Thoughts on if this will be oK. Looks like I need an O-Ring that is 1/16" smaller OD.
As I am looking at this, I think I flip the "shaved O-Ring" since it seams to have a bevel with the force of being shaved, and may would be a better seal......??????
Hey CA, did you end up getting the proper o-ring for this? Anyone have the AGCO part number? Mine has a slight leak also.
< id="idg-io-safe-browsing-enabled" ="" oninit="true"> |
|
|
CA13414
Silver Level
Joined: 25 Feb 2024
Location: Nebraska
Points: 255
|
Post Options
Thanks(0)
Quote Reply
Posted: 14 Jul 2024 at 7:00am |
1955CA wrote:
Hey CA, did you end up getting the proper o-ring for this? Anyone have the AGCO part number? Mine has a slight leak also. |
I have not. I did go to AGCO and look around but there were hundreds of "O-rings" and I could not find anything. Mostly because, there was nothing to guide me since they just list O-rings without measurements, sizes or description on where they fit.
I was planning to see if it leaked once up and running. Hoping the shaved O-ring from amazon is enough and doesnt leak.
However, now thinking about it, I will look around again and see if I get lucky!!!!
< id="idg-io-safe-browsing-enabled" ="" oninit="true">
Edited by CA13414 - 14 Jul 2024 at 7:01am
|
|
Helping the aged survive and thrive! 1953 CA
|
|
CA13414
Silver Level
Joined: 25 Feb 2024
Location: Nebraska
Points: 255
|
Post Options
Thanks(0)
Quote Reply
Posted: 14 Jul 2024 at 9:20am |
CA13414 wrote:
1955CA wrote:
Hey CA, did you end up getting the proper o-ring for this? Anyone have the AGCO part number? Mine has a slight leak also. |
I have not. I did go to AGCO and look around but there were hundreds of "O-rings" and I could not find anything. Mostly because, there was nothing to guide me since they just list O-rings without measurements, sizes or description on where they fit.
I was planning to see if it leaked once up and running. Hoping the shaved O-ring from amazon is enough and doesnt leak.
However, now thinking about it, I will look around again and see if I get lucky!!!!
|
I did just order a 110 Silicone O-Ring, 70A Durometer, Red, 3/8" ID, 9/16" OD, 3/32" Width.
Will see if that works!!
< id="idg-io-safe-browsing-enabled" ="" oninit="true">
Edited by CA13414 - 14 Jul 2024 at 9:21am
|
|
Helping the aged survive and thrive! 1953 CA
|
|
1955CA
Orange Level
Joined: 10 Sep 2018
Location: Ontario, Canada
Points: 585
|
Post Options
Thanks(0)
Quote Reply
Posted: 14 Jul 2024 at 10:56pm |
Okay, thanks CA13414. Keep us posted. Hope it works out for you.
Has anyone bought new engine oil pressure gauges from Steiner's? I'm thinking I read somewhere before they are not accurate. My rusty original AC gauge used to read on the low side of the normal but the Steiner one is right at the high end of normal.
|
|
Gary
Orange Level Access
Joined: 13 Sep 2009
Location: Peterborough,On
Points: 5302
|
Post Options
Thanks(0)
Quote Reply
Posted: 15 Jul 2024 at 8:35am |
|
Per the Allis Parts Catalog:
223578 RING, seal, adjusting screw
G
|
|
CA13414
Silver Level
Joined: 25 Feb 2024
Location: Nebraska
Points: 255
|
Post Options
Thanks(0)
Quote Reply
Posted: 15 Jul 2024 at 5:53pm |
Gary wrote:
Per the Allis Parts Catalog:
223578 RING, seal, adjusting screw
G |
< id="idg-io-safe-browsing-enabled" ="" oninit="true">
Thank you! I need to remind myself to look at the parts catalog!
|
|
Helping the aged survive and thrive! 1953 CA
|
|
CA13414
Silver Level
Joined: 25 Feb 2024
Location: Nebraska
Points: 255
|
Post Options
Thanks(0)
Quote Reply
Posted: 18 Jul 2024 at 9:02pm |
A bit more done today. First used the fiber optic camera to see if the seals we changed out on Saturday were leaking.... Yay nothing is leaking vs. three weeks ago when all of these were leaking.
The differential carrier is free of any leaks from many angles.
As well the PTO seal and spacer are free of leaking.
The Pulley seal is also free of oil drips. And finally the differential drain plug with the new nylon is not leaking. < id="idg-io-safe-browsing-enabled" ="" oninit="true">
Edited by CA13414 - 18 Jul 2024 at 9:07pm
|
|
Helping the aged survive and thrive! 1953 CA
|
|
CA13414
Silver Level
Joined: 25 Feb 2024
Location: Nebraska
Points: 255
|
Post Options
Thanks(0)
Quote Reply
Posted: 18 Jul 2024 at 9:16pm |
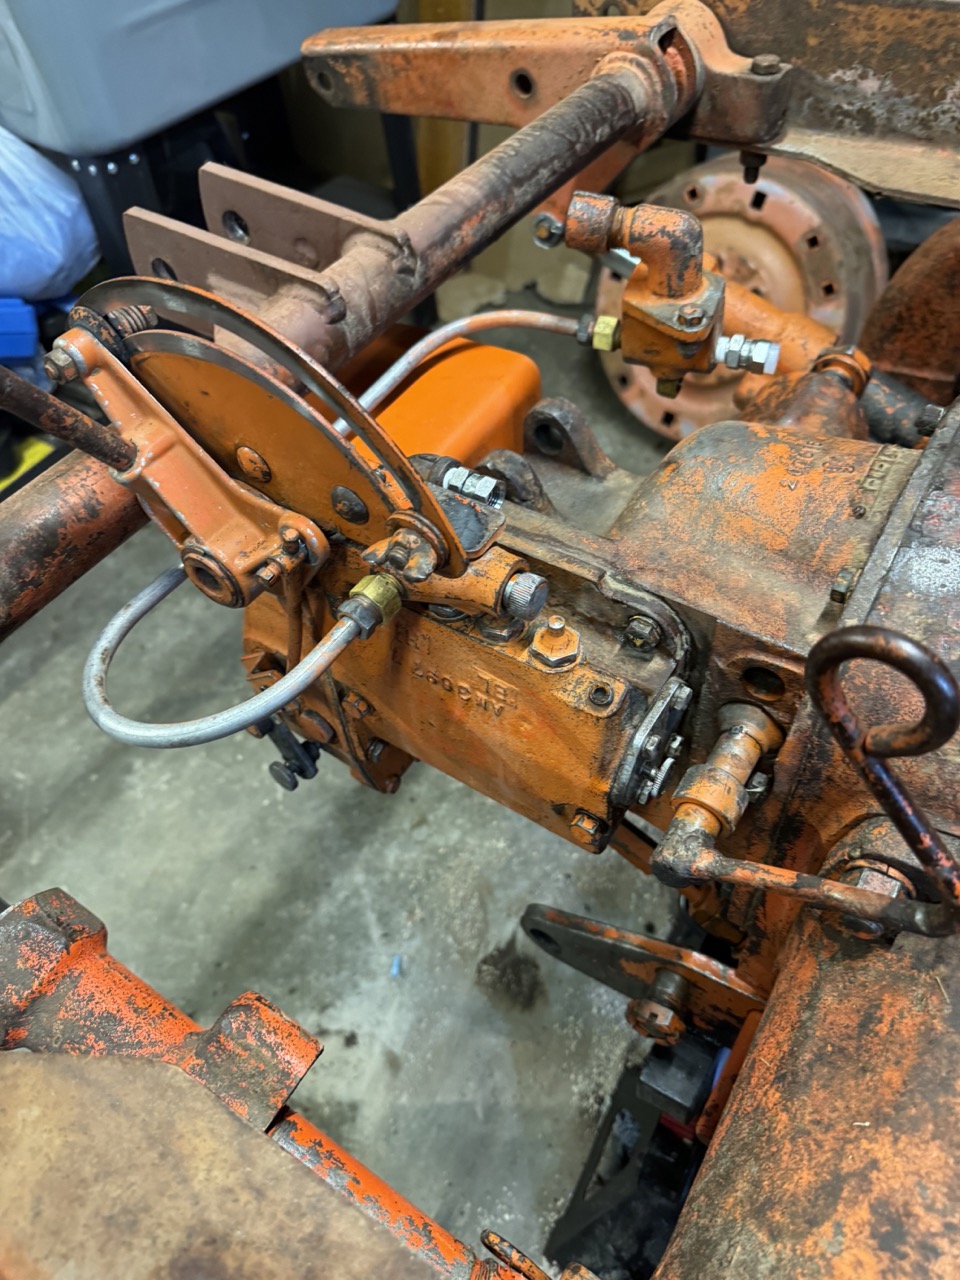
Cleaned up the hydraulic lines and cylinders and yes again took off the oil and grease with brake cleaner. Then reassembled the hydraulics. Still need to get two new 1/4 NPT 20" hoses.
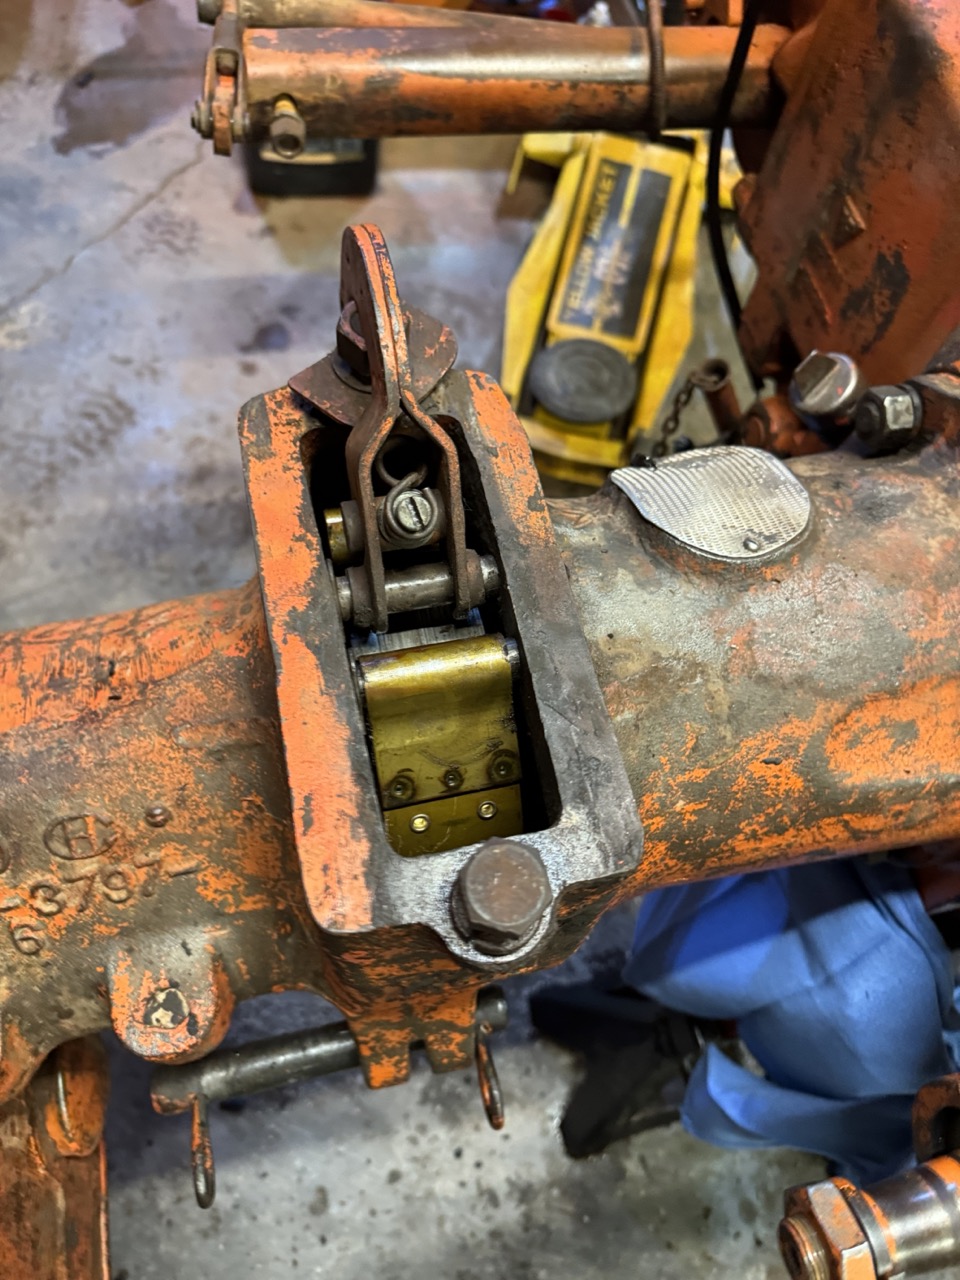
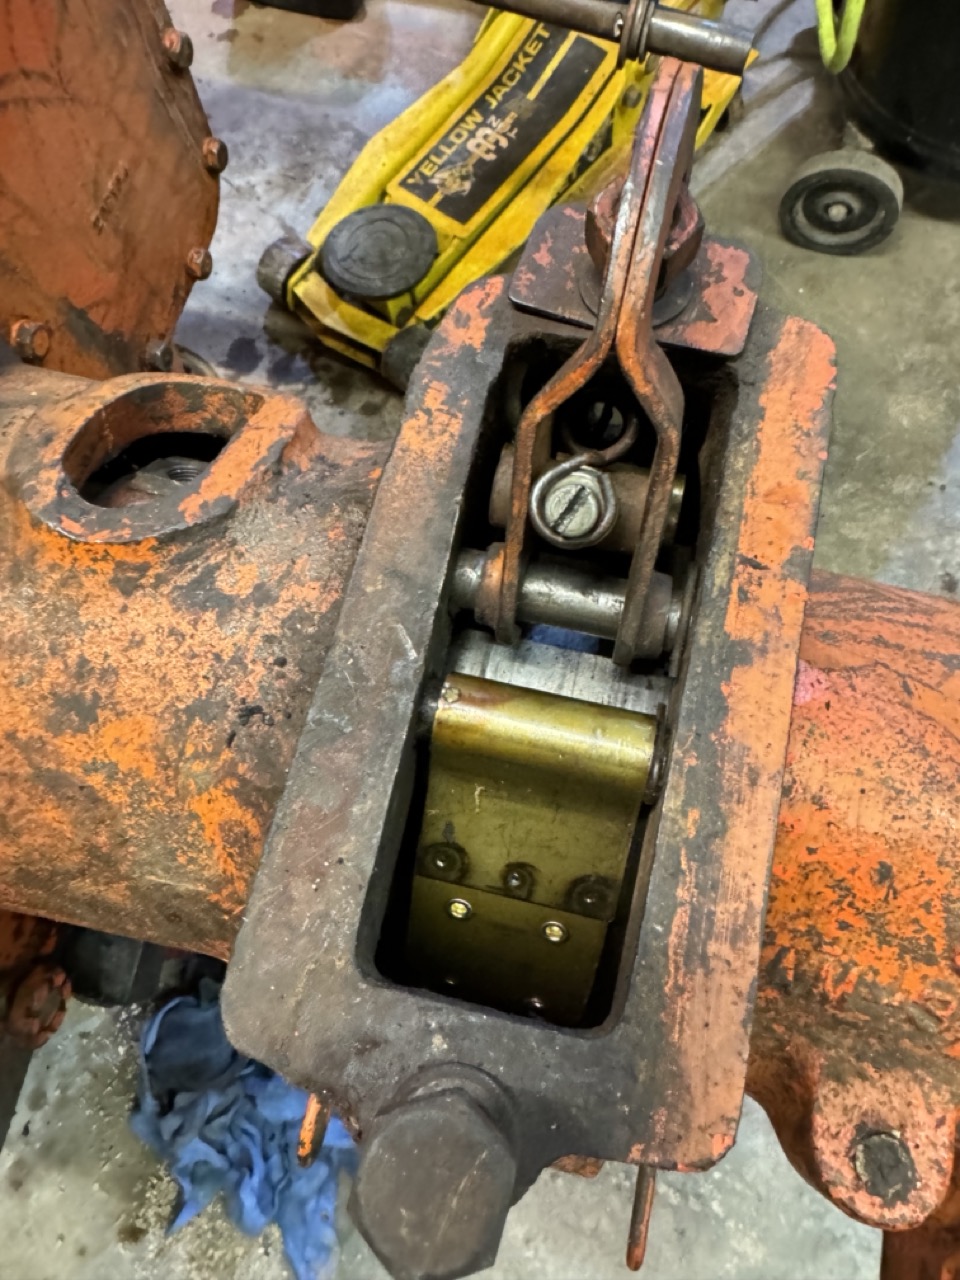
Did need to clean up the bolt threads which were worn and full of 70 years of rust, dirt and grease. Then assembled the hydraulic lift.
Here is the assembled lift sans hydraulic hoses.
I do have new seals for the hydraulic cylinders but did not rebuild these since they were not leaking when initaly evaluated. However, if they leak will rebuild them.
Finally did instal the new 3/8" ID, 9/16" OD, 3/32 Width O-ring in "Screw C" which did fit without damage to the O-ring. Will wait for a final thumbs up until we are back up and running and there is no leaking with a 3-point lift and load.
< id="idg-io-safe-browsing-enabled" ="" oninit="true">
Edited by CA13414 - 18 Jul 2024 at 10:11pm
|
|
Helping the aged survive and thrive! 1953 CA
|
|
CA13414
Silver Level
Joined: 25 Feb 2024
Location: Nebraska
Points: 255
|
Post Options
Thanks(0)
Quote Reply
Posted: 20 Jul 2024 at 10:37pm |
Checked to see if the final drive seal was holding. Another fiberscopic view which is still dry!!!! 
As well, the drain plug is dry as was the pully seal and PTO seal! Thus, at this point, there are no leaks on!!!! Now she can go in the garage, as needed, without a worry oil on the floor. Yes, a bit OCD about that!!!
< id="idg-io-safe-browsing-enabled" ="" oninit="true">
Edited by CA13414 - 20 Jul 2024 at 10:40pm
|
|
Helping the aged survive and thrive! 1953 CA
|
|