| Author |
 Topic Search Topic Search  Topic Options Topic Options
|
plummerscarin 
Orange Level Access

Joined: 22 Jun 2015
Location: ia
Points: 3374
|
 Post Options Post Options
") Thanks(0) Thanks(0)
 Quote Quote  Reply Reply
 Posted: 13 Nov 2021 at 10:39am Posted: 13 Nov 2021 at 10:39am |
|
Tag says TSXU839. Not having much success. Is very difficult to get solder to harden at just moment of no pressure coming out this little vessel. It appears to have a tiny hole on the sides which I believe could be a vent during assembly then soldered shut as the last step. All this effort could be a lost cause as there is a crack in one of the sides and could end up being too heavy for proper adjustment when all said and done. So yeah if you have a good one let me know
|
 |
|
Sponsored Links
|
|
|
IBWD MIke
Orange Level

Joined: 08 Apr 2012
Location: Newton Ia.
Points: 3642
|
Post Options
Thanks(0)
Quote Reply
Posted: 14 Nov 2021 at 6:55am |
|
Plummer, I do have some spares, they are from TSX464's. If someone can confirm that they are the same as your's, I'll send you one. I think they are the same but not 100% sure, Mike.
|
|
plummerscarin
Orange Level Access
Joined: 22 Jun 2015
Location: ia
Points: 3374
|
Post Options
Thanks(0)
Quote Reply
Posted: 14 Nov 2021 at 7:35am |
|
The TSXU 839 is described as a universal replacement for 47 different models according to Robert's Carburetor web site. The 464 is not listed. In the Steiner catalog these two models appear different. The 839 has a larger scallop to clear the venturi. One possible idea. Compatible? Maybe. I will keep plugging on this till it's fixed or wrecked. Will keep you posted.
|
|
IBWD MIke
Orange Level
Joined: 08 Apr 2012
Location: Newton Ia.
Points: 3642
|
Post Options
Thanks(0)
Quote Reply
Posted: 14 Nov 2021 at 9:18am |
|
I have one found, let me know if you need it.
|
|
plummerscarin
Orange Level Access
Joined: 22 Jun 2015
Location: ia
Points: 3374
|
Post Options
Thanks(0)
Quote Reply
Posted: 21 Nov 2021 at 7:51am |
|
Block, crank, cam, and lifters finally came back from engine shop for cleanup. Here's a tip, when they ask you how soon you need it give them a deadline. Otherwise they will not find the time. I don't fault them though as I have been guilty of the same thing when asked by others to help with a project of theirs.
Crank is turned .010" under and cam was heavily stained from sitting idle so long I had them look it over. Flywheel not ready yet. Time to order the engine kit. Hope supply delays haven't affected that.
|
|
Sugarmaker
Orange Level
Joined: 12 Jul 2013
Location: Albion PA
Points: 8236
|
Post Options
Thanks(0)
Quote Reply
Posted: 21 Nov 2021 at 10:02am |
Plummer, Thanks for the tip! I have a engine in the machine shop for the 32 truck. Told him I didnt need till next spring. I think I should call and keep it moving along. I want to have the engine in next spring and need time to assemble. Soldering a float doesn't sound like any fun! I found a carb guy out in CA that had a bunch of stuff for the carb on the F40 forklift. Now that you have this block back you can go to town on the assembly work. Keep us posted! Have a great Thanksgiving! Regards, Chris
|
|
D17 1958 (NFE), WD45 1954 (NFE), WD 1952 (NFE), WD 1950 (WFE), Allis F-40 forklift, Allis CA, Allis D14, Ford Jubilee, Many IH Cub Cadets, 32 Ford Dump, 65 Comet.
|
|
plummerscarin
Orange Level Access
Joined: 22 Jun 2015
Location: ia
Points: 3374
|
Post Options
Thanks(0)
Quote Reply
Posted: 10 Dec 2021 at 9:19pm |
Not much progress on the float but took apart front wheel hubs. One bearing fell apart upon removal and a race has some major pitting. Likely from sitting so long and the dust seal in poor condition. Picked up new bearings except 2 which are backordered  
Edited by plummerscarin - 10 Dec 2021 at 9:23pm
|
|
plummerscarin
Orange Level Access
Joined: 22 Jun 2015
Location: ia
Points: 3374
|
Post Options
Thanks(0)
Quote Reply
Posted: 18 Dec 2021 at 9:06pm |
Some wheel hub bearing parts are on backorder so went back to the steering box. Have cleaned out the nasty old grease and beginning reassembly. On the AGCO parts book it seems some of these gaskets are NLA? I pulled the gasket making idea from Jtaylor's thread and started on my own. 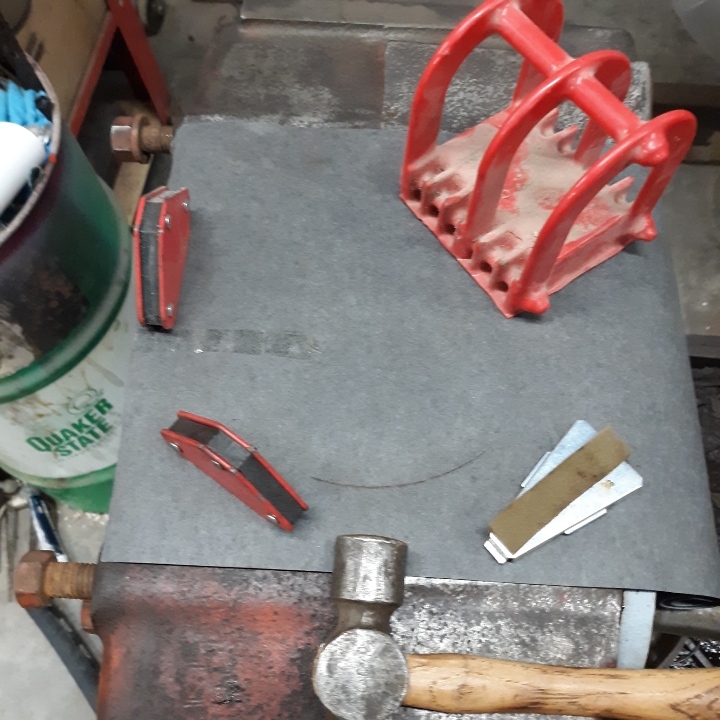 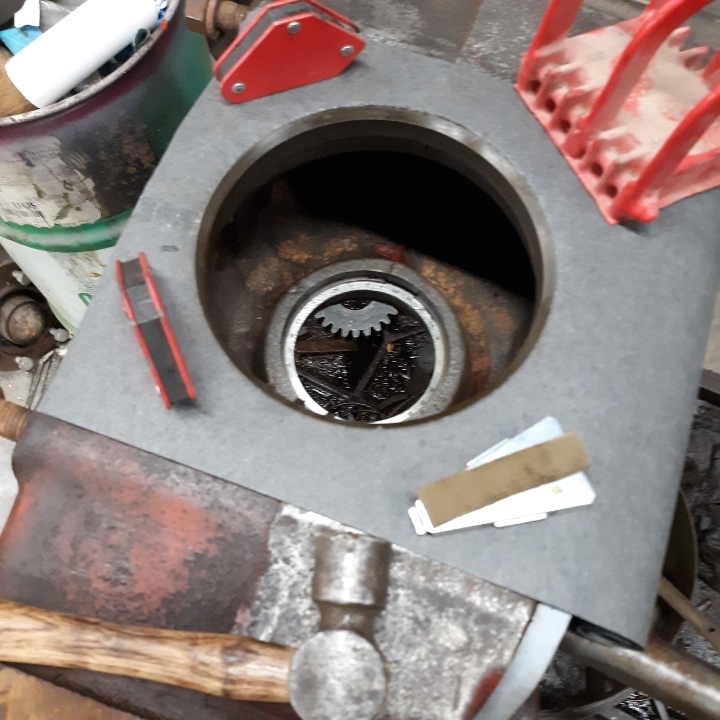 Did not have a small soft hammer so used a small ball peen with a light touch. Think it worked real well. Have a number of gaskets to make.
|
|
Sugarmaker
Orange Level
Joined: 12 Jul 2013
Location: Albion PA
Points: 8236
|
Post Options
Thanks(0)
Quote Reply
Posted: 19 Dec 2021 at 6:19am |
plummer, Very nice. Yes I find a lot of mine in a roll of gasket material too! Keep moving on it! Any reassembly work is going in the right direction for sure! Regards, Chris
|
|
D17 1958 (NFE), WD45 1954 (NFE), WD 1952 (NFE), WD 1950 (WFE), Allis F-40 forklift, Allis CA, Allis D14, Ford Jubilee, Many IH Cub Cadets, 32 Ford Dump, 65 Comet.
|
|
plummerscarin
Orange Level Access
Joined: 22 Jun 2015
Location: ia
Points: 3374
|
Post Options
Thanks(0)
Quote Reply
Posted: 02 Jan 2022 at 8:34pm |
I found that using the round end of the ball peen hammer works before punching out the bolt holes  Reassembly of the steering. 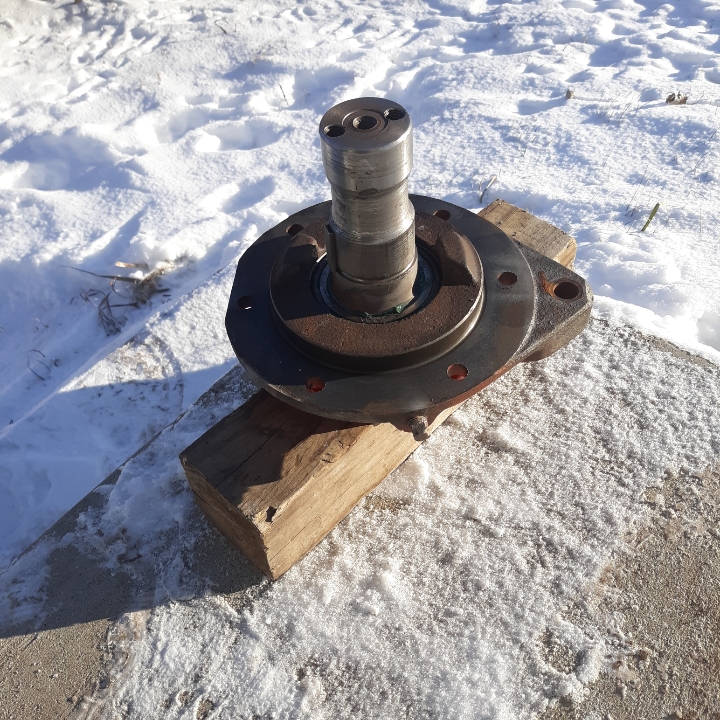 Sorry, I forgot to snap a picture of the new seal and bottom bearing. The seal was installed first then a clean and repacked bearing was driven on. It is a .003" interference fit. Next, the bottom plate with bearing race carefully set on and started with a mallet and wood block. Once started, I turned it over and used a brass drft through the spindle bolt holes to complete setting the seal in the housing. Turn over again and set it outside to chill. One benefit of sub zero temps. Again the sprocket is a .003" interference fit but this time I heated it to 250 degrees and then set it on the cold shaft where a few light taps with 2 hammers simultaneously on each side set the sprocket in place. 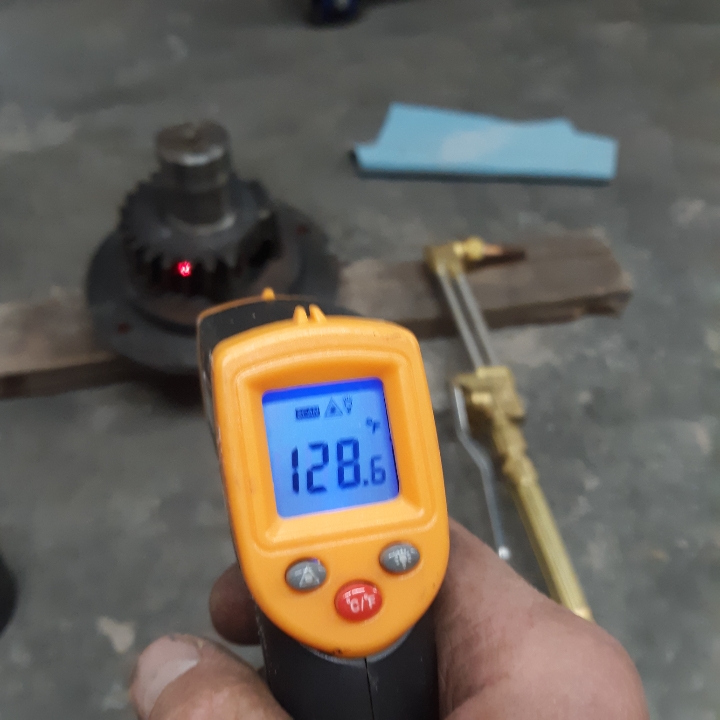 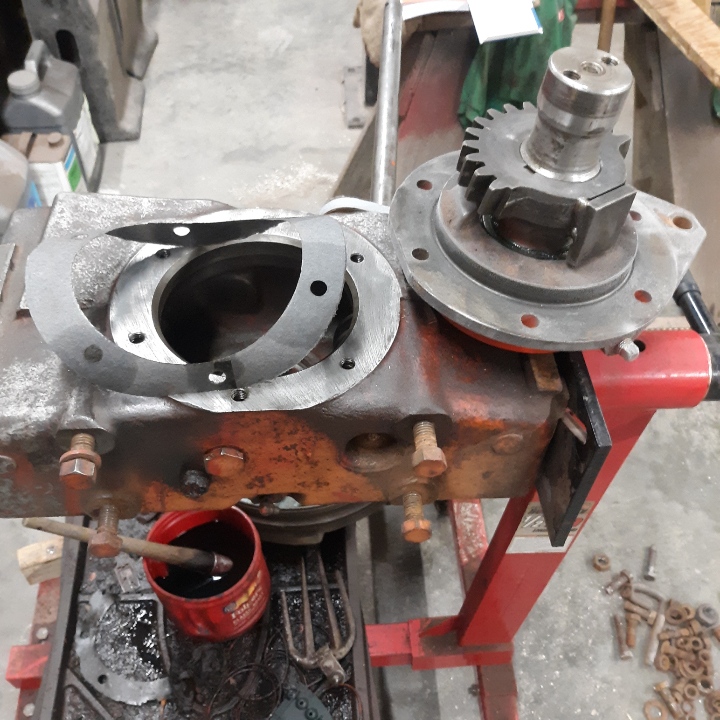
|
|
ihscout
Bronze Level

Joined: 12 Jul 2011
Location: Northern CO
Points: 147
|
Post Options
Thanks(0)
Quote Reply
Posted: 03 Jan 2022 at 12:02am |
Yeah I was hopin to see the tracks project too
|
|
'40 AC B - My Pappy always told me "Use your head for something other than a tack hammer!" I did. It makes a great 16 pound sledge hammer.
|
|
plummerscarin
Orange Level Access
Joined: 22 Jun 2015
Location: ia
Points: 3374
|
Post Options
Thanks(0)
Quote Reply
Posted: 04 Jun 2022 at 9:26pm |
|
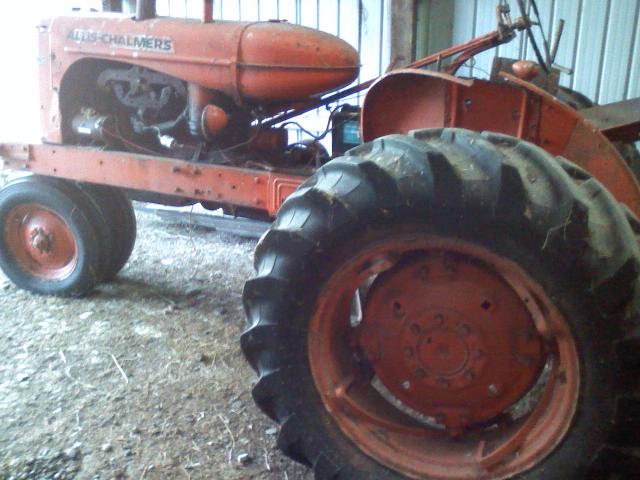
I see it's been a while since posting on this. Many things to do. Still blasting and cleaning a few small parts. Started on teardown of front axle. Was dreading this as afraid it would be as difficult as the 7XXX,s have been. Remarkably, it was an easy push with the Porta Power and the spindle assembly is out of the axle tube. Will be replacing the spindle bushings
|
|
IBWD MIke
Orange Level
Joined: 08 Apr 2012
Location: Newton Ia.
Points: 3642
|
Post Options
Thanks(0)
Quote Reply
Posted: 05 Jun 2022 at 6:42am |
|
Plummer, did you ever get the carb straightened out? I've got a float sitting here.
|
|
plummerscarin
Orange Level Access
Joined: 22 Jun 2015
Location: ia
Points: 3374
|
Post Options
Thanks(0)
Quote Reply
Posted: 05 Jun 2022 at 12:51pm |
|
Not yet. The brass on this is very weak with a number of cracks in them. May very be interested in yours.
|
|
wjohn
Orange Level

Joined: 19 Jan 2010
Location: KS
Points: 1913
|
Post Options
Thanks(0)
Quote Reply
Posted: 05 Jun 2022 at 2:43pm |
|
Ha, I've been having a rough go trying to stay focused on my own WD that I tore apart 2 years ago. At least I'm in good company. The steering parts for these tractors are almost always in need of attention at this age.
|
|
1939 B, 1940 B, 1941 WC, 1951 WD, 1952 CA, 1956 WD-45
|
|
plummerscarin
Orange Level Access
Joined: 22 Jun 2015
Location: ia
Points: 3374
|
Post Options
Thanks(0)
Quote Reply
Posted: 05 Jun 2022 at 6:08pm |
|
The U-joint on the steering shaft was seized up and the only thing preventing me from turning the wheel. Took the box apart as seals were leaking. New parts ready to go in after I finish prepping the case for paint.
|
|
IBWD MIke
Orange Level
Joined: 08 Apr 2012
Location: Newton Ia.
Points: 3642
|
Post Options
Thanks(0)
Quote Reply
Posted: 06 Jun 2022 at 7:30am |
|
I took a lot of slop out of the steering of both 45's with a new u-joint and pins in the shafts. Made oversize pins out of drill rod for one of them, don't remember which.
|
|
plummerscarin
Orange Level Access
Joined: 22 Jun 2015
Location: ia
Points: 3374
|
Post Options
Thanks(0)
Quote Reply
Posted: 20 Jun 2022 at 6:26am |
|
That's a good idea. No slop in mine. I had to use a press to get the pins out. Picked up a couple nice fenders from orange knight and a carb foat from DJs at the Amana show. And a really nice polo shirt
|
|
plummerscarin
Orange Level Access
Joined: 22 Jun 2015
Location: ia
Points: 3374
|
Post Options
Thanks(0)
Quote Reply
Posted: 02 Oct 2022 at 8:06am |
|
Another update today. Still plugging along slowly. More tin parts blasted and in primer. Started engine assembly last night. New cam bearings were installed at the engine shop and I mic'ed them and the cam journals and found them to be in spec. Set up the dial indicator on the cam lobes. Each are .001" less than original lift except #6 exhaust which is. 003" less but doubt that is a problem for this project. Also checked standout on new sleeves. .002" protruding on all of them.
Slowly but surely
Edited by plummerscarin - 02 Oct 2022 at 8:07am
|
|
Kenny L.
Orange Level Access

Joined: 12 Sep 2009
Location: NEIOWA
Points: 1264
|
Post Options
Thanks(0)
Quote Reply
Posted: 02 Oct 2022 at 8:17am |
Plummer, we need pictures, and yes these project can take forever but stay at it.
|
|
plummerscarin
Orange Level Access
Joined: 22 Jun 2015
Location: ia
Points: 3374
|
Post Options
Thanks(0)
Quote Reply
Posted: 03 Oct 2022 at 10:24pm |
This was my set up to check lift on the cam lobes  Sleeve O rings were next. Instructions say the non black silicone seal goes closest to crankshaft. Service manual says liquid soap for lubricant and kit instructions call for liquid soap or veggie oil. I went the soap route lightly watered down to keep from getting sticky 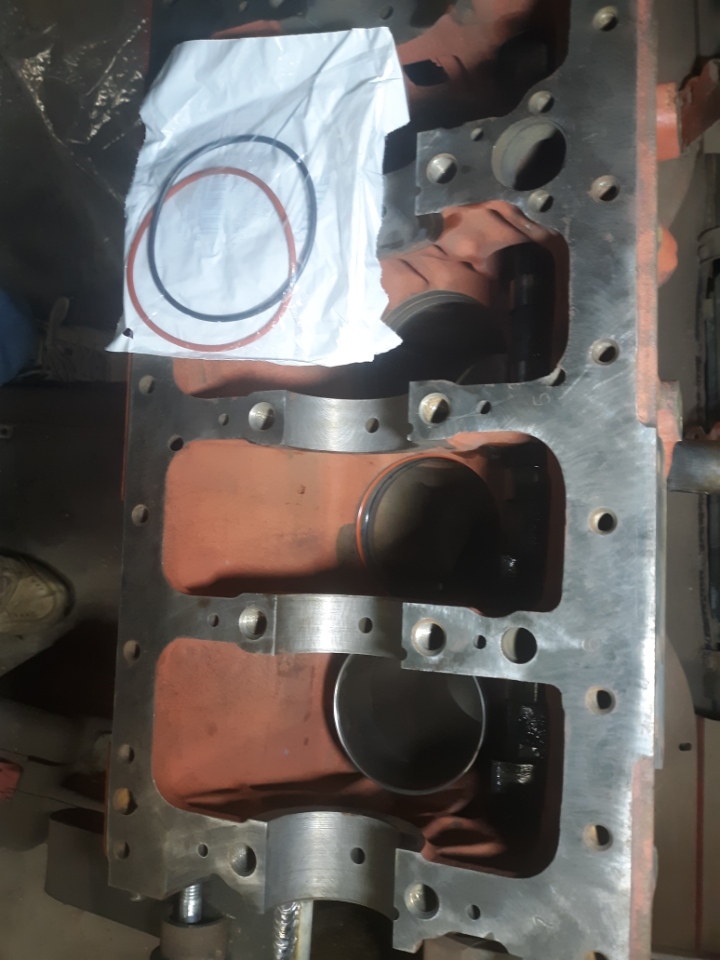 Sleeves are in. My low buck depth gauge shows .002" stand out from the deck. 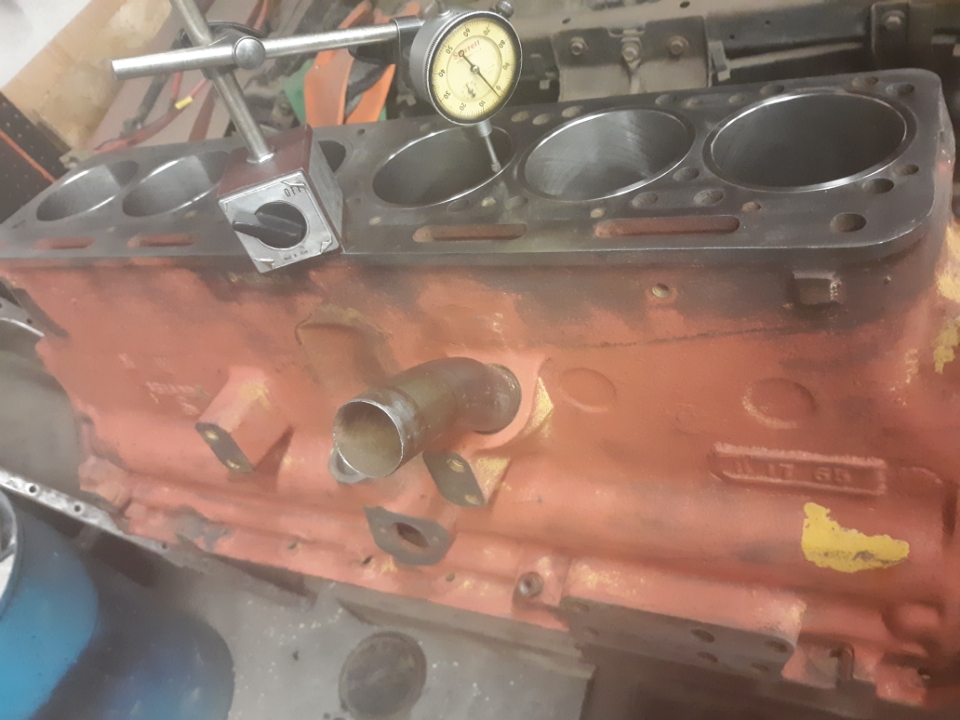
|
|
Sugarmaker
Orange Level
Joined: 12 Jul 2013
Location: Albion PA
Points: 8236
|
Post Options
Thanks(0)
Quote Reply
Posted: 04 Oct 2022 at 7:24am |
plummer, Good work! Keep hitting at it! I know if Don Bradley was still here he would be helping you too! Thanks for the update! Regards, Chris
|
|
D17 1958 (NFE), WD45 1954 (NFE), WD 1952 (NFE), WD 1950 (WFE), Allis F-40 forklift, Allis CA, Allis D14, Ford Jubilee, Many IH Cub Cadets, 32 Ford Dump, 65 Comet.
|
|
plummerscarin
Orange Level Access
Joined: 22 Jun 2015
Location: ia
Points: 3374
|
Post Options
Thanks(0)
Quote Reply
Posted: 14 Oct 2022 at 9:41pm |
Found time this week to get the crankshaft in. Have read engine build stories and watch gearhead shows and the builders always use micrometers to measure bearing clearance. So I got the sets I have to see how it compares to Plastigage 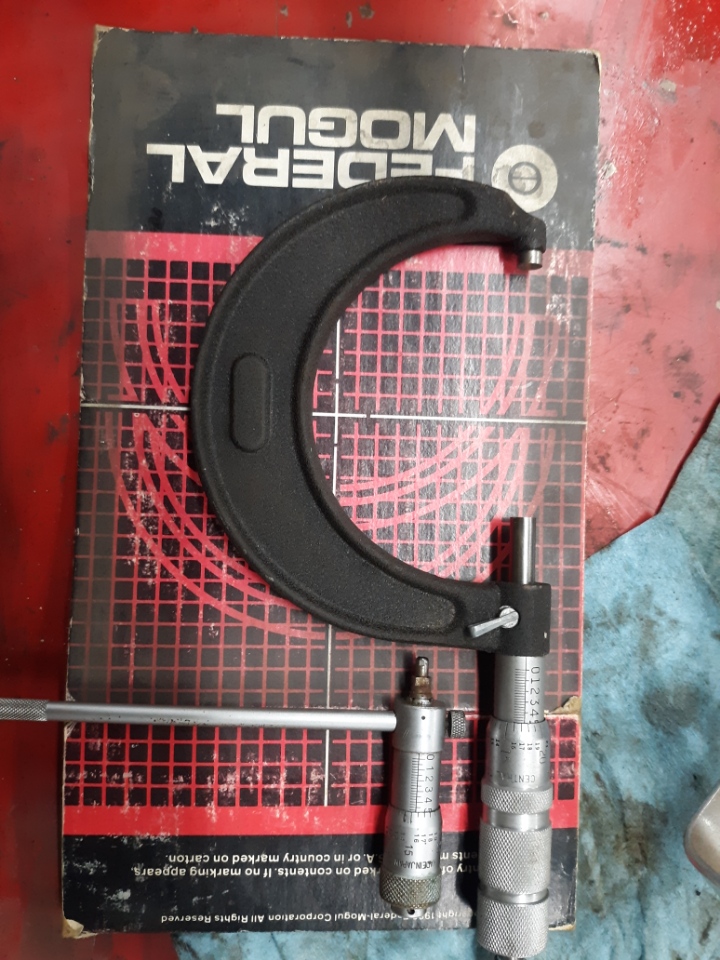 From my limited experience it appears to be just under .002" clearance 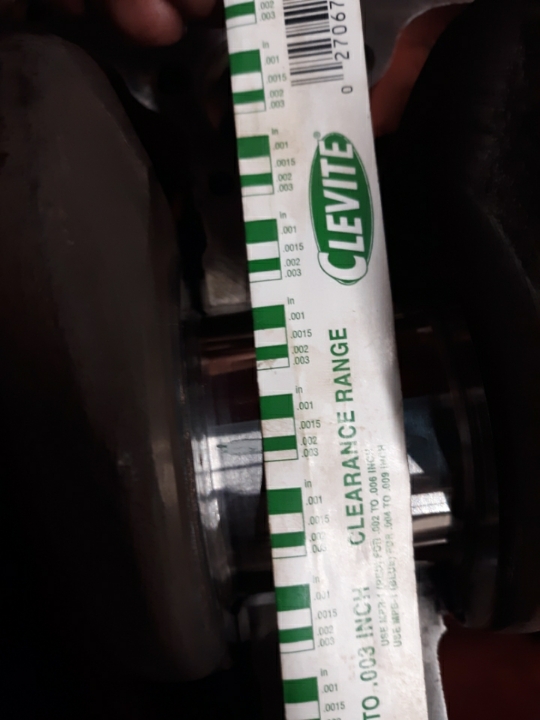 Crankshaft is in. I checked for free rotation after each main cap was torqued. Crankshaft moves easily and checked end play which measures out to .003" 
|
|
steve(ill)
Orange Level Access
Joined: 11 Sep 2009
Location: illinois
Points: 80181
|
Post Options
Thanks(0)
Quote Reply
Posted: 14 Oct 2022 at 10:08pm |
|
NICE... CLEAN.. Well done !!
|
|
Like them all, but love the "B"s.
|
|
IBWD MIke
Orange Level
Joined: 08 Apr 2012
Location: Newton Ia.
Points: 3642
|
Post Options
Thanks(0)
Quote Reply
Posted: 15 Oct 2022 at 6:25am |
") steve(ill) wrote: steve(ill) wrote:
NICE... CLEAN.. Well done !! |
X-2!
|
|
plummerscarin
Orange Level Access
Joined: 22 Jun 2015
Location: ia
Points: 3374
|
Post Options
Thanks(0)
Quote Reply
Posted: 13 Dec 2022 at 1:27pm |
|
Little has happened since the last post. I began working with the rods and pistons. The engine kit I got has new wrist pins and bushings which require pressing out the old ones then press in the new ones and hone the bushings to size for the the new pins. I don’t have that ability here so have sent those out. In the meantime I have begun assembling pistons and rings.
|
|
plummerscarin
Orange Level Access
Joined: 22 Jun 2015
Location: ia
Points: 3374
|
Post Options
Thanks(0)
Quote Reply
Posted: 17 Dec 2022 at 11:54pm |
The pistons are now ready for the rods when they get back 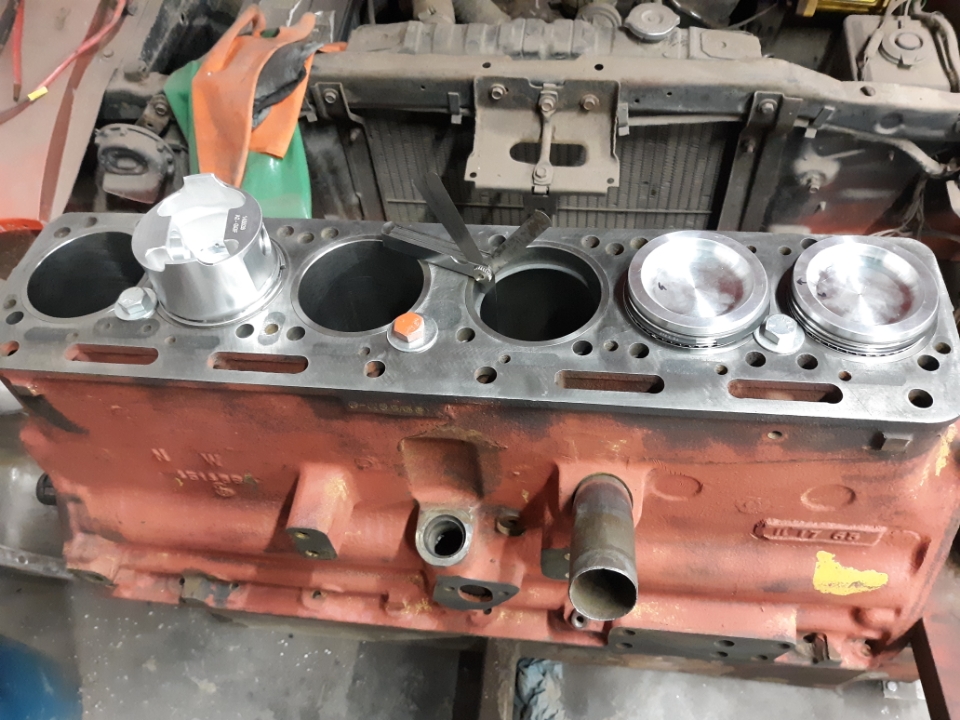 New pistons and rings are different than the old ones. Only 2 compression rings vs 3 on the old set. The book called for .007" gap on the rings while the instructions with the new says .016". This according to the math of bore diameter x .0045 for "street" applications. These rings are file to fit. Not having a gauge to set rings square in the bore, I used and old ring in the oil groove for fitting gaps. For grins I checked the gap on an old ring. .075". 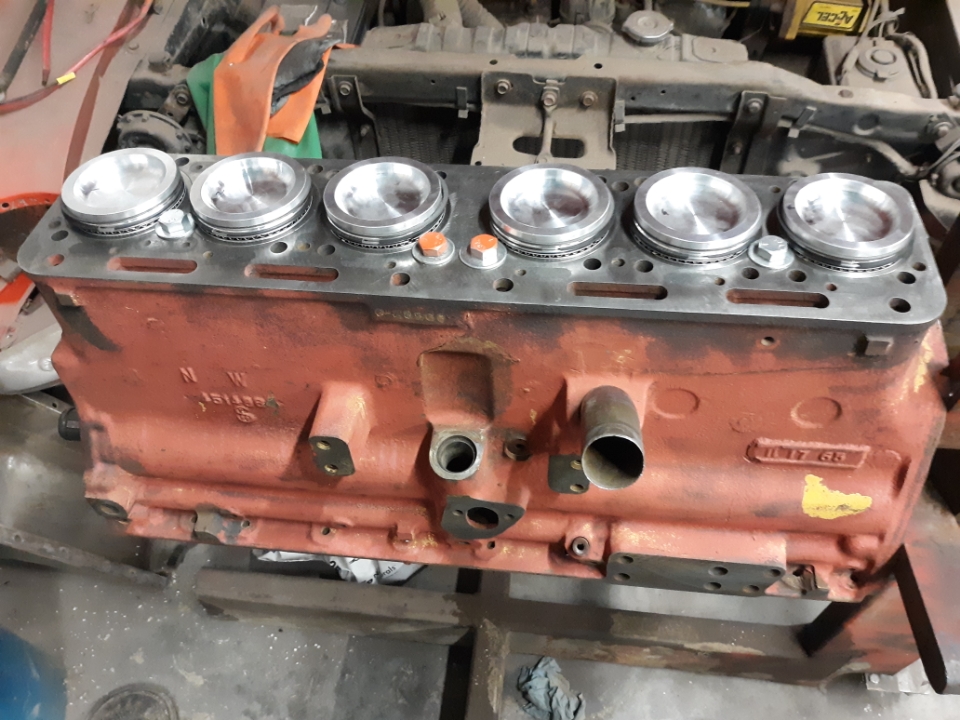
|
|
Pat the Plumber CIL
Orange Level

Joined: 11 Sep 2009
Location: Springfield,Il
Points: 4759
|
Post Options
Thanks(0)
Quote Reply
Posted: 18 Dec 2022 at 10:19am |
|
Looking Good Aaron. Keep after it . You are going to be extremely happy when it fires up for the first time.
|
|
You only need to know 3 things to be a plumber;Crap rolls down hill,Hot is on the left and Don't bite your fingernails
1964 D-17 SIV 3 Pt.WF,1964 D-15 Ser II 3pt.WF ,1960 D-17 SI NF,1956 WD 45 WF.
|
|
plummerscarin
Orange Level Access
Joined: 22 Jun 2015
Location: ia
Points: 3374
|
Post Options
Thanks(0)
Quote Reply
Posted: 08 Jan 2023 at 10:30pm |
Got the cam gear installed finally. Had been soaking in the parts washer for months but it just didn't cut through 30 years of gunk turned to varnish. Cleaned with a scuff pad, wire brushes and a pick. 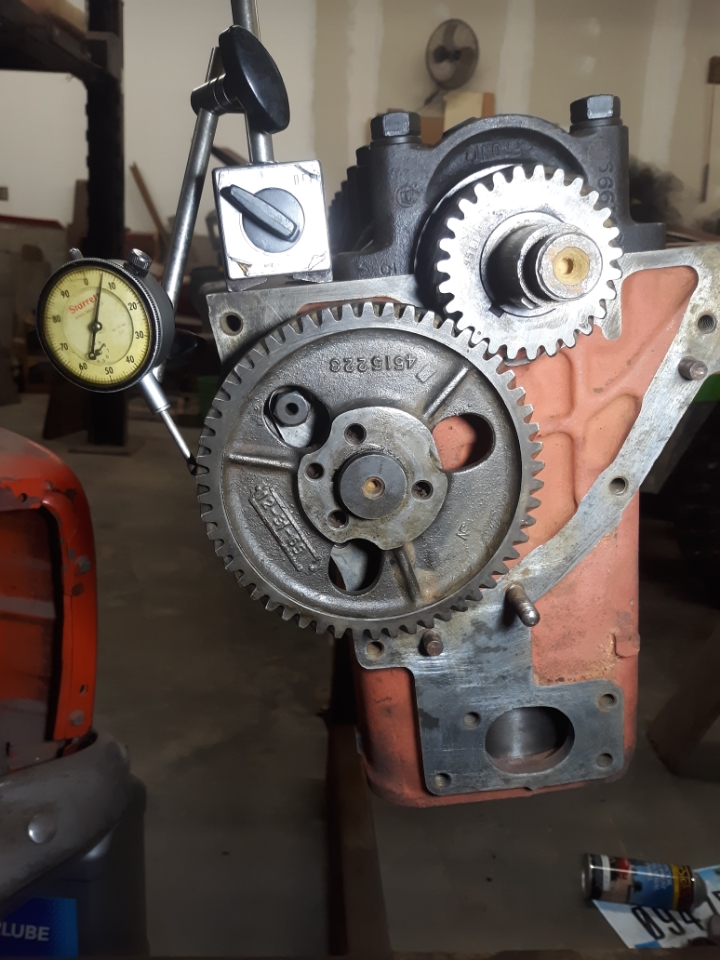 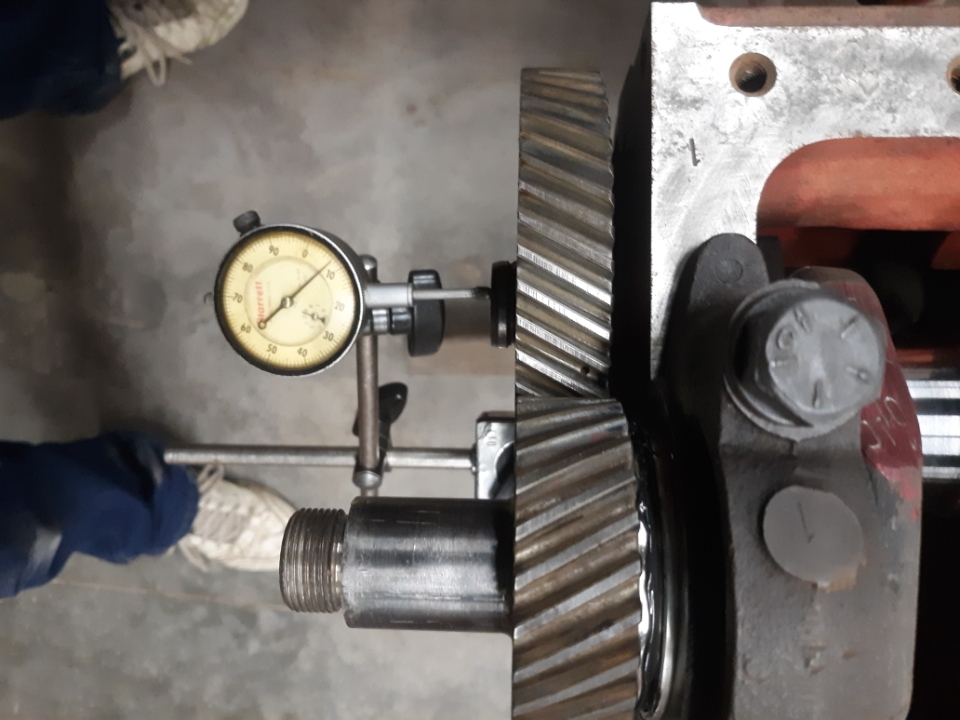 Backlash measures in at .007" Book calls for a max of .005 and replace when exceeds .008. Endplay comes in at .007" Still waiting on my rods to come back. Took a while to figure out how to press the gear back on the cam. In hindsight I didn't really need to take it off. So I hung the end of the cam from a bearing separator on the arbor press and pushed the gear on with the help of a socket. Beats heating it in this case. Granted, it's not much progress but there are many things keeping me busy I cannot find in the service manual a torque spec for the cam thrust plate bolts. These are hollow and a 7/16 bolt. Is there a torque value or maybe something like 40ft/lb?
Edited by plummerscarin - 09 Jan 2023 at 6:20am
|
|
Kenny L.
Orange Level Access
Joined: 12 Sep 2009
Location: NEIOWA
Points: 1264
|
Post Options
Thanks(0)
Quote Reply
Posted: 09 Jan 2023 at 4:21pm |
|
Looking good, I look in my factory service manual and didn't find any torque spec either so hoping someone will chime in, kept plugging way and thanks for the pictures.
|
|


