| Author |
 Topic Search Topic Search  Topic Options Topic Options
|
jaybmiller 
Orange Level Access

Joined: 12 Sep 2009
Location: Greensville,Ont
Points: 24768
|
 Post Options Post Options
") Thanks(1) Thanks(1)
 Quote Quote  Reply Reply
 Posted: 09 Aug 2023 at 7:30pm Posted: 09 Aug 2023 at 7:30pm |
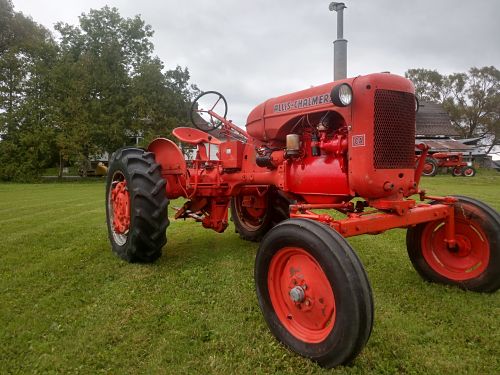
I saw somewhere, a guy use a round bucket of the right height, to hold the center up off the floor, then assemble the bits and pieces. I KNOW that's how I did one for my D-14, 20 decades ago.... good news is a CA rim/tire is lighter than a D-14 !
|
|
3 D-14s,A-C forklift, B-112
Kubota BX23S lil' TOOT( The Other Orange Tractor)
Never burn your bridges, unless you can walk on water
|
 |
|
Sponsored Links
|
|
|
1955CA
Orange Level
Joined: 10 Sep 2018
Location: Ontario, Canada
Points: 602
|
Post Options
Thanks(0)
Quote Reply
Posted: 09 Aug 2023 at 7:33pm |
 jaybmiller wrote: jaybmiller wrote:
I saw somewhere, a guy use a round bucket of the right height, to hold the center up off the floor, then assemble the bits and pieces. I KNOW that's how I did one for my D-14, 20 decades ago.... good news is a CA rim/tire is lighter than a D-14 !
|
Now that you mentioned that, I now remember reading about that trick on this forum a few years ago. Thanks.
|
|
jaybmiller
Orange Level Access
Joined: 12 Sep 2009
Location: Greensville,Ont
Points: 24768
|
Post Options
Thanks(1)
Quote Reply
Posted: 09 Aug 2023 at 7:42pm |
|
yeah, I'm gettin old at 70 but still remember some things.......
|
|
3 D-14s,A-C forklift, B-112
Kubota BX23S lil' TOOT( The Other Orange Tractor)
Never burn your bridges, unless you can walk on water
|
|
Gary
Orange Level Access
Joined: 13 Sep 2009
Location: Peterborough,On
Points: 5905
|
Post Options
Thanks(0)
Quote Reply
Posted: 10 Aug 2023 at 6:45am |
|
I, too, use the 5 gallon pail trick, but I also lay the 'tire and rim' assembly on 3 pieces of 8 X 8 Post.
That way you can reach under the tire to install the attaching bolts for the eccentric body.
You can easily slide the eccentric over the rail and down in to position on the wheel.
G
|
|
1955CA
Orange Level
Joined: 10 Sep 2018
Location: Ontario, Canada
Points: 602
|
Post Options
Thanks(0)
Quote Reply
Posted: 10 Aug 2023 at 7:29am |
Great tips. I appreciate it everyone.
Better to ask here rather than beat myself up figuring it out the hard way. LOL
|
|
dfwallis
Orange Level
Joined: 09 Mar 2023
Location: DFW
Points: 872
|
Post Options
Thanks(1)
Quote Reply
Posted: 10 Aug 2023 at 12:18pm |
1955CA wrote:
So I sprayed everything with Shop Stufff, a penetrating fluid made from canola and they have been sitting for the last week while I was off driving my other tractor in a couple parades.
So I had some time today so I laid them down, gave a whack with a big hammer like you all suggested and everything fell right out!
Tomorrow I'll just the wedges in the vise and see if I can get them apart.  |
Looks exactly like mine when I took them apart. They looked like new when I got finished with them (other than the pitting beneath the locks).
|
|
dfwallis
Orange Level
Joined: 09 Mar 2023
Location: DFW
Points: 872
|
Post Options
Thanks(0)
Quote Reply
Posted: 10 Aug 2023 at 12:20pm |
1955CA wrote:
jaybmiller wrote:
I saw somewhere, a guy use a round bucket of the right height, to hold the center up off the floor, then assemble the bits and pieces. I KNOW that's how I did one for my D-14, 20 decades ago.... good news is a CA rim/tire is lighter than a D-14 !
|
Now that you mentioned that, I now remember reading about that trick on this forum a few years ago. Thanks. |
I did have a little difficulty getting them back together. Was a very tight fit. One was easier than the other so I thought the tolerances on the rim was a little off on one.
|
|
DiyDave
Orange Level Access

Joined: 11 Sep 2009
Location: Gambrills, MD
Points: 54385
|
Post Options
Thanks(0)
Quote Reply
Posted: 10 Aug 2023 at 4:50pm |
1955CA wrote:
DiyDave wrote:
Cut the rails out before you scrap the rims... |
Oh ya? Would anybody have a use for them? |
I know I had a set welded onto new non PA rims, it was the most economical solution at the time...
|
|
Source: Babylon Bee. Sponsored by BRAWNDO, its got what you need!
|
|
1955CA
Orange Level
Joined: 10 Sep 2018
Location: Ontario, Canada
Points: 602
|
Post Options
Thanks(0)
Quote Reply
Posted: 10 Aug 2023 at 7:24pm |
Well I know I won't have a use for them. I'm pretty sure my new rims are going to last me the rest of my years anyway, LOL
I'm not putting anything but air in them.
|
|
1955CA
Orange Level
Joined: 10 Sep 2018
Location: Ontario, Canada
Points: 602
|
Post Options
Thanks(0)
Quote Reply
Posted: 23 Aug 2023 at 5:31pm |
So again, I haven't had time to try and unseize all my rim lock parts. I will eventually, but want my tractor mobile.
I was looking at all the new rim locks available and saw these. They are shown as out of stock here, but have found them at other suppliers.
My question now is.....do these not need circlips and the rectangular blocks (Eccentric Pin Block) that sit on the pins like my original ones do? Or do I need to still use those? 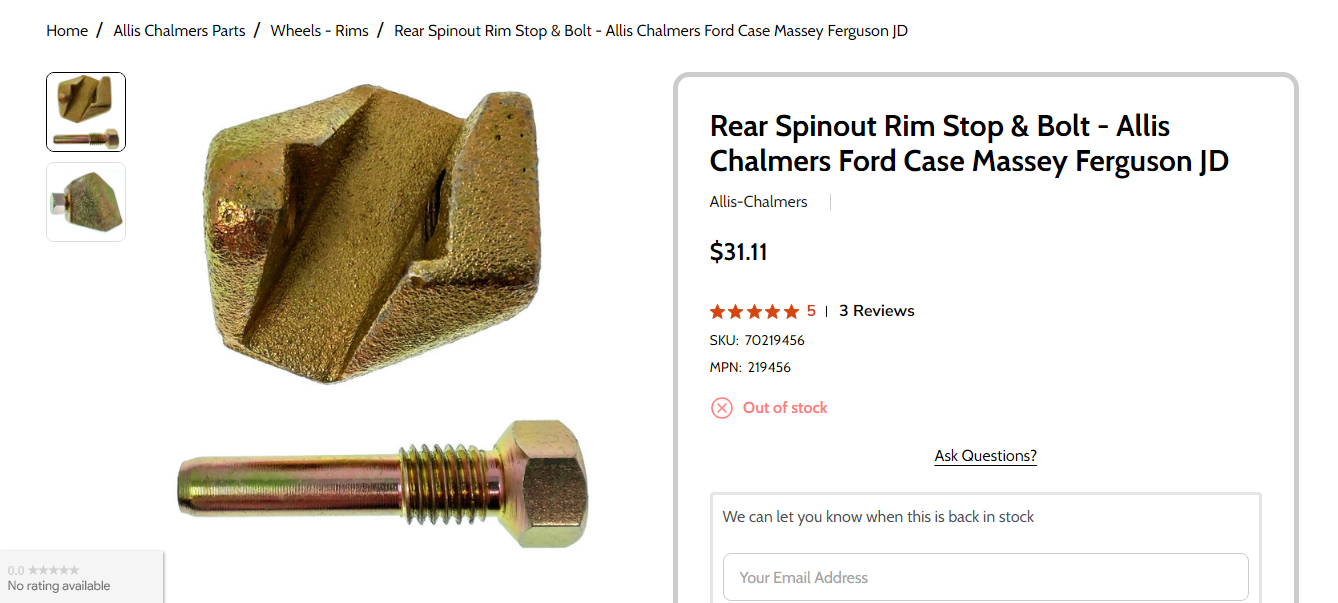 |
|
SteveM C/IL
Orange Level Access
Joined: 12 Sep 2009
Location: Shelbyville IL
Points: 8667
|
Post Options
Thanks(0)
Quote Reply
Posted: 23 Aug 2023 at 6:15pm |
|
That is the lock not the eccentric. It goes through the hole in the rail to prevent spinning wheel on rails.
|
|
dfwallis
Orange Level
Joined: 09 Mar 2023
Location: DFW
Points: 872
|
Post Options
Thanks(0)
Quote Reply
Posted: 23 Aug 2023 at 7:30pm |
1955CA wrote:
Well I know I won't have a use for them. I'm pretty sure my new rims are going to last me the rest of my years anyway, LOL
I'm not putting anything but air in them. |
I'm keeping the old rims. Not in good shape, but repairable with some effort. I thought I might use them for duals in the future...or not.
|
|
dfwallis
Orange Level
Joined: 09 Mar 2023
Location: DFW
Points: 872
|
Post Options
Thanks(0)
Quote Reply
Posted: 23 Aug 2023 at 7:32pm |
SteveM C/IL wrote:
That is the lock not the eccentric. It goes through the hole in the rail to prevent spinning wheel on rails. |
Ah ha, that's what it looks like...I need a couple of those.
|
|
1955CA
Orange Level
Joined: 10 Sep 2018
Location: Ontario, Canada
Points: 602
|
Post Options
Thanks(0)
Quote Reply
Posted: 23 Aug 2023 at 7:35pm |
SteveM C/IL wrote:
That is the lock not the eccentric. It goes through the hole in the rail to prevent spinning wheel on rails. |
Oh okay. I'm still learning this thing. So that is about all I see listed new. So guess I will have to salvage what I can and get other used parts.
|
|
AC720Man
Orange Level

Joined: 10 Oct 2016
Location: Shenandoah, Va
Points: 5248
|
Post Options
Thanks(1)
Quote Reply
Posted: 23 Aug 2023 at 9:26pm |
|
I put my wheel centers back on my D17 rims today. Had some help to make it easier. Bolted the first clamp on the wheel center. Had the wheel standing up. Placed the block(parts manual calls it a block) in the clamp(my parts manual calls it the body) and laid it on the rail at the bottom. Slid the next clamp on the rail opposite of the first one and installed the bolts loosely on the wheel center. Placed the other clamps on and and again loosely tightened the bolts. Slid the wheel center up against the stop and tightened all bolts. Once in place I tightened down all eccentrics(manual calls it pin).
Edited by AC720Man - 23 Aug 2023 at 9:42pm
|
|
1968 B-208, 1976 720 (2 of them)Danco brush hog, single bottom plow,52" snow thrower, belly mower,rear tine tiller, rear blade, front blade, 57"sickle bar,1983 917 hydro, 1968 7hp sno-bee, 1968 190XTD
|
|
Leon B MO
Orange Level
Joined: 12 Sep 2009
Location: Old Monroe, Mo
Points: 2197
|
Post Options
Thanks(0)
Quote Reply
Posted: 24 Aug 2023 at 7:55am |
|
I do assemble the eccentrics, wedges,hub and rim on the floor face up. Stem hole up on the rim. Reach though the hub center to poke bolts through.
Leon B
|
|
Uncle always said "Fill the back of the shovel and the front will take care of itself".
|
|
1955CA
Orange Level
Joined: 10 Sep 2018
Location: Ontario, Canada
Points: 602
|
Post Options
Thanks(0)
Quote Reply
Posted: 27 Aug 2023 at 9:57am |
I finally got everything apart! Went better than expected.
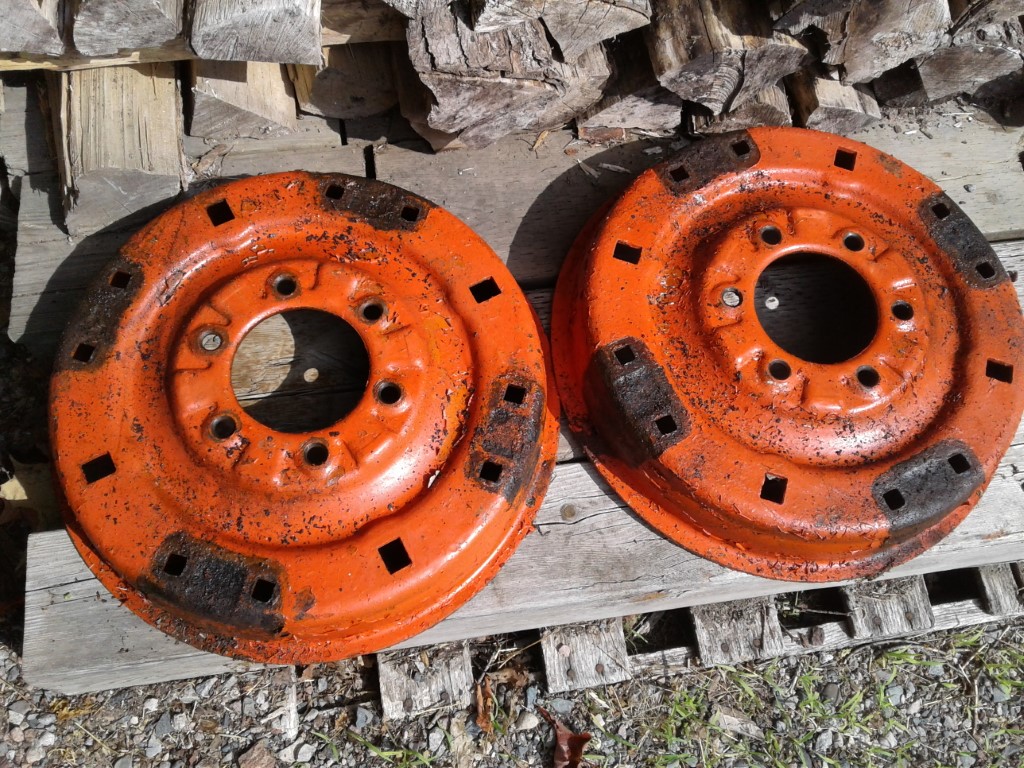
Three of my eccentric pins are pretty good shape, but three are pretty scabby and wore. And one has the head broke off. But at least I'm relieved I got everything apart. 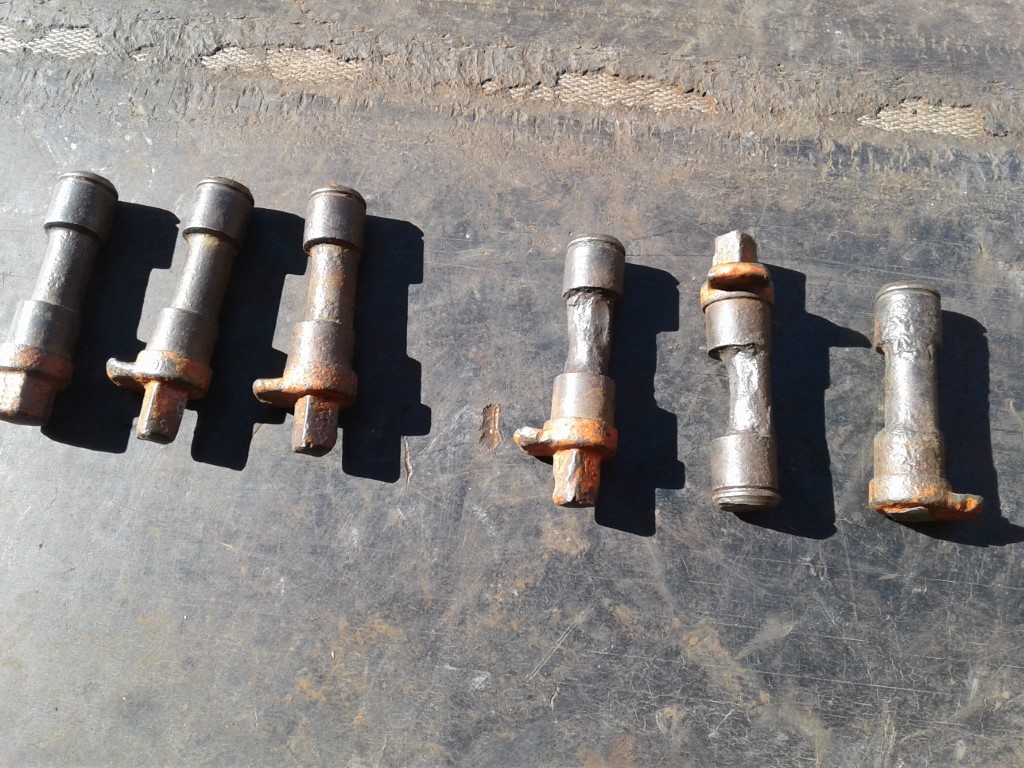 |
|
1955CA
Orange Level
Joined: 10 Sep 2018
Location: Ontario, Canada
Points: 602
|
Post Options
Thanks(0)
Quote Reply
Posted: 27 Aug 2023 at 9:59am |
And here's the blocks. They all look pretty good. 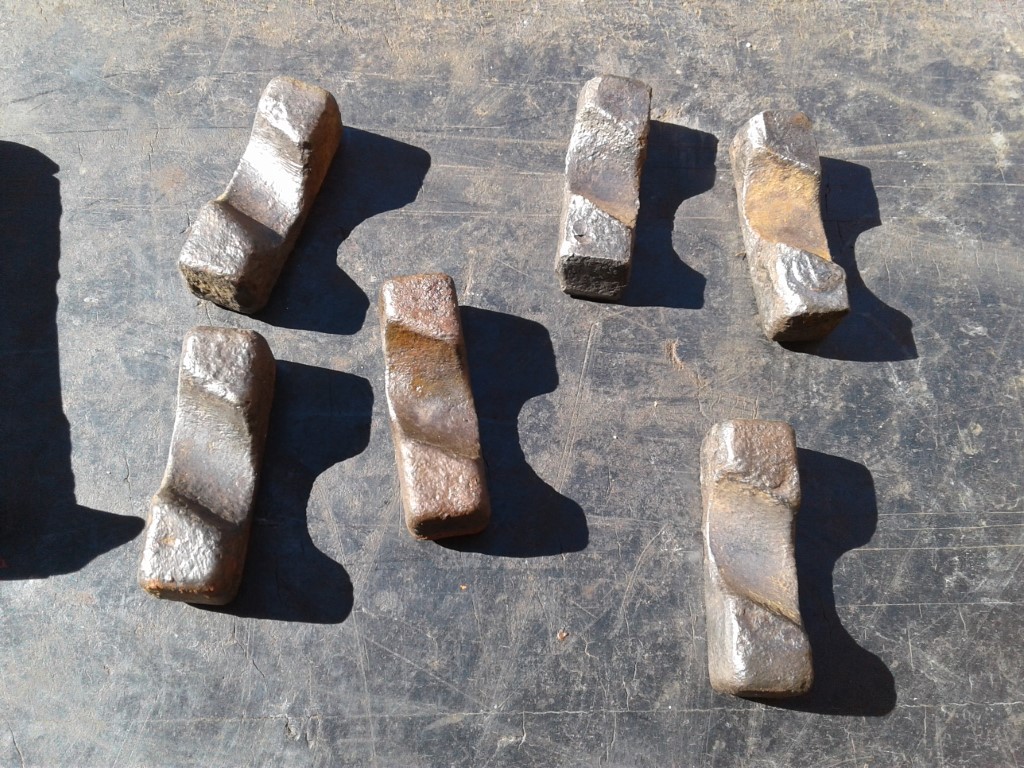
|
|
Dakota Dave
Orange Level

Joined: 12 Sep 2009
Location: ND
Points: 3972
|
Post Options
Thanks(0)
Quote Reply
Posted: 27 Aug 2023 at 12:18pm |
|
Put the center back on the tractor . One eccentric straight up put tractor in gear so it wont move roll the rim over and put one rail on the eccentric jack tractor up till rim hangs. Install the rest loosely. Tighten all to center. Tighten bottom eccentric turn wheel 90 deg and tighten turn 180 and tighten bottom eccentric. They should all be tight now.
|
|
dfwallis
Orange Level
Joined: 09 Mar 2023
Location: DFW
Points: 872
|
Post Options
Thanks(0)
Quote Reply
Posted: 27 Aug 2023 at 1:48pm |
1955CA wrote:
I finally got everything apart! Went better than expected.
Three of my eccentric pins are pretty good shape, but three are pretty scabby and wore. And one has the head broke off. But at least I'm relieved I got everything apart. |
Can't tell 100% but some of mine looked almost that bad but I was able to chip and grind them back into shape with some effort and they were smooth as butter and locked up tight. I would recommend new though. I really wanted to keep it maximally original so was a little obsessive about making it work :)
Edited by dfwallis - 27 Aug 2023 at 5:27pm
|
|
DiyDave
Orange Level Access
Joined: 11 Sep 2009
Location: Gambrills, MD
Points: 54385
|
Post Options
Thanks(0)
Quote Reply
Posted: 27 Aug 2023 at 4:23pm |
As long as the cams hold the clamps tight, that's all you need. Also, smear some anti seize lube on the cams, to keep them mobile. I'd start looking for some cams that match up with the square heads, or get all of them to hex heads, that way you only have to have 1 wrench, to adjust...
|
|
Source: Babylon Bee. Sponsored by BRAWNDO, its got what you need!
|
|
1955CA
Orange Level
Joined: 10 Sep 2018
Location: Ontario, Canada
Points: 602
|
Post Options
Thanks(0)
Quote Reply
Posted: 08 Sep 2023 at 8:39am |
I'm curious after looking at pics I have seen posted of other CA rear wheels.
Why do some of you seem to have all four wedges with eccentric pins and I only have 3 eccentrics and one of these on each of my wheels? 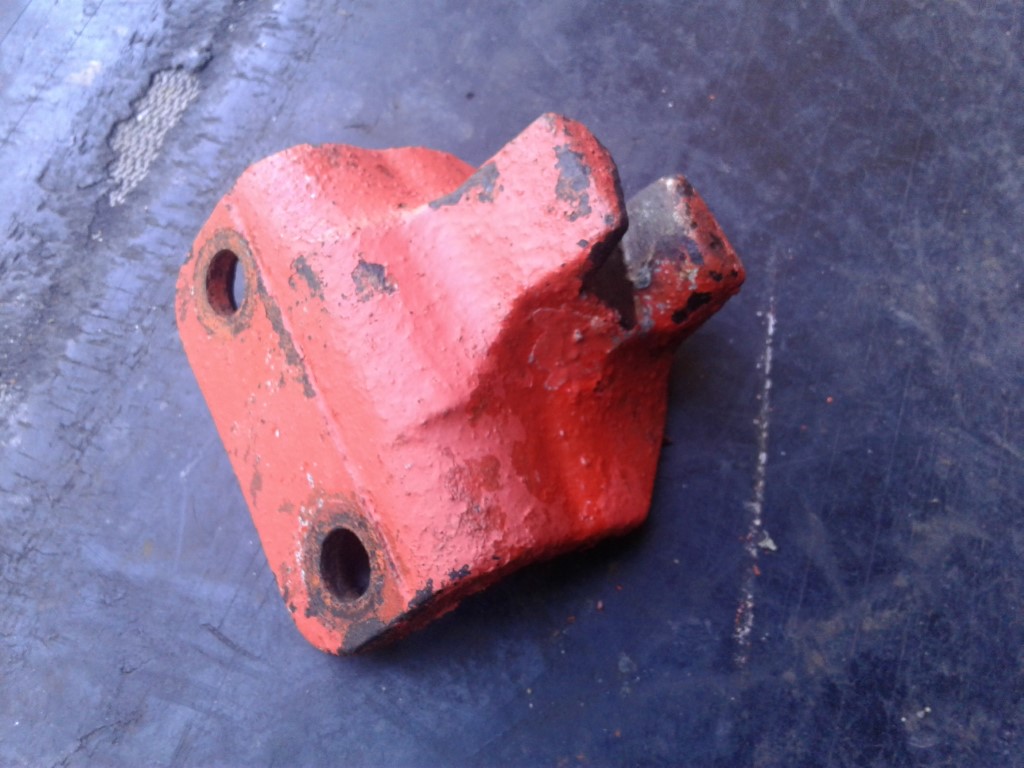 |
|
1955CA
Orange Level
Joined: 10 Sep 2018
Location: Ontario, Canada
Points: 602
|
Post Options
Thanks(0)
Quote Reply
Posted: 08 Sep 2023 at 8:40am |
|
I'm still waiting to get everything back together. Had to order new tires. The old ones were as rotten as the rims once I had them dismounted.
|
|
sparky
Orange Level Access
Joined: 13 May 2011
Location: So. Indiana
Points: 1790
|
Post Options
Thanks(0)
Quote Reply
Posted: 08 Sep 2023 at 3:38pm |
|
All of my CA’s had 3 clamps and 1 hanger. Put the hanger on top and then assemble the other three clamps.
|
|
It's the color tractor my grandpa had!
|
|
IBWD MIke
Orange Level

Joined: 08 Apr 2012
Location: Newton Ia.
Points: 4120
|
Post Options
Thanks(0)
Quote Reply
Posted: 09 Sep 2023 at 5:57am |
sparky wrote:
All of my CA’s had 3 clamps and 1 hanger. Put the hanger on top and then assemble the other three clamps. |
Pretty sure both of mine are just like Sparky describes.
|
|
1955CA
Orange Level
Joined: 10 Sep 2018
Location: Ontario, Canada
Points: 602
|
Post Options
Thanks(0)
Quote Reply
Posted: 09 Sep 2023 at 7:16am |
So what is that in the pic I posted above of the Rim Stop And Bolt? Or is that for a different model?
And I notice one rail in each of my rear rims has a series of holes along it's length.
|
|
sparky
Orange Level Access
Joined: 13 May 2011
Location: So. Indiana
Points: 1790
|
Post Options
Thanks(0)
Quote Reply
Posted: 09 Sep 2023 at 10:30am |
|
The rim stop is in your 10’th paragraph down. The rim stop bolt goes in one of the holes in the rail according to how wide you have the rear width set.
|
|
It's the color tractor my grandpa had!
|
|
1955CA
Orange Level
Joined: 10 Sep 2018
Location: Ontario, Canada
Points: 602
|
Post Options
Thanks(0)
Quote Reply
Posted: 09 Sep 2023 at 12:09pm |
sparky wrote:
The rim stop is in your 10’th paragraph down. The rim stop bolt goes in one of the holes in the rail according to how wide you have the rear width set. |
Okay. My tractor had none of those. Only the one pictured above that has no pin or bolt in it.
Is it better to have the one with the locking bolt or does it really matter?
|
|
1955CA
Orange Level
Joined: 10 Sep 2018
Location: Ontario, Canada
Points: 602
|
Post Options
Thanks(0)
Quote Reply
Posted: 11 Sep 2023 at 12:30pm |
I just got a present today from Jaybmiller! A box full of free gloves!!! 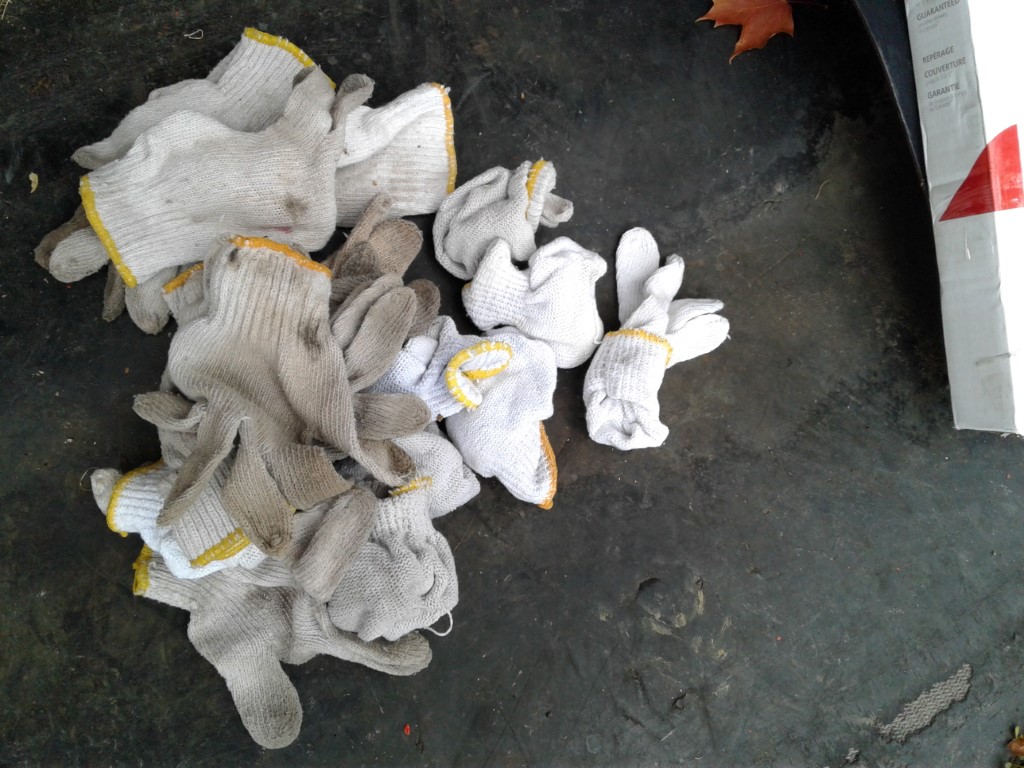
|
|
1955CA
Orange Level
Joined: 10 Sep 2018
Location: Ontario, Canada
Points: 602
|
Post Options
Thanks(0)
Quote Reply
Posted: 11 Sep 2023 at 12:34pm |
And in them was a full set of hex head eccentrics!! I can't thank him enough!!
What a super person! He wouldn't even let me send him anything for them.
He just helped save another Allis.
Got my new rear rims in the truck ready to head to the tire shop tomorrow to get new rubber mounted while I am at work this week.
Thanks again Jay!!! 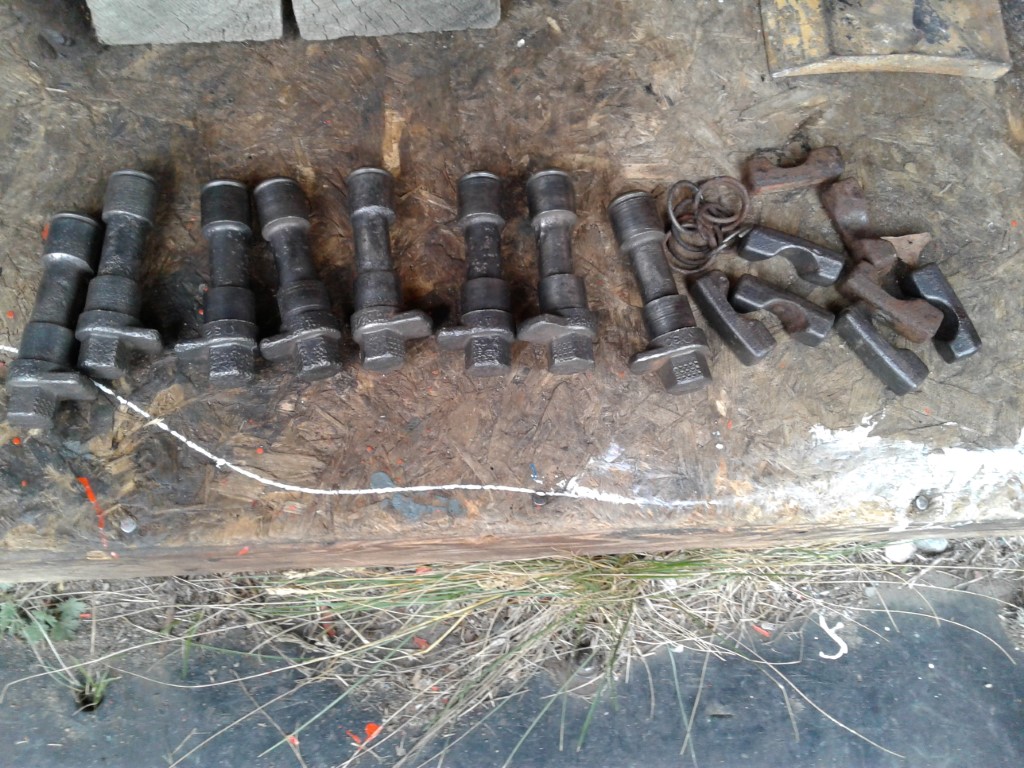 |
|