| Author |
 Topic Search Topic Search  Topic Options Topic Options
|
ohio-d19 
Bronze Level

Joined: 10 Apr 2018
Location: Dover
Points: 26
|
 Post Options Post Options
") Thanks(0) Thanks(0)
 Quote Quote  Reply Reply
 Topic: AC6g steering clutch Topic: AC6g steering clutch
Posted: 10 Apr 2018 at 1:30pm |
|
Hello all thanks for the ad. I thought I could sand bag my way through this repair but no luck. First off my dad bought this machine in 1987 and put left steering clutch in it shortly there after. Jump to 1998 ish right clutch froze meaning would not disengage, kinda like the cheap remote control car from the 80s you just had to backup and left clutch to go right. Shortly after the main clutch started slipping. Now present day after waking it from a 20 year near death nap I decided to try and resurrect it. I have tackled the main clutch, Wich happened to be a broken pressure plate caused by worn-out through out coller pins. Worked my way to Allis's hind end where I found her right cavity half full of watery mouse goodness. This is where I started at the wrong end. So I'm in it for too much dinero to exit stage left and let some Auto maker turn it into 23 full sized trucks. I finally muscled the brake drum and what was left of the clutch, thanks to John from General Gear. However that's where I damaged the ol girl. I put the rebuilt clutch back in and fastened it back to both flanges and I noticed that I have 1 whole disk sticking out of the drum. I have tried to pry the drum back to center but cannot move. I looked at the cap at the other end of the shaft under the track pad and it looks unscathed.dont know where I gained 1/4 of an inch at, but that's what it is off compared to the left side measuring the drum to center cavity wall.Sorry for the long post but any help would be greatly appreciated.
|
 |
|
Sponsored Links
|
|
|
Coke-in-MN
Orange Level Access

Joined: 12 Sep 2009
Location: Afton MN
Points: 42263
|
Post Options
Thanks(0)
Quote Reply
Posted: 10 Apr 2018 at 4:03pm |
|
Now if it was the right thickness when you assembled it on the bench - then evidently you gained the 1/4 " by the length of the bolts you used to mount it .
Each side uses a different length bolt to attach to drive flanges - I had one side where bolts cut into pressure plate - creating a weak side and plate moved back on itself as it collapsed - relieving the pressure on plates and slipping
|
|
Life lesson: If you’re being chased by a lion, you’re on a horse, to the left of you is a giraffe and on the right is a unicorn, what do you do? You stop drinking and get off the carousel.
|
|
ohio-d19
Bronze Level
Joined: 10 Apr 2018
Location: Dover
Points: 26
|
Post Options
Thanks(0)
Quote Reply
Posted: 10 Apr 2018 at 6:03pm |
|
Well not exactly I paid close attention to that . I'm trying to get a picture posted and not have much luck. From drive flange to driven flange is 1/4 inch wider on the side I took out. I struggled to get the clutch pack out. I had to pry the flanges away from clutch pack and stick a shim washer in before removing the pry bar then I could Jack it out.
|
|
Coke-in-MN
Orange Level Access
Joined: 12 Sep 2009
Location: Afton MN
Points: 42263
|
Post Options
Thanks(0)
Quote Reply
Posted: 11 Apr 2018 at 4:36pm |
|
Coming out that is about normal IF THEM MEESES made nests in case -
With everything clean and such - should go back together fine .
There is a height for when clutch is put back together - for number of clutch friction plates and metal discs in a unit .
|
|
Life lesson: If you’re being chased by a lion, you’re on a horse, to the left of you is a giraffe and on the right is a unicorn, what do you do? You stop drinking and get off the carousel.
|
|
Dozer
Orange Level
Joined: 16 Aug 2011
Location: SW New York
Points: 689
|
Post Options
Thanks(0)
Quote Reply
Posted: 11 Apr 2018 at 4:48pm |
|
If the distance between flanges is 1/4" greater than on the other side you likely have a bad bearing. Remove the cover between the steering clutch covers and the cover on the rear of the final drive housing to inspect the ring and pinion clearance. the timkin roller bearing is damaged. You moved the ring gear away from the pinion gear
|
|
ohio-d19
Bronze Level
Joined: 10 Apr 2018
Location: Dover
Points: 26
|
Post Options
Thanks(0)
Quote Reply
Posted: 11 Apr 2018 at 8:14pm |
|
I will pull that cover tomorrow and inspect. Boy I wish I could figure out how to post pictures from my phone.
|
|
Dozer
Orange Level
Joined: 16 Aug 2011
Location: SW New York
Points: 689
|
Post Options
Thanks(0)
Quote Reply
Posted: 12 Apr 2018 at 6:34am |
|
When the steering clutch pack thickness is incorrect the error thickness is inside the drum. The fact that you have a friction that was not inside the drum is a serious error signal. You will have to remove the clutch assembly again. Check that the bolts holding the drum are 1" long. As Coke-in-MN said if the bolts are too long they push on the pressure plate.
|
|
ohio-d19
Bronze Level
Joined: 10 Apr 2018
Location: Dover
Points: 26
|
Post Options
Thanks(0)
Quote Reply
Posted: 12 Apr 2018 at 7:02am |
|
I bolted the drum first and had to draw the disk assembly to the drive flange. So although i did put new bolts in it im positive they are correct. The only thing i can come up with is that i pushed the pinion shaft out. However when i measured from the drum edge to the case wall at pinion reduction it measures the same as left side. The drums measure the same. I'm going to check measurements again ...... and hopefully post pics..
|
|
JohnCO
Orange Level

Joined: 11 Sep 2009
Location: Niwot Colo
Points: 8992
|
Post Options
Thanks(0)
Quote Reply
Posted: 12 Apr 2018 at 10:18am |
|
You might send the pictures to someone else, such as Mel, as he has it figured out, and then he can post them for you.
|
|
"If at first you don't succeed, get a bigger hammer"
Allis Express participant
|
|
jerbob
Orange Level

Joined: 07 Aug 2017
Location: Michigan
Points: 961
|
Post Options
Thanks(0)
Quote Reply
Posted: 12 Apr 2018 at 2:08pm |
|
Hello Ohio.
What kind of phone do you have that you are trying to import pic with. I may be able to help out.
|
|
ohio-d19
Bronze Level
Joined: 10 Apr 2018
Location: Dover
Points: 26
|
Post Options
Thanks(0)
Quote Reply
Posted: 13 Apr 2018 at 11:21am |
|
|
|
ohio-d19
Bronze Level
Joined: 10 Apr 2018
Location: Dover
Points: 26
|
Post Options
Thanks(0)
Quote Reply
Posted: 13 Apr 2018 at 11:22am |
|
ok wow you may need to step back a few feet !
|
|
CAL(KS)
Orange Level
Joined: 18 Sep 2009
Location: Chapman, KS
Points: 3804
|
Post Options
Thanks(1)
Quote Reply
Posted: 13 Apr 2018 at 11:26am |
|
|
|
Me -C,U,UC,WC,WD45,190XT,TL-12,145T,HD6G,HD16,HD20
Dad- WD, D17D, D19D, RT100A, 7020, 7080,7580, 2-8550's, 2-S77, HD15
|
|
ohio-d19
Bronze Level
Joined: 10 Apr 2018
Location: Dover
Points: 26
|
Post Options
Thanks(0)
Quote Reply
Posted: 13 Apr 2018 at 11:26am |
|
Now i did run it last night and i seemed to get the drum started on the disk , but the disk is still partially out . I took notice that the other side and this side originally had no teeth on this disk. Was that because it works in and out? THANKS CAL!
Edited by ohio-d19 - 13 Apr 2018 at 12:23pm
|
|
Dozer
Orange Level
Joined: 16 Aug 2011
Location: SW New York
Points: 689
|
Post Options
Thanks(0)
Quote Reply
Posted: 13 Apr 2018 at 1:04pm |
Compare my picture to yours. Note the entire clutch pack is inside the drum.  The only way this could happen to you is if the flanges are too far appart (Like you said) of if your drum was cut down (not likely) The drum width from flange to end is 4.62" The first thing to do is to remove the clutch pack and find out why the flanges moved. Take another picture from farther away.
|
|
ohio-d19
Bronze Level
Joined: 10 Apr 2018
Location: Dover
Points: 26
|
Post Options
Thanks(0)
Quote Reply
Posted: 13 Apr 2018 at 2:17pm |
|
I plan to pull the drum out this weekend. In order to get the pinion shaft out to inspect the bearings do I need to break the track? Looking at the book I must have run the bearings out of their races.
|
|
Coke-in-MN
Orange Level Access
Joined: 12 Sep 2009
Location: Afton MN
Points: 42263
|
Post Options
Thanks(0)
Quote Reply
Posted: 13 Apr 2018 at 4:05pm |
|
The ring gear bearings are in a separate compartment separate bearings on that side -
the top gear on the outboard side is supported on a set of bearings - one side in steering clutch case and other under cap bolted by top of track on outside of case -
No the track does not need to be removed .
|
|
Life lesson: If you’re being chased by a lion, you’re on a horse, to the left of you is a giraffe and on the right is a unicorn, what do you do? You stop drinking and get off the carousel.
|
|
gemdozer
Orange Level
Joined: 17 Sep 2009
Points: 1074
|
Post Options
Thanks(0)
Quote Reply
Posted: 13 Apr 2018 at 4:06pm |
|
No you should't need to break the track for checking the pinion bearing and pull the stering cluch assambly after you can check by the flange if you have back lach on pinion and on the bearing
|
|
Dozer
Orange Level
Joined: 16 Aug 2011
Location: SW New York
Points: 689
|
Post Options
Thanks(0)
Quote Reply
Posted: 14 Apr 2018 at 7:46am |
|
With the steering clutch removed Try to move the flanges to feel for bearing damage. My best guess is it is on the inboard side. I have an HD5 with the steering clutch removed I can measure the distance between flanges if it will help.
|
|
ohio-d19
Bronze Level
Joined: 10 Apr 2018
Location: Dover
Points: 26
|
Post Options
Thanks(0)
Quote Reply
Posted: 15 Apr 2018 at 1:47am |
|
|
|
not a mucanik I just pretend
|
|
ohio-d19
Bronze Level
Joined: 10 Apr 2018
Location: Dover
Points: 26
|
Post Options
Thanks(0)
Quote Reply
Posted: 15 Apr 2018 at 1:59am |
|
|
|
not a mucanik I just pretend
|
|
gemdozer
Orange Level
Joined: 17 Sep 2009
Points: 1074
|
Post Options
Thanks(0)
Quote Reply
Posted: 15 Apr 2018 at 12:07pm |
|
The flange hub brake drum 049937 is too far on the shaft 049945 and look like cracked and have to be changed
|
|
ohio-d19
Bronze Level
Joined: 10 Apr 2018
Location: Dover
Points: 26
|
Post Options
Thanks(0)
Quote Reply
Posted: 15 Apr 2018 at 1:04pm |
|
You are probably right GemDozer. The flange looks seized pretty tightly on the shaft and it doesn't appear that it's moved any time recently. Could that have been caused by the bolt not being in there and it working back and forth for years?
|
|
not a mucanik I just pretend
|
|
Dozer
Orange Level
Joined: 16 Aug 2011
Location: SW New York
Points: 689
|
Post Options
Thanks(0)
Quote Reply
Posted: 15 Apr 2018 at 4:29pm |
|
The distance between flanges on my HD5 is 5 3/16. Tape measure accuracy. Looking at the rust, the increased distance happened long ago. Under the brake drum flange is a bearing cage and (2) seals. It could be that the bearing was replaced years ago with a bearing that was narrower than the correct bearing. Check it out while everything is appart.
Good Luck
|
|
gemdozer
Orange Level
Joined: 17 Sep 2009
Points: 1074
|
Post Options
Thanks(0)
Quote Reply
Posted: 15 Apr 2018 at 5:07pm |
|
The guy who had this machine before he maybe working with the bolt loosen on shaft flange and with time he had back lach on shaft and flange and maybe cut the end flange 1/8 inch at the end the flange could go more far on taper shaft and the flange could pull out the drum and you have a stering cluch disc out.I see this on CATERPILLAR D7
|
|
ohio-d19
Bronze Level
Joined: 10 Apr 2018
Location: Dover
Points: 26
|
Post Options
Thanks(0)
Quote Reply
Posted: 15 Apr 2018 at 5:49pm |
I'm having a friend of mine build a plate to pull the flange. The fellow that sold me the drum has a flange he is sending me. It doesn't look like there was a disk sticking out when I took this apart . 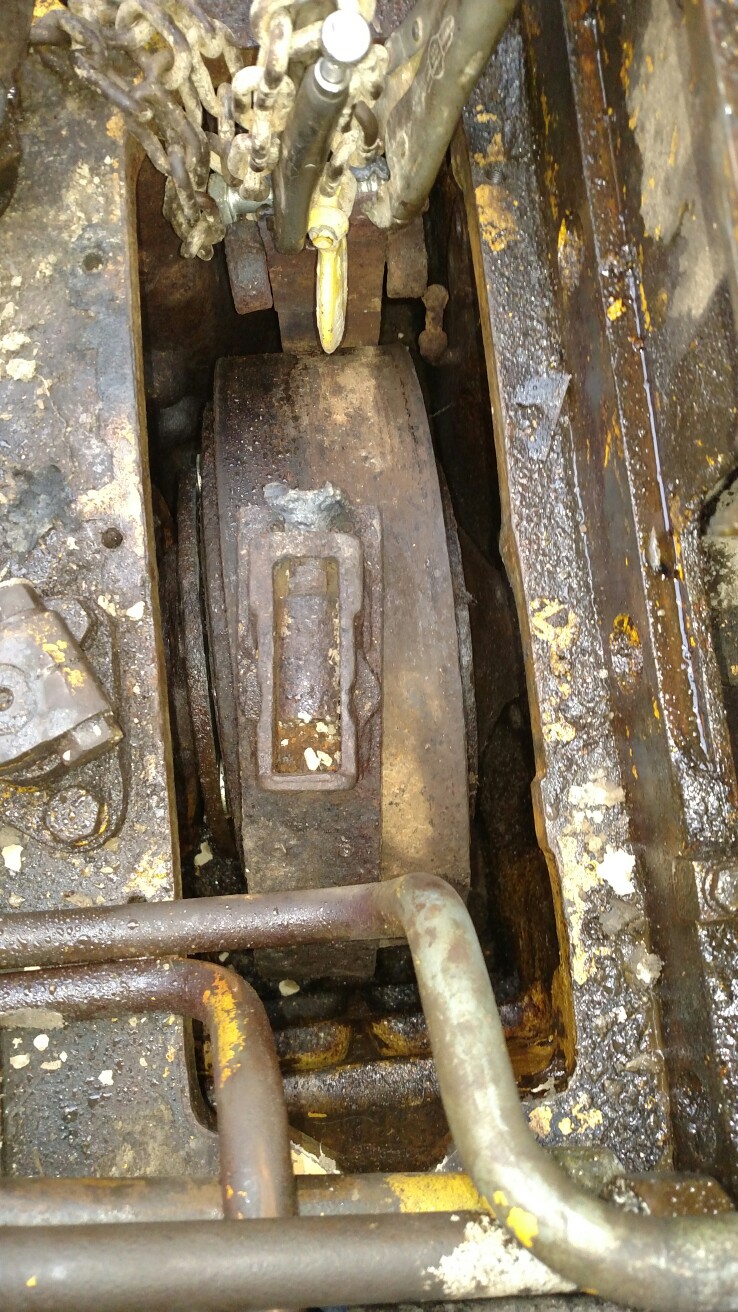
|
|
not a mucanik I just pretend
|
|
Dozer
Orange Level
Joined: 16 Aug 2011
Location: SW New York
Points: 689
|
Post Options
Thanks(0)
Quote Reply
Posted: 16 Apr 2018 at 7:53am |
|
The before and after pictures tell the story. The before picture shows part of the steering clutch hub outside the drum, but not as much as the after photo. My picture does not show the clutch hub because it is inside the drum. I had to get 1/8" on both sides before I could remove the clutch pack. I agree that it looks like the flanges are further apart now.
Consider using 1/2" bolts long enough to reach the final drive housing on the same side and a bit more. The bolts will need to have a full length thread. Put the bolts thru the flange holes and run a nut up to the flange. Use as jack screws to move the flange.
Good luck
|
|
Dozer
Orange Level
Joined: 16 Aug 2011
Location: SW New York
Points: 689
|
Post Options
Thanks(0)
Quote Reply
Posted: 16 Apr 2018 at 7:57am |
|
The after picture is with a different drum? Are the drums identical???
Are any other parts different in the before and after pictures?
|
|
ohio-d19
Bronze Level
Joined: 10 Apr 2018
Location: Dover
Points: 26
|
Post Options
Thanks(0)
Quote Reply
Posted: 16 Apr 2018 at 12:41pm |
|
As you can see I had to put washers between the flanges and clutch hub/ brake drum to keep space to pull past lip on flange. The left side pressure plate sticks in 1/16 however the first disk has no teeth to grab drum and the one I replaced was same way. I guess what I'm asking is if it's only driving off of 9 on the left is it really mandatory to change the flange?
|
|
not a mucanik I just pretend
|
|
gemdozer
Orange Level
Joined: 17 Sep 2009
Points: 1074
|
Post Options
Thanks(0)
Quote Reply
Posted: 16 Apr 2018 at 1:05pm |
|
You need 1/8 inch approximatif each side for pulling the stering cluch out and with a rebuilt stering cluch the flange will have more torke on and she could be oké for 10 hours maybe 50 hours but you have the hands inside and you better removed that flange
|
|