| Author |
 Topic Search Topic Search  Topic Options Topic Options
|
Allis dave 
Orange Level

Joined: 10 May 2012
Location: Northern IN
Points: 3121
|
 Post Options Post Options
") Thanks(0) Thanks(0)
 Quote Quote  Reply Reply
 Topic: WD45 Full Flow Oiling Conversion - How To Topic: WD45 Full Flow Oiling Conversion - How To
Posted: 19 Aug 2016 at 9:23am |
Full Flow (Filtration) Oil ConversionFirst off I want to say that this conversion was not my idea or engineering. That credit goes to Dr. Allis. I also followed a post by Bill(MN) showing his rebuild and full flow conversion. Following their advice, I am converting my WD45 to the new D17 Full Flow Oiling system. This may not be the best way, but it’s how I chose to do it. The benefit here is that the bypass oil system oil filters part of the engine oil with every circulation, but the full flow system filters all of the engine oil each trip through the oil pump. Better filtration means cleaner oil, a cleaner motor, and less wear. It's always a good thing when you can improve an engine's oiling system. Today I'll talk about the theory of the bypass and full filtration oiling systems. Bypass Oiling System, How it WorksI can't explain it better than the Allis engineers, so here's their explanation from the WD45 Service manual 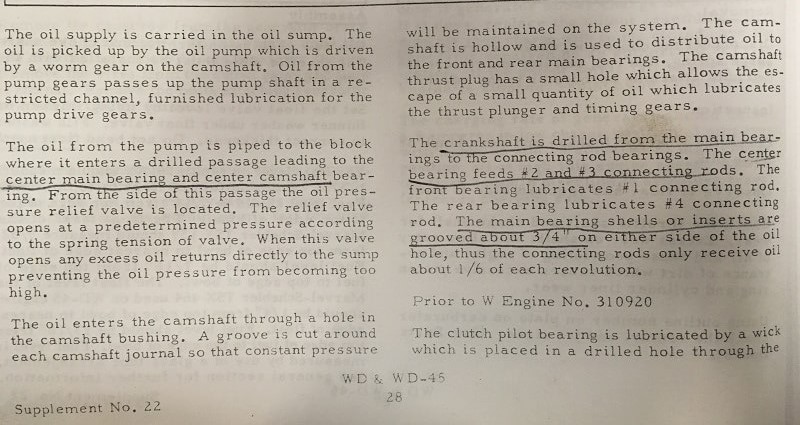 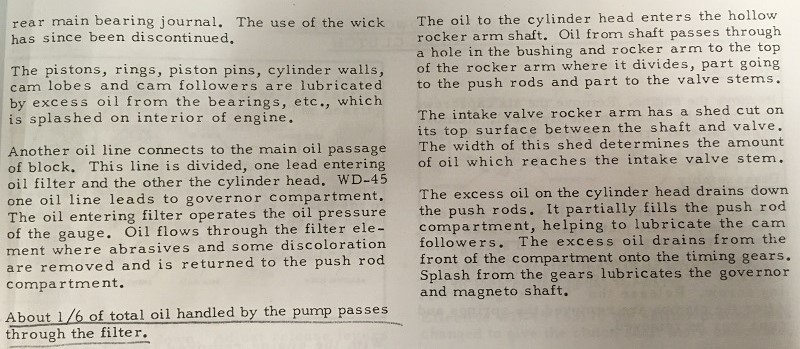 Here a bypass oil system picture from the D17 Parts Manual, prior to serial 24001. This is the same as a WD45 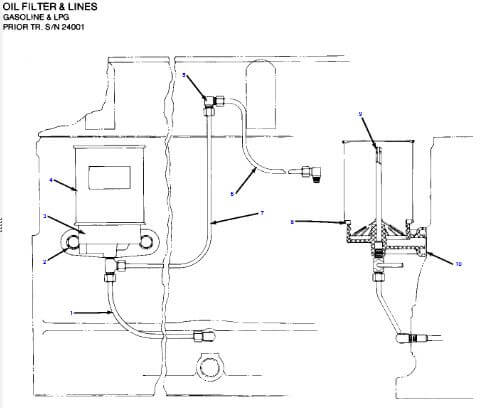 Full Filtration Oiling System, How it Works Full Filtration Oiling System, How it WorksStarting at D17 serial number 24001, Allis changed to a full filtration oiling system. All of the oil is pumped outside of the block and through the remote filter. Part of the filtered oil is pumped up to the rocker arm and governor via a small external line, while the rest is pumped back into the block. The oil then lubricates the bearings as described in the WD45 service manual. Another oiling change that I believe all D17’s had, was the D17 main bearings had an oil grove cut all the way around the bearing material. This lubricated the rod bearings during the full crank rotation. The WD45 main bearings, as stated in the Service Manual, are only partially grooved which only feeds oil to the rod bearing 1/6 of each revolution. At this serial break, Allis also switched cam and oil pump gears to speed up the pump and increase oil flow volume. Prior to the break, all WD45's and D17's had a 10 tooth gear on the oil pump matched to a 11 tooth gear on the camshaft. After the break, pumps came with a 9 tooth gear and were matched to a 14 tooth gear on the cam. Here is a picture of a WD45 main bearing insert. Unfortunately I don’t have any pictures of a D17 main bearing. 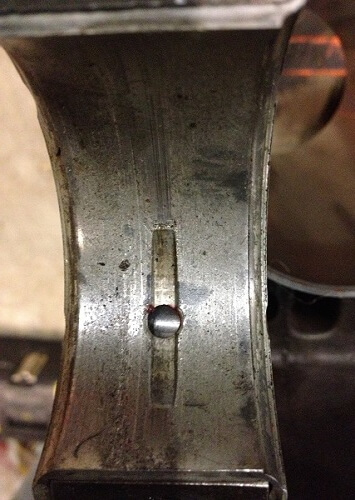 D17 Full Filtration 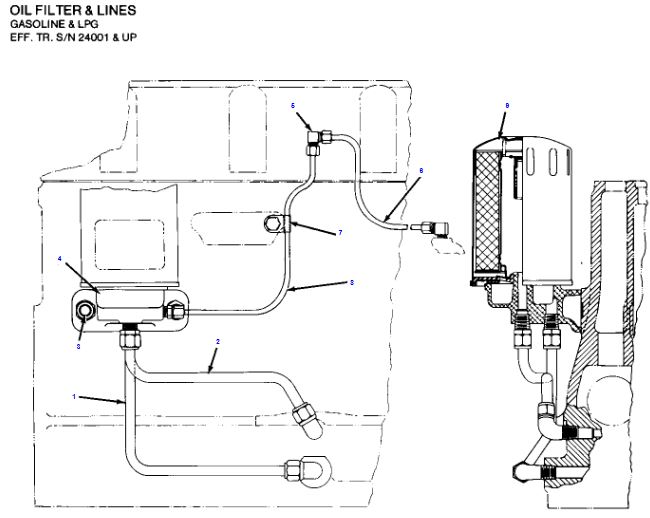
Edited by Allis dave - 31 Mar 2018 at 12:00pm
|
 |
|
Sponsored Links
|
|
|
CAL(KS)
Orange Level
Joined: 18 Sep 2009
Location: Chapman, KS
Points: 3804
|
Post Options
Thanks(0)
Quote Reply
Posted: 19 Aug 2016 at 9:31am |
|
|
|
Me -C,U,UC,WC,WD45,190XT,TL-12,145T,HD6G,HD16,HD20
Dad- WD, D17D, D19D, RT100A, 7020, 7080,7580, 2-8550's, 2-S77, HD15
|
|
79fordblake
Orange Level
Joined: 01 Jul 2010
Location: West Kentucky
Points: 829
|
Post Options
Thanks(0)
Quote Reply
Posted: 19 Aug 2016 at 6:36pm |
|
Looking forward to reading the rest of this. I have a full flow D17 base on the way.
|
|
CTuckerNWIL
Orange Level

Joined: 11 Sep 2009
Location: NW Illinois
Points: 22825
|
Post Options
Thanks(0)
Quote Reply
Posted: 19 Aug 2016 at 6:50pm |
") CAL(KS) wrote: CAL(KS) wrote:
knowledge base <-----
|
It should be there, just shows up here too.
|
|
|
|
Allis dave
Orange Level
Joined: 10 May 2012
Location: Northern IN
Points: 3121
|
Post Options
Thanks(0)
Quote Reply
Posted: 22 Aug 2016 at 11:19am |
|
Parts Needed
For the conversion, you will to find an oil filter base from a D17 that had a full filtration oil system. It will be easier if you can obtain the external oil lines as well.
You will also need an oil pump with an internal regulator. If the pump doesn’t already come with the 10 tooth gear, you will need to swap gears with your original pump. Do not try to use a 9 tooth pump gear with an 11 tooth cam gear.
I thought about switching cams and using the 9 and 14 tooth gears to add additional flow on my WD45, but I finally decided that it probably wasn’t necessary. If I was doing this conversion on an early D17 then I would definitely make the switch and take advantage of the increased flow for the larger D17 main bearings and full rotation rod bearing oiling.
For oil filters, I decided to use the NAPA Gold filter p/n# 1085. It is the same filter as the standard D17 filter except it is shorter. I checked and it has the same micron rating, flow rating, and (if I remember correctly) a higher burst rating. Since the filter sits upside down on the base (why do engineers do that??) I figured it would fill quicker on startup. It’s also the same filter that my Dodge Hemi truck takes, so I only have to stock one filter. The NAPA guy warned me though that using the wrong filter for a D17 application would void the filter warranty. I told him I wasn’t concerned because it was going on a converted WD45 so that would probably void the warranty anyway…
Edited by Allis dave - 08 Feb 2017 at 3:07pm
|
|
DrAllis
Orange Level Access
Joined: 12 Sep 2009
Points: 22750
|
Post Options
Thanks(0)
Quote Reply
Posted: 22 Aug 2016 at 1:50pm |
|
I'm unable to see any pictures (my puter blockers) but what did you use to plug the vertical passage to keep the oil flows separated ??
|
|
Allis dave
Orange Level
Joined: 10 May 2012
Location: Northern IN
Points: 3121
|
Post Options
Thanks(0)
Quote Reply
Posted: 22 Aug 2016 at 2:34pm |
Doc, http://www.oreillyauto.com/site/c/detail/DAG0/02471/N1446.oap?ck=Search_N1446_-1_-1&pt=N1446&ppt=C0266I used a 1/4NPT pipe plug with a countersunk allen head. Like a set screw. You had posted before that 12mm bolt as a plug and loctited it so you wouldn't have to enlarge the oil line hole. I couldn't come up with a good way to do that so I just enlarged the hole so I could work through it. I have all this in a Word document with pictures. If you want to see it, I'd email you it to you if you PM me your email address. Thanks for the original inspiration and instructions to make the conversation.
|
|
79fordblake
Orange Level
Joined: 01 Jul 2010
Location: West Kentucky
Points: 829
|
Post Options
Thanks(0)
Quote Reply
Posted: 22 Aug 2016 at 4:06pm |
|
I'd like to see it all Dave. PM sent.
|
|
Allis dave
Orange Level
Joined: 10 May 2012
Location: Northern IN
Points: 3121
|
Post Options
Thanks(0)
Quote Reply
Posted: 23 Aug 2016 at 7:48am |
Block Machine WorkHere are some pictures of a WD45 block and the passages that we need to modify. On a bypass oil system, Hole A connects to the oil pump. Holes B & C is where oil is returned to the sump if the pressure relief valve opens Hole D contains the pressure relief valve Hole E connects to an external line going to the oil filter.   This is where the holes go on a bypass oiled block If you spend some time with a light and wire, you’ll notice that Holes A, D, & E are passages. Passage D goes horizontally through the block and meets passage A. Passage E goes horizontally through the block and also meets and stops at passage A. Passage A goes vertically down into the block through passage D. Then Passage A has a 7/16 hole through the casting between passage D & E then opens up into Passage E. After it meets Passage E, Passage A continues down into the center cam bearing. In a standard block, the oil enters passage A. If the pressure is too great the relief valve open and oil dumps out holes B & C. The rest of the oil goes down through Passage A. Part of the oil keeps going down to the cam bearing and the rest goes out Passage E to the filter, head, governor, and pushrod galley. WD’s didn’t have a line going to the governor. For our conversion, we need to reroute all of the oil out of Passage D, to the filter and back into Passage E. Depending on your skill level and available tools, you may not want to do this machine work yourself. I had my machinist do it while he was doing the other work for my rebuild. I did do some additional tapping later to get the pipe plugs at depths that I was happier with. I would not want to free hand drill this project 1. Enlarge hole A to 37/64 down until you meet Passage D. Do not drill past Passage D. Later, we will tap this enlarged area to 3/8NPT to accept the oil line from the oil pump. 2. Tap the 7/16 portion of Passage A between Passages D & E for ¼NPT. Later we will screw a ¼ NPT plug with an allen head into this area. I actually had to buy a long ¼ pipe tap for this because a standard length wasn’t quite long enough. It took me several tries tapping this to get the tapped depth correct. I would test fit my plug, look into passages D & E and see the plug sticking up into Passage D, then tap a couple more turns. I worked on this until the plug was pretty much flush between the passages. Do not permanently install any plugs until all the machine work is complete. 3. Tap holes B & C for a 1/4 NPT pipe plug. Use a similar test fitting technique as step 2. 4. Take the relief valve hex plug from Hole D and throw away the spring and plunger (or save them for some unknown reason like I did because you’re a packrat.) Drill a 7/16 hole in the center of the hex and tap to ¼ NPT. This will accept the oil line going to the filter. 5. Enlarge Passage E to .300 (the ID of the 3/8’s oil lines) until it T’s into passage A. Do not drill past passage A. 6. Drill and tap the beginning of Passage E to 1/4NPT. The will accept the return line from the oil filter. 7. Drill and tap the small hole behind the oil filter base to accept a 1/8 pipe plug. The new filter base doesn’t use this and we don’t want oil leaking here out of the pushrod galley. When installing the new base, no filter will be needed here. When you’re 100% certain everything is correct, put some red Loctite on the plugs and tighten them into place. Your passages should now look like this.   
Edited by Allis dave - 23 Aug 2016 at 7:49am
|
|
Allis dave
Orange Level
Joined: 10 May 2012
Location: Northern IN
Points: 3121
|
Post Options
Thanks(0)
Quote Reply
Posted: 30 Aug 2016 at 10:09am |
Oil PumpFor my Full Flow oil system conversion I purchased a used oil pump from Bill Deppe with internal regulator that already had the 10 tooth gear. Great working with Bill by the way. Would definitely buy parts from him again. There was a little bit of junk between the screen and cover so I took the cover off and sprayed the pump and cover out really good with the water hose. After I installed the pump I kept having a nagging feeling that I should've pulled the cover and checked it out. I'm glad I did because I found a relief valve spring with about 1/2" broken off the end. Purchased a new one from AGCO for $7 The new spring was a little thinner, but also longer. Hopefully the difference is a wash and I get 30PSI from it. Once it's together there's no changing it without dropping the pan, unlike a standard WD45 with the pressure valve in the side of the bock. Once I was in there I decided to pull the drive shaft out and check it for wear. To pull the shaft I had to drive the roll pin out of the gear. The gear is also lightly pressed onto the shaft so I drove the shaft off the gear with a brass punch. I got lucky during re-assembly and managed to get the roll pin holes perfectly lined up after tapping the gear back onto the shaft with a block of wood and hammer. One thing I would recommend that I didn’t do is to machine the top pump plate flat again. If it’s wore very much, you will lose a small amount of flow. Mine wasn’t wore very much. The picture makes it look like more wear than what's really there. The shaft was perfectly smooth with no wear spots. I had more than one person tell me that these old oil pumps never die. I guess they were right. They never said anything about relief valves...    I made a new oil line to go from the pump to block. I tried not to pinch the line while bending. I think I did ok. You might be able to reuse your original line if you shorten it. Buying any new fitting to match up to the original line is impossible. They are some sort of 7/16-24 extra fine thread. 
|
|
Allis dave
Orange Level
Joined: 10 May 2012
Location: Northern IN
Points: 3121
|
Post Options
Thanks(0)
Quote Reply
Posted: 15 Feb 2017 at 6:22pm |
Oil LinesAlmost all of the oil lines have to be made new or reworked. I only reused the original D17 line that goes from the enlarged port in the block to the filter base. Make sure you get your lines plumbed correctly to the filter base so you don’t run oil backwards through the filter. I was able to use the original D17 line and fittings going from the base to the block. I did have a little trouble because turning the 90 degree fitting into the block, it would hit the block protrusion where the relief valve is located. I haven’t heard of any other who did this conversion have that trouble, so maybe my whole or block is just a hair different. I was able to grind a little off the fitting to make it work. I’m not thrilled because now the brass compression fitting nut only has about 3 threads left to bite to. Hopefully it will tighten and seal up without stripping the threads. For the 3/8” line going from the filter base to the old relief valve plug, I used a 3/8” x 12” piece of brake line. I bought a 90 degree ¼ NPT to 3/8” tube compression fitting to thread into the relief plug. For the filter base end I bought a 45 degree 1/4NPT to 3/8” double flare tube fitting. You could use a compression fitting here if you wanted, but I just decided to use the flare that was already on the line. I was careful to bend the line so it wouldn’t rub against the return line. I cut about 3” off the block/compression fitting side of the line to get it the perfect length. It took a couple tries of cutting off about 1/8 to get just the right length I used 3/16 brake line for the oil line going from the filter base to the head and then over to the governor cover. I bought a 90 degree 1/8” NPT to 3/16” compression fitting for the base and a 90 degree 1/8” NPT street elbow to thread into the block. I reused one of the original “T” fitting and threaded it into the elbow. I also reused the original fitting in the governor cover. With the street elbow I was able to keep the lines out of the way of the spark plugs without making extra loops in the lines.   
|
|
Allis dave
Orange Level
Joined: 10 May 2012
Location: Northern IN
Points: 3121
|
Post Options
Thanks(0)
Quote Reply
Posted: 21 Mar 2017 at 2:28pm |
Here is a picture of the new lines all painted and installed along with the distributor. I had to remake the line form the filter base to the head. Once I installed the carb, I realized that the rotating throttle bracket in the left of the picture was upside down. When I fixed that, the throttle rod rubbed on the original line. 
|
|
JC-WI
Orange Level Access
Joined: 11 Sep 2009
Location: wisconsin
Points: 34600
|
Post Options
Thanks(0)
Quote Reply
Posted: 21 Mar 2017 at 3:22pm |
|
Just a question here,
If you had taken the oil line from the
origional pump and went through the block and then to the full flow
filter and re-entered the oil back in where the old bypass filter got
fed from, and then go and plug hole "A", thus you still have the
original pressure relief assembly in the system working.
Would that not work? or does the full flow need more flow than the old oil pump can deliver?
Or is it because the pressure relief valve is now past the filter instead of before the filter and cold oil could damage the filter before it got warmed up... or possibly rupture the filter?
Thanks, JC
|
|
He who says there is no evil has already deceived himself
The truth is the truth, sugar coated or not. Trawler II says, "Remember that."
|
|
Allis dave
Orange Level
Joined: 10 May 2012
Location: Northern IN
Points: 3121
|
Post Options
Thanks(0)
Quote Reply
Posted: 22 Mar 2017 at 8:36am |
JC(WI) wrote:
Just a question here,
If you had taken the oil line from the
origional pump and went through the block and then to the full flow
filter and re-entered the oil back in where the old bypass filter got
fed from, and then go and plug hole "A", thus you still have the
original pressure relief assembly in the system working.
Would that not work? or does the full flow need more flow than the old oil pump can deliver?
Or is it because the pressure relief valve is now past the filter instead of before the filter and cold oil could damage the filter before it got warmed up... or possibly rupture the filter?
Thanks, JC
|
I'm not sure I follow you. When you say "went through the block and then to the full flow filter" Where would you exit the block from? I exit the block through the original relief valve. I'm not sure about the burst pressure on the filter, but I could see where ultra high pressure could cause a problem. The new pump pumps exactly the same oil volume as the new pump. So that's not an issue.
Edited by Allis dave - 22 Mar 2017 at 8:37am
|
|
DrAllis
Orange Level Access
Joined: 12 Sep 2009
Points: 22750
|
Post Options
Thanks(0)
Quote Reply
Posted: 22 Mar 2017 at 5:46pm |
|
If you ran a line from the oil pump out thru the side of the block to the filter base, and then ran a second line from the CENTER of the filter base back thru the side of the block and connect to port "A", things would work fine and original pressure regulator would function as intended. It wouldn't look very OEM-ish, but would work.
|
|
LeonR2013
Orange Level

Joined: 01 Jan 2013
Location: Fulton, Mo
Points: 3500
|
Post Options
Thanks(0)
Quote Reply
Posted: 24 Dec 2019 at 6:43pm |
|
Dave, don't forget to grease the drill bit so that it catches the drilled pieces in the flutes instead of pushing them into the engine. Works the same with taps as well.
|
|
LeonR2013
Orange Level
Joined: 01 Jan 2013
Location: Fulton, Mo
Points: 3500
|
Post Options
Thanks(0)
Quote Reply
Posted: 24 Dec 2019 at 6:47pm |
|
Yeah, I know this is an old post, but what I posted might save an engine.
|
|


