| Author |
 Topic Search Topic Search  Topic Options Topic Options
|
Don(MO) 
Orange Level

Joined: 12 Sep 2009
Location: Bates City MO.
Points: 6862
|
 Post Options Post Options
") Thanks(0) Thanks(0)
") Quote Quote  Reply Reply
 Posted: 19 Jun 2019 at 12:53pm Posted: 19 Jun 2019 at 12:53pm |
|
I'd find a crankshaft that set screw hole will not hold and the end of the shaft might even break off someday and the pulley will make a mess of the rad as it try's to get out of there.
|
|
3 WD45's with power steering,G,D15 fork lift,D19, W-Speed Patrol, "A" Gleaner with a 330 corn head,"66" combine,roto-baler, and lots of Snap Coupler implements to make them work for their keep.
|
 |
|
Sponsored Links
|
|
|
Sugarmaker
Orange Level

Joined: 12 Jul 2013
Location: Albion PA
Points: 8662
|
Post Options
Thanks(0)
Quote Reply
Posted: 19 Jun 2019 at 1:09pm |
Sploke, Yes I have a crude puller for the sleeves. A tube larger than the sleeve, to set on the deck, 1/2 inch thick plate that fits in the bottom of the sleeve, 5/8 allthread through the center. Washers and nut on each end. also apply a little oil to the allthread as needed. Putting them in is a lot easier. Almost by hand with twisting down pressure if your good. I am not that good. I needed a couple taps with a piece of hard wood for the last 3/8 inch. That's for the final o-ring assembly. For just checking sleeve protrusion with out the o-rings they come in and out by hand easily. I guess if you needed to you could have the block magnafluxed for cracks. I had mine checked out. Don has seen a lot of these. That crank end has seen better days! Regards, Chris
|
|
D17 1958 (NFE), WD45 1954 (NFE), WD 1952 (NFE), WD 1950 (WFE), Allis F-40 forklift, Allis CA, Allis D14, Ford Jubilee, Many IH Cub Cadets, 32 Ford Dump, 65 Comet, 66 F100.
|
|
sploke
Silver Level

Joined: 27 Jul 2015
Location: CT
Points: 113
|
Post Options
Thanks(0)
Quote Reply
Posted: 19 Jun 2019 at 1:47pm |
 Sugarmaker wrote: Sugarmaker wrote:
Sploke,Yes I have a crude puller for the sleeves. A tube larger than the sleeve, to set on the deck, 1/2 inch thick plate that fits in the bottom of the sleeve, 5/8 allthread through the center. Washers and nut on each end. also apply a little oil to the allthread as needed. Putting them in is a lot easier. Almost by hand with twisting down pressure if your good. I am not that good. I needed a couple taps with a piece of hard wood for the last 3/8 inch. That's for the final o-ring assembly. For just checking sleeve protrusion with out the o-rings they come in and out by hand easily. I guess if you needed to you could have the block magnafluxed for cracks. I had mine checked out. Don has seen a lot of these. That crank end has seen better days! Regards, Chris |
Thanks for that info. For the pull, did you need to crank on the all-thread until the entire sleeve was clear of the block? Or can you get it halfway or so and then it pulls out freely?
|
|
WF owner
Orange Level
Joined: 12 May 2013
Location: Bombay NY
Points: 5192
|
Post Options
Thanks(1)
Quote Reply
Posted: 19 Jun 2019 at 8:17pm |
|
Some sleeves come out easy. Others you have to really crank on them to get them moving. Usually, after they start, they come easy. After you move them a couple inches, they clear the O rings and come out easily.
|
|
sploke
Silver Level
Joined: 27 Jul 2015
Location: CT
Points: 113
|
Post Options
Thanks(0)
Quote Reply
Posted: 19 Jun 2019 at 9:16pm |
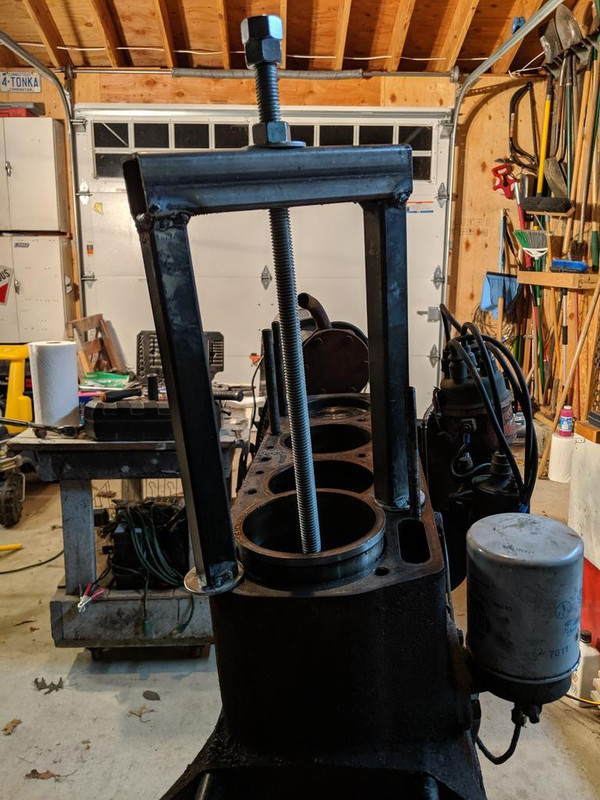
That is about what I found. It took me longer to weld up the jig than it did to pull all four liners. Once I got them unseated and up about an inch, I was able to pull them the rest of the way by hand. There is some debris inside the block at the back, furthest from the water pump, so I will clean all that up well before reinstalling.
|
|
WF owner
Orange Level
Joined: 12 May 2013
Location: Bombay NY
Points: 5192
|
Post Options
Thanks(0)
Quote Reply
Posted: 19 Jun 2019 at 9:30pm |
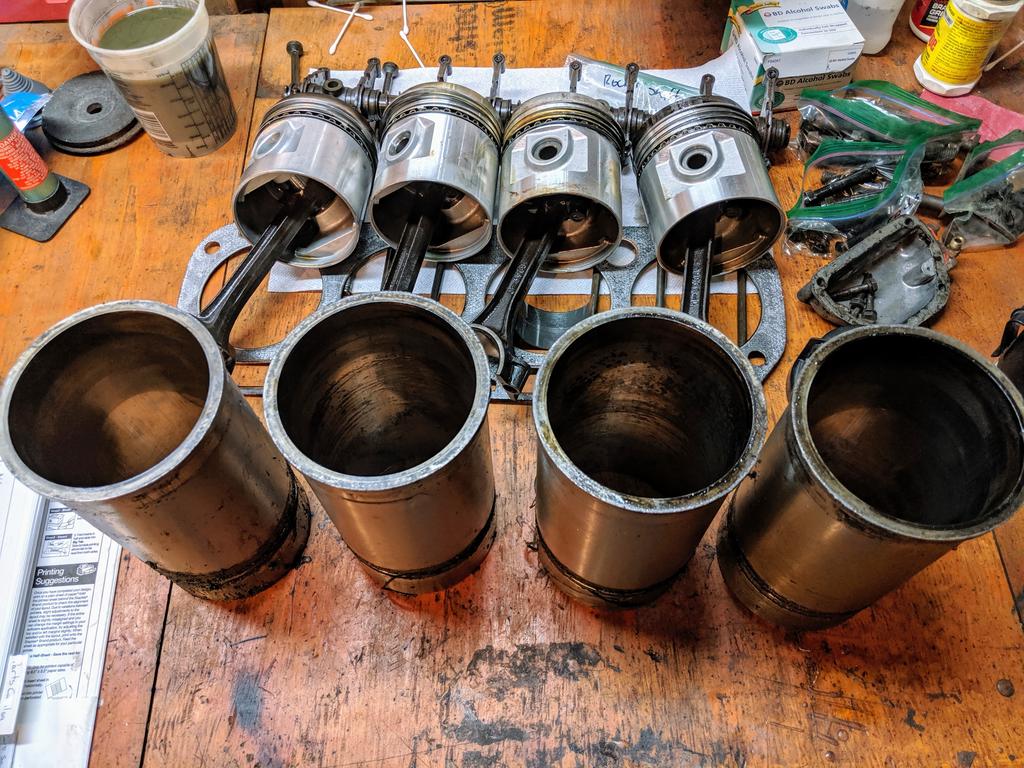
Sleeves and pistons look quite new. I would probably hone the sleeves, put in new rings and O-rings and reuse them. I see no cracks between cylinders. Check the bottom end very carefully for cracks (that may be your source of coolant in the oil).
57 Nomad???
Edited by WF owner - 19 Jun 2019 at 9:32pm
|
|
Sugarmaker
Orange Level
Joined: 12 Jul 2013
Location: Albion PA
Points: 8662
|
Post Options
Thanks(0)
Quote Reply
Posted: 19 Jun 2019 at 9:36pm |
Sploke, You have good skills and are quick too. The time fabricating the right tool saved you time. Good job! Regards, Chris
|
|
D17 1958 (NFE), WD45 1954 (NFE), WD 1952 (NFE), WD 1950 (WFE), Allis F-40 forklift, Allis CA, Allis D14, Ford Jubilee, Many IH Cub Cadets, 32 Ford Dump, 65 Comet, 66 F100.
|
|
sploke
Silver Level
Joined: 27 Jul 2015
Location: CT
Points: 113
|
Post Options
Thanks(0)
Quote Reply
Posted: 19 Jun 2019 at 9:45pm |
WF owner wrote:
Sleeves and pistons look quite new. I would probably hone the sleeves, put in new rings and O-rings and reuse them.I see no cracks between cylinders. Check the bottom end very carefully for cracks (that may be your source of coolant in the oil).
57 Nomad???
|
'57 four door Bel-Air wagon. My wife and I restored it before we were married. We both like old iron 
|
|
WF owner
Orange Level
Joined: 12 May 2013
Location: Bombay NY
Points: 5192
|
Post Options
Thanks(0)
Quote Reply
Posted: 19 Jun 2019 at 9:49pm |
|
NICE !!!!!!
|
|
Sugarmaker
Orange Level
Joined: 12 Jul 2013
Location: Albion PA
Points: 8662
|
Post Options
Thanks(0)
Quote Reply
Posted: 19 Jun 2019 at 9:55pm |
Very sharp Chevy! Regards, Chris
|
|
D17 1958 (NFE), WD45 1954 (NFE), WD 1952 (NFE), WD 1950 (WFE), Allis F-40 forklift, Allis CA, Allis D14, Ford Jubilee, Many IH Cub Cadets, 32 Ford Dump, 65 Comet, 66 F100.
|
|
sploke
Silver Level
Joined: 27 Jul 2015
Location: CT
Points: 113
|
Post Options
Thanks(0)
Quote Reply
Posted: 22 Jun 2019 at 9:13am |
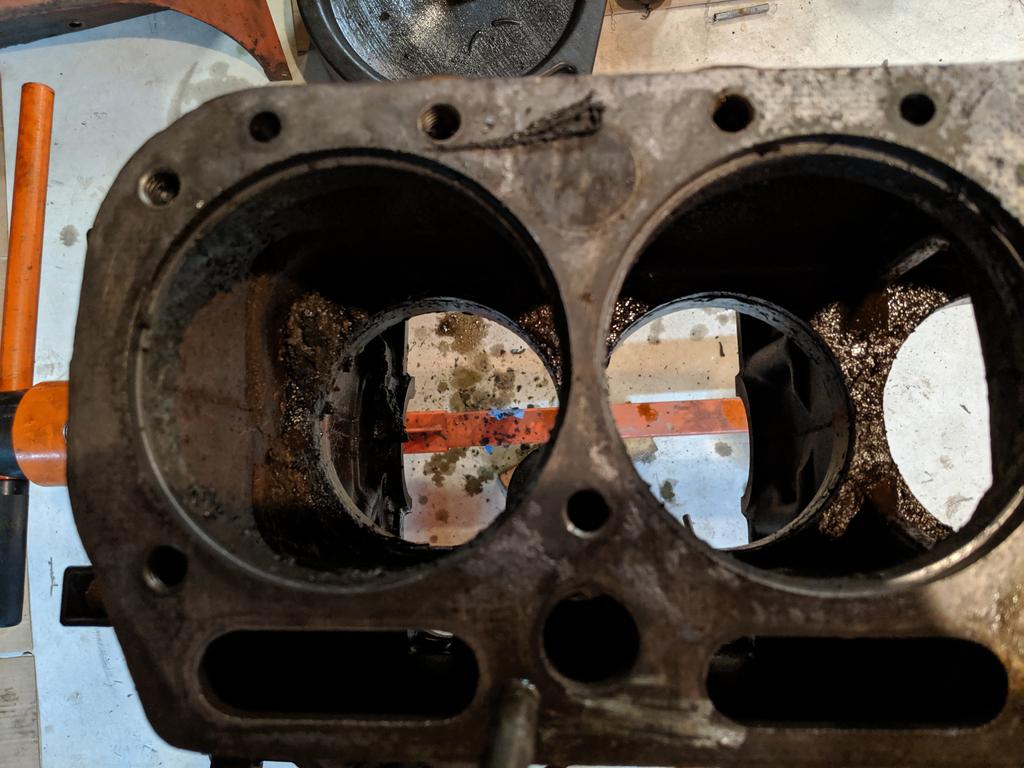
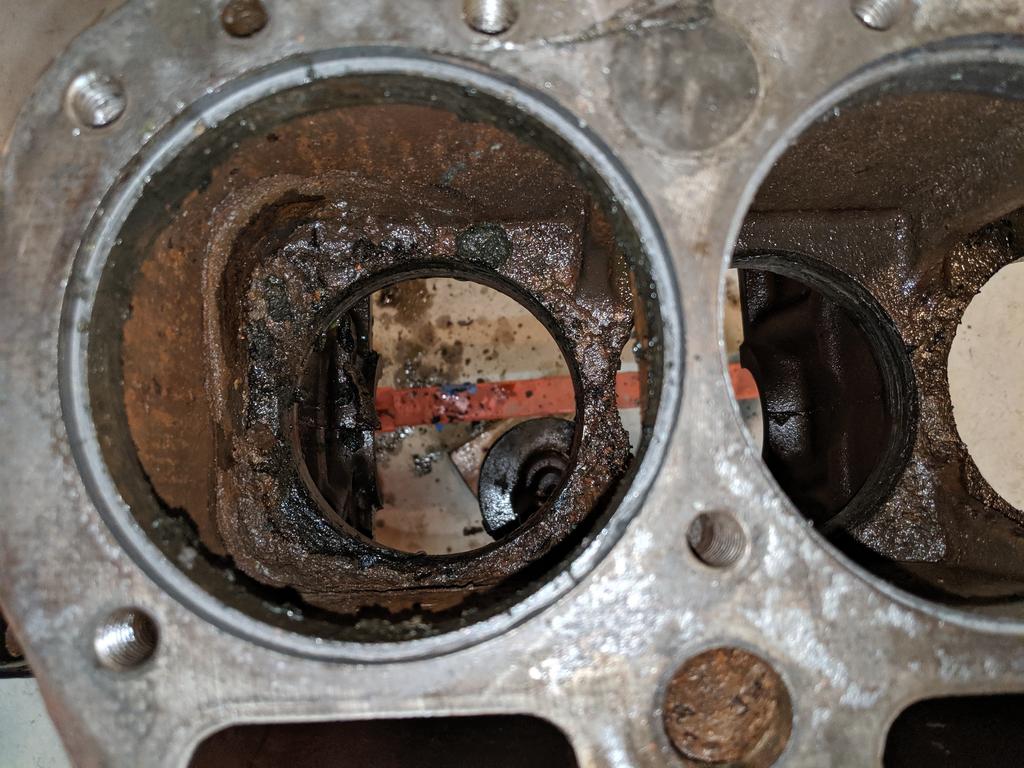
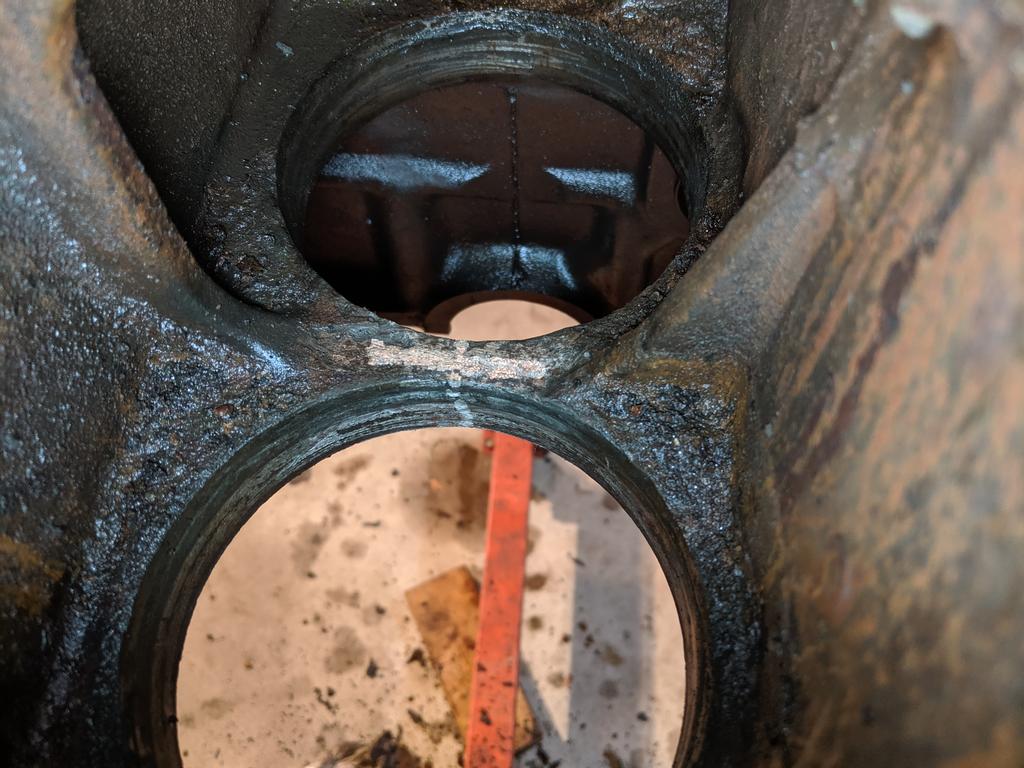
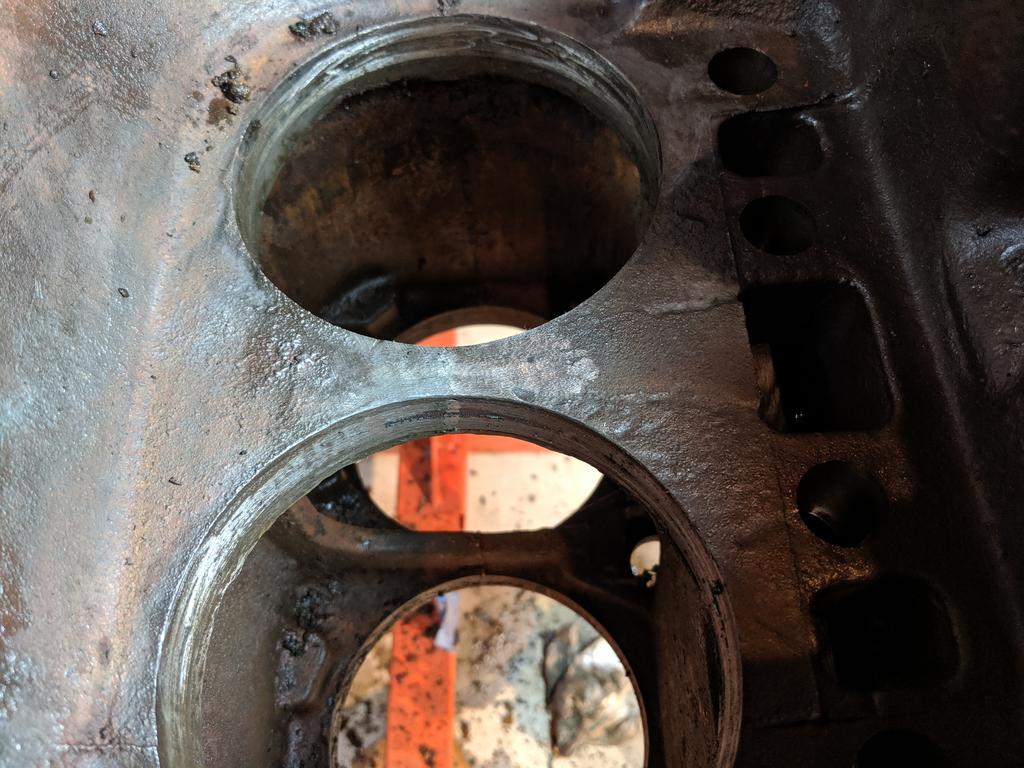
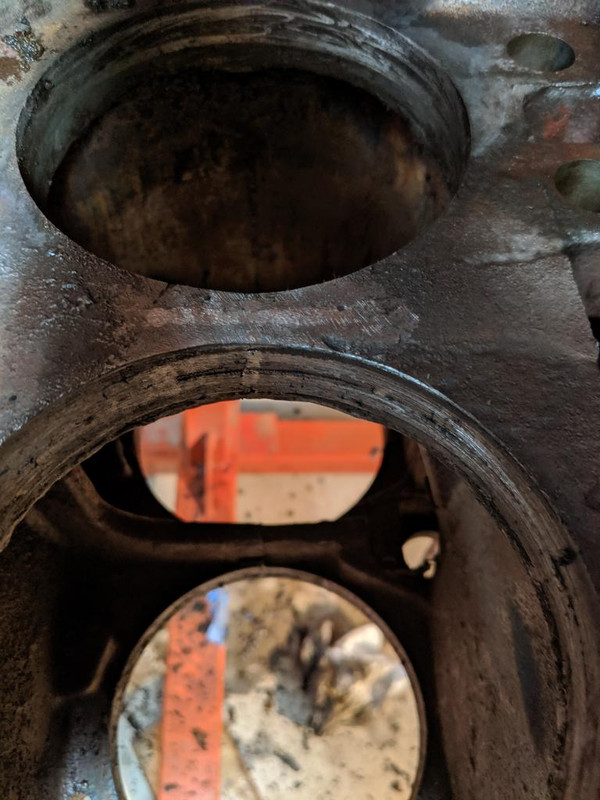
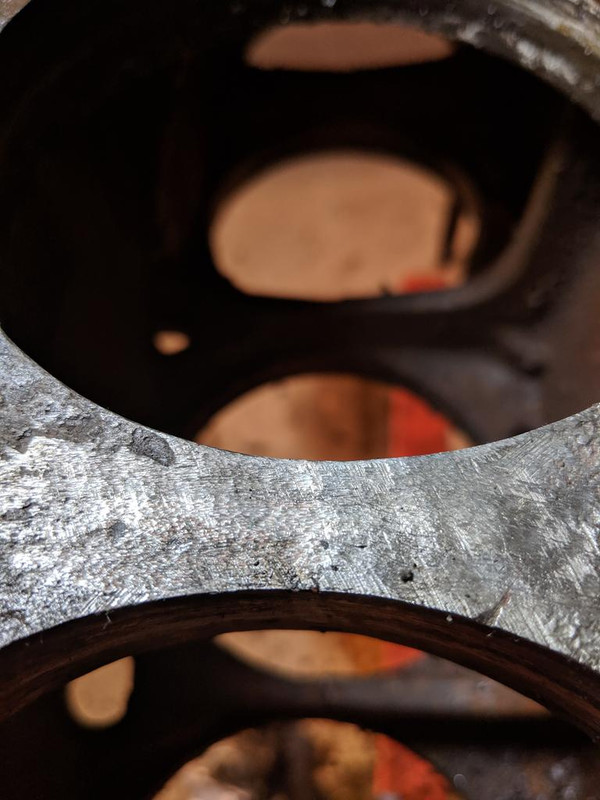
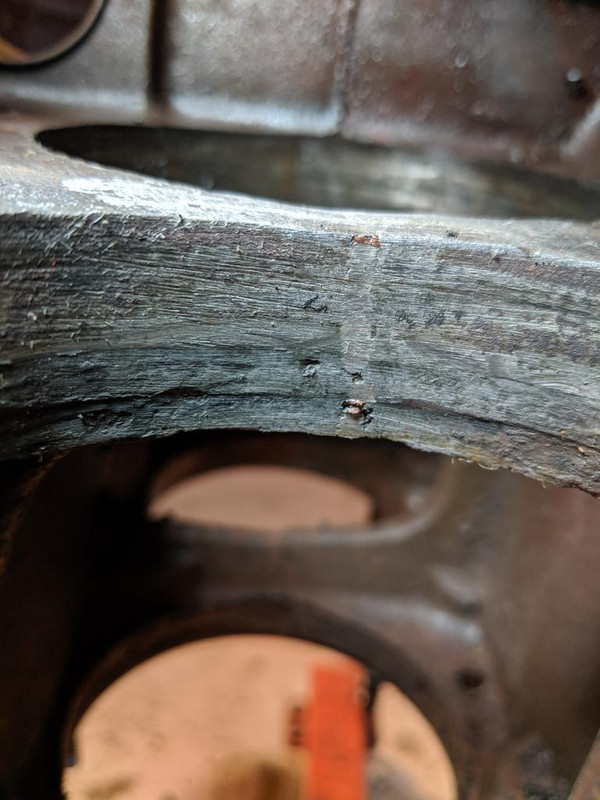
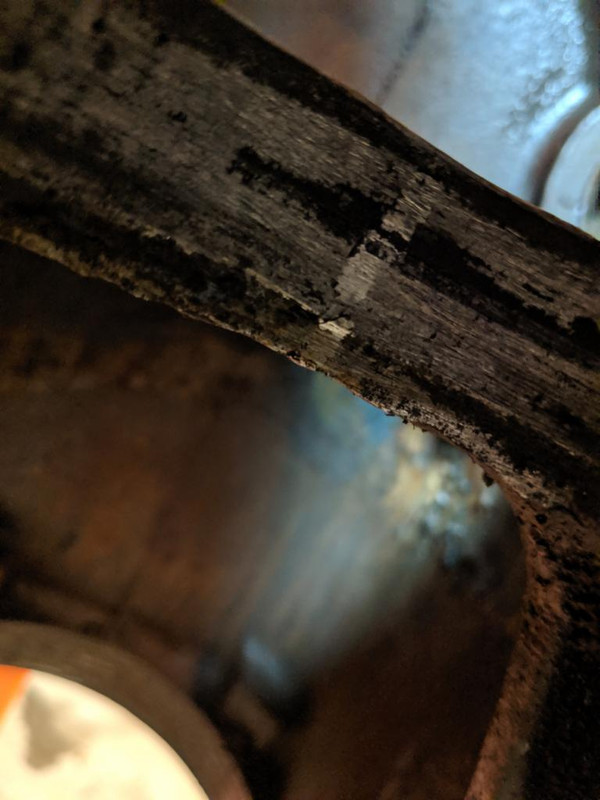
Well, got the rest of the block stripped down and ready for cleanup, and started giving things a good inspection. One of the lower spots between the cylinders caught my attention. I'm not sure if this looks like a repair....it certainly seems like it's gotten some attention in the past though. It looks solid...could that possibly be a braze repair of a previous crack?
This is from the top, looking down onto the upper surface of the lower web, where the liner o-rings seal.
Same area but other side, from the bottom of the block.
From the inside surface, where the o-rings seal. On a separate note, this surface seems a lot rougher than I would have expected. I was expecting a much more smoothly machined finish where the liner o-rings seal.
|
|
Don(MO)
Orange Level
Joined: 12 Sep 2009
Location: Bates City MO.
Points: 6862
|
Post Options
Thanks(0)
Quote Reply
Posted: 22 Jun 2019 at 10:15am |
|
I guess I'll be the bad guy here, the lower bores (where the O-rings fit) need to be bored out and install lower dry sleeves to repair that block right. Before you go on with this block please get it checked for cracks in the lower bores.
|
|
3 WD45's with power steering,G,D15 fork lift,D19, W-Speed Patrol, "A" Gleaner with a 330 corn head,"66" combine,roto-baler, and lots of Snap Coupler implements to make them work for their keep.
|
|
SteveM C/IL
Orange Level Access
Joined: 12 Sep 2009
Location: Shelbyville IL
Points: 8997
|
Post Options
Thanks(0)
Quote Reply
Posted: 22 Jun 2019 at 10:16am |
|
They are not that rough. You have a lot of crud to remove to get to the base metal
|
|
Sugarmaker
Orange Level
Joined: 12 Jul 2013
Location: Albion PA
Points: 8662
|
Post Options
Thanks(0)
Quote Reply
Posted: 22 Jun 2019 at 10:32pm |
It looks repaired and rough in the area of the o-rings just as you described. But that could be a casting mark???? I will see if I have any pictures of the block I used. May not have taken as good of pictures as you did. Heres about the only one I have. I think my sealing areas were pretty smooth at the o-rings. Regards, Chris
|
|
D17 1958 (NFE), WD45 1954 (NFE), WD 1952 (NFE), WD 1950 (WFE), Allis F-40 forklift, Allis CA, Allis D14, Ford Jubilee, Many IH Cub Cadets, 32 Ford Dump, 65 Comet, 66 F100.
|
|
sploke
Silver Level
Joined: 27 Jul 2015
Location: CT
Points: 113
|
Post Options
Thanks(0)
Quote Reply
Posted: 24 Jun 2019 at 7:16am |
|
After giving the whole block a good scrub in degreaser, it cleaned up pretty well. Whoever rebuilt this thing last went a little crazy with the permatex...both o-rings on all the sleeves were buried in the stuff, and I think that was causing a lot of the "rough" look on the lower sleeve bores. Live Steve M said, a lot of crud had to come off to expose the base metal, and it looks a lot better now. I'm waiting on parts, but I'm curious to compare the o-rings that were in there to the new ones I get. I'm wondering if the old ones were the wrong size, and the guy tried to make up for it by gluing them in with RTV. Would be a convenient solution to the leakage problem. More to come...
|
|
Sugarmaker
Orange Level
Joined: 12 Jul 2013
Location: Albion PA
Points: 8662
|
Post Options
Thanks(0)
Quote Reply
Posted: 24 Jun 2019 at 7:29am |
sploke, Yes! There should be permatex police! it does get over used on occasion! Sound slike your block cleaned up good. Those seal areas are going to be critical. I used veggie oil to lube the sleeve o-rings. Regards, Chris
|
|
D17 1958 (NFE), WD45 1954 (NFE), WD 1952 (NFE), WD 1950 (WFE), Allis F-40 forklift, Allis CA, Allis D14, Ford Jubilee, Many IH Cub Cadets, 32 Ford Dump, 65 Comet, 66 F100.
|
|
SteveM C/IL
Orange Level Access
Joined: 12 Sep 2009
Location: Shelbyville IL
Points: 8997
|
Post Options
Thanks(0)
Quote Reply
Posted: 24 Jun 2019 at 9:05am |
|
When clean,you should be able to set bare liner in block and should turn circles freely. If not,you have more cleaning to do.
|
|
sploke
Silver Level
Joined: 27 Jul 2015
Location: CT
Points: 113
|
Post Options
Thanks(0)
Quote Reply
Posted: 24 Jun 2019 at 9:28am |
SteveM C/IL wrote:
When clean,you should be able to set bare liner in block and should turn circles freely. If not,you have more cleaning to do. |
good advice, thanks. I will check that soon - right now I have the covers and everything dry-fit and taped off to paint the motor tonight. Once it's apart again I'll be sure to check that.
|
|
frnkeore
Silver Level

Joined: 07 May 2019
Location: Southern Oregon
Points: 362
|
Post Options
Thanks(0)
Quote Reply
Posted: 24 Jun 2019 at 12:30pm |
|
It looks to me that the block was "pinned", to repair a crack.
After pinning, it was ground, to remove the exposed parts of the pins, to try to match the sleeve bore and one side is very rough and could tear the O-ring.
You need measure, a good bore, then across that area. I suspect that the measurement will be larger than the other bores and factory specs.
|
|
Frank
1959 D17 Series I #24001+, '59 D14
'55 & '59 Ford 850 & 861
Ferguson TO 35 Deluxe, Oliver 70 and 5 more.
|
|
CTuckerNWIL
Orange Level

Joined: 11 Sep 2009
Location: NW Illinois
Points: 22825
|
Post Options
Thanks(0)
Quote Reply
Posted: 24 Jun 2019 at 6:26pm |
frnkeore wrote:
It looks to me that the block was "pinned", to repair a crack.
After pinning, it was ground, to remove the exposed parts of the pins, to try to match the sleeve bore and one side is very rough and could tear the O-ring.
You need measure, a good bore, then across that area. I suspect that the measurement will be larger than the other bores and factory specs.
|
That was my thought too, when I saw the pictures.
|
|
|
|
sploke
Silver Level
Joined: 27 Jul 2015
Location: CT
Points: 113
|
Post Options
Thanks(0)
Quote Reply
Posted: 24 Jun 2019 at 7:41pm |
Running out of time to get the paint taken care of tonight, but did get the bore measurements.
I couldn't find any mention in the service manual of the spec'd bore size, or the clearance between block and liner, so I really have no idea if these measurements are acceptable or not. If anyone has that data I would in interested in seeing it.
The repair was done between cylinders 3 and 4. I took measurements on 1 for a baseline, then 3 and 4. These are the places I took measurements:
Cyl 1 A - 4.51
B - 4.53 C - 4.52
Cyl 3 A - 4.50 B - 4.55 C - 4.59
Cyl 4 A - 4.54 B - 4.61 C - 4.56
So, the bores for cyl 3 and 4 are slightly larger, but NOT in the area where I expected if the pin repair was ground down too much inside the bores. All that being said, without a tolerance measurement I really have no idea how much variance the sleeve o-rings can be expected to make up.
|
|
Sugarmaker
Orange Level
Joined: 12 Jul 2013
Location: Albion PA
Points: 8662
|
Post Options
Thanks(0)
Quote Reply
Posted: 24 Jun 2019 at 8:33pm |
Sploke, I think your right on in doing the measuring! But I have a question. You have dimension spread of .090 thousands! That seems way to big, but I must say that I did not measure mine in that area. I would have expected machined dimensions of .010 inch total? I have my junk block but sent my sons mics home. Ok so that is a repair in that one web. Makes sense. Hope you can save this block! Regards, Chris
|
|
D17 1958 (NFE), WD45 1954 (NFE), WD 1952 (NFE), WD 1950 (WFE), Allis F-40 forklift, Allis CA, Allis D14, Ford Jubilee, Many IH Cub Cadets, 32 Ford Dump, 65 Comet, 66 F100.
|
|
SteveM C/IL
Orange Level Access
Joined: 12 Sep 2009
Location: Shelbyville IL
Points: 8997
|
Post Options
Thanks(0)
Quote Reply
Posted: 24 Jun 2019 at 9:32pm |
|
Just me but I wouldn't chance using a repaired lower web. It's one thing to bore and sleeve it but pinning it would distort the bore wouldn't it? There are good used blocks out there. Wish you had plugged the hoses and put some real pressure on water jacket to see where the leak was. If you use this,I'd advise filling block and head with coolant,plugging radiator hoses with round stock and put pressure on it with pan off....before you ever install it. You can drill and tap one of the plugs and install a fitting to connect air to. Leave it at 15# for 4-5 hrs. Then overnight.If it passes all that you MAY be good to go.
|
|
frnkeore
Silver Level
Joined: 07 May 2019
Location: Southern Oregon
Points: 362
|
Post Options
Thanks(0)
Quote Reply
Posted: 25 Jun 2019 at 1:47am |
|
First check your engine number. W Engines #146608 and above, use a bottom sleeve diameter of 4.459. Engines from #146607 back, use a diameter of 4.467. Verify your sleeve diameter. The above dimensions are from sleeve specs, in my TRW catalog.
Your measurements, tell me that you didn't use a inside micrometer to do the measurements? With a inside mic, I would expect a 3rd digit in the measurement.
If you don't have one, try to borrow one and measure across the worst part of the repair, that is where it will leak the most. Then, put a O-ring on the sleeve and with a mic, carefully measure that diameter.
If that diameter isn't at least .0050 - .010 larger than the largest diameter, in the pinned area, I don't think there is a chance that it will seal, especially on the area, with the roughest surface.
I couldn't find the spec for the lower bore, in my service manual but, that would be a great help and something that should be checked when doing a sleeve replacement.
|
|
Frank
1959 D17 Series I #24001+, '59 D14
'55 & '59 Ford 850 & 861
Ferguson TO 35 Deluxe, Oliver 70 and 5 more.
|
|
Sugarmaker
Orange Level
Joined: 12 Jul 2013
Location: Albion PA
Points: 8662
|
Post Options
Thanks(0)
Quote Reply
Posted: 25 Jun 2019 at 6:31am |
sploke, Hows it going? We haven't provided a very good prognosis on your engine project. Your pictures really help bring up some good questions and good point. I for one did not look too hard at that sealing area. I guess I sanded it smooth and did not notice any serious issues. I did not measure it. In fact to be honest I didn't measure anything related to the sleeve area. Just cleaned and set the sleeve protrusion, and made sure the sleeves rotated freely by hand prior to o-rings. Looking forward to your updates on your engine work. I am keeping my fingers crossed on mine! I haven't started it yet and its my first 226 rebuild! Regards, Chris
Edited by Sugarmaker - 25 Jun 2019 at 6:33am
|
|
D17 1958 (NFE), WD45 1954 (NFE), WD 1952 (NFE), WD 1950 (WFE), Allis F-40 forklift, Allis CA, Allis D14, Ford Jubilee, Many IH Cub Cadets, 32 Ford Dump, 65 Comet, 66 F100.
|
|
Don(MO)
Orange Level
Joined: 12 Sep 2009
Location: Bates City MO.
Points: 6862
|
Post Options
Thanks(0)
Quote Reply
Posted: 25 Jun 2019 at 7:00am |
Don(MO) wrote:
I guess I'll be the bad guy here, the lower bores (where the O-rings fit) need to be bored out and install lower dry sleeves to repair that block right. Before you go on with this block please get it checked for cracks in the lower bores. |
Please re-read this before you put it back together. All that sealer is a warring of trouble the last time it was overhauled.
|
|
3 WD45's with power steering,G,D15 fork lift,D19, W-Speed Patrol, "A" Gleaner with a 330 corn head,"66" combine,roto-baler, and lots of Snap Coupler implements to make them work for their keep.
|
|
sploke
Silver Level
Joined: 27 Jul 2015
Location: CT
Points: 113
|
Post Options
Thanks(0)
Quote Reply
Posted: 25 Jun 2019 at 7:29am |
frnkeore wrote:
First check your engine number. W Engines #146608 and above, use a bottom sleeve diameter of 4.459. Engines from #146607 back, use a diameter of 4.467. Verify your sleeve diameter. The above dimensions are from sleeve specs, in my TRW catalog.
Your measurements, tell me that you didn't use a inside micrometer to do the measurements? With a inside mic, I would expect a 3rd digit in the measurement.
If you don't have one, try to borrow one and measure across the worst part of the repair, that is where it will leak the most. Then, put a O-ring on the sleeve and with a mic, carefully measure that diameter.
If that diameter isn't at least .0050 - .010 larger than the largest diameter, in the pinned area, I don't think there is a chance that it will seal, especially on the area, with the roughest surface.
I couldn't find the spec for the lower bore, in my service manual but, that would be a great help and something that should be checked when doing a sleeve replacement.
|
Do you mean engine s/n or tractor s/n? I don't have the tractor s/n handy but I did confirm it's a 1953 last time I looked at it, so it's definitely an earlier WD45. The engine block s/n is 45-3667-G, for whatever that's worth.
I don't have an inside micrometer, I used a standard mic with a bore gauge to get the measurements. I can get better resolution measurements...I was rushing through it last night. I don't have the new o-rings yet, they are scheduled for delivery tomorrow, but I think your suggestion is valid - if I measure the diameter of the sleeve with the o-ring on, and compare that to the bore measurements, I should be able to get a good idea of how much compression I'd be looking at on the o-rings once the sleeves are installed.
|
|
sploke
Silver Level
Joined: 27 Jul 2015
Location: CT
Points: 113
|
Post Options
Thanks(0)
Quote Reply
Posted: 25 Jun 2019 at 7:36am |
Don(MO) wrote:
Don(MO) wrote:
I guess I'll be the bad guy here, the lower bores (where the O-rings fit) need to be bored out and install lower dry sleeves to repair that block right. Before you go on with this block please get it checked for cracks in the lower bores. |
Please re-read this before you put it back together. All that sealer is a warring of trouble the last time it was overhauled. |
Yeah...I'm beginning to understand that. With the appearance of a repair to the web, the variance in the bore diameter and the sheer volume of sealant found on the sleeves and bores...this is not a new problem. Ugh.
I bought this machine not really knowing what I was getting into, and originally noticed the oil leak (which even at that time looked like chocolate milk) when we were loading it on the trailer at pickup. Seller (who reportedly bought the tractor from a mechanic friend who did the previous rebuild) kind of brushed it off as, "oh, it probably just needs an oil change". Looking back, the internal coolant leak had probably already started and has steadily gotten worse in the time I've had it. I probably paid too much for the tractor even without this issue, so now I'm struggling with, am I throwing good money after bad by chasing all these problems? This went from an oil pan gasket replacement, to a rear main seal replacement, to holy crap I really need to replace the whole block and potentially the crank! Budget, meet torpedo 
|
|
sploke
Silver Level
Joined: 27 Jul 2015
Location: CT
Points: 113
|
Post Options
Thanks(0)
Quote Reply
Posted: 25 Jun 2019 at 10:39am |
|
Oof. Local machine shop says budget $800 or so to bore and dry sleeve the lower liner bores in the block. That is pushing deep into the margin of "not worth it to repair". Although the other downside of spending $400-500 to get a used block with who knows what pre-existing problems is not much of a better option.
|
|
DrAllis
Orange Level Access
Joined: 12 Sep 2009
Points: 22844
|
Post Options
Thanks(0)
Quote Reply
Posted: 25 Jun 2019 at 11:32am |
|
Well at $400 to $500 for a used block, I'll buy one for $200 and bring it to you. That old block is junk and not worth even trying to fix. Maybe used parts are scarce where you live, but not around here. Those blocks are easily checked with your eyes. Clean it up and if no cracks are visible on the top deck or the bottom, it is probably OK fine.
|
|