| Author |
 Topic Search Topic Search  Topic Options Topic Options
|
Dave(inMA) 
Orange Level


Joined: 12 Sep 2009
Location: Grafton, MA
Points: 2399
|
 Post Options Post Options
") Thanks(0) Thanks(0)
") Quote Quote  Reply Reply
 Topic: Stubborn WD45 Breather Cap - SUCCESS Topic: Stubborn WD45 Breather Cap - SUCCESS
Posted: 20 Dec 2016 at 6:02pm |
See post at 9:37pm 12/21. 
I'm working on my WD45 and have found that the breather/oil fill cap on the valve cover is refusing to come off. It will wiggle just a bit on the valve cover pipe. I'm trying really hard to not damage the cap, so a couple of questions:
1. Are there 'ears' inside the cap so that it has to be twisted to come off? Or does the cap just pull off? I'm pretty sure it just pulls off, but it'd be nice to know for sure!
2. Anyone have a surefire way to break the cap loose without destroying it? I've sprayed solvent down into the cap around the pipe with the valve cover upside down, and I've applied some heat and light tapping with a nylon hammer, but so far nothing good is happening. :)
Thanks much for your help! Dave
Edited by Dave(inMA) - 21 Dec 2016 at 10:19pm
|
|
WC, CA, D14, WD45
|
 |
|
Sponsored Links
|
|
|
dawntreader74
Orange Level

Joined: 28 Oct 2013
Location: Manteno
Points: 1770
|
Post Options
Thanks(0)
Quote Reply
Posted: 20 Dec 2016 at 6:57pm |
|
i took a round peaces of small broom stick' put in the inside an knocked it off that way' won't haft to it very hard at all. came right off.
|
|
Dave(inMA)
Orange Level
Joined: 12 Sep 2009
Location: Grafton, MA
Points: 2399
|
Post Options
Thanks(0)
Quote Reply
Posted: 20 Dec 2016 at 7:03pm |
Thanks, dawntreader. Tried a 1/2" dowel with no success. I'll look for something that mostly fills the tube and see if that does it.
Dave
|
|
WC, CA, D14, WD45
|
|
Darb210
Orange Level

Joined: 10 Jan 2011
Location: Ohio
Points: 889
|
Post Options
Thanks(0)
Quote Reply
Posted: 20 Dec 2016 at 7:08pm |
|
I have had luck with a rubber mallet
|
|
dawntreader74
Orange Level
Joined: 28 Oct 2013
Location: Manteno
Points: 1770
|
Post Options
Thanks(0)
Quote Reply
Posted: 20 Dec 2016 at 7:08pm |
turn it up-side-down on some blocks on each side an knock it off of there is all you can do' lets see if it works 
|
|
Ted J
Orange Level

Joined: 05 Jul 2010
Location: La Crosse, WI
Points: 18943
|
Post Options
Thanks(0)
Quote Reply
Posted: 20 Dec 2016 at 8:22pm |
|
You could try one of those plumber straps.....the rubber kind that tighten up as you turn. Get it spinning slowly and then lift upward.
Or.......
wood blocks under the underside and whack it with a small hammer. Should come off easily.
|
|
"Allis-Express"
19?? WC / 1941 C / 1952 CA / 1956 WD45 / 1957 WD45 / 1958 D-17
|
|
Allis dave
Orange Level
Joined: 10 May 2012
Location: Northern IN
Points: 3086
|
Post Options
Thanks(0)
Quote Reply
Posted: 21 Dec 2016 at 7:10am |
|
I sympathize. I have one that's stuck on so tight I didn't think it was supposed to come off. I later found out it was. Put a pry bar under it this summer and got it to move a little, but it started bending the bottom of the cap.
|
|
NICKMI
Orange Level Access
Joined: 15 Sep 2009
Location: Greenville
Points: 534
|
Post Options
Thanks(0)
Quote Reply
Posted: 21 Dec 2016 at 12:21pm |
|
Just take valve cover off and hit it from the inside
|
|
Don(MO)
Orange Level
Joined: 12 Sep 2009
Location: Bates City MO.
Points: 6862
|
Post Options
Thanks(0)
Quote Reply
Posted: 21 Dec 2016 at 4:22pm |
|
Dave you have found one of the pains of working on old tractors, sometimes the little things can be a big pain in the butt! lol If it not coming out and you drive it off and you don't have a good used one and you can and order a new one get ready for the price. lol
I'd check if the old one is not plugged up I'd just clean it with parts washer and blow it out good let it dry out and leave it on the valve cover.
|
|
3 WD45's with power steering,G,D15 fork lift,D19, W-Speed Patrol, "A" Gleaner with a 330 corn head,"66" combine,roto-baler, and lots of Snap Coupler implements to make them work for their keep.
|
|
Dave(inMA)
Orange Level
Joined: 12 Sep 2009
Location: Grafton, MA
Points: 2399
|
Post Options
Thanks(0)
Quote Reply
Posted: 21 Dec 2016 at 4:26pm |
|
Thanks for all the suggestions! I'd really like to get the darn thing off so I can clean the tube - there's a lot of crude and rust in there. I'm going to give it another try this evening and see if it'll come loose. I'll report back. :)
|
|
WC, CA, D14, WD45
|
|
kev/ont
Orange Level
Joined: 12 Sep 2009
Location: Castleton Ont
Points: 282
|
Post Options
Thanks(0)
Quote Reply
Posted: 21 Dec 2016 at 4:50pm |
|
I'd try a filter strap. It should put a nice even pressure on it.
|
|
Dave(inMA)
Orange Level
Joined: 12 Sep 2009
Location: Grafton, MA
Points: 2399
|
Post Options
Thanks(0)
Quote Reply
Posted: 21 Dec 2016 at 8:37pm |
Well, I have won this battle! I put the valve cover upside down on two 6x6 blocks, inserted a short length of broom handle and drove the cap off with just a few solid raps from the plastic hammer - distorted the top of the cap a bit but that has been fixed.
Below is a photo before I began the cleanup effort. The volume of crud is hard to see, but I consumed several shop rags and lots of solvent cleaning these parts! Valve cover and cap are now cleaned and primed. 
Thanks for all the ideas!
Edited by Dave(inMA) - 21 Dec 2016 at 10:29pm
|
|
WC, CA, D14, WD45
|
|
Dave(inMA)
Orange Level
Joined: 12 Sep 2009
Location: Grafton, MA
Points: 2399
|
Post Options
Thanks(0)
Quote Reply
Posted: 21 Dec 2016 at 10:31pm |
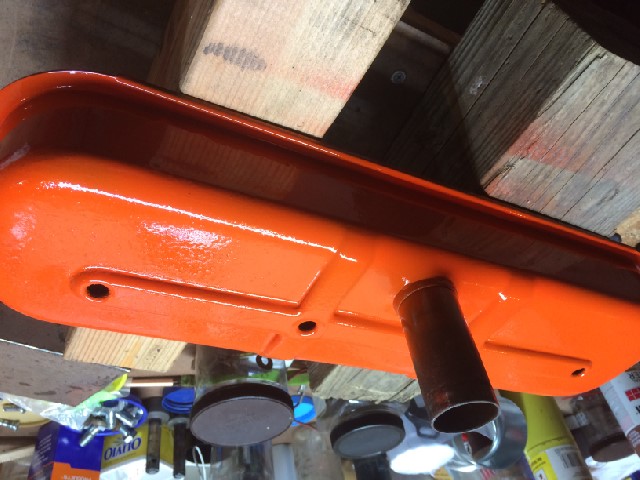
Another photo after some primer and PO#1. Sorry it's upside down - not sure why THAT is happening! But it still looks a lot better.
Edited by Dave(inMA) - 21 Dec 2016 at 10:32pm
|
|
WC, CA, D14, WD45
|
|
dawntreader74
Orange Level
Joined: 28 Oct 2013
Location: Manteno
Points: 1770
|
Post Options
Thanks(0)
Quote Reply
Posted: 21 Dec 2016 at 10:42pm |
|
better put that broom stick in the tool-box'' works good for lot's of things. good JOB''
|
|
CrestonM
Orange Level
Joined: 08 Sep 2014
Location: Oklahoma
Points: 8459
|
Post Options
Thanks(0)
Quote Reply
Posted: 21 Dec 2016 at 11:44pm |
|
A buddy keeps part of a broom stick in his tool box on his WD-45. He uses it to measure fuel, but it's handy for other things, too!
|
|
dawntreader74
Orange Level
Joined: 28 Oct 2013
Location: Manteno
Points: 1770
|
Post Options
Thanks(0)
Quote Reply
Posted: 22 Dec 2016 at 12:03am |
|
dang' rite''
|
|
Dave(inMA)
Orange Level
Joined: 12 Sep 2009
Location: Grafton, MA
Points: 2399
|
Post Options
Thanks(0)
Quote Reply
Posted: 22 Dec 2016 at 7:16am |
 Yup. Definitely a keeper.
Now I'm toying with pulling the rocker arm assembly off to do some housekeeping. There's some blobs of what once was oil under the assembly that maybe oughta be cleaned out... The same kind of stuff that collects in the bottom of the oil pan. But this could go on and on and on........sorta like some of the other stories I read on here!!
|
|
WC, CA, D14, WD45
|
|
WD45Diesel57
Orange Level

Joined: 20 Jul 2010
Location: Varna, Ont. Can
Points: 646
|
Post Options
Thanks(0)
Quote Reply
Posted: 22 Dec 2016 at 7:26am |
|
this is where the phrase "I should really do this while im in here" comes in lol been there
|
|
1-B's, 2-C, 2-CA's,2-WF, 1-WC,1-G, 3-WD's, 2-WD45, 1-RC, 1-D17 Diesel, 1-D14, 2-D15,1-D17 row crop,1-D19 gas and All Crop 40,60,66,72,90 and 100
|
|
Allis dave
Orange Level
Joined: 10 May 2012
Location: Northern IN
Points: 3086
|
Post Options
Thanks(0)
Quote Reply
Posted: 22 Dec 2016 at 7:36am |
|
Good job,
Is there supposed to be some packing in there to act as a filter?
|
|
jaybmiller
Orange Level Access
Joined: 12 Sep 2009
Location: Greensville,Ont
Points: 24892
|
Post Options
Thanks(0)
Quote Reply
Posted: 22 Dec 2016 at 8:36am |
|
re: upside down...
those fancy 'edevices'(aka smart phones) have an option for 'locking orientation' or some cryptic wording.... it keeps the picture the way you took it,right side up....
at least that's what I was told......
|
|
3 D-14s,A-C forklift, B-112
Kubota BX23S lil' TOOT( The Other Orange Tractor)
Never burn your bridges, unless you can walk on water
|
|
FloydKS
Orange Level

Joined: 12 Sep 2009
Location: S E Kansas
Points: 8463
|
Post Options
Thanks(0)
Quote Reply
Posted: 22 Dec 2016 at 8:49am |
|
You said you turned it upside down on the blocks to get it off...the picture thinks it should be that way. :)
good job on completing the job...and a job well done.
|
|
Holding a grudge is like taking poison and expecting the other person to die
|
|
Dave(inMA)
Orange Level
Joined: 12 Sep 2009
Location: Grafton, MA
Points: 2399
|
Post Options
Thanks(0)
Quote Reply
Posted: 22 Dec 2016 at 2:37pm |
Thanks, guys. Glad to see that humor is in ready supply. :) I'll have to check on that iPhone setting.
There was and still is some steel wool-like material in the upper half behind the inner shell and above the shelf with holes.
I pulled the rocker arm assembly and the baffle off and cleaned them. There was nearly 1/8" of sludge on the back of the baffle and lots of sludge stuck to the assembly. They were a lot cleaner when they went back on the tractor! Reset the valve clearances after I pulled it in the shop while it was still warm - they were all at least .020 vs the .012 they're supposed to be.
Several of the rocker arm pads appeared to be worn down by the valve stems - are those pads supposed to have a "ledge" or are they supposed to be flat?
Edited by Dave(inMA) - 22 Dec 2016 at 3:32pm
|
|
WC, CA, D14, WD45
|
|
Don(MO)
Orange Level
Joined: 12 Sep 2009
Location: Bates City MO.
Points: 6862
|
Post Options
Thanks(0)
Quote Reply
Posted: 22 Dec 2016 at 8:26pm |
|
I knew you get it off, good job of staying after it.... I did an engine over haul on a WD that the valve cover top hole was pluged tight with oily crap to the point that the engine wood build pressure and blow seals and gaskets, your didn't look that bad. lol
Sounds like your rocker arms are in need or a regrind I'd remove the rocker arm assy take note or how they are on the shaft and remove the rockers off the shaft take them to you head re-builder and have them ground them or just use a wire feeler gauge to set them.
|
|
3 WD45's with power steering,G,D15 fork lift,D19, W-Speed Patrol, "A" Gleaner with a 330 corn head,"66" combine,roto-baler, and lots of Snap Coupler implements to make them work for their keep.
|
|
Dave(inMA)
Orange Level
Joined: 12 Sep 2009
Location: Grafton, MA
Points: 2399
|
Post Options
Thanks(0)
Quote Reply
Posted: 23 Dec 2016 at 9:13am |
Thanks, Don. I was curious about why the clearances were so far off - I think the pad issue is the answer.
Another question about sealing the valve cover so oil doesn't leak out under the gasket. I reinstalled the cover with a new gasket and tightened the nuts gently. After running it a while, I saw oil seeping out under the gasket at the left front. I've tightened the nuts more, but I'm worried about warping the cover and making it worse. Should I use a sealer? Seems that might cause more trouble when I need to remove the cover down the road. Thanks.
|
|
WC, CA, D14, WD45
|
|
Don(MO)
Orange Level
Joined: 12 Sep 2009
Location: Bates City MO.
Points: 6862
|
Post Options
Thanks(0)
Quote Reply
Posted: 23 Dec 2016 at 9:55am |
I check the cover is still flat and not bent up on one corner first then glue the gasket to cover and hold the gasket in place like this, let it sit for a day with the pins on it. 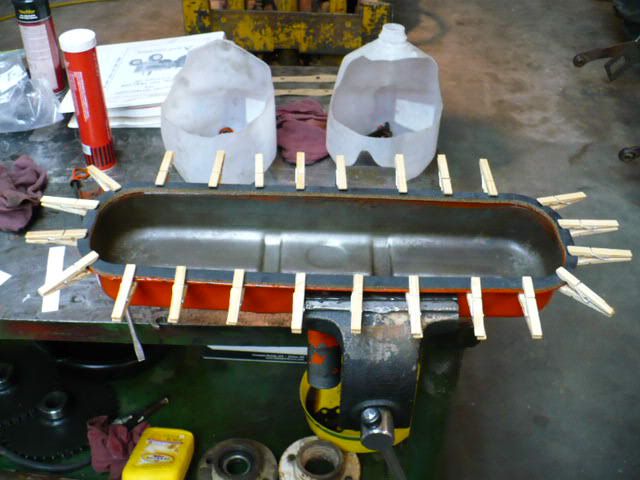
|
|
3 WD45's with power steering,G,D15 fork lift,D19, W-Speed Patrol, "A" Gleaner with a 330 corn head,"66" combine,roto-baler, and lots of Snap Coupler implements to make them work for their keep.
|
|
Don(MO)
Orange Level
Joined: 12 Sep 2009
Location: Bates City MO.
Points: 6862
|
Post Options
Thanks(0)
Quote Reply
Posted: 23 Dec 2016 at 9:58am |
|
I forgot to say after letting it sit and dry I go back and cut all the left over glue off the cover so it is not found in the pan years latter. lol
|
|
3 WD45's with power steering,G,D15 fork lift,D19, W-Speed Patrol, "A" Gleaner with a 330 corn head,"66" combine,roto-baler, and lots of Snap Coupler implements to make them work for their keep.
|
|
TimNearFortWorth
Orange Level

Joined: 12 Dec 2009
Points: 2014
|
Post Options
Thanks(0)
Quote Reply
Posted: 23 Dec 2016 at 11:22am |
|
Don, see you also use the high tech plastic parts holders.
Good for trimming into parts holders, after they get a puncture and no longer work for round bale tarp hold downs!
|
|
Don(MO)
Orange Level
Joined: 12 Sep 2009
Location: Bates City MO.
Points: 6862
|
Post Options
Thanks(0)
Quote Reply
Posted: 23 Dec 2016 at 12:23pm |
|
Tim I have tons on them high tech parts holders so come get all you need. lol
|
|
3 WD45's with power steering,G,D15 fork lift,D19, W-Speed Patrol, "A" Gleaner with a 330 corn head,"66" combine,roto-baler, and lots of Snap Coupler implements to make them work for their keep.
|
|
Dave(inMA)
Orange Level
Joined: 12 Sep 2009
Location: Grafton, MA
Points: 2399
|
Post Options
Thanks(0)
Quote Reply
Posted: 23 Dec 2016 at 4:07pm |
|
Interesting. Do you use gasket sealer between the block and the gasket as well?
|
|
WC, CA, D14, WD45
|
|
Don(MO)
Orange Level
Joined: 12 Sep 2009
Location: Bates City MO.
Points: 6862
|
Post Options
Thanks(0)
Quote Reply
Posted: 23 Dec 2016 at 5:22pm |
") Dave(inMA) wrote: Dave(inMA) wrote:
Interesting. Do you use gasket sealer between the block and the gasket as well? |
No I don't, without sealer between gasket and head you can remove the valve cover without tearing the gasket.
|
|
3 WD45's with power steering,G,D15 fork lift,D19, W-Speed Patrol, "A" Gleaner with a 330 corn head,"66" combine,roto-baler, and lots of Snap Coupler implements to make them work for their keep.
|
|