| Author |
 Topic Search Topic Search  Topic Options Topic Options
|
Hunt4Allis 
Orange Level

Joined: 13 Mar 2018
Location: Ohio
Points: 1172
|
 Post Options Post Options
") Thanks(0) Thanks(0)
 Quote Quote  Reply Reply
 Posted: 06 Mar 2022 at 5:54pm Posted: 06 Mar 2022 at 5:54pm |
|
Ok, I think before I pull anything apart I'll see if cracking lines on each injector tells me anything, if not then I'll drain oil pull oil pan and valve cover and see what I can( any tips on pulling head if I get that far into it?
|
 |
|
Sponsored Links
|
|
|
Hunt4Allis
Orange Level
Joined: 13 Mar 2018
Location: Ohio
Points: 1172
|
Post Options
Thanks(0)
Quote Reply
Posted: 07 Mar 2022 at 12:23pm |
|
I know my regular set of mic calipers should fit up inside to measure the crankshaft for the rod end but how can I measure what bearing thickness I need with crankshaft still in motor? ( I'm asking b/c the motor overhaul sets have standard,. 010,. 020,. 030 bearings I will need to specify before ordering) will my book call out how much Freeplay there should be between bearing and crank and bearing to rod or is there a industry standard for this? Once I can get time to start I'd like to have some idea of what measurements should be... Thanks Matt
|
|
steve(ill)
Orange Level Access

Joined: 11 Sep 2009
Location: illinois
Points: 88605
|
Post Options
Thanks(0)
Quote Reply
Posted: 07 Mar 2022 at 12:44pm |
You can NOT use oversize bearings unless you you turn the crank journals UNDERSIZE.. You are not going to have .020 clearance between the rod and crank on a running motor. You would not be able to maintain oil pressure... If the motor has been overhauled BEFORE, then the back side of the bearings should have a stamping on it for size.
You can not order bearings until you measure the crank and see if it is GOOD and IN SPEC.
Proper bearing clearance to the crank is normally .001 inch per diameter of crank journal... If your crank is 2.5 inch diameter, then the clearance would be "about" .0025 inch.
Edited by steve(ill) - 07 Mar 2022 at 12:47pm
|
|
Like them all, but love the "B"s.
|
|
Codger
Orange Level

Joined: 23 Dec 2020
Location: Utopia
Points: 2458
|
Post Options
Thanks(0)
Quote Reply
Posted: 07 Mar 2022 at 12:49pm |
|
One of the first things a machine shop does is measure up the existing parts to ensure ordering the correct bearings, pistons, rings, etc.
|
|
WF owner
Orange Level
Joined: 12 May 2013
Location: Bombay NY
Points: 5058
|
Post Options
Thanks(0)
Quote Reply
Posted: 07 Mar 2022 at 4:02pm |
|
If you aren't going to remove the crankshaft, the only thing you can do is replace the existing bearings with the exact size that are in there now. The best practice would be to remove the crankshaft, have it miked, and, if the crankshaft is out of spec, have it turned.
|
|
Hunt4Allis
Orange Level
Joined: 13 Mar 2018
Location: Ohio
Points: 1172
|
Post Options
Thanks(0)
Quote Reply
Posted: 07 Mar 2022 at 5:10pm |
|
Ok, great info! Thanks fellas
|
|
Hunt4Allis
Orange Level
Joined: 13 Mar 2018
Location: Ohio
Points: 1172
|
Post Options
Thanks(0)
Quote Reply
Posted: 09 Mar 2022 at 6:10am |
|
I'm not sure what makes the whining noise towards the front of motor( on start up it's not doing it but within a couple seconds it starts) kinda to me sounds like a noisy pump bearing but not sure how to pinpoint it?
Could be oil pump or coolant pump right?
|
|
DrAllis
Orange Level Access
Joined: 12 Sep 2009
Points: 22166
|
Post Options
Thanks(0)
Quote Reply
Posted: 09 Mar 2022 at 6:23am |
|
Hydraulic pump for the loader/backhoe.
|
|
Hunt4Allis
Orange Level
Joined: 13 Mar 2018
Location: Ohio
Points: 1172
|
Post Options
Thanks(0)
Quote Reply
Posted: 09 Mar 2022 at 8:29am |
|
I know I need a new radiator while I have this torn apart this far so that's in the plans (anyone have a recommendation for a maker of one? I found a couple on eBay that are custom TIG welded for $150 cheaper than regular old black steel one- commercial made)
I'm wondering since I'm that far in I should probably see what the whining noise is is why I'm asking...
I will look into the hydraulic pump. I'm obviously not a motor guy I'm just learning as I go and trying to pick up on the correct way to do things and I need to look into my manual to even see where this hydraulic pump is located. Is there any reason to look at the oil pump for the motor while I'm doing all this or the water pump? By saying this I'm assuming there's all three? Thanks Matt
Edited by Hunt4Allis - 09 Mar 2022 at 8:32am
|
|
DrAllis
Orange Level Access
Joined: 12 Sep 2009
Points: 22166
|
Post Options
Thanks(0)
Quote Reply
Posted: 09 Mar 2022 at 9:14am |
|
A big hydraulic pump like on a machine like that often does make some noise. It also could have worn out hardware on the pumps drive shaft, which could make noise.
|
|
Ray54
Orange Level Access
Joined: 22 Nov 2009
Location: Paso Robles, Ca
Points: 4768
|
Post Options
Thanks(0)
Quote Reply
Posted: 09 Mar 2022 at 11:29am |
If you get the pan off as your worrying about rod bearing, yes look at the oil pump.
Everyone needs to learn from experience. There's or others. Sounds like you could use more experience. See if you can find some equipment similar to yours and see if owner will start it so you can hear what "normal" sounds like. Hydraulics make more noise than you might think. But caution can be cheap, rather than charging ahead without thought. But if you add new parts that are not needed, that is expensive.
I tend to be paranoid about my equipment after fixing things and think I hear all kinds of "new" noises. I do not recall any of those being a problem, just my worries.
|
|
steve(ill)
Orange Level Access
Joined: 11 Sep 2009
Location: illinois
Points: 88605
|
Post Options
Thanks(0)
Quote Reply
Posted: 09 Mar 2022 at 12:22pm |
Everyone needs to learn from experience. There's or others. Sounds like you could use more experience. See if you can find some equipment similar to yours and see if owner will start it
Hunt ---- one GOOD OPTION for you would be to look for someone in your area that is experienced and possibly is rebuilding a motor at this time... Any brand / and motor... If you could talk to him for a couple hours, look at what he is doing, visually SEE what different parts are doing, WHERE normal wear occurs.... That might help a bunch... I would think most people would be willing to show you the ropes, if you could find someone local.
|
|
Like them all, but love the "B"s.
|
|
Hunt4Allis
Orange Level
Joined: 13 Mar 2018
Location: Ohio
Points: 1172
|
Post Options
Thanks(0)
Quote Reply
Posted: 10 Mar 2022 at 9:19am |
Crawled under to look at removing oil pan and it's a cast iron one that is somewhat "pinned" together (incorporated) with the front axle support as can be seen in attached screenshot of parts manual. For removal it says" remove oil pan" !?! Well I'd like to just unbolt it but it has me allittle hesitant to do so since it seams pinned together to front axle support? What are people s thought here? 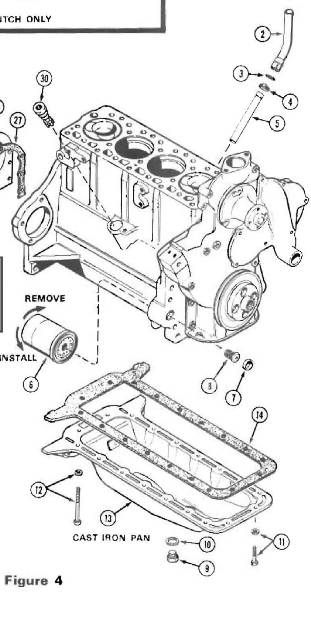
|
|
Hunt4Allis
Orange Level
Joined: 13 Mar 2018
Location: Ohio
Points: 1172
|
Post Options
Thanks(0)
Quote Reply
Posted: 10 Mar 2022 at 9:38am |
_ 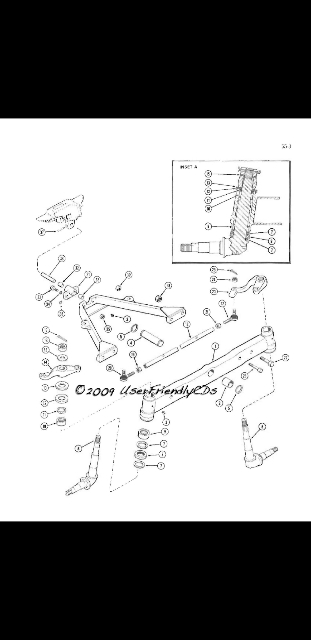 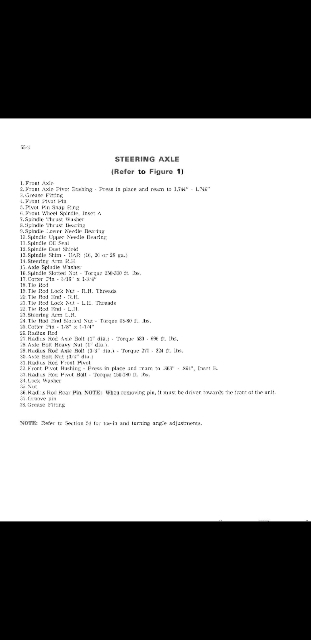 Here is more on how it goes together, I just want to make sure I can remove pin without steering arms falling or if I should support somehow( it's parts 36+37 that pins thru cast oil pan... Thanks Matt
|
|
steve(ill)
Orange Level Access
Joined: 11 Sep 2009
Location: illinois
Points: 88605
|
Post Options
Thanks(0)
Quote Reply
Posted: 10 Mar 2022 at 12:41pm |
Hunt, its hard to see the item numbers in the photo above... I would look at the pan a little closer.. It would be very abnormal to connect anything to the oil pan.. The rear pivot pin for steering is normally connected to the bottom of the bell housing and it is very CLOSE to the pan, but should not have anything to do with the pan.
I could be wrong, but very abnormal to connect steering linkage to the pan.
|
|
Like them all, but love the "B"s.
|
|
Hunt4Allis
Orange Level
Joined: 13 Mar 2018
Location: Ohio
Points: 1172
|
Post Options
Thanks(0)
Quote Reply
Posted: 11 Mar 2022 at 9:38am |
I will take picture of What it looks like and post it here .let me see if this is clearer 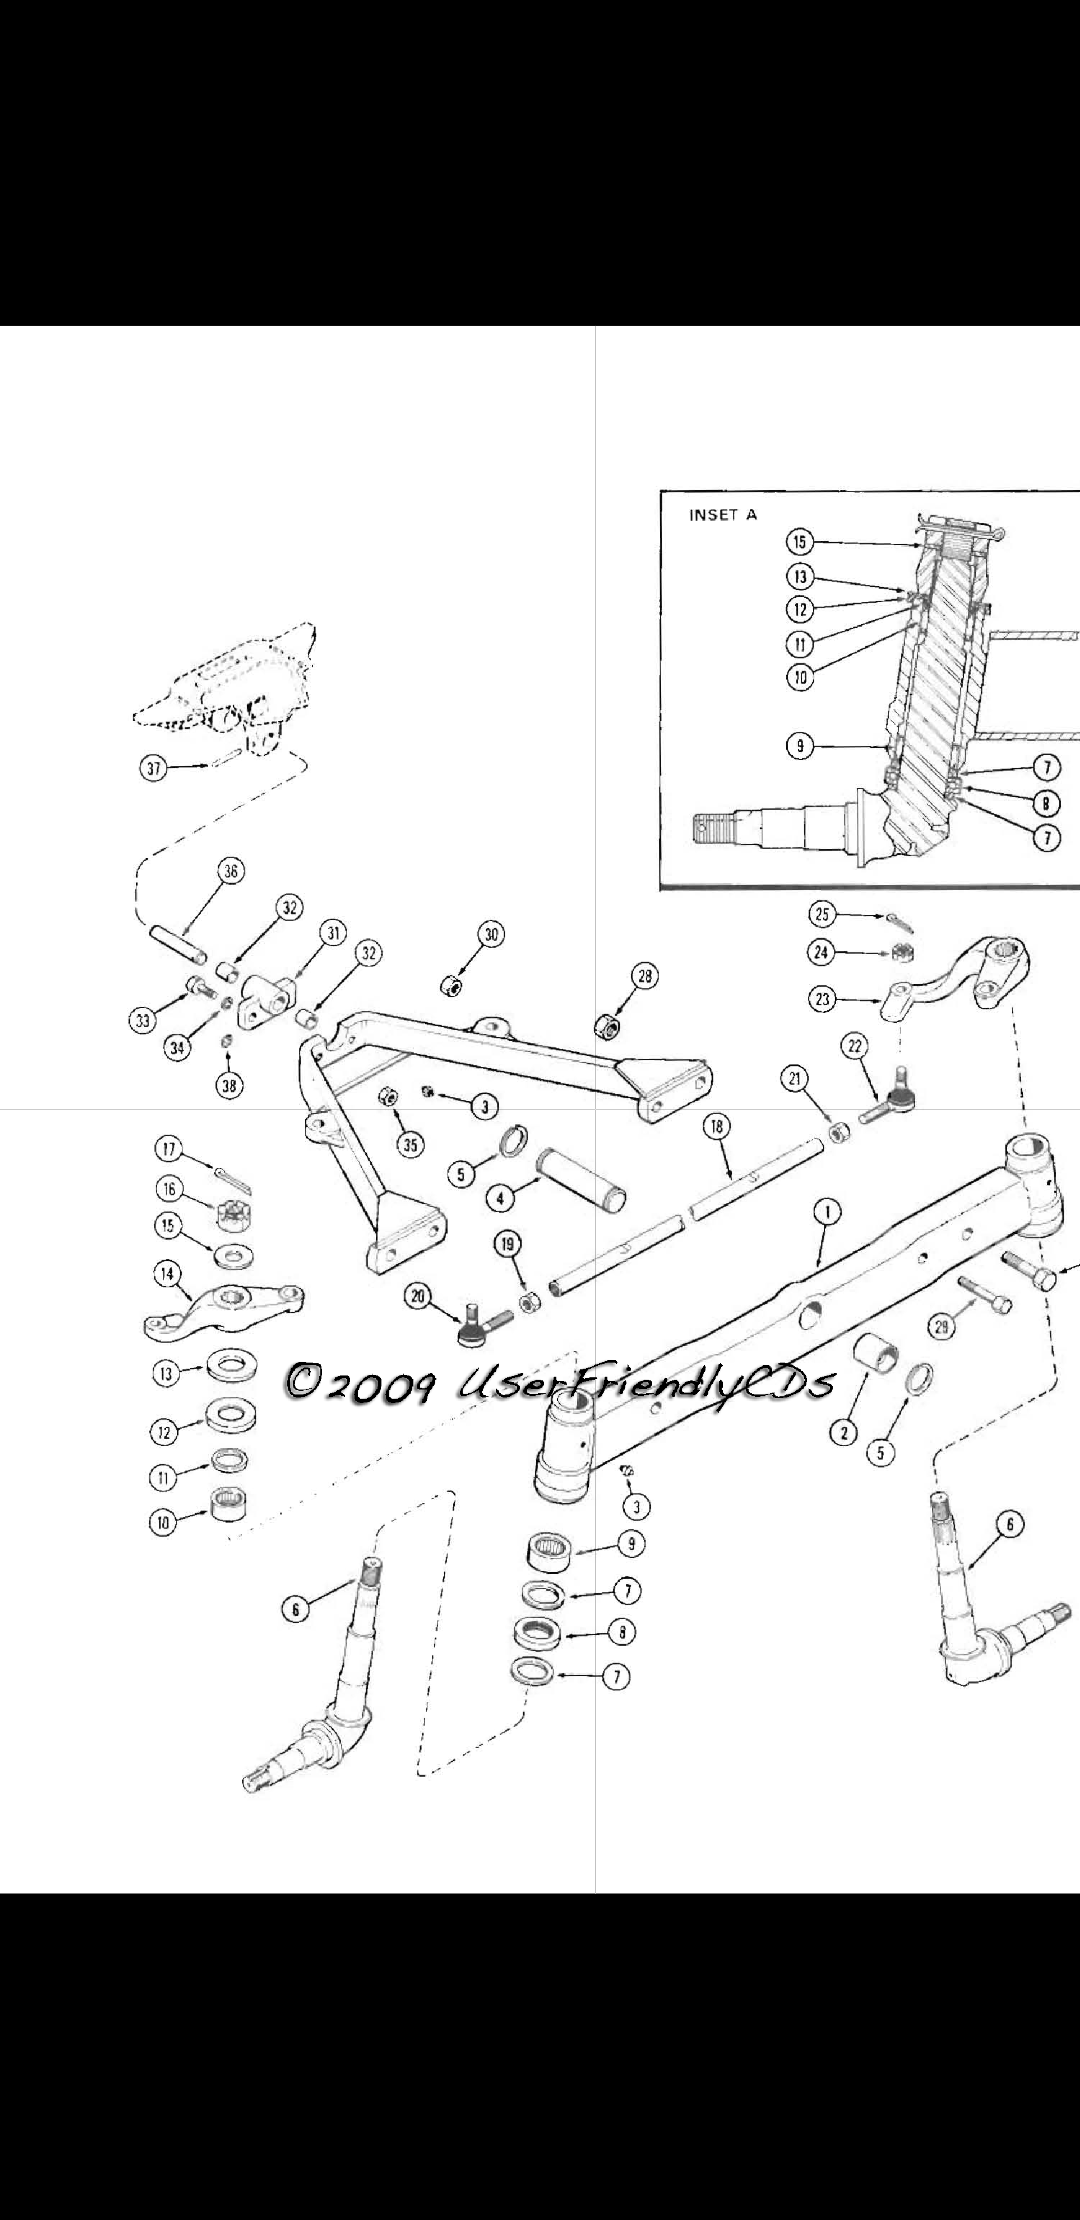 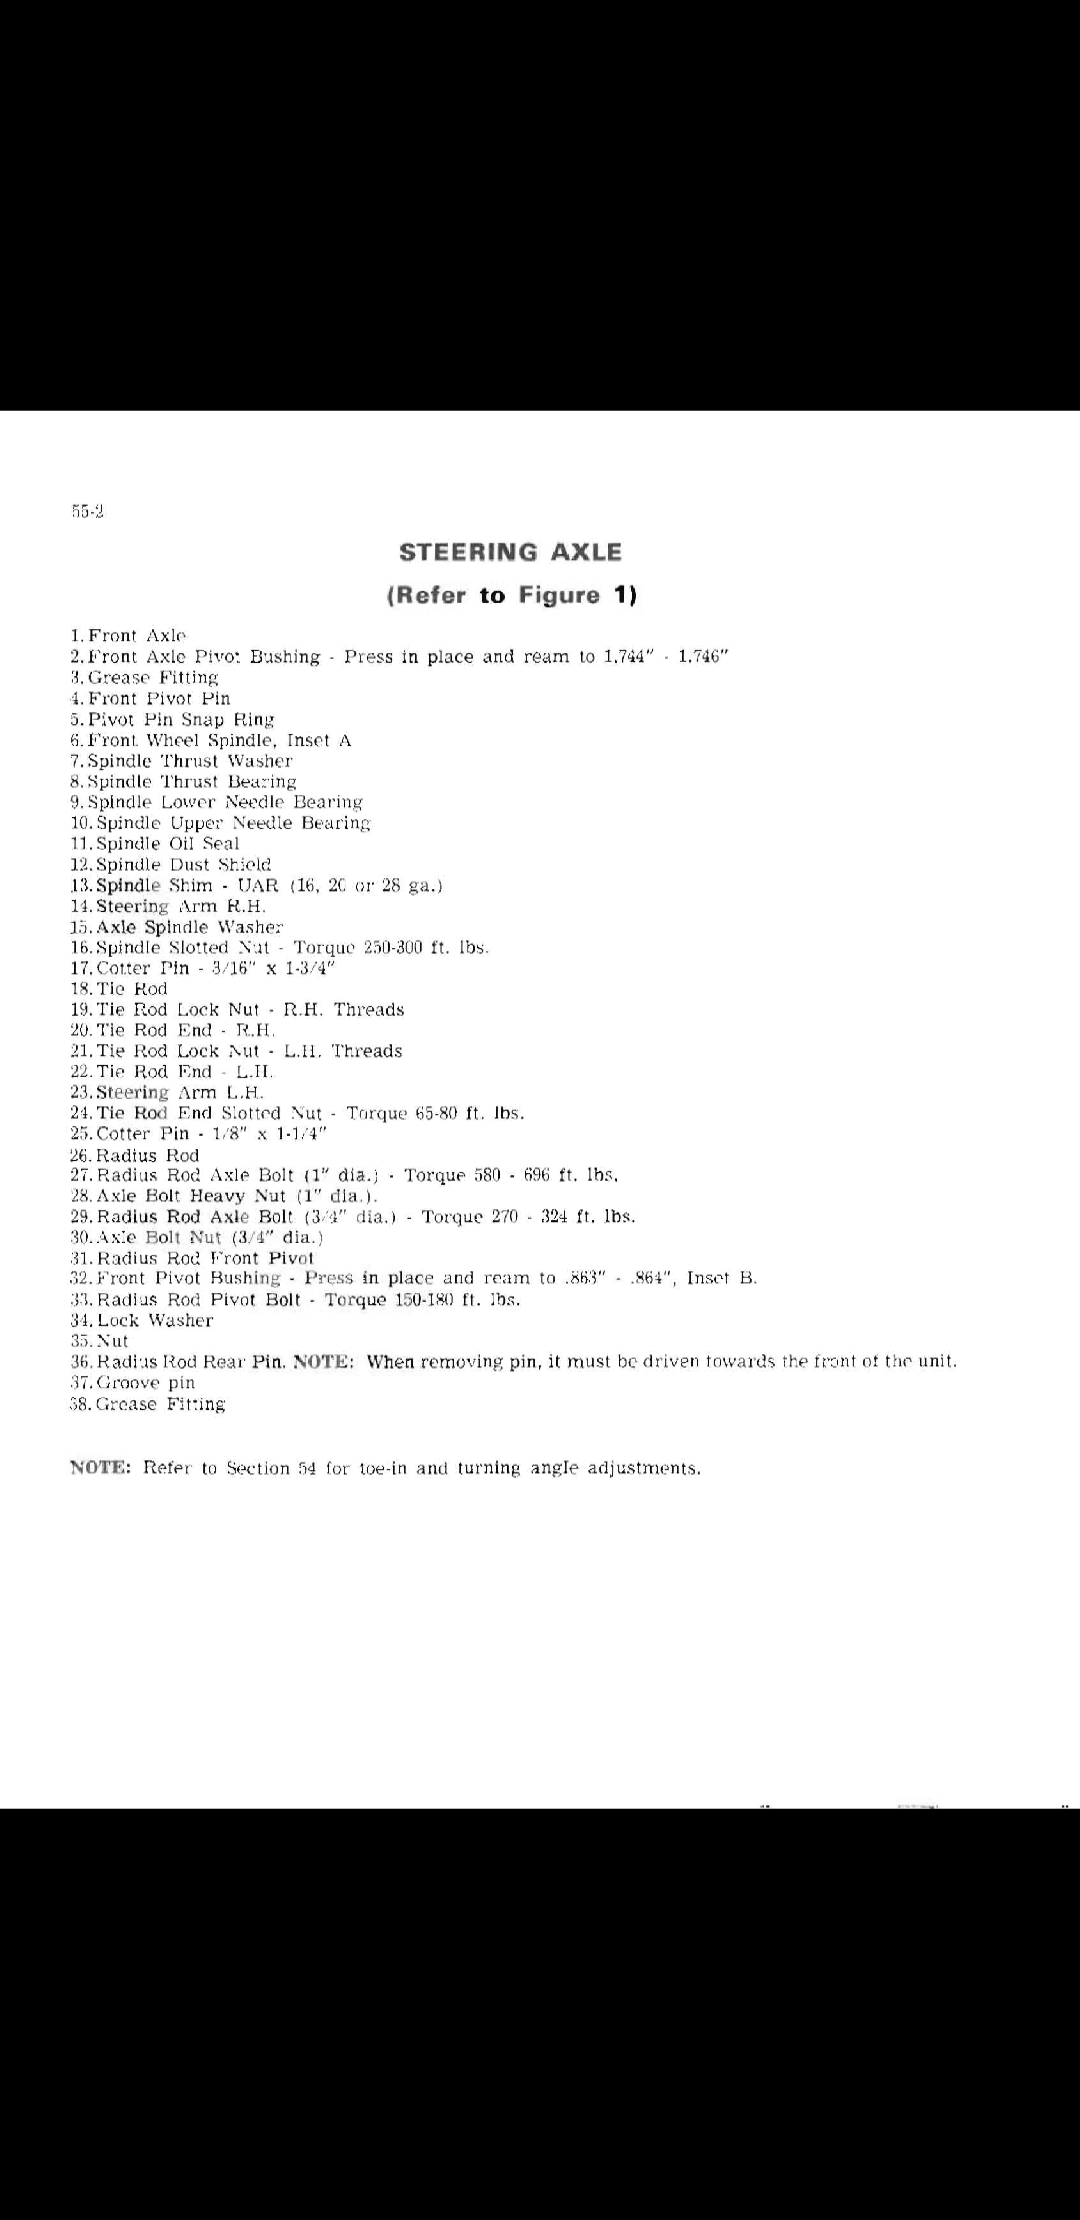
|
|
Hunt4Allis
Orange Level
Joined: 13 Mar 2018
Location: Ohio
Points: 1172
|
Post Options
Thanks(0)
Quote Reply
Posted: 12 Mar 2022 at 9:20am |
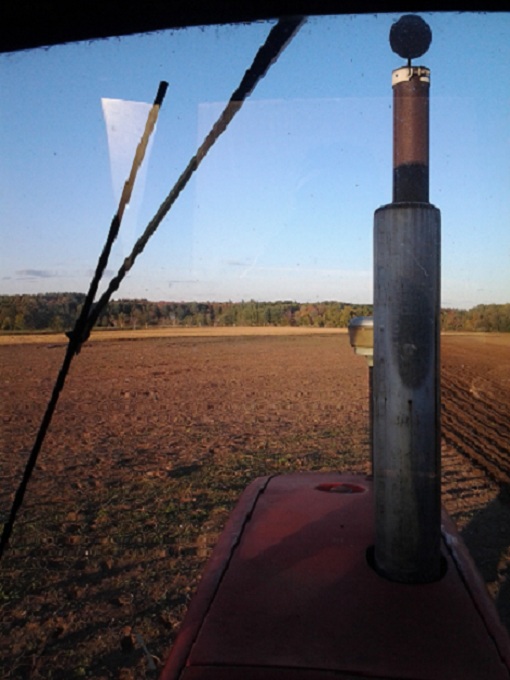
Here's a picture of under oil pan I think the whole wish bone will need removed and the round steering cross arm 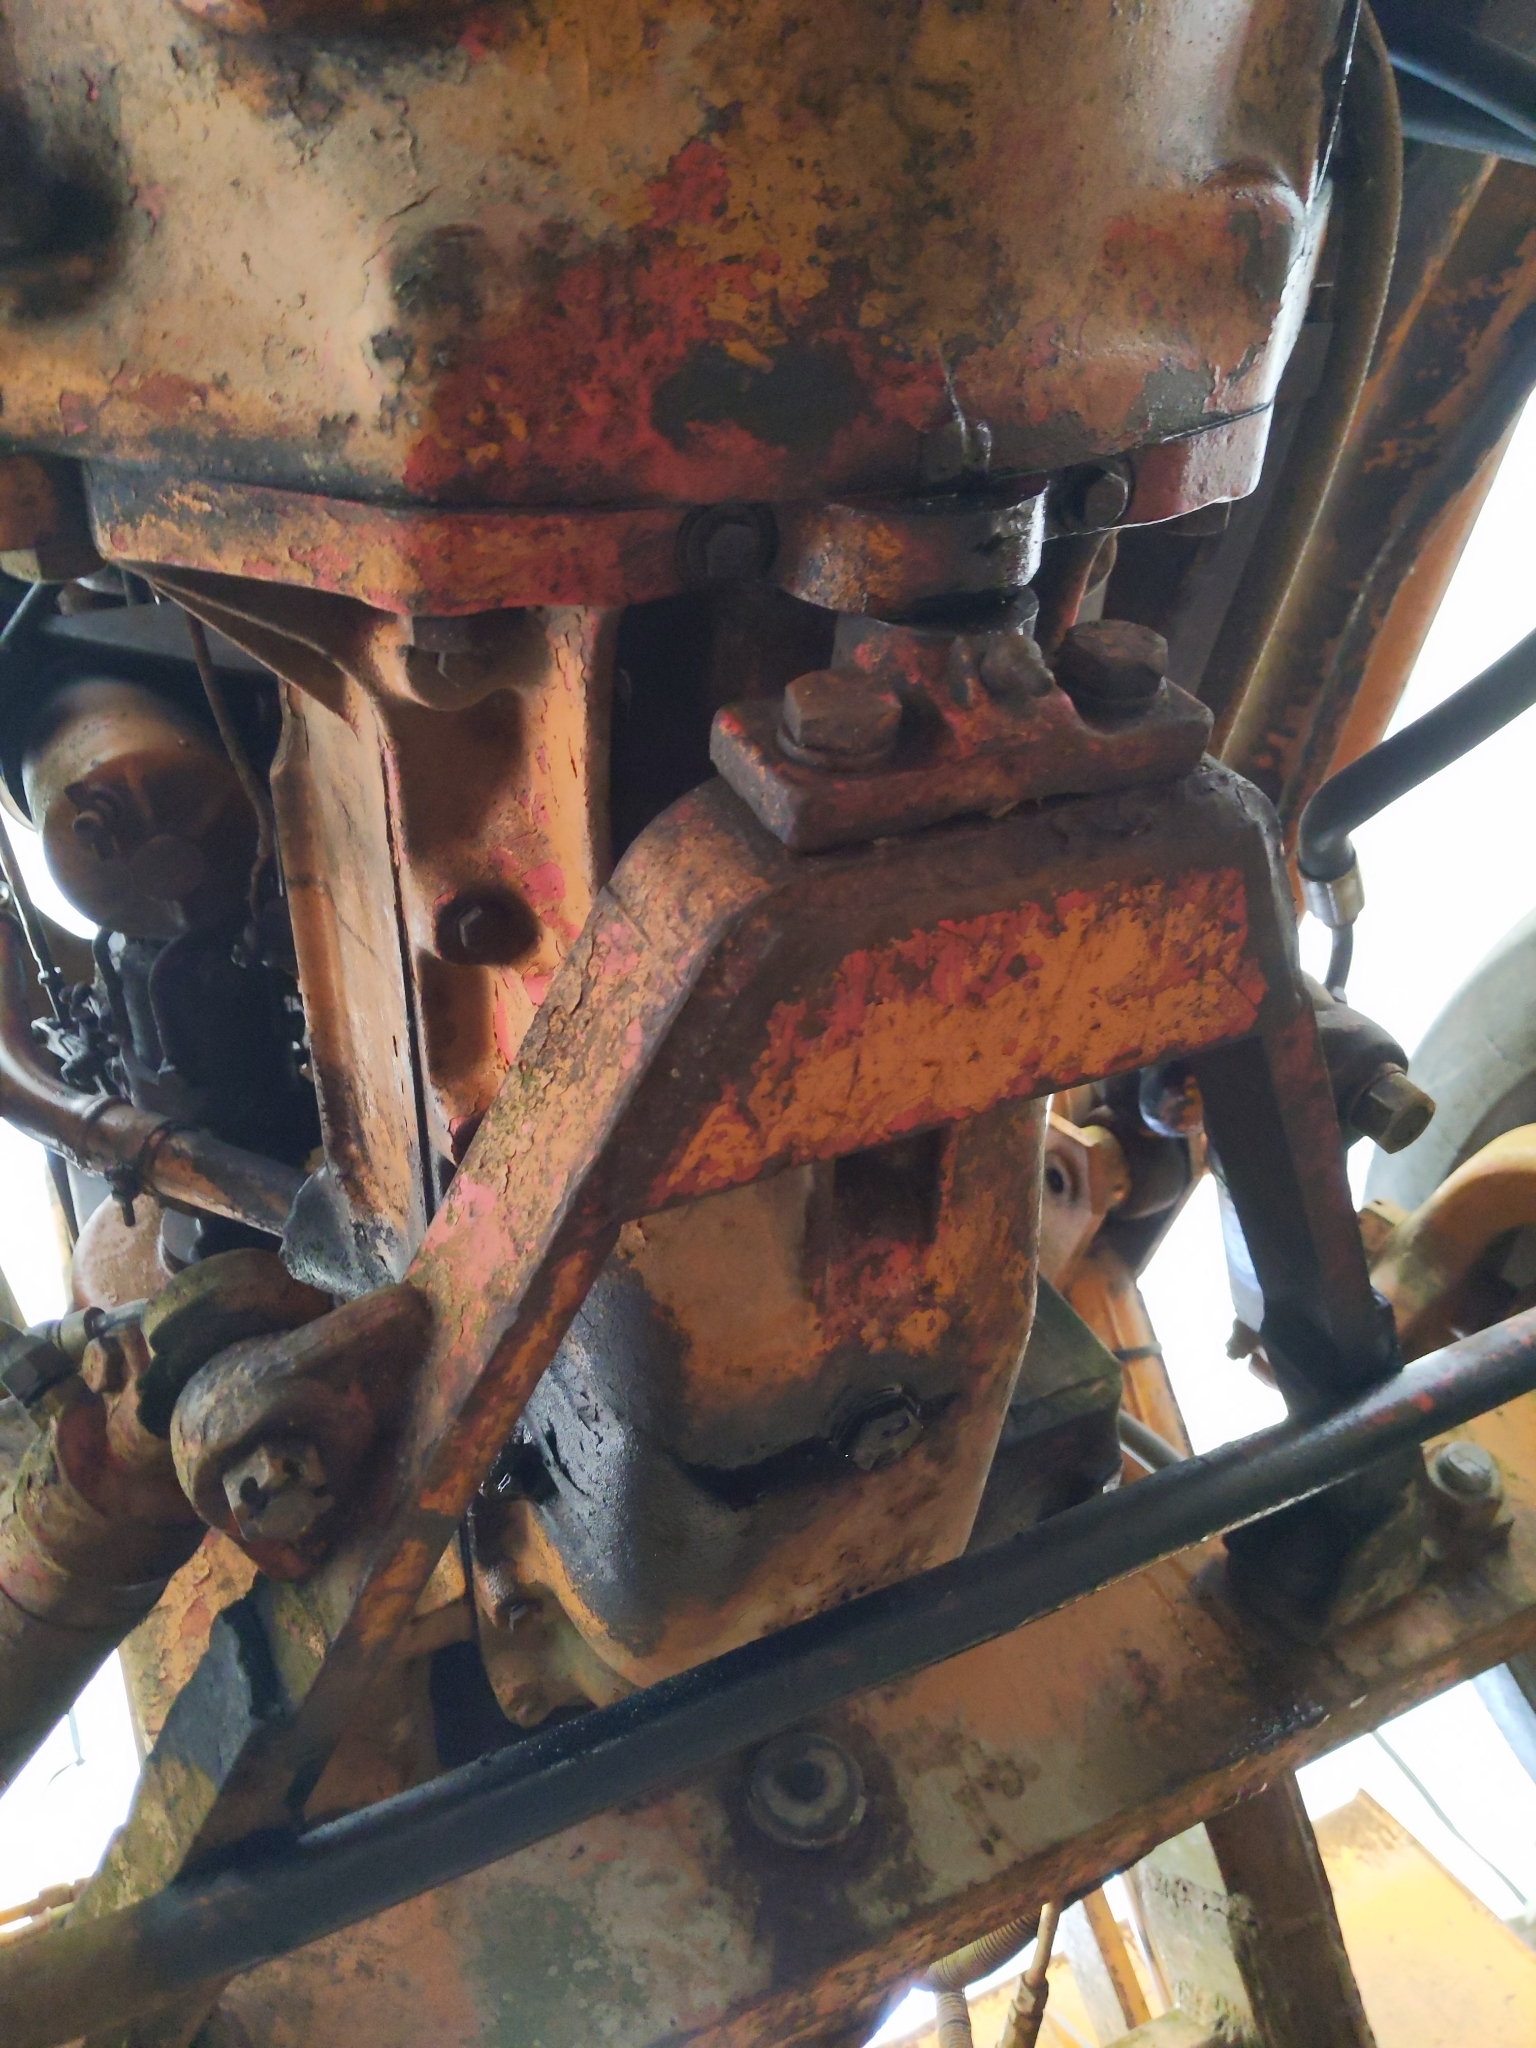
|
|
steve(ill)
Orange Level Access
Joined: 11 Sep 2009
Location: illinois
Points: 88605
|
Post Options
Thanks(0)
Quote Reply
Posted: 12 Mar 2022 at 12:03pm |
Our backhoe has the G159 gas motor in it... When i was going to rebuild it, i blocked under the transmission and loader frame in that area... Removed the radiator / hood.... Pulled the mounting bolts and pins on the axle and front end bolster, and rolled it forward 12 inches toward the bucket........... Then i pulled the motor and lowered it to the ground and set on a piece of plywood ...... then drug the plywood out with the motor setting on it... I was working under a 7 ft awning.
Edited by steve(ill) - 12 Mar 2022 at 12:03pm
|
|
Like them all, but love the "B"s.
|
|
Hunt4Allis
Orange Level
Joined: 13 Mar 2018
Location: Ohio
Points: 1172
|
Post Options
Thanks(0)
Quote Reply
Posted: 13 Mar 2022 at 11:14am |
|
Okay it looks like you had somewhere to rig to overhead to utilize a chain fall to lower the motor down correct? I often hear about when a new crankshaft is needed that the front bucket and rear bucket need to be removed and the tractor needs split in half which creates a ton of problems for me at least at the time because I don't have a large enough area to rig anything overhead like that. Most places around me want somewhere between $2,500 and $5,000 just to split the motor from the transmission which is not going to happen. That is only for splitting it. I plan on starting the process of taking it apart and seeing what all is going on. In my manual it says to remove the injectors which I don't understand what that has to do with taking the valve cover off? I do realize that I will have to remove them and I've started looking at what type of puller is needed to get them out. I will post on here a puller part number from my manual to see if anyone knows what can be cross referenced with it.
|
|
Hunt4Allis
Orange Level
Joined: 13 Mar 2018
Location: Ohio
Points: 1172
|
Post Options
Thanks(0)
Quote Reply
Posted: 13 Mar 2022 at 11:38am |
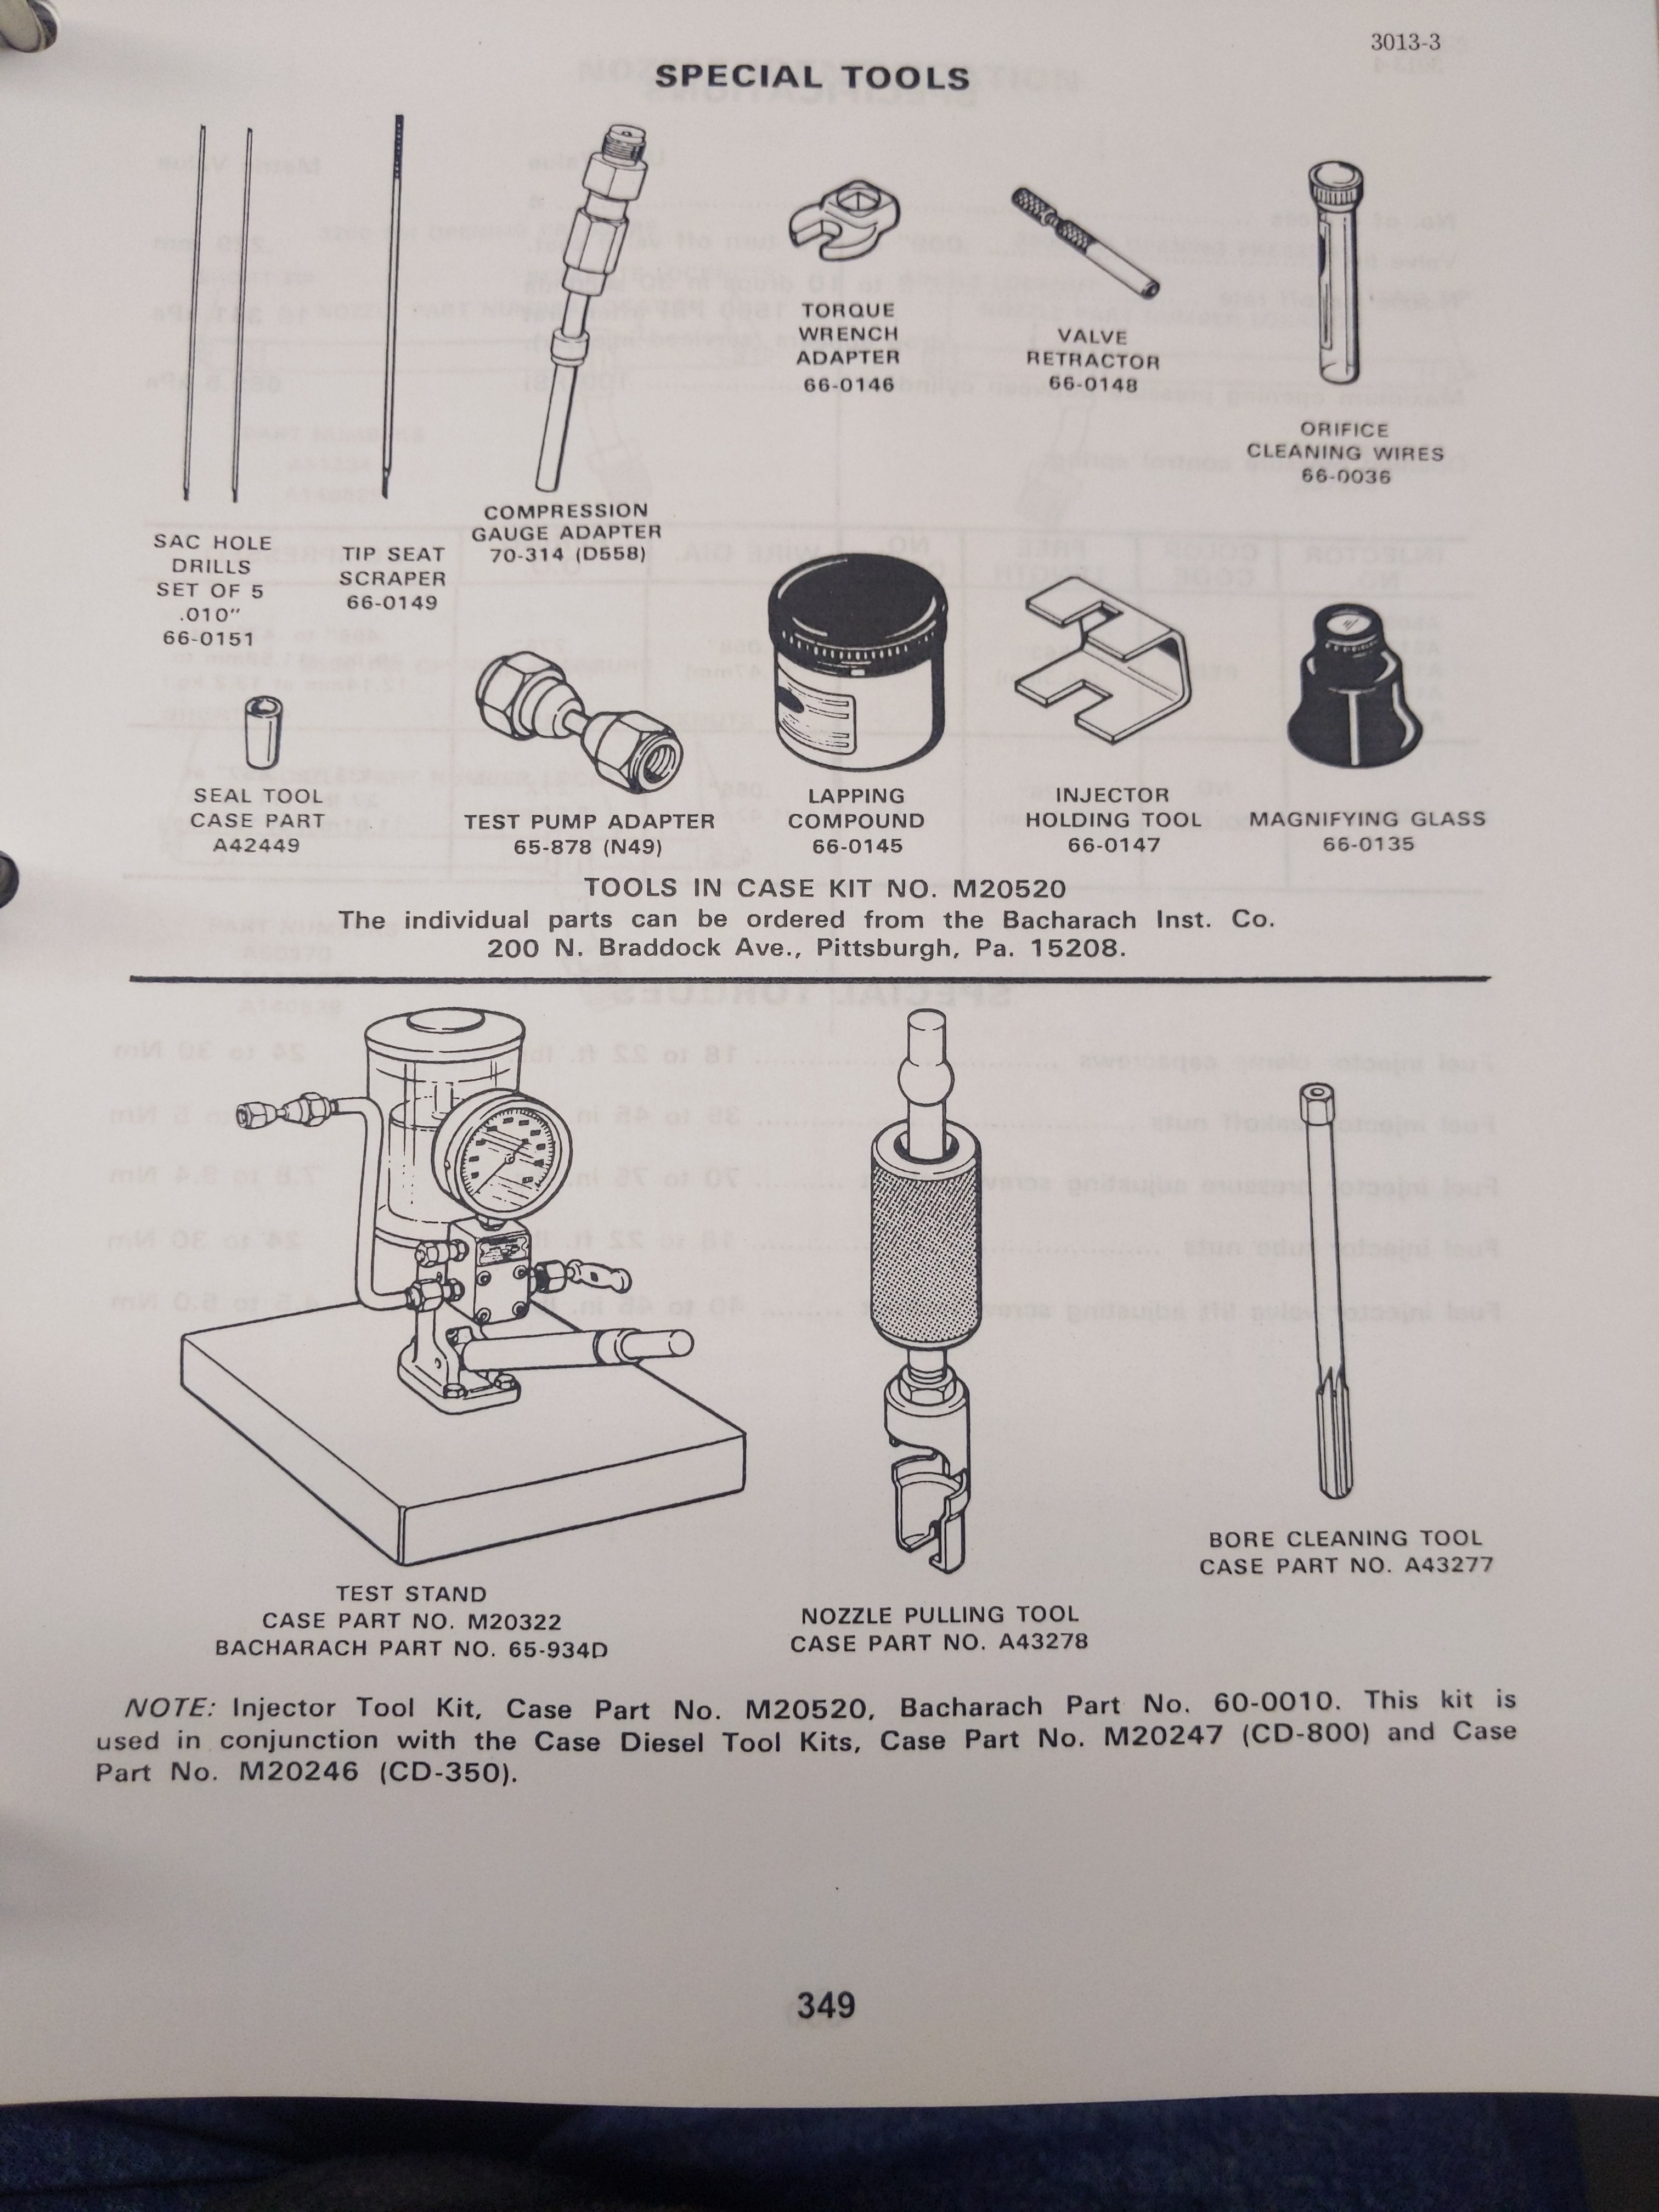 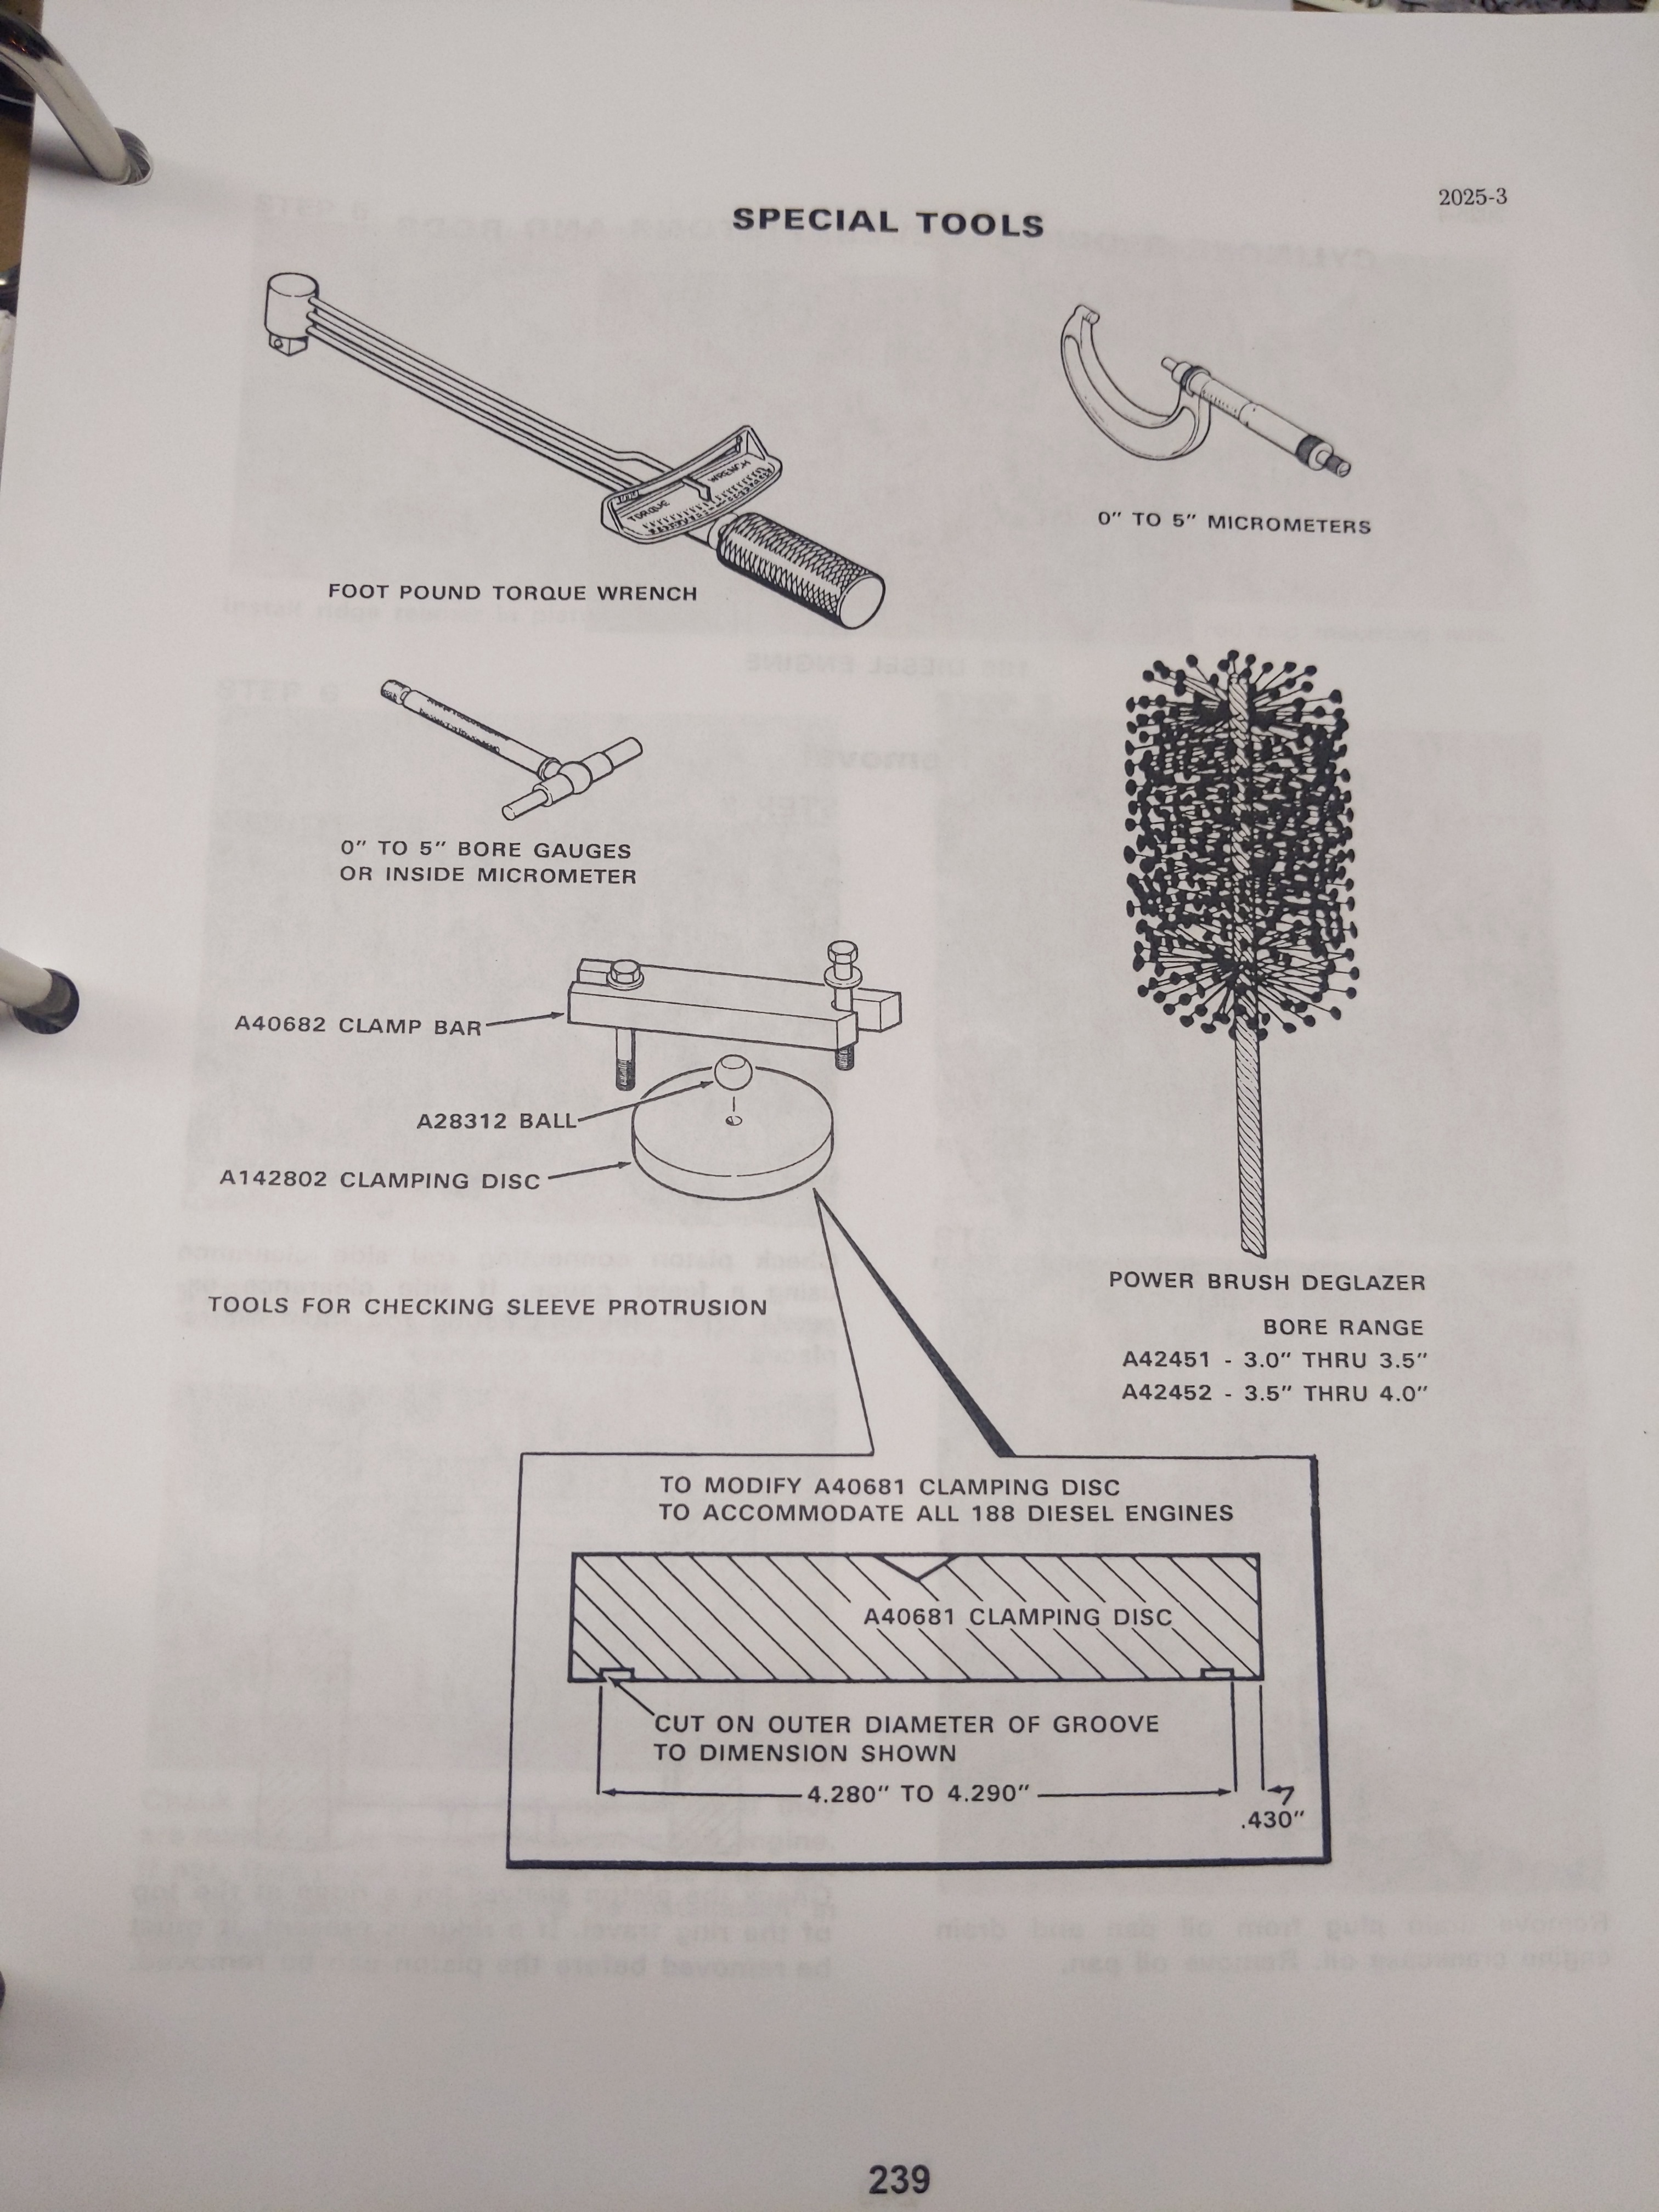 Here's the picture of the injector puller part number(it sounds like I should first try to pull them out just by hand the way it reads in the manual and then if they won't move I need to use a puller of some kind which I need to get what size I need for the manual somewhere) and also something I found interesting for putting new sleeves and has this clamping disc and a ball to reseat the new sleeves after pulling the old ones, anyone know what this is about with the clamping disc and ball?
Edited by Hunt4Allis - 13 Mar 2022 at 11:39am
|
|
steve(ill)
Orange Level Access
Joined: 11 Sep 2009
Location: illinois
Points: 88605
|
Post Options
Thanks(0)
Quote Reply
Posted: 13 Mar 2022 at 12:34pm |
Okay it looks like you had somewhere to rig to overhead to utilize a chain fall to lower the motor down correct? I often hear about when a new crankshaft is needed that the front bucket and rear bucket need to be removed and the tractor needs split in half
A small motor only weights maybe 3-400 pounds. You can normally rig that to any overhead rafter or a movable beam made out of a couple 2 x 6 s........Normally a tractor has to be split if your taking out the transmission... Many tractors can have the motor pulled out forward, after removing the radiator and dropping the front axle... as i did above... you can then get the crank out of the motor.
|
|
Like them all, but love the "B"s.
|
|
Hunt4Allis
Orange Level
Joined: 13 Mar 2018
Location: Ohio
Points: 1172
|
Post Options
Thanks(0)
Quote Reply
Posted: 14 Mar 2022 at 4:44am |
|
Anyone seen a "clamping disc/ metal ball to reseat sleeve?
|
|
WF owner
Orange Level
Joined: 12 May 2013
Location: Bombay NY
Points: 5058
|
Post Options
Thanks(0)
Quote Reply
Posted: 14 Mar 2022 at 6:32am |
if it's a wet sleeve engine that is not needed.
Clean the counter bore very well. Lubricate the sleeves and o rings with dish soap and water and set your sleeves.
Even of you used some sort of device like their "clamping disc", as soon as you remove it, you could move the wet sleeves by hand.
|
|
DrAllis
Orange Level Access
Joined: 12 Sep 2009
Points: 22166
|
Post Options
Thanks(0)
Quote Reply
Posted: 14 Mar 2022 at 7:42am |
|
Wet sleeves always need to be installed without the Orings to make sure they will fall into place easily and I like them to be able to rotate in the block. I have always used vegetable oil or Crisco smeared on the lower block bore and the sleeve Orings.
|
|
Hunt4Allis
Orange Level
Joined: 13 Mar 2018
Location: Ohio
Points: 1172
|
Post Options
Thanks(0)
Quote Reply
Posted: 14 Mar 2022 at 1:23pm |
 DrAllis wrote: DrAllis wrote:
Wet sleeves always need to be installed without the Orings to make sure they will fall into place easily and I like them to be able to rotate in the block. I have always used vegetable oil or Crisco smeared on the lower block bore and the sleeve Orings. |
I'm confused by you say wet sleeves need to be installed without the o-rings and then at the end of the sentence it says in the sleeve o-rings?
Edited by Hunt4Allis - 14 Mar 2022 at 1:23pm
|
|
Tbone95
Orange Level Access
Joined: 31 Aug 2012
Location: Michigan
Points: 12250
|
Post Options
Thanks(0)
Quote Reply
Posted: 14 Mar 2022 at 1:34pm |
Hunt4Allis wrote:
DrAllis wrote:
Wet sleeves always need to be installed without the Orings to make sure they will fall into place easily and I like them to be able to rotate in the block. I have always used vegetable oil or Crisco smeared on the lower block bore and the sleeve Orings. |
I'm confused by you say wet sleeves need to be installed without the o-rings and then at the end of the sentence it says in the sleeve o-rings? |
Pretty sure he means as in a "test fit" to be sure they fit easily / correctly. Then take them out, lubricate, assemble with orings.
|
|
DrAllis
Orange Level Access
Joined: 12 Sep 2009
Points: 22166
|
Post Options
Thanks(0)
Quote Reply
Posted: 14 Mar 2022 at 1:36pm |
|
No Orings to be SURE the block is clean and not warped and rotating the sleeves while in the block without Orings on them.. The sleeve standout is checked with no Orings on the sleeves for accuracy.
|
|
Hunt4Allis
Orange Level
Joined: 13 Mar 2018
Location: Ohio
Points: 1172
|
Post Options
Thanks(0)
Quote Reply
Posted: 14 Mar 2022 at 1:48pm |
|
Okay no o-rings to check for fit, then install o-rings and press into place.
Edited by Hunt4Allis - 14 Mar 2022 at 1:49pm
|
|
WF owner
Orange Level
Joined: 12 May 2013
Location: Bombay NY
Points: 5058
|
Post Options
Thanks(0)
Quote Reply
Posted: 14 Mar 2022 at 2:14pm |
You won't need to "press into place". As Doc says, dry fit them with no o rings, then install the O rings and seat the sleeves by hand turning them slightly as you push them in. If everything is clean, they should push in quite easily.
After you do final installation of every sleeve, you are going to want to put some washers on a head bolt and snug a nut on it to hold the sleeve in place. If you don't, the sleeve could fall out (gravity) when you rotate the engine to work on the bottom end.
Don't remove the nuts until you are ready to install the head gasket and head.
Edited by WF owner - 14 Mar 2022 at 2:18pm
|
|
Hunt4Allis
Orange Level
Joined: 13 Mar 2018
Location: Ohio
Points: 1172
|
Post Options
Thanks(0)
Quote Reply
Posted: 14 Mar 2022 at 5:52pm |
WF owner wrote:
You won't need to "press into place". As Doc says, dry fit them with no o rings, then install the O rings and seat the sleeves by hand turning them slightly as you push them in. If everything is clean, they should push in quite easily.
After you do final installation of every sleeve, you are going to want to put some washers on a head bolt and snug a nut on it to hold the sleeve in place. If you don't, the sleeve could fall out (gravity) when you rotate the engine to work on the bottom end.
Don't remove the nuts until you are ready to install the head gasket and head.
Thanks for you tip, I appreciate the info!
So a nut/washer on top will stop it from falling?(I don't get that part yet?)
|
|
|


