Hot engine won't start?
Printed From: Unofficial Allis
Category: Other Topics
Forum Name: Shops, Barns, Varmints, and Trucks
Forum Description: anything you want to talk about except politics
URL: https://www.allischalmers.com/forum/forum_posts.asp?TID=207218
Printed Date: 10 Apr 2026 at 5:15am
Software Version: Web Wiz Forums 11.10 - http://www.webwizforums.com
Topic: Hot engine won't start?
Posted By: modirt
Subject: Hot engine won't start?
Date Posted: 24 Jun 2025 at 12:04pm
|
Have a DewEze Bale Mobale (aka, hay monster) that starts and runs fine. Unless you manage to kill it when hot. Then it won't start. An other wise fully charged battery can barely turn it over. But give it a couple hours to cool down and she turns over and starts right u. Engine is a 318 Chrysler........with carter 2 barrel carb.......from early 70's. Hay monster built on Dodge D600 truck chassis. Aside from the hydraulics, more or less a stock truck. Any ideas on why it won't start? Carb vapor locked maybe?
|
Replies:
Posted By: steve(ill)
Date Posted: 24 Jun 2025 at 12:26pm
|
or a bad coil / condenser... break down when hot... Since it does not DIE when hot, just not RESTART , vapor is a good guess.... Maybe start in ether ? ------------- Like them all, but love the "B"s. |
Posted By: TedN
Date Posted: 24 Jun 2025 at 12:54pm
|
I would guess you are getting voltage drop between battery and starter, a voltage test at the starter while cranking will tell you. get a set of test leads (I have a Maddox 30' set from Harbor Freight, under $20) so you can check from the starter housing to the positive lead. What I have most commonly found is the ground isn't sufficient when hot. A lot of older vehicles used an open weave ground cable that gets to the point it doesn't conduct well. If you don't have a test meter or just want to try an easy way to test for a bad ground, hook jumper cables from the negative terminal on the battery to the engine block when it doesn't start and see if that helps. You could have other issues, but the bad ground is the one I have seen the most. Ted ------------- 190XTD seriesIII, 190XTD seriesI, maroon belly 7000, 7045, 190XTD series??? project(or maybe parts) |
Posted By: modirt
Date Posted: 24 Jun 2025 at 2:08pm
|
Now that I think of it, there may be another cause/fix. The fuel line from the fuel pump is now exposed. Somebody had wrapped it with a glass mat insulation and black tape, but that is now gone. I have some insulation tube that I forgot to install. That may help. It also may not help that the radiator and fan are mounted up high and remote. No cooling fan on the motor block itself, so no help for the fuel line. Ground could also do it, but this one has black battery cable running directly from battery to the chassis frame. Previous owner told me he was also looking for a coil, so that may help too. Can't ever recall any farm truck.....once it was running and warmed up......not starting.
|
Posted By: Tbone95
Date Posted: 24 Jun 2025 at 2:25pm
| Just doesn’t seem like stuff like fuel line insulation, coil, condenser would have anything to do with barely being able to crank it. Ground going bad or something seizing. |
Posted By: AveryD12
Date Posted: 24 Jun 2025 at 3:17pm
|
I had similar issues with a Chrysler product. When the engine got up to operating temp and it had run for an hour or so it wouldn’t restart until it cooled down. Found it to be a bad starter. Don’t know if this could be your problem or not. Avery |
Posted By: Joe Goodwill
Date Posted: 24 Jun 2025 at 5:18pm
| Mid 70’s Chevy 454 would get tight and hard to turn over if you shut it down quick after running hard and temp was up. Never figured it out but that thing was sure hard on back tires!!😳 |
Posted By: Ed (Ont)
Date Posted: 24 Jun 2025 at 6:50pm
| Certainly sounds like a bad starter. Slow to turn hot usually indicates starter problem. But check all your cables and connections as well and battery condition. If that starter is 50 years old it has done well!!!! Gear reduction starter on that?? Chrysler used those a lot. |
Posted By: modirt
Date Posted: 24 Jun 2025 at 6:58pm
|
Since last year, new points, plugs, condenser and distributor cap. Was advised to get new air filter. I said was probably fine, but did so anyway. Hard to find industrial canister type. Pulled out old filter and found a birds nest and feathers helping filter. Running on a new filter now. New gas tank (aluminum fuel cell sold to race car guys), new starter, new battery, new gauges, including tach with hour meter. Those are hard to find. Did look at battery cables and they are smaller gauge than I remember. Can put on larger ones. Is it possible something in the engine is expanding enough when hot to be that much of a problem turning it over? Engine has enough power to spin it but battery and starter don't? Fresh 10-30 oil.......looks clean and slick.
|
Posted By: Ed (Ont)
Date Posted: 24 Jun 2025 at 7:28pm
| You have thrown a lot of parts at it and none of those will cure the problem you said you had which seems to be not turning over well hot. Check your timing to see that it is correct. Too much advance could cause that same problem. Put a starter on it. Or get yours rebuilt - that may be the better option given the poor parts quality these days. |
Posted By: steve(ill)
Date Posted: 24 Jun 2025 at 7:44pm
|
with a new starter, its a good bet that you have something getting TIGHTER as the engine heats up.. Maybe you got carbon the pistons ... maybe just drag between the pistons expanding and TIGHT in the bores.... you could try to rotate the engine with a torque wrench on the crank pulley when hot / cold and compare... ------------- Like them all, but love the "B"s. |
Posted By: modirt
Date Posted: 24 Jun 2025 at 8:53pm
Agreed.......except most of those parts were intended to bring it back from the dead. A classic case of "it was running when parked". Had sat in the weeds for 3 or 4 years. Little to none of it to address current problem of not starting when hot. For now, that is just an annoyance. I'm careful not to kill it till the day is done. But we are now using it. Picking up about 400 bales with it tomorrow. Back in the day, I"m told a good crew would not show up for a job less than 1,000 bales. I don't have that kind of crew.
|
") Ed (Ont) wrote:
Ed (Ont) wrote:Posted By: Lars(wi)
Date Posted: 24 Jun 2025 at 11:16pm
|
When you say ‘kill it’ are referring to stalling the engine, or turning the ignition off? ------------- I tried to follow the science, but it was not there. I then followed the money, and that’s where I found the science. |
Posted By: TedN
Date Posted: 25 Jun 2025 at 12:44am
|
If you running it now it doesn't take much to throw a decent set of jumpers in with you and do a quick test if the situation arises, negative terminal to block. Reading the original post again I think this is important, as I believe the issue may be between chassis and engine. With a hydraulic pump tied in you have hydraulic lines that will conduct some electricity before they burst into flames. I have witnessed this exact thing on a S2200 IH, but it was the stainless line off the compressor that lit up. Also had a local trucker lose his truck because it was using the power steering hoses for a ground, when they carried too much current the steel braid got hot enough to ignite the rubber around it. I personally like to run the ground cable directly to the engine, and either ground from there to the chassis or run a seperate ground from the battery. Could be a starter issue, but you say it has been changed. I think if you had something in the engine getting that tight with heat you would notice it, and since friction causes more heat it would get bad enough to kill the engine in short order. I hope this helps. Ted ------------- 190XTD seriesIII, 190XTD seriesI, maroon belly 7000, 7045, 190XTD series??? project(or maybe parts) |
Posted By: Thad in AR.
Date Posted: 25 Jun 2025 at 5:32am
|
Next time you try it and it doesn’t want to turn over quickly grab rack battery cable. If one feels hot it’s either bad or not making a good connection. Could be a bad starter. I’d trust a junk yard starter muck more than a new one. It took me 4 new starters to get a good one on my work truck. As mentioned before check timing. |
Posted By: ekjdm14
Date Posted: 25 Jun 2025 at 5:59am
Agreed, wouldn't surprise me at all if the new starter is failing when hot. ------------- Stuck Farmer |
Posted By: Codger
Date Posted: 25 Jun 2025 at 6:03am
|
I don't know the machine at all. Are you certain the load is declutching, or releasing from the engine when the engine is not running? You mention hydraulics and if these are not relieving pressure in the driven system immediately you are fighting system pressure with engine start. This possibly decays as time goes by allowing the engine to crank somewhat unloaded. If certain the load is coming off of the engine when not operating, install either in series a shunt fed, or inductive clamp on ammeter and measure starting current. If you see over 800A inrush on starting current, start moving downstream first removing the starter motor and bench testing. Chrysler gear reduction starters should show about 90A inrush when bench testing with no load as example. within about two seconds taper to 30A or less. I would agree with electrical connection integrity. I like a minimum of 2AWG from the negative battery post to both the engine block, and frame rail in a gasoline engine application. 2/0AWG in diesel applications. Land that negative lead under a starter mounting fastener is preferred and use dielectric paste to keep corrosion at bay. ------------- That's All Folks! |
Posted By: modirt
Date Posted: 25 Jun 2025 at 8:23am
Both of those. Biggest risk is when nudging front end into a barn with full load of 150 bales. That is nearly 4 tons of hay. Helps that transmission is geared way down, but can still be kind of exciting getting it where it needs to be without hitting anything. Another time was when we had to shut it down to add fuel. Only made that mistake once. Still odd that when I go out later today, she will fire right up on first turn. But if hot.......at moment of kill, can barely turn engine over with fully charged battery. Half an hour later, will turn over, but drags as if battery is on last legs. But no fire or hint of wanting to start. But once cool, fires right up.
|
Posted By: modirt
Date Posted: 25 Jun 2025 at 8:33am
|
Hydraulics is powered by a single small pump mounted on frame in front of engine. A pto shaft runs from front pulley off crankshaft to the pump. If engine is turning, pump is pumping. Hydraulics running off the pump include a remote fan behind the radiator (runs on hydraulic motor), power steering, lift cylinders for the front snout and when loading or unloading, a hydraulic motor runs drag chains on front snout and conveyor down centerline of the bed. To give an idea of it's purpose, couple days back driver and two stackers on the the truck picked up 150 bales from the field in 20 minutes. At barn, front snout raises up as much as 12 feet to become hay elevator. Can unload as fast as stacker guys in the barn can keep up. Or would if the driver (me) didn't screw up and kill it.
|
Posted By: modirt
Date Posted: 25 Jun 2025 at 8:46am
|
I'll mention one more thing.......when we swapped out distributor cap, checked that against a firing order diagram for 318 Chrysler and concluded the distributor shaft had been put in backwards. But they they put spark plug wires on to match the order and it starts and runs. So one thing we have not done is to check the timing. With things reversed, not sure how that would work unless #1 is #1 either way. Have considered pulling the distributor shaft to set it right, BUT, as mounted not sure if there is enough clearance between motor and deck above it to pull it. Because it is running, decided to go with it as it. Lots of little improvements and fixes needed once hay season is over.
|
Posted By: Les Kerf
Date Posted: 25 Jun 2025 at 8:48am
|
The first thing I check (because it is easy) is voltage drop at the battery while cranking. If the voltage barely drops but the engine barely cranks, then there is poor connectivity (corroded connections, cables too small, whatever). If the voltage drops WAY down then either the battery has no guts or there is excessive load (dragging starter, tight engine, whatever). |
Posted By: TedN
Date Posted: 25 Jun 2025 at 9:45am
|
I just did a search on it, that is an interesting way to pick up hay. I can see why you don't want it to not run part way through the day, you have a crew standing around unhappy. In our area the few of us that still put up hay in small bales usuall use the New Holland Harobed. My brother has a 1068 and just picked up a S1048, we put up 16x18 bales that run #90-100 in alfalfa and #75-85 in grass. I know that our area is one of the few that uses this size bale, so I find it interesting to see how it is done in other places. Ted ------------- 190XTD seriesIII, 190XTD seriesI, maroon belly 7000, 7045, 190XTD series??? project(or maybe parts) |
Posted By: Ray54
Date Posted: 25 Jun 2025 at 10:50am

I the good old day (1970's ) when we grew grain here we harvested from June to September (no summer rain here,why have 2 combines when one run more hours did the job). Lot of 1940' and 50's trucks hauling grain. As a teen hauling grain, one of my greatest fears was killing a truck at the elevator in town. I never had one that did not start, but a lot of cranking sometimes. Dad had a 48 and 49 Ford F6's. The 49 had a Y block transplant including automatic choke that did not have original heat shields. But it did happen that someone got towed off the pit or scales. It was so nice my last years having my IH 1700 that has a engine that started very easy hot. Good luck
In this situation it may be blind luck that get you there first. |
Posted By: modirt
Date Posted: 25 Jun 2025 at 12:11pm
|
This is the actual contraption in question........... https://www.youtube.com/watch?v=onIsfsSXRXc" rel="nofollow - https://www.youtube.com/watch?v=onIsfsSXRXc This is a cleaner version.......closer to original. This one a Ford engine. Second half shows front chute/snout with elevator extension for reaching barn lofts, etc. I have the extension, but it's not working.....yet. https://www.youtube.com/watch?v=Tah60EnFRWs" rel="nofollow - https://www.youtube.com/watch?v=Tah60EnFRWs A couple items high on agenda to fix........one is that alternator. Somebody did some creative redneck engineering.......welded a tightener bracket to the FRAME, so belt tightens and loosens as engine moves. Have the actual Mopar/Dodge alternator brackets for the engine, but need to get a different alternator. This one is a Delco, with internal voltage regulator, but mounting holes don't fit. A real Dodge has a voltage regular setup under the dashboard and behind the firewall. The hay monster doesn't have that. Creative parts solution for some of this comes from Summit Racing......which have several self regulated alternator options for this engine. All high output, but if the lights are on, there is a big voltage drop........which may also be an indication the battery is weak......but existing alternator may only be 30 or 40 amp. |
Posted By: TedN
Date Posted: 25 Jun 2025 at 12:36pm
|
I watched your video and I agree that the alternator needs to be fixed, that may actually be the source of your starting issues. The belt isn't tight enough for it to put out full output. You should have about 13.5 volts at the battery when running, my guess is you are closer to 13, maybe a little less. Enough to not go dead, but not actually charged. I would still check to be sure you have good ground between engine and chassis just because of the other issues that can cause, but your alternator is only barely able to keep up as is. Ted ------------- 190XTD seriesIII, 190XTD seriesI, maroon belly 7000, 7045, 190XTD series??? project(or maybe parts) |
Posted By: LouSWPA
Date Posted: 25 Jun 2025 at 2:29pm
|
Grounding or starter would be my first suspects ------------- I am still confident of this; I will see the goodness of the Lord in the land of the living. Wait for the Lord; be strong and take heart and wait for the Lord. Ps 27 |
Posted By: Lars(wi)
Date Posted: 25 Jun 2025 at 3:42pm
|
Watched your video, what is the advantage of this contraption, instead of pulling a flat rack directly behind the baler? ------------- I tried to follow the science, but it was not there. I then followed the money, and that’s where I found the science. |
Posted By: iowallis
Date Posted: 25 Jun 2025 at 4:49pm
|
I would guess battery cables and ground. Get some decent ones (4 ga minimum) and clean the connections on both ends when installing. I would also run a cable from the engine to the frame/body of the machine to insure good grounding. 2nd guess would be a bad stater despite being new. Long shot is what happened to one of my old cars that wouldn’t start when hot. For years blamed it on vapor lock. Found out that using multi weight oil it would get too thin in my well worn engine and the cylinders couldn’t pull enough vacuum to get the gas/air mixture into the cylinder. Switched to straight weight oil (30 weight) and a bottle of STP and no hot start issues since. It is a warm weather car so no need to worry about starting in cold weather. |
Posted By: modirt
Date Posted: 25 Jun 2025 at 9:14pm
One advantage is I started baling today at 2 PM. It was 95 and humid. Plus had no help then. Help showed up at 6 PM when it cooled down. We put 200 bales in the barn in 2 hours, start to finish. Could have been faster if we made it in one big load. This shows front end elevated enough to stack bales 8 high, which is all we need. Could go higher.  Before finding this thing, spent some time looking for a New Holland Stackliner.......but even the smallest one needs more height to the trusses than this barn has. The other ways to haul hay all seem to be regional. I doubt there is a baler with bale thrower anywhere in MO. Some guys do stack on wagons behind the baler, but very rare. I've seen accumulators and skid loaders, but never seen one in the field. Most common method in MO today for small squares? Crew of 4 or 5 picking them up by hand and stacking on a flatbed trailer towed by 1 ton pickup. The Amish can make it look like hay levitates onto that trailer and into the barn.
|
Posted By: modirt
Date Posted: 25 Jun 2025 at 9:27pm
|
On a hunch, put a battery charger on the battery today at 1.00. Pulled it about 5.30. It needed some charge. Started and ran, but at start, volt meter dropped way off. So tired battery, bad cables, bad connection, or all the above. Also, watching volt meter, alternator never kicked in as it has in past. May spend some time looking for reason, but gave up on that one long time ago. Just need to get a new one and start over. There was quite a bit of redneck engineering that had been added that is being put back to normal / original.
|
Posted By: modirt
Date Posted: 25 Jun 2025 at 9:29pm
|
Also, at end of day, parked it, then turned the key off. On a whim, tried to start and she groaned a bit, but did start and run........even when hot. Extra juice in the battery may have been a factor. |
Posted By: modirt
Date Posted: 26 Jun 2025 at 3:08pm
|
Quick update. Pulled the battery and had it tested and they said still good. Was low on charge, but voltage output tested OK. Battery cables were #4 and negative was grounded to the engine block. Cables corroded, so have upgraded to new #2 cables. Will install those on the existing battery. If memory serves, 725 cold cranking amps. They sell one with more CCA's that sits in same foot print. As is, the battery box is full. BTW, forgot but there is a 2nd battery box. So may have been setup to run a 2nd battery in parallel for running lights at night. Existing alternator......one in the video......despite being large in physical size is only putting out 30 amps or so. Since it has been causing trouble anyway, new 90 amp single wire (self regulated) alternator on order. Local NAPA can make me new charging wire.........thinking #6 AWG wire to handle the loads. Will make those changes, then see what happens.
|
Posted By: Ed (Ont)
Date Posted: 26 Jun 2025 at 9:59pm
That sounds like good changes. Bigger battery cables should help. 30 amp alternator is not a whole bunch but a lot of alternators back in the day were in that range. Chev in the 70's were 37 amps. I plowed snow with a 77 GMC with 37 amps. We would stop in the middle of the night when the lights got so dim you could not see. Park truck and let it run and go for a coffee. Then work again!!! Lol. 
|
Posted By: WF owner
Date Posted: 27 Jun 2025 at 6:01am
|
Probably not the same problem, but years ago (80's), I had a Chevy motorhome that never wanted to start when it was warm. The starter was very close to the exhaust. With the setback style of the engine, engine compartment heat was always a problem. I tried various attempts at heat shielding and only ever managed to make the problem worse. A local electrical shop rebuilt the starter, and I had no more problems.
|
Posted By: modirt
Date Posted: 27 Jun 2025 at 8:06am
|
Bad starter could be part of problem, but in this case, not from the exhaust. Open air mounting and this one has a pair of cherry bomb glass packs on duel exhaust pipes. Somebody had a sense of humor. I added turnouts so the hot exhaust didn't hit rear tires directly.
|
Posted By: TedN
Date Posted: 27 Jun 2025 at 10:34am
|
Fix the (now) known alternator issue, replace the cables, and see if that solves the problem. Looks like it uses an electric fan, that will speed up a little too. I think if I were working on it I would get some convoluted tubing and zip ties and get some of the wiring cleaned up a little while doing it. A few extra minutes gains quite a bit of piece of mind. Its neat to see something like that out being used, and it works for what you are doing. Ted ------------- 190XTD seriesIII, 190XTD seriesI, maroon belly 7000, 7045, 190XTD series??? project(or maybe parts) |
Posted By: modirt
Date Posted: 03 Jul 2025 at 5:37pm
|
Quick update. Got the #2 battery cables installed, then put battery charger on and left it overnight. Battery needed it. Got a chance to get it all back to normal and hit starter. Volt meter went from 12 volts to 10 (had been dropping below 6 volts), engine turned over way faster than had been before and once she started, volt meter quickly climbed up to over 14.......so alternator was trying to charge. New alternator has arrived, currently waiting on mounting brackets to install it. Also, as mentioned before, part of fuel line was lacking insulation, so that has been replaced. For first time I also noticed that the 2 or 3 inch area where the insulation was missing passed within about 2 inches or so of exhaust manifold, which is likely why it was cooked off. New high temp insulation on it now. Old alternator is unable to keep up with any type of load, so belief is under normal operation was getting a slow battery drain. With any lights on, drain was killing the battery. Hoping new alternator fixes that. Will see. |
Posted By: Ed (Ont)
Date Posted: 03 Jul 2025 at 9:27pm
| Sounds good. Voltage should be about 13.6 to 14.5 with engine running so the alternator seems to be good. Or does it drop when you turn some accessories on? |
Posted By: modirt
Date Posted: 04 Jul 2025 at 7:31am
|
As noted, this is a 318 Chrysler engine, but has none of the normal charging system.....external voltage regulator, etc........and somebody in the past rigged up an AC Delco GM style alternator with internal regulator. Rigged is an understatement. They found a way to mount wrong fit alternator to engine......big stack of washers used to get belts to align......then made a tensioning bracket......and welded it to the frame.......so belt tension varies if engine and frame do not move together. Had this GM alternator tested to see if it was working and it was only putting out something like 30 amps. Have seen the original stickers for some Dodge D600 farm trucks from early 70's era.....same engine....and even those had 43 amp alternators. If you don't get all the day's hay picked up before dark, and turn on the lights, the drain on battery goes way up. Doing some research on this, they also say it is very hard on the alternator if battery ever gets really low and engine is then jump started such that alternator then has to charge a nearly dead battery. That has happened with this. Another reason for getting the bigger 90 amp alternator installed. Hopefully it will keep up with the load and keep battery topped up all the time. Once topped up, extra capacity of bigger alternator won't matter. It only charges as needed. Seems like only way to go.
|
Posted By: SteveM C/IL
Date Posted: 04 Jul 2025 at 10:33am
| 366 & 427 truck engines were known for no start hot and the cure was an extra solenoid on the fender or firewall but your starter is not encased in a heat zone so may not be a helpful suggestion. I'm pretty sure your engine doesn't get "tight" when hot. |
Posted By: modirt
Date Posted: 16 Jul 2025 at 3:30pm
|
Quick update......with new replacement alternator, pulled the old one and was ready to install new........instantly ran into trouble. The lower, main support OEM alternator bracket is held in place by either two or three bolts......depending on the age and style of water pump......but that braket and the bracket to tension it is held one by only one bolt. One of 7 that holds the water pump in place. The key one.......the one that has to be used.......was found to have been snapped off inside the water pump housing. That bolt passes thru bracket, bracket, water pump, timing chain cover, then screws into the block.....and the end of it is open to coolant. So to install, a good thread sealant has to be used. No telling now many youtube videos there are documenting removal of that snapped off bolt. Now my turn to figure it out. Has been soaking in penetrating oil for days. Trying hard not to snap it off again as that would require removal of timing chain cover. Exciting times. Next question.........I now have 3 or 4 of these long bolts out, and hopefully 4th and final is coming out with no drama. I normally would plan to chase the threads in engine block with an oiled tap before putting bolts back. Problem being my 3/8" tap appears to be damaged (won't go into a matching nut without binding) and not long enough to reach thru the timing chain cover to get to the threads in the block anyway. Do they make a longer than standard tap with 4 inch or so shank? If so, what is now a good brand to buy? What I have now are Blue Point, which as I understand it was an economy line of tools sold by Snap On. I may be able to buy Irwin or Hanson locally. Anything else to consider?
|
Posted By: modirt
Date Posted: 16 Jul 2025 at 3:32pm
|
As she sits now.........that big 4 belt pulley is in place of a harmonic balancer. Have no clue how that is being held in place.......and no desire to find out. But if that bolt gets snapped, I get to find out. 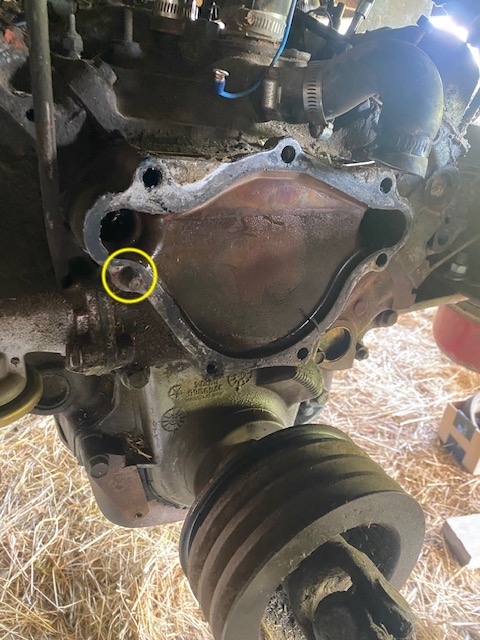 |
Posted By: Acguywill
Date Posted: 16 Jul 2025 at 11:15pm
| If you just want to clean the threads take a grinder and cut a groove or two through the threads of a bolt that is long enough to reach. I have done lots of times. Simple cheap and don't have to worry about damaging a tap. |
Posted By: DiyDave
Date Posted: 17 Jul 2025 at 4:43am
https://www.mcmaster.com/products/extended-taps/long-reach-chip-clearing-taps~~/" rel="nofollow - https://www.mcmaster.com/products/extended-taps/long-reach-chip-clearing-taps~~/ ------------- Source: Babylon Bee. Sponsored by BRAWNDO, its got what you need! |
Posted By: modirt
Date Posted: 24 Jul 2025 at 11:40am
|
Not much progress on the bolt, except new plan to attack it. Have now added an induction heater to stable to tools. Have had more than one guy who turns wrenches for a living tell me that is what they use to free stuck bolts. For lack of a better way to explain it, seems to work like a microwave oven or some such........a coil is placed over end of the bolt and when you hit the on switch, energy waves are directed towards center of the coil (like a loose coil spring), with bolt positioned in the center. Some show it heating to read hot in a matter of seconds. No open flame as a torch or welder. Anyway, going to heat it up, let it cool and bang on it. Do that a couple times and hopefully bolt gives it up. Interesting that I've now watched dozens of youtube videos of guys working on front end of these old 318 motors and that very same bolt is problem for 99% of them. Generally it gets broken (as mine was), then drama follows as guys figure out ways to get it out. It may be a major design flaw. In normal use, carbon steel bolt passes thru steel alternator mounting bracket 1, then steel alternator mounting bracket 2, then aluminum water pump housing, then aluminum timing chain cover, then into thread in cast iron block (held in place by some nasty sealant), where tip of bolt is then exposed to some form of coolant cocktail. If for some reason, stray current finds it's way from alternator frame or electrical system you could have no telling what in terms of corrosion from dissimilar metals and all the rest. Bolt just gets chemically welded into place. Don't know if there is a non-metalic bolt tough enough for that duty, but would be worth looking into.
|
Posted By: modirt
Date Posted: 24 Jul 2025 at 11:55am
|
And while we are at it, here is another issue. Has power steering,
turns left OK, but does not turn same to the right. Turn radius to the
right might be 150 feet or so. At a T intersection, always concerned it
will end up in the opposite road ditch or field on other side before it
will turn down the road. Looking for problems,
I now see the steering cylinder has a hard stop on the shaft. Why would
that be there? Either mismatched cylinder pulled from another use or
maybe if it retracts too far it hits something? Once she is running
again, will have to look to see if that is a problem. As is, using less than half the throw of the piston when trying to retract to turn right. 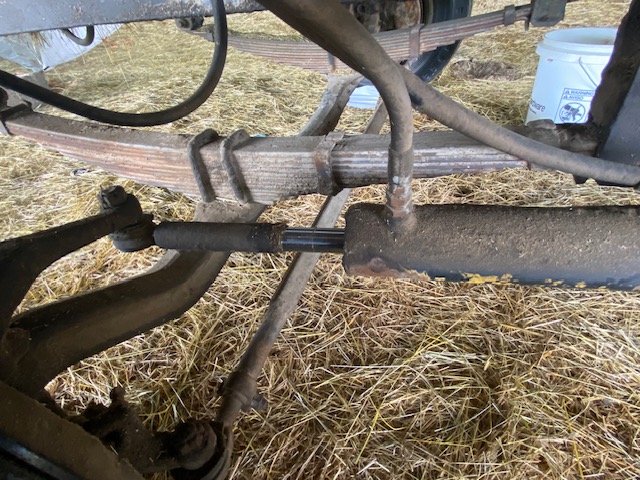 |
Posted By: TedN
Date Posted: 24 Jul 2025 at 12:55pm
|
Without seeing the whole cylinder this is just speculation, but maybe it is mounted incorrectly. That may be as far as the cylinder retracts, but you may be hitting the steering stop before it is fully extended. If it were me, I would pop the end loose from the steering arm and cycle it fully as a first step. You may just need to move the rear mounting point. Glad to hear you have your hot start issue figured out. Ted ------------- 190XTD seriesIII, 190XTD seriesI, maroon belly 7000, 7045, 190XTD series??? project(or maybe parts) |
Posted By: modirt
Date Posted: 05 Aug 2025 at 12:26pm
|
No progress at all on the broken stud. Have concluded it all needs
to come off. Started with PTO shaft this morning and front end popped
right off. Rear end......the part in front of pulley.......is stuck
tight. If it is same as front, and it looks to be......is keyed onto the
shaft and held there by set screw. But is locked tight from fit, corrosion or all the above. Can't pry it
off and won't even slide back on further if you whack it with a hammer. Last U-joint like this I wrestled with was off a hay rake and we managed to pull
the shaft out of the rake, take it to a bench, heat it with a torch and
eventually drive it off with a hammer. Considering all the grease, oil
on engine and that rig is parked in a pole barn full of equipment and
loose hay, not wanting to get a fire going on front of engine . So torch
option last resort. If the U-joint could be
taken apart, might be able to get wheel puller on it (and on the belt
pulley), but see no way to get the cross out of that joint to take it
apart. All 4 cap ends for the cross appear solid. Really hoping to not
destroy the U-joint. Any ideas? (currently being doused with penetrating oil pending better ideas).  |
Posted By: steve(ill)
Date Posted: 05 Aug 2025 at 1:38pm
|
normally the pulleys on "most" engines are retained by a bolt in the end of the crank.. What holds your pulley onto the shaft ? Possible to pull the pulley off and bring the shaft with it ?... Could you put a rectangular bar thru the U joint by the cross, that has a pusher bolt hole on each side, and screw down agains the pulley to push the joint OUT ?
some type of slide hammer attached to the shaft between the two u joints... and then slam with the hammer to shock the shaft out ? ------------- Like them all, but love the "B"s. |
Posted By: modirt
Date Posted: 05 Aug 2025 at 2:16pm
|
It may be possible to run flat bar stock thru the U-joint yoke, then use a bolt / bar stock / flat washer / nut.......one on each side......to gently push it off. Worth a try. You would be pushing on the yoke's cross, so may damage that to the point it has to be replaced, but so be it. What holds pulley on is unknown. Behind the U-joint are for 3/8" bolts going aft towards the engine, so I assume there is a flange of some type behind / under it holding it in place. Like fan belt pulley? Then expect that to also be held on by the usual big bolt they use to hold the harmonic balancer in place. Remove the bolt, pull the flange and maybe that would do it? Had hoped to avoid removing timing chain cover, but may be best after all. From dates, it is mismatched to the block anyway and appears to be showing some corrosion. Also need to get it off to chase threads on the block so that can run bolts back in good condition threads. Also won't hurt to get a peek at unknown condition of timing chain and gear. Clean out all the gang green and build back better? Not happy to be doing all that, but willing to if it makes things better. Just pain in the hinny when it wants to fight with you every step of the way.
|
Posted By: plummerscarin
Date Posted: 05 Aug 2025 at 5:41pm
| Pretty greasy there but think if you clean it some you would find circlips inside the yoke to be removed then push the caps out. |
Posted By: SteveM C/IL
Date Posted: 05 Aug 2025 at 10:31pm
agree on the internal clips
|
Posted By: DiyDave
Date Posted: 06 Aug 2025 at 4:44am
|
Use your induction heater on the PTO shaft... Them are handy things! ------------- Source: Babylon Bee. Sponsored by BRAWNDO, its got what you need! |
Posted By: modirt
Date Posted: 06 Aug 2025 at 12:00pm
Cleaned it up and you look to be right. These are what I suspect are the clips or snap rings. And this is where the unskilled mechanic hits the wall. If there is an opening on any of these so you can pry them off, I've not found it. Opening may be facing aft out of sight and just can't see them, but also had no luck rotating the clip to get it to show it's pretty face. I have worked with the external clips and if this was off the shaft an on a bench, could probably defeat this one too. But until then........ Once these are off, have concluded will be good idea to replace both crosses anyway. Aside from engine propelling machine around the field and up and down the road, all the rest of the functions run off the small hydraulic pump this shaft powers. Machine is helpless without it. And it would only break down with hay in the field. Not a good time to be fixing anything. Cheap insurance while it's apart anyway.  |
Posted By: modirt
Date Posted: 06 Aug 2025 at 12:04pm
 Another view. Can see the bolt heads holding pulley on. This shaft comes off, may be home free.
|
Posted By: plummerscarin
Date Posted: 06 Aug 2025 at 12:31pm
|
Yep, that’s it Use a punch or screwdriver to drive on the end of the snap ring. It will either pop out or rotate. If if rotates, then switch to two punches or needle nose pliers and drive both ends simultaneously. |
Posted By: DonBC
Date Posted: 06 Aug 2025 at 1:37pm
|
A failing coil could also be the problem. They can be warm but if they are getting warm or hot it is a sign that they are failing. When the get hot they can have a weak spark and worst case, no spark. ------------- Jack of all trades, master of none |
Posted By: DiyDave
Date Posted: 06 Aug 2025 at 3:49pm
|
Give one of the caps a smack with a medium size hammer. An O-ring pick can help rotate the SR into a visible position. Once you get 1 off, do the same thing on the other side... ------------- Source: Babylon Bee. Sponsored by BRAWNDO, its got what you need! |
Posted By: Ray54
Date Posted: 07 Aug 2025 at 10:56am
| In my experience it looks like the u joint could be removed by taking the cap screws out I see in the last picture. Very similar to the hydraulic drives on many things made in the same era. They have always been bolted to the flywheel pully. |
Posted By: modirt
Date Posted: 07 Aug 2025 at 12:37pm
|
Progress!!! Went on a blood hunt and managed to find the ends of the clips......as suspected, both facing aft and hidden. But eventually got on the ends and they pooped off. One into the ether.......I heard it ping off metallic stuff 2 or 3 times, but it is gone. About an hour later, had the cross out, and as suspected, the yolk was just keyed onto the shaft. Used a wheel puller and it didn't give it up easy. Was close to point breaking....tapped it a few times with hammer......tighten....tap......then came the big bang when it broke free. This is where she sits now. Ran out of time and battery powered trouble light went dead at same time. But now off and running. Once those 4 cap screws are off, will know what's left to get this pulled apart.    |
Posted By: modirt
Date Posted: 07 Aug 2025 at 12:42pm
| BTW, where does one go to get new crosses? I did know a guy........he could match anything.......but he up and died on us a while back and his shop is closed. |
Posted By: steve(ill)
Date Posted: 07 Aug 2025 at 1:22pm
|
I buy all my u-joints from these guys... Farm Store carries 2 sizes in the 30- 50 HP range.. These guys carry EVERYTHING and the adaptors... You just got to know the bearing OD and joint width... https://www.qualityfarmsupply.com/products/series-6-220-metric-kit" rel="nofollow - https://www.qualityfarmsupply.com/products/series-6-220-metric-kit ------------- Like them all, but love the "B"s. |
Posted By: modirt
Date Posted: 08 Aug 2025 at 12:39pm
|
More progress. After going over the pulley setup numerous times, concluded there HAD to be a seam somewhere, if only I could find it. No way to assemble it otherwise. Turns out the cap screws were only holding a plate on in front......not the entire pulley. Seam was on insider corner. As it turns out, didn't need to do anything to pto shaft / yolk / u-joint. Just remove those 4 cap screws. Now I know. Now we all know. Next one will be easy.    |
Posted By: plummerscarin
Date Posted: 08 Aug 2025 at 1:20pm
|
Can be frustrating trying to figure something out and then the realization it is not that difficult once you understand the thing. Obviously, service manuals can be very important if you can even find one. Glad you got it apart. I see a set screw on the yoke. Does that hold it to a stub shaft? If so, now you can put some heat to it and separate those two pieces and make it more easy next time. If there is a next time. Glad to see you’re making progress |
Posted By: PaulB
Date Posted: 08 Aug 2025 at 2:24pm
|
For U-Joints: there is a "Fleetpride" Heavy truck parts place close to me that can match nearly anything. If they can't match it there is a Farm drivelines place that can. ------------- If it was fun to pull in LOW gear, I could have a John Deere. Real pullers don't have speed limits. If you can't make it GO... make it SHINY |
Posted By: modirt
Date Posted: 08 Aug 2025 at 5:05pm
|
Got the big cap screw holding pulley on off and now appears to be
same boat as normal case of having to pull the harmonic
balancer.......except this pulley setup isn't normal. Have borrowed the loan of a
balancer pulling tool, but short bolts normally used doesn't work with
this pulley setup. Need to procure some much longer bolts in range of
3/8" x 3 1/2" fine thread......just to be able to reach the holes to
pull it off with. Apparently neat trick is to delete the big washer,
then put big cap screw back in and use that to push against. Whole unit
is supposed to slide past it. Will see.  |
Posted By: steve(ill)
Date Posted: 08 Aug 2025 at 7:39pm
|
you knew they didnt put a special crank shaft in the motor with a 3 inch longer snout... Had to be an adaptor plate or something... Makes a lot more sence after you got it apart ! ------------- Like them all, but love the "B"s. |
Posted By: modirt
Date Posted: 09 Aug 2025 at 6:56am
|
Not sure if time will permit any further progress will be made over the weekend. Found this video of a guy facing similar problem. Same bolt. This is what I fear may be causing the stuck bolt problem. Corrosion. Fast forward to around 5 min to get started. NO amount of prying was getting his cover free from that bolt. Seems like a design flaw. https://www.youtube.com/watch?v=U57uM8X8Ybs" rel="nofollow - https://www.youtube.com/watch?v=U57uM8X8Ybs |
Posted By: modirt
Date Posted: 11 Aug 2025 at 1:05pm
|
More progress and hit yet another wall. With the right puller, the big pulley walked right off just like harmonic balancer would. As
feared, corrosion around that broken bolt may have the cover welded on
tight. I thought maybe if i got it freed on one side, I could wedge it
off. Is free on top, left side and bottom Entire right side is stuck
down tight. Have driven wedges in, banged on cover and bolt.....rise and
repeat......and no joy. It has hit the wall. Trying
to free it around the fuel pump damaged the cover to point of no
return. It's toast. Have given thought to drilling a hole in the cover
to the bolt.......say 3/16" or so......then filling that with PB Blaster
and letting it soak a bit in hopes it might give it up......or just
quit the subtle stuff and get out a saw and start hacking it up.    |
Posted By: DiyDave
Date Posted: 11 Aug 2025 at 4:27pm
|
Thread and bolt a piece of steel to the bolts above and below the broken one, weld a piece of threaded steel to the bolted steel, the same size as will thread onto a slide hammer. slide hammer the cover off. this suggestion will only work if you have room for said slide hammer... ------------- Source: Babylon Bee. Sponsored by BRAWNDO, its got what you need! |
Posted By: modirt
Date Posted: 11 Aug 2025 at 5:32pm
|
Had to quit early and unscheduled field trip all day tomorrow. As stands now, drilled the hole thru cover above the bolt, and have been irrigating with PB blaster. Sitting under serious tension with driven in wedges above and below. If it doesn't give it up in a day or two, will pull out the Fein multitool and start hacking. Get on the edge of that bolt and ride it to the bottom.
|
Posted By: DaveKamp
Date Posted: 11 Aug 2025 at 9:17pm
|
For what it's worth... Chrysler, like Ford and GM, had manufacturing lines specific for 'industrial' engines.... so if you assume an engine to be same as automotive/truck, there's a fair chance you'll be wrong. My Clark IT-60 has a 225 slant six. While it looks just like what'd be in as Plymouth Volare, Chrysler LeBaron, or Dodge Aspen... or an A or D-series truck or van... But it's different. About 80% of the parts are different. Different crank, different intake, different pan, different water pump... ------------- Ten Amendments, Ten Commandments, and one Golden Rule solve most every problem. Citrus hand-cleaner with Pumice does the rest. |
Posted By: modirt
Date Posted: 12 Aug 2025 at 7:31am
|
Widely believed the Deweze version (this one) left factory with engine, tranny, front and rear axles same as Dodge D600. The rest was fabricated and grafted on. Spoke to the young man I bought this from and he replaced the original factory engine with a used 318 engine sourced from a salvage yard. He had no idea what it came out of. It has an odd casting number.........xxxxxx-318-16. The 16 part is where numbers vary depending on use. Nobody seems to know what a 318-16 was intended for. Aside from cars and trucks, we know they were used in a whole slew of military vehicles, RV's, boats, irrigation pumps, Oliver combines and who knows what else. Some floating around were just spare crate engines, which is what this one may have been. The MOPAR guys gas on about cams, headers, carbs, etc., with most of them interested in high RPM horsepower and if it will hold together above 6,000 RPM long enough to smoke the tires off. At other end of the spectrum would have been that Dodge D600 truck. High torque at low RPM's not intended for high road speed. (Not a muscle car). Carb, headers, cam shaft all optimized for that use. That would be ideal for this rig, but not sure how close it matches......if at all. It does have same NP 540 transmission, but only single speed rear axle. So the geared way down, high torque setup. If i was to go on a hunt to replace engine, I'd be looking for a donor from some form of Dodge D600 truck. Actually have a line on one in form of an old firetruck, which is sitting in a salvage yard. Some of these D600 trucks were retired with less than 30,000 actual miles.
|
Posted By: tadams(OH)
Date Posted: 12 Aug 2025 at 2:55pm
| Try putting some heat on the area that the bolt is in |
Posted By: modirt
Date Posted: 13 Aug 2025 at 11:44am
|
Cover is off (and it wasn't easy) and broken bolt is finally out. Had to
hack up the cover and once inside was very plain to see, corrosion to
the bolt was holding it on. No amount of heat or soaking was going to
free it up. Had to go postal on it. Once cover was off, the bolt backed
out easy with vice grips. Once inside, looks
to me like timing chain is suspect. Good amount of slack in it. If going
to replace, no time like the present.    |
Posted By: plummerscarin
Date Posted: 13 Aug 2025 at 12:43pm
| Your issue was same as one shown in video link you posted. Corrosion of dissimilar metals in the cover itself. The flaw in design is not addressing the problem before the corrosion begins. Some sort of anti seize or bushing would be in order. |
Posted By: modirt
Date Posted: 13 Aug 2025 at 3:52pm
|
Have given thought all manner of fixes.......everything from a hard plastic bolt.....some sort of ceramic coating, etc. Cheap and easy might be to butter it up with Anti-Seize before installing. Once installed, this one bolt would be the only one of several that would ever have to turn. It is one of three that is used to hold alternator bracket on, but this one also does double duty, being lower anchor point for the arm used to adjust fan belt tension on alternator. Anytime the fan is adjusted, or to replace the belt, that bolt has to turn. Somewhere along the line somebody tried and broke it. And again, it does extend into the block where end is exposed to coolant. Some design engineer screwed the pooch on this one.
|
Posted By: Les Kerf
Date Posted: 13 Aug 2025 at 7:31pm
Is it practical to install a custom stud rather than a bolt to allow future maintenance?
|
Posted By: steve(ill)
Date Posted: 13 Aug 2025 at 7:55pm
|
stainless bolt... plenty of pipe dope and thread tape to seal the coolant.. if you realy want to get fance, drill out the housing hole and put in a brass bushing. ------------- Like them all, but love the "B"s. |
Posted By: modirt
Date Posted: 22 Aug 2025 at 5:32pm
|
Found a solution for the PTO U joints. There is a welding /
fabrication shop about 20 miles from here in middle of nowhere.
Bearings, U joints, hydraulics and related. If they don't have it, you
don't need it. Total cost........$30 installed. 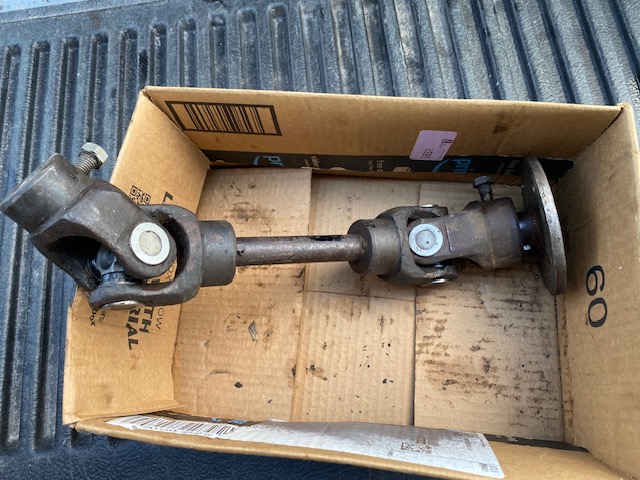 |
Posted By: PaulB
Date Posted: 22 Aug 2025 at 7:23pm
|
If you are looking for a replacement 318 TRUCK engine, you need to look at where the data codes are STAMPED into the block, if you are reading numbers casted on the side of the block, they are irrelevant. You want to find a 318-3 engine, this will have the steel crankshaft. Back in 1974 we special ordered a new D500 that had a 318 in it. with a 5 speed and 6.8:1 rear, it would haul anything a pull a loaded trailer to boot. Of course it would only do 62 MPH against the governor under the 2BBL but back then there was a national 55MPH speed limit. ------------- If it was fun to pull in LOW gear, I could have a John Deere. Real pullers don't have speed limits. If you can't make it GO... make it SHINY |
Posted By: modirt
Date Posted: 17 Sep 2025 at 3:14pm
|
Together again........  Now sporing a new 90 amp one wire Powermaster Alternator from Summit Racing. Looks to be charging! 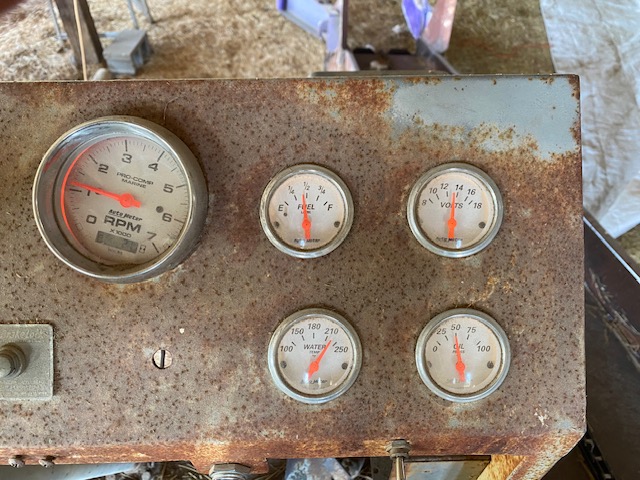 Once that bolt came out, it was clear sailing. Having said that, this turned into bigger project than I expected. In no particular order....... 1. Upgraded battery cables to #4....upgrade charging wire to #6.....hot and ground. 2. Installed new alternator, which required specific alternator brackets to match old cast iron water pump. Those took some looking to find. Also....now running on two new fan belts. 3. New double roller timing chain and timing chain cover. Found and installed an oil slinger on crankshaft behind the big pulley. It was missing the slinger when I pulled it apart. 4. Pulled oil pan to clean out the sludge. So all new gaskets, front and back. 5. Installed new dip stick tupe into the block (that wasn't easy). As near as I can tell, it's half inch or so longer than the old, and came with the extra long dip stick needed for this jumbo sized oil pan. So using the shorter dip stick tube that was on the engine, I may have been running half a quart to quart low all along. That's not good. 5. Pulled and rotated distributor to get it in synch with timing marks.....then swapped out all the plug wires to match correct firing order. (Distributor had been installed backwards, so instead of fixing it, they swapped plug wires to match). 6. Found a harmonic balancer to get crankshaft to Top Dead Center for #1 cylinder, then installed the big 4 pulley replacement, and put timing marks on it (there were none). All that thru the timing off, but she did start....but ran ruff. Trial and error got her running great........needs to be fine tuned with timing light or vacuum gauge. 7. New crosses for U-joint that runs hydraulics. 8. Swapped engine temp sensor from water pump to correct position on top of engine block, so reads correctly. 9. Hard to tell from photos, but also painted all those parts. Paint job marred by all the sealant and anti-seize smeared all over everything. 10. Removed old insulation around fuel line from pump to carb. Replaced it with an aluminum / glass heat shield fabric tube. Old insulation was burnt off where it ran too close to the exhaust manifolds, so bent it a bit to give it some space. That may have been hot enough to have caused it to vapor lock and not start when hot. The water pump and timing gear bolts all new Grade 8. If they ended in the engine block in coolant, they got thread sealer, plus anti-seize on the shaft of the bolt. Bolts in oil were short, they got thread sealant. Bolts in dead ends in the block all got anti-seize. next guy won't have as much trouble pulling it apart as I did. Anyway, as noted, cranked it a bit and she started........then once I got the timing right, she ran good. I'd say she purred, but with a pair of cherry bomb glass packs for mufflers, that is more of a deep throated rumble. Long hard road and painful lessons learned, but learned a lot and added to my tool stash.........by a lot. Hope the juice I get was worth the squeeze!
|
Posted By: modirt
Date Posted: 17 Sep 2025 at 4:35pm
|
Bolt circled in green was the culprit that started all the trouble. It runs thru tensioning bracket, mounting bracket, cast iron water pump, aluminum timing cover, then into threads in cast block, but also terminates with end exposed to engine coolant. Bolt circled in red ends in a blind pocket in the engine block. It is the main support for the alternator. When tightening belts, tendency may be to loosen the problem child bolt too, but if you do, that would break the seal on the thread sealant......maybe now a leak. One just has to remember to never, ever touch that bolt. The bolt in red and tightning screw on the alternator......and nothing else.  |
Posted By: Les Kerf
Date Posted: 17 Sep 2025 at 5:13pm
|
Thank you for the excellent documentation and follow-up |
Posted By: Lars(wi)
Date Posted: 18 Sep 2025 at 9:40am
|
Keep on eye on that alternator, the belt appears to ‘riding high’, the pulley may be too narrow. The top of the belt should be level with the top of the pulley grove. ------------- I tried to follow the science, but it was not there. I then followed the money, and that’s where I found the science. |
Posted By: TedN
Date Posted: 18 Sep 2025 at 10:31am
|
That looks much better than it did in your youtube video. Did you get your steering figured out, or decide that's another project for another day? Whoever did the tension bracket to the frame setup that it had probably came to the same stuck bolt that you did and tried to cut corners. It isn't always easy to do a job properly, but it is a good feeling to know it is right when you are done. Ted ------------- 190XTD seriesIII, 190XTD seriesI, maroon belly 7000, 7045, 190XTD series??? project(or maybe parts) |
Posted By: DiyDave
Date Posted: 18 Sep 2025 at 3:56pm
X2 on the high riding belt. Looks like a B belt in an A pulley... ------------- Source: Babylon Bee. Sponsored by BRAWNDO, its got what you need! |
Posted By: modirt
Date Posted: 18 Sep 2025 at 7:03pm
|
The belt is riding high on the 3/8" pulleys on the alternator. The other two.....water pump and lower crank pulley's are 1/2". The ride flush on those two. So not matched. Lessor of two evils seemed to be to let belts ride high on alternator. The older AC Delco was done the same way and belts didn't cause the problems. At worst, belts may wear faster. Option B would be to try to replace pulleys on alternator. Instructions that came with it had some dire warnings about that. So for now, have left it as is.
|
Posted By: modirt
Date Posted: 18 Sep 2025 at 7:17pm
As near as I can tell, someone put a sleeve on the steer cylinder shaft as a hard stop to prevent it from going any further. I cannot understand why.......unless cylinder is also mismatched and seal in the middle is not centered. Have hit a few new snags, but once all that is sorted, plan is to run it about 15 miles to same welding / fabrication shop that had the PTO crosses and they are going to do some welding on it for me. They also work on hydraulics, so will pull cylinder off to have a look. On the old alternator had a guy look at it and not only was all else wrong, but they wired it wrong. They got a lot wrong with that one. That and several other fixes.....non fixes......and patch it up to keep going. I have left all the baling wire they had hanging on it. Not sure if that was from some busted bales, or busted bales for the baling wire to make fixes with. To date, have found no chewing gum.
|
Posted By: PaulB
Date Posted: 18 Sep 2025 at 7:17pm
|
The Brillman Co. offer a wide assortment of different pulleys for alternators. There one that I use often that will work for B & C belts that is a small OD to spin the alternator faster at slower engine speeds. http://www.brillman.com" rel="nofollow - www.brillman.com ------------- If it was fun to pull in LOW gear, I could have a John Deere. Real pullers don't have speed limits. If you can't make it GO... make it SHINY |
Posted By: modirt
Date Posted: 19 Sep 2025 at 7:51am
|
That is a really good resource I wasn't aware of. This one might work........ https://brillman.com/product/alternatorgenerator-2-groove-pulley-12-belt-width-x-2-1316-od-x-17mm/" rel="nofollow - https://brillman.com/product/alternatorgenerator-2-groove-pulley-12-belt-width-x-2-1316-od-x-17mm/ That assumes 17mm is same as 0.625 diameter shaft on alternator. The math isn't exact, but close. Frustrating that they have to mix apples and oranges (SAE and metric) to to make it more confusing. Past that........the plot thickens........meaning my education on all this continues. This from Powermaster (whose material is both excellent and abysmal)......... https://www.powermastermotorsports.com/power_pulleys_a.html" rel="nofollow - https://www.powermastermotorsports.com/power_pulleys_a.html Edit: Measured and it's 6.25" / 2.65 = 2.358 (better than I feared, but still not good) I'll have to measure, but my guess is OD of big pulley is no more than 5 inches.....turning a pulley of about 2 3/4"......so ratio is not much more than 2:1. At engine RPM of 1,000 fast idle speed, even this high amp alternator is not putting out much juice. Even in use in the field, engine rarely exceeds 2,000 RPM's. Documentation that came with alternator shows it tested to 65 amps at idle speed, but that was with 3:1 ratio. At my idle speed, may not be doing much at all. So a lot of this then goes to operation. If working at night and are moving from field to barn.......and back........best let the engine rev......(do not shift up)......to get RPM's to 2,500 or more for as long as you can. Alternator really isn't doing much unless you do. All part of the puzzle.
|
Posted By: modirt
Date Posted: 19 Sep 2025 at 8:58am
|
Just got off phone with Powermaster tech support. Long story short, belts as now configured are good to go. As per those guys, they don't have a 1/2" groove pulley for this alternator. Running high on those grooves at low speed not going to hurt anything. Pulley has OD of 2.65", so is faster than what I can replace it with, which BTW, the pulley is held on by some strange screw setup......maybe along the lines of a tamper proof setup. Not the nut and torque wrench change over some show to use. Best leave it alone. Alternator kicks in at around 1,800 RPM alternator shaft speed, and comes up to rated speed at around 2,400 RPM, which at my fast idle speed ** will be around 2,400 RPM. Most transit and field work way above that, so should be OK. ** - Fast idle needed when unloading at the barn. Needed to turn the hydraulic pump to get drag chains moving, and is also needed to keep the radiator fan (runs on hydraulic motor) spinning fast to keep cooling system working. Those all speed up and slow down with engine speed. 1,000 RPM is about right.
|
Posted By: PaulB
Date Posted: 19 Sep 2025 at 10:08am
|
Be aware that if the belts are not down in the groove where the top of the belt is flush with the pully, you are effectively running a larger diameter pulley. Measure what you get for the OD of the belts around you alternator pulley. Do you have a mechanical tachometer that you can actually measure the alternator RPM ? ------------- If it was fun to pull in LOW gear, I could have a John Deere. Real pullers don't have speed limits. If you can't make it GO... make it SHINY |
Posted By: modirt
Date Posted: 19 Sep 2025 at 10:29am
|
Good call.....it may be sitting 1/8" or so proud, so maybe 2 3/4" plus effective diameter of pulley. The one from Brillman better than that, and 1/2" to boot. If I can figure out what "special tools" are needed to make the swap. No.....do not have a shaft RPM. Just tach on the engine. But do have an electric meter, so may be able to measure voltages and amps when running to see what I got.
|
Posted By: steve(ill)
Date Posted: 19 Sep 2025 at 1:09pm
|
alternator output is not linear.. Generator output is relative to SPEED... Alternator might take some RPM to kick in, but after that the output is a curve.. running half speed might get you 75% output..( 1200 engine rpm, 2500 rpm alternator).. they are all a little different, but the main advantage of an alternator is good amp output at lower rpm as compared to a generator. .... once an alternator goes above 3000 rpm the output starts to go flat... ------------- Like them all, but love the "B"s. |
Posted By: iowallis
Date Posted: 19 Sep 2025 at 3:17pm
And make things simple?? I have done repair work on late 1970s to late 1980s vehicles that are mish-mash of metric and SAE bolts/nuts. There was one manufacture (Chevy?) that 2 out of the 3 starter bolts were metric and the other SAE. Then the Ford 5.4 oil filter, supposedly the engines built in Windsor Canada has SAE threads on the filter and the engine built in Romeo MI (USA) has metric threads. Sound like you are making much progress on this project, might as well go all the way and restore it to its original, as sold when new, glory.
|
Posted By: Les Kerf
Date Posted: 19 Sep 2025 at 9:09pm
It will be just fine. Install a voltmeter if you are concerned (a voltmeter tells you far more than does an ammeter).
|
Posted By: modirt
Date Posted: 20 Sep 2025 at 7:25am
|
When this thing showed up on my doorstep, don't think any gauges were working (along with a lot of other stuff). One of first things I did to start rehab was to install full set of new gauges. Could not stand operating blind.
Might work OK for a lawnmower, but not a big piece of equipment like
this. Hardest part was to find a tachometer.....with hour meter. Those
are not cheap!! All gauges are Auto Meter.......which offers good quality gauges for automotive and marine use. Watching the volt meter work was how I concluded changes had to be made.  |
Posted By: modirt
Date Posted: 20 Sep 2025 at 7:29am
| As for rest of rehab, once engine is running again with no issues, plan it is to drive it to local welding/fabrication shop for a few welding projects, then start working on getting it painted. Not the full deal, but the visible sheet metal. 50 to 60 years of sitting outside in the weather takes it's toll. |
Posted By: Les Kerf
Date Posted: 20 Sep 2025 at 8:09am
Was this photo taken while running the new alternator? I like to check the voltage with my Fluke 88 meter to verify the calibration of the dash gauge; a full 14 Volts makes me happy
|