7000 Series Fuel Sending Unit Adjustment
Printed From: Unofficial Allis
Category: Allis Chalmers
Forum Name: Farm Equipment
Forum Description: everything about Allis-Chalmers farm equipment
URL: https://www.allischalmers.com/forum/forum_posts.asp?TID=206546
Printed Date: 07 Nov 2025 at 7:13am
Software Version: Web Wiz Forums 11.10 - http://www.webwizforums.com
Topic: 7000 Series Fuel Sending Unit Adjustment
Posted By: calico190xt68
Subject: 7000 Series Fuel Sending Unit Adjustment
Date Posted: 02 May 2025 at 12:32pm
|
My new fuel gauge isn't registering properly. I have a new fuel gauge and what looks to be a fairly new Fuel Sending Unit. I have done a test where I hooked the + and - and sending wire to the guage and directly wired with test leads to the sending Unit. I can move the sending Unit Float up and down it will move the needle from below empty to almost Full. So everything works. I bought the gauge from Agco but it appears to be a chinese knockoff that everyone sells. I don't know the history of the sending unit but it looks pretty new although I have owned the tractor about 5 years so predates me owning. It is not original though. The problem is that when the sending unit is in the tank, it won't register empty at all. The needle won't move when the key is turned on and "full" registers only about 5/8 tank. I don't mind full not being full, but I would really like empty to be on the mark. When I see empty now, it seems it really has 1/4 of a tank. I see there are two adjustments. One the entire sensor arm can slide up and down the steel channel. The other adjustment is that the float can be moved up or down the steel rod. My thought is that I should lower the float to the bottom of the steel rod and that the entire sensor should be also at the bottom. This should cause the float to work when empty but it does not. Is there another adjustment that I need to make? The float is plastic so I think it works but maybe not? I could put it in a bucket of water and see what happens. I suppose a different float could help? There are two metal clips that can be taken off to add a different float? Anybody calibrated one of these? I don't think this is a electrical resistance issue but rather a float issue but maybe I am wrong? Any guidance is appreciated! Here is the sending unit: 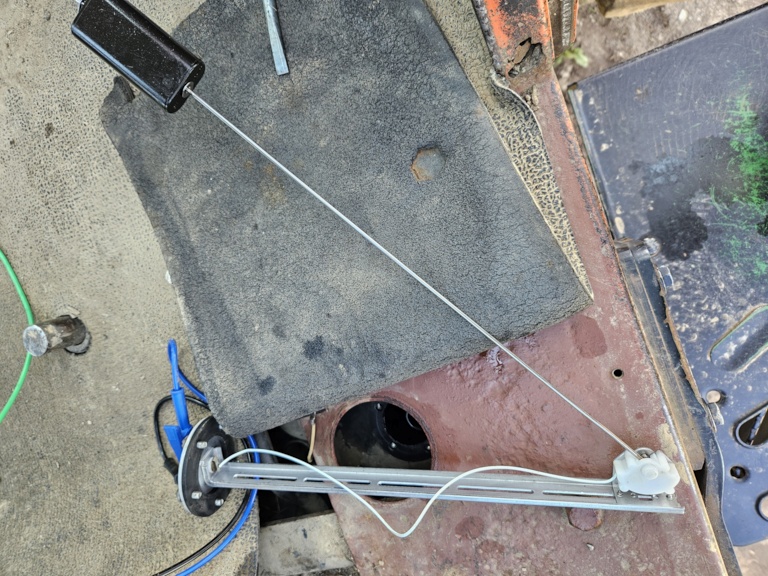 ------------- 80 7010, 80 7020. 67 190XTD Series I w/500 Loader, AC 2000 Plow, Member Indiana A-C Partners, Member TAC |
Replies:
Posted By: Alvin M
Date Posted: 02 May 2025 at 2:48pm
| Make sure you have a good ground wire from sending unit mounting screw to the tank And the sending unit float must face front |
Posted By: injpumpEd
Date Posted: 02 May 2025 at 3:30pm
|
not sure if this applies here, but some fuel gauges and sending units work in different ohm ranges. Maybe the new gauge is not compatible with your sending unit's ohm range. ------------- 210 "too hot to farm" puller, part of the "insane pumpkin posse". Owner of Guenther Heritage Diesel, specializing in fuel injection systems on heritage era tractors. stock rebuilds to all out pullers! |
Posted By: Stan R
Date Posted: 02 May 2025 at 4:05pm
| Faulty resistor- Shorts out when submerged in liquid????? |
Posted By: calico190xt68
Date Posted: 03 May 2025 at 8:47am
|
This is a long sordid tale but the details matter to me. I have gotten a solution to work on the empty end. The lack of accuracy on empty and full is a combination of factors. First, the rail that holds the sensor is too short to read empty correctly. I cut the rail about 1/3 from the end and spliced an aluminum flat stock piece to lower the sensor. The limiting factor on lowering it is the wire length. They give you some play so I lowered until I ran out of wire. After doing this, when turning on the key, the gauge read below empty but at least the needle moved when the key was on. Prior to lowering, the needle didn't move with key on. The next thing I did was put a slight bend into the steel rod attached to the float. After doing research, you don't want to bend the rod any more than necessary. If you do, then your full reading will not be correct. However, if I lowered the sensor anymore, I would have had to splice the wire. This bend now got my needle to hit the empty mark on the gauge when key turned on. I don't know exactly how much fuel I had in the tank because the old gauge didn't work. I dipped a rod into the tank from the fuel sending hole and I had about 2 inches of fuel. So, I am guessing I had about 5 gallons of fuel but I could have 6 or 7 gallons. I just don't know without draining the tank. This wouldn't really be empty but better than having a 1/4 of tank under the previous empty reading. I believe the tanks hold about 68 gallons. I then proceeded to put about 30 gallons of fuel into the tank. This put my gauge at 5/8 of a tank. If I had about 5-7 gallons to begin with and I added 30 then over half would be correct although 5/8 is probably a little on the high side. Close enough though for my desire to get a better empty and half reading. Those are critical for knowing when I need more fuel. If you read my beginning post, I did a test with the sending unit out of the tank and hooked up to the gauge with test wires thereby eliminating all of the tractor wires and ground wire issues. On my test, empty took the movement of the float quite a while before it registered anything on the gauge. Also, full never caused the gauge needle to achieve making it to the absolute full mark. So, once I put another 25 gallons in the tank, the needle did the same thing. Never hit the absolute full mark on the gauge. So, I believe the resistance of the sensor does not match the requirements of the gauge. Otherwise, absolute full should hit the full needle mark when done outside of the tank. According to the Fuel Gauge Ohm readings specs included in the box, 10 Ohms is Empty and 88 Ohms is Full. The gauge is not getting 88 Ohms when the float shows full is my guess. I might need to add a resistor in the 2-10 Ohm range to get that needle to get to Full. This same resistor might cause my empty to be a better reading. If empty only needs 10 Ohms, it couldn't be more than 2-5 Ohms. I can test this theory by measuring the resistance with a multimeter as the float moves through the range. I ran out of time to do this. Now that the fuel is completely full, I will have to take the sending unit out of the tank and do the resistance measurement. I may have to "bend" back the float arm to original position, if I get the ohms targeted correctly. Also, "Full" may never be correct since I lowered the sensor. This means it will achieve full, long before it is full. I also tested my readings using the test jumpers and the tractor wire and both agreed so I know the tractor wiring is good. I don't know if my sending unit is different than another sending unit. It is possible that my sensor would not have the same readings from the same manufacturer at the various levels in the tank. I tend to think there is only one manufacturer of the sending units being sold by all of the various dealers so they should be similar. If the original sending unit is still in the tank, my guess is that it would not work with these new gauges. To keep both empty and full to be correct, I think adjusting the ohms with a resistor is probably more correct instead of cutting the rail and extending. I can always try this once I get the resistance amount figured out. I have spent way too much time on this and I am not done! This all started because I had to remove the shields to fix the clutch cable which exposed the gauges! Good news is I think my documentation trail will help anyone else trying to fix the fuel gauge and sending units. If I get resistors to fix this, I will post what size and where I got them. By the way, this is a combination Temp/Fuel gauge. I will have another post on the Temp Gauge findings coming too. While the fuel gauge is something I wanted to fix, I really wanted to fix the Temp Gauge before I fixed the Fuel Gauge. Baling hay in the summer time causes the engine to get quite hot and a critical engine function. You can run out of fuel and cause no problems, but an overheated engine is a major engine issue. More to come there. ------------- 80 7010, 80 7020. 67 190XTD Series I w/500 Loader, AC 2000 Plow, Member Indiana A-C Partners, Member TAC |
Posted By: calico190xt68
Date Posted: 05 May 2025 at 3:31pm
|
I put a 10 ohm resistor in place and it caused the needle to hit Full as I suspected. I won't know what that 10 ohm resistor does to the Empty needle though for awhile. Going to put it into a place where I can easily change it out, if it negatively impacts Empty. So, the correct fix is to definitely use a resistor to tune the needle. Here is what I used and got it on Amazon for about $6.00. 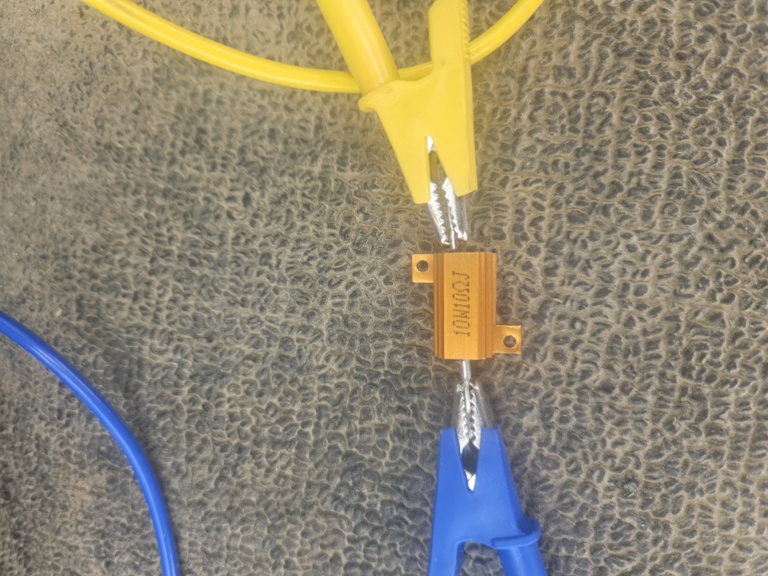 ------------- 80 7010, 80 7020. 67 190XTD Series I w/500 Loader, AC 2000 Plow, Member Indiana A-C Partners, Member TAC |
Posted By: Stan R
Date Posted: 05 May 2025 at 6:11pm
|
Maybe buy a variable resistor so you can ""dial it in"", then measure what works and buy a resistor??? |
Posted By: calico190xt68
Date Posted: 05 May 2025 at 8:58pm
|
I did as you suggested to figure out the 10 ohm setting. I bought a variable resistor on amazon for about $18 that I used to test out various settings. I wished I had it when the tank was empty. I will get another chance to try it out on another tractor. I have about 3 tractors to fix up the fuel gauge on. Thanks for your reply. 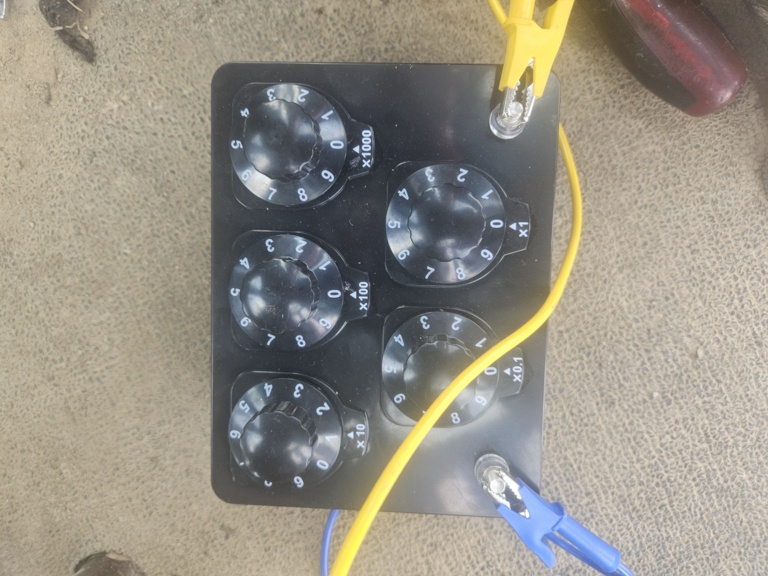 ------------- 80 7010, 80 7020. 67 190XTD Series I w/500 Loader, AC 2000 Plow, Member Indiana A-C Partners, Member TAC |
Posted By: JC-WI
Date Posted: 06 May 2025 at 2:33am
|
Was there a paper with the float assembly? It would tell you how to set the adjustments for depth in tank. I had bought a gauge assembly kit from NAPA to put in a 170, and if remember correctly it was 240 ohms when the float was at the bottom and 33 ohms when float was at the top. I did not allow the float to contact the bottom of the tank and set the float to be near the top, but not to rub there either. and I didn't change the gauge at the time. Fast forward, 15 years later the sender quit working again and bought new kit and put sender and gauge in. set it up like the other but... it only register 3/4 full when full and when the needle goes past the empty mark, I have about 2" in the bottom. I can live with that. I was surprised when I looked in the 7000 brochure and seen the 7000 has only a 37 gallon tank, specially when the 200 had 48 gallon tank. Why the decrease, specially when they jumped the hp up a few extra. Don't know if the 7010 has the same tank as the 7000, but wondered if a 7020 tank would fit in there. LOL ------------- He who says there is no evil has already deceived himself The truth is the truth, sugar coated or not. Trawler II says, "Remember that." |
Posted By: calico190xt68
Date Posted: 06 May 2025 at 7:25am
|
There is a paper but it doesn't suggest the depth setting. It simply has the ohm ratings for the Temp Gauge and the Fuel Gauge. Empty=10 Ohms, 1/4=22, 1/2=44, 3/4=66, full=88 On the Temp Gauge 100F=350 Ohms, 130F=100 Ohms, 180F=75.7 Ohms, 230F=61.5 Ohms and 250F=47.3 Ohms. I don't know if my float is contacting the bottom but it didn't register any ohms until it moved about an inch with my gauge. 68 Gallons is what the 7010 holds. I have about 60+ gallons in now. It could be a month before I run it down to empty again, once hay season gets in full swing. If Empty, ends up not being Empty with the new resistor, I will bend the rod back to straight as a first adjustment. The Gauge came from Agco but it looks to be the same for all resellers. I think there is only one supplier at this time for the temp/fuel gauge. I don't want to empty 68 gallons to figure out the needle Empty at this time. It may be a month before I get this tuned correctly. ------------- 80 7010, 80 7020. 67 190XTD Series I w/500 Loader, AC 2000 Plow, Member Indiana A-C Partners, Member TAC |
Posted By: SteveM C/IL
Date Posted: 06 May 2025 at 9:52am
| Can't you measure the depth of tank at gauge and mock up something to give you the two planes of the tank (top-bottom) to figure travel/position? |
Posted By: JC-WI
Date Posted: 06 May 2025 at 10:11am
|
Can't find my 7010 literature at this moment, but the 7020 and on
up shows a 51 gallon fuel tank and an optional 13 gallon auxiliary tank
to make 64 gallon capacity... the 7080 shows it has 64 gallon capacity
right from factory and no aux. fuel tank for it. Did it come with the
aux. as standard equip or did it have just 1 large 64 gal. tank? Your 7010, does it have just one 68 gallon capacity tank, or do you have the auxiliary tank too? Looks like AC must have changed their ohms on the gauges on the the newer 7xxx machines when they stopped making the 3 number series models. thanks ------------- He who says there is no evil has already deceived himself The truth is the truth, sugar coated or not. Trawler II says, "Remember that." |
Posted By: DrAllis
Date Posted: 06 May 2025 at 10:45am
| 7010 came with 51 gallon large/left side fuel tank and standard equipment. That is what capacity it was advertised at. It may have held more, but 51 is what they called it. The OPTIONAL 13 gallon capacity right side fuel tank was usually on those tractors. So, that is a total of 64 gallons rated capacity. I could really give a rip about the gauges accuracy as long as I know when it's time to head to the house to refuel. |
Posted By: calico190xt68
Date Posted: 06 May 2025 at 11:52am
|
Yes, I think I could have mocked up something. Good idea that I should have thought about. ------------- 80 7010, 80 7020. 67 190XTD Series I w/500 Loader, AC 2000 Plow, Member Indiana A-C Partners, Member TAC |
Posted By: calico190xt68
Date Posted: 06 May 2025 at 11:56am
|
I do have the auxiliary tank. I got 68 and 64 mixed up along the way so thanks for correcting on that. I agree, I really wanted to make sure empty was correct. However, I got into this project and decided to try and finish it with empty and full as right as possible.:-) ------------- 80 7010, 80 7020. 67 190XTD Series I w/500 Loader, AC 2000 Plow, Member Indiana A-C Partners, Member TAC |