Replacing CA Water Pump
Printed From: Unofficial Allis
Category: Allis Chalmers
Forum Name: Farm Equipment
Forum Description: everything about Allis-Chalmers farm equipment
URL: https://www.allischalmers.com/forum/forum_posts.asp?TID=201573
Printed Date: 02 Apr 2026 at 9:03pm
Software Version: Web Wiz Forums 11.10 - http://www.webwizforums.com
Topic: Replacing CA Water Pump
Posted By: 1955CA
Subject: Replacing CA Water Pump
Date Posted: 30 May 2024 at 4:53pm
|
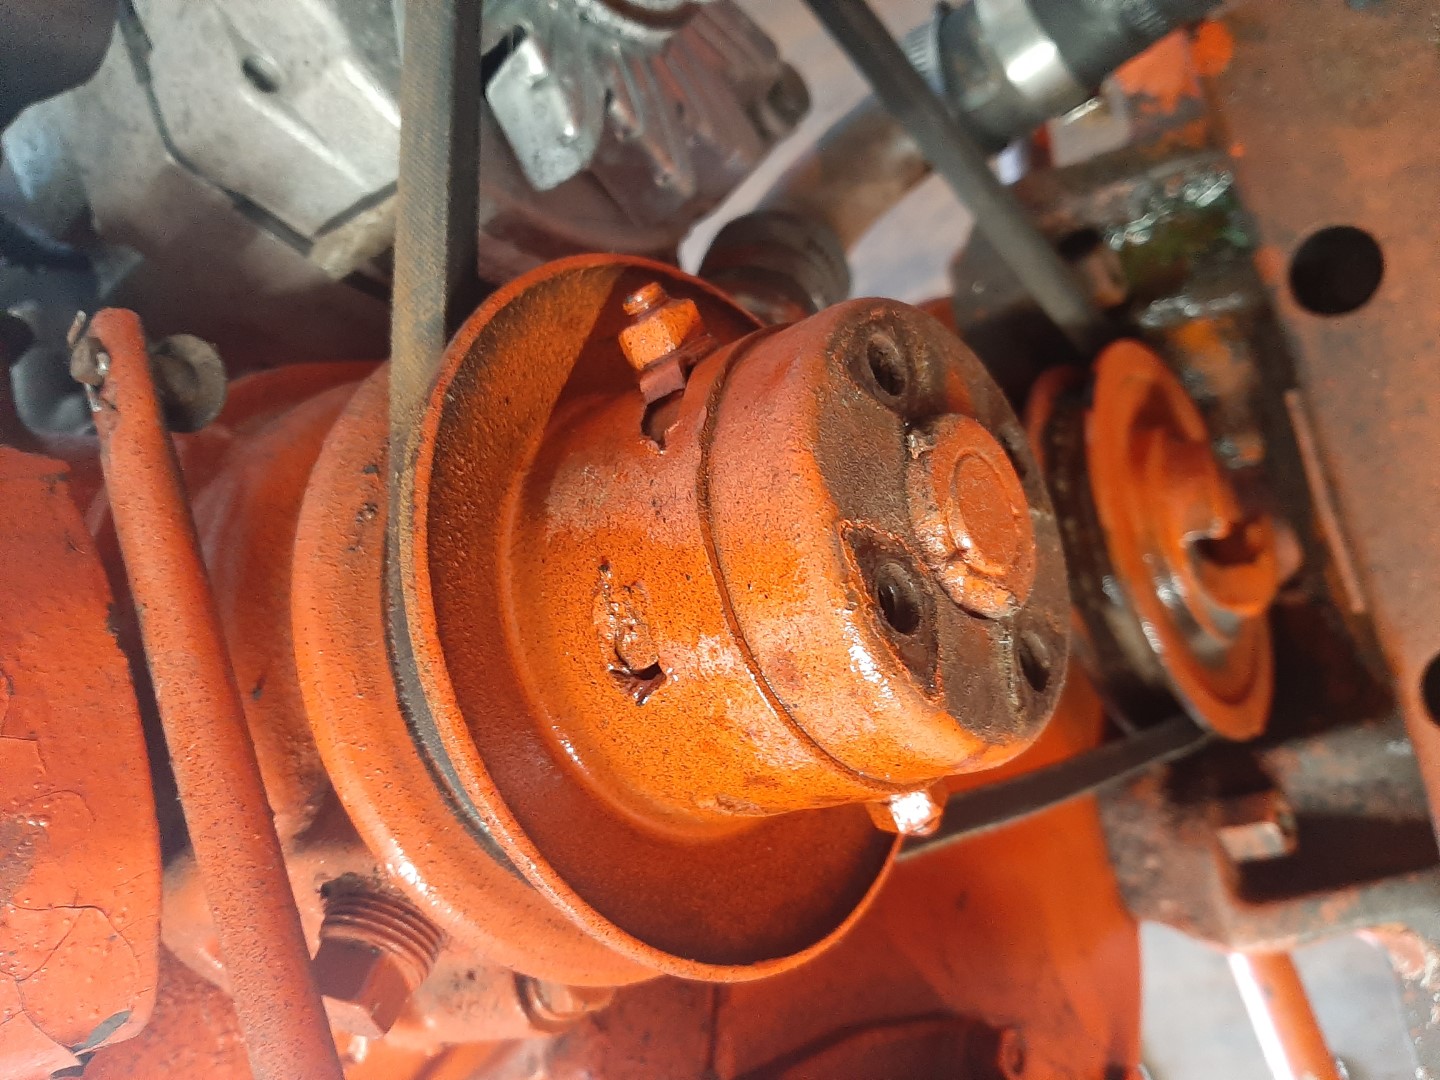
Hello everyone. First time I've been on here in a while. And first time finally got some time to work on my 55 CA again. I got a new water pump from Steve@B&B and I got the tins stripped off, rad out, everything good so far. But before I go any further and screw anything up, how do I get this pulley off the water pump? Do I have to remove those nuts? I have never seen one like this before. I'd like too try and get this done tonight. And what are torque specs for the water pump bolts? Thanks, Shawn.
 |
Replies:
Posted By: steve(ill)
Date Posted: 30 May 2024 at 5:24pm
|
the 4 fan bolts hold the pulley on... those nuts are to adjust the pulley width... Just tap on the pulley side to side... paint and rust are holding it on..
if you have a belt adjuster on your generator / alternator, then those nuts on the pulley adjuster do not need to be operational.. ------------- Like them all, but love the "B"s. |
Posted By: PaulB
Date Posted: 30 May 2024 at 6:21pm
|
#1 get the pulley loose on the hub. #2 hold hub and turn pulley 1/8 turn. That will allow the bolt heads to pass the divots in the hub. After the pulley is off, you can remove the bolts and get the 2 halves of the pulley separated from each other and get them to spin when together to allow fanbelt adjustment like it was meant to do.
------------- If it was fun to pull in LOW gear, I could have a John Deere. Real pullers don't have speed limits. If you can't make it GO... make it SHINY |
Posted By: 1955CA
Date Posted: 30 May 2024 at 6:22pm
|
Oh okay. So do I need to loosen the nuts before I try and knock it off? Turns out water pump is okay. It's the thermostat housing gasket that was leaking, but no way to see it until I pulled it all apart.
But going to replace everything at this point. |
Posted By: dfwallis
Date Posted: 30 May 2024 at 6:34pm
The generator bracket has VERY limited range. I found that it was necessary to "fix" the water pump adjustment because someone had put a 1/2" belt on and I wanted to go back to 5/8". If not changing the belt characteristics, probably ok. ------------- 1952 CA13092 |
") steve(ill) wrote:
steve(ill) wrote:Posted By: 1955CA
Date Posted: 30 May 2024 at 6:36pm
Mine is already converted to 12 volt with an alternator and I have adjustment there too.
|
Posted By: 1955CA
Date Posted: 30 May 2024 at 6:38pm
|
I'm just hoping I get it off without damaging the pulley. Need to get this thing to the parade on July first.
|
Posted By: 1955CA
Date Posted: 30 May 2024 at 8:17pm
|
Everything came apart and cleaned up perfect! Now what's everyone's opinion....RTV silicone on gasket surfaces with the new gaskets or no? EDIT: got ahold of two of my Cat mechanics and they said gasket only.
|
Posted By: WF owner
Date Posted: 31 May 2024 at 6:31am
| I, personally, like a very little good old Indian head Shellac on one side of the gasket. It also helps hold things in place when assembling. |
Posted By: Les Kerf
Date Posted: 31 May 2024 at 8:13am
|
As a youngster back in 1960's I watched my Dad smear Permatex #2 Aviation gasket sealer all over everything; nothing ever leaked. As a teenager in high school shop class my shop teacher told us that if everything is properly clean you don't need any type of gasket sealer and will never have any leaks. I then embarked on a mission for several years to clean everything properly and never have any leaks. I failed. Now, as I am instructing my 13-year old grandson how to properly smear Permatex #2 Aviation gasket sealer all over everything, I tell him "Some day, you are going to think unkind thoughts about me for doing this, but it won't leak during my lifetime".
 |
Posted By: dfwallis
Date Posted: 31 May 2024 at 11:48am
|
I don't think it necessary with a new gasket and clean mating surfaces but I usually use permatex red (partly for color matching) sparingly on most gaskets. On the oil pan gasket (cork) I only applied it to the top cover as it was extremely difficult to get the gasket to align properly without first fixing it in place to the cover. No leaks at the bottom...yet...When I was a youngster I used the permatex brown tarry stuff (#1 rosin) on everything.
------------- 1952 CA13092 |
Posted By: 1955CA
Date Posted: 31 May 2024 at 9:27pm
|
So far so good. Had it out running. No more coolant leak and got the Pertronix ignition installed. Only bad thing is now I think I have a valve issue, hopefully just clearance. I'll have to pull valve cover. It was popping before. You can here it in air intake breather. I was hoping it just needed a tune up, but still doing it with the electronic ignition. Any specific things I should look at or test? It starts perfect, but popping increases with RPM
|
Posted By: Ted J
Date Posted: 03 Jun 2024 at 2:32am
|
I have no idea Shawn, but if you don't get an answer soon, start a new thread with the popping sound. ------------- "Allis-Express" 19?? WC / 1941 C / 1952 CA / 1956 WD45 / 1957 WD45 / 1958 D-17 |
Posted By: 1955CA
Date Posted: 03 Jun 2024 at 7:31am
Sure thing Ted. But not sure if I'll have time to look at it this week. I'm going to look at my manuals I have for it and see if they have the specs for the rocker arm clearances and timing and I'll start there. First thing I'll do is pull the valve cover and run it and see if there is a valve not moving or moving slower than the others. Hopefully it's nothing major. Was really looking forward to taking it to the big tractor ride July first this year along with my Ford.
|
Posted By: Les Kerf
Date Posted: 03 Jun 2024 at 10:44am
|
I recently pulled the valve cover on my Model C to replace the leaking Welsh plugs; just before closing it back up my sharp-eyed 13 year old Grandson said "That valve looks crooked". Yup, the #4 exhaust valve spring was broken and sitting cattywampus. |