Possible broken drive axle D grader
Printed From: Unofficial Allis
Category: Allis Chalmers
Forum Name: Construction and other equipment
Forum Description: everything else with orange (or yellow) paint
URL: https://www.allischalmers.com/forum/forum_posts.asp?TID=198548
Printed Date: 27 Mar 2026 at 5:55am
Software Version: Web Wiz Forums 11.10 - http://www.webwizforums.com
Topic: Possible broken drive axle D grader
Posted By: LangdonStevenson
Subject: Possible broken drive axle D grader
Date Posted: 05 Dec 2023 at 7:11am
|
While running my D model grader last week cutting in a drainage ditch beside a private road I bogged it down with too deep a cut. Before I dropped the clutch though there was a dull thump from down low in the machine. I also stalled it at that moment and was subsequently distracted by a coincidentally broken starter cable. When I got it running again I discovered that the right hand tandems were not driving - but the left side still is. [Edit] I checked the right hand chain box and both chains are intact, so the problem is definitely not chains. Having had a look at the diagram for the rear axle assemblymy conclusion is that the right hand drive shaft must have broken.  I have found a replacement (new apparently) driveshaft with seals and bearings for $2,000 delivered. I think that is a reasonable investment to keep the machine operational as I have a lot of work to do with it and it's working well since the hydraulic rams were rebuilt. Has anyone ever replaced a drive shaft in a D/DD grader? From the service manual it doesn't look like a difficult task and I can probably do it without even removing the rear axle assembly. Any thoughts and experience welcomed. Langdon
|
Replies:
Posted By: Mikez
Date Posted: 05 Dec 2023 at 9:11am
| I’m curious Do you have part number |
Posted By: PaulB
Date Posted: 05 Dec 2023 at 11:20am
|
Before you sink a bunch into an expensive part you may not need, have you checked to see if a chain broke in the lower case? ------------- If it was fun to pull in LOW gear, I could have a John Deere. Real pullers don't have speed limits. If you can't make it GO... make it SHINY |
Posted By: steve(ill)
Date Posted: 05 Dec 2023 at 12:28pm
|
chain ties the two wheels together.... If it broke, the DRIVE wheel would still be turning ?? ------------- Like them all, but love the "B"s. |
Posted By: Coke-in-MN
Date Posted: 05 Dec 2023 at 12:59pm
|
The guess of what might be wrong can be costly , The exploration to find the problem is well worth the time to find the actual problem . ------------- Life lesson: If you’re being chased by a lion, you’re on a horse, to the left of you is a giraffe and on the right is a unicorn, what do you do? You stop drinking and get off the carousel. |
Posted By: LangdonStevenson
Date Posted: 05 Dec 2023 at 3:52pm
|
Hi Paul and Steve, I should have mentioned in my original post that I checked the chains and they are both fine, so the problem has to be (as far as I can see) between the drive sprocket in the right hand tandem/chain box and the bevel gear in the axle housing, which also drives the left side which still has power.
|
Posted By: LangdonStevenson
Date Posted: 05 Dec 2023 at 3:59pm
|
Hi Mike, No I don't have a part number sorry. I bought the service manual, but not the parts manual. It would be easy enough to get though. Do you have a line on a driveshaft?
|
Posted By: LangdonStevenson
Date Posted: 05 Dec 2023 at 4:05pm
|
Hi Coke, Yes I plan on pulling the right hand axle to confirm that it is in fact broken, but I didn't want to go ahead and do that until I knew that the probable part was available and affordable. Since it is, the next step is to do that investigation and confirm the failure. If I'm right, then I'll take the plunge and order the parts.
|
Posted By: steve(ill)
Date Posted: 05 Dec 2023 at 4:14pm
|
I think your on the right track Landon... Axle shaft is a good possibility.. ALso could have broke the hub or torn splines out of the hub... Good idea to look further at this time. ------------- Like them all, but love the "B"s. |
Posted By: DiyDave
Date Posted: 05 Dec 2023 at 4:20pm
As Steve said, check the splines, these graders have a bit of a history of spline stripping, on the output end of the transmission... ------------- Source: Babylon Bee. Sponsored by BRAWNDO, its got what you need! |
Posted By: LangdonStevenson
Date Posted: 05 Dec 2023 at 4:41pm
| Thank you Steve and Dave, that's good to know. When I pull the shaft I'll know. I'll be very disappointed if the splines on the hub are torn out. That will be a significantly bigger job to fix - if I can get the part. |
Posted By: Ian Beale
Date Posted: 05 Dec 2023 at 5:18pm
|
Just a thought We've found that AC 45 graders have a habit of breaking the welds that attach the chain sprockets to the axles of the wheels. Any chance that could have happened to the sprocket that drives your chain?
|
Posted By: Coke-in-MN
Date Posted: 05 Dec 2023 at 11:26pm
|
Bought my Adams 411 grader cheap as they said clutch was out . When working on it I found one spring was broken but noticed the nut holding the clutch housing hub had play in washer behind nut . Found the splines to drive that clutch housing were worn and housing moved and when it did it released the clutch disc .. Weird setup as engine flywheel drove a shaft that went to clutch housing that acted like a flywheel / clutch unit but a separate unit mounted under cab area . So checked splines and did some welding and grinding to restore worn splines somewhat . Original nut on that shaft replaced with a self locking nut , and no problems since . I did have to go to a spring place and have the spring made as was a different geometry than even they had ever seen (coil spring with tabs like what might be on a door hinge) ------------- Life lesson: If you’re being chased by a lion, you’re on a horse, to the left of you is a giraffe and on the right is a unicorn, what do you do? You stop drinking and get off the carousel. |
Posted By: LangdonStevenson
Date Posted: 09 Dec 2023 at 6:21am
|
Hi Ian, thanks for sharing that. I don't believe that's the problem in my case, but I'll be sure when I start to disassemble. |
Posted By: LangdonStevenson
Date Posted: 03 Jan 2024 at 6:02am
|
I finally got a chance to block the grader up today and investigate the right hand drive shaft. Had to pull the two right hand wheels off, drain the chain box oil, and pull off the side hatch, split the drive chains, then take the drive gears off. All of that went pretty easily thankfully. Even getting the spring clip that retains the outboard bearing out was easy enough. As soon as the chains were off it was clear that the shaft was broken near the chain box end. When it came out (with a little help from a slide hammer) you could see that it had sheared off very cleanly right at the point where the drive shaft had been machined to create a shoulder for the outboard bearing to sit against. The shoulder had created a stress concentrator and it broke from a crack that had started working its way into the shaft from the shoulder. I don’t have any photos currently (as it started pouring rain just as I got the shaft out). I’ll take some tomorrow and post them here. New drive shaft is ordered along with a new outboard bearing and seal. I should have them by next week and hopefully will have the grader running again the following week!
|
Posted By: steve(ill)
Date Posted: 03 Jan 2024 at 8:56am
|
Thanks for the update Langdon... that makes a lot of sense.. and not as bad to repair as it could have been ! ------------- Like them all, but love the "B"s. |
Posted By: LangdonStevenson
Date Posted: 03 Jan 2024 at 1:28pm
|
Hi Steve. Yes I got *very* lucky with this failure. It could have been far worse. If it was the shaft spline then I’d have had a lot more work pulling off the tandem cases, and axle housing. As it is, it should just be a case of sliding in the new shaft. Frankly, cleaning up the tandem cases and getting the chains back on is probably going to be more work! I will say though that I’m disappointed with the shaft design. Not machining in stress concentrators was pretty much “design 101” when I was studying these things. Oh, something else I noticed with I pulled the broken shaft: the castle nut that holds the double sprocket onto the end of the drive shaft was missing its locking wire! Seems the last person to work on this machine just didn’t give a toss. I’m going to have to give it all a good look over at some stage and find what else has been ignored.
|
Posted By: Coke-in-MN
Date Posted: 03 Jan 2024 at 2:13pm
|
I had bought a couple used axles for my HD4 from small repair shop - had 2 failures on those axles - then when I asked the guy about them , he said he had a guy repair them , weld up worn area and turn down to size to fit old seal and bearing . Seems he fixed them to the point that they became brittle at the end next to mounting flange for sprocket , where they ended up breaking each time . Found a axle with just worn seal area , bought a speedy sleeve and proper seal to run with it and no more problems . Sometimes one persons idea of a fix - creates another problem if not done right . Could be reason yours broke , a bad repair the last time with buildup to fix a problem ! ------------- Life lesson: If you’re being chased by a lion, you’re on a horse, to the left of you is a giraffe and on the right is a unicorn, what do you do? You stop drinking and get off the carousel. |
Posted By: LangdonStevenson
Date Posted: 04 Jan 2024 at 3:18am
|
Hi Coke. That would have been disappointing for you. Yes you really need to understand your metallurgy if you are going to do those sorts of repairs, otherwise you just create a new problem down the track. My driveshaft doesn’t look like it was repaired though, as I mentioned above I think it’s just a design flaw. The shoulder for locating the bearing creates a stress concentrator and it just snapped clean as at that point. I’ll post some photos.
|
Posted By: LangdonStevenson
Date Posted: 04 Jan 2024 at 4:24am
|
So when I pulled the drive shaft out, this is what I found! On the left of the image is the outboard end of the shaft with the bearing still in position. You can see that it’s a very clean break thankfully. On the right in my hand is the inboard end of the shaft that fits into the gear box bevel gear. The break occurred right on the shoulder that locates the bearing. I’m supposing that the very sharp corner created a stress concentrator that lead to a little crack forming. The last time I ran the machine I was improving an old V ditch and I got the left side chain box hung up the berm of the ditch and the wheels lost contact with the ground, so the all torque of the motor was going through just one shaft - which had this fatal flaw. And then it broke. Anyway, I should have the new shaft next week and assuming the inner bearing is ok I can put it back together. Frankly, cleaning out the years of gunge in the chain boxes is going to be a bigger, nastier job than replacing the drive shaft. I’m seriously considering drilling and tapping a new drain hole in the chain boxes as the one that is in it is about 10mm above the bottom of the box, which isn’t very helpful.  |
Posted By: Codger
Date Posted: 05 Jan 2024 at 6:15am
|
Seen a lot of axles twisted and sheared much as you have experienced in heavy trucks. Mostly from harsh clutch engagement or sudden traction to a slipping wheel such as a hard surface while spinning in gravel. Bouncing is very hard on these things while power is applied also. Does that roller bearing abut against a shoulder on the shaft opposite the break? I too am trying to reason why the bevel on the shaft where it failed unless a circlip of some fashion was to go into a machined groove to retain the bearing? Definitely a stress riser and weak point. From your photo I cannot tell if the shaft in your hand is the long part with the splines, or the shorter broken part outboard? ------------- That's All Folks! |
Posted By: LangdonStevenson
Date Posted: 05 Jan 2024 at 6:28am
|
Hi Codger, Yes I figure that the weight coming off the left hand wheels (even though it wasn't exactly sudden) probably just overloaded the right hand drive shaft. Also my grader (which originally had a petrol motor) has been engine swapped and now has a Cummins diesel which probably makes significantly more torque than the original petrol motor, so the shafts may just be a bit under spec'ed for that motor. Yes the bearing sits against the shoulder - I assume that the shoulder is machined there to prevent the bearing migrating inward (the break occurred on the inboard/gearbox side of the bearing) there is a spring clip that I had to remove on the outboard side of the bearing to retain it in that direction. Yes the part in my hand is the long section with the splined end that slides into the bevel gear in the gearbox.
|
Posted By: Codger
Date Posted: 05 Jan 2024 at 6:51am
|
Thanks for the clarification. Your explanation is how I seen it but have been wrong in the past. Yes, that Cummins engine will have significantly higher torque output than the former engine. Glad you are able to source parts. Definitely worthy of a repair as those machines are handy to keep around. ------------- That's All Folks! |
Posted By: LangdonStevenson
Date Posted: 05 Jan 2024 at 6:59am
|
Coger - yes, definitely worth clarifying. In the future I'm going to be a bit more careful about not pushing it too hard - it is after all only little! Yes I am really lucky that there was a brand new part available on the shelf. And I agree about these small machines. I can do work with it that I couldn't do with a bigger machine and it's cheaper to get it trucked from one site to the next because it's so small. I think that the owner of the farm I'm working on at the moment would buy it off me just to maintain his roads if I offered.
|
Posted By: Codger
Date Posted: 05 Jan 2024 at 7:55am
|
I understand that for certain. Seemingly these older motor graders can be purchased reasonable and if a guy can work on them himself, do quite well. I've never been around them myself nor really operated one where it counts, but an experienced operator can make some nice work on short order; especially ditching and sloping.
------------- That's All Folks! |
Posted By: Coke-in-MN
Date Posted: 05 Jan 2024 at 1:26pm
|
I have a full size grader setting out back Adams 411 - vintage of around 1938/40 or so and with a IN UD-4 4 cylinder gas / diesel power . All mechanical blade system and steering - something i have not used in 20 years - now if someone needs a grader ???? ------------- Life lesson: If you’re being chased by a lion, you’re on a horse, to the left of you is a giraffe and on the right is a unicorn, what do you do? You stop drinking and get off the carousel. |
Posted By: LangdonStevenson
Date Posted: 05 Jan 2024 at 4:05pm
|
Codger - yes they are still very productive machines. Not as comfortable, powerful, and fast as modern machines, but they will get the job done if you let them. Take small bites, repeat. There is literally no other machine that will do the same job. As for price - they are a lot more expensive (still) here in Australia, even for a very tired old junker like my D Model than they are in the US. Mine cost $14,000, but it has paid for itself in a couple of projects. If I get even a couple of years out of it without too many issues then it will have been very profitable to own. The key thing here though is that the machine doesn't do a lot of hours - but having it lets me win jobs that I wouldn't otherwise get that include a *lot* of hours doing other work. The project I'm working on currently will only require a day of grader work probably, but I'll rack up 100+ hours of excavating gravel/clay on site to use on the road that the grader will finish. Without that machine I wouldn't have gotten the job at all, so it's been an excellent investment.
|
Posted By: Codger
Date Posted: 05 Jan 2024 at 5:13pm
That is the same way with my 11-B dozer. I know enough people needing work from a medium sized machine it will pay for itself in just a couple of small jobs. Running near perfect with no mechanical problems I'm aware of it a large bonus of course to start out with. Like you, a medium sized machine is much easier to move than something larger. Though not as productive on a large job, (not my focus) several small bites will get the job done. With no debt or encumbrances on a machine, you can charge less and still operate profitable and productive which on the backside will get you more work. I've only done a couple of small jobs for family for some very poor wages, but I've certainly learned lots as there is no better training than time in the saddle. These basically low paying jobs have garnered other work in the same area for others whom had they not seen me would not have materialized. Nothing like completing one job to throw tires down to cross the street to start the next. Now I just need warm weather.....
------------- That's All Folks! |
Posted By: LangdonStevenson
Date Posted: 07 Jan 2024 at 1:13am
|
Hi Codger - that's a pretty cool dozer. I'm working on rescuing an old D6 8U that's a similar size. I have a lot of work that i could do with a machine like yours. Yeah the transport cost can be a real killer, especially here in Australia where heavy trailers cost a *lot* to register ($14,000 per year for a two axle low loader). Yes - the same thing has happened to me multiple times. I get onto a job then have a neighbour come over and ask if I can do something for them! Love that photo of you walking the dozer over the road. Ha, yes keep that fuel topped up - especially in older machines so you don't pull the crud in the bottom of the tank through!
|
Posted By: TramwayGuy
Date Posted: 07 Jan 2024 at 8:54am
Check the new shaft to make sure there is a radius where the shoulder is. If not, it would pay you to have one machined in it. Stress risers occur without one. |
 LangdonStevenson wrote:
Posted By: DonBC
Date Posted: 07 Jan 2024 at 2:06pm
|
I saw the same problem with the shaft for the mixer of a large mixing tank at a mine in the Yukon. They kept having failures on the output shaft of the worm drive that was rigidly couple to the long mixer shaft. Theoretically the shaft diameters were more than adequate. I got into one of my old design books regarding diameter changes. The rotation of the mixer blades at the bottom of the long mixer shaft produced variable cyclical lateral forces at the end of the shaft. Using a formular from my text and the rotation speed of the shaft it projected almost to the day that the shaft would fail. They made a new shaft with a radius at the shaft diameter change and never had a failure again. ------------- Jack of all trades, master of none |
Posted By: LangdonStevenson
Date Posted: 07 Jan 2024 at 4:31pm
|
TramwayGuy - I have to say that I'm loathed to make any modifications to the new shaft. Given the age of the machine and the amount that I use it, my inclination is just to run it as it is. I have no doubt that it will give me a few years of work - which will be more than enough. There is also the question of: if I fix that flaw where does the stress go to? The answer may well be: to the splines on the inboard end in the bevel gear (which I'm told is another common failure in these machines), which would be a much bigger problem to fix! If I have to choose a failure point then I'd definitely rather it broke at the chain box end like this. Call it "sacrificial"
|
Posted By: LangdonStevenson
Date Posted: 07 Jan 2024 at 6:23pm
|
DonBC - Hurray for math and science! It really does suprise me when simple mistakes like this are made in engineering and design. We understand all of the basic principals involved here - we just have to apply them! |
Posted By: Les Kerf
Date Posted: 08 Jan 2024 at 9:17am
And sometimes the design and engineering is correct but manufacturing gets it wrong. In my last job before retiring I worked in the engineering department of a company that builds industrial rotary encoders. Compared to earth moving equipment, these gadgets are tiny; we started having some field failures of a certain model, the 1/4" diameter shafts were breaking inside the unit right where there was a shoulder for mounting the code wheel. The engineering specs and drawings called for a small radius at this juncture (I forget the exact number) and even specified the part number of the tool to be used for this operation. Whoever it was that set up the CNC machine either didn't read the specs or simply ignored them, because they used the sharpest most pointed tool available to cut that 'radius'. We had a really nifty high-powered optical inspection system there so it was easy to diagnose the problem (I sometimes wish I still had access to all of the wonderful tools in that engineering lab). We replaced those units at no charge to the customers. |
Posted By: Ray54
Date Posted: 08 Jan 2024 at 9:25am
When you get into the D6 check out Antique Caterpillar Machinery Owners Club forum. Membership gets you into the library that is still growing. But all the operators, repair manuals, and parts books are there. As well as all the books for attachment such as the cable winches and hydraulic parts and repair, and dozer blade manuals. As well as a good number local clubs are active in your county.
|
Posted By: LangdonStevenson
Date Posted: 08 Jan 2024 at 5:10pm
|
Les Kerf - yes, that's a valid point about manufacturing not following the design documents. It just goes to show that product quality is a result of well designed systems and whole company culture. Not easy to do and something that requires eternal vigilance and support. |
Posted By: LangdonStevenson
Date Posted: 08 Jan 2024 at 5:14pm
|
Ray54 - thank you! ACMOC has already been an invaluable resource for me, it was the first thing I found when I started doing the research on what would be involved. I think I found them via PacificNorthWestHillBilly's Youtube channel as he was using them for assistance on his little D4 rebuild (a series that's well worth a watch). As you say ACMOC have a lot of resources and knowledgeable people who are very happy to help. |
Posted By: steve(ill)
Date Posted: 08 Jan 2024 at 6:06pm
|
Also the axle is 65 years old.. Could have been made to spec and just hit something HARD and put a small crack in the shaft that grew over time.... YES, each shaft has a weak point and that would normally be at a sharp cut step in the shaft. ... or could be a small radius cut in the shaft........hard to tell what happened in the last 60- 75 years.. ------------- Like them all, but love the "B"s. |
Posted By: LangdonStevenson
Date Posted: 15 Jan 2024 at 4:42pm
|
I now have all the pieces in place to get the grader back together.
It's weird that the cheapest supplier (including shipping) was from the other side of the country. But anyway, I'm all set. Now I just need it to stop pouring rain for a day so I can do the work! And a pump to get the oil into the gearbox. That I don't have yet. 
|
Posted By: Codger
Date Posted: 15 Jan 2024 at 4:50pm
|
Good on ya mate! Hopefully she goes smooth on reassembly. I see your gear oil is in steel pails. Is that still common down under? Plastic pails are the common container any longer here.
------------- That's All Folks! |
Posted By: LangdonStevenson
Date Posted: 15 Jan 2024 at 4:56pm
|
Codger - thank you, yes fingers crossed! I'm looking forward to seeing it all buttoned up again and back to work. I think putting the new drain bungs in is going to fun too. It's nice to do an actual upgrade like the hydraulic rams rebuild. Honestly I've never bought oil in bulk like this, so I don't know what's standard and what's not. Anything up to about 6 liters is always in plastic at least.
|
Posted By: LangdonStevenson
Date Posted: 25 Jan 2024 at 1:46am
|
So today was the day and I finally got to start putting the new drive shaft in the grader! First job:drill a new drain hole at the back of the chain box because there was no way I was going to bail the remaining 15mm of oil out through the side hatch. That oil was nasty... Drilling of a 10.8mm hole was followed by tapping and the installation of a sump plug with crush washer. Took me forever to find the right size drill bit (10.8mm - seriously? I had to buy that online couldn't find it anywhere on a shelf) 12mm (UNF I think) taps (which everyone had sold out of) and bungs to suit (which were thankfully easy enough to find), but it worked out really well - and the (horrible dirt laden) oil made the tapping pretty easy - free lubrication! A side note here - when I was measuring up the chain box to work out where to put the drain hole it became apparent that Allis Chalmers A. weren't playing - those chain boxes are made of 12mm / half inch steel that my HS drill bits took their own sweet time getting through and B. did not care in the least how the result looked. The end plate is just slapped on there and welded in place. Alignment? Who cares? it won't matter once it's welded on!  Next step, clean out about four liters of oil, 3mm of mud, and - I kid you not - enough ball bearings, split pins, and shards of metal to make a disaster movie. Bad things happened in that chainbox somewhere in the past (yes that a little bit of foreshadowing). But it all cleaned up pretty nicely in the end - after repeated flushing with diesel (shaking the grader around to slosh the diesel was the hardest part), then lots of wiping out with cloth rags that went straight in the bin! Looks rather nice in there now:  Next step: insert the new oil seal. I didn't have anything to press it in with, so I went for the "lump of wood hacked into a workable shape" option. It worked. I don't think that the seal suffered any real damage.  The eagle eyed among you will notice that something bad happened to the bearing seat in the photo above. Here's a better view: 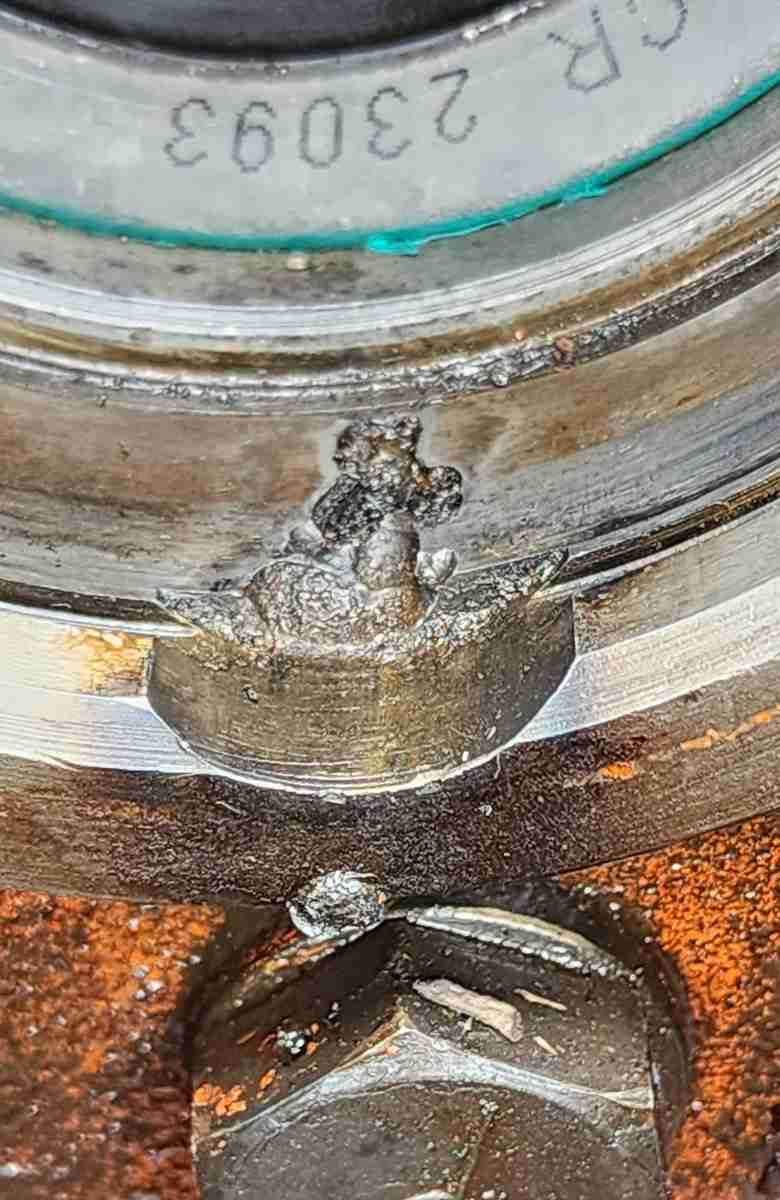 I have no idea what, but I'm guessing that it was involved in the installation of the scrap bin of metal parts and shards in the bottom of the chain box some time ago. Still, I think it just looks nasty and shouldn't effect anything. And yes I did clean out the bearing and snap ring seat before I proceeded. Then it was time to pull out the new driveshaft: 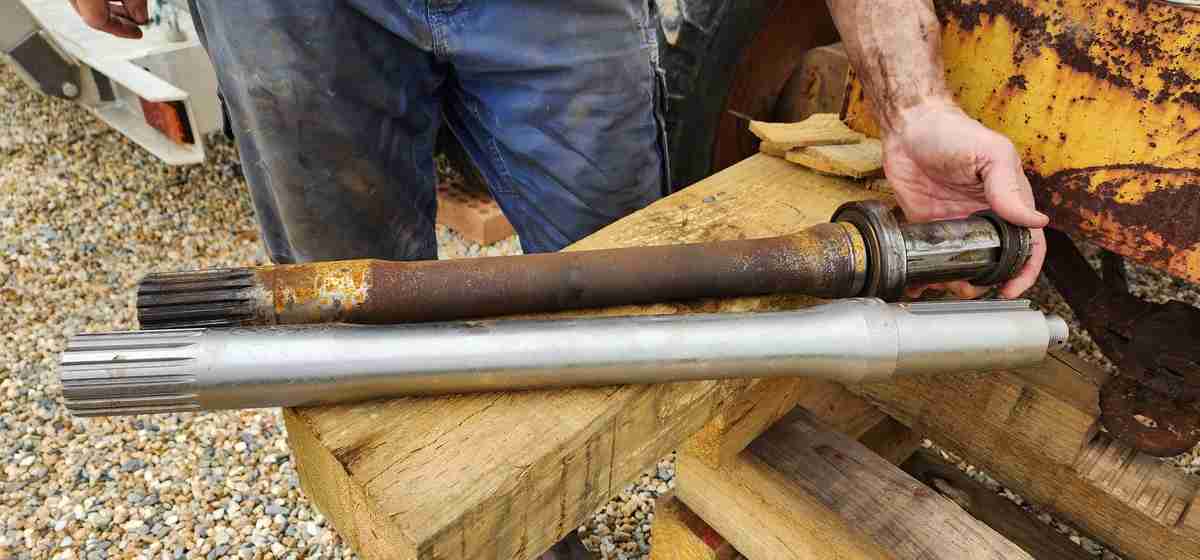 Don't ask me how but the (phone) camera makes these two *identical* shafts look vastly different lengths. Thankfully they aren't and I have other photos to prove it - but look at that shiny new metal! Mmmmm... shiny. Shaft went in nicely, then I pressed the bearing in. Thankfully while firm, it wasn't nearly as tight a fit as the oil seal, so I managed to slowly, gently tap it in, again with appropriately hacked wood. I got it in flush with the housing, but ran out of time to shape another piece of wood to let me push it in further. But it's in place at least!  So, having run out of time I buttoned everything back up to keep the water out and called it a day. I'll be back to it on Sunday hopefully. Get that bearing finished, install the snap ring (I have a bad feeling that is going to be a fight), install the centre sprocket, reinstall the chains, fill with oil, make up new gaskets for all of the chain box ports, then bolt the ports down. Then I have to go de-sludge the other side... (at least I get to use my expensive, weird drill bit and expensive, rare taps again). So more photos and narration will follow!
|
Posted By: Codger
Date Posted: 25 Jan 2024 at 6:29am
|
Good progress and thanks for the update. I've seen all kinds of bearing bores destroyed over the years and that one won't hurt anything as the outer bearing race is tight to the bore. Before you button it up, I would get some oil into that bearing whether it be a thing gear oil, or even a thin bearing grease. Reason being is that even though that is a lubricated bearing, it has none upon initial startup. It is perhaps submerged in oil and if the case then no pre lube is required but I always grease them upon installation as the grease will disolve into the lubricating oil but dry startup is never a good thing with roller bearings. ------------- That's All Folks! |
Posted By: steve(ill)
Date Posted: 25 Jan 2024 at 8:21am
|
Those SPOTS where the bearing sets actually look like caused by an arc welder ? Im wondering if they could not get the race out and welded on it to shrink it... Dont know how they got that deep, but look like local hot spots / points from a weld stick..
I have used a welder to WELD on the race.. This actually looks like they were trying to BURN the race in half.. Carbon arc.. or HIGH AMPS on that stick. ------------- Like them all, but love the "B"s. |
Posted By: Codger
Date Posted: 25 Jan 2024 at 8:42am
|
That was my thought too with attempting to remove a former race. I've never had to split one in it's bore but have welded a plate to the inner side to pull with a slide hammer a couple of times when the backside was not accessible. ------------- That's All Folks! |
Posted By: Les Kerf
Date Posted: 25 Jan 2024 at 4:51pm
|
Yup, I have welded bearing races to shrink them, if you get it right they just fall out |
Posted By: wjohn
Date Posted: 25 Jan 2024 at 8:32pm
|
Welding out a race was my first though too for the missing material. Lots of loose parts... Don't you wish these things could tell us their stories sometimes? ------------- 1939 B, 1940 B, 1941 WC, 1951 WD, 1952 CA, 1956 WD-45 |
Posted By: DonBC
Date Posted: 26 Jan 2024 at 2:14pm
|
I imagine that many D grader owners have chain box story's. When I got my grader one of the chains for the left side was sitting on the floor of the cab. Using a magnet on a telescopic handle I started looking in the chain box for the pin for the master link. Besides some pieces of metal I fished out a very badly beaten up 1/2" drive 5/8" socket. It was just large enough to jamb the driven sprocket. I removed all the oil and cleaned out any metal pieces and reassembled the chain. The old chain was stretched enough that it would jump a tooth now and then so I finally bought a new chain. The rear sprocket on the same side was slightly loose on the tapered shaft. The washer and the nut were tight to the boss on the shaft but the wheel was still loose on the shaft. It had been this way since new so the taper and the keyway on the wheel had suffered some wear. Some spray welding and machining to the inner hole of the wheel match the taper of the axle made the wheel tight to the shaft. The keyway was machined and a new key was made that fit the keyway on the wheel one one side and the keyway on the axle on the other side. I had a cupped washer made so the nut could now push the wheel tightly on the shaft. New chains for that side and it was good to go. Spent a lot of money for this fix but never had any more problems with the wheels. Apparently some others had encountered similar problems with bad machining by AC. ------------- Jack of all trades, master of none |
Posted By: LangdonStevenson
Date Posted: 28 Jan 2024 at 6:43am
I got back to do some more work today. Got the bearing seated properly and the snap ring in place. Then I put the double gear on the new shaft. Was going well until I figured out that I had forgotten one thing… The spacer that is meant to go between the bearing and the gear… Oh well. Have to take a trip to town and buy a gear puller tomorrow, pull it off, install the spacer, then put it back on again. I live and learn, but making progress.
|
Posted By: Codger
Date Posted: 28 Jan 2024 at 6:51am
|
I think we've all done that, (or similar) a time or two over the years. Good you caught it now rather than finding it under a bench remembering, "I remember dropping that" and never retrieving prior to the next task and then forgetting all about it..... ------------- That's All Folks! |
Posted By: LangdonStevenson
Date Posted: 29 Jan 2024 at 5:14am
| Codger - oh yes - definitely better to catch it now! And it has the rather important job of maintaining a gap between the bearing and the drive gear - which allows oil from the chain box to circulate to the bearing. So missing that would have been BAD. |