A Story About "Allie", The 1953 WD
Printed From: Unofficial Allis
Category: Allis Chalmers
Forum Name: Farm Equipment
Forum Description: everything about Allis-Chalmers farm equipment
URL: https://www.allischalmers.com/forum/forum_posts.asp?TID=183867
Printed Date: 19 Mar 2026 at 2:30pm
Software Version: Web Wiz Forums 11.10 - http://www.webwizforums.com
Topic: A Story About "Allie", The 1953 WD
Posted By: Jtaylor
Subject: A Story About "Allie", The 1953 WD
Date Posted: 12 Oct 2021 at 8:06pm
|
Let Me introduce myself. My name is Justin, A small town local to Elmvale Ontario Canada. Farming Community and home of a ton of great folks! And my Wife, Sarah. She's mentioned here but you will rarely see her reply here. Our journey of "Allie" Started about a week ago. I was invited to take part in a local tractor parade for our Canadian Thanksgiving. I reached out to a local farmer that is very good friends of ours and asked if he had anything since my 1949 McCormack W4 is out on a field working away with other family members. Our local farmer was happy to have us take his fully restored Allis Chalmers Two-Ten into the parade. Ecstatic, We planned for the weekend to be running a "large" restored tractor for the whole community. The Friday before the parade, we found some injector issues with the Two-Ten and did not feel comfortable running the tractor through the streets just in case something did not go as planned. So, My Wife and I ended up with a very nicely restored 1955 WD45 as seen pictured below. It was an absolute blast to drive and we thoroughly enjoyed the day with the WD45. Here is a couple of photos of the parade tractor we had the pleasure of driving.   Immediately following the parade, My other half turned to me and asked if we could purchase one to restore into that condition. My answer was definitely YES! so, We continued to look online for the best candidate. Luckily, We found one about 1 hour away in another small community. Here is a couple photos of the internet Ad:   We scheduled to look at the tractor 2 days following the original parade. Drove out there with the truck and the trailer in hopes it was good enough to bring home. The owner of the tractor was a great fella, Father and son duo that were looking to do the same thing as us but ran out of time and space. The tractor fired up and we drove it onto the trailer to bring it home. it came with a complete spare engine with all accessories including 5 blade fan and water pump. We mentioned to the father/son duo we purchased the package off of we would keep them in the loop with updates. Both Sarah and I figured this would be best done on a forum site or YouTube. Here "Allie" is on the trailer for the ride home  And after the first round of pressure washing.  We pondered the name for a while, Talking about different names that were fitting to the tractor for humor. We actually settled on what the previous owner called it in an email after we picked it up. here is a clip from that email: " I would like to follow with great interest your work on Allie. Enjoy. " There we had it. A running tractor with a fitting name! Keep following along for a winter/spring build to prepare for tractor show season next summer. I will keep it picture heavy as possible for all interested!
|
Replies:
Posted By: Calvin Schmidt
Date Posted: 12 Oct 2021 at 8:20pm
|
Welcome to the Forum. WD-45 are a great tractor. Have a few. Fellow Ontarioian from near Stratford. ------------- Nothing is impossible if it is properly financed |
Posted By: Eric B
Date Posted: 12 Oct 2021 at 9:53pm
|
Thanks for posting, we'll look forward to seeing your progress with pictures. Enjoy! Eric. ------------- Currently- WD,WC,3WF's,2 D14's B. Previously- I 600,TL745,200,FL9,FR12,H3,816 LBH. Earth has no sorrow that Heaven cannot heal! |
Posted By: AC720Man
Date Posted: 12 Oct 2021 at 9:55pm
|
Welcome Justin and Sarah! Lucky man to have such a sweet wife that likes tractors too. They are a lot of fun to tinker with and make a great project for the 2 of you to enjoy together. I’m sure most of us wish our wives were like Sarah lol. Got a WD that needs a lot of cosmetic repairs but until i fix some leaks she will remain as is. Just need to find time to do that. Enjoy your project, I hope you find it fun and enjoyable for you both. ------------- 1968 B-208, 1976 720 (2 of them)Danco brush hog, single bottom plow,52" snow thrower, belly mower,rear tine tiller, rear blade, front blade, 57"sickle bar,1983 917 hydro, 1968 7hp sno-bee, 1968 190XTD |
Posted By: Ed (Ont)
Date Posted: 13 Oct 2021 at 3:44pm
| Hi Justin. I’m 20 min away from you in New Lowell. I have a WD45 that I have done some work to. A family piece which is nice. Give me a shout if you need some help. Do you know the year and serial number of yours. Mine is 1954 model. 😀 |
Posted By: Jtaylor
Date Posted: 13 Oct 2021 at 8:04pm
Awesome! Glad to see an active local! ours is #WD139778
|
") Ed (Ont) wrote:
Ed (Ont) wrote:Posted By: Jtaylor
Date Posted: 15 Oct 2021 at 8:43am
|
Well, A small progress update. the tractor would not run unless the choke was left on and the carb was leaking some fuel. I took the carb off the tractor and prepared for an inspection and cleaning. here is the carb coming off the engine. pulling all linkage out and draining fuel.  It looks like we have ourselves a Marvel TSX-464 carb. I found the throttle shaft bent causing it not to see full throttle and the choke shaft has a bunch of play in it. Floats are in good shape.    once all jets were cleaned, I put the carb back together temporarily to move the tractor under its own power until we have a nice spot to pull it apart. New carb kit is added to the list to repair. |
Posted By: FloydKS
Date Posted: 15 Oct 2021 at 10:14am
|
sounds like you are having fun, enjoying...so keep up the good work and keep us up to date, as you said you would. Congrats on your finding Allie. ------------- Holding a grudge is like taking poison and expecting the other person to die |
Posted By: SteveM C/IL
Date Posted: 15 Oct 2021 at 2:58pm
| After all these years it's hard to say what all you have there. I haven't looked up year by # but it has a WD radiator shell complete with shutters. Wide front is WD - early WD45,curved shifter is late WD or WD45. Has WD45 governor /distributor housing....Doesn't matter as long as you steer clear of "correct police". |
Posted By: LeonR2013
Date Posted: 15 Oct 2021 at 5:33pm
| I just went through getting the right carb kit for my 45. Make sure to check the throttle shaft for size and the bore size. There is more than one kit for the 464 carb if that is what you have, so read what the specs are and then check your carb. And you sure got a better looking tractor than most of us started with. Have fun. Leon |
Posted By: 55allis
Date Posted: 15 Oct 2021 at 5:43pm
|
Looks like a great project. The carb looks like a WD45’s if that helps. Them o’ll Allis’s are the best to mess with!! |
Posted By: SteveM C/IL
Date Posted: 16 Oct 2021 at 1:52pm
| Looks like the air cleaner hose is pinched a lot smaller on air cleaner indicating WD. 45 has air cleaner pipe same size as carb.Can't see if it's got short head/tall cover or tall head/short cover. |
Posted By: Jtaylor
Date Posted: 16 Oct 2021 at 2:36pm
If I am not mistaken it has a tall head and short valve cover. I also have a spare wd engine with the same setup (numbers matching engine) Looks like it has the wd45 carb but everything else has wd all over it. I will have to pull a spark plug and measure the stroke when I get a chance this week |
Posted By: 55allis
Date Posted: 16 Oct 2021 at 3:08pm
| And it has the 3 bolt wide front( which would be on most wds and maybe the early 45s). I’m sure that the manifold is a 45s so maybe the owner before you had a parts 45 possibly. |
Posted By: Jtaylor
Date Posted: 16 Oct 2021 at 5:53pm
The block does have the right block plate as all wd's should. I wonder if it does have a 45 crank in it... Time will definitely tell! |
Posted By: 55allis
Date Posted: 16 Oct 2021 at 8:07pm
It also has a 45 seat, the Wd ones are straight. For example look at my Wd compared to my 45 seat. 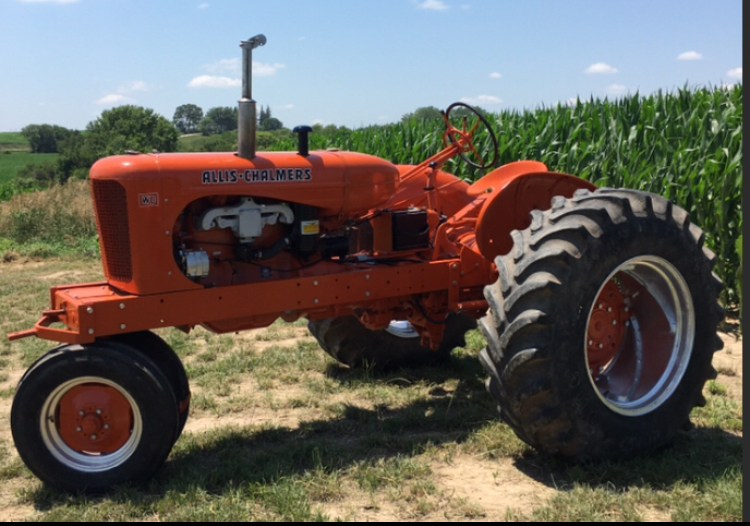 
|
Posted By: 55allis
Date Posted: 16 Oct 2021 at 8:09pm
| Do you know the serial number on the rear end? |
Posted By: Jtaylor
Date Posted: 16 Oct 2021 at 8:18pm
It is listed above I think on post 4 or 5 |
Posted By: 55allis
Date Posted: 16 Oct 2021 at 8:38pm
sorry, don’t know how I missed that!! |
Posted By: AC720Man
Date Posted: 16 Oct 2021 at 10:19pm
|
55allis, what brand and size tire is that on your WD? Looks really mean and aggressive. Size of the rim? ------------- 1968 B-208, 1976 720 (2 of them)Danco brush hog, single bottom plow,52" snow thrower, belly mower,rear tine tiller, rear blade, front blade, 57"sickle bar,1983 917 hydro, 1968 7hp sno-bee, 1968 190XTD |
Posted By: 55allis
Date Posted: 16 Oct 2021 at 11:03pm
Firestone fwd 16.9-28 on a 16 inch rim. Same size on the 45 just BFGood Rich brand. |
Posted By: AC720Man
Date Posted: 16 Oct 2021 at 11:09pm
|
Thank you, man I love the look of it. My 160 has 14.9x28’s on it that need to be replaced soon. I’ve only dealt with factory rims, what are the rims off of? ------------- 1968 B-208, 1976 720 (2 of them)Danco brush hog, single bottom plow,52" snow thrower, belly mower,rear tine tiller, rear blade, front blade, 57"sickle bar,1983 917 hydro, 1968 7hp sno-bee, 1968 190XTD |
Posted By: AC720Man
Date Posted: 16 Oct 2021 at 11:11pm
|
Is that a radial or bias ply? ------------- 1968 B-208, 1976 720 (2 of them)Danco brush hog, single bottom plow,52" snow thrower, belly mower,rear tine tiller, rear blade, front blade, 57"sickle bar,1983 917 hydro, 1968 7hp sno-bee, 1968 190XTD |
Posted By: 55allis
Date Posted: 16 Oct 2021 at 11:14pm
|
I think a d17 or d19. They are radials. |
Posted By: AC720Man
Date Posted: 16 Oct 2021 at 11:20pm
|
Thank you, I appreciate it. My 160 will be getting a fresh paint job this winter after the complete engine and clutches rebuild I just finished. Really glad you posted that picture. Hope you don’t mind me stealing your idea? ------------- 1968 B-208, 1976 720 (2 of them)Danco brush hog, single bottom plow,52" snow thrower, belly mower,rear tine tiller, rear blade, front blade, 57"sickle bar,1983 917 hydro, 1968 7hp sno-bee, 1968 190XTD |
Posted By: 55allis
Date Posted: 16 Oct 2021 at 11:28pm
| Not at all, plus that’s what it had when I got it. |
Posted By: AC720Man
Date Posted: 16 Oct 2021 at 11:39pm
|
I’m sorry to jump your thread Justin, 55allis pic of his WD was very appealing to me. Good luck with your WD project, I will be following it with great interest. ------------- 1968 B-208, 1976 720 (2 of them)Danco brush hog, single bottom plow,52" snow thrower, belly mower,rear tine tiller, rear blade, front blade, 57"sickle bar,1983 917 hydro, 1968 7hp sno-bee, 1968 190XTD |
Posted By: Jtaylor
Date Posted: 17 Oct 2021 at 2:46pm
|
Well, We got the tractor into its home for the winter. I own my own business (vinyl signs and graphics) and currently is operating from the garage until we find a decently priced place to rent out. Here is a photo of the garage as it currently sits sort of explaining my predicament: 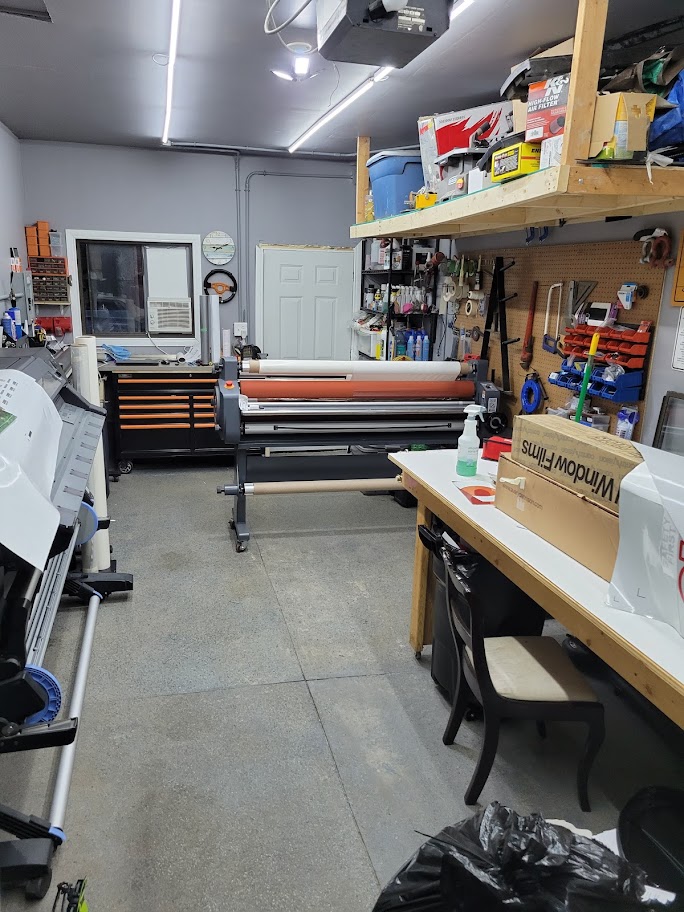 So, We built one of those shelter-logic shelters. originally it was bought as a 10x10ft which with some modification and a couple extra lengths of steel, we were able to get it to 14ft long x 10 wide x 8ft tall. a new tarp at princess auto (the canadian version of Harbor Freight) and we're off to the races. Here is some photos of the inside of the shelter:   And Sarah driving it to the shelter for the winter:  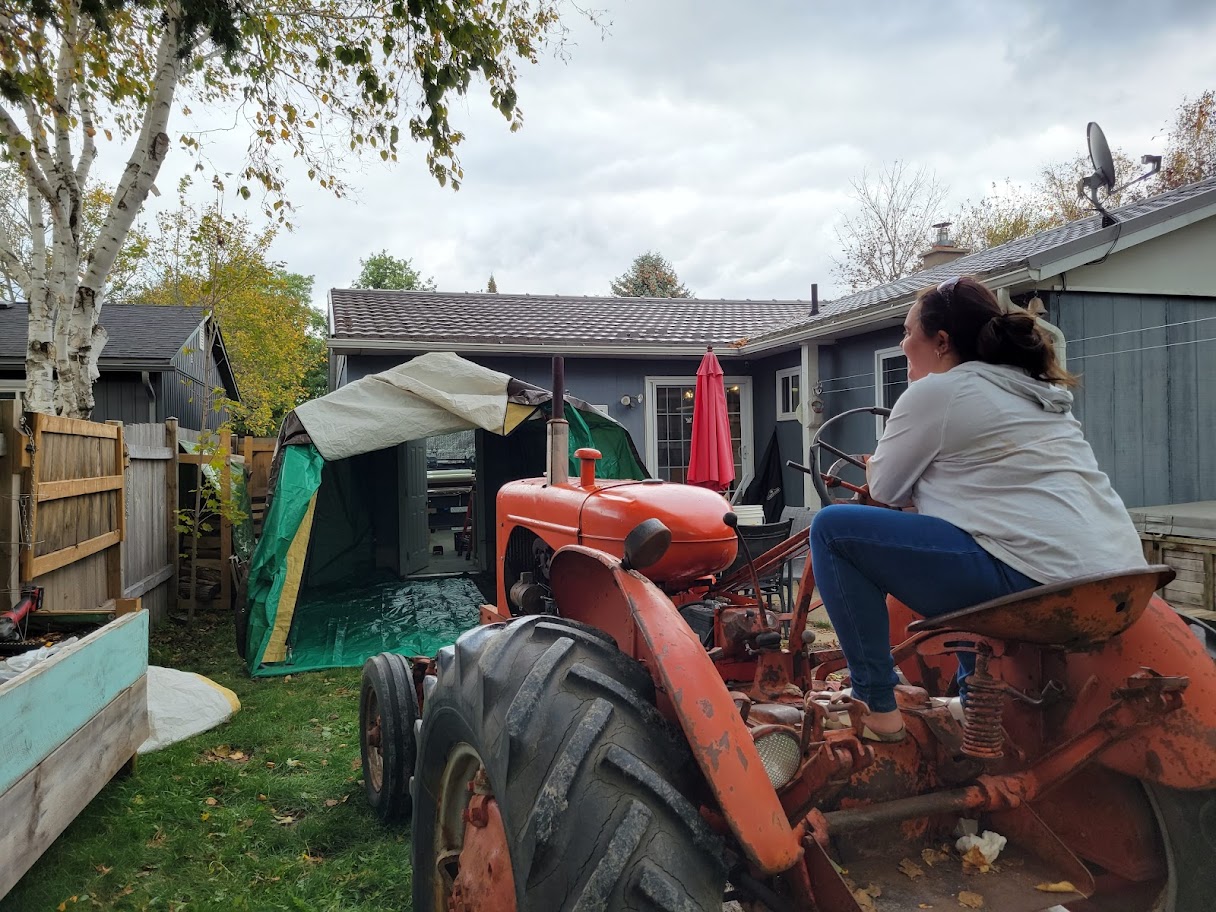  Now to get a couple of lights in the shelter for night time and get this pulled apart.
|
Posted By: 55allis
Date Posted: 17 Oct 2021 at 2:54pm
| Well if you need some help figuring out something, I can give some pictures of mine. |
Posted By: Jtaylor
Date Posted: 17 Oct 2021 at 3:11pm
I certainly appreciate that!
|
Posted By: Jtaylor
Date Posted: 18 Oct 2021 at 8:21pm
|
Well, Another progress update. I Have watched every episode of Sparks, Fire and bailing wire's youtube restoration and have started to dig in myself. wasting no time i started with the hood and radiator. I also pulled the spark plugs to see how things were doing. Everything got bagged up into ziploc bags for future use. You can see Sarah with the nicer writing marking and putting everything away here: 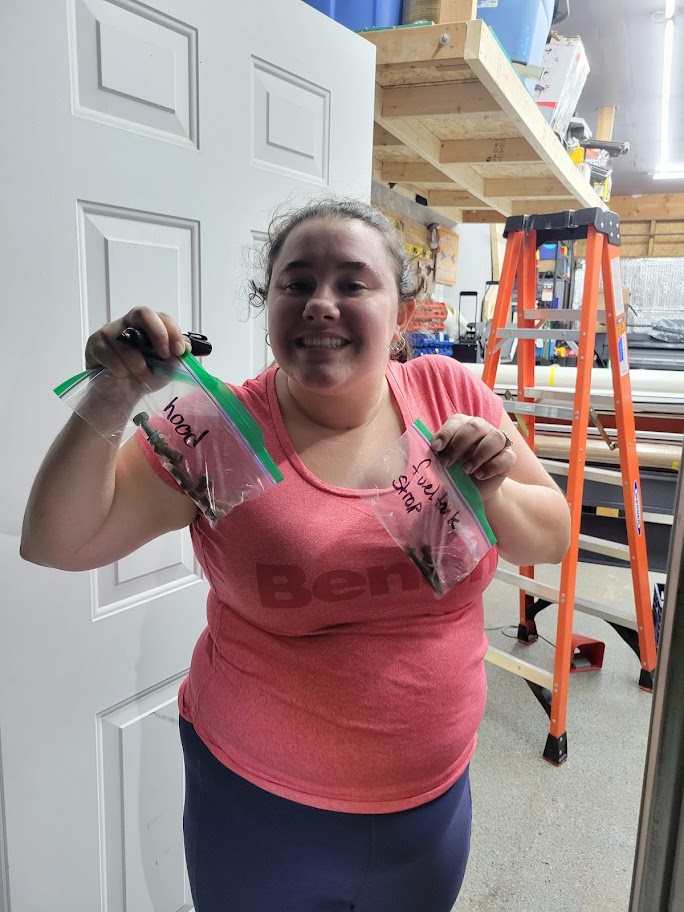 And Myself, Getting ready to wrench some more: 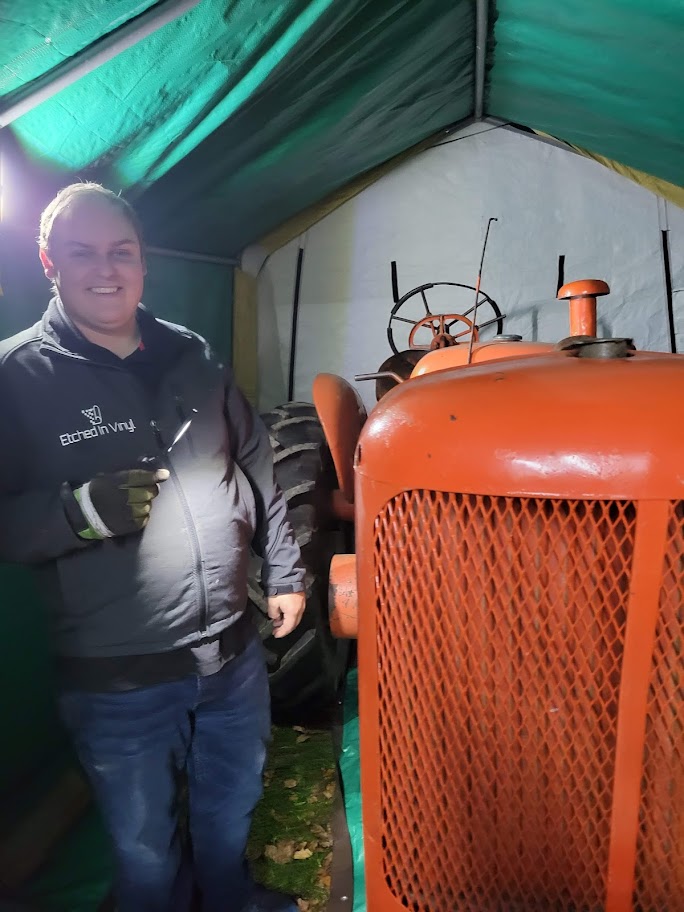 We were able to pull the radiator without any broken bolts (BONUS). Found the radiator was original to the tractor built in 03/1953 and is still in decent shape 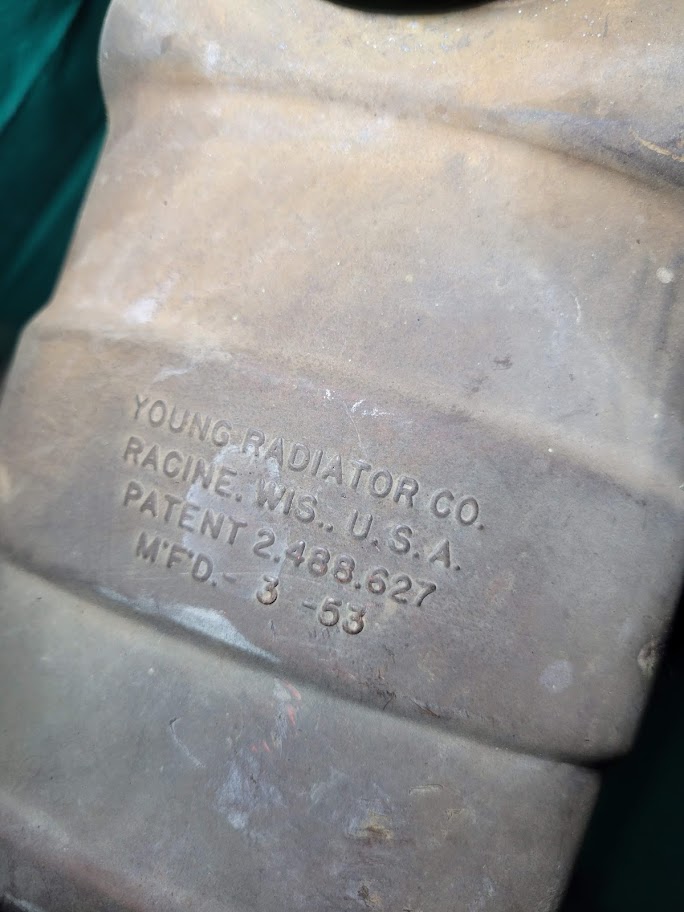 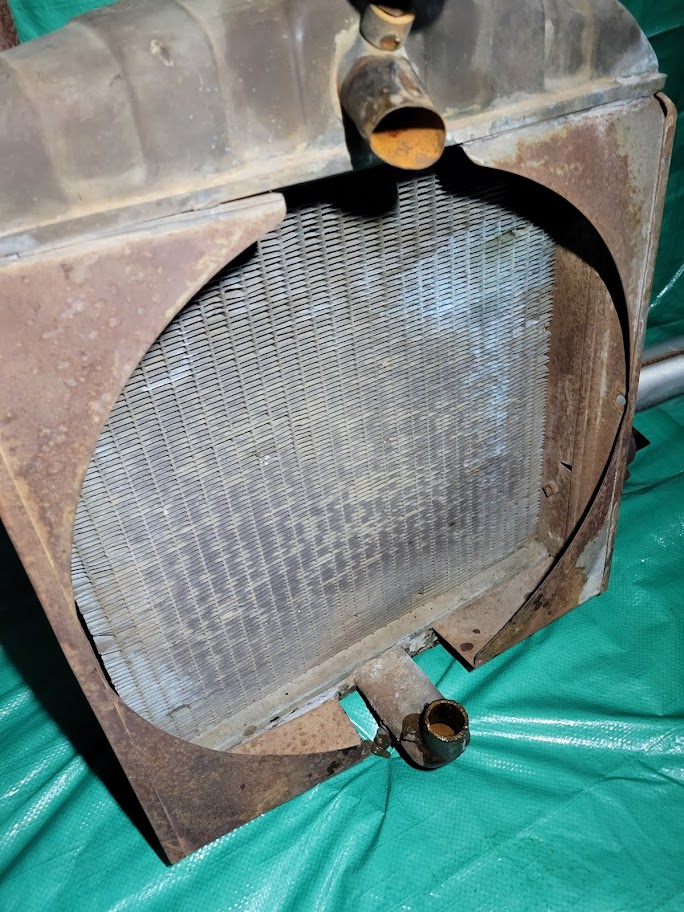 And the problem was found here. Cylinder #2 spark plug is super wet, And the cylinder is clean of carbon. Indicating a coolant leak. internal to the engine. 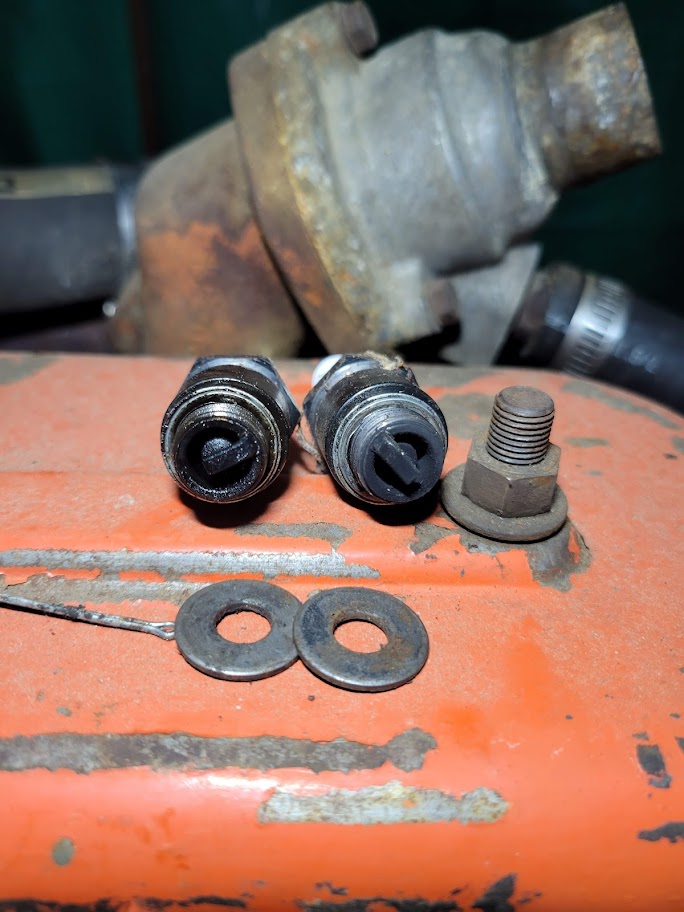 Looks like it is making oil also... weirdest color of oil i've seen recently. 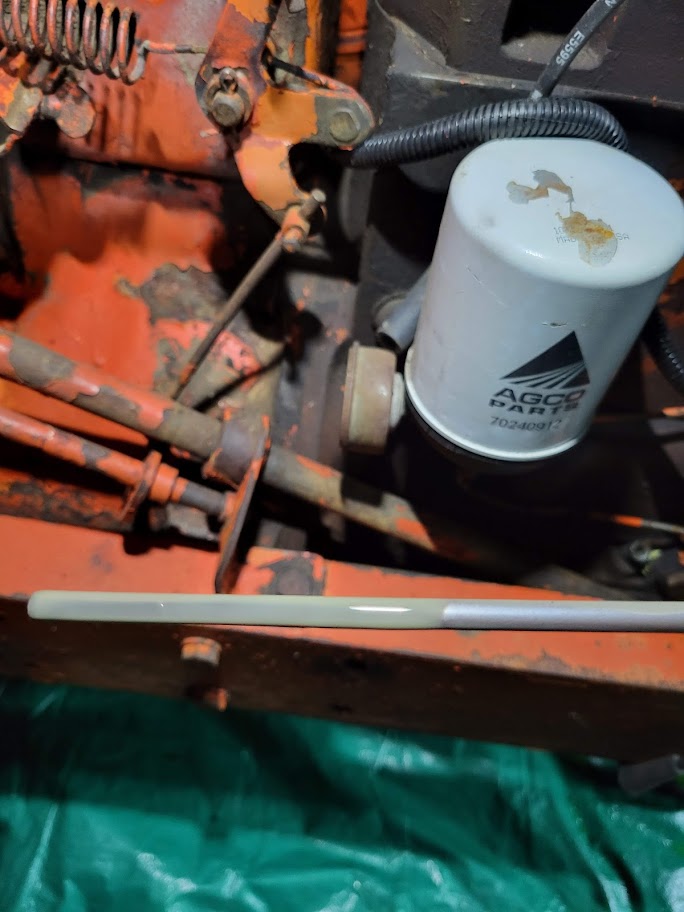 As it is nearing the end of the night, here is how it sits. 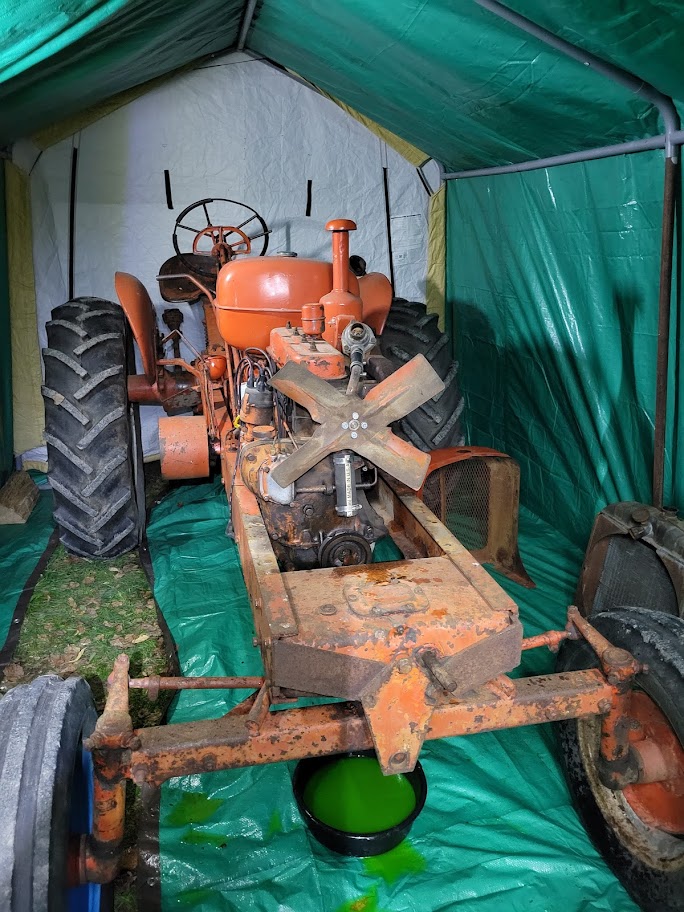 I will get the coolant cleaned up tomorrow when the tractor is finished draining. Looks like our next step is to have the engine removed on the weekend and put onto an engine stand until we are ready to plug away at it. Haven't ordered any parts as of yet, but i have the feeling it will be coming sooner rather than later. Since the engine has to come apart, Maybe now's the time to install a WD45 crankshaft? I think we will be mainly using it in the parades and we would like to do 10 or so tractor pulls a year and be somewhat competitive in a farm "stock" class.
|
Posted By: Sugarmaker
Date Posted: 19 Oct 2021 at 6:24am
|
Justin, You have a great project with the WD series tractor! You will have some work ahead of you, but lots of folks on here for support, advice, and also good Allis parts too. You do have a water leak into the oil system. It may have been easier to find through a water pressure test through the radiator, but you may be able to find it in other ways. That looks to be your main hurdle at this point. Having done one that had this problem it can be a challenge. But it has to be remedied. I just rebuild a Ford engine that had a internal block leak and was able to use some magic K&W sealer to stop the leak. One my first one I had to get another Allis block. I like your writing style. Glad you and your wife are working on the tractor together. I can tell you a trick that is a lot of work but very rewarding near the end of the project. Sometimes I do this sometimes I dont. Try to clean the parts going into the bags as you take them off. It is a lot of extra work, and they may need final touches before assembly be it helps speed up the end process. And you can see if something needs replaced. Great job bagging and tagging items! You will have 75 of those. Well worth the time. Also take lots of pictures before you take things apart. It helps too. Keep up the good work on Allie! Regards, Chris ------------- D17 1958 (NFE), WD45 1954 (NFE), WD 1952 (NFE), WD 1950 (WFE), Allis F-40 forklift, Allis CA, Allis D14, Ford Jubilee, Many IH Cub Cadets, 32 Ford Dump, 65 Comet. |
Posted By: 55allis
Date Posted: 19 Oct 2021 at 1:45pm
|
Just thought of the paint, what kind are you thinking of? It should be Persian 1 orange and gloss black. If you want to take a look at my thread (1949 Allis Chalmers WD project) it might help a little going through with the restoration. Although I didn’t take the engine apart like what you are doing. |
Posted By: Jtaylor
Date Posted: 19 Oct 2021 at 1:58pm
I will be on the hunt shortly for Persian #1 paint for the whole tractor. If i am not mistaken it should be Persian #1 with black lights and some features and silver rear rims. I will definitely check out your thread!
|
Posted By: 55allis
Date Posted: 19 Oct 2021 at 2:14pm
|
Here’s where I got mine. https://www.vansicklepaint.com/shopnow/products/tractor-equipment-industrial-ename" rel="nofollow - https://www.vansicklepaint.com/shopnow/products/tractor-equipment-industrial-ename |
Posted By: 55allis
Date Posted: 19 Oct 2021 at 2:18pm
If the page has about 33 different colors, than select the one I circle.  Just in case you get it from them. It’s just less than $40 a gallon but it will need harder also. |
Posted By: Jtaylor
Date Posted: 19 Oct 2021 at 2:31pm
I appreciate the color! Unfortunately, Vansickle paint does not ship to canada. May have to get a member here to order it up in the USA and ill pay the shipping to get it to canada. |
Posted By: 55allis
Date Posted: 19 Oct 2021 at 3:25pm
|
I’m sorry, I never thought of that problem with them. Is there a AGCO dealer around your place? |
Posted By: SteveM C/IL
Date Posted: 19 Oct 2021 at 7:55pm
| A 45 cam is same...you want a 175 cam...NLA but can be ground on old cam |
Posted By: Jtaylor
Date Posted: 20 Oct 2021 at 6:16am
I have a couple spare camshafts, But i was looking for the Crankshaft to give it some more stroke. Whats the Cam differences between the WD45 cam and the 175 cam? Your telling me my machine shop should be able to grind it to 175 specs from the original 45 cam?
|
Posted By: Jtaylor
Date Posted: 22 Oct 2021 at 7:30am
|
Some minor progress made on the tractor last night. i have been working on getting the sandblasting cabinet up and running again for all the small parts. here was a test of the air intake rain cap with glass beads. turned out pretty slick i would say! 4 layers of orange paint removed. here is before: 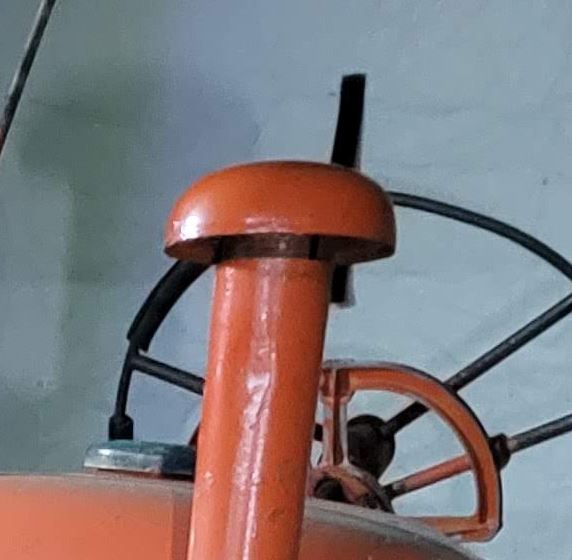 and after 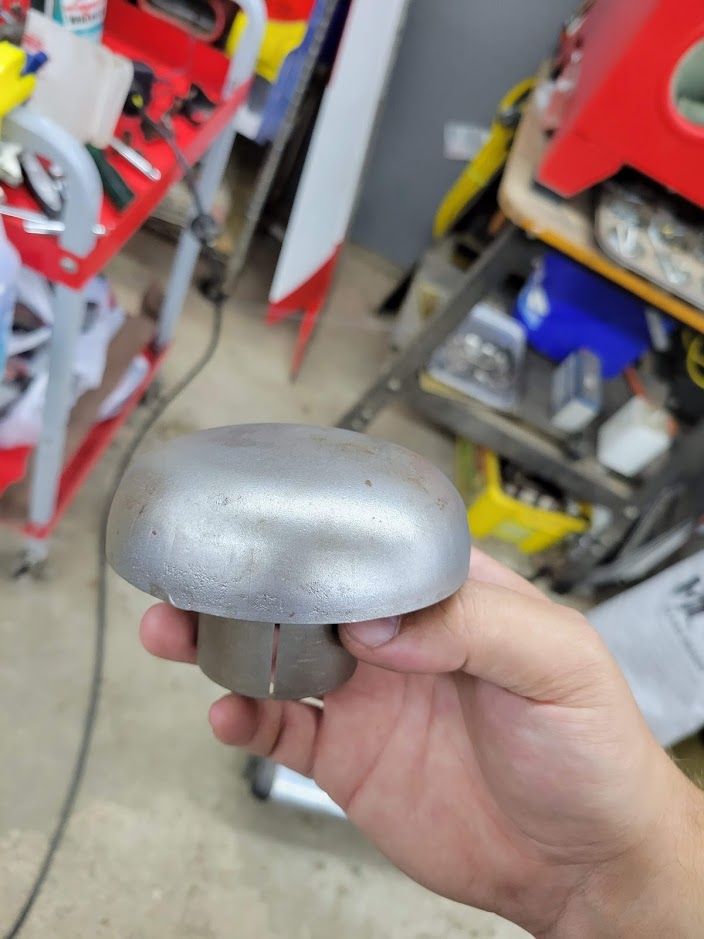 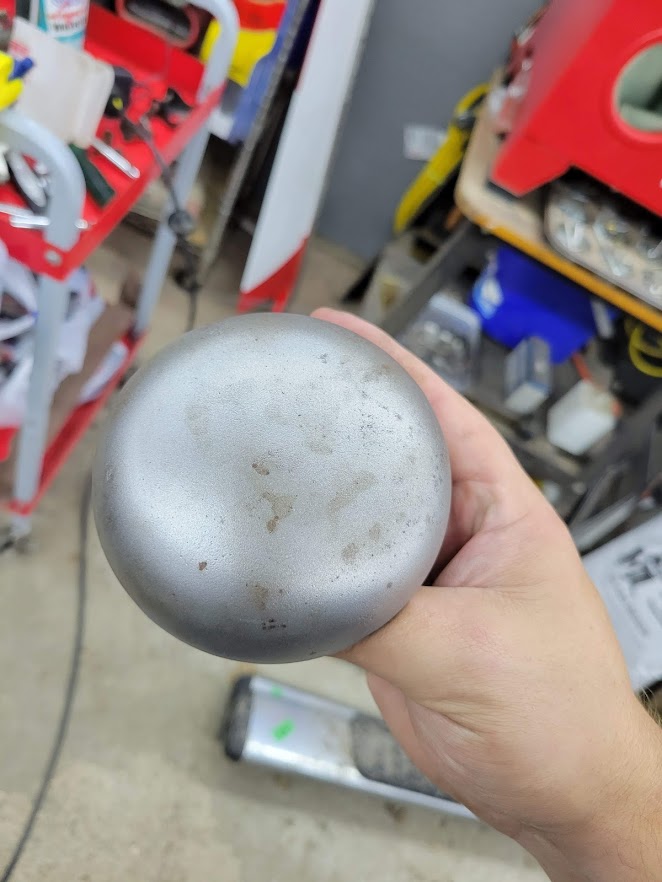 a little skim coat for all the pitting and we will be ready for primer on that piece. I will likely get the primer onto all the small parts and pieces during the winter before we paint things earlier into next year. |
Posted By: 55allis
Date Posted: 22 Oct 2021 at 1:05pm
|
I use Diamond cut sandblast media, not saying anything bad about the glass because never tried glass. That just about looks like what my soda blaster leaves!!! The diamond cut will get rid of some of the rust dents, anyway it did on mine. Also the soda blaster can be used on the engine, transmission, and the rear end. Hopefully I didn’t ramble too much about that. 
|
Posted By: 55allis
Date Posted: 22 Oct 2021 at 1:46pm
|
One other thing, what kind of blaster did you get? Also if you want to blast something too big to fit in the cabinet just pull the blaster out of the cabinet and lay a tarp or something to save the sand and less clean up. |
Posted By: Jtaylor
Date Posted: 22 Oct 2021 at 1:55pm
Thanks for the tip! Its just a small little cabinet setup. nothing crazy. i did also purchase an outdoor unit for another winter project that we will be using during the next couple days. I will likely use the outdoor stuff for large items and the cabinet for the small ones like bolts, plates and covers.
|
Posted By: Jtaylor
Date Posted: 25 Oct 2021 at 10:51am
|
Well, More progress this weekend. Got some lighting installed into our shelter and was able to remove the engine from the tractor! Here is some photos of the engine removal (Sarah looking super impressed) : 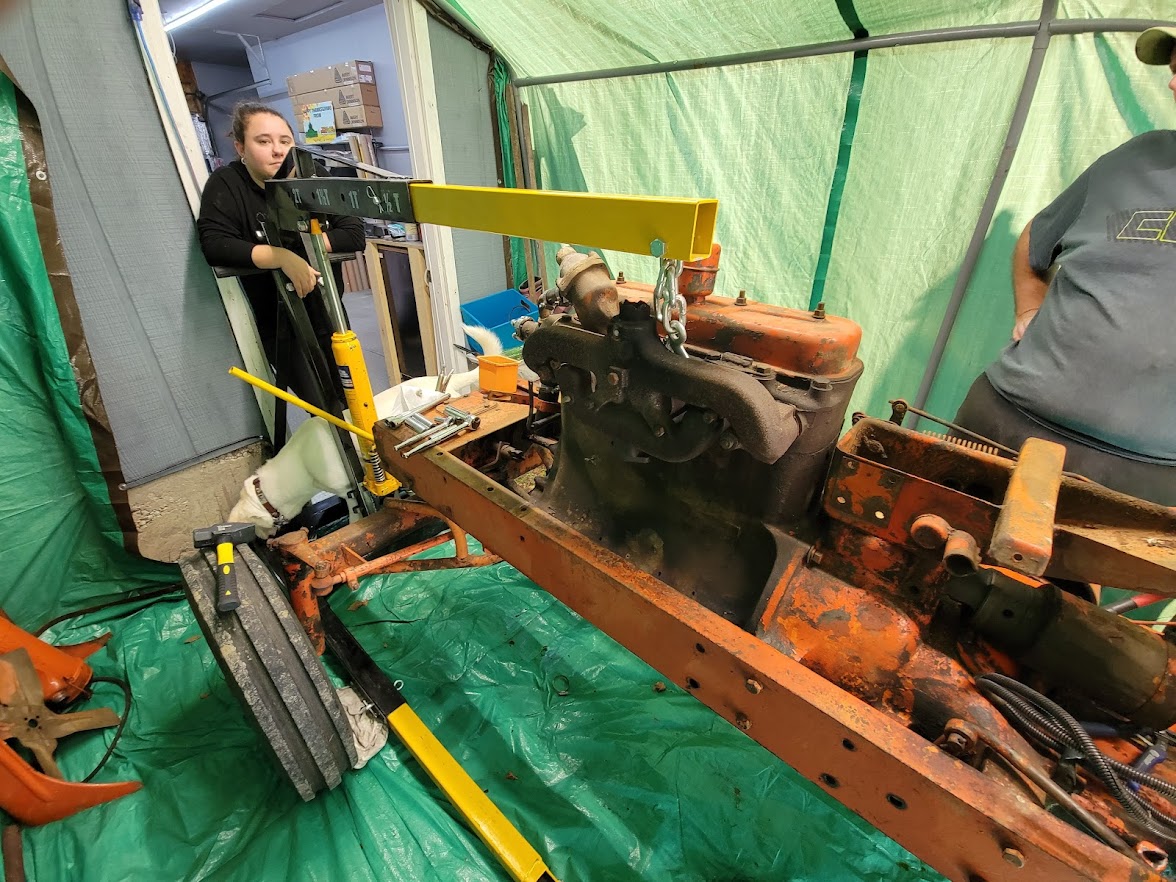 We were able to remove the engine without removing the steering box or steering shafts. worked well and took about 30 minutes to remove once everything was in order 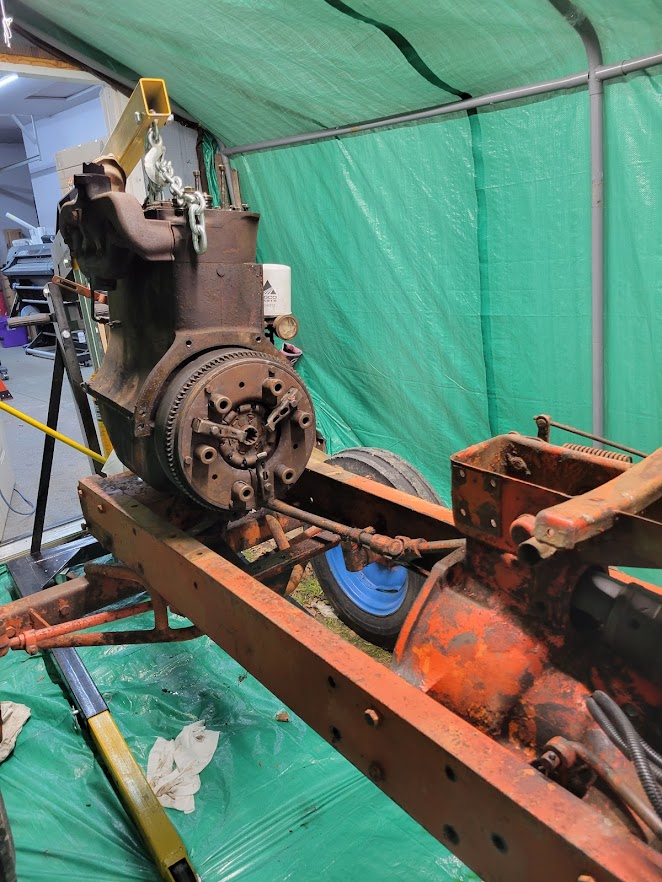 this is how it sits now, Back in its home and ready for more disassembly over the next week or so. prepping for sandblasting in the next 3 weeks before the snow flies! 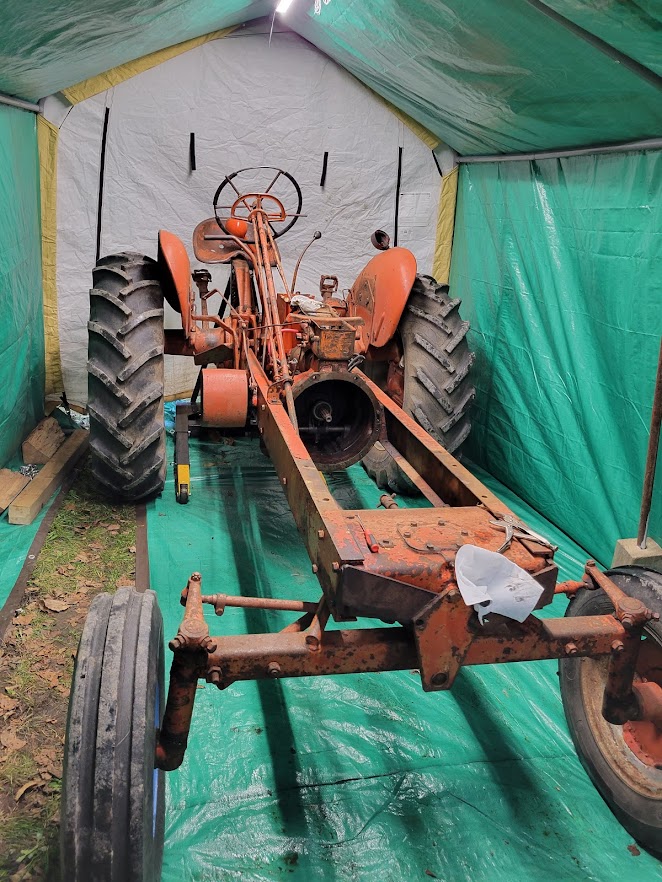 Check out the valve lash on this one! and crusty rocker arms! Good thing for spares!!! 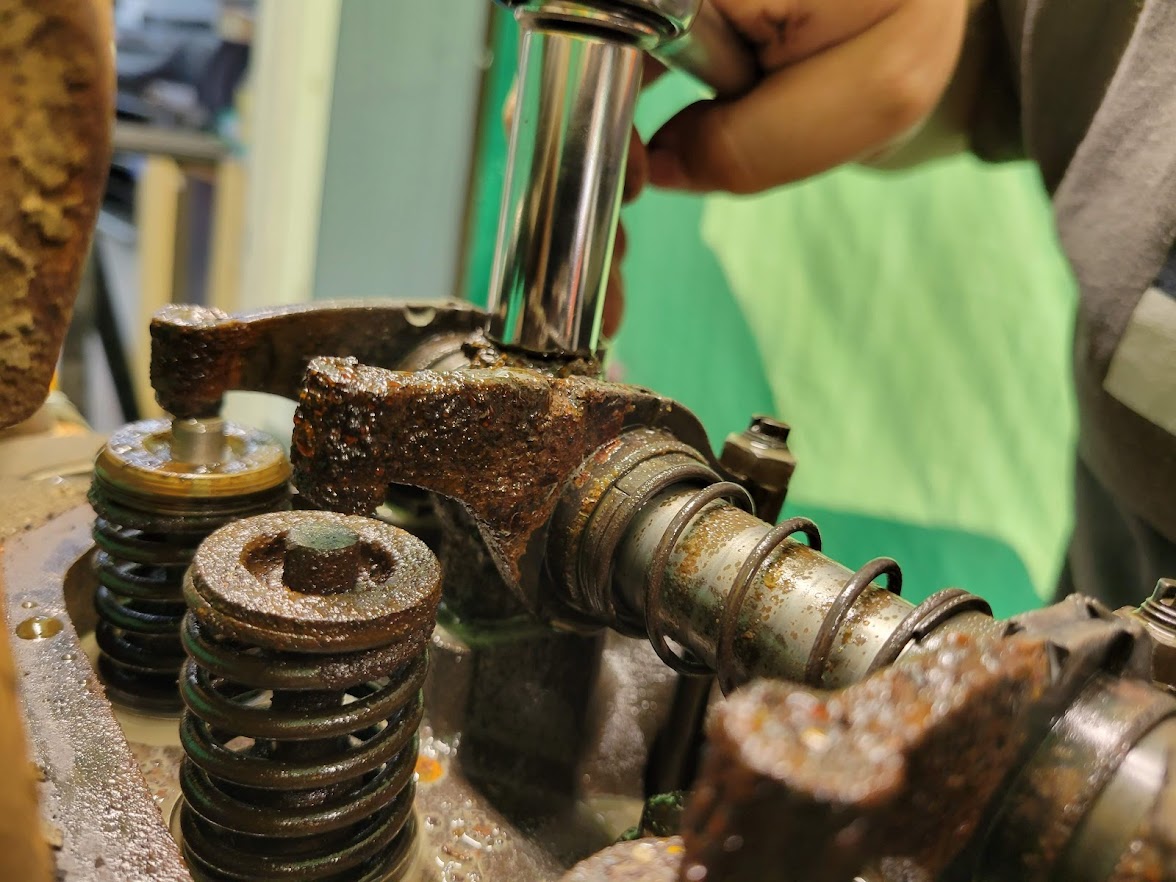 Got the engine onto a stand in the garage. I was curious as to what was inside and if the crankshaft was a WD45 or WD crankshaft. here are the results for yourself... 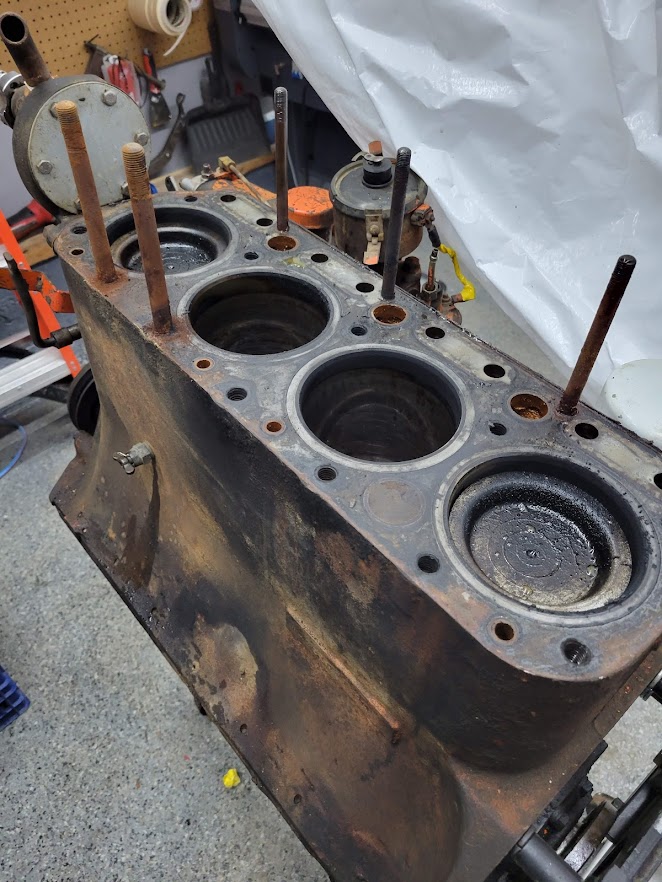 The cylinder head doesn't look too terrible and will be reused with a bit of cleanup and a valve job. 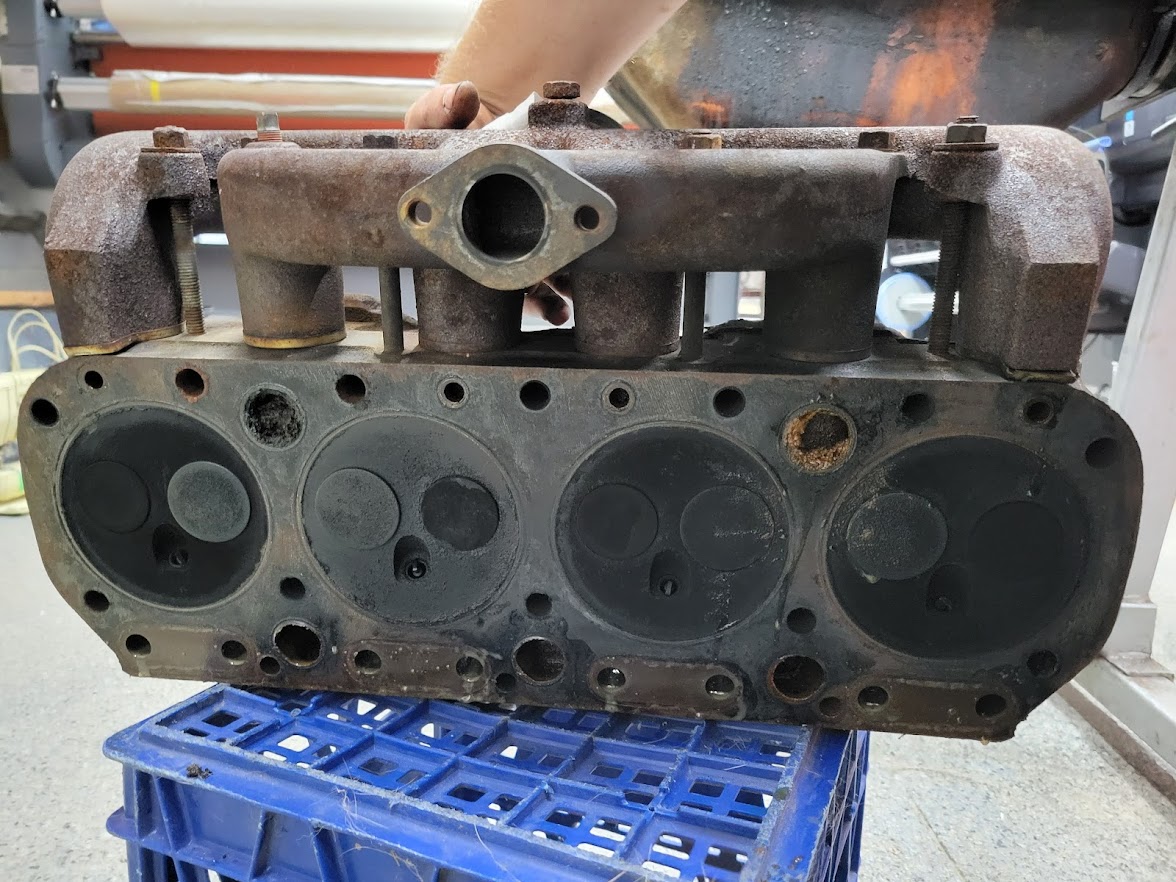 Looks like we have a 4" stroke (WD) crankshaft with a set of aftermarket or original? WD45 power crater pistons. The ultimate low compression setup. 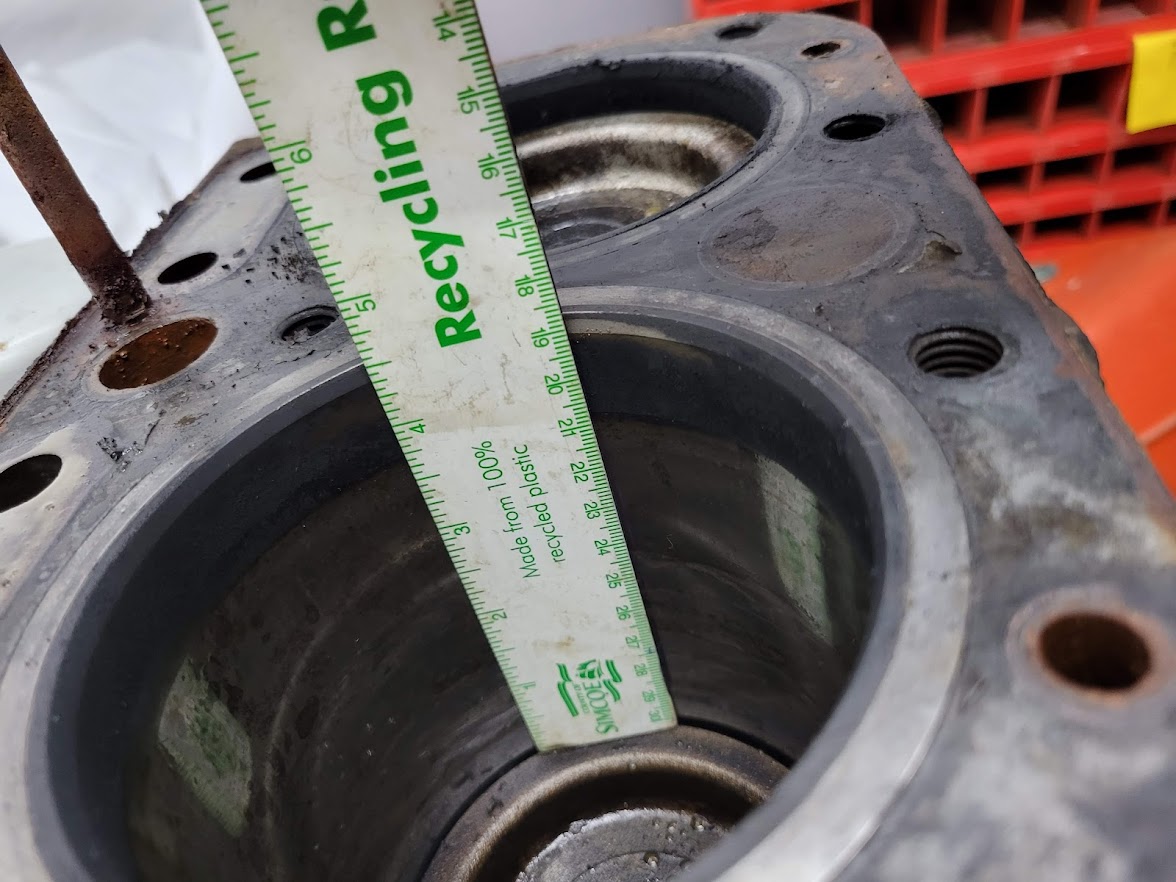 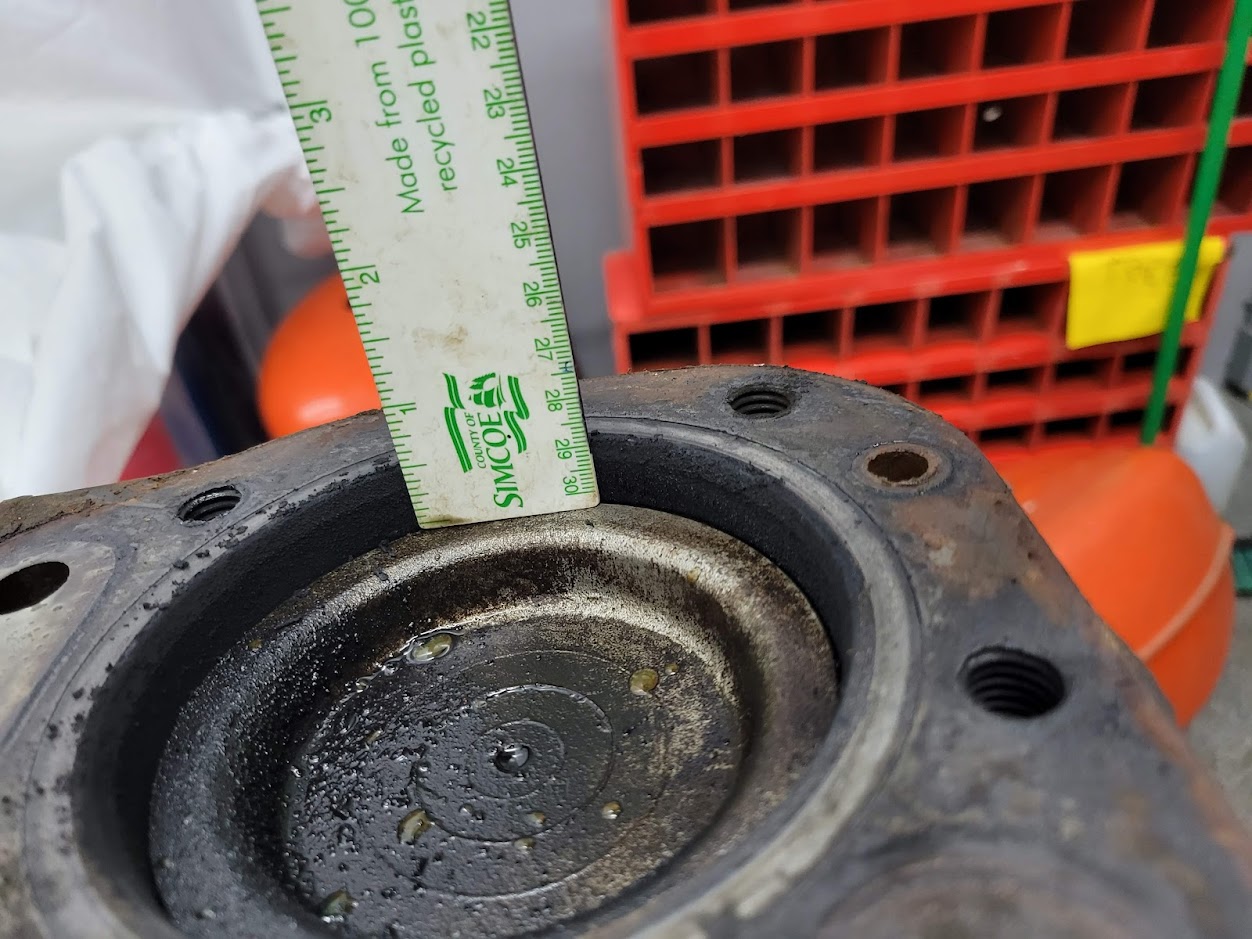 Now onto the rest. Lets get the remaining items removed and prepared for sandblasting.
|
Posted By: JK in Pa
Date Posted: 25 Oct 2021 at 11:15am
| Looking good. Looks like you have a series 40 block. No cracks between cylinders 2-3 and 3-4. Correct? If possible would you post the number inside the pistons. I rebuilt my 53 serial 144087 about fifteen years ago. I bought my rebuild kit from an AC dealer that was closing. Was told it was a 45 kit and didn’t question it as it was shipped in an older AC box. Installed with a 45 crank and after using for several weeks I couldn’t believe the tork the motor had. I checked on some information and come to the realization that I had installed 175 pistons. Your pistons look very similar. If they are 4” I would suggest that you reuse them if you find no problems with them. Good luck. |
Posted By: Jtaylor
Date Posted: 25 Oct 2021 at 12:13pm
I have not pulled the liners out of the block yet, but I have noticed one crack between cylinder 2-3. very minor but once i have the sleeves out i will check it over and go from there. I am not sure what the difference is with a series 40 block? Once pulled apart i will check over all part numbers before getting prepped for rebuild.
|
Posted By: Jtaylor
Date Posted: 26 Oct 2021 at 7:47pm
|
Well, We started to pull the engine apart to see what is making all that extra milky oil. and the results aren't too good... Crack between cylinder 3-4. definitely sucks! the top is absolutely perfect. just this one crack that deems it no good. Thankfully i have a spare block that has no cracks on the bottom but all the common cracks on the top. 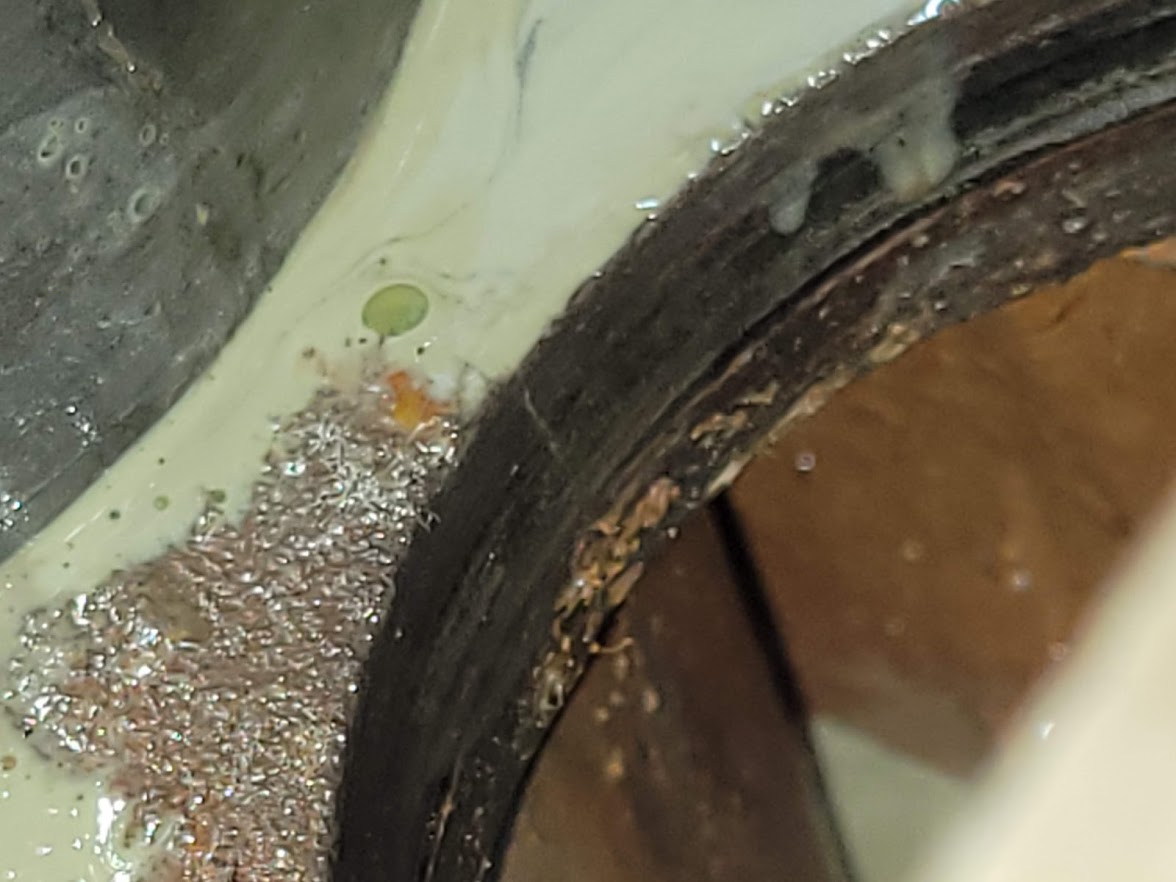 I also checked into the piston part numbers. 230578 is the part number on these ones. 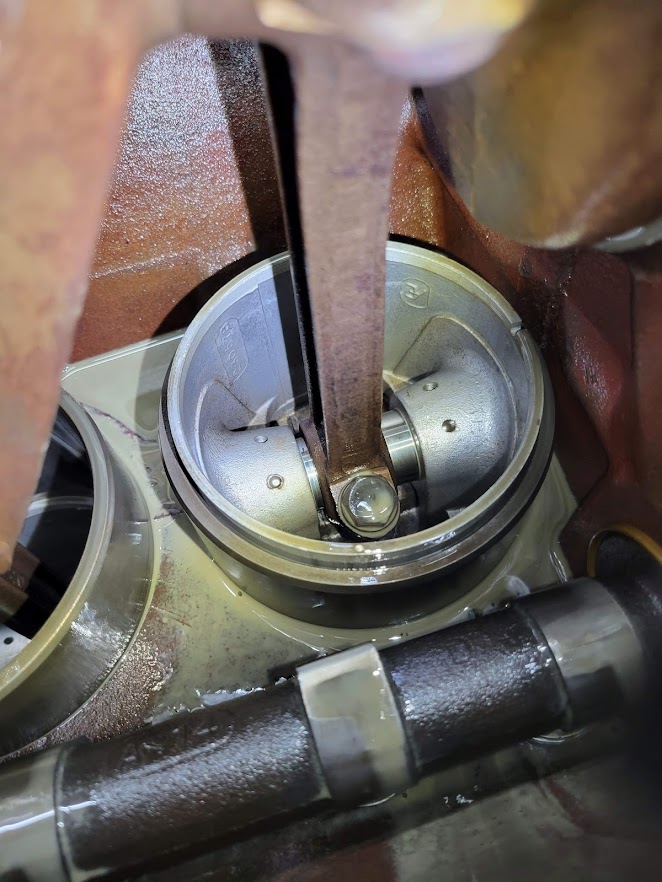 Sleeves have a lot of coolant gunk and crud built up in the coolant gallery 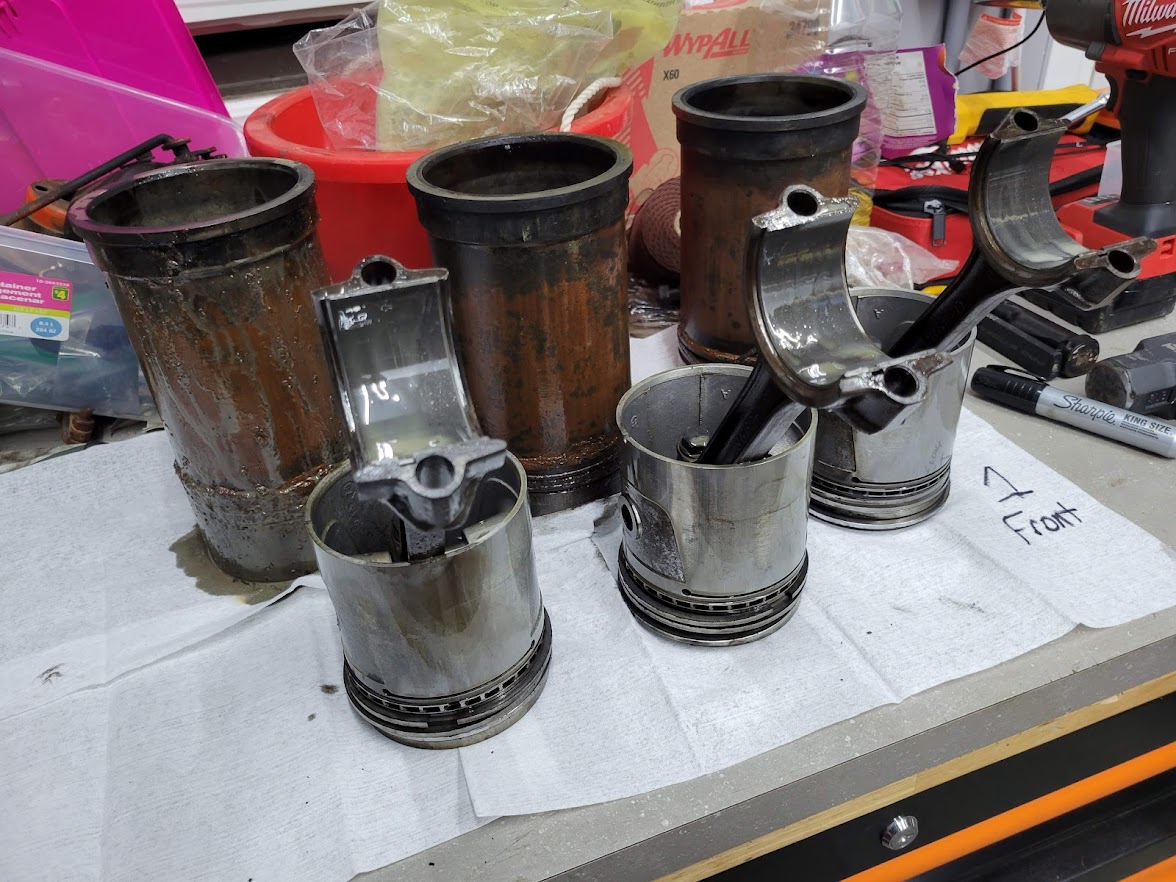 The rest of the engine looks okay, just a lot of milky oil! 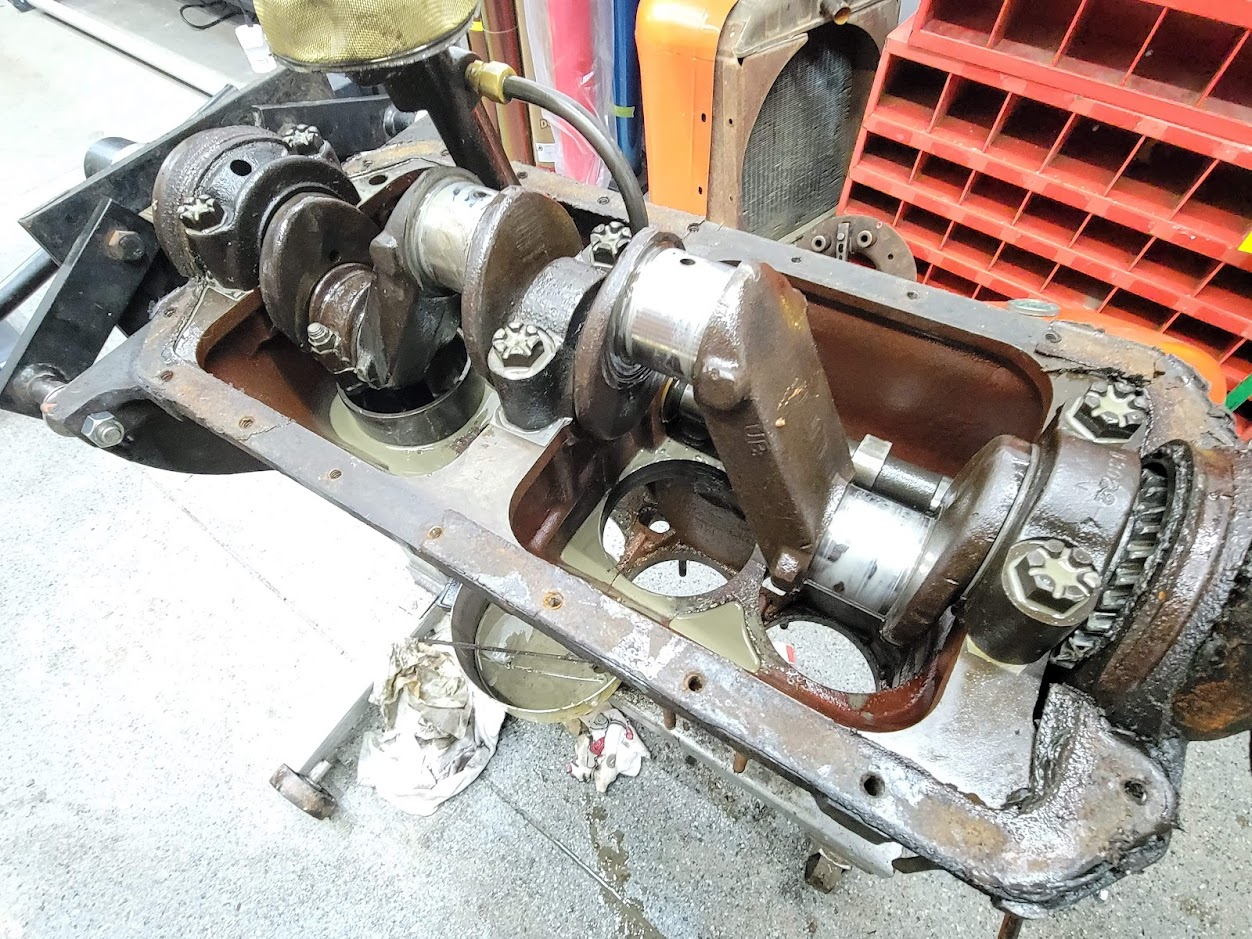 So, While i wait to find a decent WD45 Crankshaft, I moved onto the tractor again. lots of little parts that had to be removed to prep for sandblasting. I have about 3 weeks before the snow starts to fly here in Ontario and would like to get the major parts blasted and primed before then.  |
Posted By: Sugarmaker
Date Posted: 27 Oct 2021 at 6:53am
|
Mr and Mrs Taylor, I am impressed! Your right into it! I am sure a 45 crank is out there for you somewhere! clean up of parts? Yes I had parts all over the place as I did these refurb projects Might look like this:   Your doing great! Thanks for posting the updates! Regards, Chris ------------- D17 1958 (NFE), WD45 1954 (NFE), WD 1952 (NFE), WD 1950 (WFE), Allis F-40 forklift, Allis CA, Allis D14, Ford Jubilee, Many IH Cub Cadets, 32 Ford Dump, 65 Comet. |
Posted By: SteveM C/IL
Date Posted: 27 Oct 2021 at 7:11am
I mis read your statement thinking cam but you are correct on regrinding a used one. 175 has more lift but don't remember how much. Ballpark of .050? Have no idea about duration timing.
|
Posted By: JK in Pa
Date Posted: 27 Oct 2021 at 8:51am
| Making good progress. The crack between 2-3 usually isn’t anything to be concerned about. A good quality head gasket will seal properly. The 40 series I had mentioned would be after the main casting number located on lower right side toward front. 3019-40 was the last WD series casting and had a little more “meat” between cylinders. I have never seen a 40 block that had any cracks. You will have to carefully check the bottom for cracks if you would use that block. Good luck. |
Posted By: Jtaylor
Date Posted: 27 Oct 2021 at 9:39am
I will be using the spare block (original to the tractor) for the engine rebuild. the engine serial number i have here is WD331048PA
|
Posted By: Jtaylor
Date Posted: 27 Oct 2021 at 9:42am
I appreciate the feedback! hopefully have some new-looking parts shortly. some items are cleaning up great. I am just aiming to have the main chassis prepped before it snows!
|
Posted By: Sugarmaker
Date Posted: 30 Oct 2021 at 7:36am
|
Justin, Always a race with mother nature. Good luck! Keep up the good work on the WD! Regards, Chris
------------- D17 1958 (NFE), WD45 1954 (NFE), WD 1952 (NFE), WD 1950 (WFE), Allis F-40 forklift, Allis CA, Allis D14, Ford Jubilee, Many IH Cub Cadets, 32 Ford Dump, 65 Comet. |
Posted By: ac hunter
Date Posted: 30 Oct 2021 at 8:51am
| Very interesting to watch your progress. Thanks for all the pictures. Hope the weather doesn't catch up to you too soon. |
Posted By: Jtaylor
Date Posted: 01 Nov 2021 at 7:20am
Well, A continuation of cotter pin and lefty-loosie bolt removals got us a lot closer to blasting. 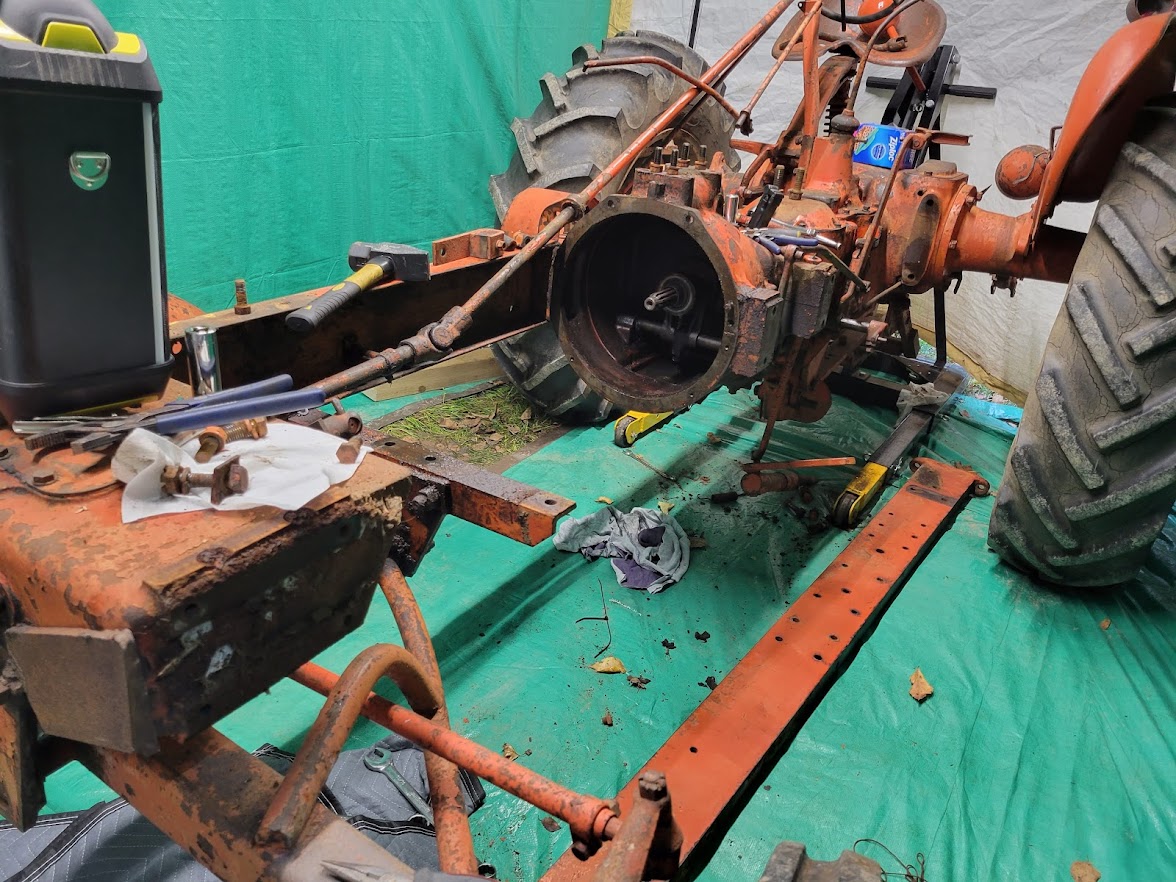 the steering u-joint came out with ease. must have been a good thing being that it was covered in oil for who knows how long.. 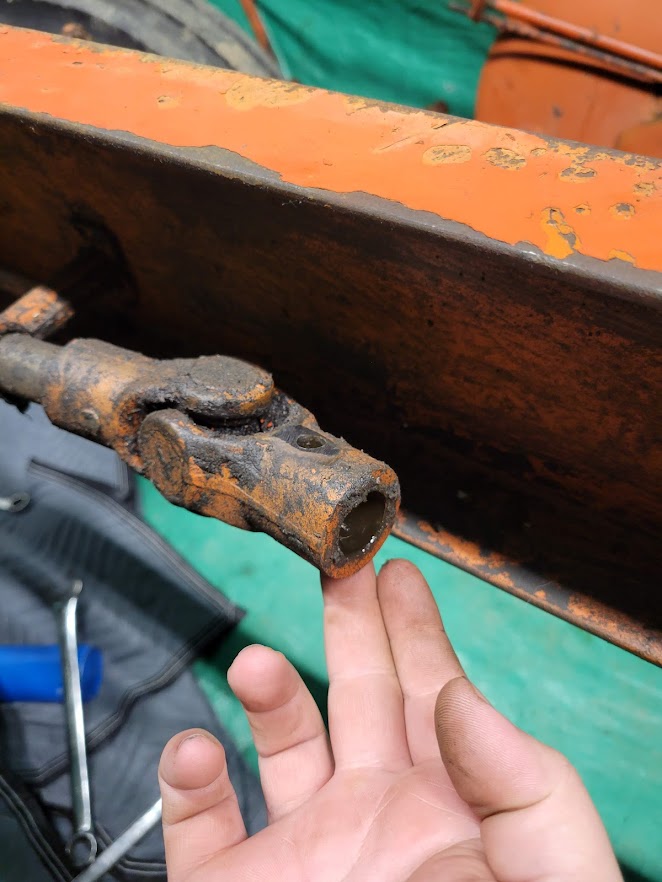 No broken bolts during frame rail removal, broke 2 bolts in the cast fender mounts, not the end of the world at the moment. will remove those later. this photo brought to you by our sponsor... ZIPLOC!  here is how the rear of the unit looks at the moment. 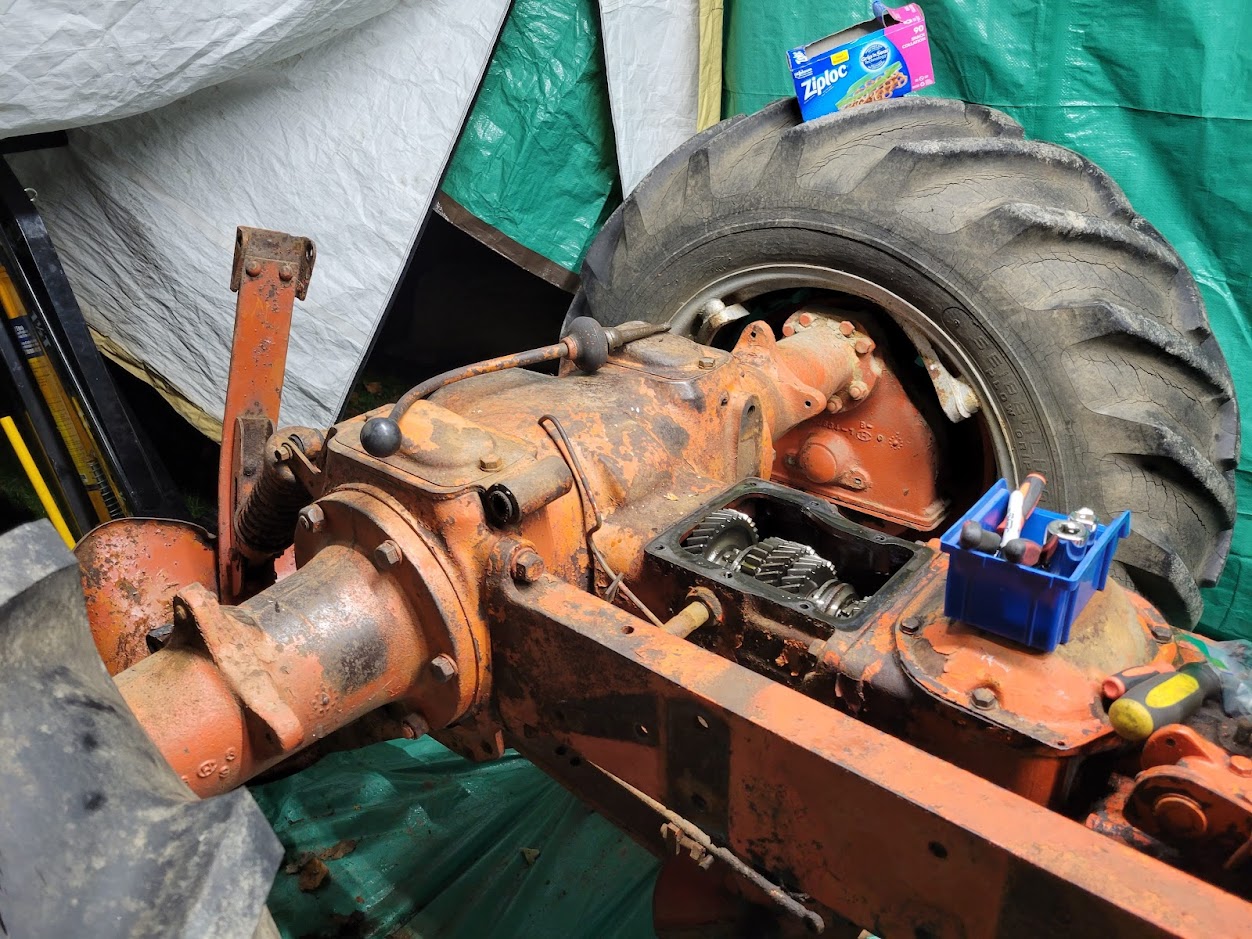 Transmission internals look okay, a little surface rust - likely from sitting for so long prior to us getting it. 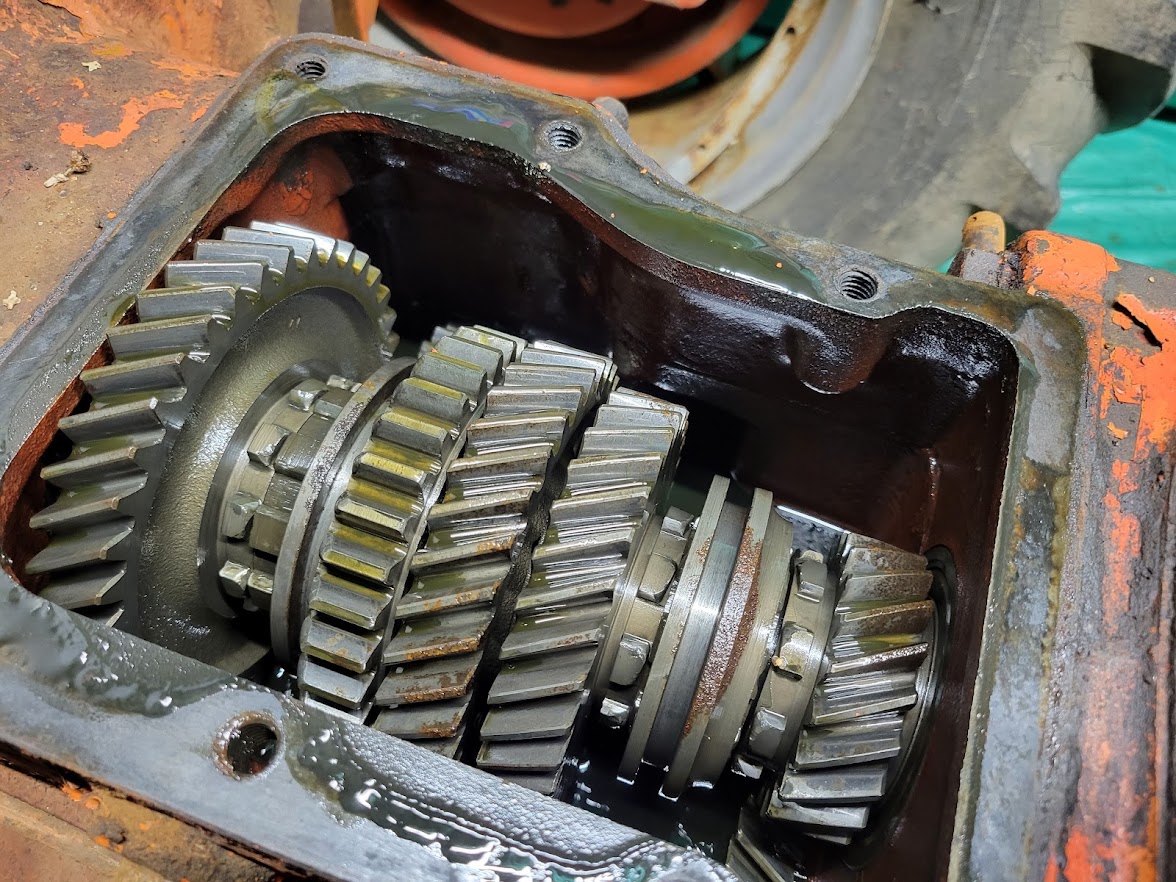 We should be good for sandblasting this weekend. I will be degreasing the transmission and frame assembly prior to that. more photos coming soon! |
Posted By: Sugarmaker
Date Posted: 01 Nov 2021 at 7:43am
|
Justin, I did a 7 bolt front plate for my wide front Allis. Looks like youre is going to need some attention too. Your doing great! Wow! I have been hear before and its a lot of work. Hate to say that this is the easy part, but the clean up and repairs just take a lot of time. Sandblasting some of the items will help a lot. Are you doing and clutch work in there? Like hand clutch?? Yep now is the time. Some need it some are ok for a long time as is. Hang in there. Colder weather is around the corner. Heading to the shop and hoping its about 68 degrees in there on this 44 degree morning! Regards, Chris ------------- D17 1958 (NFE), WD45 1954 (NFE), WD 1952 (NFE), WD 1950 (WFE), Allis F-40 forklift, Allis CA, Allis D14, Ford Jubilee, Many IH Cub Cadets, 32 Ford Dump, 65 Comet. |
Posted By: Jtaylor
Date Posted: 01 Nov 2021 at 10:33am
We are going to see, i dont think the hand clutch needs much work, currently it is working great and rarely wear out. I think we are just going to change fluid and run it as is. everything mechanically that way is good just the engine mainly. Sandblasting will give me a fresh starting point for the whole tractor. lets me start from the ground up and make sure we dont have much to address on the rebuild.
|
Posted By: 55allis
Date Posted: 01 Nov 2021 at 12:43pm
| Still well you have it apart check how many shims are left in the hand clutch since you’d have to split the tractor to rebuild. |
Posted By: Jtaylor
Date Posted: 07 Nov 2021 at 8:36pm
|
Well, Another update here. Took Allie for a little pre-sandblasting bath. 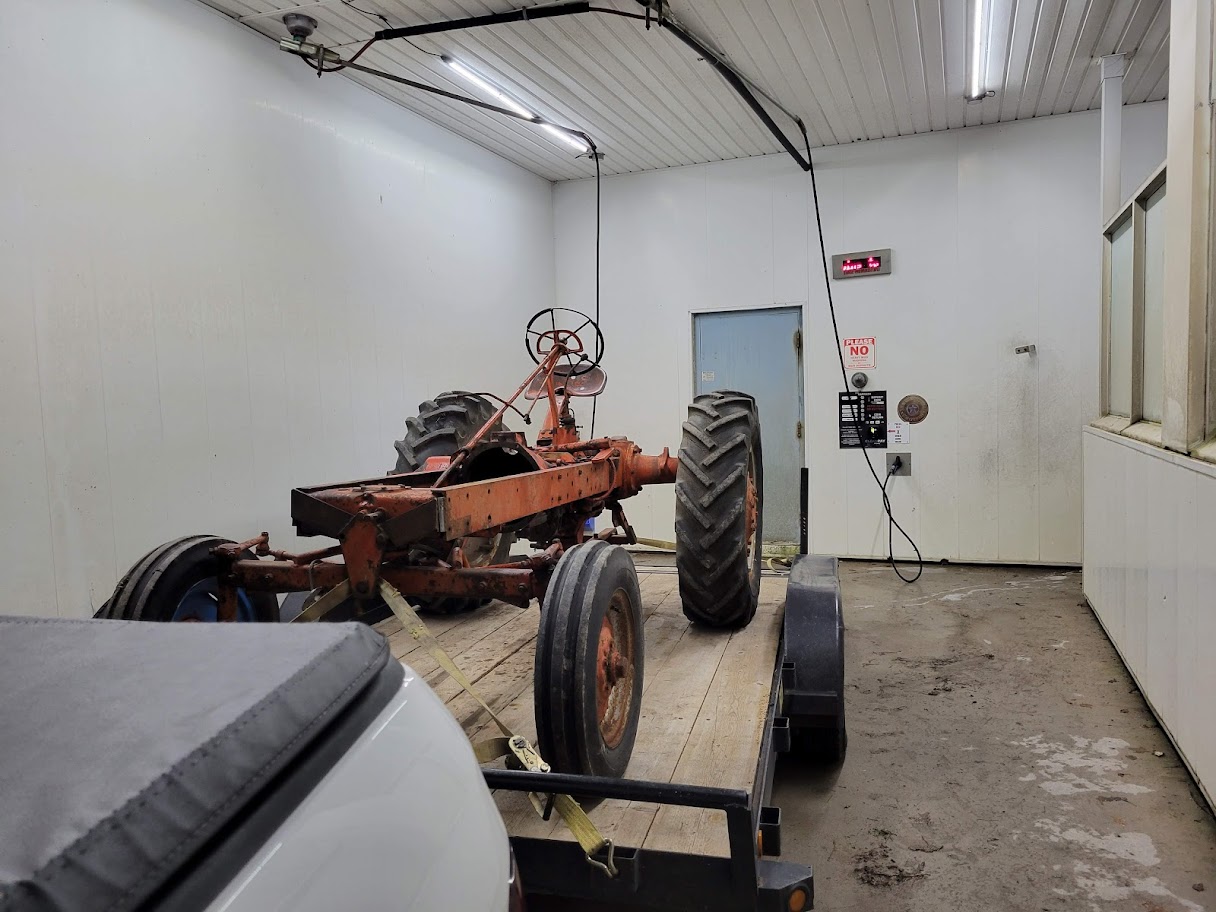 Then, off to the parents property to get setup for sandblasting. Under tent and all! 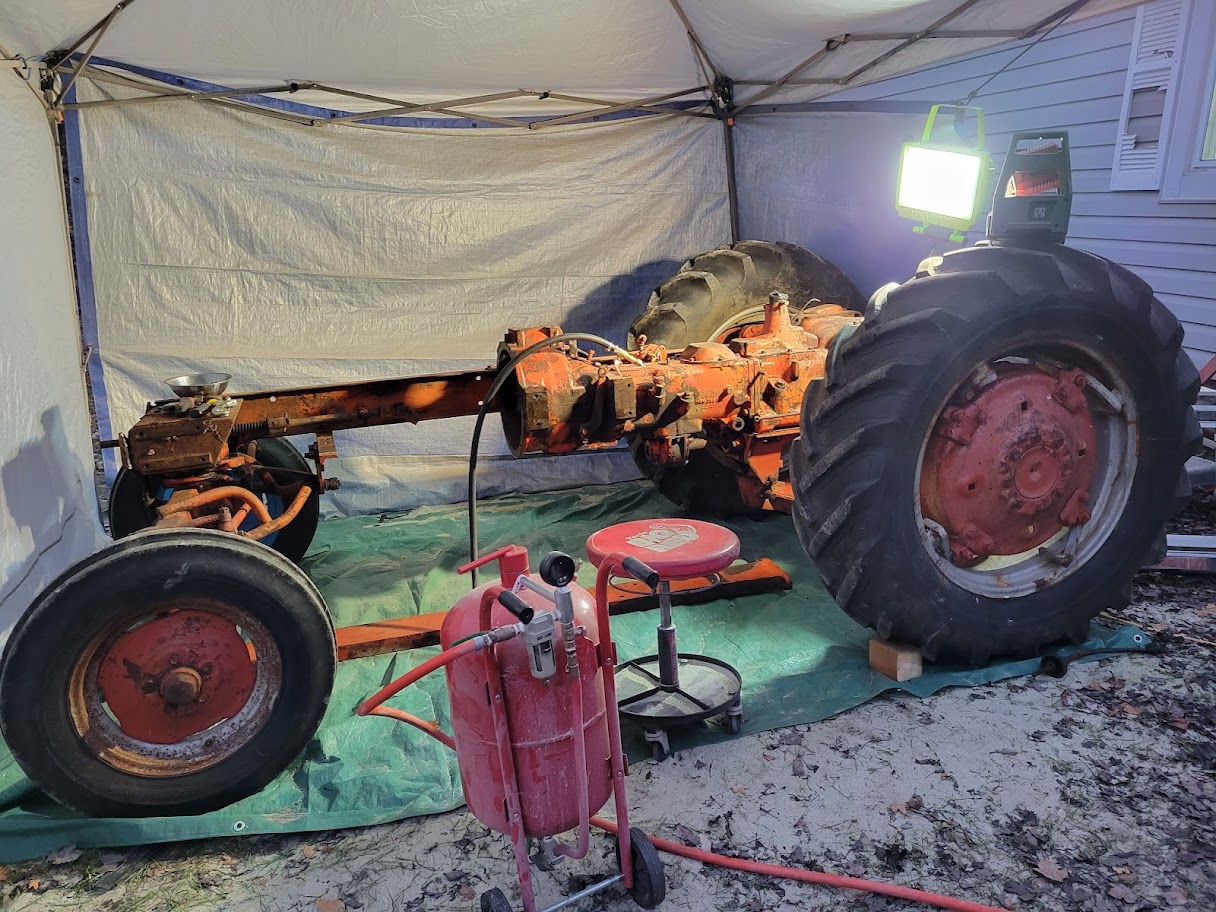 And so we begin... About 1 hour into it and this is how far we've gotten. using crushed glass and about 70psi of constant pressure. Aiming to have this finished up on the next couple of days and prepped for primer on all the fresh metal asap. 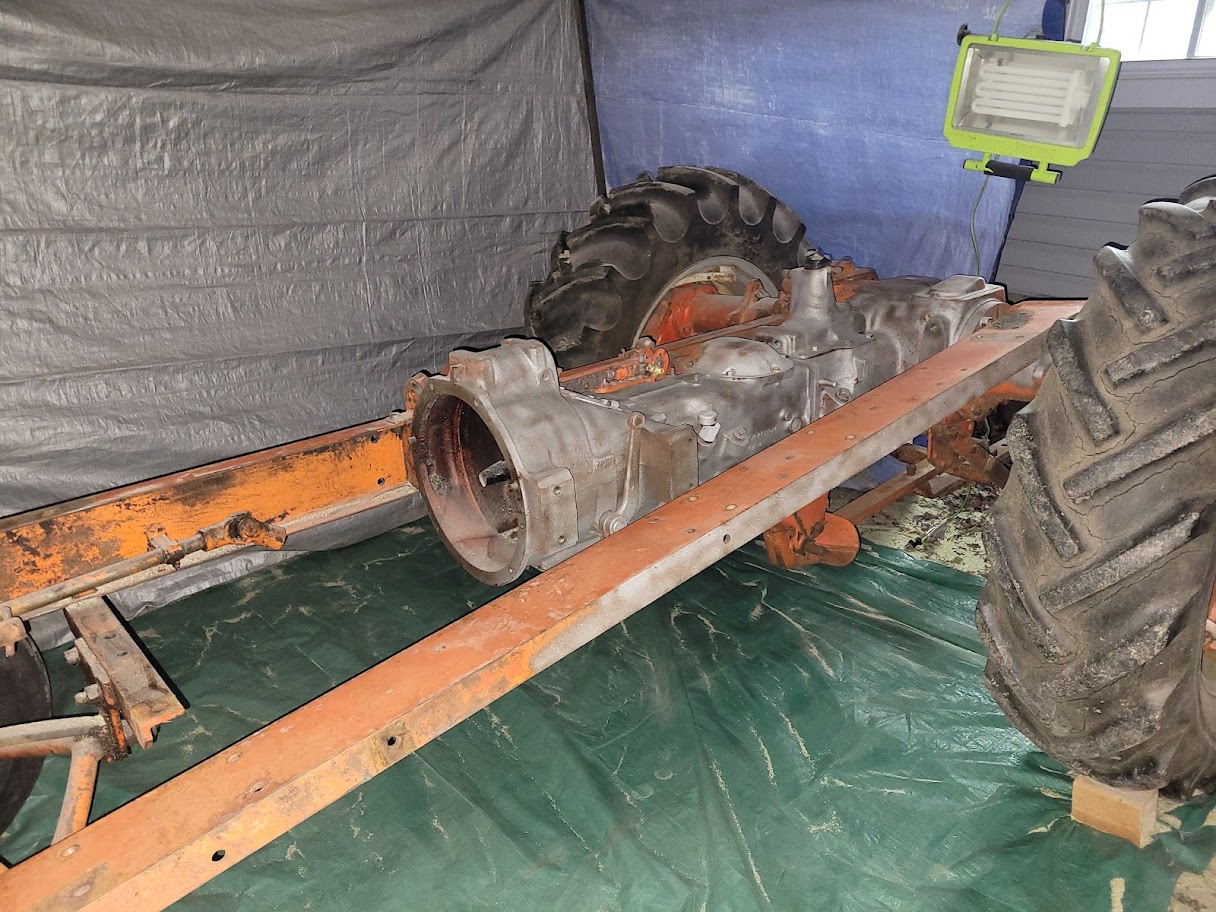 |
Posted By: 55allis
Date Posted: 07 Nov 2021 at 9:21pm
| Looking good!!! |
Posted By: plummerscarin
Date Posted: 08 Nov 2021 at 6:35am
| Doing great. Keep it up |
Posted By: Jtaylor
Date Posted: 09 Nov 2021 at 6:44am
Made some more progress on the tractor last night sandblasting. almost finished the back half anyways. 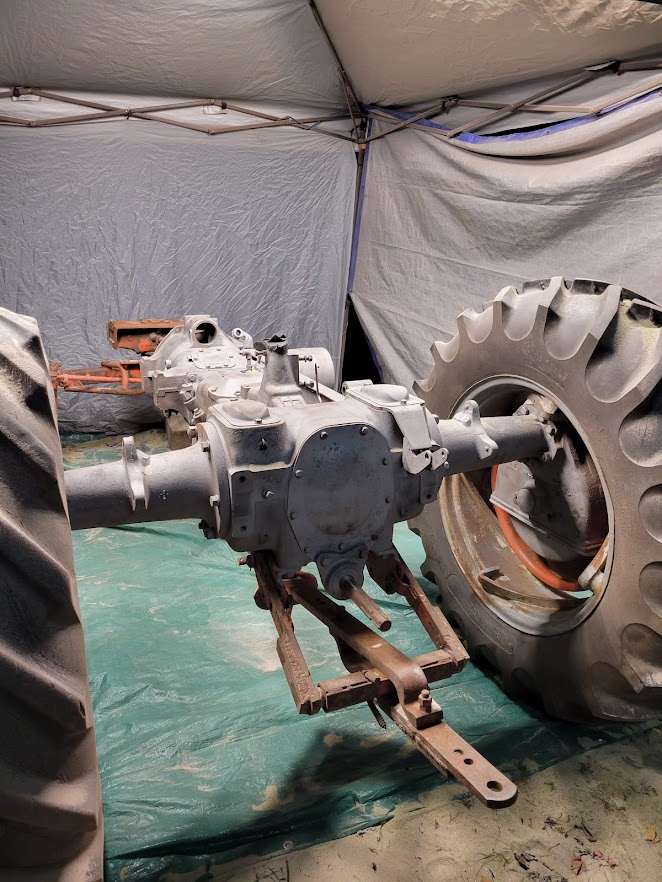 and, after sandblasting the crud off the shift tower, take a look at the twisted number "1". You could say its a "one-off"  Now, I just need to get the correct Primer, What does everyone suggest? looking at painting in the springtime with PPG 60080 single stage (MTX) or the vansickle paint if i can get down to the USA sometime soon..
|
Posted By: Eric B
Date Posted: 09 Nov 2021 at 12:04pm
|
Looking good!!! ------------- Currently- WD,WC,3WF's,2 D14's B. Previously- I 600,TL745,200,FL9,FR12,H3,816 LBH. Earth has no sorrow that Heaven cannot heal! |
Posted By: Ed (Ont)
Date Posted: 09 Nov 2021 at 2:06pm
| That number “1” is pretty unique. Wonder how many went down the line like that? |
Posted By: Sugarmaker
Date Posted: 09 Nov 2021 at 3:40pm
|
Yes I like the number "1" also! I have never seen one like that. Very rare and expensive unit you have there! The cleaning is coming along nicely! Keep at it! There are a lot of nooks and crannies to get the protective coatings off of. I have found most of them and daubed some paint on places no one will ever see. Its going to look real good in PO#1! Thanks for the update! Regards, Chris ------------- D17 1958 (NFE), WD45 1954 (NFE), WD 1952 (NFE), WD 1950 (WFE), Allis F-40 forklift, Allis CA, Allis D14, Ford Jubilee, Many IH Cub Cadets, 32 Ford Dump, 65 Comet. |
Posted By: Jtaylor
Date Posted: 10 Nov 2021 at 7:49am
|
Well, Let the money spending commence! here was my cheap pickup from Princess Auto (canadian harbor freight). Cotter pin kit, "R" clip kit and the pin for $30. Cant beat that! The pin was suggested by a local farmer for the replacement hand clutch. He suggested to cut down one of these pins and drill a hole for the cotter pin as a replacement for the transmission mounted pivot. at $10.99, it was a much cheaper (and shorter) option than 7/8 cold rolled steel ($55 here for 4 ft) 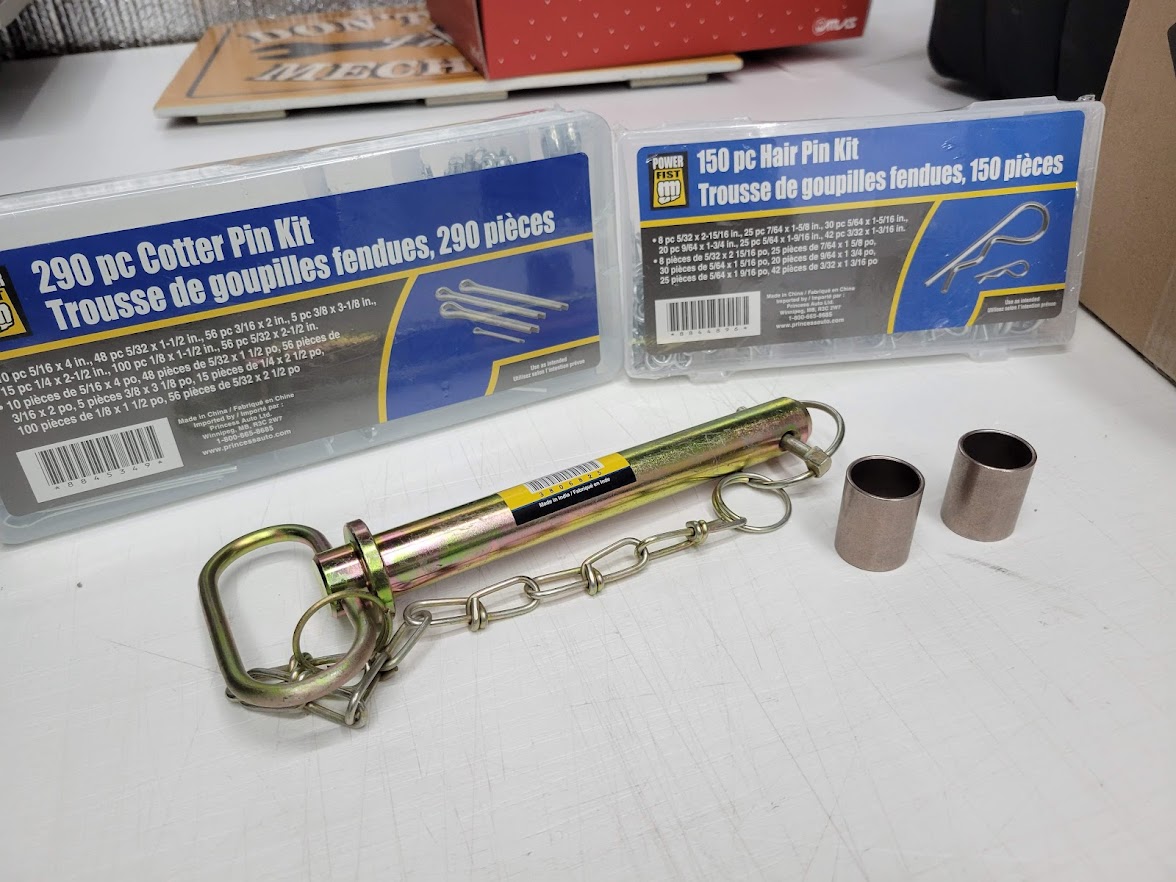 We also picked up the primer required for the cast iron. the local paint expert suggested epoxy primer since it will be sitting until springtime for paint. this was quite expensive but well worth it for the correct paint finish. $232.50 for 2 usable gallons. mixing at 1:1 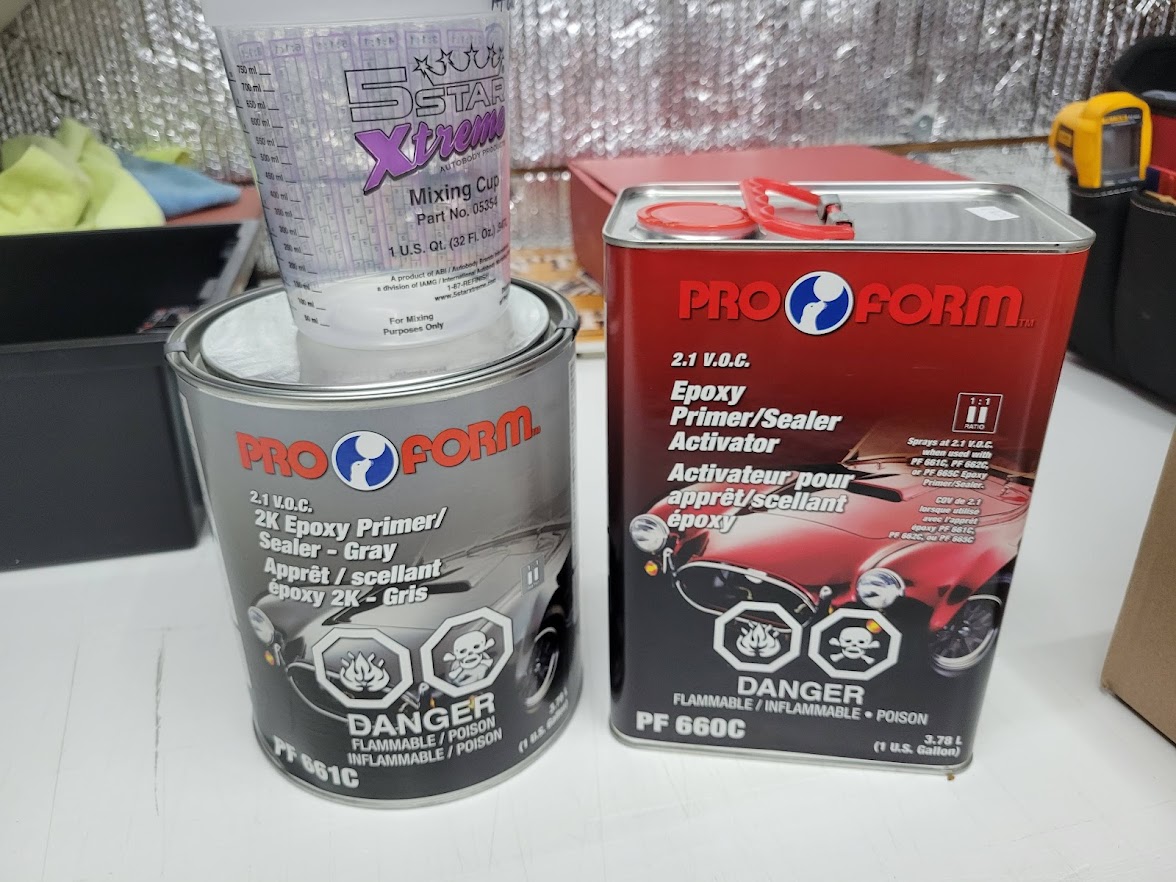 |
Posted By: IBWD MIke
Date Posted: 10 Nov 2021 at 8:49am
|
Nice. That cotter-pin kit should be required before being allowed to farm. Don't know how many nasty scratches I've had from some rusty nail bent to work as a c-pin!
|
Posted By: Jtaylor
Date Posted: 15 Nov 2021 at 8:14am
Well, I am finished for the time being on the sandblasting side of things. here is how it turned out. 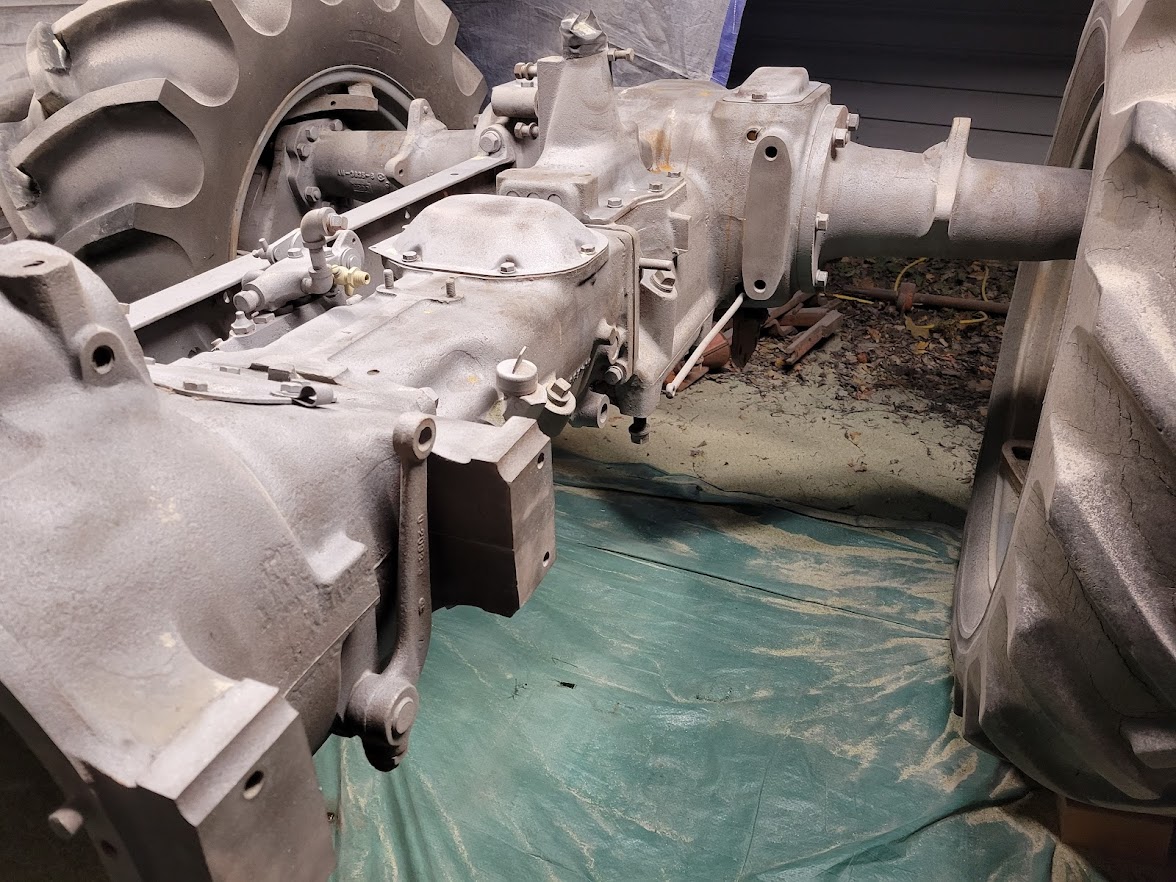 I have started on the repairs to the transmission shift forks (that are bent) so i have removed the cover and set it on the bench for the time being. 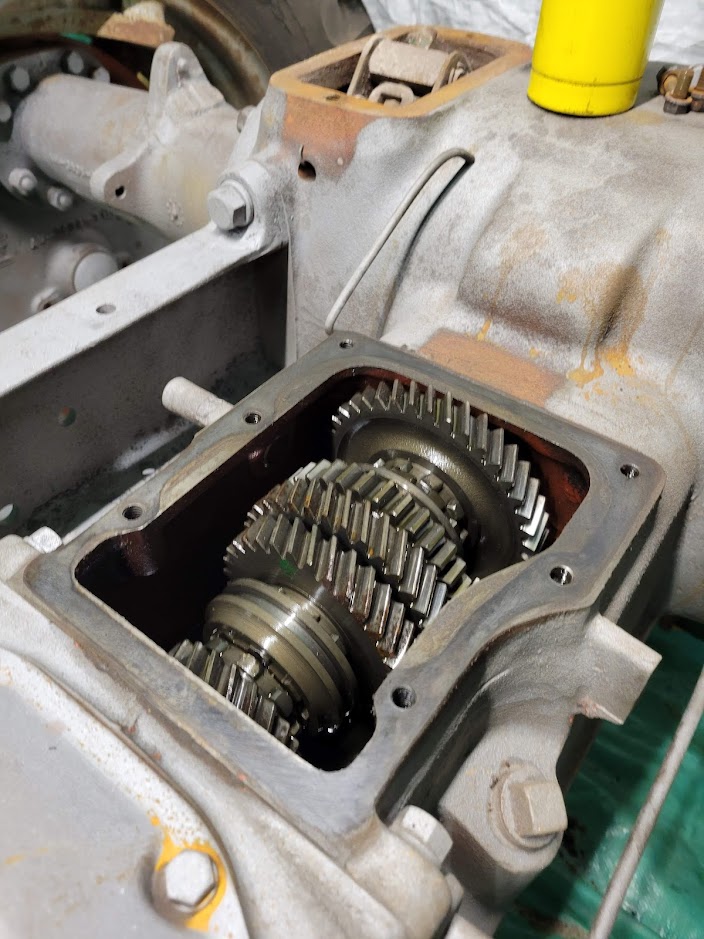 I also wanted to replace the hand clutch shaft while the cover was off. I got my punch set and a couple of rather large hammers ready. I heated it up with map gas as hot as i was comfortable with and started to pound the shaft out from the inside. no luck! didnt even move a tiny bit.. it looks like i will have to get things a lot warmer for it to expand enough. any tips from the ones who have replaced it before? it is beyond repair in my books and would rather it be replaced with new than repaired. 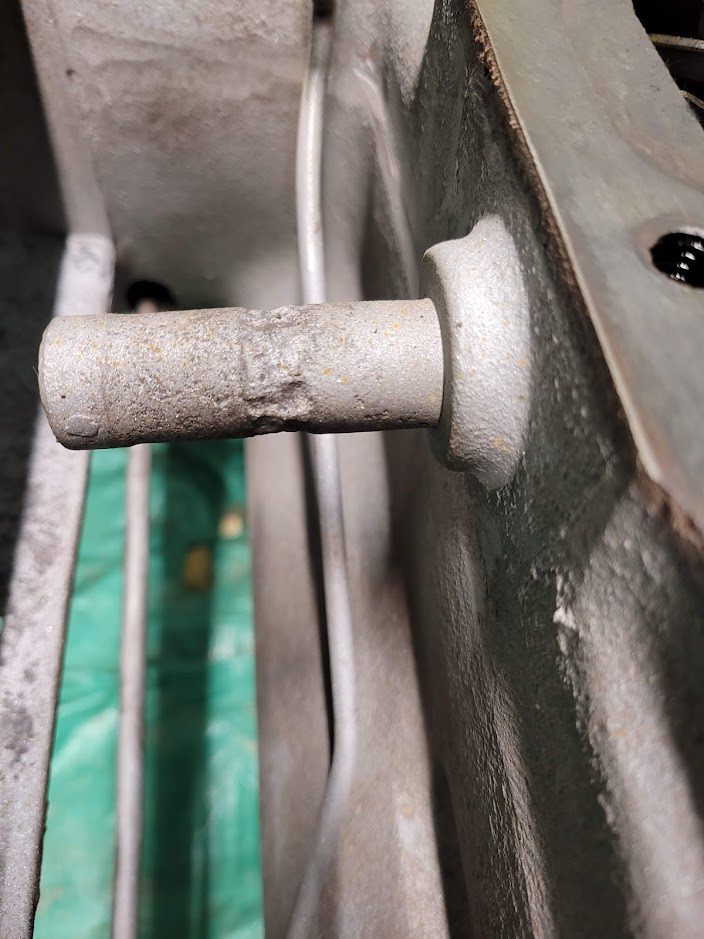 |
Posted By: Sugarmaker
Date Posted: 17 Nov 2021 at 8:33pm
|
Justin, Sandblasting for clean up looks good. I did one pin replacement and did not do a good job. The hole in the case was wollowed out. I attempted to drill it and put in another pin. I did not have the tools to do it right and it still iss loose and leaks. I assume this pin really needs to be pressed out and in for a correct job. I have welded up several of them to my satisfaction and hand worked them back close to round. Mush better than they were in the worn state. And then also re bushed the handle. Took out 90% of the slop. Keep at it! Regards, Chris ------------- D17 1958 (NFE), WD45 1954 (NFE), WD 1952 (NFE), WD 1950 (WFE), Allis F-40 forklift, Allis CA, Allis D14, Ford Jubilee, Many IH Cub Cadets, 32 Ford Dump, 65 Comet. |
Posted By: DaveKamp
Date Posted: 18 Nov 2021 at 7:58am
|
Hi Justin- GREAT WORK!!! On that pin... either lay filler across it with a MIG, then follow up with a 4" angle grinder and a flap-disk to hand-form it back to round, or grind it DOWN to a slightly smaller OD, and make a sleeve that will slip over. Drill a hole in the sleeve about where the deepest divot is, then fill INTO the hole, which will not only fill the void, it will also secure the sleeve... Then dress the hole you welded shut to round and smooth. Do re-bush the inside of the lever. Take the guys' advise on the hand clutch, and while you're in there, make certain that none of the pins can migrate loose and fall into the PTO gear housing. Don't ask me how I know... ------------- Ten Amendments, Ten Commandments, and one Golden Rule solve most every problem. Citrus hand-cleaner with Pumice does the rest. |
Posted By: Jtaylor
Date Posted: 18 Nov 2021 at 2:01pm
|
We have success! The pin was removed. a couple of good hits with the hammer and it started to move.  Here is a side by side comparison of the original pin and the new pin that i made up.  I ultimately had to finish splitting the tractor in half to get the new pin in place correctly. that required removal of the pulley and removing the front end to set aside. here is some not very pretty photos of that process. 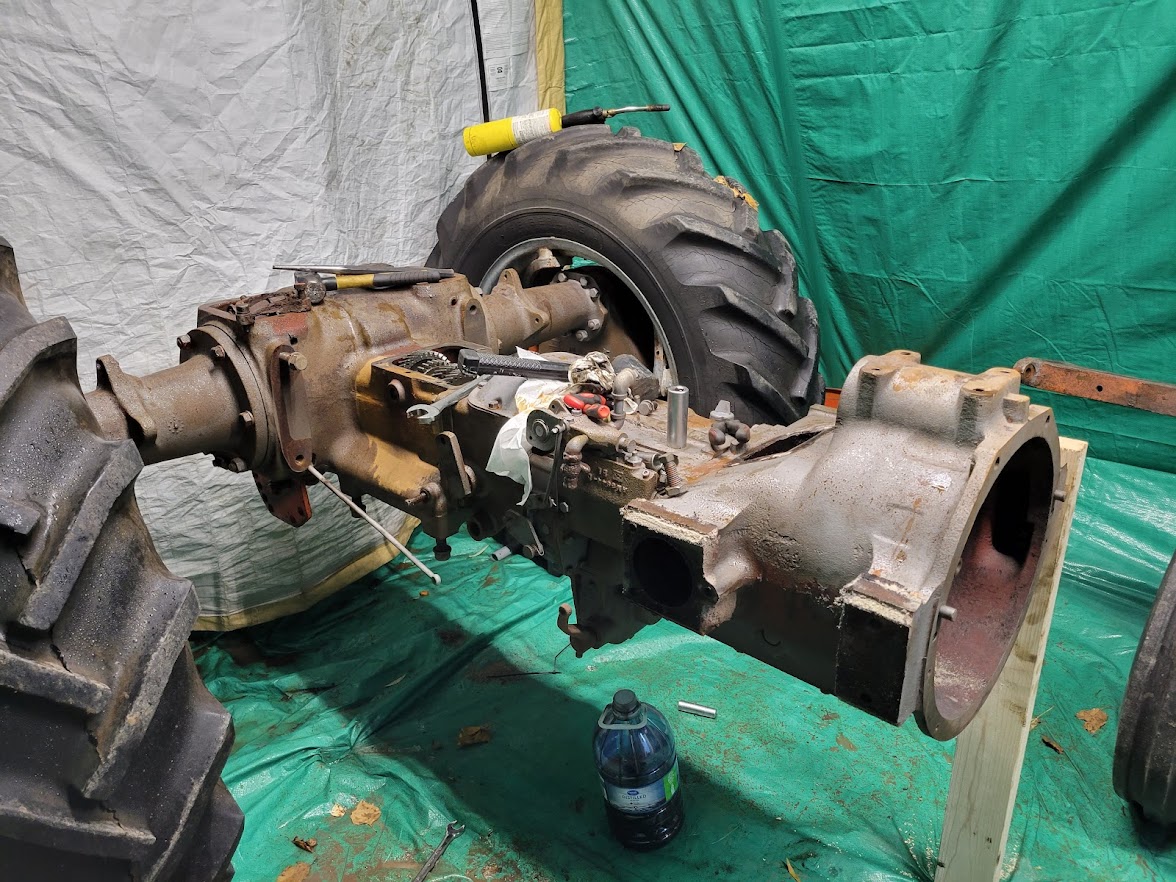 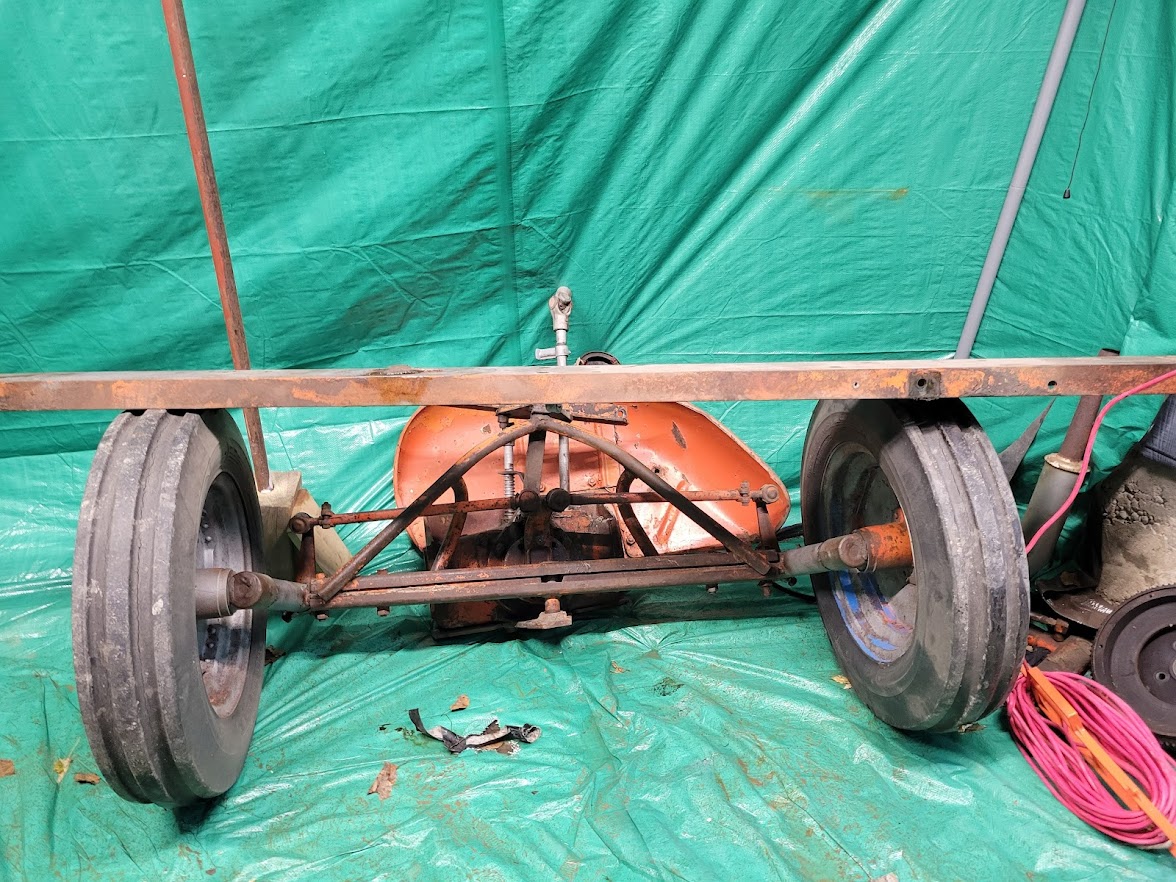 I will be disassembling the front end at some point, although this was just fine for the time being. I started on removal of the bushings for the clutch handle. they came out as expected. 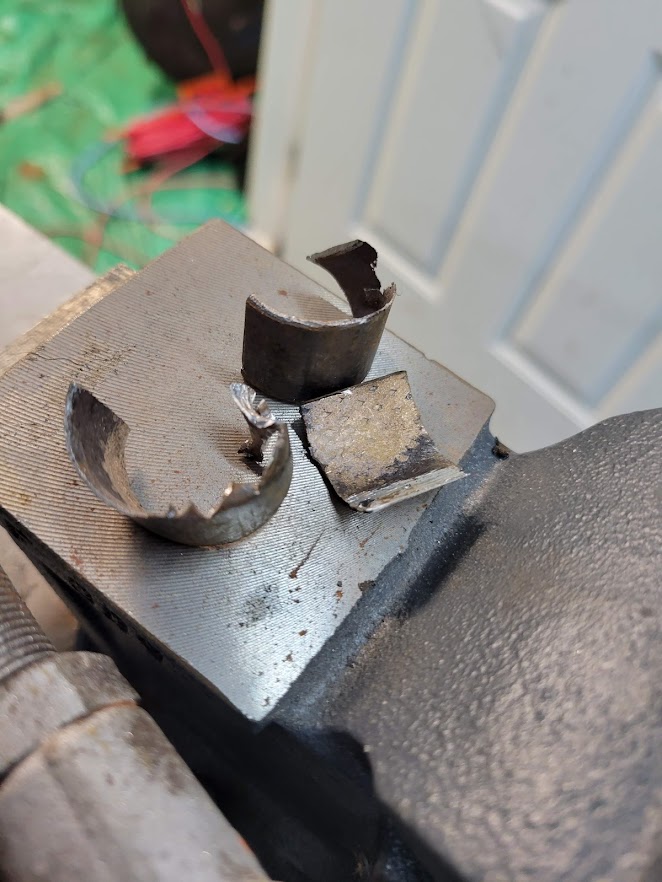 Might just have to repair these pins prior to reinstallation. they are quite worn. hand clutch linkage pins. 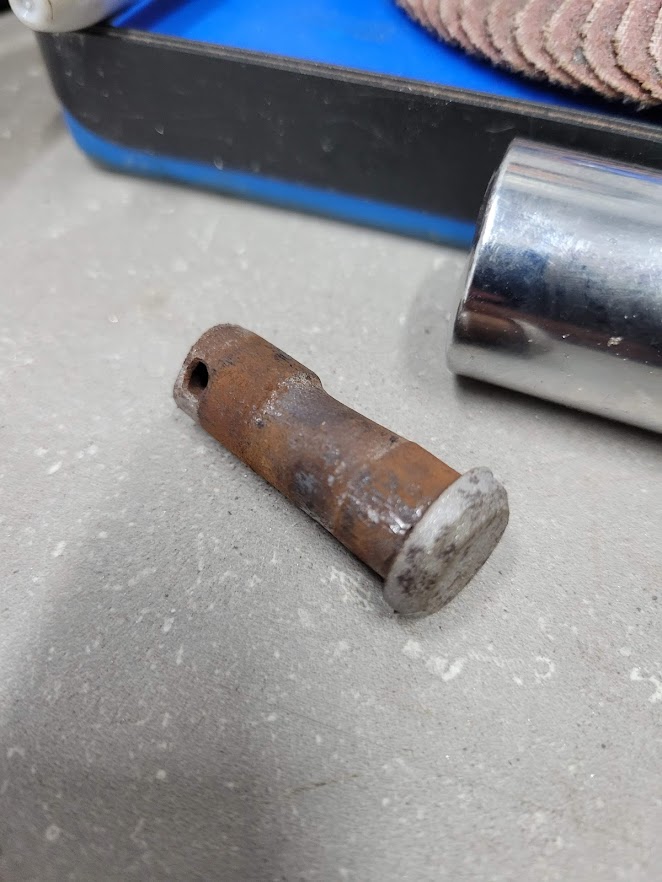 I have also purchased the paint required. That was quite expensive but it is the correct color and finish type. I look forward to laying that down ASAP. Thanks everyone for the input! very helpful! |
Posted By: ac hunter
Date Posted: 19 Nov 2021 at 7:05am
| We enjoy watching your progress. Thanks for the updates and pictures. Good work. |
Posted By: Jtaylor
Date Posted: 19 Nov 2021 at 8:47am
And.... We have paint! I spent the extra money on PPG MTX paint. Code was 60080 Allis Persian Orange. Looks very close actually. I am pleased with the color. 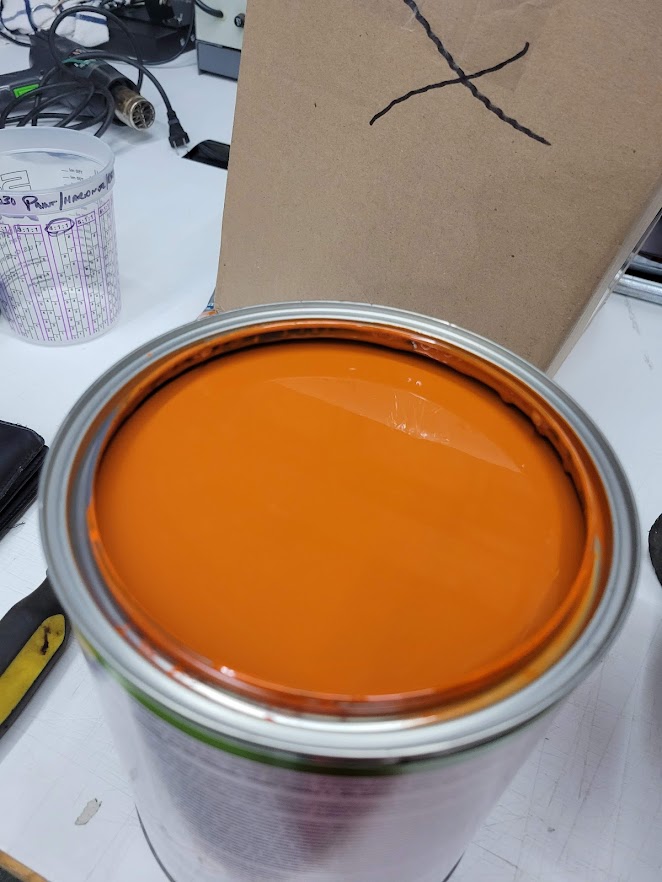 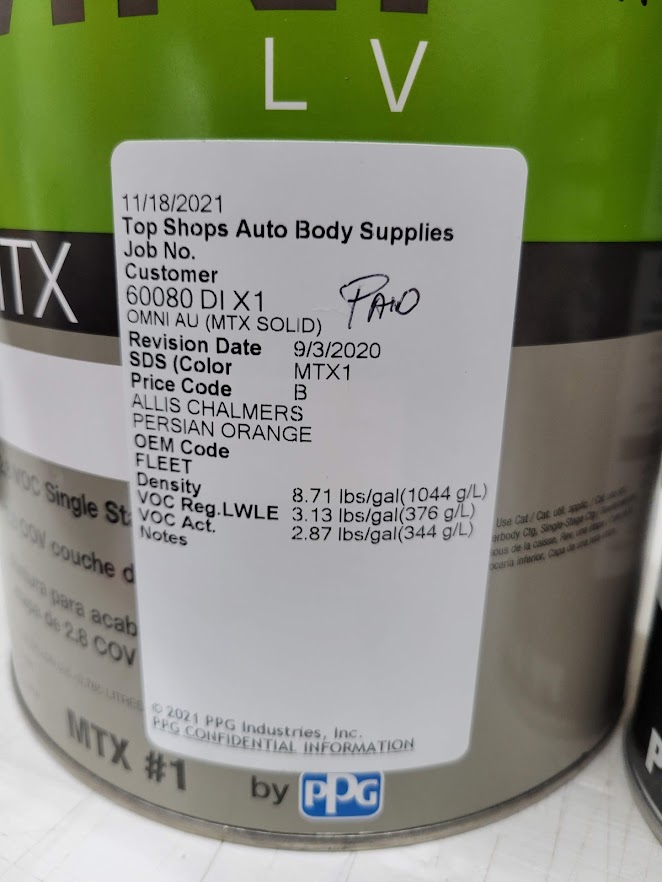 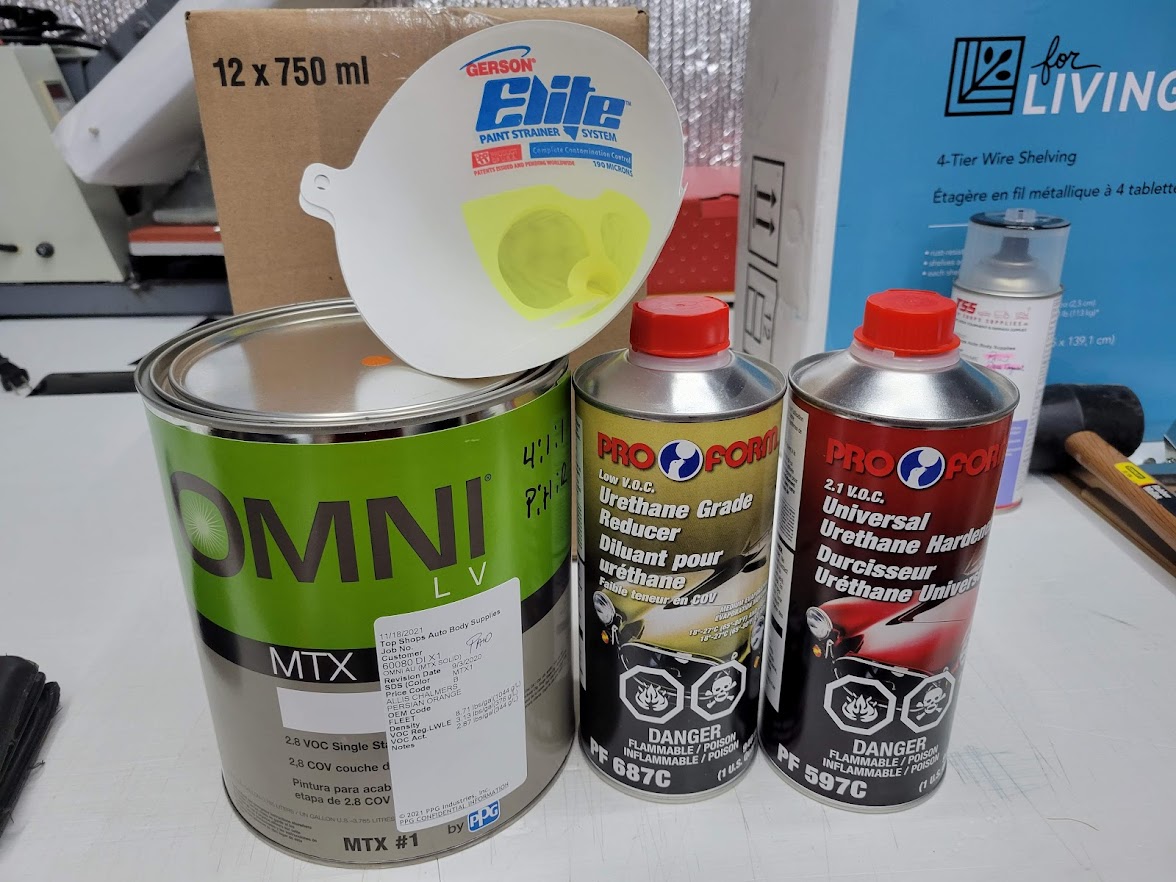 And, As recommended by the body shop, this will be used as the final skim coat on the frame rails and tin. just to make things smooth and nice.  |
Posted By: Sugarmaker
Date Posted: 20 Nov 2021 at 5:44pm
|
Justin, Looks like your work is progressing nicely! Paint looks proper too! Stay at it. Do you have the weather to get it in primer? I spent a lot of time on some of mine and could have spent double that! Regards, Chris ------------- D17 1958 (NFE), WD45 1954 (NFE), WD 1952 (NFE), WD 1950 (WFE), Allis F-40 forklift, Allis CA, Allis D14, Ford Jubilee, Many IH Cub Cadets, 32 Ford Dump, 65 Comet. |
Posted By: Jtaylor
Date Posted: 22 Nov 2021 at 9:27am
Thanks! I have some heat where needed for the primer to work correctly. should be good here in the next few days to get it primed and prepped for paint.
|
Posted By: Jtaylor
Date Posted: 22 Nov 2021 at 9:31am
|
A little more progress with the pre-primer prep. Got the hand clutch pivot pin installed into the frame of the tractor. freezing this pin and heating the casting made this a 10 minute project. its even the correct length! 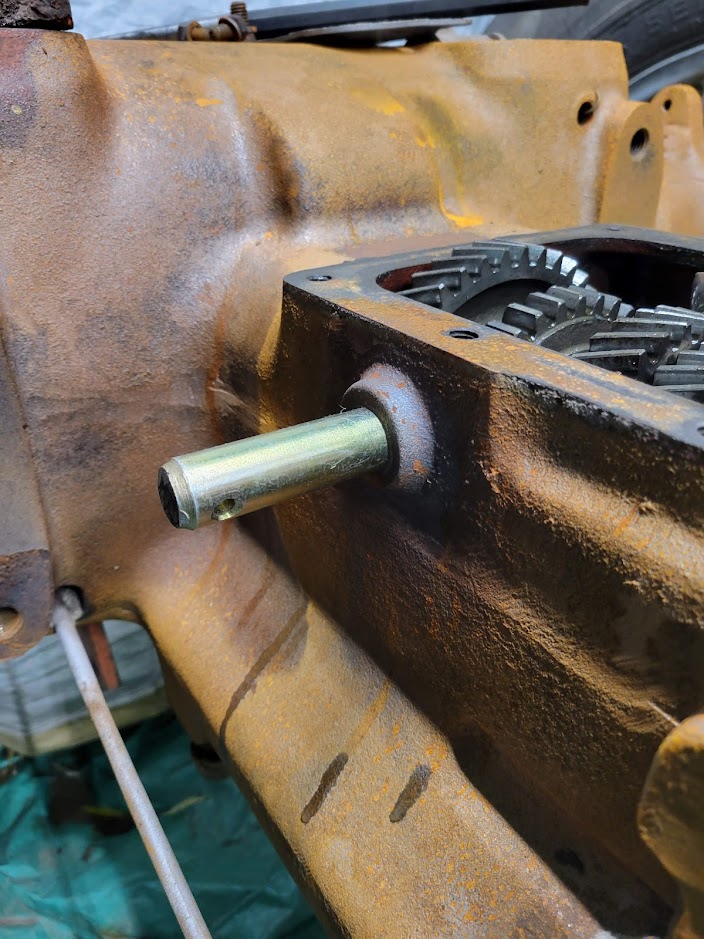 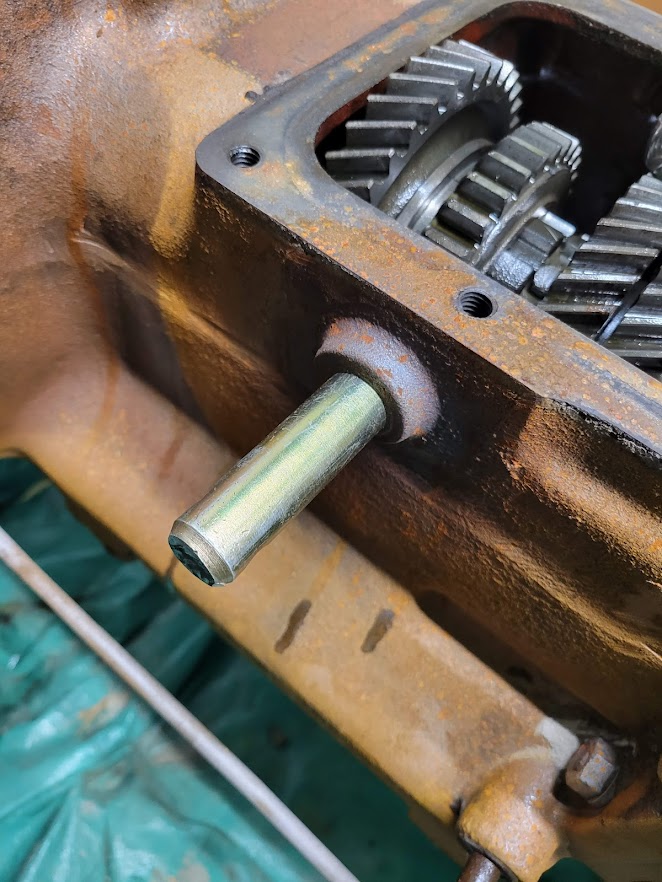 I also plugged away with cleaning some remaining gunk from the small hard to reach areas. brake cleaned all the areas i needed to and got the unit much closer to primer.
|
Posted By: 55allis
Date Posted: 25 Nov 2021 at 11:54am
|
Most brake cleaners will leave a residue that will make the primer not stick. I tried it once on a different tractor I was painting and it peeled later on. |
Posted By: Jtaylor
Date Posted: 25 Nov 2021 at 1:02pm
The plan was to use the brake cleaner to remove the gunk, then as requested by the proform folks was to lacquer thinner the whole chassis prior to priming. they say that is the best combo for my application. they also recommend to off gas the cast iron for about 1 day after the lacquer thinner.
|
Posted By: Sugarmaker
Date Posted: 27 Nov 2021 at 5:48pm
|
J, Pivot pin looks great! Your almost there. Prep is the biggest part of the project. Stay at it! Fresh paint is a great accomplishment! Regards, Chris ------------- D17 1958 (NFE), WD45 1954 (NFE), WD 1952 (NFE), WD 1950 (WFE), Allis F-40 forklift, Allis CA, Allis D14, Ford Jubilee, Many IH Cub Cadets, 32 Ford Dump, 65 Comet. |
Posted By: Jtaylor
Date Posted: 29 Nov 2021 at 9:35am
|
Well, Some slow progress on the tractor as of lately. working away at cleaning all the push and pull rods for external linkages, i started masking the top covers in preperation for some primer and paint. After looking more and more, I did Notice a couple of bolts i needed to remove prior to paint and thought about removing the brake anchor pins and relining the brakes (i'm already this far, might as well re-do those also) here is a cool tip i learned back in the days when i was painting day in and day out. We used to mask all gasket surfaces with traditional tape, overhang the edges and use a standard rubber mallet at a 45* angle to the sharp gasket edges. it seals the edges with the tape adhesive and pinches the tape causing it to be cut perfectly to the edges. much, much easier than cutting with a knife. 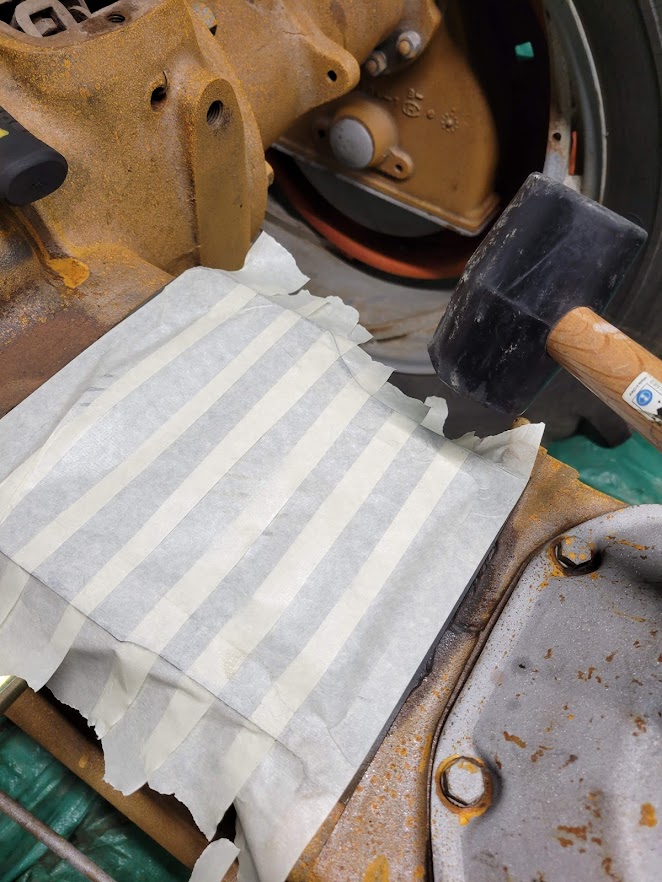 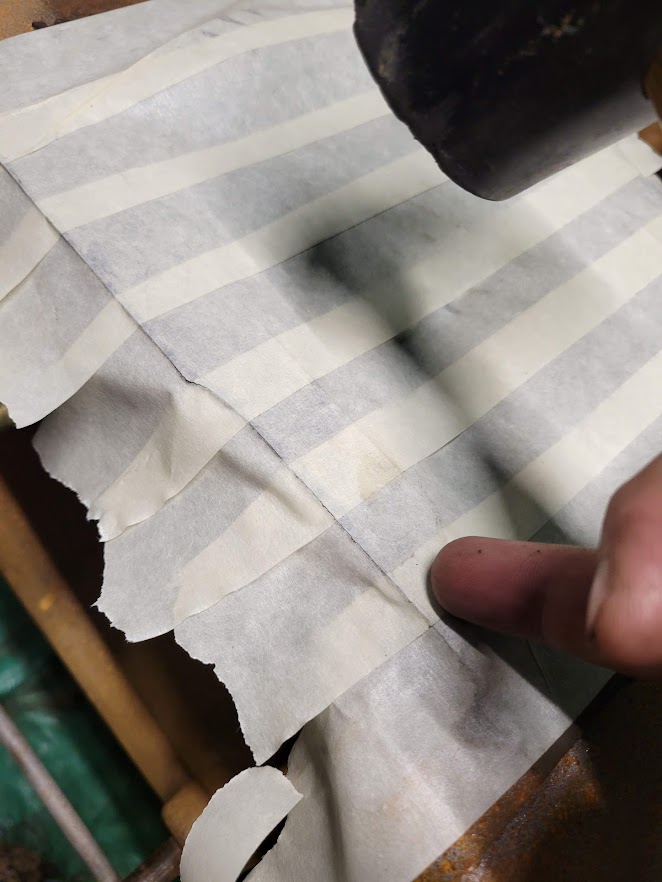  |
Posted By: plummerscarin
Date Posted: 29 Nov 2021 at 11:51am
| Great tip, thanks |
Posted By: IBWD MIke
Date Posted: 29 Nov 2021 at 1:15pm
|
Don't remember where I learned that at but do it the same way, very slick. |
Posted By: Jtaylor
Date Posted: 01 Dec 2021 at 7:04am
|
Placed the order for the majority of the replacement chassis parts. I did also order the engine rebuild kit so I had one ready to prep the block at the local machine shop. here is the start of the list. I pick it up this weekend in New york.  check out that total! not including the majority of engine components or other front end parts  |
Posted By: AC720Man
Date Posted: 01 Dec 2021 at 7:11am
|
Unfortunately it’s very easy to put more into them than what they are worth. It’s a passion of AC love that makes us do it lol. You will have a nice show piece when your done and your doing it the right way, all in. ------------- 1968 B-208, 1976 720 (2 of them)Danco brush hog, single bottom plow,52" snow thrower, belly mower,rear tine tiller, rear blade, front blade, 57"sickle bar,1983 917 hydro, 1968 7hp sno-bee, 1968 190XTD |
Posted By: Jtaylor
Date Posted: 03 Dec 2021 at 6:20am
Finally received my new hand clutch bushings. these were on order for a while and finally came in. 7/8ID X 1"OD. had to be cut down to size after it was pressed into the hand clutch handle. 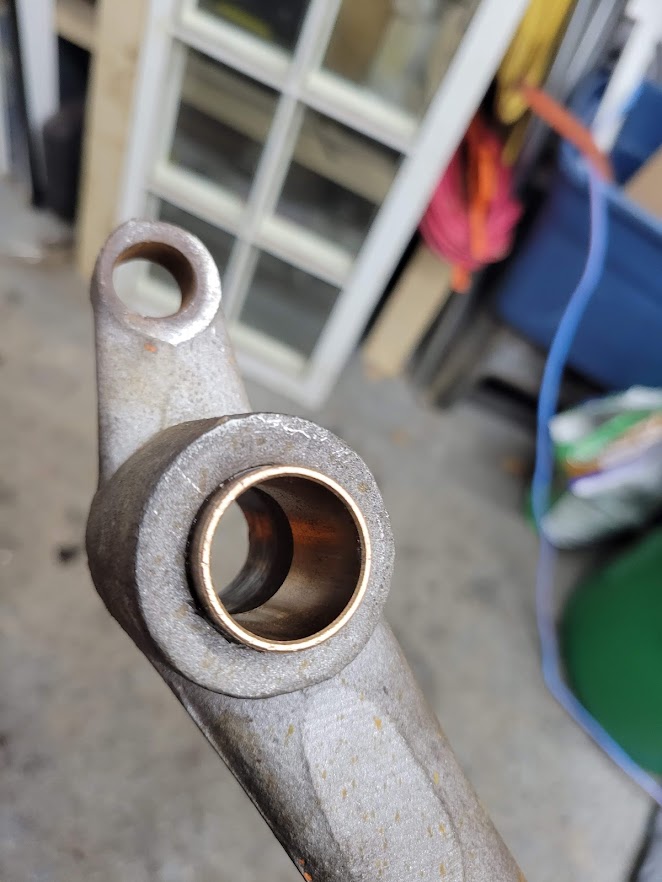 after it was pressed in and cut down, they were test fitted onto the new hand clutch pin. fit perfectly! still need to fill the worn section for the clevis to the linkage rod. I have a new 1/2" clevis bushing ready to go. once installed this piece will be ready for paint. 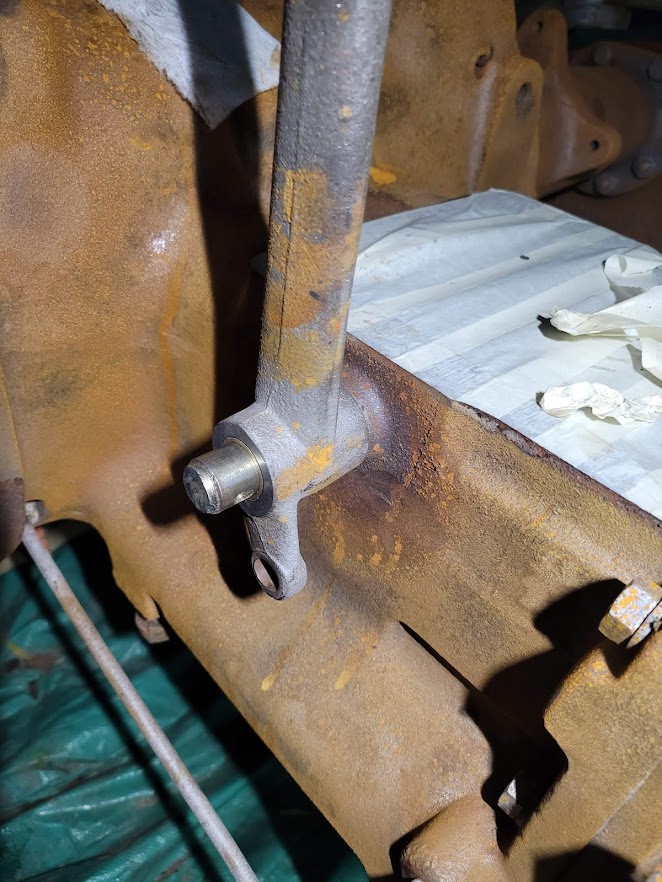 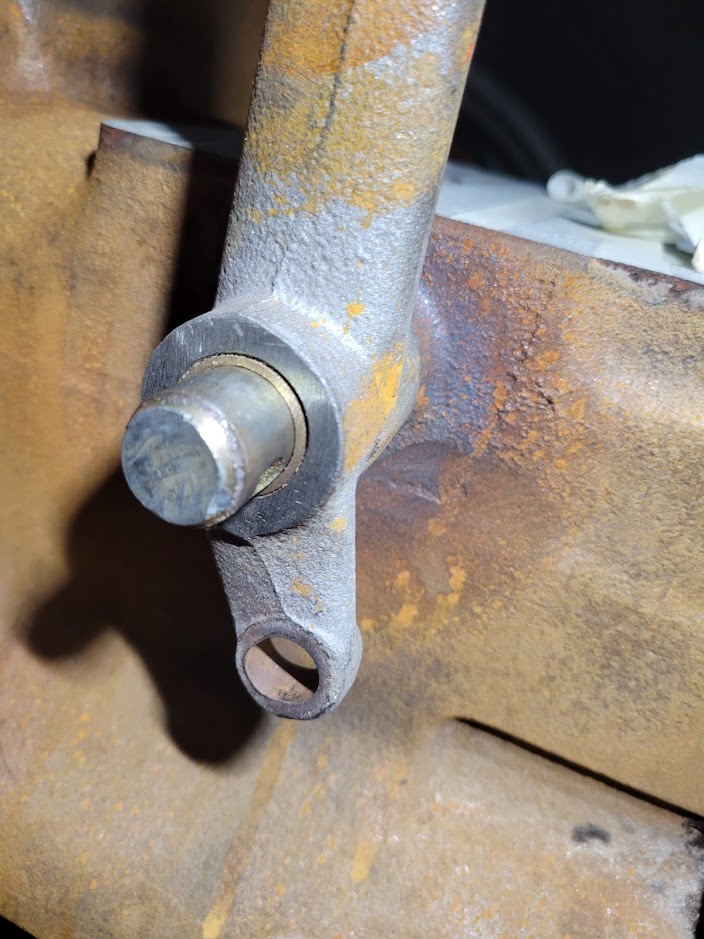 I have a handful of parts ready to be primed and painted. I am working away at the smaller pieces now getting them all cleaned of old paint, chasing threads and getting all the parts and pieces ready to go prior to priming or painting.
|
Posted By: Sugarmaker
Date Posted: 03 Dec 2021 at 7:46am
|
Justin, Thats what you have to do. Keep hitting at each little piece. I must say you did a way better job on the hand clutch rebuild than I have done on some of mine. You will be pleased each time you use it. Remember the orange wind chimes! There are 183 spterate parts other than the engine components! Your doing great. You will probably have parts all over the house? Maybe even hanging on the Christmas tree?:) Thanks for the update on the Allis! Is the bare metal treated? Or is that some light surface rust? Regards, Chris
------------- D17 1958 (NFE), WD45 1954 (NFE), WD 1952 (NFE), WD 1950 (WFE), Allis F-40 forklift, Allis CA, Allis D14, Ford Jubilee, Many IH Cub Cadets, 32 Ford Dump, 65 Comet. |
Posted By: Jtaylor
Date Posted: 03 Dec 2021 at 7:56am
Tons of parts EVERYWHERE! none on the Christmas tree though! i am working away at things, Just plugging away. the more i get painted at the same time the less cleaning of the paint gun i have to do right!? haha. That is bare metal at the moment, I really want to get it sealed up but waiting for the best time to do so. I may have put the cart before the horse on sandblasting but nothing a little surface prep can't handle.
|
Posted By: ac hunter
Date Posted: 03 Dec 2021 at 9:41am
|
I agree with AC720, you can't do a proper restoration without getting more $$ involved that it is likely worth but you will end up with a tractor you can be very proud of. We redid the WD my dad purchased new in 1950. I took the engine to a local rebuilder I have used for other work. When I dropped it off he said he would call me and let me know what it needed. In a few days he said "it needs everything", and it did. Had almost $4,000 in just the engine but it runs a whole lot better now and we ended up with a dandy looking tractor. Keep up the good work and keep sharing pictures, etc.
|
Posted By: Jtaylor
Date Posted: 07 Dec 2021 at 9:12am
|
Baby steps in this update. been working away at different parts and pieces. here is the hole i drilled and tapped for 1/4"-28 thread for a grease fitting on the hand clutch. I have since installed the fitting and tested. works well. 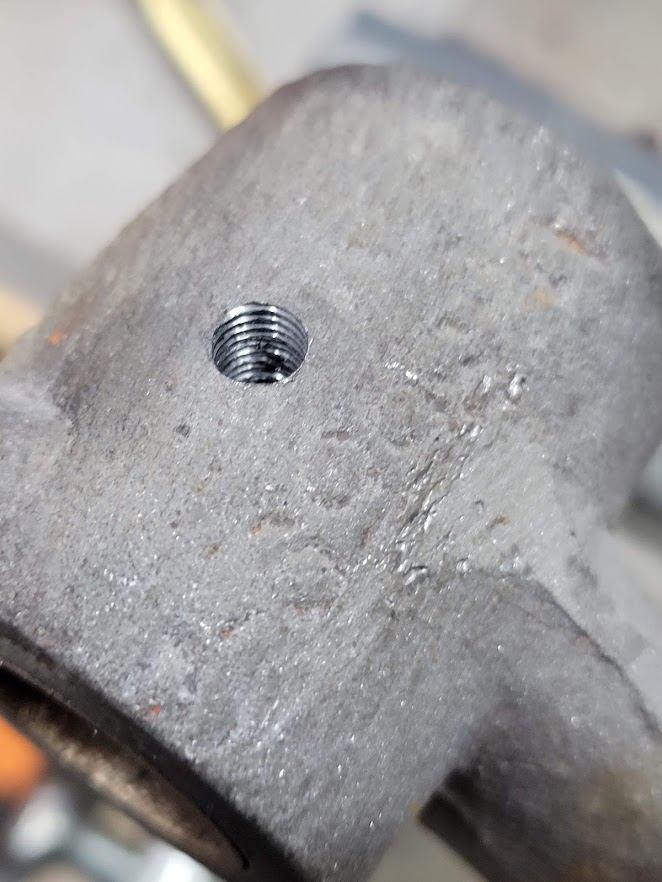 I also received my package from DJS tractor. Great bunch of folks there. everything was shipped well. super packaged and no damages from anything i ordered. 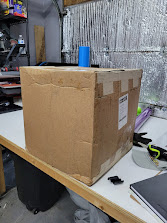 and, The Dish pistons i ordered with the rebuild kit. These are WD45 & D17 pistons. should work well with a WD45 crankshaft once i find one. 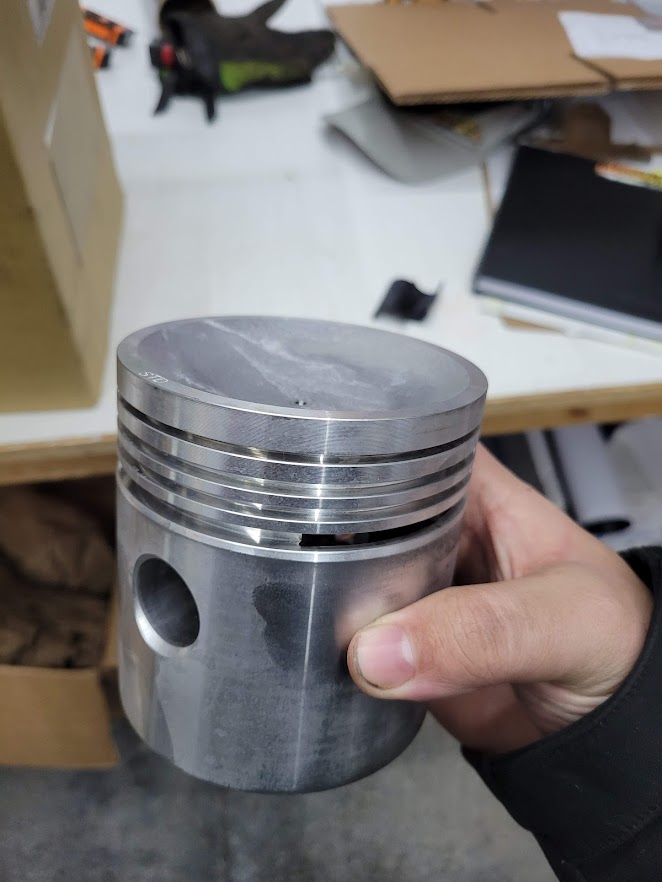 |
Posted By: 55allis
Date Posted: 07 Dec 2021 at 10:53am
|
That’s a good idea with adding a grease fitting to the hand clutch lever, wonder why Allis didn’t do that? Now it’s going to be better than new!!! |
Posted By: Jtaylor
Date Posted: 10 Dec 2021 at 6:30am
|
some more small progress. I thought i would try to extract the brake pins on the rear of the tractor. I have soaked them in penatrating fluid for the last couple weeks. No such luck with the removal. Not only did my $75 tool from DJS break, i also ripped the head off the right side pin.. 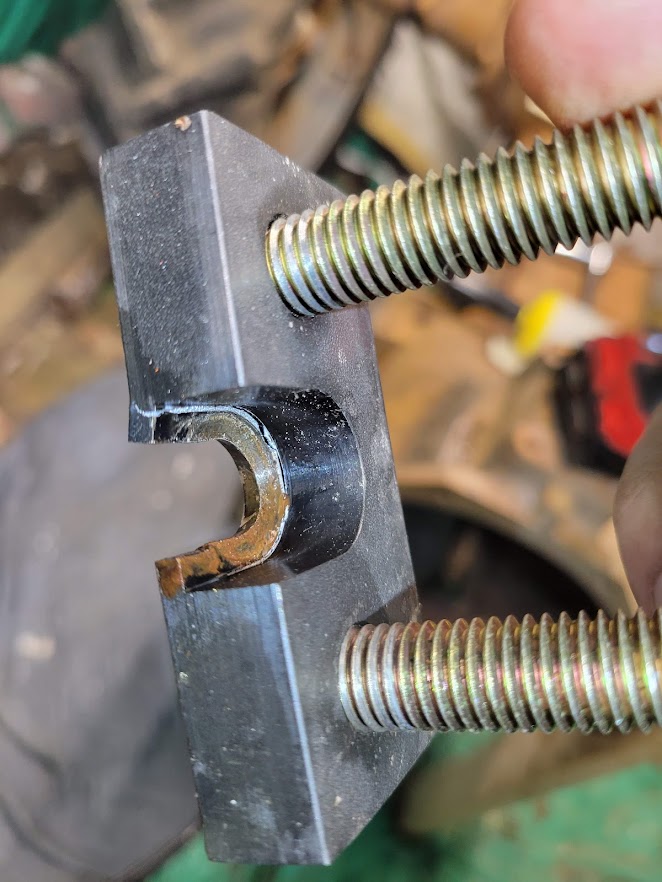  These are really stuck! Looks like i will be cutting it out with the plasma this weekend.. not entirely the way i wanted to have these done. but.. better now than later. I need to re-line the shoes regardless. lets see what else i can break! on another note, The starter rod was extra bent, Did not resemble the loop anymore at the top and the lower 90* bend was 45*. so, I used a bit of heat and bent it back. now it matches the choke lever.  |
Posted By: IBWD MIke
Date Posted: 10 Dec 2021 at 9:04am
|
I have a puller I made very similar to yours, sad part is, that's what happens most of the time! I have cut them out with a torch a couple of times. Last one I did I drilled and tapped and pulled that way. |
Posted By: Sugarmaker
Date Posted: 13 Dec 2021 at 6:33am
|
Justin, One of the tougher jobs on these tractors for sure. Most of them only come out once in the life of the tractor. I had to torch one and the other fell out. I used a mirror to not have hot parts falling on my head. Cut out a small section, drive the outside pin inboard, cut again till its out. Get a hold of the inside piece and it should slip right out. The pull handles look great! Its amazing how many details there are to getting one of these back to good working order! Thanks for the updates. Regards, Chris ------------- D17 1958 (NFE), WD45 1954 (NFE), WD 1952 (NFE), WD 1950 (WFE), Allis F-40 forklift, Allis CA, Allis D14, Ford Jubilee, Many IH Cub Cadets, 32 Ford Dump, 65 Comet. |
Posted By: Jtaylor
Date Posted: 13 Dec 2021 at 6:52am
|
This weekend was full of small items. Getting these small things checked off and put away until we are ready to reinstall them. starter rebuild. New starter switch, cleaned the starter and fresh paint ( i know, it is not orange, but i thought a bit of contrast would look good here. may change it up if needed. ) 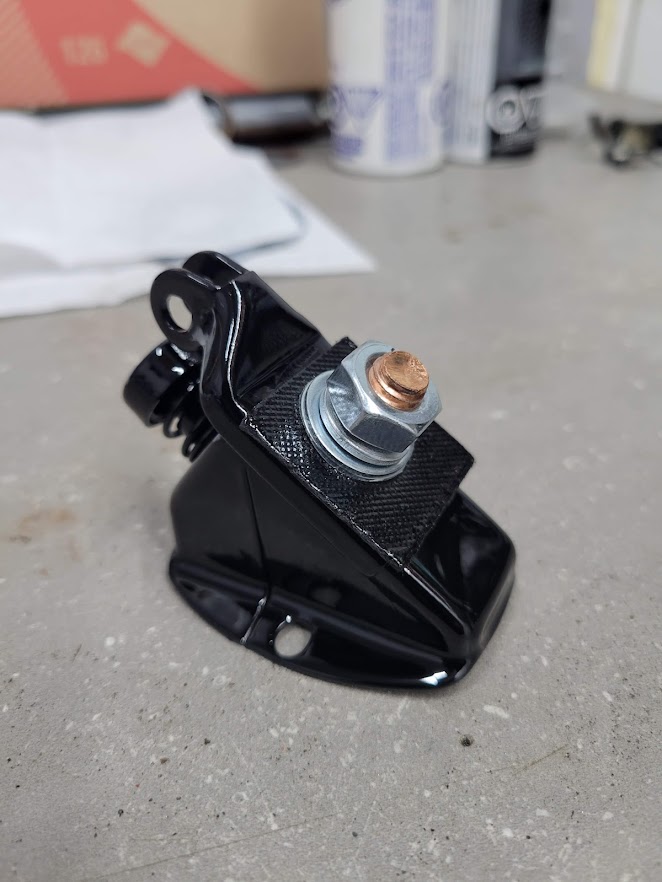  Carb rebuild went better than expected. media blasted the carb and cleaned thoroughly. installed my platinum kit including shafts and it now is better than ever. I will be pulling it back apart at some point to paint it orange. but for now its super nice and clean!     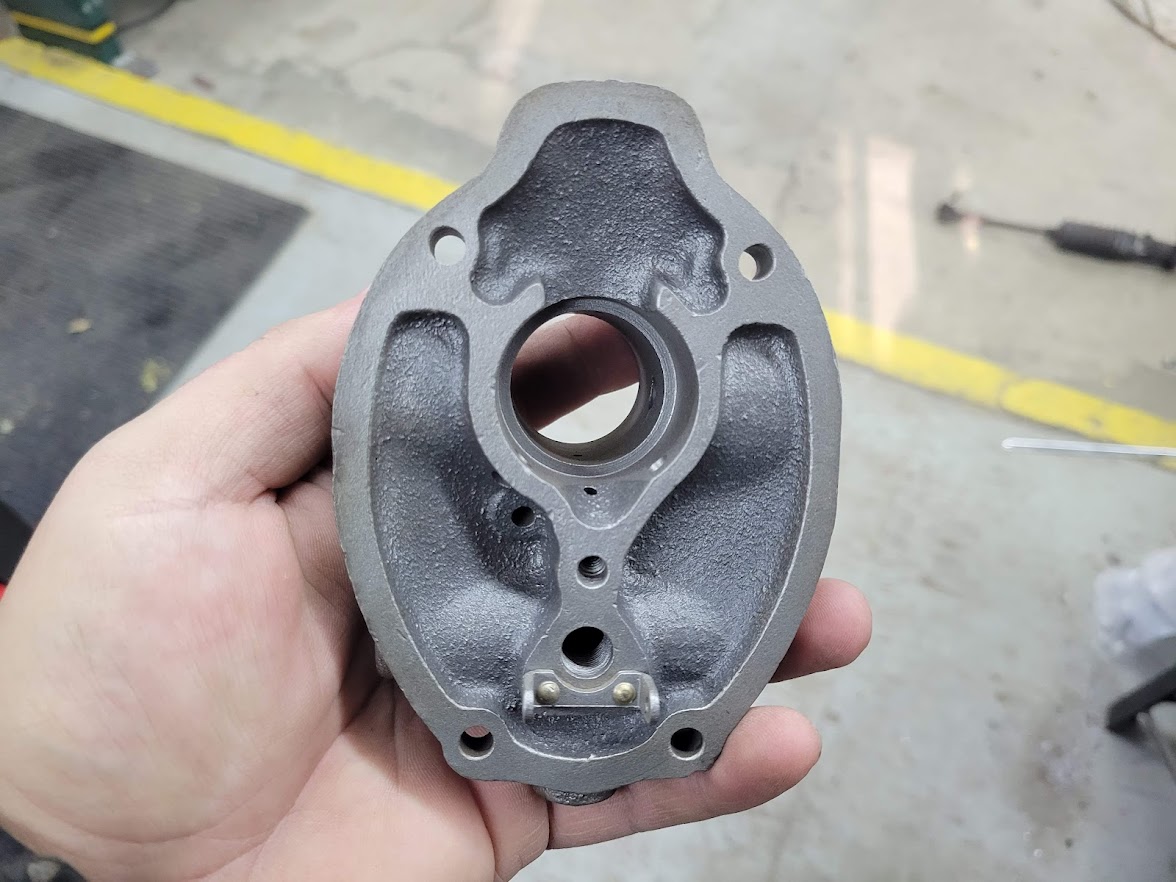  And the hand clutch is finished until paint. I got the last bushing fit into place (did not want to braze it back together and couldn't weld the cast correctly so i enlarged the hole and installed the bushing with a special metal bonding epoxy that will keep it in place for another 50+ years!   one of these days i will get the brake pins out. hopefully it goes smoother than it did saturday. will likely need oxy/acetylene to cut it out. my plasma cutter is only good for 1/2" unfortunately.
|
Posted By: IBWD MIke
Date Posted: 13 Dec 2021 at 8:19am
|
You're definitely going the extra mile with all the new bushings. I thought about that on mine but was lucky enough to find good used parts. |
Posted By: Eric B
Date Posted: 13 Dec 2021 at 1:03pm
|
Wow!! that has got to be the best looking carb I have ever seen, that was an at home refurbished job! Have you tried rattling the brake pin with an air chisel/hammer while and using penetrating spray between applications? It worked very well on my B. ------------- Currently- WD,WC,3WF's,2 D14's B. Previously- I 600,TL745,200,FL9,FR12,H3,816 LBH. Earth has no sorrow that Heaven cannot heal! |
Posted By: Jtaylor
Date Posted: 13 Dec 2021 at 1:15pm
I was actually just doing some reading, A lot of guys mention to do that. I will be grabbing some tools likely tonight and see if i can get it to budge. I have penetrating spray on it now for the last couple weeks. I burnt out all the mouse nests and have pulled the tires off to get access. hopefully i can get it to wiggle. I was also thinking of a slide hammer to make it move. currently it has pressure against it with a large socket and a 3/8" bolt pulling. maybe i can get it to move with the air hammer? definitely worth a try!
|
Posted By: steve(ill)
Date Posted: 13 Dec 2021 at 3:22pm
|
air hammers are great...The constant pounding is better than swinging a 5 pound sledge 100 times ! ..... the SHOCK load is the secret. ------------- Like them all, but love the "B"s. |
Posted By: Jtaylor
Date Posted: 14 Dec 2021 at 7:31am
|
I cleaned up the throwout bearing including new bearing installation. shot some grease through the zerk and cleaned all the 20+ year old grease from it. turned out great! very easy to do. I also cleaned the throwout fork and pivot rod as well. no pitting and is very clean. good for re-use.   |