WD45 Char Lynn power steering
Printed From: Unofficial Allis
Category: Allis Chalmers
Forum Name: Farm Equipment
Forum Description: everything about Allis-Chalmers farm equipment
URL: https://www.allischalmers.com/forum/forum_posts.asp?TID=171455
Printed Date: 04 Apr 2026 at 9:06pm
Software Version: Web Wiz Forums 11.10 - http://www.webwizforums.com
Topic: WD45 Char Lynn power steering
Posted By: IBWD MIke
Subject: WD45 Char Lynn power steering
Date Posted: 24 May 2020 at 10:00pm
As if I didn't have enough Orange projects going on, I decided today is the day the 'Wide Front' gets power steering. Well, it gets torn down and the process started. Have had this setup around here for several years. Been dragging my feet because I didn't want to have the tractor down. Well, now I'm committed, or should be. There are several little things that I'm going to address during this process. In the better to be lucky than good category, i just happen to have a new steering wheel, that will be getting installed. Going to build up the steering shaft where it goes through the support and install a new u-joint. This may take awhile to get completely done but hopefully the tractor isn't down too long. |
Replies:
Posted By: Unit3
Date Posted: 24 May 2020 at 11:21pm
|
I have seen some of your work and I know for a fact, it will be done right. If it should happen to drag on longer then maybe it really should, don't feel alone. I have 6 or 8 of those someday projects as well. One of them will be a glass and walnut cabinet to show off my 1/64 collection. I am having my daughter build it so she can show it for 4H. ------------- 2-8070FWA PS/8050PS/7080/7045PS/200/D15-II/2-WD45/WD/3-WC/UC/C |
Posted By: Sugarmaker
Date Posted: 25 May 2020 at 6:47am
|
Mike, I will be watching. I remember the factory power steering on one of the WD45's when I was a kid on Dad's farm. It was a joy to drive, compared to the std steering! I probably should have spent more money and found a unit for my NF 45. Oh well. Always good to have several projects waiting to be done. Looks like you do have a good start. How do you plan to get the old wheel off? That hub to shaft connection can be a bugger! Looking forward to your updates. Regards, Chris
------------- D17 1958 (NFE), WD45 1954 (NFE), WD 1952 (NFE), WD 1950 (WFE), Allis F-40 forklift, Allis CA, Allis D14, Ford Jubilee, Many IH Cub Cadets, 32 Ford Dump, 65 Comet, 66 F100. |
Posted By: Lon(MN)
Date Posted: 25 May 2020 at 7:39am
| I cut the steering shaft to get the wheel off. Press the stub out of the wheel if I want to save the wheel. Replace the shaft with a new stick. It is stock cold rolled. Cut to length and drill two holes. Just my two cents. |
Posted By: IBWD MIke
Date Posted: 25 May 2020 at 9:08am
|
Unit3, thanks. Chris, guys, the old wheel is already off the shaft, heated it up with the rosebud and removed with a hammer. Really going to try to resist the temptation to hurry this. I want to get everything stripped down and painted if possible. This tractor has became my 'pet'. I don't like having it inoperable! I'll try to keep this updated with pictures. If I get all these things done there is the '57 with factory PS sitting over in a corner.......
|
Posted By: IBWD MIke
Date Posted: 25 May 2020 at 8:37pm
|
Got a little bit done on this today, not too much. Changed the cross in the steering u-joint and got it reinstalled on the forward shaft. A friend showed up and that is a two person job so that was timely. |
Posted By: Sugarmaker
Date Posted: 25 May 2020 at 9:05pm
|
Mike, I see! A pet tractor! I guess I have several too. But that 45 I finished last year is still my favorite of the bunch. Good to take your time. I like the fact your going to paint it too. They always feel so much fresher with clean clothes on!:) But painting them is another big project. At least it has been for me. Regards, Chris
------------- D17 1958 (NFE), WD45 1954 (NFE), WD 1952 (NFE), WD 1950 (WFE), Allis F-40 forklift, Allis CA, Allis D14, Ford Jubilee, Many IH Cub Cadets, 32 Ford Dump, 65 Comet, 66 F100. |
Posted By: IBWD MIke
Date Posted: 26 May 2020 at 8:26am
|
Chris, maybe I should have said, "I hope to get this thing painted". Kind of my own worst enemy on these things. I tend to obsess with the prep. As you know, getting these things clean before applying paint is lots of work! I do have a real paint gun and need to experiment with it sometime, hopefully the wind lays down this summer! |
Posted By: Dennis J OPKs
Date Posted: 26 May 2020 at 8:51am
| I'm not sure if all of these units are installed in the same spot. My Dad had one, dealer installed and it was just behind the steering support bracket attached to the frame rail. Anyway, it required a little fab work to bow the throttle and hydraulic rods around the unit. They probably had to splice in a short section of rod to gain the length required. It's been a long time since then and that's what I remember. |
Posted By: IBWD MIke
Date Posted: 26 May 2020 at 8:58am
|
Dennis, I've seen several different ways the throttle rod has been addressed! The tractor this came from they just forced it out around, really ugly. Have seen one, (or possibly more) that someone used a rod bender to jog the shaft out around. Was a really clean install, I liked that a lot! Alas, I don't have a rod bender so It's going to get done like my NF 45. Whoever did it cut the shaft and made some plates to weld in for the jog, this is in process, will post pictures of it. |
Posted By: Dennis J OPKs
Date Posted: 26 May 2020 at 9:15am
| I think I misspoke, probably only the throttle rod is a problem since the hydraulic rod doesn't go down that far. I don't have a good drawing/picture to look at. As I recall it was a fairly neat appearing installation and the power steering was a real plus as it was a loader tractor. On the other hand, I have a WD 45 wide front without PS and unless it has some weight on the front-it steers fairly easy as long as you're moving. |
Posted By: ac fleet
Date Posted: 26 May 2020 at 3:49pm
|
One of my WD's has char-lynn steering on it.--someone added it before I got it. --It does drive nicer that one of the 45's without power steering. One 45 has factory power steering on it and I have no idea how it drives, ---need to pull-start it and right now thats out, since I can't drive the puller and the pulled by myself! ------------- http://machinebuildersnetwork.com/ |
Posted By: HudCo
Date Posted: 26 May 2020 at 10:27pm
| i want to see pictures pump mounting tank and allof the other things done, because i want to do my wd |
Posted By: IBWD MIke
Date Posted: 27 May 2020 at 8:46am
Dennis, the fact that it drives and turns good while moving has kept this project on the back burner for quite a while. However, I have a set of four stack weights I want to get put on this machine and when they are on it steering takes some effort! HudCo, I'll try to get pictures of how things get mounted. Some time back there was a thread on here where the poster, (can't remember who) brazed a hydraulic dipstick from a WD into the lid of the reservoir and cut a small hole in the hood for easy checking of fluid level. I hope to duplicate that.
|
 Dennis J OPKs wrote:
Posted By: SteveM C/IL
Date Posted: 28 May 2020 at 8:22am
| Dad used a torch and a vise to heat/bend the rod to clear unit on the WD. |
Posted By: IBWD MIke
Date Posted: 28 May 2020 at 10:54am
|
Not much of an update but all I've got for now. This old spinner was on the steering wheel that the power steering came from. I've never seen one like it and think it's kind of cool, will be going on when this is complete. I guess if I don't like it the one that was on it can go back on. Had to do a little repair work to make it work. It was worn enough that it might pinch. Took it to town and found a stripper bolt in my inventory the right length, yes! When I screwed it in the threads came
 right out! Installed a helicoil and shimmed the new bolt and good as new, I think. right out! Installed a helicoil and shimmed the new bolt and good as new, I think. |
Posted By: IBWD MIke
Date Posted: 31 May 2020 at 8:31am
  Progress has been slow, should have time to get some work done on this today. Got the steering shaft cleaned up and ready to weld. Lon, if I had a stick of new CRS I would just make a new one but alas... Hopefully get the torque-generator mounted today and get some measurements so I can get the shaft cut. Progress has been slow, should have time to get some work done on this today. Got the steering shaft cleaned up and ready to weld. Lon, if I had a stick of new CRS I would just make a new one but alas... Hopefully get the torque-generator mounted today and get some measurements so I can get the shaft cut. Some pics of the portable red workbench, (note that it can be accessorized) and the throttle set-up on the NF. I hope to refine this a little, it works good.  |
Posted By: Unit3
Date Posted: 31 May 2020 at 11:14pm
|
Now that is inventive. I have put offsets in metal by heating it and putting bolts on each side and crushing it in a vise. Use different sized bolts to give different sized offsets. ------------- 2-8070FWA PS/8050PS/7080/7045PS/200/D15-II/2-WD45/WD/3-WC/UC/C |
Posted By: Dakota Dave
Date Posted: 31 May 2020 at 11:28pm
| I kinked mine in the vice with a torch and hammer. It only needed about 3/8" offset to clear the torque generator. My tank is just bolted to the under Sid if the hood just in front of the fuel tank. The pump mount is the worst mine looks as cobbled as it is. Tractor steers with the loader easily. I still need tone slightly moving as my belt will slip under heavy load and I didn't engineer enough tension adjustment into the mount. |
Posted By: IBWD MIke
Date Posted: 01 Jun 2020 at 8:44am
|
Sunday and I finally got some time to tinker with this a little. There are just too many things around a farm that need attention this time of year! Grass that needs mowing, Cub Cadets that need oil changes, varmints...... I welded up the shaft where it was worn going through the support and filed it back round. Used the quadrant for my gauge. That took a little time but not too bad. For some reason, I kind of like doing this. Got the torque-generator loosely mounted for mock up purposes. Did some measuring and some ciphering and came up with one foot needed removed, quick measurement of the other two 45's in the shed and a trip to the power hacksaw and three pieces. Brought the two pieces to be used to town for a paint job and to fit the new steering wheel. That's it for now. I did get most of the mowing caught up so I should have time to tinker with it some this week.
 |
Posted By: IBWD MIke
Date Posted: 05 Jun 2020 at 8:54am
|
If I recall correctly, I had this update done the day the site crashed. Got the lower steering rod and torque generator mounted and hooked together. Always a little trepidation when drilling for the roll pin, it's really easy to get off coarse and I did have to 'massage' the hole just a bit with a small file, not much but some. Also if you look closely you will see I changed the bolts holding the TG to the mount from hex-heads to socket-heads. Much easier to work with. Hopefully I get the rest of the garden planted/taken care of today and I can concentrate on this this weekend.  |
Posted By: HudCo
Date Posted: 05 Jun 2020 at 9:27am
| lets see your tank and pump mounting,thanks hud |
Posted By: HudCo
Date Posted: 05 Jun 2020 at 9:30am
| where did you get your componants ? or what were they off of? |
Posted By: IBWD MIke
Date Posted: 05 Jun 2020 at 1:21pm
|
HudCo, we are getting close to mounting the pump and reservoir. I'll get pics when I do. I installed the two grove pulley on the crank a few years back when the engine was out for a rear main seal job. The thing that keeps slowing me down is continuing to find things that need cleaned-up/painted as I go along. No better time to do it than now. Today the steering support and hydraulic, starter, and choke levers got removed for the paint process. Stopping there for now, I have a shifter in the basement that is going to get gone through and installed at some point in the future. These components came from a WD I bought a few years ago, basically for the power steering. Compression was low on the engine so it turned into a parts machine.
|
Posted By: IBWD MIke
Date Posted: 12 Jun 2020 at 8:47am
|
Time for a quick update before I head for the farm to continue on this thing. I have been experiencing a lot of three steps forward and two back. Seems to no end of the small parts I see and think, now is the time to pain that. There is no real time-frame that I 'need' this tractor. Local antique power show in August has already been cancelled. HudCo, that pump mount has fought valiantly! I 'think' I'm happy with it now, it took LOTS of massaging to get it right. I had painted it last year, by the time I was satisfied with the fit the paint was damaged pretty bad so I stripped it back to shiny and repainted it. One little note about this mounting; the set-up came off a WD with the three inch head and is going on a 45. Not a lot of difference but not a direct swap either. I thought since I'm painting, these lift links for a 50 series plow just as well get some too. They have been laying on the bench taking up space long enough need to get them on the plow and out of the way! Couple of pics of my progress.   |
Posted By: IBWD MIke
Date Posted: 13 Jun 2020 at 7:39am
|
Spent quite a bit of time working on this on Friday, planning on the same today. This power-steering install has somehow turned into a quasi paint job. That wasn't my original intention but no time like the present. I would probably get this thing back together a lot faster if I would quit tearing it apart. I wasn't happy with the paint on the fuel tank, may have been in a hurry when I did the propane unconversion. So it came off for a little facelift. How far do you go with something like this? I keep looking at things that could use a fresh coat of paint, like that starter. It may come out today for it's paint! When getting ready to paint the reservoir, how do you suspend this silly thing? Answer, drill a 1/8" hole in one ear of the wingnut.   |
Posted By: IBWD MIke
Date Posted: 15 Jun 2020 at 8:09am
|
Let the reassembly begin! Finally got done cleaning and painting,(for now) and am getting things back together. Pump and reservoir are mounted, hope the belt is tight enough. I bought new hose for the returns and had a new pressure hose so all should be well there. Bought enough hose that I can replace the sad ones on the other tractor also. I believe I have the leak in that system under control so will move the reservoir to the valve cover also.   |
Posted By: Ted J
Date Posted: 15 Jun 2020 at 9:16am
|
I haven't been on here Mike, so I have missed this whole thing. I didn't have any internet at the farm so I miss a lot all summer. Now I can get internet through my cell phone so I should be on here more. Looks like a lot of 3 steps, 2 steps. You're right, but you're headed down the right road. NICE JOB!! When are you headed up to get some more beer? That looks like a dry hot job and can bring on a big thirst.....  ------------- "Allis-Express" 19?? WC / 1941 C / 1952 CA / 1956 WD45 / 1957 WD45 / 1958 D-17 |
Posted By: Kenny L.
Date Posted: 15 Jun 2020 at 10:24am
|

Posted By: IBWD MIke
Date Posted: 15 Jun 2020 at 1:27pm
|
Ted, not sure when I'll next get to your lovely state. I would like to go to the Barboo antique power show this August, (I think it's in August). The last I saw it is still on. Went to it three years ago, great show! |
Posted By: IBWD MIke
Date Posted: 16 Jun 2020 at 2:20pm
|
Made a little progress today. Going back together slowly, mounted the alternator. Looking at it the belt alignment was not good. As fun as that belt is to change I thought I would tweak it a bit. Slotted one hole in my home-made alt. bracket and shimmed it forward a pinch, much better. My OCD seams to be rearing it's head. Everything I look at needs fresh paint. Screws and washers for the gas tank band. Filed the burrs off, wire brushed and paint.  |
Posted By: IBWD MIke
Date Posted: 18 Jun 2020 at 2:44pm
|
Light at the end of the tunnel, starting to look like a tractor again. More three steps forward, two back. Most aggravating part is the damage to the new paint! I may actually be able to drive this thing around this weekend, I hope! 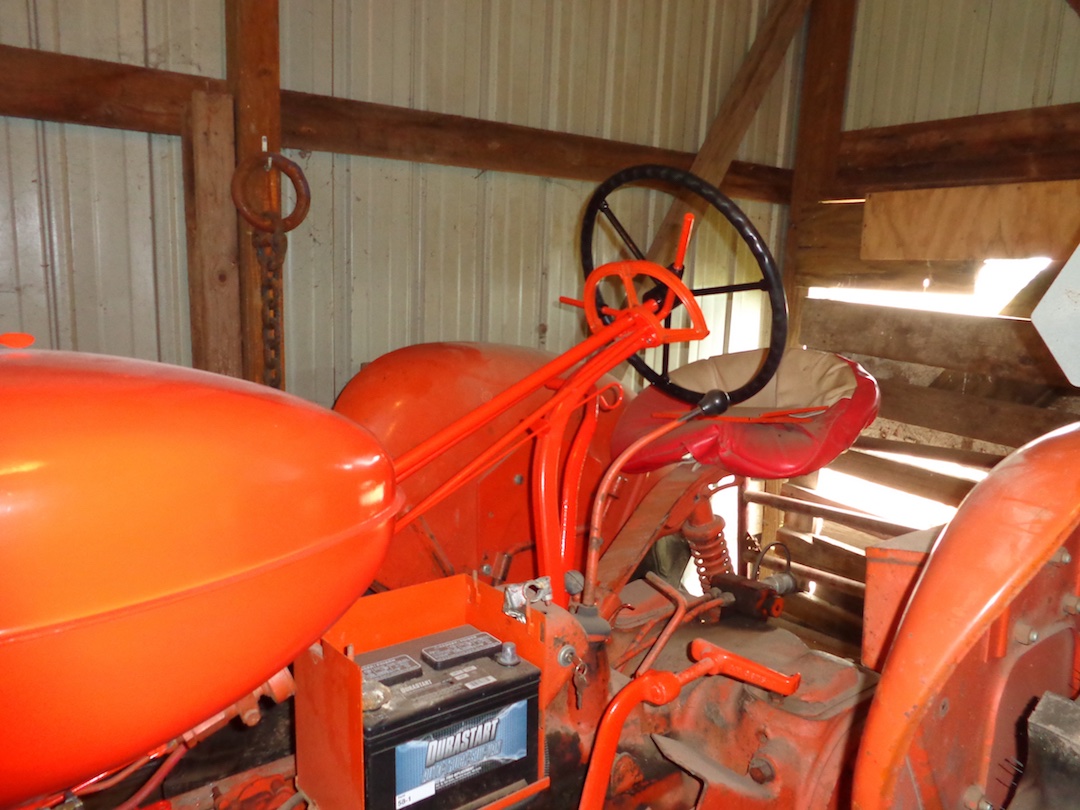 |
Posted By: IBWD MIke
Date Posted: 19 Jun 2020 at 2:38pm
|
For those of you that have been following, you note the change of habitat! Got her put together today, filled up the fluid and put some gas in. When first fired up I turned the wheel without thinking and thought WOW, that was easy! Did not see any leaks and the belt seems tight enough, a pinch more wouoldn't hurt but there is only about 1/8th inch clearance between the top radiator hose and the pump pulley. Now to get the hood painted and maybe pick up some decals in Amana this weekend. Stack weights are going to get a coat of paint and installed too. This project will continue to 'evolve' as time moves forward. Got lots of things in mind but need to move on to other things.  |
Posted By: Dave(inMA)
Date Posted: 19 Jun 2020 at 5:53pm
|
Very nice, Mike! Nifty project - wouldn't mind doing that to my WD45 if ever I run across a set of the parts. Dave ------------- WC, CA, D14, WD45 |
Posted By: IBWD MIke
Date Posted: 20 Jun 2020 at 7:29am
|
Thanks Dave. Now have power steering on 3 out of five WD's/45's. If I find another ps setup, the WD, Micha, will be next in line. 'Grandpa' will be fine without. Though he does wear a two row front mounted cultivator, not enough use to justify all the work/expense. If I live long enough, the factory PS setup on the '57 has some pretty serious leaks that need addressed. As well as many other issues. That will be harder as I have only the one with factory setup. Nice to have a reference machine when working on something like this. Might have to get better about taking pics before tearing into it! |
Posted By: IBWD MIke
Date Posted: 24 Jun 2020 at 2:43pm
|
Cleaned up, painted, and installed the hood. Need to get a set of decals headed this way. Shiny new muffler in this photo too! 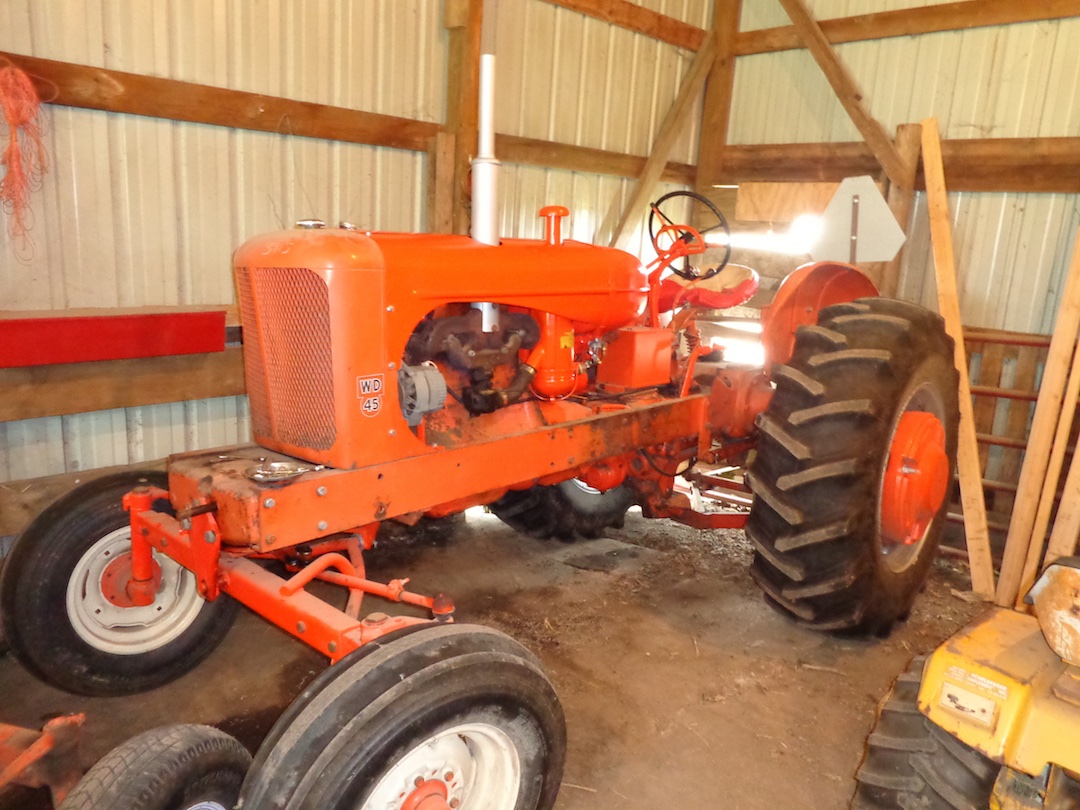 |
Posted By: Dave(inMA)
Date Posted: 24 Jun 2020 at 5:03pm
|
Nice!!!!!!!!!!!! Dave ------------- WC, CA, D14, WD45 |
Posted By: IBWD MIke
Date Posted: 25 Jun 2020 at 8:28am
|
Thanks Dave. |
Posted By: Lon(MN)
Date Posted: 25 Jun 2020 at 9:02am
| Big weights on the rear. Where did you find them? |
Posted By: IBWD MIke
Date Posted: 25 Jun 2020 at 2:54pm
|
Lon, I found those at Colfax tractor parts. It pays to look every once in a while! Haven't been for a time, probably should go. |
Posted By: IBWD MIke
Date Posted: 29 Jun 2020 at 8:55am
|
Not sure weather to wrap this thread up or keep going with it. The power steering is on and working and best of all, keeping it's oil where it belongs. Doing this got me motivated to freshen up the paint but I'm running out of time for that. Hopefully get back to it later this year. One of the big motives for the PS was easier steering with the stack weights installed, put them on yesterday. I would have liked to paint them first.... I think it's ready for a plowday, now if we just had one to go to. 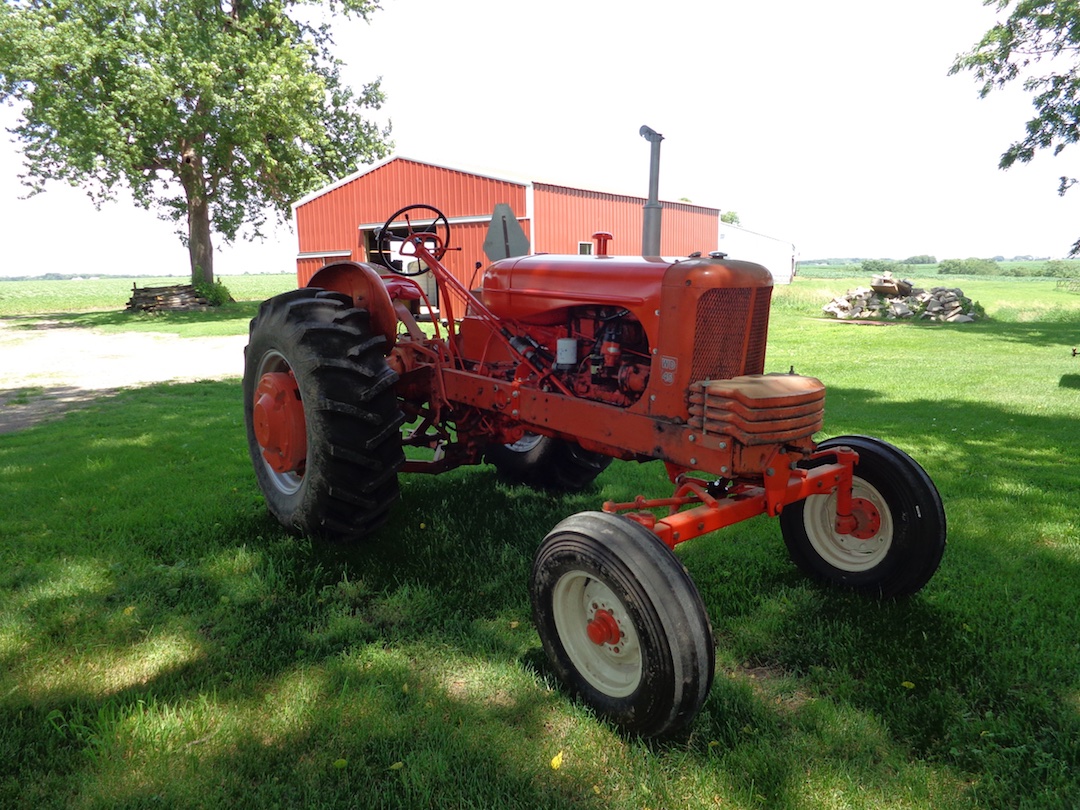 |
Posted By: Ted J
Date Posted: 29 Jun 2020 at 3:27pm
|
It's looking great Mike! I love my 45 with the PS on it too, makes it a whole nother tractor! Wish I had a setup for my D-17 as it steers REAL hard. I had heard that 4 stack weights were bad for a WF? The books only called for 3... I've seen the front bending on some tractors. Take care and hope to see you soon.... ------------- "Allis-Express" 19?? WC / 1941 C / 1952 CA / 1956 WD45 / 1957 WD45 / 1958 D-17 |
Posted By: Dave(inMA)
Date Posted: 29 Jun 2020 at 9:39pm
|
Mike, we DEFINITELY need a video of your '45 in action!! Dave ------------- WC, CA, D14, WD45 |
Posted By: IBWD MIke
Date Posted: 30 Jun 2020 at 8:06am
|
Ted, the weights are 300 lbs. I would think a front end loader would be more than that even empty? Anyway, they are all staying on there, don't want one getting lost or being a trip hazard. Dave, I will try to get some video plowing with it. I might get the plow out in August. Then figuring out how to get the video on here. I picked up a really nice pair of fenders at Lathrope this spring. They and a nice toolbox are next on the list for paint and install. Also started on a different shifter yesterday. Maybe I should start a general refurbishment thread?
|
Posted By: IBWD MIke
Date Posted: 01 Jul 2020 at 8:41am
|
I meant to mention, (and forgot) before I started the PS project I 'synced' the governor as per Doctor Allis. This made a big difference as the governor was kind of dead. Never any shortage of power, just had to compensate by hand. Would have never guessed I would have to bend the linkage rod that much to make it right. Now the governor works nicely. |
Posted By: IBWD MIke
Date Posted: 27 Jul 2020 at 8:19am
Last installment in this story, I think. Rain day here on Sunday. Friend of mine was over, he spotted my safety-wire pliers and asked what they were. I explained a little, then got to thinking I hadn't wired those roll pins in the 45 so we moved things around a bit and now they will stay put. The safety wire may not be necessary but is piece of mind. Had a roll pin come out on the Narrow front once, it's a little disturbing to turn the wheel and nothing happens. Have seen these pins held in with heat-shrink tubing, just working with what I have.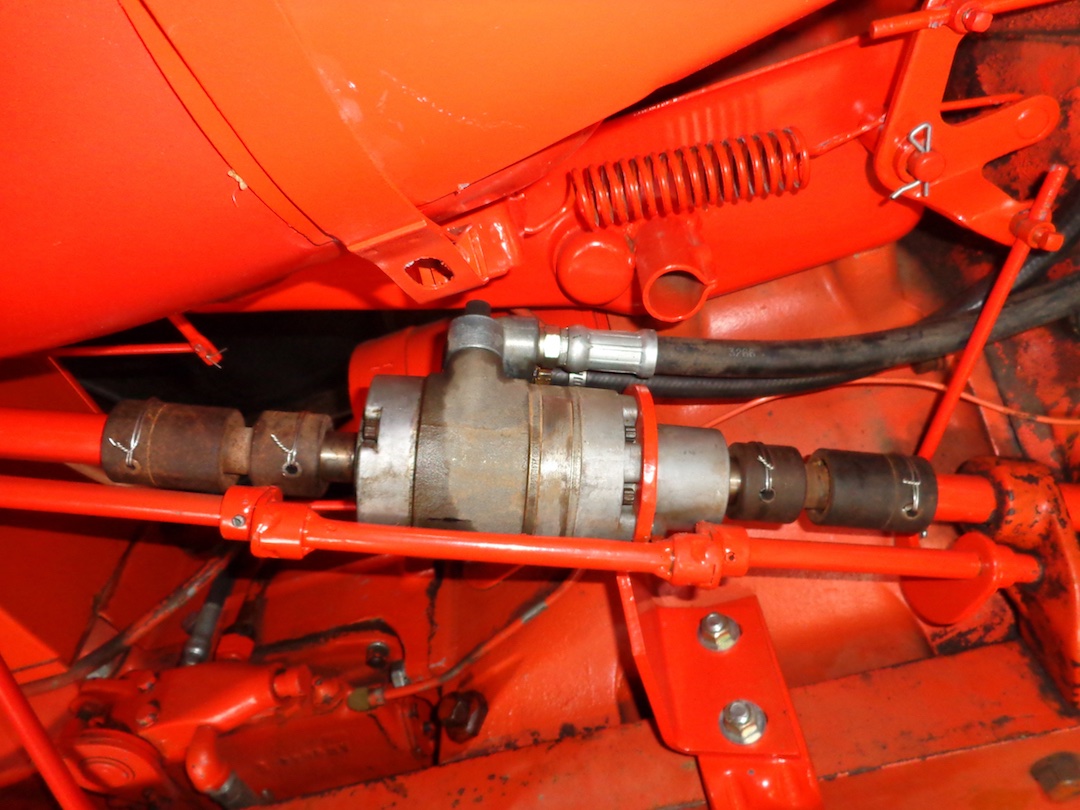 |
Posted By: IBWD MIke
Date Posted: 17 Nov 2021 at 1:30pm
Here's an update to this old thread; When I installed the
power-steering, there were some clearance issues with belt and hoses.
Well, they finally reared their ugly head. The ps belt rubbed a hole in
the bypass hose and the pulley was rubbing one in the top radiator hose. What I decided to do, after looking at the NF 45, is bend a pipe nipple to make the curve in the bypass hose. Long story short, heated it up with the torch and bent until it was about the same bend as the hose. Used lots of pipe dope on the threads and used the straight,(undamaged) part of the hose. Was able to get enough clearance to go with a 1"shorter belt which can now be run tighter for less slap. Also got the pulley away from the top hose. As you can see in the picture, it's very 'busy' in the pump area. I post this update in hopes that it might help someone in the future.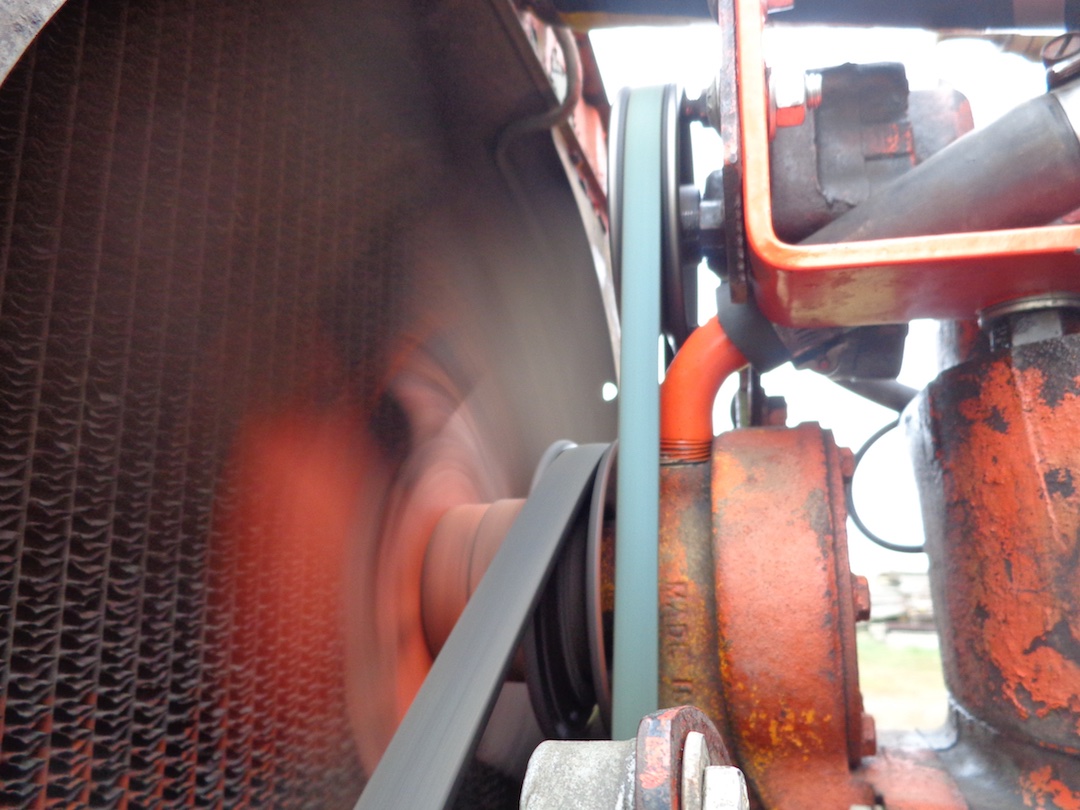
|
Posted By: Ted J
Date Posted: 19 Nov 2021 at 8:13am
|
I'm gonna have to go out and look at mine and see how it was done? It's all of 15 degrees here this am. WHAT a change over a week ago!! DANG,,,,,I'm getting to hate this cold any more. Thanks for the update Mike! ------------- "Allis-Express" 19?? WC / 1941 C / 1952 CA / 1956 WD45 / 1957 WD45 / 1958 D-17 |
Posted By: IBWD MIke
Date Posted: 19 Nov 2021 at 8:21am
|
Good to hear from you Ted. Put the sheet-metal back on yesterday and plowed the garden.
|
Posted By: fixer1958
Date Posted: 21 Nov 2021 at 5:05am
|
Very clean nice setup. PS makes a world of difference. Mine is very similar that I got from a tractor salvage yard. Double crank pulley, steering shaft, pump everything for $400. Pump wasn't any good and I told them about it and they bought me another. I like it.
|
Posted By: IBWD MIke
Date Posted: 21 Nov 2021 at 7:45am
|
Fixer, it amazed me how much more I enjoy that tractor after the install. Well worth the time spent. Have one more set-up that will probably go on WD Micha when I get time. |