Adding a top link adapter to a WD
Printed From: Unofficial Allis
Category: Allis Chalmers
Forum Name: Farm Equipment
Forum Description: everything about Allis-Chalmers farm equipment
URL: https://www.allischalmers.com/forum/forum_posts.asp?TID=170426
Printed Date: 20 Oct 2025 at 12:48pm
Software Version: Web Wiz Forums 11.10 - http://www.webwizforums.com
Topic: Adding a top link adapter to a WD
Posted By: littlemarv
Subject: Adding a top link adapter to a WD
Date Posted: 22 Apr 2020 at 7:33pm
|
Hello all, its been awhile. I have been so busy with work and kids over the winter, and my little free time has gone to an Allis garden tractor, so I haven't been on here much. But, with spring, comes making firewood and planting food plots, so its time to get some of the bigger tractors out. Anyways, maybe someone on here can help me. We have a three point adapter that came with my brothers D-14. We'd like to install it on my WD. It should fit, cause all the measurements must be the same from tractor to tractor for snap coupler equipment to work. So really all I need is a spot to hook up the top link on the WD. I see Steiner has a clamp on one, but with shipping its going to be $75 for one, part number ACS016. Do I vaguely remember people having problems with the clamp on ones slipping or something, I seem to remember welding ones on were better. Can a fellow just weld two pieces of flat stock sticking out of the rock shaft to make a spot to pin the top link on? How do you know how to orient it? Top links have quite a bit of adjustment as far as I can tell. The main intended use is for a PTO driven three point lime spreader for putting lime on the food plots. I have access to a welder, so I could pop the rockshaft off and weld two pieces of flat stock on, just need to know about how far apart they need to be, and how they are oriented in relation to the lift arms??? Any help is appreciated. ------------- The mechanic always wins. B91131, WC23065, WD89101, CA29479, B1, Early B10, HB212, 416H |
Replies:
Posted By: Sugarmaker
Date Posted: 22 Apr 2020 at 8:07pm
|
Hi, I like the attachment that is just a "U" shape with a hole in it. This can be held in the central position around the rock shaft with a couple muffler clamps. This doesn't require welding or un-welding if you want to put the tractor back to original. and seems to function just fine.  Regards, Chris ------------- D17 1958 (NFE), WD45 1954 (NFE), WD 1952 (NFE), WD 1950 (WFE), Allis F-40 forklift, Allis CA, Allis D14, Ford Jubilee, Many IH Cub Cadets, 32 Ford Dump, 65 Comet. |
Posted By: Dakota Dave
Date Posted: 22 Apr 2020 at 10:04pm
my Ca has two flat plates welded to the rock shaft wide enough to apart for he end of a 3 pt link it works just fine they are welded so when the rock shaft arms stick straight back they stick straight back. One of my WD 45s has the U shape on it it flops around even with muffler clamps. Took the muffler lamps off and drilled a hole in a piece of angle iron cut to fit between the pivot points. It holders it in the center and took out all the flop. It was a 5 minute job this last winter I needed it for the snow blower.My other WD 45 has an angle iron bolted across the two top pivot point bolts with two tabs welded on for the top link it works the best of any home brewed solution.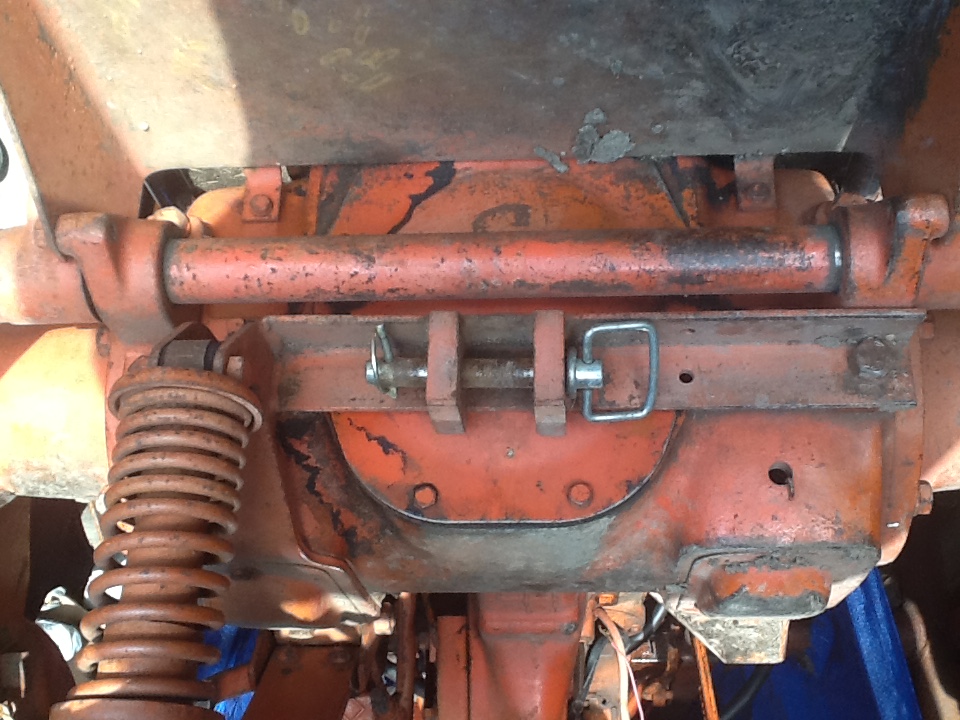 p p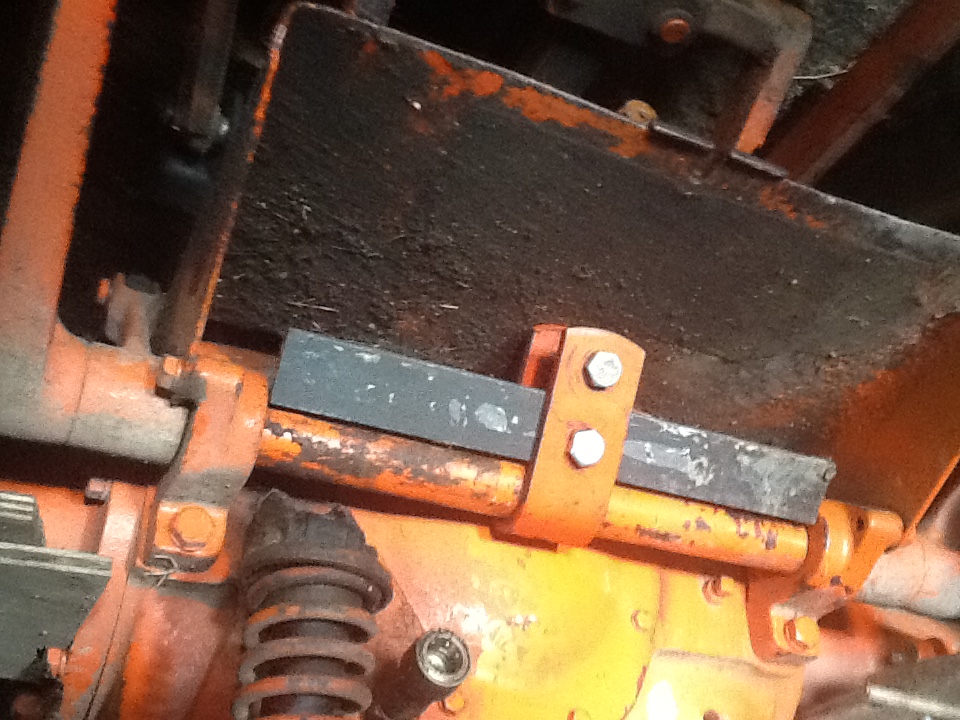
|
Posted By: jaybmiller
Date Posted: 23 Apr 2020 at 6:45am
|
Take SM's muffler clamps idea and add a 'dogboned' pieced of steel plate with 4 holes, attaching it to the mufflerclamps. The plate goes inside the U-steel, keeps it from floppin around. ------------- 3 D-14s,A-C forklift, B-112 Kubota BX23S lil' TOOT( The Other Orange Tractor) Never burn your bridges, unless you can walk on water |
Posted By: Brian G. NY
Date Posted: 23 Apr 2020 at 7:53am
|
I made one like Sugarmaker's.....works perfectly fine. I got hold of a "real" A-C one after I made it but I never put it on as this one works well enough.
|
 Sugarmaker wrote:
Posted By: Gary
Date Posted: 23 Apr 2020 at 9:28am
|
My D-12 Ser. III has factory 3 pt. The 2 brackets for the centre links are welded to the 'cross shaft'. Took some measurements. The space between the 2 links is 1 3/4". The 3/4" hole thru the links is 1 1/4" from side of shaft to centre of hole. The 2 links extend 2 1/8" out from side of cross shaft. Gary |
Posted By: Ed (Ont)
Date Posted: 23 Apr 2020 at 10:48am
| That angle iron that Dave has rigged up seems to be the best idea. Gets the 3rd link up a bit where it needs to be. Someone else here had a post on a while back but I can’t remember who it was. He had built a bracket that fastened to all the diff cover bolts. It really looked good. |
Posted By: sparky
Date Posted: 23 Apr 2020 at 11:35am
|
I think that may have been Dave Kamp??? ------------- It's the color tractor my grandpa had! |
Posted By: ac fleet
Date Posted: 23 Apr 2020 at 11:53am
|
One of mine is just the U-shaped piece and the other one is a bunch of welded together iron. Both go around the rockshaft and can slide along it. ------------- http://machinebuildersnetwork.com/ |
Posted By: Ed (Ont)
Date Posted: 23 Apr 2020 at 11:54am
| It may have been Dave. Maybe he could repost that pic. 😀 |
Posted By: littlemarv
Date Posted: 23 Apr 2020 at 12:02pm
|
Thanks for all the good ideas and info. One last question and I should be able to make something work. When the lift arms are pointed straight back, how far is it from the holes in the lift arm latches to the hole in the top link bracket? Thanks in advance. ------------- The mechanic always wins. B91131, WC23065, WD89101, CA29479, B1, Early B10, HB212, 416H |
Posted By: Dakota Dave
Date Posted: 23 Apr 2020 at 7:43pm
| The top link is adjustable so it's not that critical. The welded up one I have works the best. The top link pin hole is right above the rock shaft even in line with the top mount bolt for the rock shaft pivot. It makes a differance weather you are using a wishbone adapter or one bolted to the draw bar. |
Posted By: SteveM C/IL
Date Posted: 23 Apr 2020 at 9:43pm
Mine has 2 straps similar to this which hold a flat bar to keep it from moving sideways and there are a couple ears on the center of the flat bar where you pin the 3rd link. It's yellow. It was farm store bought by a neighbor many years ago.
|
Posted By: SteveMaskey(MO)
Date Posted: 24 Apr 2020 at 6:11pm
 This is one I made years ago, split pipe around rock shaft and bolts to the pto bearing hanger. Just need ½” longer bolts and you have to notch the plate This is one I made years ago, split pipe around rock shaft and bolts to the pto bearing hanger. Just need ½” longer bolts and you have to notch the plate
|
Posted By: Ted J
Date Posted: 25 Apr 2020 at 9:27pm
|
Ryan, my 45 has a piece of pipe slid over the rock shaft. I'll get a pic of it when I go up to the farm. I think I'm going up on Monday. I'm going to meet Alex as he's heading to Westby. I'll text it to you. ------------- "Allis-Express" 19?? WC / 1941 C / 1952 CA / 1956 WD45 / 1957 WD45 / 1958 D-17 |
Posted By: littlemarv
Date Posted: 04 May 2020 at 10:40pm
|
Here's what I came up with. Took the two top rockshaft bolts out. Unbolted the seat shock mount and put the bolt back in.  A quick dip in the scrap bin, a little wire feed and some drilling, and some paint and a pin.  Relocated the seat shock mount. Looks pretty sharp. I did have to put a washer behind the angle iron to get it away from the differential cover. Thanks for all the good ideas! ------------- The mechanic always wins. B91131, WC23065, WD89101, CA29479, B1, Early B10, HB212, 416H |
Posted By: jaybmiller
Date Posted: 05 May 2020 at 5:24am
|
That's a nice 'clean' install ! At first I saw the rope as the 'top link attachment'...  Great thing is it can be 'undone' and put back to OEM specs before the 'correct cops' arrive !!! Have to ask why the angled cut on the left horizontal section ? Just curious... jay ------------- 3 D-14s,A-C forklift, B-112 Kubota BX23S lil' TOOT( The Other Orange Tractor) Never burn your bridges, unless you can walk on water |
Posted By: littlemarv
Date Posted: 05 May 2020 at 5:49am
|
One less thing to bash my ankle on when getting on and off. The rope is for pulling the hitch pin so you can unhook without getting off and on again. I'm 5' 19" tall so once I get on the WD and get my legs in there and adjusted so one leg is 8" shorter than the other, I try to stay there. Thinking of extending the seat back 6". And installing a seat bushing kit to make it a little more comfortable. ------------- The mechanic always wins. B91131, WC23065, WD89101, CA29479, B1, Early B10, HB212, 416H |
Posted By: jaybmiller
Date Posted: 05 May 2020 at 5:54am
|
Hay I like the rope for pin trick !! I'm always dropping the R-pin onto the ground. NOW I have to find some old school rope to secure the pin onto the tractor. You guys are great..all sorts of neat idears.... have fun but be safe ! Jay ------------- 3 D-14s,A-C forklift, B-112 Kubota BX23S lil' TOOT( The Other Orange Tractor) Never burn your bridges, unless you can walk on water |
Posted By: Ed (Ont)
Date Posted: 05 May 2020 at 8:25am
|
Very nice job Marv. When I get to doing mine I will do it like that. Only problem I see is right side of that bracket should have end cut at 45 just like the left. 😀
What size is the angle - 2 in?
|
Posted By: Brian G. NY
Date Posted: 05 May 2020 at 9:16am
|
Hey Marv, 5' 19" works out to 6' 7"......no wonder you have to move the seat back 6"! I like your setup a lot. I agree that it places the link in a better position. I built mine the quick and easy way years ago. I used two bolts to eliminate some of the "sloppiness". I also reinforced the pin holes. I've used it for many hours with a 5' Bush Hog behind my WD.  |
Posted By: littlemarv
Date Posted: 05 May 2020 at 9:41am
|
It's 1/4" by 2 1/2" angle. Just some scrap I had laying around. I don't see why 2" wouldn't work. ------------- The mechanic always wins. B91131, WC23065, WD89101, CA29479, B1, Early B10, HB212, 416H |