CA Hand Clutch Restore - Final Update 4/23
Printed From: Unofficial Allis
Category: Allis Chalmers
Forum Name: Farm Equipment
Forum Description: everything about Allis-Chalmers farm equipment
URL: https://www.allischalmers.com/forum/forum_posts.asp?TID=158871
Printed Date: 22 Feb 2026 at 3:17am
Software Version: Web Wiz Forums 11.10 - http://www.webwizforums.com
Topic: CA Hand Clutch Restore - Final Update 4/23
Posted By: Dave(inMA)
Subject: CA Hand Clutch Restore - Final Update 4/23
Date Posted: 08 Mar 2019 at 1:55pm
|
Final update! See post dated 4/23 on p2. I've mentioned in an earlier post that the hand clutch on my CA won't release. I had rehabbed it 10+ years ago, and, though it worked fine at first, I then had problems with it slipping. I tried adjusting the release actuator - that didn't help at all. The most recent issue is that it won't release.
Today I tackled removal of the hand clutch to investigate. As I reported in my "CA Brake Mystery" thread, the drive shaft, clutch/brake unit and pinion shaft all separated from each other with no effort at all! I should be and am grateful!! 
I will replace the brake drum part of the brake/clutch unit with a used one that has been sitting on the shelf for years, waiting for this moment to arrive. Here are some pictures of the unit: 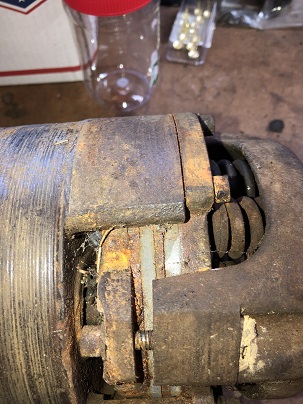 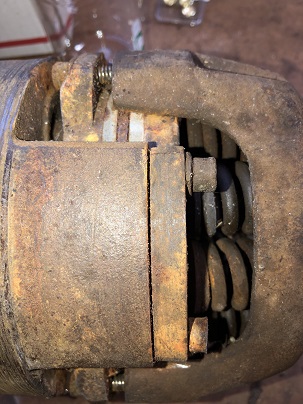  And here is a shot of the actuator. You'll see that there's no set screw locking the adjusting hub...... 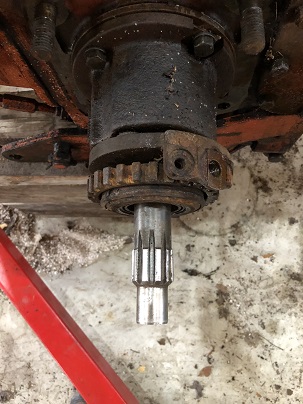 And here's what fell out of the housing when I tipped it: 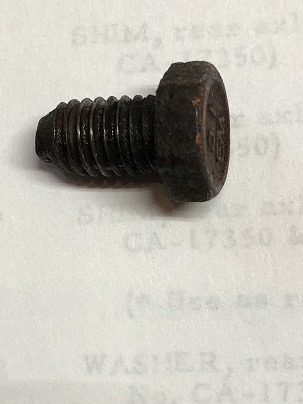 The missing set screw! Not having this bolt installed probably contributed to my issues! Next step is to review - again - all the information on here about restoring the clutch and actuator. In the meantime, any comments based on the pictures would be really welcome. Dave
------------- WC, CA, D14, WD45 |
Replies:
Posted By: Dave(inMA)
Date Posted: 08 Mar 2019 at 2:10pm
|
Okay. I have read the CA Hand Clutch rebuild thread in the Knowledge section - very helpful. I am questioning the actuator gap quoted in photo #7 - the manuals I have state 0.005" (IT manual) or 0.055" (AC reprint) compared to the 0.50" in the caption for #7! Next step is to disassemble the unit and clean up the parts. I'll report back when this is done. Dave
------------- WC, CA, D14, WD45 |
Posted By: Dave(inMA)
Date Posted: 08 Mar 2019 at 4:38pm
|
I have disassembled the clutch pack. Both of the primary, secondary pressure plates were rusted to the clutch plate. Clutch plate will need to have the material removed and new riveted on. Both pressure plates are pitted to some degree. I'll try to post some pictures later. I'm still trying to dope out the actuator/clutch pack separation. The post in the Knowledge forum says 0.5" which clearly can't be right. The IT manual specifies 0.005" while the AC service manual says 0.055". I'm strongly wanting to believe the AC service manual, of course, but it'd be nice to have some corroboration! Thanks, all. Dave ------------- WC, CA, D14, WD45 |
Posted By: Dave(inMA)
Date Posted: 08 Mar 2019 at 7:48pm
|
The clutch pack innards were pretty well welded together by rust. Here are pictures of the clutch plate and the two pressure plates after I separated them and cleaned up the pressure plates: Clutch: 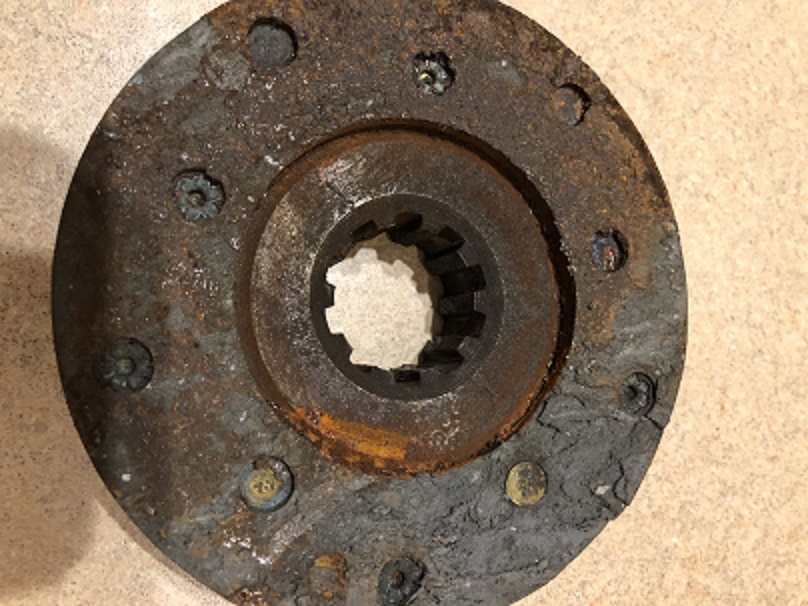 Primary pressure plate: 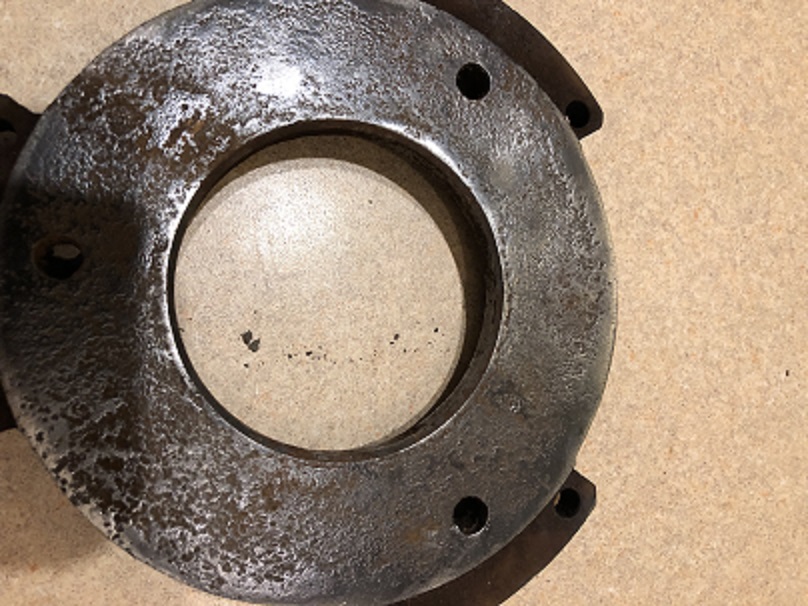 Secondary pressure plate: 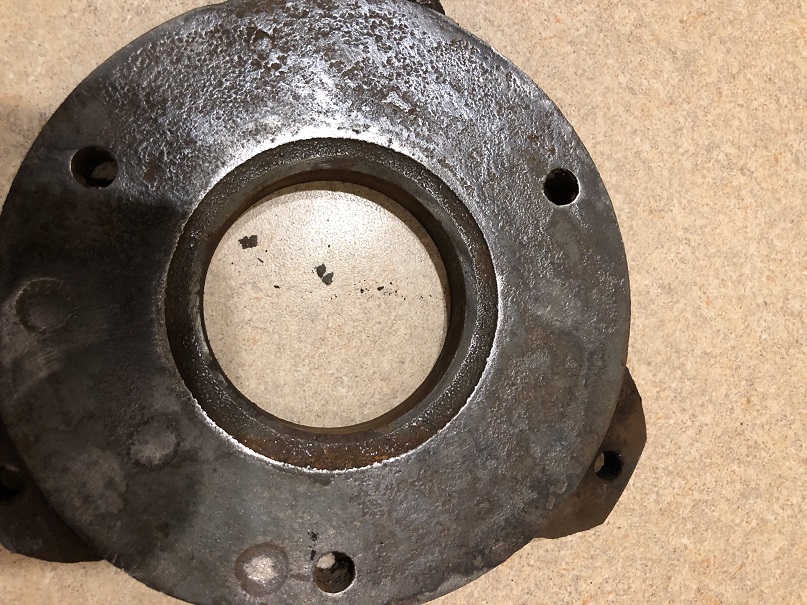 Clearly the clutch needs to be rebuilt. What do you all think of the pressure plates? Can they be resurfaced, or would it be better to replace them? Parts sources? Thanks much. Dave ------------- WC, CA, D14, WD45 |
Posted By: GregLawlerMinn
Date Posted: 09 Mar 2019 at 9:03am
|
The actuator clearance stated in the knowledge base is a "Phat Phinger" error. It should be 0.050". These clutches, and parts, are hard to come by. You can try to resurface the plates; however, you will have to adjust the gap setting by grinding material off the ears. ------------- What this country needs is more unemployed politicians-and lawyers. Currently have: 1 D14 and a D15S2. With new owners: 2Bs,9CAs,1WD,2 D12s,5D14s,3D15S2s, 2D17SIVs,D17D,1D19D;1 Unstyled WC |
Posted By: Dave(inMA)
Date Posted: 09 Mar 2019 at 12:26pm
|
Thanks, Greg. There's a machine shop near me that might be able to do this work. Per the Knowledge Base, the clutch wants a gap of 0.020" when compressed. Do you know if the gap is measured between the primary pressure plate and the clutch disc or secondary pressure plate and the clutch disc? Thanks Dave ------------- WC, CA, D14, WD45 |
Posted By: GregLawlerMinn
Date Posted: 09 Mar 2019 at 1:18pm
|
Compress the assembled clutch in a shop press, vise, C-Clamp or ?? and measure the gap between the friction surfaces. I would suspect that you will see 1/8 to 1/4" gap initially. Measure the actual gap and subtract 0.020" to get the amount you will need to remove from the ears to reach the final 0.020" gap. Note the 0.020" gap is nominal, the clutch will function fine with less of a gap. Measure your springs; they should all be the same height, if not consider replacing them. I also apply a little never seize (sparingly) to the ball seats before final assembly. ------------- What this country needs is more unemployed politicians-and lawyers. Currently have: 1 D14 and a D15S2. With new owners: 2Bs,9CAs,1WD,2 D12s,5D14s,3D15S2s, 2D17SIVs,D17D,1D19D;1 Unstyled WC |
Posted By: DennisA (IL)
Date Posted: 09 Mar 2019 at 1:37pm
|
The plates and ball seats are no longer available. You can still get the springs, liners w/rivets, disc assembly & rollers from AGCO. McMaster Carr should have the rollers as well for less money. I don’t know of any 3rd party suppliers. I currently have parts being machined. I plan on putting together a “CA” hand clutch rebuild video. I would recommend replacing the springs as they do lose tension over time. ------------- Thanks & God Bless Dennis |
Posted By: Dave(inMA)
Date Posted: 09 Mar 2019 at 3:07pm
|
Greg and Dennis - thanks very much for all that info - big help. I'll check the springs and balls. I'll update this once I resurface the clutch, get the pressure plates cleaned up, etc. Looking forward to seeing the video, Dennis. Dave
------------- WC, CA, D14, WD45 |
Posted By: DennisA (IL)
Date Posted: 09 Mar 2019 at 3:55pm
|
If the roller seats are worn you may be able to remove them and rotate them 90 degrees. I’ve never done that so it may work or just open a can of worms. If you do rotate them make sure you do it before you machine the ears/ tabs down. That way your clearance is right. ------------- Thanks & God Bless Dennis |
Posted By: Gerald J.
Date Posted: 09 Mar 2019 at 5:53pm
|
Shop manual should have details: http://geraldj.networkiowa.com/Trees/Allis-Chalmers-G-B-C-CA-Service.pdf" rel="nofollow - http://geraldj.networkiowa.com/Trees/Allis-Chalmers-G-B-C-CA-Service.pdf Gerald J. |
Posted By: Dave(inMA)
Date Posted: 09 Mar 2019 at 9:23pm
|
Dennis, the ball seats look uniform - thankfully. But this would be a good thing to make right before reassembling. Dave ------------- WC, CA, D14, WD45 |
Posted By: Bill Long
Date Posted: 10 Mar 2019 at 9:53pm
|
Be certain to look on the Knowledge section of this forum. You will find a section on the rebuild of the CA hand clutch there. It has been most helpful to some. As to grinding the ears when we were selling and servicing them we ground 1/8" off the ears. Seemed to work well. As to parts, Sandy Lake - one of the advertisers on this forum - does outstanding work on parts and supplies for Allis Chalmers. They are most helpful. Give them a call Looks like you have a difficult job ahead. When we got into them we replaced the springs and dishes but that was "back in the day" Let us know how it goes. Good Luck! Bill Long
|
Posted By: Dave(inMA)
Date Posted: 11 Mar 2019 at 7:51am
|
Hi Bill - thanks for all that! I think it'll go well once I line up some parts and a machine shop. I'll be back with updates. Dave ------------- WC, CA, D14, WD45 |
Posted By: Dave(inMA)
Date Posted: 11 Mar 2019 at 3:55pm
|
So the pressure plates are at a machine shop to have the pitting removed. And some parts are ordered: clutch plate kit, springs and balls. Meanwhile, I ran across a fellow who claims to have a trailer full of NOS parts and MIGHT have unused replacements for some of the clutch parts. He was a little vague about whether the stash is AC parts or parts for various brands. Gonna go look tomorrow morning.
------------- WC, CA, D14, WD45 |
Posted By: DennisA (IL)
Date Posted: 13 Mar 2019 at 3:18pm
I got my clutch plates back today. They had to remove about .060" from each plate. Just waiting for springs and disc assy from AGCO.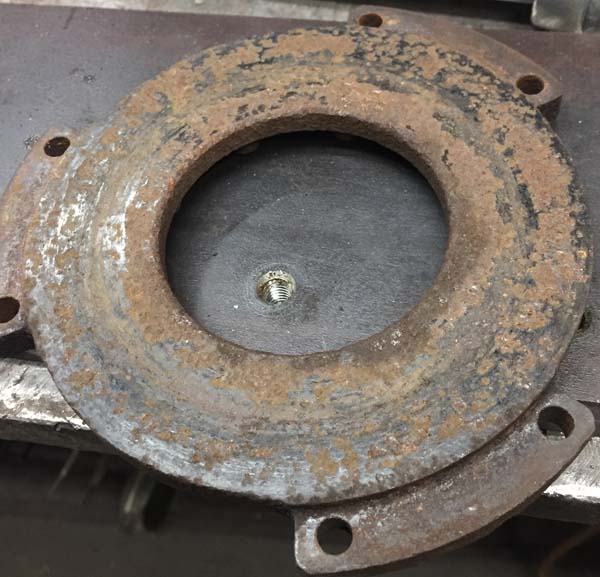 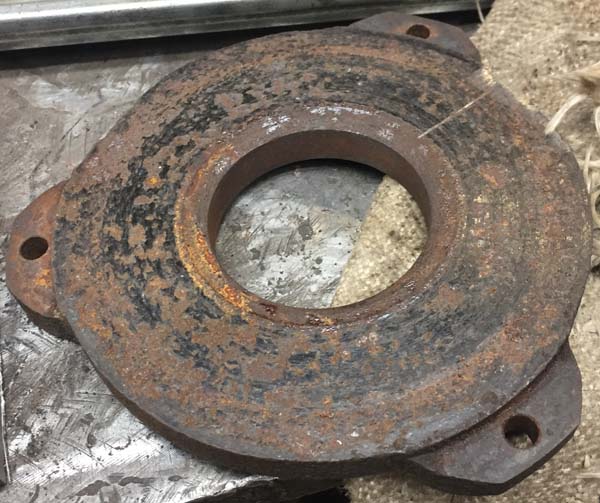 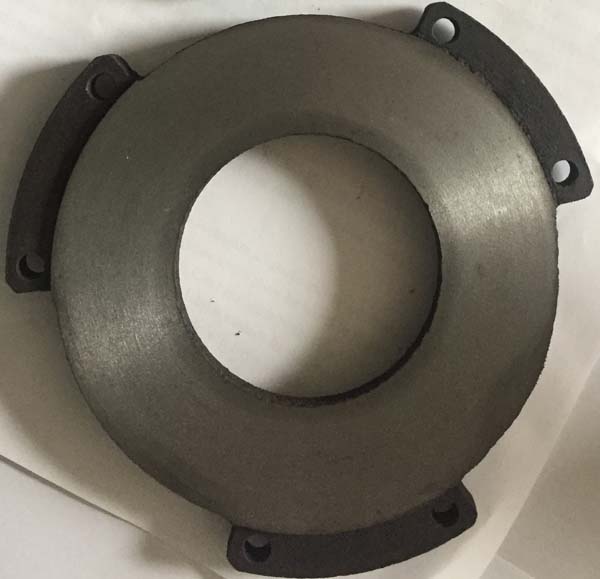 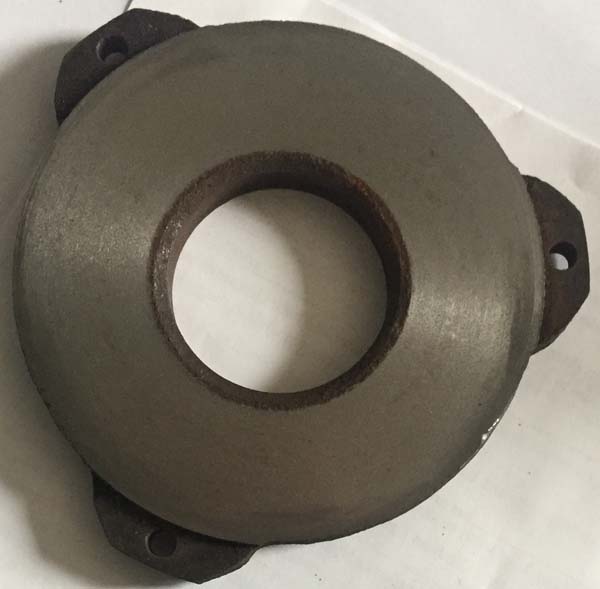 I got the springs and disc assy in today. 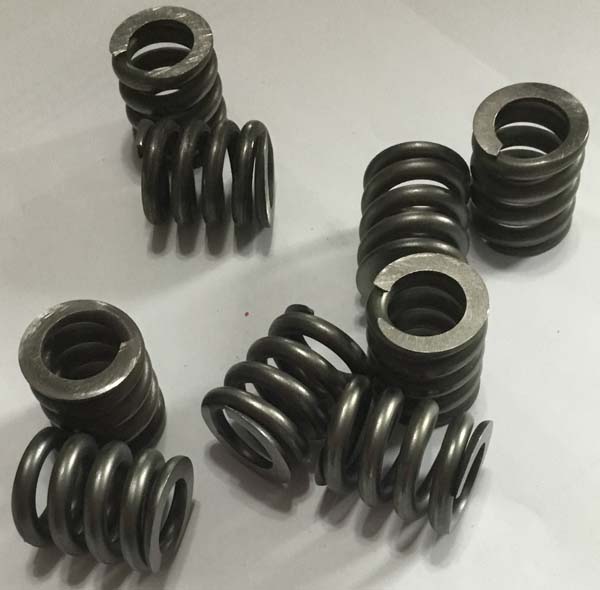 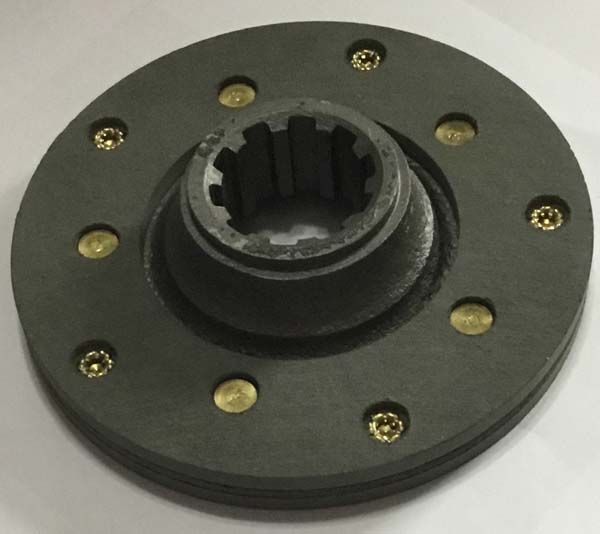  ------------- Thanks & God Bless Dennis |
Posted By: Dave(inMA)
Date Posted: 14 Mar 2019 at 4:53pm
|
Those plates look great all cleaned up, Dennis. It'll be interesting to see how much you have to remove from the "ears". I'm also waiting for a kit to resurface the clutch plate and springs as well. And waiting to have the pressure plates resurfaced.
------------- WC, CA, D14, WD45 |
Posted By: Dave(inMA)
Date Posted: 16 Mar 2019 at 7:58am
|
Parts came yesterday! Included new disc balls. They look larger than the ones that came out of mine. I haven't taken the actuator apart yet to compare them to the release balls. ------------- WC, CA, D14, WD45 |
Posted By: Dave(inMA)
Date Posted: 16 Mar 2019 at 4:19pm
|
Parts to rehab the clutch surfaces arrived yesterday. The old surfaces were totally destroyed by the rust. Here's my riveting machine - sorry for the clutter in the background. It's foot-pedal actuated and sets up a rivet like a dream. This belonged to my local AC buddy who passed away in 2010. It's been sitting in his shop since then. Knowing that I needed to install rivets for this project, I stopped by when his son was there and asked if I could borrow it. He GAVE it to me. 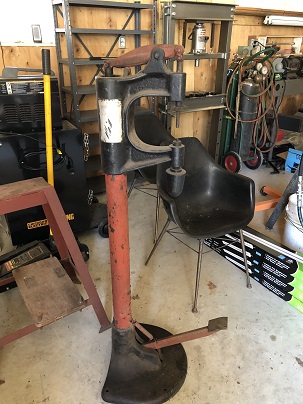 And here's the clutch plate with new friction surfaces: 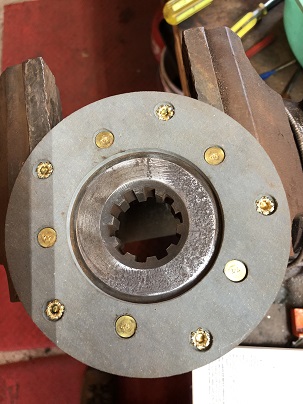 The pressure plates are at the machine shop. Unfortunately they won't be touched for a week. But I'm looking forward to posting some shots like Dennis's soon. ------------- WC, CA, D14, WD45 |
Posted By: Rick
Date Posted: 16 Mar 2019 at 5:58pm
|
The CA disc balls are much smaller than say...the brake disc balls for the 100 series tractor...there's a very big difference. Hopefully, they didn't send you the wrong ones, but can be returned, I'm sure. Rick |
Posted By: Dave(inMA)
Date Posted: 16 Mar 2019 at 8:44pm
|
Thanks, Rick. I was able to compare the balls shipped to me to the disc balls that came out of the clutch pack - they're the same size. So, all good. Dave ------------- WC, CA, D14, WD45 |
Posted By: Dave(inMA)
Date Posted: 19 Mar 2019 at 12:04pm
Machine shop called to say that the pressure plates were ready! They took off 0.045 total in addition to whatever I removed with the belt sanding machine - so maybe a total of 0.055". They look a LOT better - see my 3/8 post for the "before" pictures. Here are the refreshed plates: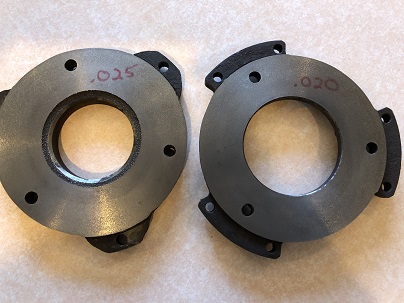 I'll be able to reassemble the clutch pack later today and measure the gap, then back to the machine shop to trim the ears. PROGRESS!! BTW, note the three holes in each plate. There were corresponding holes in the clutch plate - clearly this clutch had been thru-bolted at one point.
------------- WC, CA, D14, WD45 |
Posted By: DennisA (IL)
Date Posted: 19 Mar 2019 at 12:20pm
|
Looking good! ------------- Thanks & God Bless Dennis |
Posted By: Dave(inMA)
Date Posted: 19 Mar 2019 at 4:43pm
I assembled the clutch pack today. New springs, new disc balls. Put the pack in my shop press and applied pressure. Here are the pictures of the compressed pack - the white arrow indicates where the gap opened up in the pack. The second picture shows the compressed pack with 0.072" of feeler gauge inserted. So my gap is 0.052" over the recommended width.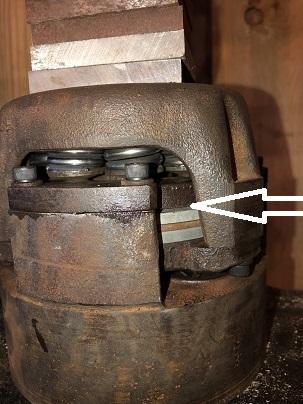 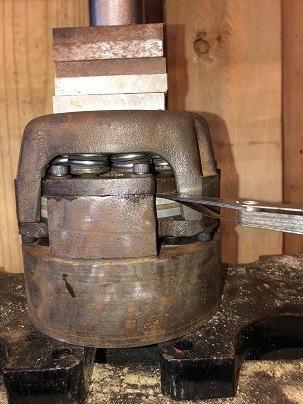 So two questions: 1. The pack is compressed in a 20 ton press. Does this compress the pack more than the clutch handle? Said differently, how far should I compress the pack in the shop press to match what will happen in the tractor? 2. The disc balls are slightly loose when the clutch pack is uncompressed. Is this okay? Thanks very much guys! Dave ------------- WC, CA, D14, WD45 |
Posted By: Dave(inMA)
Date Posted: 19 Mar 2019 at 9:03pm
|
With a little nudge from GregLawler, I think I'm clear on my first question. The 0.020" is a nominal measurement in the shop press that translates into a smaller gap - but enough - when in use in the tractor. It'd help if I would read what he wrote in his post 10 days ago! ------------- WC, CA, D14, WD45 |
Posted By: Dave(inMA)
Date Posted: 20 Mar 2019 at 3:53pm
|
I have double-checked the disc balls. They and the ones I removed from the clutch pack are 0.75" diameter. So it's likely that these are the right balls. Spent some time thinking about what these balls do. When the clutch is opened to stop the tractor, the clutch disc and the primary pressure plate move toward the right wheel inside the clutch pack - away from the secondary pressure plate which doesn't move as the secondary pressure plate is bolted to the brake drum which is keyed to the final drive shaft. The resulting gap interrupts power to the right wheel. The purpose of the disc balls is to support the clutch and primary pressure plates against the force of the springs when the clutch is opened. So here's the punch line: If the disc balls were immovable with the clutch closed (power to right wheel), there'd be no space for the clutch to open into. That is, the balls have to be loose with the clutch closed in order for it to be able to open. I hope this is making sense to you who read it. ------------- WC, CA, D14, WD45 |
Posted By: CTuckerNWIL
Date Posted: 20 Mar 2019 at 8:13pm
NO, the purpose of the clutch balls is to ramp the clutch OPEN, when you pull the actuator, which compresses the springs. The ball set in a recess on either side and you "mis-align" those recesses when you actuate the clutch. I hope this is making sense to you who read it.  ------------- http://www.ae-ta.com" rel="nofollow - http://www.ae-ta.com Lena 1935 WC12xxx, Willie 1951 CA6xx Dad bought new, 1954WD45 PS, 1960 D17 NF |
") Dave(inMA) wrote:
Dave(inMA) wrote:Posted By: Dave(inMA)
Date Posted: 20 Mar 2019 at 9:13pm
|
CTucker, there are two sets of balls involved. You are absolutely correct about the release balls. They sit behind the release actuator and translate the force on the hand lever into force on the actuator. On the other hand, the disc balls sit between the primary pressure plate and the brake drum inner surface - they're at the other end of the whole assembly and have nothing to do with opening the clutch. It's the disc balls that I've been concerned about. I'll try to figure out how to copy the parts diagram - that'll help with understanding all this. Dave ------------- WC, CA, D14, WD45 |
Posted By: Ted J
Date Posted: 20 Mar 2019 at 9:47pm
HUH?  ------------- "Allis-Express" 19?? WC / 1941 C / 1952 CA / 1956 WD45 / 1957 WD45 / 1958 D-17 |
Posted By: Dave(inMA)
Date Posted: 20 Mar 2019 at 10:42pm
Here's the hand clutch diagram: CTucker's post describes how the release balls function to move the release actuator. I've been thinking about the disc balls which sit at the other end of the entire hand clutch assembly between the primary pressure plate and the inside of the brake drum. The function of the disc balls is to support the primary pressure plate when the clutch is fully open.
------------- WC, CA, D14, WD45 |
Posted By: Bret (OH)
Date Posted: 21 Mar 2019 at 6:12am
|
The balls on the brake drum side of the clutch are a self energizing mechanism. They act to increase the clamping force of the clutch disc as load is applied to the drive side of the clutch assembly. If the clutch would begin to slip the potential rotation of the outside pressure plate would "ramp" against the balls thus exerting a tighter clamping force on the clutch disc. This is the same principal used on the "self energizing" type brakes found in the Series IV 17 and the West Allis 100 series.
|
Posted By: Dave(inMA)
Date Posted: 21 Mar 2019 at 7:55am
|
Thanks, Bret. Question: the disc balls in this clutch sit between a round seat in the drum and a corresponding round seat in the primary pressure plate. There's no ramped groove associated with these seats. Is that the same mechanism as in the Series IV D17, etc? If these are a self-energizing mechanism, I'd think that it'd be important to maintain the proper clearance between the pressure plate and the balls. Yes? Thanks again. Dave
------------- WC, CA, D14, WD45 |
Posted By: DennisA (IL)
Date Posted: 21 Mar 2019 at 9:08am
If you want to keep the factory clearance then the answer is yes. Whatever you take off the spring cover ears you’ll take off the brake ears. ------------- Thanks & God Bless Dennis |
Posted By: Dave(inMA)
Date Posted: 22 Mar 2019 at 4:27pm
|
I want to thank all of you who have contributed thus far on this thread, especially DennisA and GregLawler. And Rick Corder who spent time on the phone with me. The challenge here is that there doesn't seem to be a spec for this clearance, so I need to invent one - as well as a way to measure it. My plan is to fully compress the clutch, measure the gap between the secondary pressure plate and the clutch disc, subtract 0.020" and remove that amount from the brake drum ears. That would preserve the 0.020" (nominal) gap that GregLawler has mentioned when shortening the spring cover ears. Edit 3/23 - plan above doesn't make much sense now that I'm on my second cup of coffee. If the spring cover ear trim is correct, the result of the measurement described would be 0.0"! Comments welcome!
------------- WC, CA, D14, WD45 |
Posted By: DennisA (IL)
Date Posted: 22 Mar 2019 at 6:00pm
|
On the brake side, you could put the balls in place and just sit the Primary pressure plate on top of the balls. Then measure that distance between the bottom of the pressure plate in the brake drum. Once you get that measurement you can fully assembled the clutch. Now put the clutch in the disengage position and and take a measurement again from the brake drum to the bottom of the primary pressure plate. Subtract those two numbers that should be your total gap. Now you will need to come up with a clearance because I don’t know of one. Just don’t make it to tight. ------------- Thanks & God Bless Dennis |
Posted By: Dave(inMA)
Date Posted: 22 Mar 2019 at 7:16pm
|
Interesting suggestion, Dennis. Are there any similar situations involving balls and ramps where clearances are known? Maybe this would give us a ballpark for the CA hand clutch. Dave ------------- WC, CA, D14, WD45 |
Posted By: DennisA (IL)
Date Posted: 22 Mar 2019 at 9:15pm
|
Also rotate the the pressure plate while sitting on the disc balls to see how much travel there is and check the gap. ------------- Thanks & God Bless Dennis |
Posted By: Dave(inMA)
Date Posted: 22 Mar 2019 at 10:21pm
|
Good idea - to ensure that the clearance is less than the change in the gap so that the self-energizing feature would still be effective. ------------- WC, CA, D14, WD45 |
Posted By: Dave(inMA)
Date Posted: 28 Mar 2019 at 12:53pm
Got the spring cover back from the machine shop this morning. I had 0.050" taken off the ears: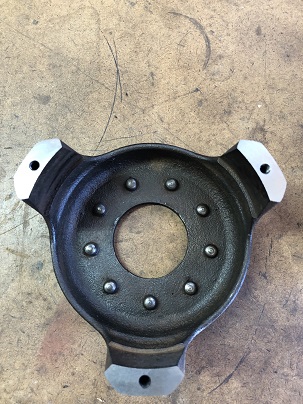 Secondary pressure plate sitting on top of the new springs: 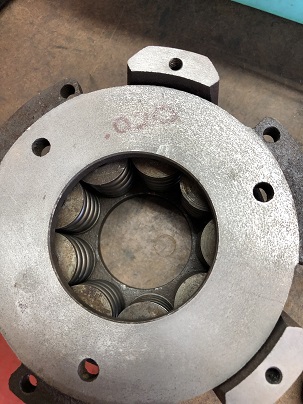 Spring cover with both pressure plates and clutch disc installed: 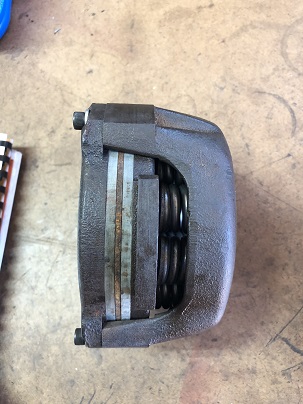 Assembled clutch pack: 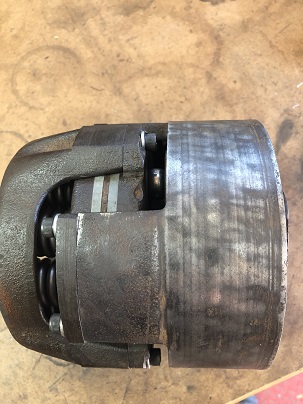 Pack fully compressed in the shop press - note gap between clutch disc and secondary pressure plate: 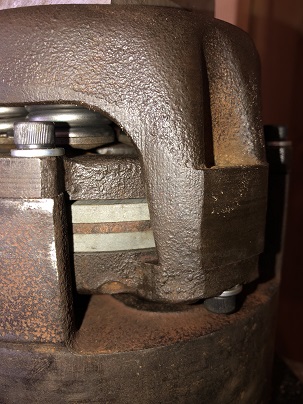 This gap measured 0.057" at which point the primary pressure plate is sitting on the disc balls - there's no further room for the clutch to open. I'm betting that the clutch is farther open in the shop press than would happen in real life when the hand lever is pulled. There are two reasons this would happen: 1. The shop press can compress the clutch springs more than the hand lever/actuator mechanism; and 2. Removing material from the two pressure plate surfaces has widened the gap between the primary pressure plate and the disc balls. Here's the rub: we don't know what the clearance between the primary pressure plate and the disc balls is supposed to be. As well, there's no way to measure the gap directly as the balls are sitting in rounded seats. According to the one of the shop manuals I have, the hand clutch is a Lambert. Searching on "Lambert clutch" turned up no useful references. Hmmmm...... ------------- WC, CA, D14, WD45 |
Posted By: Dave(inMA)
Date Posted: 18 Apr 2019 at 9:09pm
|
Finally I have an update to share. My project was interrupted by a week of family vacation and the time it took to recover from me cracking a part of the clutch pack: the secondary pressure plate....too much pressure on it in the shop press. Thanks to DennisA (IL), I have a replacement which arrived Monday. The plate is rusty and pitted, and the surface is slightly dished. Following the advice of a local old time mechanic, I am trying a different approach to resurfacing the plate: "Put it on a 6" belt sander to flatten it and to remove the high spots and rust - don't worry about the pitting." Here's the result, sitting inside the spring cover atop the 9 springs: 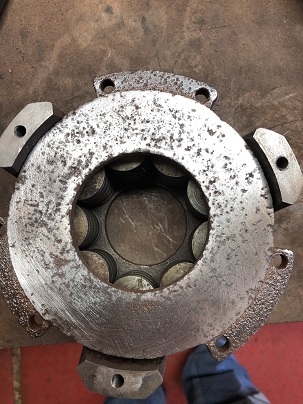 And here's the assembled clutch with the drive shaft inserted to align the clutch plate and brake drum: 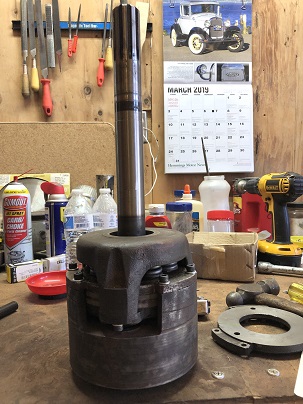 Off to the right is the secondary pressure plate that I cracked. At this point, the assembled clutch is installed inside the final drive housing which is now bolted to the differential. The actuator clearance is set at 0.050". It took several cycles of adjust the clearance and compressing the clutch pack to get the clutch fully seated on the outer drive shaft. I've installed a new brake band. Tomorrow I will mount the right rear wheel and the platform frame and fender. This will leave access to the opening in the housing if I need to adjust the actuator clearance again. Then I'll test the clutch (and the brakes) to see if it functions properly. Will the secondary pressure plate work as my old timer predicted?
------------- WC, CA, D14, WD45 |
Posted By: Sugarmaker
Date Posted: 19 Apr 2019 at 7:46am
|
Very nice documentation and pictures on the CA hand clutch rebuild! If I ever own one this may be very helpful! Regards, Chris ------------- D17 1958 (NFE), WD45 1954 (NFE), WD 1952 (NFE), WD 1950 (WFE), Allis F-40 forklift, Allis CA, Allis D14, Ford Jubilee, Many IH Cub Cadets, 32 Ford Dump, 65 Comet. |
Posted By: Dave(inMA)
Date Posted: 19 Apr 2019 at 5:02pm
|
Thanks, Chris. That's high praise from the master of documenting AC projects! I finished the clutch-and-brake reinstall today. I'm happy to report two good outcomes: 1. the tractor finally has working brakes - a major plus in hilly central Massachusetts. and 2. the hand clutch is working - pulling on the handle stops the tractor! And releasing it works as it should, too. Here's a brief video: [TUBE]7NLNsT6WcwE[/TUBE] Next week I'll hang my two-bottom plow on the old girl and drop it in some fresh turf at a friend's farm to test whether there's any slipping in the hand clutch. Hopefully I'll have good news. In the meantime, I'd like to thank all you forum guys who've commented and helped with this project, especially DennisA (IL) who bailed me out when I cracked the one of the clutch pressure plates and answered my questions by PM and text. This forum and the guys who freely lend their knowledge are a great tribute to the orange legacy. ------------- WC, CA, D14, WD45 |
Posted By: Ted J
Date Posted: 21 Apr 2019 at 11:29pm
|
Well Dave, THANK you!! I've followed this since it's start because I have a CA that the lever does nothing. I'm going to have to pull it apart this summer and now at least I have an idea where to start. And if I get in trouble, I'll be asking you and Dennis and Greg for answers. OR,,,,, I may just ship the whole thing to Rick and let him fool with it. ------------- "Allis-Express" 19?? WC / 1941 C / 1952 CA / 1956 WD45 / 1957 WD45 / 1958 D-17 |
Posted By: Dave(inMA)
Date Posted: 22 Apr 2019 at 4:08pm
|
You're welcome, Ted. Happy to help if I can. ------------- WC, CA, D14, WD45 |
Posted By: Dave(inMA)
Date Posted: 23 Apr 2019 at 4:48pm
Ah. Didn't realize that editing post #1 would leave this thread deep into p2 on the Forum. So I'm adding this post to direct you to post #1 where I provide the final update.  ------------- WC, CA, D14, WD45 |
Posted By: chaskaduo
Date Posted: 23 Apr 2019 at 5:23pm
|
That sure is some wet ground, your CA did a great job though. ------------- 1938 B, 79 Dynamark 11/36 6spd, 95 Weed-Eater 16hp, 2010 Bolens 14hp |
Posted By: Dave(inMA)
Date Posted: 23 Apr 2019 at 5:52pm
Yup, it surely was, chaskaduo. Add in the clay content and my lack of experience plowing and the experience probably qualifies as tractor abuse.  Anyway, I thought the old girl did well. Glad you agree! Anyway, I thought the old girl did well. Glad you agree!------------- WC, CA, D14, WD45 |
Posted By: DennisA (IL)
Date Posted: 23 Apr 2019 at 6:26pm
|
Job well done Dave! One thing that I try to do when possible is before I re-engage the hand clutch I disengage the engine clutch. This will make the hand clutch last a little longer. ------------- Thanks & God Bless Dennis |
Posted By: Dave(inMA)
Date Posted: 24 Apr 2019 at 8:20am
|
Apparently posting the final update in my OP wasn't the smartest idea I've had: readers quite naturally expect the "final" to be at the end, not the beginning. So here's the report on how the hand clutch held up. Hung the #52 plow on the CA and gave the clutch the acid test at my friend's farm. Nary a hint of slippage! Here's a video - we were plowing in what my friend referred to as "virgin soil" and the plow was biting deep. Lots of clay in the soil, and the ground is still really wet. Here's a video of the CA in action: [TUBE]d-IrW3md3QQ[/TUBE] I'm really pleased with how the http://i.viglink.com/?key=d7d7aa5ced1ebc0821effbccab897fa0&insertId=b134a5a26a0da593&type=H&mid=38891&exp=60%3ACI1C55A%3A20&libId=juv8tbve010009ks000DLktvrn9yp&loc=https%3A%2F%2Fwww.allischalmers.com%2Fforum%2Fca-hand-clutch-restore-final-update-4-23_topic158871_page1.html&v=1&iid=b134a5a26a0da593&opt=true&out=https%3A%2F%2Fclick.linksynergy.com%2Flink%3Fid%3Dje6NUbpObpQ%26offerid%3D401480.13092630%26type%3D15%26murl%3Dhttp%253A%252F%252Ftracking.searchmarketing.com%252Fclick.asp%253Faid%253D530007130006023084%26mid%3D38891&ref=https%3A%2F%2Fwww.allischalmers.com%2Fforum%2Fca-hand-clutch-restore-final-update-4-23_topic158871_page2.html&title=CA%20Hand%20Clutch%20Restore%20-%20Final%20Update%204%2F23%20-%20AllisChalmers%20Forum%20-%20Page%201&txt=%3Cspan%3Ehand%20%3C%2Fspan%3E%3Cspan%3Eclutch%3C%2Fspan%3E" rel="nofollow - hand clutch is performing. Thanks again to everyone who read/commented/lent a hand in any way with this project.
------------- WC, CA, D14, WD45 |
Posted By: Grouse
Date Posted: 28 Jul 2019 at 6:47pm
|
I also am trying to rebuild my hand clutch on my CA. The balls were there but the seats are missing. Is there some place I can order new balls and seats? |
Posted By: Rick
Date Posted: 28 Jul 2019 at 10:40pm
| The last I knew, you could still get them from AGCO...I did. Rick |
Posted By: Sugarmaker
Date Posted: 29 Jul 2019 at 11:02am
|
Dave, Nice video of you plowing with the CA. Do you have the traction booster too show when you gain traction as you raise the plows in those soft spots. Looks like all your detailed hand clutch work payed off and you now have a working clutch and a nice operating tractor too! But now I want a CA to add to the herd! I need to go see about that narrow front one setting under a big willow tree. (tree fell over on it) Regards, Chris ------------- D17 1958 (NFE), WD45 1954 (NFE), WD 1952 (NFE), WD 1950 (WFE), Allis F-40 forklift, Allis CA, Allis D14, Ford Jubilee, Many IH Cub Cadets, 32 Ford Dump, 65 Comet. |
Posted By: Arthur
Date Posted: 29 Nov 2025 at 4:15pm
|
I have read on here that some one can rebuild the hand clutch for a CA . Would like to know if they can still rebuild them thanks jim |
Posted By: Ray54
Date Posted: 30 Nov 2025 at 5:26pm
| I will bump you up to the top. Maybe that will get you an answer. If not start a new topic with your question. Somedays nobody looks that it is 5 years old. But on this they figured a scammer was bring up an old topics and did not look. |
Posted By: Les Kerf
Date Posted: 06 Jan 2026 at 4:41pm
I am dredging this thread up because I am in the process of rebuilding my CA hand clutch. I am seriously questioning the need to have the clutch fully assembled in order to check the clearance. 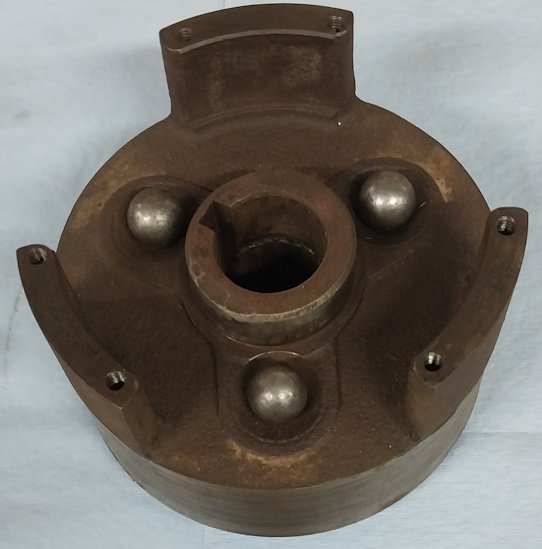 Clutch balls in seats (I have not yet installed the center bushing). 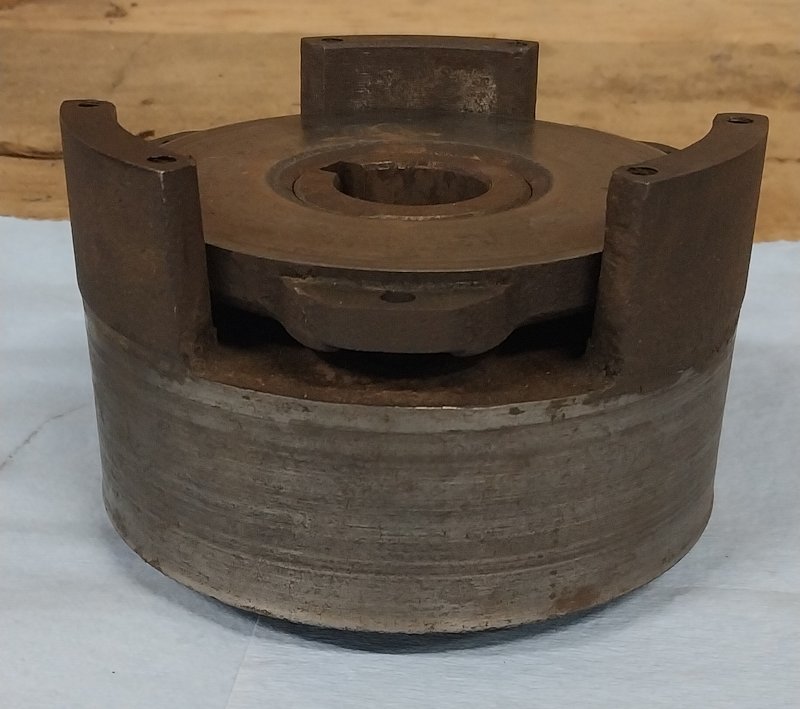 Primary pressure plate sitting on disc balls; this is as far as the plate will go even when the fully assembled clutch is compressed. 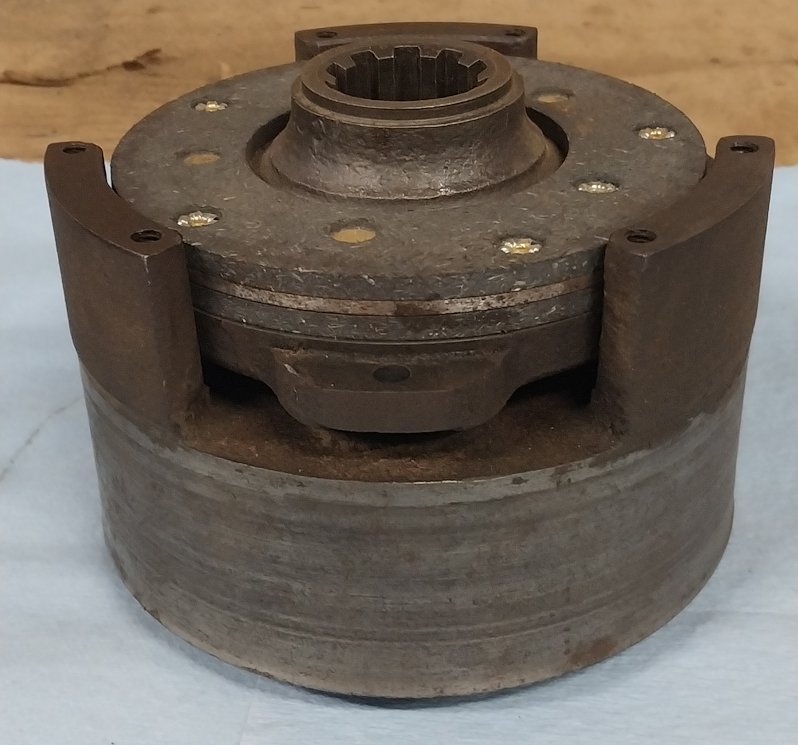 Clutch disc sitting on primary pressure plate 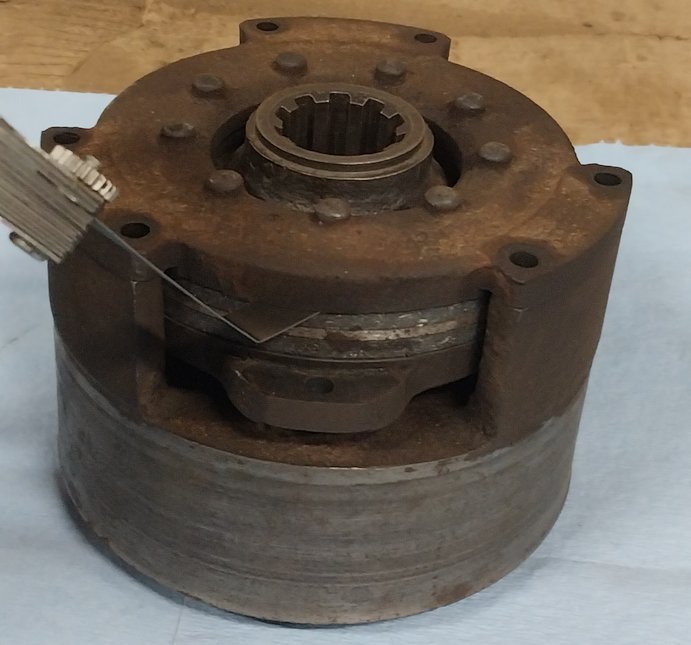 Secondary pressure plate sitting on brake drum ears with 0.015" feeler gauge in gap. I did this same test with the unit fully assembled and compressed with large C-clamps; I measured the same 0.015" clearance in that test also. When fully assembled, the springs force the primary pressure plate toward the secondary pressure plate, thus pulling the primary pressure plate away from the disc balls. It is easy to see that this clearance will increase when the pressure plates are re-surfaced, but it would require massive amounts of material removal to end up with the 1/4" clearance mentioned in previous posts, although it is certainly possible. |
Posted By: PaulB
Date Posted: 06 Jan 2026 at 8:07pm
|
Many years ago Bill Long talked about trimming the ears of the axle clutch cover on the CA hand clutch. If I remember correctly he said the this sometimes had to be done on new tractors ------------- If it was fun to pull in LOW gear, I could have a John Deere. Real pullers don't have speed limits. If you can't make it GO... make it SHINY |
Posted By: rilenz
Date Posted: 07 Jan 2026 at 6:52am
| Les do you still plan on putting the hand clutch on the left side and if so will you be posting your progress. |
Posted By: DennisA (IL)
Date Posted: 07 Jan 2026 at 7:05am
|
Mounting the hand clutch on the left side is a great improvement if you plan on running a n All-Crop harvester or a Roto-Baler. I have never regretted mounting mine on the left. I would definitely machine down to three tabs so that the clutch grips tighter. I started making a “How To” video on rebuilding the CA hand clutch that includes the machining down the tabs but I haven’t finished it yet, got side tracked and never returned to it. ------------- Thanks & God Bless Dennis |
Posted By: Les Kerf
Date Posted: 07 Jan 2026 at 8:16am
Yes and yes. Please note that I ain't got but one gear, and that one is tolerable slow
I do hope to get this done before springtime though. |
Posted By: Les Kerf
Date Posted: 07 Jan 2026 at 8:21am
That seems reasonable. Reckon how would I know whether my parts have already been machined down, and if so, by how much? It would not be prudent to just whack a bunch of material off willy-nilly
 |
Posted By: DennisA (IL)
Date Posted: 07 Jan 2026 at 10:22am
|
That is correct. What I’ve done in the past, with the clutch Assembled, is to totally collapse the springs and measure the gap in between the clutch disk and the pressure plates. Whatever that measurement is subtract 0.050” and that will be what you machine off. ------------- Thanks & God Bless Dennis |
Posted By: rilenz
Date Posted: 08 Jan 2026 at 5:12am
| I will be tackling the switch over in the spring. So defiantly will be watching your progress. Do have a another ? I rebuilt my hand clutch this last spring and sometimes I hear a squeal when disengaged. Might be an adjustment thing ? |
Posted By: Les Kerf
Date Posted: 08 Jan 2026 at 6:38am
I am just a rank beginner on the CA and learning as I go. We got this tractor last spring as a parts machine, Grandson got it running and putt-putted around with it last summer. It runs well but the main clutch is shot, the rear main leaks badly, and the brakes are toast. The hand clutch was totally soaked in gear oil and was so well-lubricated that it didn't squeal at all
Otherwise it functioned nicely and didn't slip, but we never really stressed it very much either. I only drove it a couple of times as Grandson had it commandeered most of the time |
Posted By: Sugarmaker
Date Posted: 08 Jan 2026 at 10:28am
|
Les, Sounds like you need start at page one of my CA thread!:) your grandson will be very happy. Regards, Chris and Cheryl ------------- D17 1958 (NFE), WD45 1954 (NFE), WD 1952 (NFE), WD 1950 (WFE), Allis F-40 forklift, Allis CA, Allis D14, Ford Jubilee, Many IH Cub Cadets, 32 Ford Dump, 65 Comet. |
Posted By: tadams(OH)
Date Posted: 08 Jan 2026 at 2:00pm
| I have had my hand clutch apart a couple of time and the second time all I had to do was retighten the bolts that hold it on, I didn't use locktite on them and now it's slipping again. I am not planing on trearing it down again. |
Posted By: Les Kerf
Date Posted: 08 Jan 2026 at 7:37pm
I have followed your CA thread with great interest; you do set the bar rather high for we mere mortals
|
Posted By: rilenz
Date Posted: 10 Jan 2026 at 6:32am
| Thanks for all the insight I'll be moving the clutch handle this spring and will check all the parts. It works great just has a noise once and awhile. I think it would work much better on the left when operating the hydralic lever when using the back blade and loader |
Posted By: Les Kerf
Date Posted: 10 Jan 2026 at 8:36am
|
I snapped more photos of measurements that may be worthy of consideration.  This is the spring cover sitting on three springs, when fully assembled there will be no gap. These are the spring cover ears that would need to be milled shorter in order to increase the spring's holding force. 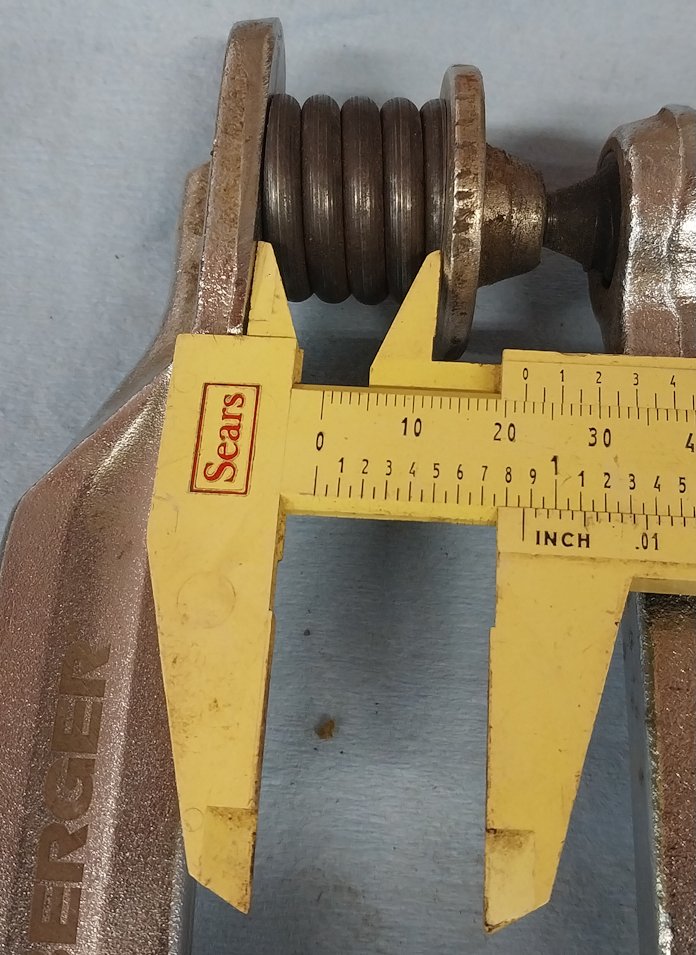 This is a spring fully collapsed in a c-clamp; it would require a massive amount of milling before a stock spring would approach coil bind, but it is something to keep in mind.
|