Steering Good and Boogered
Printed From: Unofficial Allis
Category: Allis Chalmers
Forum Name: Farm Equipment
Forum Description: everything about Allis-Chalmers farm equipment
URL: https://www.allischalmers.com/forum/forum_posts.asp?TID=154833
Printed Date: 09 Oct 2025 at 12:04pm
Software Version: Web Wiz Forums 11.10 - http://www.webwizforums.com
Topic: Steering Good and Boogered
Posted By: Coke
Subject: Steering Good and Boogered
Date Posted: 15 Oct 2018 at 3:32pm
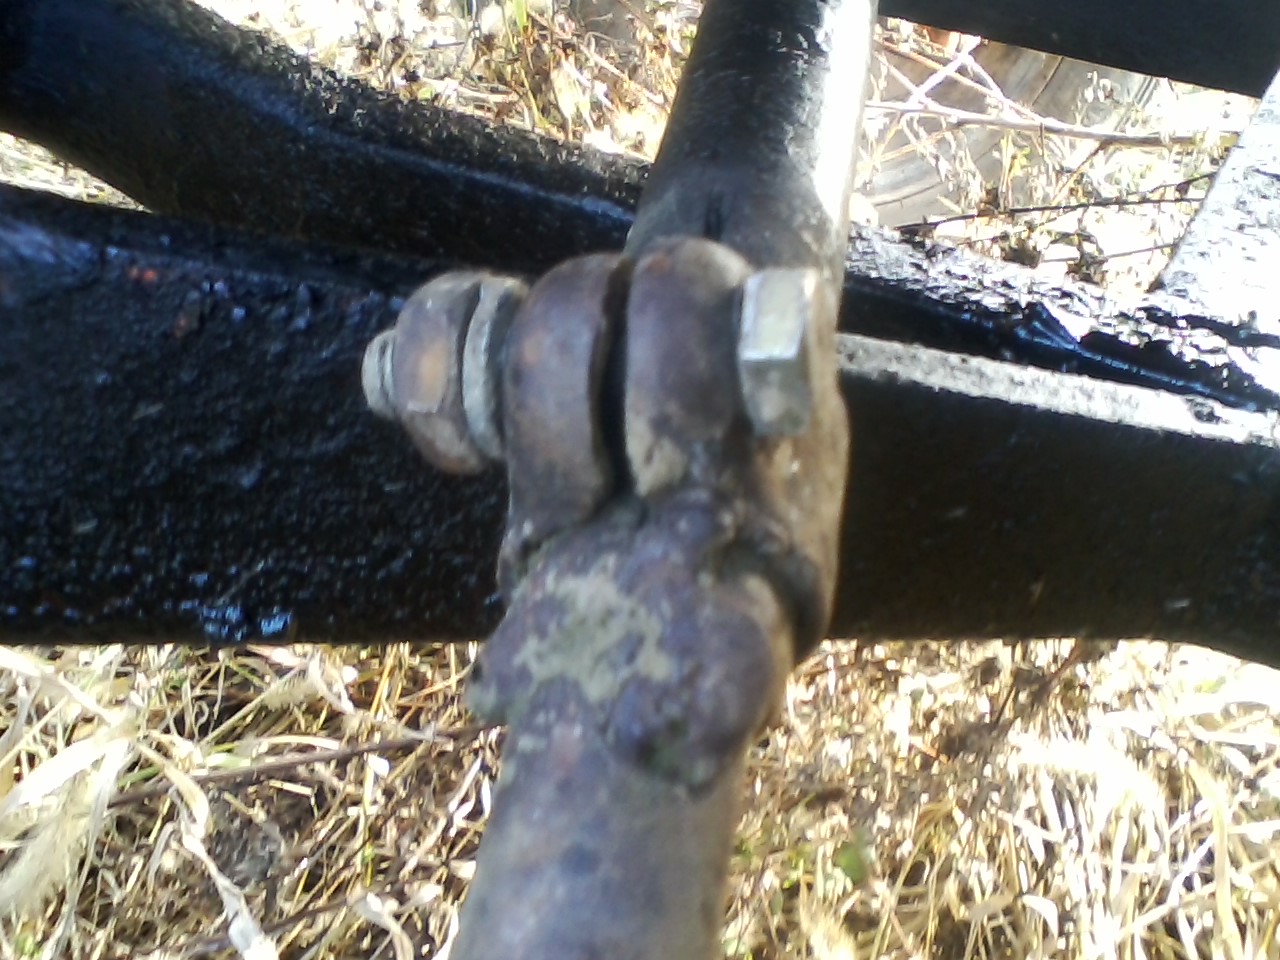
 So today this happened. 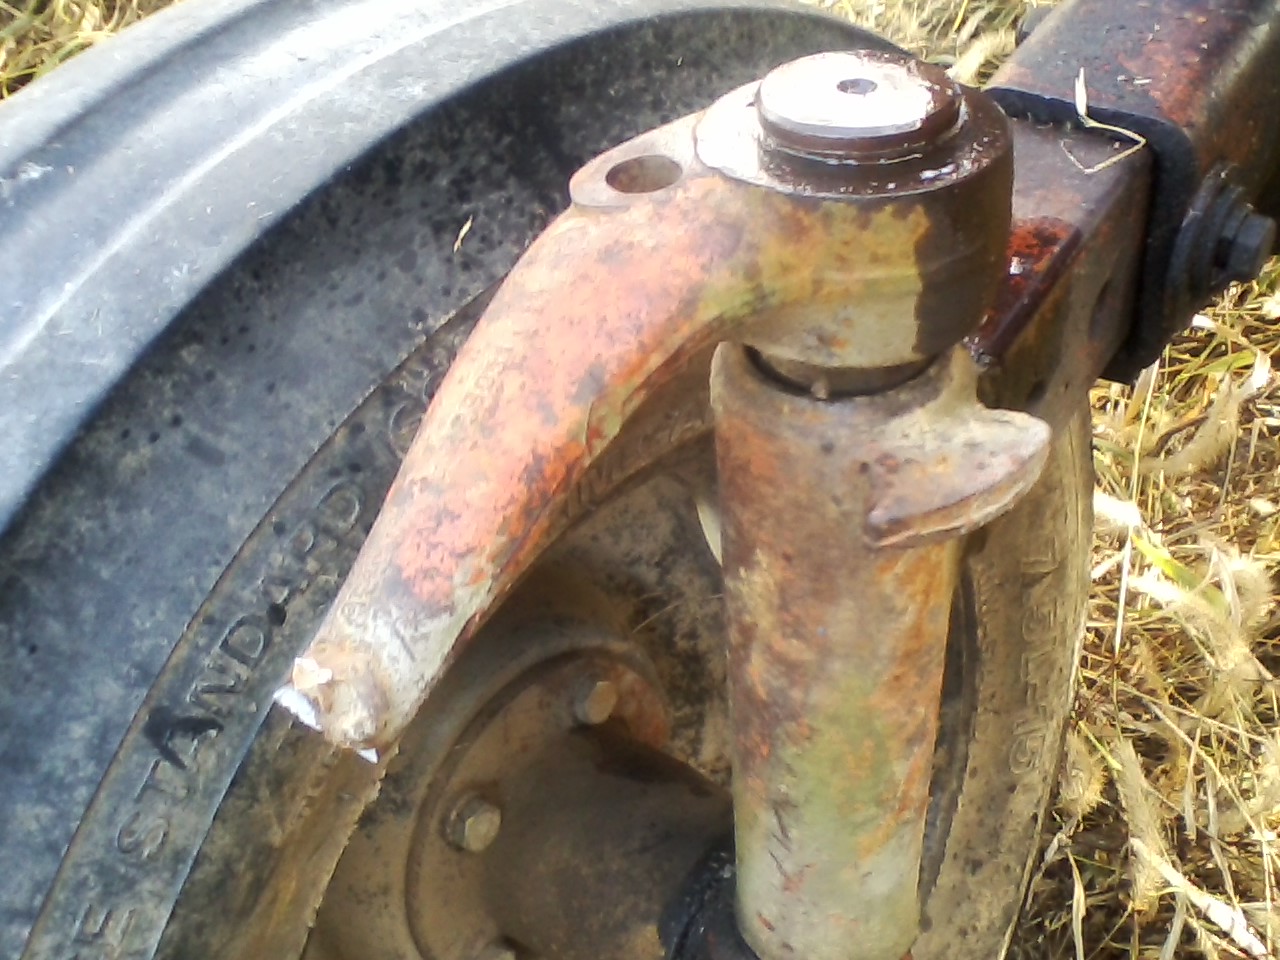 I can't even pull the steering arm off at the adjustment point as someone has booger welded it to the shaft! ------------- 1957 D17 Diesel w/ M&W Pistons |
Replies:
Posted By: Coke
Date Posted: 15 Oct 2018 at 3:35pm
 So how do I get the arm of the steering spindle? I got the snap ring off, but do I need to get the key out? Been pounding on it with a sledge as I don't have a torch. And do you think our local blacksmith can weld this back up, or should I be looking for a new arm? ------------- 1957 D17 Diesel w/ M&W Pistons |
Posted By: jaybmiller
Date Posted: 15 Oct 2018 at 3:41pm
|
gotta be Monday ! man I do feel for you though ... It looks like you'll need a spindle and the arm piece....oh yeah, tie rod end with zerk too.... hmm maybe, just maybe you can use a thin cutoff wheel and remove a piece of the busted casting (2 cuts, 1 whack with cold chisel)? if it's like the D-14, they are 'keyed' so, cut there first as keystock is cheap and you may not damage the spindle. slow and steady, patience and you may win..... Jay ------------- 3 D-14s,A-C forklift, B-112 Kubota BX23S lil' TOOT( The Other Orange Tractor) Never burn your bridges, unless you can walk on water |
Posted By: Coke
Date Posted: 15 Oct 2018 at 3:52pm
|
Dang. Why do I need the spindle piece too? I can't get the thing to separate what you see on it is a bunch of WD40. I been using my little Thor hammer to try and get it off, no luck. ------------- 1957 D17 Diesel w/ M&W Pistons |
Posted By: AaronSEIA
Date Posted: 15 Oct 2018 at 4:08pm
|
Can you get the nut off the tie rod end? Pickle for would have that piece off quick and save you some money. AaronSEIA
|
Posted By: Coke
Date Posted: 15 Oct 2018 at 5:05pm
It's spinning in place, I'll probably get it off, but I think tomorrow I need to get a fine torch, for the arm, the one I have just now would take out the tyre too  ------------- 1957 D17 Diesel w/ M&W Pistons |
 AaronSEIA wrote:
Posted By: jaybmiller
Date Posted: 15 Oct 2018 at 5:10pm
|
OK, as long as the arm wasn't welded to the spindle(which is what I thought) I'd cut/grind off the busted arm. I doubt a welder can fix it 'like new'. 2 cuts will get rid of a piece of the spindle, so the rest will come off. Jay ------------- 3 D-14s,A-C forklift, B-112 Kubota BX23S lil' TOOT( The Other Orange Tractor) Never burn your bridges, unless you can walk on water |
Posted By: DiyDave
Date Posted: 15 Oct 2018 at 5:43pm
WD40 is not a penetrating oil. mix up some atf and acetone, 50/50, and drip a little of that, then try again. Rome wasn't built in a day, and some of these mechanical things take time, specially if you don't have the red wrench...
Oh, and if yer hammer is a little thor, get a bigger hammer, and it won't get tho thor...
|
Posted By: AaronSEIA
Date Posted: 15 Oct 2018 at 6:17pm
|
Ga, didn't proof read. Pickle fork. Tie rod fork. I wonder if you hammer it in there a bit if that wouldn't keep the thing from spinning. AaronSEIA
|
Posted By: Coke
Date Posted: 15 Oct 2018 at 7:31pm
Groan at DIYDave  Tie rod fork, OK, autocorrect is a bane. I got to go up to town tomorrow anyways, right by Harbor Freight, so going to pick up a torch, already have the propane bottles. That'll cover the big part of the arm, on the spindle, not sure about the little part, it is spinning with the nut, on the tie rod end (not sure of name), along with the threads. Don't want to mung up anything else, hoping I can regrease and reuse that end, get it going. I doubt the arm can be fixed, but I'll try the local blacksmith, but the small end looks pretty frail and brittle anyway. Seems like a lot of places sell that arm, fits a bunch of models. So that's a bright spot. The welded adjustment point (tie rod?) I'm hoping to leave as is. ------------- 1957 D17 Diesel w/ M&W Pistons |
Posted By: AaronSEIA
Date Posted: 15 Oct 2018 at 8:09pm
|
Try using a pipe wrench or channel lock pliers to hold the broken piece from spinning. The tapered part of the tie rod is wedged in there anyway. If you can get a good grip on it, that will let you get the nut off, then use the tie rod fork to pop it off the end of the tire rod. AaronSEIA
|
Posted By: Dakota Dave
Date Posted: 15 Oct 2018 at 8:58pm
| Put a 1/8" cutting disk in your 4 1/2" angle grinder and cut the arm on two sides. You don't even cut all the way down to the spindle. Cut deep as you dare and wack it hard it'll break at the score and not damage the spindle. I personally would not even bother with the tierod end just replace it. When I did mine a complete tierod assembly was Cheeper than buying both ends and I didn't have to fight a rusty stuck one apart. |
Posted By: Sugarmaker
Date Posted: 15 Oct 2018 at 9:12pm
|
I would (as mentioned ) cut the broken arm off carefully with a 1/16 inch thick cut off wheel. one slice might be enough. Get a good used arm and then replace the adjustment rod with a new piece. I fought one of those half a day to get it apart and it wasn't welded! They get rusted together pretty bad. You might want to check those bearings for the vertical steering shaft. It looks like there may be some slop in those. Now would be the time while you can drop the spindle out the bottom. It was well worth the effort on the WD I repaired. Regards, Chris ------------- D17 1958 (NFE), WD45 1954 (NFE), WD 1952 (NFE), WD 1950 (WFE), Allis F-40 forklift, Allis CA, Allis D14, Ford Jubilee, Many IH Cub Cadets, 32 Ford Dump, 65 Comet. |
Posted By: AC720Man
Date Posted: 15 Oct 2018 at 9:21pm
|
Dakota Dave is correct, carefully cut both sides. You may try a chisel in the cut and wack it with a hammer. Or try a two point puller, after all that’s what the hole in the top is for. Replace the whole tie rod assembly, as said before it’s cheaper to replace it all than each piece separately. Found that out when I called Brenda at Sandy Lake about my XT. ------------- 1968 B-208, 1976 720 (2 of them)Danco brush hog, single bottom plow,52" snow thrower, belly mower,rear tine tiller, rear blade, front blade, 57"sickle bar,1983 917 hydro, 1968 7hp sno-bee, 1968 190XTD |
Posted By: AC720Man
Date Posted: 15 Oct 2018 at 9:23pm
|
Chris is correct also, he chimed in as hit post lol. ------------- 1968 B-208, 1976 720 (2 of them)Danco brush hog, single bottom plow,52" snow thrower, belly mower,rear tine tiller, rear blade, front blade, 57"sickle bar,1983 917 hydro, 1968 7hp sno-bee, 1968 190XTD |
Posted By: FREEDGUY
Date Posted: 15 Oct 2018 at 9:29pm
| Looks like the cast arm was welded on before ?? |
Posted By: shameless dude
Date Posted: 15 Oct 2018 at 9:38pm
| don't hit your fingers! |
Posted By: Coke
Date Posted: 16 Oct 2018 at 2:23am
------------- 1957 D17 Diesel w/ M&W Pistons |
Posted By: AaronSEIA
Date Posted: 16 Oct 2018 at 5:56am
|
[/QUOTE] What would the puller push against? I like the idea of a puller more than using fire BUT don't see where it would seat? Or is it clawing up on the two edges of the arm, and down the middle of the spindle, maybe I'm being obtuse.[/QUOTE] Yes. AaronSEIA
|
Posted By: Dnoym N. S. Can.
Date Posted: 16 Oct 2018 at 6:21am
 B:-) Dnoym
|
Posted By: ac-mike
Date Posted: 16 Oct 2018 at 7:43am
|
I did not read anywhere if you are aware that you cannot drive the spindle out of steering arm. The steering arm has to come off and remove key before the shaft can move out of the knee. The broken steering arm eye that is on the tie rod can be removed by laying it on an anvil and striking the other side with a heavy hammer, you may rotate it to help get it to release. The reason the tie rod was welded on is because someone replaced the tie rod with an import part and did not change the factory clamp. The import clamps are very prone to slipping. If you decide you want to salvage the tie rod, you will need to grind away the weld. Then you can lay this on the anvil and peen it to loosen it. You can than try various methods to pull it out. Many times I weld a slap hammer puller to it, use some heat and bring it out. Laugh at my methods if you wish but I get them apart without destroying them. ------------- D-12III, 200D, 170G, HD-3, D19D 3pt, D17D High Crop, WD45G p/s, D15IID, D15IIG, D15G IND, 655, (3)WD45D p/s, 700, 816 |
Posted By: Coke
Date Posted: 16 Oct 2018 at 3:12pm
|
Well bit of a fiasco today. Got a set of 3 pullers from Harbor Freight,
they had a nice heavy looking Pittman puller but the opening was too
small, so I had to go with a two jaw puller set. Started with the biggest puller, it bent to a 45degree angle and stayed there  So went to the medium size puller, it snapped a bolt So I figured I had to use the torch (new from Menards for the purpose), had a bugger of a time getting it lit, got it lit, it burned for a second and a half and went out. Refused to light, no hiss of gas, even another tank didn't help So at that point I stopped, rather than pound on it in frustration. I'm back in town Thursday, so all this stuff is going to have to sit. ------------- 1957 D17 Diesel w/ M&W Pistons |
Posted By: chaskaduo
Date Posted: 16 Oct 2018 at 3:52pm
|
Coke I'm feeling for ya. ------------- 1938 B, 79 Dynamark 11/36 6spd, 95 Weed-Eater 16hp, 2010 Bolens 14hp |
Posted By: chaskaduo
Date Posted: 16 Oct 2018 at 4:19pm
|
Coke I just confused you with Coke in MN, but I still feel for ya. I just did a strut that fought back. ------------- 1938 B, 79 Dynamark 11/36 6spd, 95 Weed-Eater 16hp, 2010 Bolens 14hp |
Posted By: Lonn
Date Posted: 16 Oct 2018 at 4:46pm
|
I've found the only good torches are sold at the gas supplier's. Throw the pullers away. Get a good torch with a rosebud tip. Remove tire and rim. Heat until arm is red hot and douse with cold water. Tap arm off with a hammer. To reinstall heat the new arm red hot again, making sure to line up key in spindle with slot in arm, drop the red hot arm onto the spindle with a couple pair of pliers or visegrips. Tap down into place. Let cool to shrink fit onto arm again. Install snap ring. ------------- -- --- .... .- -- -- .- -.. / .-- .- ... / .- / -- ..- .-. -.. . .-. .. -. --. / -.-. .... .. .-.. -.. / .-. .- .--. .. ... - Wink I am a Russian Bot |
Posted By: Coke
Date Posted: 16 Oct 2018 at 5:22pm
|
You heat it, then cool it, before trying to remove? Not remove it hot? Wonder why they didn't just make a custom puller like this?  ------------- 1957 D17 Diesel w/ M&W Pistons |
Posted By: DiyDave
Date Posted: 16 Oct 2018 at 5:30pm
You can try the wax trick, heat to 500ºF, or so, let it start to cool, and as it cools, stick a beeswax candle, on the joint, in question, let the wax wick into the joint, as it cools.
|
Posted By: Lonn
Date Posted: 16 Oct 2018 at 5:52pm
|
You can use a puller if you want and then hammer it back on. I don't like to because it's my belief the arm will not be as tight as needed to ensure it won't come loose and ruin the spindle and arm. Several here will argue against that. But my way is the way I learned at the Allis dealership when I worked there years ago. If you have a torch I find it to be the fastest way with the least amount of effort and since it shrinks to the spindle I am sure it will never come loose. BTW the reason you douse it with cold water is to freeze the metal in it's expanded state so you can just tap it off with a hammer. You do what is comfortable for you. ------------- -- --- .... .- -- -- .- -.. / .-- .- ... / .- / -- ..- .-. -.. . .-. .. -. --. / -.-. .... .. .-.. -.. / .-. .- .--. .. ... - Wink I am a Russian Bot |
Posted By: Coke
Date Posted: 16 Oct 2018 at 8:23pm
------------- 1957 D17 Diesel w/ M&W Pistons |
Posted By: DougG
Date Posted: 16 Oct 2018 at 8:53pm
| How did Allis do this process at the factory I wonder? |
Posted By: Tbone95
Date Posted: 17 Oct 2018 at 6:45am
Yes, this is an odd one.....kinda hate to wade into it. I've seen Lonn post this before, and I trust Lonn and have no doubt he's been trained this way, that it works, and that he's had multiple successes with it. Just not sure all the terminology and understanding is scientifically spot on..... In order for steel to change structure, it has to be cold worked to a certain degree ( I don't recall....seems like 15% runs in my mind, as in change in cross sectional area. Been a while). So like the final rolling at the mill can do this. Then it has to be heated up, VERY HOT, like WHITE HOT, and be cooled back to no color within a minute or 2. This changes the hardness and changes the structure. The change in grain structure causes the steel to "stretch" a very little bit and this change is "permanent". It can be undone by a full anneal. To do this in a controlled manner with a torch seems pretty difficult to me. And for cast iron? Whole different animal.....don't think it really works like the steel scenario I just described..... Did I mention I trust Lonn and believe his method works?
|
Posted By: Coke
Date Posted: 17 Oct 2018 at 7:25am
|
Well the reason to heat stuck metal is the different rates of expansion in the two pieces, causes the rusted bond to break. The reason to cool it is usually because when hot the metal is too soft to work, things like stuck nuts. But something this large, not sure if cooling is necessary? ------------- 1957 D17 Diesel w/ M&W Pistons |
Posted By: Tbone95
Date Posted: 17 Oct 2018 at 7:48am
| Yes, I understand you. When I say changes the hardness, I meant the cold hardness before and the cold hardness after is different. |
Posted By: Sugarmaker
Date Posted: 17 Oct 2018 at 8:23am
|
Folks, The arm is probably cast steel, not cast iron. That's why you can get a fair weld on it. My guess in the factory the installed the arm with a press. Probably didn't need much pressure when all surfaces were new and machined. I would have called it a light press fit. All that is speculation since I wasn't there.:) Regards, Chris ------------- D17 1958 (NFE), WD45 1954 (NFE), WD 1952 (NFE), WD 1950 (WFE), Allis F-40 forklift, Allis CA, Allis D14, Ford Jubilee, Many IH Cub Cadets, 32 Ford Dump, 65 Comet. |
Posted By: Coke
Date Posted: 17 Oct 2018 at 9:48am
Not knowing whether it's steel or iron, and also not knowing how hot we heat it (I'm asuming a light red glow) it would be hard to guess whether you make thing worse or better, it's at this point I wish my late Uncle, the blacksmith, was still around ------------- 1957 D17 Diesel w/ M&W Pistons |
Posted By: Tbone95
Date Posted: 17 Oct 2018 at 9:58am
Yep....lots to it. And heating it up and cooling it rapidly like pouring water on it versus heating it up and letting it cool slowly is very different. Since the latter is done when you put it back together, it should be relatively stress relieved and be ok. The blacksmiths like your uncle are extremely knowledgeable and get stuff done. It's just that......their terminology versus what is read in a metallurgy book don't necessarily sound the same, or "Jibe", but in the end both get results. That's why I was hesitant to wade into the fray, I don't want to tick someone off sounding like I disrespect an old school blacksmith, I surely have tons of respect for guys like that.
|
Posted By: Coke
Date Posted: 17 Oct 2018 at 6:00pm
|
Now, I've seen welders (the people) heat up cast parts before welding, and then wrap them so they cool very, very slowly, so the weld holds. I'm hoping I don't have to heat up the new part, as the paint is nicely patina'd already.  That said, still have to get the old one of, but this whole discussion reminded me, I could always take it to the local blacksmith, who kept my old mower going so long after I broke bits off it. I'm thinking I should probably rub the paint of the mating surface on the new one, yeah? Pardon the cat.  ------------- 1957 D17 Diesel w/ M&W Pistons |
Posted By: jaybmiller
Date Posted: 17 Oct 2018 at 6:49pm
|
Gee like the kitty in the picture !!! He looks purrfect ! ------------- 3 D-14s,A-C forklift, B-112 Kubota BX23S lil' TOOT( The Other Orange Tractor) Never burn your bridges, unless you can walk on water |
Posted By: Michael V (NM)
Date Posted: 17 Oct 2018 at 8:09pm
| Gettin a "cat scan" there |
Posted By: Tbone95
Date Posted: 18 Oct 2018 at 7:41am
| My prof back in the day told us if you were going to weld on cast, dig a hole in the sand beforehand. Heat them up hot but slow with a rosebud, do your welding, then place it in the hole and bury it to slow the cooling down. Obviously that won't work for everything, but the concept is there. |
Posted By: Lonn
Date Posted: 18 Oct 2018 at 8:57am
I bought a 190 that was ran with a loose arm. It destroyed the arm and spindle where the key sets. I just welded the arm directly to the spindle because I needed it now. Still running that way today. ------------- -- --- .... .- -- -- .- -.. / .-- .- ... / .- / -- ..- .-. -.. . .-. .. -. --. / -.-. .... .. .-.. -.. / .-. .- .--. .. ... - Wink I am a Russian Bot |
Posted By: Tbone95
Date Posted: 18 Oct 2018 at 9:46am
| My thinking is......Lonn's method has good tried, true, and proven results repeated many times. Just that there is some inaccuracies in the explanation of what happened and the lingo that goes with it. |
Posted By: Lonn
Date Posted: 18 Oct 2018 at 11:48am
|
It's like explaining as to why my wife married me, I can spout a lot of reasons but I really don't know why, just that she did.  Anyhow, Coke, if you don't feel comfortable doing it the way I was taught, then by all means try something else as suggested on this site. Get a good quality puller and pull it off and then pound or press the new one on. Either way it's not that difficult.
------------- -- --- .... .- -- -- .- -.. / .-- .- ... / .- / -- ..- .-. -.. . .-. .. -. --. / -.-. .... .. .-.. -.. / .-. .- .--. .. ... - Wink I am a Russian Bot |
Posted By: Coke
Date Posted: 18 Oct 2018 at 12:12pm
No, I'm not disputing atall that your way works, just the reasoning behind it, like Tbone said. Also because at that point I didn't have a torch. But just hitting it wasn't working either. I tried with a propane torch, got nowhere, and now have a borrowed cutting torch (no rosebud tip unfortunately) and am so far still unsuccesful, perhaps I need to just hit it like a rocket. ------------- 1957 D17 Diesel w/ M&W Pistons |
Posted By: FREEDGUY
Date Posted: 18 Oct 2018 at 3:30pm
Pretty sure you're gonna have to "polish up" more than 1 section of paint after this ordeal
|
Posted By: allisbred
Date Posted: 18 Oct 2018 at 4:19pm
| Coke, You are correct, fast cooling such as water quenching will most likely ruin the material structure properties. |
Posted By: FREEDGUY
Date Posted: 18 Oct 2018 at 4:50pm
| My first thought on the "red hot" metal doused with cold water was the reaction of a baking dish(glass) fresh out oven that had a pitcher of cold milk overturned on it; glass everywhere !! |
Posted By: Coke
Date Posted: 18 Oct 2018 at 6:52pm
 ------------- 1957 D17 Diesel w/ M&W Pistons |
Posted By: Coke
Date Posted: 18 Oct 2018 at 6:53pm
|
Would the front loader have enough power to yank it off? There's hooks on the bucket, I could run a chain to. ------------- 1957 D17 Diesel w/ M&W Pistons |
Posted By: DanWi
Date Posted: 18 Oct 2018 at 9:36pm
| You could pick the front of the tractor up with the loader and it wouldn't come off. Besides that you have to lift it straight off or it is binding any way. |
Posted By: Lonn
Date Posted: 19 Oct 2018 at 4:50am
------------- -- --- .... .- -- -- .- -.. / .-- .- ... / .- / -- ..- .-. -.. . .-. .. -. --. / -.-. .... .. .-.. -.. / .-. .- .--. .. ... - Wink I am a Russian Bot |
Posted By: Coke
Date Posted: 19 Oct 2018 at 6:26pm
|
Fought me every step of the way, we tried Lonn's way, we tried smacking it off hot, we ended up having to cut both ends off. I feel a little bit better about it breaking, my mate pointed out it had been welded there previously. 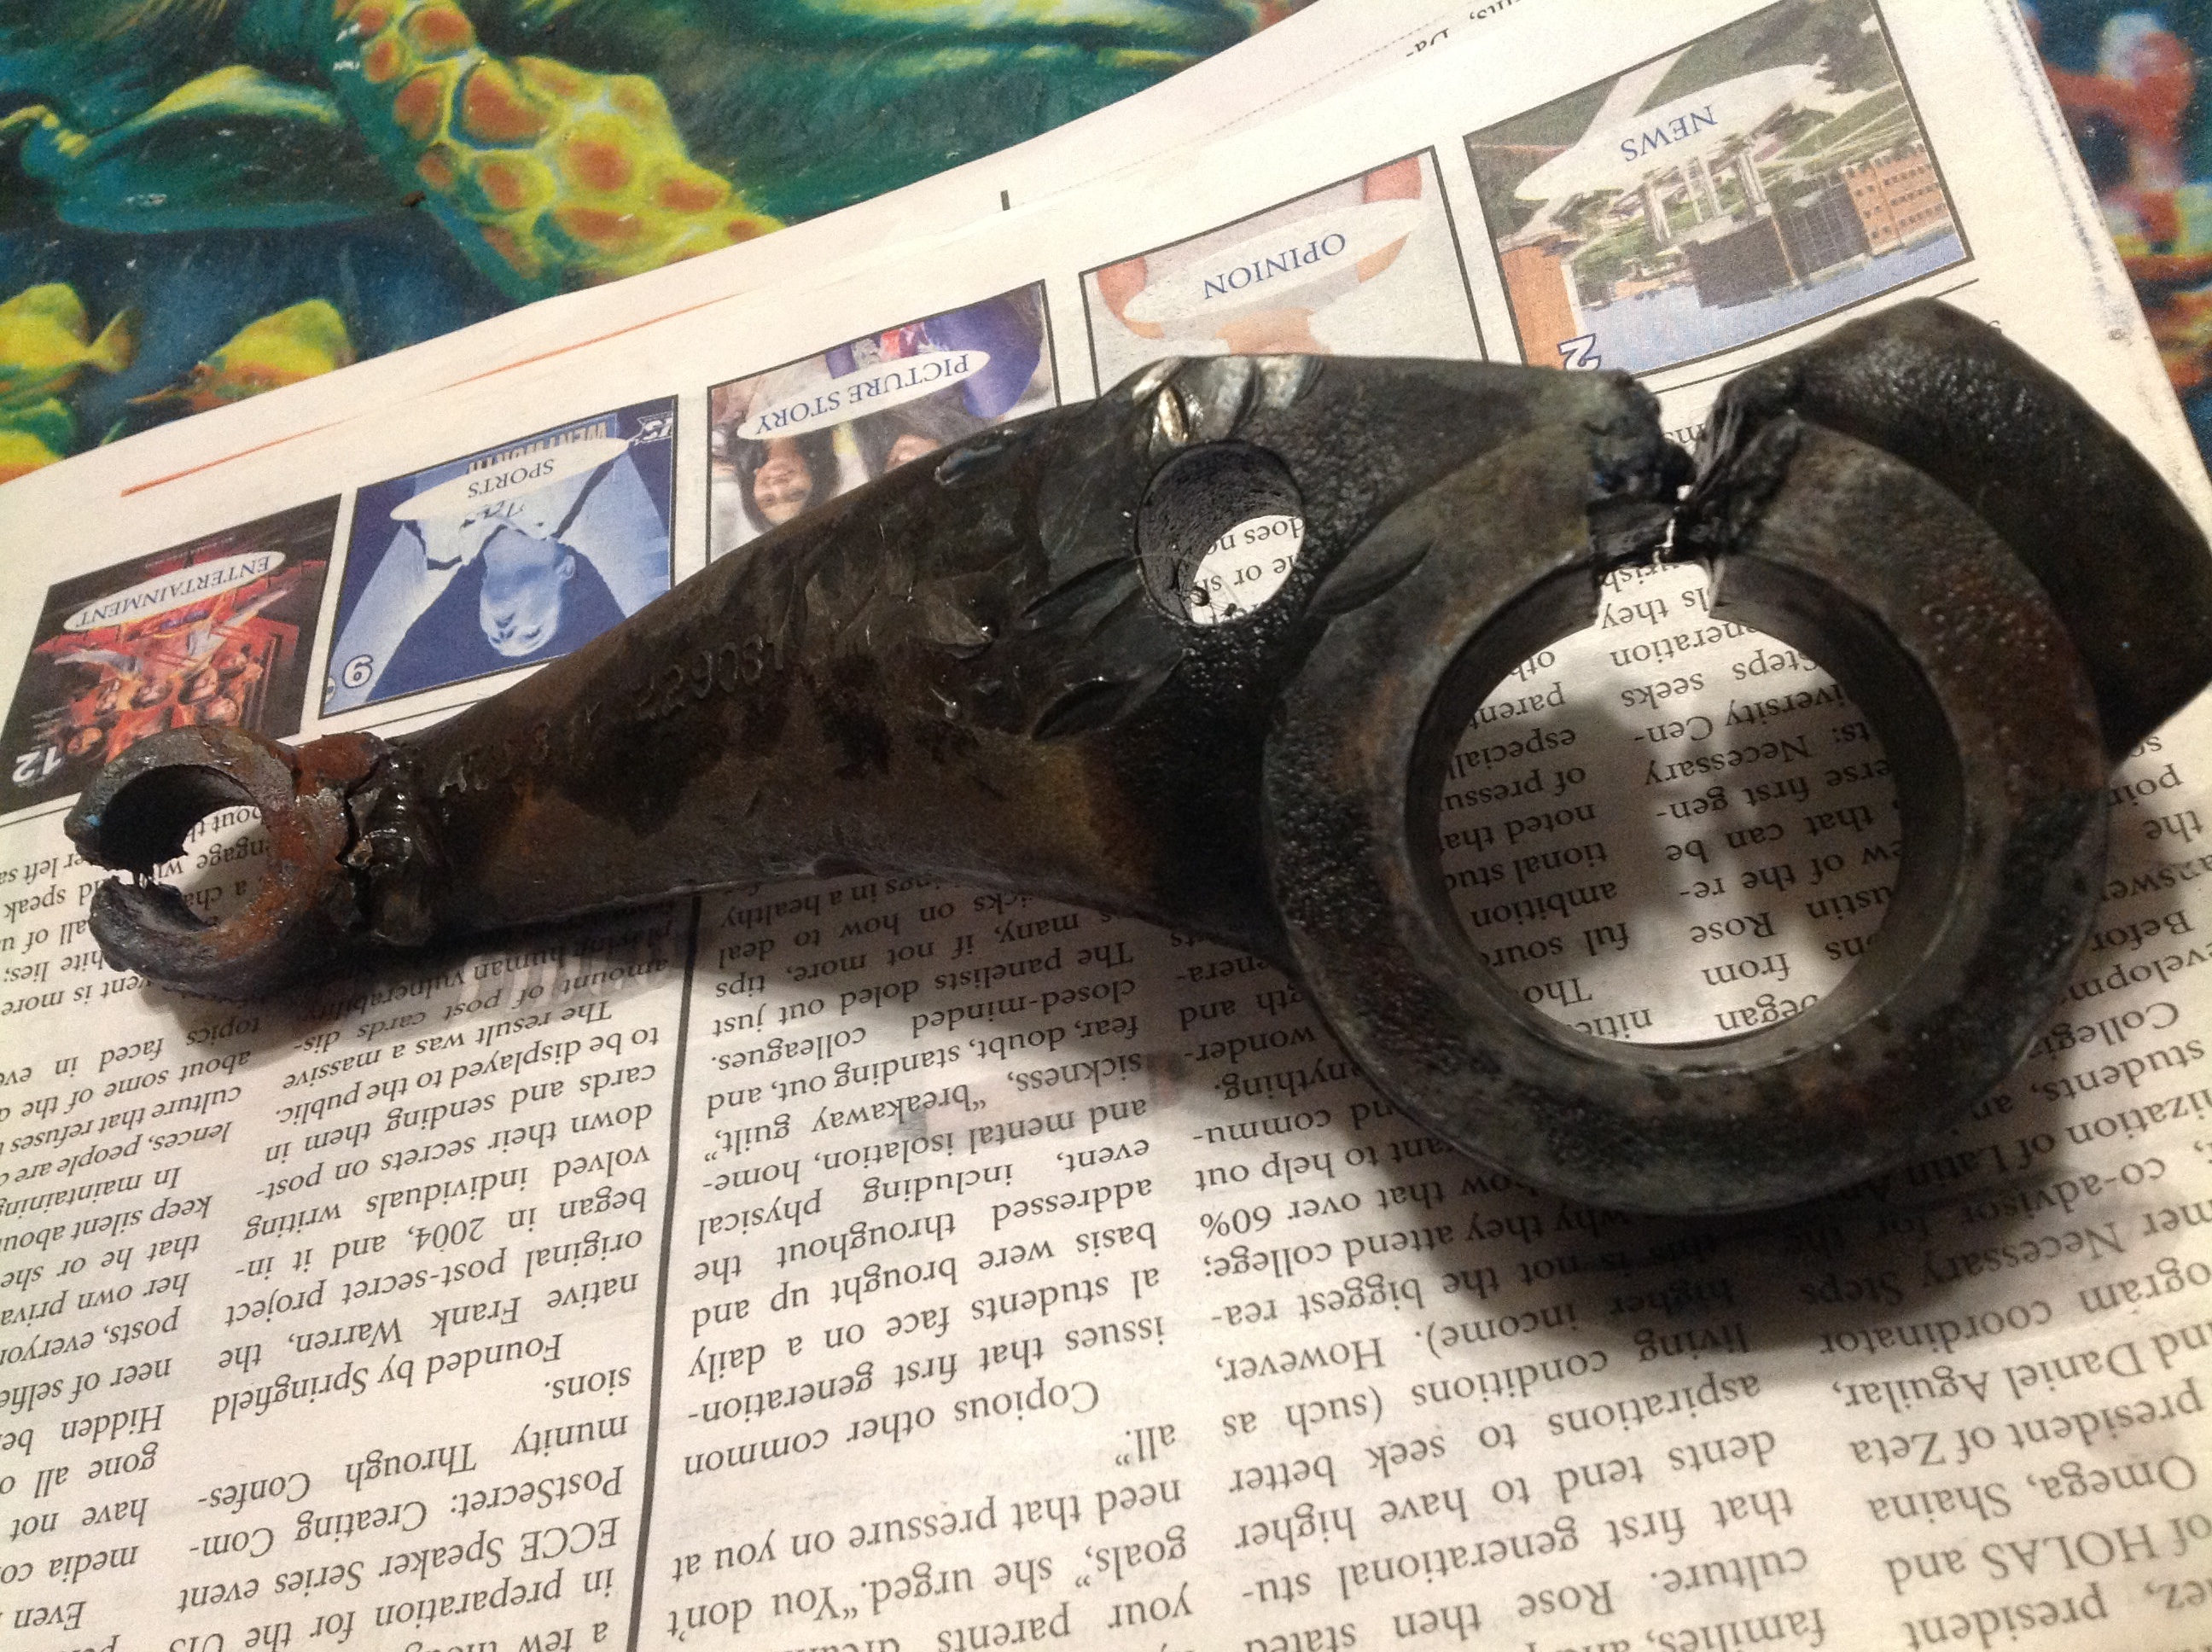 Was unable to get the new one on, even with heating it, before the rain came down. I think I'm gonna clean it up, and get it bored out enough that it fits on properly. ------------- 1957 D17 Diesel w/ M&W Pistons |
Posted By: DiyDave
Date Posted: 19 Oct 2018 at 8:58pm
|
You might wanna try freezing the spindle shaft, and heating the new arm to 500ºF, in an oven. Do this when the wife is out...
|
Posted By: Coke
Date Posted: 19 Oct 2018 at 9:40pm
|
I was thinking of just running a hone round the large hole in the arm, but worried about what it'll do to the key slot if it catches? ------------- 1957 D17 Diesel w/ M&W Pistons |
Posted By: HudCo
Date Posted: 19 Oct 2018 at 11:21pm
| looks to me in the first picture that the axle and spinlde needs to be rebushed real badly |
Posted By: JC-WI
Date Posted: 21 Oct 2018 at 9:46pm
|
Just got through reading this thread. When Lonn wrote about quenching with cold water couple years ago, The next day I was out baling and had a ball bearing failure on one of the rolls... Balls all gone and smoking... I grabbed my water bottle and squirted the race that was on the shaft right then and there... then drove up to the garage to work on pounding or cutting that race off... and low and behold that inner race of the previously sealed bearing slipped off like it was a size to big... I thought CRAP, the shafts worn out and I will have a sloppy fit bearing, I put the new bearing up on the shaft and had to tap it on... and was back to baling in less than a half hour, thanks to the information Lonn had said. How it works I don't really know but the fact was it did work. Second thing Coke of Midwest, is, you did not take the outer axel assembly out and turn it upside down so you could give the arm down with a harder sharper blow when it was red hot or redhot chilled cold.. One of my axle assemblies snapped off at the bottom so it came out the top real easy and I put it in a press and I don't think I had over 5-6 ton on it before it started moving... and when I was putting the new shaft in, I had it in ice and the arm was laying on the hood of the tractor...90+ degree day. Measured the verticle tube, measured the shaft, put shims on the shaft and slipped it in, and blocked it up and then smeared some anti-seize on and drove the arm on, and put the snap ring on. Don't know if the antiseize helped or not, but it is still tight 15 years later. 3rd thing, check out HudCo's comment. replace them bushings now while it's apart if they are worn. Sure helped replacing them in the ones I did. ------------- He who says there is no evil has already deceived himself The truth is the truth, sugar coated or not. Trawler II says, "Remember that." |
Posted By: Coke
Date Posted: 22 Oct 2018 at 2:00pm
|
Well in good news, I got it together, I got it moved back to the shed. I did it by taking the spindle and the arm to a machine shop, and having them fit it, so I could fit it with a few good taps of a mallet. Yes, I may live to regret this, but I needed it out the yard. I didn't even fit the tie-rod on all the way, just enough to get it moved. It's all coated with anti-seize, so I can pull it apart and do the bushings, I don't see any bushings in mine, could I maybe not have bushings, it's a very early model, or are they disintegrated? The service manual shows two bushings and two thrust washers, with it fitted: bushing, bushing, then washer, washer, I have two washers on the end of the spindle. ------------- 1957 D17 Diesel w/ M&W Pistons |
Posted By: wfmurray
Date Posted: 22 Oct 2018 at 5:40pm
| I may not total correct on this but metal like that was called maleded ironn (molded iron).You can cut and weld like mild steel. Been around a long time .Uncle Henry used it on his model Ts and As. |
Posted By: Lonn
Date Posted: 22 Oct 2018 at 8:33pm
Sometime I'm gonna do a video on it to prove how easy it is. ------------- -- --- .... .- -- -- .- -.. / .-- .- ... / .- / -- ..- .-. -.. . .-. .. -. --. / -.-. .... .. .-.. -.. / .-. .- .--. .. ... - Wink I am a Russian Bot |