| Author |
 Topic Search Topic Search  Topic Options Topic Options
|
WaltDevore 
Bronze Level


Joined: 03 Jan 2020
Location: IdahoSprings CO
Points: 143
|
 Post Options Post Options
") Thanks(0) Thanks(0)
 Quote Quote  Reply Reply
 Topic: Mega Colossal Scew Up Topic: Mega Colossal Scew Up
Posted: 17 Jul 2021 at 8:49pm |
Surely no one will ever surpass this.
I finally get brilliant and heat the oversize bushing for a new crank sealing surface and it goes right on, after not going on for tortuous time before. I have 1/10 second of elation getting it on, then total despair as it didn't go all the way. I remove the oil pan to see what's going on, can't see anything. I unbolt the flywheel cover and it won't budge, being locked tight with this bushing. Nothing will budge. I don't see how I can reheat it again with the crank being a super heat sink. What the heck to do?
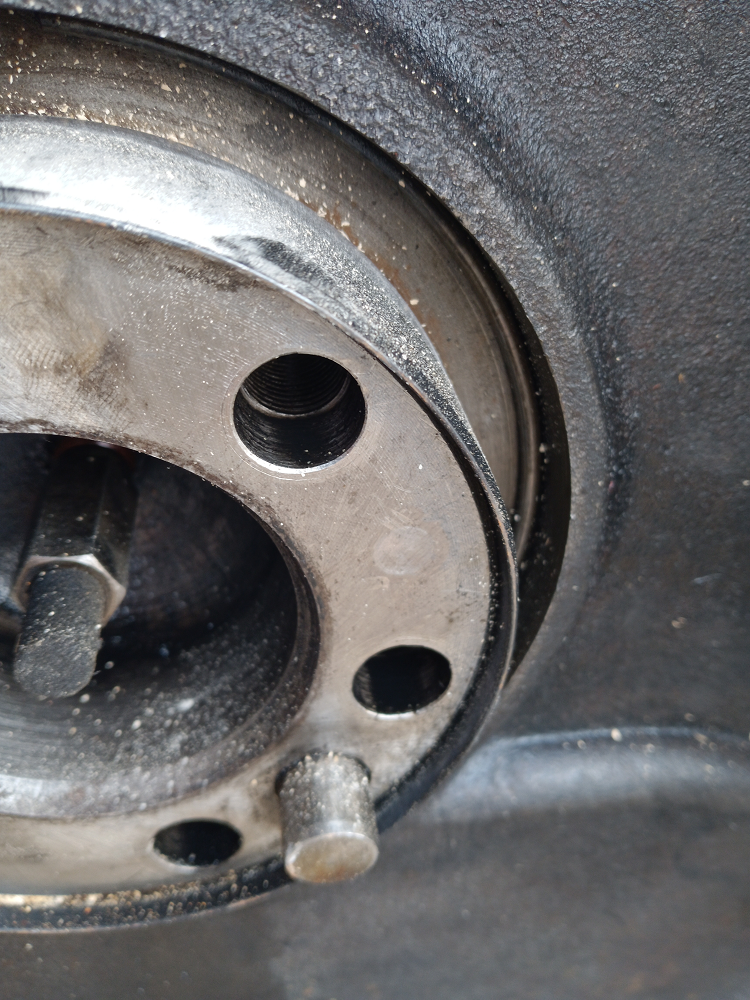
Is that the "oil slinger" lip against the flywheel cover? Biggest mess I've been in.
|
 |
|
Sponsored Links
|
|
|
JTOOL
Silver Level Access

Joined: 28 Feb 2021
Location: 64720
Points: 346
|
Post Options
Thanks(0)
Quote Reply
Posted: 17 Jul 2021 at 9:33pm |
|
Beat it on home and see what happens.
|
|
WaltDevore
Bronze Level
Joined: 03 Jan 2020
Location: IdahoSprings CO
Points: 143
|
Post Options
Thanks(0)
Quote Reply
Posted: 17 Jul 2021 at 9:55pm |
|
Somehow it's jammed against the flywheel cover and won't budge. I don't understand why there wouldn't be clearance for it.
|
|
steve(ill)
Orange Level Access


Joined: 11 Sep 2009
Location: illinois
Points: 90744
|
Post Options
Thanks(0)
Quote Reply
Posted: 17 Jul 2021 at 10:11pm |
|
Is it on far enough to cover the seal and do its job ?... just cut the last 1/8 inch off with a die grinder and call it good !
|
|
Like them all, but love the "B"s.
|
|
WaltDevore
Bronze Level
Joined: 03 Jan 2020
Location: IdahoSprings CO
Points: 143
|
Post Options
Thanks(0)
Quote Reply
Posted: 17 Jul 2021 at 10:32pm |
|
I was thinking that but the flywheel cover will never ever come off again. Don't know why it's blocked from sliding on rest of the way any there isn't any clearance for it. I tried a long pry bar with the flywheel bolts removed and it's a frozen solid as can be. Maybe after grinding it down, getting the flywheel on, mounting the starter, and see if that will free it up a bit.
|
|
TramwayGuy
Orange Level Access
Joined: 19 Jan 2010
Location: Northern NY
Points: 11854
|
Post Options
Thanks(0)
Quote Reply
Posted: 17 Jul 2021 at 11:29pm |
|
The flange is supposed to be cut off after you install it. Whatever it is jammed against would not have been present at the time. Chisel it off and get another one. Put the new one on, then cut the installation flange with a side cutter and peel it off, leaving only the sleeve itself.
|
|
WaltDevore
Bronze Level
Joined: 03 Jan 2020
Location: IdahoSprings CO
Points: 143
|
Post Options
Thanks(0)
Quote Reply
Posted: 17 Jul 2021 at 11:42pm |
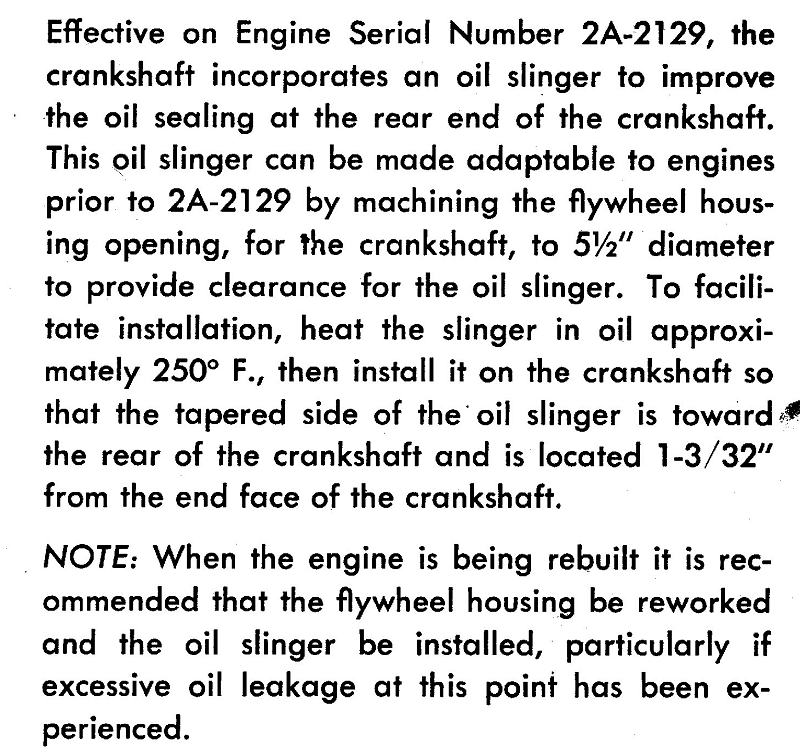
This may have a lot to do with it.
|
|
WaltDevore
Bronze Level
Joined: 03 Jan 2020
Location: IdahoSprings CO
Points: 143
|
Post Options
Thanks(0)
Quote Reply
Posted: 18 Jul 2021 at 12:12am |
They don't tell you that in putting that bushing on that the flywheel housing needs to be machined oversize, I believe. If I can trim it down, get the flywheel on, oil that bushing well before hand against the flywheel housing, hopefully the torque of the starter will grind a little clearance between the bushing and the flywheel cover.
Looking at this picture, there seems to be no space for the bushing through the housing.
|
|
WaltDevore
Bronze Level
Joined: 03 Jan 2020
Location: IdahoSprings CO
Points: 143
|
Post Options
Thanks(0)
Quote Reply
Posted: 18 Jul 2021 at 9:11pm |
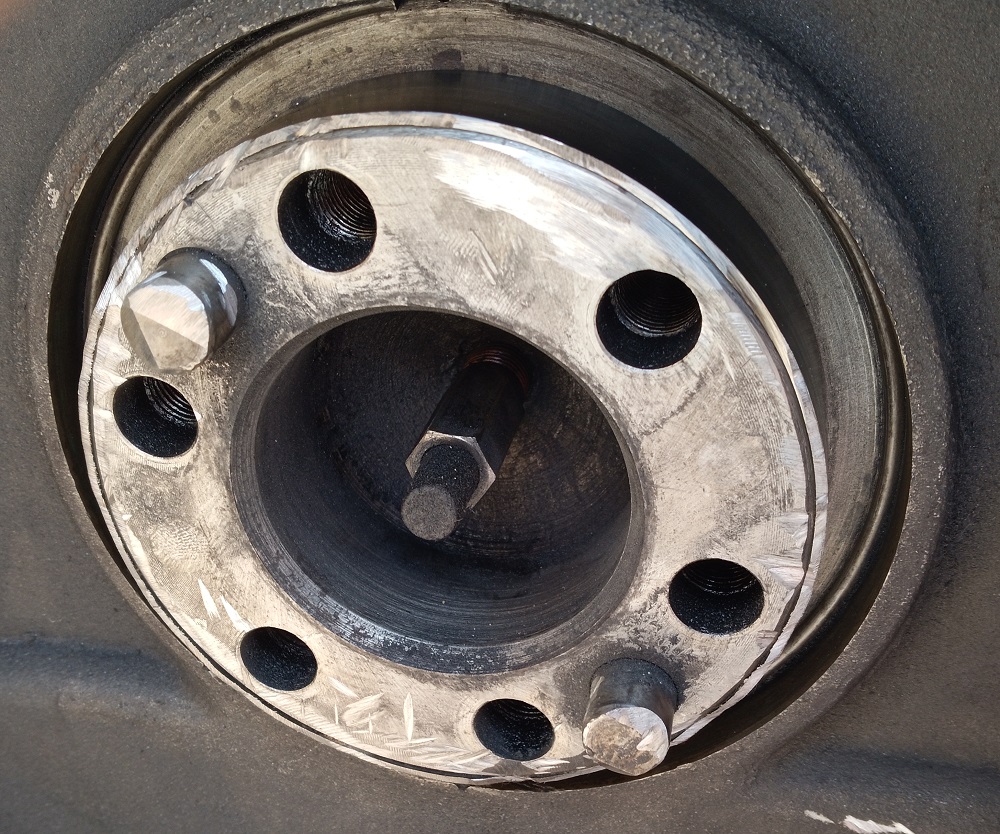
My art work after grinding and cutting it down. Cannot for life of me get oil seal installed. Stymied again.
|
|
DiyDave
Orange Level Access

Joined: 11 Sep 2009
Location: Gambrills, MD
Points: 55252
|
Post Options
Thanks(0)
Quote Reply
Posted: 19 Jul 2021 at 5:37am |
There is probably a special tool to make this easier. I'm not saying go spend a mint on it. If you have a wood lathe, you probably could make it, use the crank dowel pins to mount a tapered round block of wood, with the taper just a little bigger than the diameter of that sleeve, and tap it right into place. JMHO  |
|
Source: Babylon Bee. Sponsored by BRAWNDO, its got what you need!
|
|
CAL(KS)
Orange Level
Joined: 18 Sep 2009
Location: Chapman, KS
Points: 3804
|
Post Options
Thanks(0)
Quote Reply
Posted: 19 Jul 2021 at 7:21am |
not the best appearing but should work, and saves a mountain of time and more work. i would takes some emery cloth and dress the leading edge so as to not damage the seal on install, but since you posted about trouble installing the seal I have commented too late. of course you may have already done this. 
|
|
Me -C,U,UC,WC,WD45,190XT,TL-12,145T,HD6G,HD16,HD20
Dad- WD, D17D, D19D, RT100A, 7020, 7080,7580, 2-8550's, 2-S77, HD15
|
|
steve(ill)
Orange Level Access
Joined: 11 Sep 2009
Location: illinois
Points: 90744
|
Post Options
Thanks(0)
Quote Reply
Posted: 19 Jul 2021 at 5:32pm |
|
the sleeve has a sharp 90 degree edge.. It should be rolled or tapered at an angle so the seal can start, then slide up onto the new OD.
|
|
Like them all, but love the "B"s.
|
|
JTOOL
Silver Level Access
Joined: 28 Feb 2021
Location: 64720
Points: 346
|
Post Options
Thanks(0)
Quote Reply
Posted: 19 Jul 2021 at 8:20pm |
|
Have you mic'ed the OD of the wear sleeve and the ID of the seal? Sometimes parts are mispackaged or the wrong part is sent. Keep after it. You'll get it done.
|
|
WaltDevore
Bronze Level
Joined: 03 Jan 2020
Location: IdahoSprings CO
Points: 143
|
Post Options
Thanks(0)
Quote Reply
Posted: 19 Jul 2021 at 11:27pm |
|
They seem right. My caliper only goes to 0.01 inch. I assumed like an ass the sleeve was no big deal. Getting it on the crank dwarfed wondering if it would fit through the flywheel cover. Knowing before hand and getting the flywheel cover machined would be the only way. The huge thing right now is finding out if the sleeve against the flywheel will quickly relieve any contact, scraping, and grinding. I can see it going either way. I"m trying to remount the flywheel without the seal so I can attach the starter to see if it can initiate motion and solution. Amazing how the first time doing something takes one to distant lands of discovery. I didn't know wrenching could send one into the occult.
|
|
steve(ill)
Orange Level Access
Joined: 11 Sep 2009
Location: illinois
Points: 90744
|
Post Options
Thanks(0)
Quote Reply
Posted: 20 Jul 2021 at 9:08am |
|
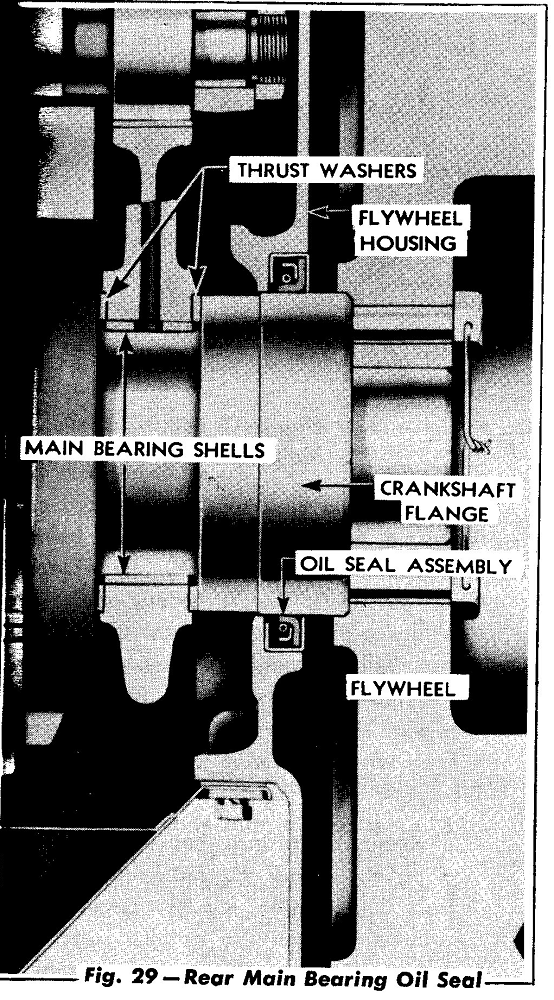
your picture from the service manual shows that the flywheel might PILOT onto the first 1/8 inch of shaft where the new sleeve is setting ? Better check that.
|
|
Like them all, but love the "B"s.
|
|