| Author |
 Topic Search Topic Search  Topic Options Topic Options
|
Calvin Schmidt 
Orange Level


Joined: 11 Sep 2009
Location: Ontario Can.
Points: 4540
|
 Post Options Post Options
") Thanks(0) Thanks(0)
 Quote Quote  Reply Reply
 Topic: Making 32" rims into double doubles Topic: Making 32" rims into double doubles
Posted: 05 Apr 2012 at 4:03pm |
|
|
|
Nothing is impossible if it is properly financed
|
 |
|
Sponsored Links
|
|
|
Kip-Utah
Orange Level

Joined: 14 Sep 2009
Location: Southern Utah
Points: 910
|
Post Options
Thanks(0)
Quote Reply
Posted: 05 Apr 2012 at 4:35pm |
|
It's a shame to mount tires on those rims, so that you can't admire your craftsmanship. Great job!! Kip
|
|
HANSEN'S OLD ORANGE IRON. Showing, Pulling, & Going!!
|
|
Unit3
Orange Level

Joined: 17 Oct 2009
Location: NC Iowa
Points: 5595
|
Post Options
Thanks(0)
Quote Reply
Posted: 05 Apr 2012 at 5:19pm |
Did you first true the rims to the tractor frame or did you just start cutting? Don't even begin to tell me that this is your very first time running a plasma cutter and a wire welder. I won't believe you. Great work.
|
|
Calvin Schmidt
Orange Level
Joined: 11 Sep 2009
Location: Ontario Can.
Points: 4540
|
Post Options
Thanks(0)
Quote Reply
Posted: 05 Apr 2012 at 5:44pm |
|
A good friend and former farming partner has been the master fabractor/welder in our shop for more than 30 years. Everything was trued up first and the old combine rims were trued up on the tractor using 3 ready rods. Tire spins true within 3/16th. This was not our first rim widening job.
|
|
Nothing is impossible if it is properly financed
|
|
dpower
Orange Level
Joined: 11 Sep 2009
Location: Madison Ne
Points: 1578
|
Post Options
Thanks(0)
Quote Reply
Posted: 05 Apr 2012 at 6:10pm |
|
Looking good Calvin you are really going to have two hosses with that 210 and 220. I will get you what shipping is soon on that grill piece. Sorry been busy getting ready for planting.
|
|
D-17_Dave
Orange Level
Joined: 11 Sep 2009
Location: Mocksville NC
Points: 990
|
Post Options
Thanks(0)
Quote Reply
Posted: 05 Apr 2012 at 6:41pm |
|
VERY nice work done there.
|
|
Yea, I can fix that.....
|
|
DougG
Orange Level
Joined: 20 Sep 2009
Location: Mo
Points: 8335
|
Post Options
Thanks(0)
Quote Reply
Posted: 05 Apr 2012 at 6:51pm |
|
Dang thats the way to do it !! Good work
|
|
Bob D. (La)
Orange Level Access
Joined: 12 Sep 2009
Location: Louisiana
Points: 25529
|
Post Options
Thanks(0)
Quote Reply
Posted: 05 Apr 2012 at 6:56pm |
Good gosh, Gertie. When you gonna dual it up so's you can get some traction? LOL Sweet job. Thanks for posting.
|
|
When you find yourself in a hole,PUT DOWN THE SHOVEL!!!
|
|
Eldon (WA)
Orange Level
Joined: 11 Sep 2009
Location: Spokane, WA
Points: 7765
|
Post Options
Thanks(0)
Quote Reply
Posted: 05 Apr 2012 at 9:10pm |
|
Sweet!
|
|
ALLIS EXPRESS!
This year:
|
|
omahagreg
Orange Level Access
Joined: 11 Sep 2009
Location: Omaha, Nebraska
Points: 2806
|
Post Options
Thanks(0)
Quote Reply
Posted: 05 Apr 2012 at 9:19pm |
|
Thems serious tennies you got there!
|
|
Greg Kroeker
1950 WD with wide front and Freeman trip loader
|
|
CTuckerNWIL
Orange Level

Joined: 11 Sep 2009
Location: NW Illinois
Points: 22825
|
Post Options
Thanks(0)
Quote Reply
Posted: 05 Apr 2012 at 9:22pm |
|
Nice job Calvin. When I wanted to put new rims on the rusted out front spokes of the 35WC, I couldn't find any narrow enough. I bought a set and chucked them in the welding lathe at work, parted one side off, moved over an inch and parted it again (using the plasma cutter attached to the compound). Then all I had to do was tack the 2 pieces back together and put em in the lathe to weld em up. After welding to the spokes, you can't tell they were ever cut. You can tell the rims aren't original cause they are welded to the spokes instead of riveted like when original F&H.
|
|
|
|
TexasAllis
Silver Level


Joined: 14 Sep 2009
Location: Texas
Points: 396
|
Post Options
Thanks(0)
Quote Reply
Posted: 06 Apr 2012 at 6:35am |
|
Calvin how did you prep the metal before paint?
|
|
1944 Allis C
1960 Allis D-17 LP
|
|
Butch(OH)
Orange Level
Joined: 11 Sep 2009
Location: Lucerne Ohio
Points: 3838
|
Post Options
Thanks(0)
Quote Reply
Posted: 06 Apr 2012 at 10:30am |
Calvin, You gonna have enough ponies under the hood to turn them big tars?? LOL
Looking great!
|
|
wheatbreeder
Orange Level
Joined: 12 Sep 2009
Location: Harrow, Ontario
Points: 581
|
Post Options
Thanks(0)
Quote Reply
Posted: 06 Apr 2012 at 5:22pm |
|
Calvin, your a true craftsman
|
|
Farm stuff 8050,6690,175,F2,5050,WD
|
|
ChuckLuedtkeSEWI
Orange Level
Joined: 11 Sep 2009
Location: Jackson, WI
Points: 1826
|
Post Options
Thanks(0)
Quote Reply
Posted: 07 Apr 2012 at 6:17am |
|
Calvin, great pictures. Love the way you made the fixture for the plasma cutter to sit in. I have been wanting to do something similar with a set of 36" spoke rims and 38" dished rims and combine the two for a WC, but I was worried about making it all come out true, but you gave me alot of ideas with that setup. Thanks for the tips.
|
|
1955 WD45 diesel 203322 was my dad's tractor, 1966 D15 23530, 1961 HD3 Crawler 1918, 1966 D17 IV 83495, 1937 WC 41255, 1962 D19 6221
|
|
Toscani NE SD
Orange Level
Joined: 21 Jan 2011
Location: Milbank S.D.
Points: 369
|
Post Options
Thanks(0)
Quote Reply
Posted: 07 Apr 2012 at 7:10am |
|
as far as i'm concerned ,all d21's 210's and 220's should have that size standard looks great
|
|
CTuckerNWIL
Orange Level
Joined: 11 Sep 2009
Location: NW Illinois
Points: 22825
|
Post Options
Thanks(0)
Quote Reply
Posted: 07 Apr 2012 at 9:58am |
 ChuckLuedtkeSEWI wrote: ChuckLuedtkeSEWI wrote:
Calvin, great pictures. Love the way you made the fixture for the plasma cutter to sit in. I have been wanting to do something similar with a set of 36" spoke rims and 38" dished rims and combine the two for a WC, but I was worried about making it all come out true, but you gave me alot of ideas with that setup. Thanks for the tips. |
Just a note of caution, I would connect the ground to the rim in some way so as not to cause a problem with axle bearings. That being said, the shop I worked at had a lathe that has been used for welding for probably 30 years by grounding to the headstock. Whenever we needed a different set-up than the old welding lathe, we used a set of old bearings mounted to an angle iron plate and held against the part. We welded up complete shafts this way so many revolutions were needed. Cutting the rim off would only take one revolution.
|
|
|
|
WD45
Orange Level

Joined: 20 Sep 2009
Location: STAYNER,ONTARIO
Points: 956
|
Post Options
Thanks(0)
Quote Reply
Posted: 07 Apr 2012 at 1:00pm |
|
Nice job done Calvin.Happy Easter.
|
|
Fred Dunlop, G,B,CA, WC,WF, 3 WD45`s,gas, diesel and LP,U,D10 series III, D12,D14,D15 SERIES II,D17 Series IV in Gas and Diesel ,D19 GAS and D21,170 185,210 ,220 an I-600 8070 fwd, 716H and 1920H
|
|
Calvin Schmidt
Orange Level
Joined: 11 Sep 2009
Location: Ontario Can.
Points: 4540
|
Post Options
Thanks(0)
Quote Reply
Posted: 07 Apr 2012 at 6:06pm |
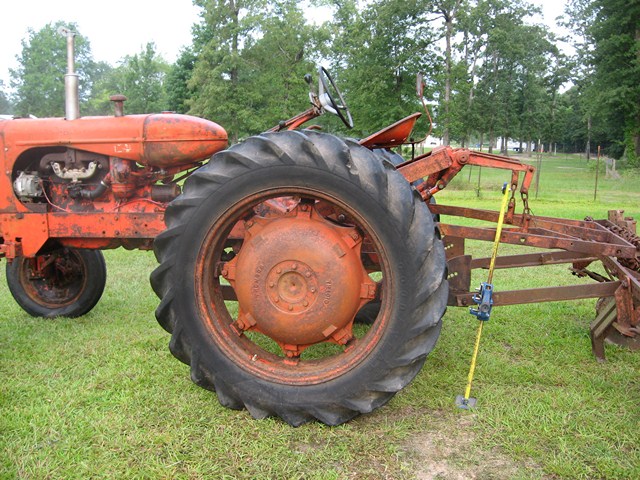
Thanks for the kind compliments guys!! I'll answer a few questions that came up. The ground for the plasma cutter was on the rim for the cut (first picture). Power? I bought this tractor on skids with a bad engine out of a salvage yard. First plan was to install a 670T engine from a genset that I bought. I also had a 220 with a fresh rebuild. Then a 3500 MKII industrial engine with 7080 injectors, inline pump and 82 originial hours came along. So the new plan had the 220 engine go into the 210 and MKII engine with intercooler going into the 220. Both these tractors will not be factory correct. I can't resist touring through the A-C parts bins and putting together something that could or should have been. I call the Big Hoss my 220 XT. I'll post more on that one when it gets out of the Skunk Works lab and into the field. It will have more rubber than the 210. The rims were sand blasted and painted CaseIH silver (sorry) , but that what the painter had in stock. Here are two pictures of our other rim and tire variation from factory correct.
All rims had 4" added and the tires are 23.1 x 34 all across.   |
|
Nothing is impossible if it is properly financed
|
|
Calvin Schmidt
Orange Level
Joined: 11 Sep 2009
Location: Ontario Can.
Points: 4540
|
Post Options
Thanks(0)
Quote Reply
Posted: 07 Apr 2012 at 6:10pm |
Opps wrong picture above 
|
|
Nothing is impossible if it is properly financed
|
|
JoeO(CMO)
Orange Level

Joined: 11 Sep 2009
Location: Cent Missouri
Points: 2696
|
Post Options
Thanks(0)
Quote Reply
Posted: 07 Apr 2012 at 8:01pm |
|
Wow Calvin, this project makes me drool. Nice job! Great pictures
|
|
|
|
CTuckerNWIL
Orange Level
Joined: 11 Sep 2009
Location: NW Illinois
Points: 22825
|
Post Options
Thanks(0)
Quote Reply
Posted: 07 Apr 2012 at 8:29pm |
|
Sure looks like it'll put a lot of power to the ground. I missed the location of the ground clamp in the first picture cause I was too lazy to open it so I could see the whole picture. Thanks for pointing that out.
|
|
|
|
Tracy Martin TN
Orange Level Access

Joined: 11 Sep 2009
Location: Gallatin,TN
Points: 10756
|
Post Options
Thanks(0)
Quote Reply
Posted: 07 Apr 2012 at 8:46pm |
|
Excellant job! Tracy Martin
|
|
No greater gift than healthy grandkids!
|
|


 but wanted the best of all worlds when it came to widening the rims. The easiest way is to weld in a 6" band on the inside half of the rim but that ment moving the cast center out to the end of the axle and I didn't like all the overhung load on the axle and the bearing. The other way was to put the 6" between the double drop and the bead but that would put the double drop too far in to mount the tire. The solution was to cut the originial rim between the double drop and the bead, cut an old combine rim inside the double drop and weld the two together. It was easy to get the tire mounted and I did not have to move the cast center. I'm very happy with the results so thought I would share.
