| Author |
 Topic Search Topic Search  Topic Options Topic Options
|
PaxG 
Bronze Level

Joined: 18 Oct 2009
Location: Maryland
Points: 23
|
 Post Options Post Options
") Thanks(0) Thanks(0)
 Quote Quote  Reply Reply
 Topic: G Broken Engine - Photo Topic: G Broken Engine - Photo
Posted: 18 Jun 2010 at 9:02pm |
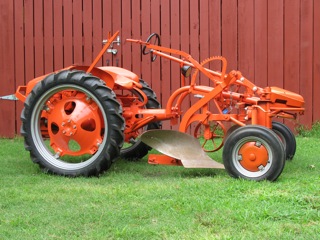
Found the source of my G's leaking head gasket - two broken head bolts. Lower Left and Center. Center stud sticking up 1/2", the other is approx 3/8".
Help: Please tell me the recommended method of removal. I was thinking about heating the block near the stud with a torch then trying to back it out.
thank you

|
|
'49 G, '51 G
|
 |
|
Sponsored Links
|
|
|
Tracy Martin TN
Orange Level Access


Joined: 11 Sep 2009
Location: Gallatin,TN
Points: 10920
|
Post Options
Thanks(0)
Quote Reply
Posted: 18 Jun 2010 at 9:54pm |
|
Weld a nut on them. Let it cool, then try to turn it out, use some Kroil if need be. HTH Tracy Martin
|
|
fixer1958
Orange Level

Joined: 13 Feb 2010
Location: kansas
Points: 2434
|
Post Options
Thanks(0)
Quote Reply
Posted: 18 Jun 2010 at 10:26pm |
|
Heat the stud and not the block.
|
|
split51
Orange Level
Joined: 13 Sep 2009
Location: Guthrie, OK
Points: 713
|
Post Options
Thanks(0)
Quote Reply
Posted: 18 Jun 2010 at 10:28pm |
|
I removed 4 broken exhaust manifold bolts on my 29 Model E the same way Tracy described except I used PB Blaster.
|
|
CTuckerNWIL
Orange Level

Joined: 11 Sep 2009
Location: NW Illinois
Points: 22825
|
Post Options
Thanks(0)
Quote Reply
Posted: 18 Jun 2010 at 10:32pm |
|
Set a close fitting washer on first and weld it to the broken stud. Then weld a nut on top. Put a wrench on the nut and start backing the stud out.
|
|
|
|
Dick L
Orange Level
Joined: 12 Sep 2009
Location: Edon Ohio
Points: 5093
|
Post Options
Thanks(0)
Quote Reply
Posted: 19 Jun 2010 at 7:07am |
|
Caution on the welding nut deal. If the standard original head bolts are broken off they were most likely pulled into by over tightening rather than stuck in the threads. If head bolts are stuck in the threads the most common cause is someone used a longer bolt than the block was threaded deep. This damages the bottom bolt thread and when removing the broken bolt the bottom thread will take out the threads as it is (forced) out. If it does not turn out easy after it first moves it would need to be drilled out (on center) and a tap used to get the threads out.
|
|
Dusty MI
Orange Level

Joined: 13 Sep 2009
Location: Charlotte, Mi
Points: 5061
|
Post Options
Thanks(0)
Quote Reply
Posted: 19 Jun 2010 at 12:40pm |
Instead of using a nut I take a heavy strap iron drill a hole in it a little larger than the broken stud and weld that to the broken stud. It's easier to hold in place while welding and being larger it protects the block or what ever when welding.
Dusty
|
|
917 H, '48 G, '65 D-10 series III "Allis Express"
|
|
Dusty MI
Orange Level
Joined: 13 Sep 2009
Location: Charlotte, Mi
Points: 5061
|
Post Options
Thanks(0)
Quote Reply
Posted: 19 Jun 2010 at 12:48pm |
Instead of using a nut I take a heavy strap iron drill a hole in it a little larger than the broken stud and weld that to the broken stud. It's easier to hold in place while welding and being larger it protects the block or what ever when welding.
Dick has a good point. I'd use the weld method and if it didn't turn easy after it started to turn I'd drill it with a bit about 3/4 the size of stud then that bottom thread if damaged could collapse inward instead of ruining the threads. Not sure this would work but I would try it.
|
|
917 H, '48 G, '65 D-10 series III "Allis Express"
|
|
Dave(inMA)
Orange Level

Joined: 12 Sep 2009
Location: Grafton, MA
Points: 2399
|
Post Options
Thanks(0)
Quote Reply
Posted: 19 Jun 2010 at 1:05pm |
|
More great ideas!
|
|
WC, CA, D14, WD45
|
|
BrianC,Ont
Orange Level

Joined: 11 Sep 2009
Location: Belleville Ont
Points: 903
|
Post Options
Thanks(0)
Quote Reply
Posted: 19 Jun 2010 at 3:33pm |
|
You dont want to heat the stud. Heat expands things, You want to heat the block around the stud and the use a good or new set of Vise Grips and try and get it out that way, or purchase a stud remover. The welding idea is a good one, but make sure you cover the rest of the engine good. The sl*g from welding will ruin those bores in short order. After looking at the picture again, I am not sure if this engine has wet sleeves or not. If it does I would not heat the centre one to much. It looks like you have enough stud stickig out to get a stud remover on them. Your success will depend on wheter they broke from botttoming out or the broke from over torque.
|
|
Bee
Orange Level
Joined: 14 Jun 2010
Location: NC
Points: 201
|
Post Options
Thanks(0)
Quote Reply
Posted: 19 Jun 2010 at 3:39pm |
|
You can get a stud remover from sears-
http://www.sears.com/shc/s/p_10153_12605_00904458000P?prdNo=1&blockNo=1&blockType=G1
or call your local auto parts store and see if they will loan one out.
|
|
Dusty MI
Orange Level
Joined: 13 Sep 2009
Location: Charlotte, Mi
Points: 5061
|
Post Options
Thanks(0)
Quote Reply
Posted: 19 Jun 2010 at 5:38pm |
Brian, my theory on why welding something to the stud works. Try it.
Welding to the stud heats it which causes it to expand when steel expands it expands in all directions, but because it is screwed into a hole it can't expand sideways only length ways. When it cools it shrinks in all directions. So now it pulls away from the hole it's in, thus loosing it's grip which makes it easy to turn out.
Dusty
|
|
917 H, '48 G, '65 D-10 series III "Allis Express"
|
|
Gerald J.
Orange Level
Joined: 12 Sep 2009
Location: Hamilton Co, IA
Points: 5636
|
Post Options
Thanks(0)
Quote Reply
Posted: 19 Jun 2010 at 6:15pm |
|
And heating the bolt softens it so that constraint of the metal around it give it clearance when it cools. Welding the nut on does that heating really quick.
Gerald J.
|
|
PaxG
Bronze Level
Joined: 18 Oct 2009
Location: Maryland
Points: 23
|
Post Options
Thanks(0)
Quote Reply
Posted: 19 Jun 2010 at 7:17pm |
Success! I drilled them out, three bits each bigger than the next, followed by the 5/8 tap. The holes did not bottom out, which made it easier to repair. I suspect the tiny metal bits fell into the water passage. Off to the races tomorrow. DP

|
|
'49 G, '51 G
|
|
Dave(inMA)
Orange Level
Joined: 12 Sep 2009
Location: Grafton, MA
Points: 2399
|
Post Options
Thanks(0)
Quote Reply
Posted: 19 Jun 2010 at 7:22pm |
|
I took a look at the product reviews for the tool Bee mentions above. I had used one that belongs to a friend - it worked pretty good for me, but he has owned it for years. The gist of the reviews is that it's a great concept, those manufactured years ago were really good, and the new ones now available are junk. Don't know if that's the right story, but I'd go cautiously on buying a new one. Now, if I find one at the used tool store, that could be a different story!
|
|
WC, CA, D14, WD45
|
|
Dave(inMA)
Orange Level
Joined: 12 Sep 2009
Location: Grafton, MA
Points: 2399
|
Post Options
Thanks(0)
Quote Reply
Posted: 23 Jun 2010 at 4:29pm |
PaxG, good for you! Looks like you did a great job.
Happened to find one of those Craftsman stud removers on eBay - checked with the seller and found out it was acquired in 1998. I figured I'd be safe and now own it - "USA" is stamped right on it. Looks to be in fine shape, not much use. I'm sure that there will be "opportunities" to use it!
|
|
WC, CA, D14, WD45
|
|
Gerald J.
Orange Level
Joined: 12 Sep 2009
Location: Hamilton Co, IA
Points: 5636
|
Post Options
Thanks(0)
Quote Reply
Posted: 23 Jun 2010 at 5:18pm |
|
I saw a NAPA version of that Sears stud extractor in a NAPA store today. They wanted more than $40. I wanted something much smaller for pulling deck screw stubs. I think I've invented a scheme. I'll use a sturdy easyout and a nut with the two sizes picked so it binds on the #8 deck screw stub. I'll know if it works in a few days.
Gerald J.
|
|
Dave(inMA)
Orange Level
Joined: 12 Sep 2009
Location: Grafton, MA
Points: 2399
|
Post Options
Thanks(0)
Quote Reply
Posted: 23 Jun 2010 at 8:39pm |
|
Gerald, you should call your creation "Necessity"!! LOL
|
|
WC, CA, D14, WD45
|
|
Gerald J.
Orange Level
Joined: 12 Sep 2009
Location: Hamilton Co, IA
Points: 5636
|
Post Options
Thanks(0)
Quote Reply
Posted: 23 Jun 2010 at 9:15pm |
|
I found some tools for removing broken deck screws on line, but within 12 miles two hardware stores, two lumber yards, and a B&D outlet store didn't have anything like what I saw on line and hadn't ever heard of any such thing. Their solution was "vice grips" but I doubt their chinese vice grips will hold on to a #8 deck screw and I'm sure my US made have enough wear they will slip too. Besides backing out a dozen of them twirling them with vice grips gets old in a real hurry. Using a nut and a large easy out should solve the strength problem of the easy out and wedge tight on the screw stub.
I might think to take a picture if it works.
Gerald J.
|
|
Dave(inMA)
Orange Level
Joined: 12 Sep 2009
Location: Grafton, MA
Points: 2399
|
Post Options
Thanks(0)
Quote Reply
Posted: 24 Jun 2010 at 4:45am |
|
Pictures would be nice!! People on here come up with some terrific purpose-built tools... now that would be another neat Forum section.
|
|
WC, CA, D14, WD45
|
|
Butch(OH)
Orange Level
Joined: 11 Sep 2009
Location: Lucerne Ohio
Points: 3842
|
Post Options
Thanks(0)
Quote Reply
Posted: 24 Jun 2010 at 8:18am |
As DickL has wisely pointed out the success rate of the various easy out type tools varies considerably with just exactly why there is a problem to begin with. Over torqued, rusted in, sheared off and eroded shanks are all differant problems. Heating and quenching and welding tricks are OK,, IF they work. If not you just made a tedious job into a darned miserable one. One thing that allways works is drilling and tapping and it isnt that hard to do IF you do it first, not as the last resort. If anything at all is sticking out I grab it with whatever will latch on to it, Vice grips (USA Peterson by the way) pipe wrench etc. If it comes out good, if not the stub needed to be out of the way anyway. Grind what is left flat with the deck to make it easier to center the hole and spend a good bit of time centering your center punch mark. This is done by makng a light mark then moving it by angling the center punch as you deepen the mark. Once done I touch the mark with a good 1/8" bit and double check my center moving the drill to make changes. Then move direcly to the tap drill size. I have watched people try this and they seem to miss out on the key points, CENTERED. Good bit and good tap. Grind the stub flat so you can see the center. Make the punch mark in stages moving it to center. Get you drill centered when you start it. Drill in two stages, not 10. Use a good bit a tap and youll be done while the others are still cussing.
|
|
Butch(OH)
Orange Level
Joined: 11 Sep 2009
Location: Lucerne Ohio
Points: 3842
|
Post Options
Thanks(0)
Quote Reply
Posted: 24 Jun 2010 at 8:25am |
 Gerald J. wrote: Gerald J. wrote:
I found some tools for removing broken deck screws on line, but within 12 miles two hardware stores, two lumber yards, and a B&D outlet store didn't have anything like what I saw on line and hadn't ever heard of any such thing. Their solution was "vice grips" but I doubt their chinese vice grips will hold on to a #8 deck screw and I'm sure my US made have enough wear they will slip too. Besides backing out a dozen of them twirling them with vice grips gets old in a real hurry. Using a nut and a large easy out should solve the strength problem of the easy out and wedge tight on the screw stub.
I might think to take a picture if it works.
Gerald J.
|
We have redecked several trailers and have decided it is easier to grind the old twisted off screws flush and move the screw locations but if you are reinstalling the old deck thats a differant deal.
|
|
Gerald J.
Orange Level
Joined: 12 Sep 2009
Location: Hamilton Co, IA
Points: 5636
|
Post Options
Thanks(0)
Quote Reply
Posted: 24 Jun 2010 at 10:57am |
|
I plan to put the planks back in the same places. But with wood, they probably won't fit back down over the stubs sticking up after being off a few days. So I'd like to pull the stubs and put in new. At least these shouldn't be as tough as steel rusted into cast iron. I figure on using longer deck screws for the replacements, maybe self drilling torx that the lumber yards claim don't snap off.
Centering on the end of a thread gets confused by the thread, even when ground off flat. A few years ago I was trying to measure the clamp bolt spacing on my JD 4020 rear wheels so i could make rim adapters (went from 18.4-34 to 12.4-42 for spraying). Working with the bolt ends I couldn't get a consistent distance. So I made up an parallel based on a bit of angle iron that was about half the width of the nut and scribed three lines on the ends of the bolts working off the flats of the hex nuts. Measuring between triangle centers I had a dozen consistent measurements. And when I built the adapter plates, all 40 holes lined up with the bolts, no reaming required. The bolt holes in the wheel centers were a snug fit and in my plates were a full 1/32" oversize. Point is, it might be easier to leave some stub sticking up on a head bolt, grind it flat, but bore out a nut to fit snugly and scribe lines across opposing nut corners when the stud threads are at the flattened end.
And when drilling a left handed drill is handy because if it catches, it just might back the stub out. Better than drilling with a pilot and bigger drill is to use a 132 degree split point that doesn't need a pilot. I drilled those 21/32" holes in half inch steel plate without a pilot drill and they were located as perfectly as I could measure with the milling machine. About 20 holes later in 3/4 steel that drill needed a touch up on the grinder.
Gerald J.
|
|
Butch(OH)
Orange Level
Joined: 11 Sep 2009
Location: Lucerne Ohio
Points: 3842
|
Post Options
Thanks(0)
Quote Reply
Posted: 24 Jun 2010 at 11:14am |
|
Gerald, we used screws that are sold special for trailer decking, you can get them at Fastenal or truck&trailer places. They take a torx bit and seems to me thet are 1/4" fine thread but its been a couple years. Problem we had was the old screws in our trailers were very hard and next to impossible to drill, we were also in a bit of a hurry. Good luck.
|
|
Gerald J.
Orange Level
Joined: 12 Sep 2009
Location: Hamilton Co, IA
Points: 5636
|
Post Options
Thanks(0)
Quote Reply
Posted: 24 Jun 2010 at 11:42am |
|
I built a flat bed trailer with those trailer deck screws. They are made to screw into steel, not wood joists. I probably still have some somewhere on the farm. The house deck will get other screws, I'll worry about them after the digging under the deck for a new septic pipe is completed.
Gerald J.
|
|
Butch(OH)
Orange Level
Joined: 11 Sep 2009
Location: Lucerne Ohio
Points: 3842
|
Post Options
Thanks(0)
Quote Reply
Posted: 24 Jun 2010 at 11:45am |
|
Guess I oughta read more and blab less, thought you were working on a hauler, LOL
|
|
David Maddux
Orange Level
Joined: 13 Sep 2009
Points: 2545
|
Post Options
Thanks(0)
Quote Reply
Posted: 24 Jun 2010 at 12:08pm |
|
Glad you got them out. Here is what I do. First take a punch and hit the bolt hard to straighten out the threads.[ Most of the time they break when overtightening, you end up stretching the threads.] Then drill out the center of the bolt with about a 2/3rds the size bit that the bolt is. Then I take a wire welder and reweld the hole shut. That makes the entire bolt red hot, expands the bolt and breaks any sealer or rust loose. As it starts cooling, touch the bolt with a candle, not too soon or the wax will burn up, but keep testing until you can see the wax melt and wick down around the threads. At this point you can usually turn it out with left hand bit or pliers if you have enough standing out. Or you can weld a washer on it. Then turn out with a pair of pliers. Dave.
|
|


