| Author |
 Topic Search Topic Search  Topic Options Topic Options
|
Bret (OH) 
Silver Level

Joined: 15 Sep 2009
Location: Blanchester, OH
Points: 347
|
 Post Options Post Options
") Thanks(0) Thanks(0)
") Quote Quote  Reply Reply
 Posted: 21 Mar 2019 at 6:12am Posted: 21 Mar 2019 at 6:12am |
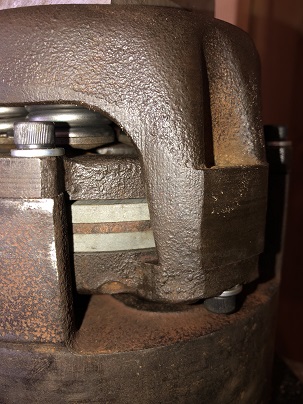
The balls on the brake drum side of the clutch are a self energizing mechanism. They act to increase the clamping force of the clutch disc as load is applied to the drive side of the clutch assembly. If the clutch would begin to slip the potential rotation of the outside pressure plate would "ramp" against the balls thus exerting a tighter clamping force on the clutch disc. This is the same principal used on the "self energizing" type brakes found in the Series IV 17 and the West Allis 100 series.
|
 |
|
Sponsored Links
|
|
|
Dave(inMA)
Orange Level


Joined: 12 Sep 2009
Location: Grafton, MA
Points: 2398
|
Post Options
Thanks(0)
Quote Reply
Posted: 21 Mar 2019 at 7:55am |
Thanks, Bret.
Question: the disc balls in this clutch sit between a round seat in the drum and a corresponding round seat in the primary pressure plate. There's no ramped groove associated with these seats. Is that the same mechanism as in the Series IV D17, etc?
If these are a self-energizing mechanism, I'd think that it'd be important to maintain the proper clearance between the pressure plate and the balls. Yes?
Thanks again. Dave
Edited by Dave(inMA) - 21 Mar 2019 at 7:57am
|
|
WC, CA, D14, WD45
|
|
DennisA (IL)
Orange Level
Joined: 11 Sep 2009
Location: Ridott IL.
Points: 2064
|
Post Options
Thanks(0)
Quote Reply
Posted: 21 Mar 2019 at 9:08am |
") Dave(inMA) wrote: Dave(inMA) wrote:
Thanks, Bret.
Question: the disc balls in this clutch sit between a round seat in the drum and a corresponding round seat in the primary pressure plate. There's no ramped groove associated with these seats. Is that the same mechanism as in the Series IV D17, etc?
If these are a self-energizing mechanism, I'd think that it'd be important to maintain the proper clearance between the pressure plate and the balls. Yes?
Thanks again. Dave
|
If you want to keep the factory clearance then the answer is yes. Whatever you take off the spring cover ears you’ll take off the brake ears.
|
|
Thanks & God Bless
Dennis
|
|
Dave(inMA)
Orange Level
Joined: 12 Sep 2009
Location: Grafton, MA
Points: 2398
|
Post Options
Thanks(0)
Quote Reply
Posted: 22 Mar 2019 at 4:27pm |
I want to thank all of you who have contributed thus far on this thread, especially DennisA and GregLawler. And Rick Corder who spent time on the phone with me.
The spring cover is at the machine shop to have its ears trimmed. Then I'll reassemble the clutch unit, check the clearance between the seats and the balls, and determine how much to remove from the drum ears.
The challenge here is that there doesn't seem to be a spec for this clearance, so I need to invent one - as well as a way to measure it. My plan is to fully compress the clutch, measure the gap between the secondary pressure plate and the clutch disc, subtract 0.020" and remove that amount from the brake drum ears. That would preserve the 0.020" (nominal) gap that GregLawler has mentioned when shortening the spring cover ears.
Edit 3/23 - plan above doesn't make much sense now that I'm on my second cup of coffee. If the spring cover ear trim is correct, the result of the measurement described would be 0.0"!
Comments welcome!
Edited by Dave(inMA) - 23 Mar 2019 at 7:36am
|
|
WC, CA, D14, WD45
|
|
DennisA (IL)
Orange Level
Joined: 11 Sep 2009
Location: Ridott IL.
Points: 2064
|
Post Options
Thanks(0)
Quote Reply
Posted: 22 Mar 2019 at 6:00pm |
|
On the brake side, you could put the balls in place and just sit the Primary pressure plate on top of the balls. Then measure that distance between the bottom of the pressure plate in the brake drum. Once you get that measurement you can fully assembled the clutch. Now put the clutch in the disengage position and and take a measurement again from the brake drum to the bottom of the primary pressure plate. Subtract those two numbers that should be your total gap. Now you will need to come up with a clearance because I don’t know of one. Just don’t make it to tight.
Edited by DennisA (IL) - 22 Mar 2019 at 6:08pm
|
|
Thanks & God Bless
Dennis
|
|
Dave(inMA)
Orange Level
Joined: 12 Sep 2009
Location: Grafton, MA
Points: 2398
|
Post Options
Thanks(0)
Quote Reply
Posted: 22 Mar 2019 at 7:16pm |
Interesting suggestion, Dennis.
Are there any similar situations involving balls and ramps where clearances are known? Maybe this would give us a ballpark for the CA hand clutch.
Dave
|
|
WC, CA, D14, WD45
|
|
DennisA (IL)
Orange Level
Joined: 11 Sep 2009
Location: Ridott IL.
Points: 2064
|
Post Options
Thanks(0)
Quote Reply
Posted: 22 Mar 2019 at 9:15pm |
|
Also rotate the the pressure plate while sitting on the disc balls to see how much travel there is and check the gap.
|
|
Thanks & God Bless
Dennis
|
|
Dave(inMA)
Orange Level
Joined: 12 Sep 2009
Location: Grafton, MA
Points: 2398
|
Post Options
Thanks(0)
Quote Reply
Posted: 22 Mar 2019 at 10:21pm |
|
Good idea - to ensure that the clearance is less than the change in the gap so that the self-energizing feature would still be effective.
|
|
WC, CA, D14, WD45
|
|
Dave(inMA)
Orange Level
Joined: 12 Sep 2009
Location: Grafton, MA
Points: 2398
|
Post Options
Thanks(0)
Quote Reply
Posted: 28 Mar 2019 at 12:53pm |
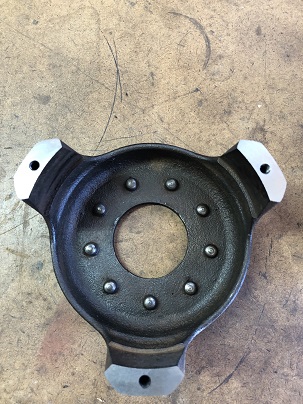
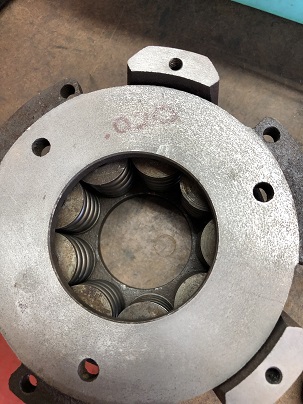
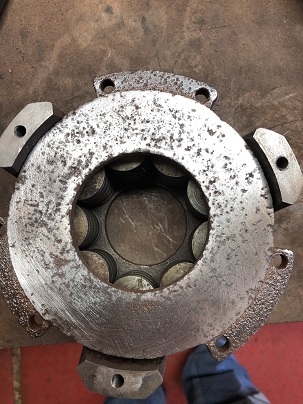
Got the spring cover back from the machine shop this morning. I had 0.050" taken off the ears:
Secondary pressure plate sitting on top of the new springs:
Spring cover with both pressure plates and clutch disc installed:
Assembled clutch pack:
Pack fully compressed in the shop press - note gap between clutch disc and secondary pressure plate:
This gap measured 0.057" at which point the primary pressure plate is sitting on the disc balls - there's no further room for the clutch to open.
I'm betting that the clutch is farther open in the shop press than would happen in real life when the hand lever is pulled. There are two reasons this would happen:
1. The shop press can compress the clutch springs more than the hand lever/actuator mechanism; and
2. Removing material from the two pressure plate surfaces has widened the gap between the primary pressure plate and the disc balls.
Here's the rub: we don't know what the clearance between the primary pressure plate and the disc balls is supposed to be. As well, there's no way to measure the gap directly as the balls are sitting in rounded seats. According to the one of the shop manuals I have, the hand clutch is a Lambert. Searching on "Lambert clutch" turned up no useful references. Hmmmm......
|
|
WC, CA, D14, WD45
|
|
Dave(inMA)
Orange Level
Joined: 12 Sep 2009
Location: Grafton, MA
Points: 2398
|
Post Options
Thanks(0)
Quote Reply
Posted: 18 Apr 2019 at 9:09pm |
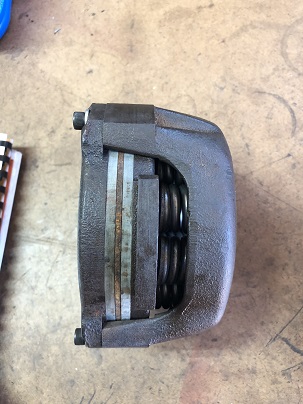
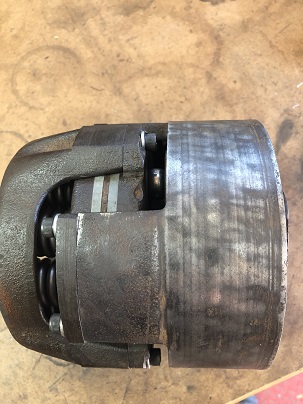
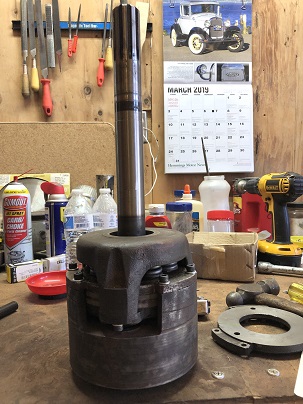
Finally I have an update to share. My project was interrupted by a week of family vacation and the time it took to recover from me cracking a part of the clutch pack: the secondary pressure plate....too much pressure on it in the shop press. Thanks to DennisA (IL), I have a replacement which arrived Monday. The plate is rusty and pitted, and the surface is slightly dished.
Following the advice of a local old time mechanic, I am trying a different approach to resurfacing the plate: "Put it on a 6" belt sander to flatten it and to remove the high spots and rust - don't worry about the pitting." Here's the result, sitting inside the spring cover atop the 9 springs:
And here's the assembled clutch with the drive shaft inserted to align the clutch plate and brake drum:
Off to the right is the secondary pressure plate that I cracked.
At this point, the assembled clutch is installed inside the final drive housing which is now bolted to the differential. The actuator clearance is set at 0.050". It took several cycles of adjust the clearance and compressing the clutch pack to get the clutch fully seated on the outer drive shaft. I've installed a new brake band. Tomorrow I will mount the right rear wheel and the platform frame and fender. This will leave access to the opening in the housing if I need to adjust the actuator clearance again. Then I'll test the clutch (and the brakes) to see if it functions properly. Will the secondary pressure plate work as my old timer predicted?
Edited by Dave(inMA) - 18 Apr 2019 at 9:14pm
|
|
WC, CA, D14, WD45
|
|
Sugarmaker
Orange Level

Joined: 12 Jul 2013
Location: Albion PA
Points: 8240
|
Post Options
Thanks(0)
Quote Reply
Posted: 19 Apr 2019 at 7:46am |
Very nice documentation and pictures on the CA hand clutch rebuild! If I ever own one this may be very helpful! Regards, Chris
|
|
D17 1958 (NFE), WD45 1954 (NFE), WD 1952 (NFE), WD 1950 (WFE), Allis F-40 forklift, Allis CA, Allis D14, Ford Jubilee, Many IH Cub Cadets, 32 Ford Dump, 65 Comet.
|
|
Dave(inMA)
Orange Level
Joined: 12 Sep 2009
Location: Grafton, MA
Points: 2398
|
Post Options
Thanks(1)
Quote Reply
Posted: 19 Apr 2019 at 5:02pm |
Thanks, Chris. That's high praise from the master of documenting AC projects!
I finished the clutch-and-brake reinstall today. I'm happy to report two good outcomes:
1. the tractor finally has working brakes - a major plus in hilly central Massachusetts.
and
2. the hand clutch is working - pulling on the handle stops the tractor! And releasing it works as it should, too. Here's a brief video: [TUBE]7NLNsT6WcwE[/TUBE]
Next week I'll hang my two-bottom plow on the old girl and drop it in some fresh turf at a friend's farm to test whether there's any slipping in the hand clutch. Hopefully I'll have good news.
In the meantime, I'd like to thank all you forum guys who've commented and helped with this project, especially DennisA (IL) who bailed me out when I cracked the one of the clutch pressure plates and answered my questions by PM and text. This forum and the guys who freely lend their knowledge are a great tribute to the orange legacy.
|
|
WC, CA, D14, WD45
|
|
Ted J
Orange Level

Joined: 05 Jul 2010
Location: La Crosse, WI
Points: 18786
|
Post Options
Thanks(0)
Quote Reply
Posted: 21 Apr 2019 at 11:29pm |
Well Dave, THANK you!! I've followed this since it's start because I have a CA that the lever does nothing. I'm going to have to pull it apart this summer and now at least I have an idea where to start. And if I get in trouble, I'll be asking you and Dennis and Greg for answers. OR,,,,, I may just ship the whole thing to Rick and let him fool with it. 
|
|
"Allis-Express"
19?? WC / 1941 C / 1952 CA / 1956 WD45 / 1957 WD45 / 1958 D-17
|
|
Dave(inMA)
Orange Level
Joined: 12 Sep 2009
Location: Grafton, MA
Points: 2398
|
Post Options
Thanks(0)
Quote Reply
Posted: 22 Apr 2019 at 4:08pm |
|
You're welcome, Ted. Happy to help if I can.
|
|
WC, CA, D14, WD45
|
|
Dave(inMA)
Orange Level
Joined: 12 Sep 2009
Location: Grafton, MA
Points: 2398
|
Post Options
Thanks(0)
Quote Reply
Posted: 23 Apr 2019 at 4:48pm |
Ah. Didn't realize that editing post #1 would leave this thread deep into p2 on the Forum. So I'm adding this post to direct you to post #1 where I provide the final update. 
|
|
WC, CA, D14, WD45
|
|
chaskaduo
Orange Level

Joined: 26 Nov 2016
Location: Twin Cities
Points: 5200
|
Post Options
Thanks(0)
Quote Reply
Posted: 23 Apr 2019 at 5:23pm |
|
That sure is some wet ground, your CA did a great job though.
|
|
1938 B, 79 Dynamark 11/36 6spd, 95 Weed-Eater 16hp, 2010 Bolens 14hp
|
|
Dave(inMA)
Orange Level
Joined: 12 Sep 2009
Location: Grafton, MA
Points: 2398
|
Post Options
Thanks(0)
Quote Reply
Posted: 23 Apr 2019 at 5:52pm |
Yup, it surely was, chaskaduo. Add in the clay content and my lack of experience plowing and the experience probably qualifies as tractor abuse.  Anyway, I thought the old girl did well. Glad you agree!
|
|
WC, CA, D14, WD45
|
|
DennisA (IL)
Orange Level
Joined: 11 Sep 2009
Location: Ridott IL.
Points: 2064
|
Post Options
Thanks(0)
Quote Reply
Posted: 23 Apr 2019 at 6:26pm |
|
Job well done Dave! One thing that I try to do when possible is before I re-engage the hand clutch I disengage the engine clutch. This will make the hand clutch last a little longer.
|
|
Thanks & God Bless
Dennis
|
|
Dave(inMA)
Orange Level
Joined: 12 Sep 2009
Location: Grafton, MA
Points: 2398
|
Post Options
Thanks(0)
Quote Reply
Posted: 24 Apr 2019 at 8:20am |
Apparently posting the final update in my OP wasn't the smartest idea I've had: readers quite naturally expect the "final" to be at the end, not the beginning. So here's the report on how the hand clutch held up.
Hung the #52 plow on the CA and gave the clutch the acid test at my friend's farm. Nary a hint of slippage! Here's a video - we were plowing in what my friend referred to as "virgin soil" and the plow was biting deep. Lots of clay in the soil, and the ground is still really wet. Here's a video of the CA in action: [TUBE]d-IrW3md3QQ[/TUBE]
I'm really pleased with how the hand clutch is performing. Thanks again to everyone who read/commented/lent a hand in any way with this project.
Edited by Dave(inMA) - 24 Apr 2019 at 8:21am
|
|
WC, CA, D14, WD45
|
|
Grouse
Bronze Level

Joined: 19 Jun 2019
Location: Michigan
Points: 1
|
Post Options
Thanks(0)
Quote Reply
Posted: 28 Jul 2019 at 6:47pm |
I also am trying to rebuild my hand clutch on my CA. The balls were there but the seats are missing. Is there some place I can order new balls and seats?
|
|
Rick
Orange Level

Joined: 11 Sep 2009
Location: Jonesburg,Mo.
Points: 3646
|
Post Options
Thanks(0)
Quote Reply
Posted: 28 Jul 2019 at 10:40pm |
|
The last I knew, you could still get them from AGCO...I did. Rick
|
|
Sugarmaker
Orange Level
Joined: 12 Jul 2013
Location: Albion PA
Points: 8240
|
Post Options
Thanks(0)
Quote Reply
Posted: 29 Jul 2019 at 11:02am |
Dave, Nice video of you plowing with the CA. Do you have the traction booster too show when you gain traction as you raise the plows in those soft spots. Looks like all your detailed hand clutch work payed off and you now have a working clutch and a nice operating tractor too! But now I want a CA to add to the herd! I need to go see about that narrow front one setting under a big willow tree. (tree fell over on it) Regards, Chris
|
|
D17 1958 (NFE), WD45 1954 (NFE), WD 1952 (NFE), WD 1950 (WFE), Allis F-40 forklift, Allis CA, Allis D14, Ford Jubilee, Many IH Cub Cadets, 32 Ford Dump, 65 Comet.
|
|