| Author |
 Topic Search Topic Search  Topic Options Topic Options
|
jerbob 
Orange Level


Joined: 07 Aug 2017
Location: Michigan
Points: 961
|
 Post Options Post Options
 Thanks(0) Thanks(0)
 Quote Quote  Reply Reply
 Topic: repaired my track adjuster Topic: repaired my track adjuster
Posted: 23 Oct 2017 at 8:38am |
|
|
 |
|
Sponsored Links
|
|
 |
jerbob 
Orange Level


Joined: 07 Aug 2017
Location: Michigan
Points: 961
|
 Post Options Post Options
 Thanks(0) Thanks(0)
 Quote Quote  Reply Reply
 Posted: 23 Oct 2017 at 8:43am Posted: 23 Oct 2017 at 8:43am |
|
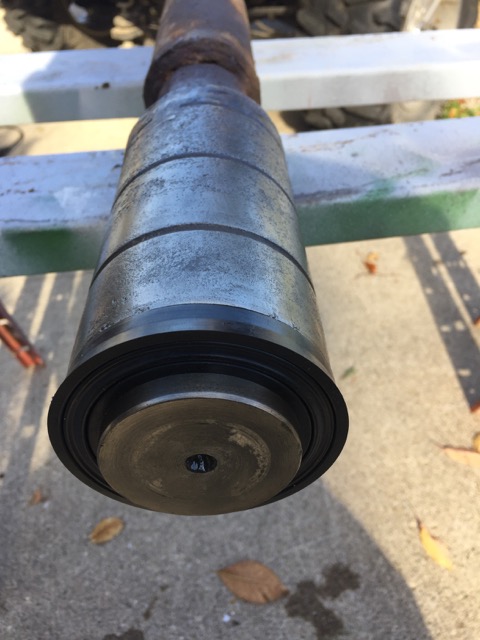
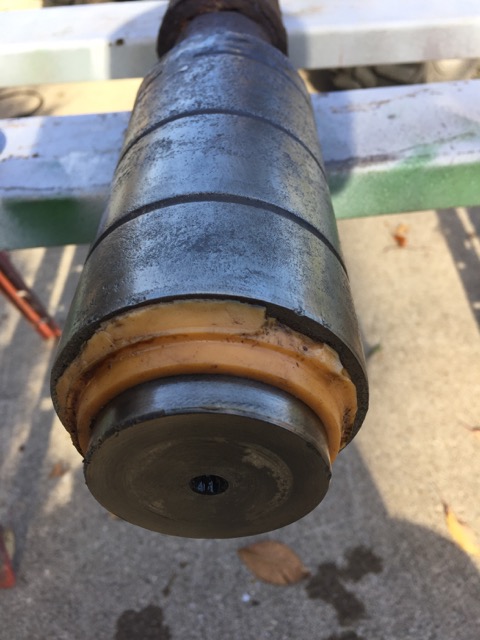
Forgot to mention that the pics are pre- polishing the ram and cylinder. I used wire wheel and emory cloth to polish. The cylinder was not pitted and in very good shape, the ram was very good up till the last inch. Polished up pretty good all in all. I know this is minor in the scope of work on a piece of equipment like this, however I am always pleased when something works out like this. Next is working on left side which is not leaking but idler is froze. Will be using a 10 ton porta power on it in conjunction with the adjuster. I can also use a chain and come along off the blade to help move the idler wheel assembly to get it moving. Not worried on this one.
|
 |
CAL(KS) 
Orange Level

Joined: 18 Sep 2009
Location: Chapman, KS
Points: 3786
|
 Post Options Post Options
 Thanks(0) Thanks(0)
 Quote Quote  Reply Reply
 Posted: 23 Oct 2017 at 8:53am Posted: 23 Oct 2017 at 8:53am |
|
If you cant get it to move I would bet money leaving the adjuster slack and running the dozer would work the idler loose.
|
|
Me -C,U,UC,WC,WD45,190XT,TL-12,145T,HD6G,HD16,HD20
Dad- WD, D17D, D19D, RT100A, 7020, 7080,7580, 2-8550's, 2-S77, HD15
|
 |
jerbob 
Orange Level


Joined: 07 Aug 2017
Location: Michigan
Points: 961
|
 Post Options Post Options
 Thanks(0) Thanks(0)
 Quote Quote  Reply Reply
 Posted: 23 Oct 2017 at 9:16am Posted: 23 Oct 2017 at 9:16am |
|
Good thought Cal. I am pleased the ram is not leaking and I put a lot of pressure on it so I think I will just leave it and take the old girl out for a walk and see what happens. I'm not patient on this type of approach. I can't seem to just leave it alone. LOL. I will be firing up the girl this weekend as I just installed new batteries, and am replacing the battery cables with new 00 welding cable. You suggestion on a hose cover is going to work well. 3/4" garden hose will work nicely in all the sensitive places.
|
 |
CAL(KS) 
Orange Level

Joined: 18 Sep 2009
Location: Chapman, KS
Points: 3786
|
 Post Options Post Options
 Thanks(0) Thanks(0)
 Quote Quote  Reply Reply
 Posted: 23 Oct 2017 at 10:23am Posted: 23 Oct 2017 at 10:23am |
|
I think it was actually Coke's suggestion but I do it as well. you might take a look at the shims on the idler where it sits on the track frame. Likely they have rusted and expanded and that's why the idler wont move, but a little usage will probably work it loose.
Edited by CAL(KS) - 23 Oct 2017 at 10:24am
|
|
Me -C,U,UC,WC,WD45,190XT,TL-12,145T,HD6G,HD16,HD20
Dad- WD, D17D, D19D, RT100A, 7020, 7080,7580, 2-8550's, 2-S77, HD15
|
 |
jerbob 
Orange Level


Joined: 07 Aug 2017
Location: Michigan
Points: 961
|
 Post Options Post Options
 Thanks(0) Thanks(0)
 Quote Quote  Reply Reply
 Posted: 23 Oct 2017 at 11:09am Posted: 23 Oct 2017 at 11:09am |
 CAL(KS) wrote: CAL(KS) wrote:
I think it was actually Coke's suggestion but I do it as well. you might take a look at the shims on the idler where it sits on the track frame. Likely they have rusted and expanded and that's why the idler wont move, but a little usage will probably work it loose. |
Thank you Cal. My thanks to the forum for responding back so timely and with advise and great commentary. I love this forum. Hope to be able to contribute whenever I can as well to 'give back".
|
 |
CAL(KS) 
Orange Level

Joined: 18 Sep 2009
Location: Chapman, KS
Points: 3786
|
 Post Options Post Options
 Thanks(0) Thanks(0)
 Quote Quote  Reply Reply
 Posted: 24 Oct 2017 at 8:23am Posted: 24 Oct 2017 at 8:23am |
I hope you decide a 16DC is too big, and youd like me to have it. 
Edited by CAL(KS) - 24 Oct 2017 at 8:24am
|
|
Me -C,U,UC,WC,WD45,190XT,TL-12,145T,HD6G,HD16,HD20
Dad- WD, D17D, D19D, RT100A, 7020, 7080,7580, 2-8550's, 2-S77, HD15
|
 |
jerbob 
Orange Level


Joined: 07 Aug 2017
Location: Michigan
Points: 961
|
 Post Options Post Options
 Thanks(0) Thanks(0)
 Quote Quote  Reply Reply
 Posted: 24 Oct 2017 at 9:12am Posted: 24 Oct 2017 at 9:12am |
|
Hahahah you are generous to a fault Cal. Thank you for your offer. Big is beautiful baby!
|
 |
jerbob 
Orange Level


Joined: 07 Aug 2017
Location: Michigan
Points: 961
|
 Post Options Post Options
 Thanks(0) Thanks(0)
 Quote Quote  Reply Reply
 Posted: 17 Dec 2017 at 6:42am Posted: 17 Dec 2017 at 6:42am |
|
Been a few weeks since this post but forgot to ask this question. On the piston shown in the pics, the grooves on the piston,, are they for O rings to ack as secondary seals?
Would make sense. No parts manual shows that so I wanted to ask.
|
 |


 Topic Options

 Post Options
 Thanks(0)


 CAL(KS) wrote: