| Author |
 Topic Search Topic Search  Topic Options Topic Options
|
calico190xt68 
Orange Level


Joined: 12 Jan 2017
Location: Frankton, IN
Points: 803
|
 Post Options Post Options
 Thanks(0) Thanks(0)
 Quote Quote  Reply Reply
 Topic: Early 190xt Replacing the Headlights Topic: Early 190xt Replacing the Headlights
Posted: 01 Feb 2023 at 10:38am |
I have a single headlight that is mounted on the fender right above the grab handle. I measured the light and it shows 5.5 inches. Most of the LED replacement lights say they are 5.75 inches that I have found. I have 2 rear lights that are 4 inch and I have a match for them. I tried Steiner, All States Ag and Larsen and couldn't find a 5.5 inch replacement lamp. I looked in the Agco Parts book and all of the lamp part numbers returned work lights which were the smaller 4 inch light bulbs. I tried reading the numbers on the current headlight and I can't make out the numbers/letters.
I did find several 5.75 inch versions but wasn't convinced they would fit.
I also saw in the parts book that they had an option for flasher lights for 190xt and an electrical plug for rear implements. I have not seen any 190s with the optional flasher lights? I am thinking about putting the flasher lights on the fenders which can also operate as turn signals.
Anyone know of an exact match for the larger headlights?
Finally, has anyone had a problem with wires overheating assuming I replaced all 4 lights with LEDs?
Thanks for any help.
|
|
80 7010, 80 7020. 67 190XTD Series I w/500 Loader, AC 2000 Plow, AC 4 row Planter, AC 77G Rake, Member Indiana A-C Partners, Member TAC
|
 |
|
Sponsored Links
|
|
 |
DSeries4 
Orange Level


Joined: 12 Sep 2009
Location: Ontario, Canada
Points: 7332
|
 Post Options Post Options
 Thanks(0) Thanks(0)
 Quote Quote  Reply Reply
 Posted: 01 Feb 2023 at 3:03pm Posted: 01 Feb 2023 at 3:03pm |
Napa has proper sealed beams for all your lights - not LEDs.
Question
for you: Why do you think wires would overheat with LEDs? LEDs use a
much lower amperage and run cooler than conventional sealed beams. If
the wires survived with sealed beams, there is no way they can overheat
with LEDs.
My 67 XT had a flasher on the left fender when I got it. Was it correct and factory installed? Couldn't tell you. When I restored the tractor I put a flasher on each fender with the Hobbs style flashers from AGCO.
|
|
'49 G, '54 WD45, '55 CA, '56 WD45D, '57 WD45, '58 D14, '59 D14, '60 D14, '61 D15D, '66 D15II, '66 D21II, '67 D17IV, '67 D17IVD, '67 190XTD, '73 620, '76 185, '77 175, '84 8030, '85 6080
|
 |
calico190xt68 
Orange Level


Joined: 12 Jan 2017
Location: Frankton, IN
Points: 803
|
 Post Options Post Options
 Thanks(0) Thanks(0)
 Quote Quote  Reply Reply
 Posted: 01 Feb 2023 at 3:47pm Posted: 01 Feb 2023 at 3:47pm |
I installed LEDs on my 7010 in place of the headlights and my switch in the cab has gotten real hot. I was under the impression that the LEDs should be less too but the hot switch happened after I installed LEDs. I have a light bar which may be a big load. Maybe the switch is going bad and a coincidence.
I found direct replacement for my 7010 for the round headlights, but they were the 4 inch version. The LEDS are so much brighter than the incandescents and I do a lot of night work in the winter which is why I wanted them. I can install a set of spotlight LEDs elsewhere if I can't find a 5.5 inch replacement.
Your tractor looks really nice. Thanks for the picture. That is exactly what I want to put on my XT regarding the flasher lights. There appears to be a hole where a flasher once was but like you, not sure it was factory. There is no flasher relay that I can find so it would have just been a light. The potential flasher light in the parts book actually had a knob on top which I had never seen before either. Looking at parts book, it might have been an option in the very later years. My tractor also has the 2 prong electrical outlet as shown in the parts book, which I thought was not factory. 2 Prong doesn't help me much so I would prefer a 4 prong.
I also notice that you only have one worklight on the back. I have two worklights but I am guessing the right side work light was added later and not factory.
I am not trying to make it an original tractor but rather a very functional tractor with better lighting. My 190xt is also a 67 model. Thanks for the input.
|
|
80 7010, 80 7020. 67 190XTD Series I w/500 Loader, AC 2000 Plow, AC 4 row Planter, AC 77G Rake, Member Indiana A-C Partners, Member TAC
|
 |
Steve in NJ 
Orange Level Access

Joined: 12 Sep 2009
Location: Andover, NJ
Points: 11788
|
 Post Options Post Options
 Thanks(0) Thanks(0)
 Quote Quote  Reply Reply
 Posted: 01 Feb 2023 at 5:33pm Posted: 01 Feb 2023 at 5:33pm |
If you have a rack of lights across the top of the Tractor along with Headlights, LED or not, you should use a relay or two to take the load off the Headlight switch. Could be the Headlight switch is old and has corrosion inside it causing resistance. Resistance makes heat. The thing you should do is see what amperage each lamp is up top, add them together to get a total amperage count. Then pick a relay to handle that circuit and the amperage the lamps draw. If they are incandescent lamps, they can draw some power. You may also need to step up the size of the circuit that feeds the rack of lamps as well. HTH. Steve@B&B
|
|
39'RC, 43'WC, 48'B, 49'G, 50'WF, 65 Big 10, 67'B-110, 75'716H, 2-620's, & a Motorhead wife
|
 |
PaulB 
Orange Level

Joined: 12 Sep 2009
Location: Rocky Ridge Md
Points: 4722
|
 Post Options Post Options
 Thanks(0) Thanks(0)
 Quote Quote  Reply Reply
 Posted: 01 Feb 2023 at 7:38pm Posted: 01 Feb 2023 at 7:38pm |
|
Those head lights are also use on the late D10/12/15 & 17 tractors. I can't tell you the industry number without taking one apart and getting the number off of the back of the light.
|
|
If it was fun to pull in LOW gear, I could have a John Deere.
Real pullers don't have speed limits.
If you can't make it GO... make it SHINY
|
 |
Carl(NWWI) 
Orange Level

Joined: 13 Sep 2009
Location: NW WI
Points: 954
|
 Post Options Post Options
 Thanks(0) Thanks(0)
 Quote Quote  Reply Reply
 Posted: 01 Feb 2023 at 11:19pm Posted: 01 Feb 2023 at 11:19pm |
|
Part number ABC3696 from Steiner fit in my 190 factory light housings. One bulb fit perfect, other one I had to trim down on the belt sander a touch .
|
 |
calico190xt68 
Orange Level


Joined: 12 Jan 2017
Location: Frankton, IN
Points: 803
|
 Post Options Post Options
 Thanks(0) Thanks(0)
 Quote Quote  Reply Reply
 Posted: 02 Feb 2023 at 12:35pm Posted: 02 Feb 2023 at 12:35pm |
Thanks for the part number! Good to know it worked in your 190 too.
I noticed that the dimensions are supposed
to be 5.623 inches so should work as a 5.5 inch replacement. Maybe that
is why you had to grind it a little. I will report back after I order
them and replace.
I tried searching by Allis part numbers but I did not get consistent results. Steiner says this is a 4419 bulb. When I take both bulbs out, I will see if I can find that number or whatever it has.
|
|
80 7010, 80 7020. 67 190XTD Series I w/500 Loader, AC 2000 Plow, AC 4 row Planter, AC 77G Rake, Member Indiana A-C Partners, Member TAC
|
 |
calico190xt68 
Orange Level


Joined: 12 Jan 2017
Location: Frankton, IN
Points: 803
|
 Post Options Post Options
 Thanks(0) Thanks(0)
 Quote Quote  Reply Reply
 Posted: 02 Feb 2023 at 12:42pm Posted: 02 Feb 2023 at 12:42pm |
I got to thinking about this dash switch overheating issue and while I replaced the stadium lights on the front of cab with 4 individual LED lights and the back of the cab with a light bar and 2 individual lights, does the stadium light circuit run through the light switch circuit on the dash on the 7010? Since they have their own switches at the top of the cab, they may have nothing to do with headlights down below? If they do run through the dash switch circuit, then I may be overloading it. I probably need to look at a wiring diagram unless someone knows for sure here on the forum.
I may need to start over on this topic since it is off topic for my original 190xt question.
|
|
80 7010, 80 7020. 67 190XTD Series I w/500 Loader, AC 2000 Plow, AC 4 row Planter, AC 77G Rake, Member Indiana A-C Partners, Member TAC
|
 |
plummerscarin 
Orange Level Access

Joined: 22 Jun 2015
Location: ia
Points: 3451
|
 Post Options Post Options
 Thanks(0) Thanks(0)
 Quote Quote  Reply Reply
 Posted: 02 Feb 2023 at 5:20pm Posted: 02 Feb 2023 at 5:20pm |
|
If reading my 7045 diagram correctly, the feed for the stadium lights comes off one of the circuit breakers on the firewall to a solenoid under the dash. The rotary light switch then activates the solenoid to feed power to the overhead switches for the stadium lights? Again, this is if reading correctly. The solenoid is shown as an option when equipped with stadium lights. Mine did not have these lights from new. I tapped the circuit breaker overhead for the wiper to power the added lights. In the 7060 I added another breaker on the firewall and fed it directly to the harness that came with the light bars for a separate circuit rather than tax the existing lighting circuit. HTH
|
 |
calico190xt68 
Orange Level


Joined: 12 Jan 2017
Location: Frankton, IN
Points: 803
|
 Post Options Post Options
 Thanks(0) Thanks(0)
 Quote Quote  Reply Reply
 Posted: 02 Feb 2023 at 5:36pm Posted: 02 Feb 2023 at 5:36pm |
Thanks for looking at that diagram for me. Appreciate that a bunch.
I think my Stadium lights are original. Based upon what you found, the circuit is running through the dash.
I was cutting hay at nighttime this past summer and running my stadium lights (which are now LEDS) and noticed that the light switch got really hot so I should have known they were running through the switch. I may have damaged the switch because my flasher lights are working erratically now. They used to blink then after leaving Stadium lights on they would stop blinking. Turn off the stadium lights and let things cool down and they would start working again. Although I noticed they don't work at all now.
I probably need to separate the stadium lights from the dash switch since I am probably pulling more amps than the incandescents were, even though LEDS are more efficient, those light bars may be a different story.
I think you are right about the solenoid feeding power from the roatary switch. I think they ran the stadium lights through the dash to prevent you from turning on the stadium lights unless you had the dash switch in the proper position. I like using the stadium light switches up at top of cab so I would like to keep those functioning. If I separate the stadium lights, I will need to put a relay in the circuit I think. I need to figure out the right size though.
I will have to take the dash off and see if I have that Solenoid and how best to make this work better. A dedicated feed would do it and is probably best. May need a new rotary switch too though.
|
|
80 7010, 80 7020. 67 190XTD Series I w/500 Loader, AC 2000 Plow, AC 4 row Planter, AC 77G Rake, Member Indiana A-C Partners, Member TAC
|
 |
plummerscarin 
Orange Level Access

Joined: 22 Jun 2015
Location: ia
Points: 3451
|
 Post Options Post Options
 Thanks(0) Thanks(0)
 Quote Quote  Reply Reply
 Posted: 02 Feb 2023 at 5:57pm Posted: 02 Feb 2023 at 5:57pm |
|
I too was thinking stad light solenoid is activated when main lights are on. Puzzling is the rotary switch gets hot when really the power that feeds lights goes through solenoid. My understanding of solenoid is a small amount of power from switch energizes solenoid. Have read other posts where rotary switch is worn enough due to age to cause your issues.
|
 |
plummerscarin 
Orange Level Access

Joined: 22 Jun 2015
Location: ia
Points: 3451
|
 Post Options Post Options
 Thanks(0) Thanks(0)
 Quote Quote  Reply Reply
 Posted: 02 Feb 2023 at 6:02pm Posted: 02 Feb 2023 at 6:02pm |
|
My LED light bars draw more power than 8 individual lights. That's why I ran a dedicated circuit to them. I fished the supply wire from the firewall alongside the heater hoses to the roof.
|
 |
farmboy520 
Orange Level Access


Joined: 22 Jun 2016
Location: Beason, IL
Points: 553
|
 Post Options Post Options
 Thanks(0) Thanks(0)
 Quote Quote  Reply Reply
 Posted: 03 Feb 2023 at 7:54am Posted: 03 Feb 2023 at 7:54am |
|
My light switch on my 7010 was getting hot with no additional lights on the circuit and just running the flashers. The flashers were being erratic like yours. I replaced the switch and everything operates like it's suppose to. Also, we had put different halagen lights on the rear of my 7060 and they would make the switch get hot from the extra pull. I've since put led lights on the rear of the 7060 and now the switch stays cool.
|
|
On the farm: Agco Allis 9695, 7060, 7010, R66, Farmall H, and Farmall F20 (Great Grandpa's)
|
 |
calico190xt68 
Orange Level


Joined: 12 Jan 2017
Location: Frankton, IN
Points: 803
|
 Post Options Post Options
 Thanks(0) Thanks(0)
 Quote Quote  Reply Reply
 Posted: 03 Feb 2023 at 9:49am Posted: 03 Feb 2023 at 9:49am |
|
I probably should get a new switch and start there in case that solves it. Has to happen anyway.
|
|
80 7010, 80 7020. 67 190XTD Series I w/500 Loader, AC 2000 Plow, AC 4 row Planter, AC 77G Rake, Member Indiana A-C Partners, Member TAC
|
 |
calico190xt68 
Orange Level


Joined: 12 Jan 2017
Location: Frankton, IN
Points: 803
|
 Post Options Post Options
 Thanks(0) Thanks(0)
 Quote Quote  Reply Reply
 Posted: 13 Feb 2023 at 9:27pm Posted: 13 Feb 2023 at 9:27pm |
|
I can confirm that ABC3696 Lights from Steiner will work on the early 190XT fender headlights. I had to do a bunch of grinding on the outside of the metal light housing. I ground a bevel on the back side of the light at 45 degrees. I then ground down the outside edge as close to the light lense as I dared. It was still a very tight fit. I may have a hard time prying the light out someday, if I have too. They are nice and bright though. I paid $49 per light. I have all LEDs now.
|
|
80 7010, 80 7020. 67 190XTD Series I w/500 Loader, AC 2000 Plow, AC 4 row Planter, AC 77G Rake, Member Indiana A-C Partners, Member TAC
|
 |
Carl(NWWI) 
Orange Level

Joined: 13 Sep 2009
Location: NW WI
Points: 954
|
 Post Options Post Options
 Thanks(0) Thanks(0)
 Quote Quote  Reply Reply
 Posted: 13 Feb 2023 at 11:30pm Posted: 13 Feb 2023 at 11:30pm |
|
Glad it worked. It took some patience but they will fit. Excellent visibility and still original housings to keep the look.
|
 |
calico190xt68 
Orange Level


Joined: 12 Jan 2017
Location: Frankton, IN
Points: 803
|
 Post Options Post Options
 Thanks(0) Thanks(0)
 Quote Quote  Reply Reply
 Posted: 27 Feb 2023 at 8:40am Posted: 27 Feb 2023 at 8:40am |
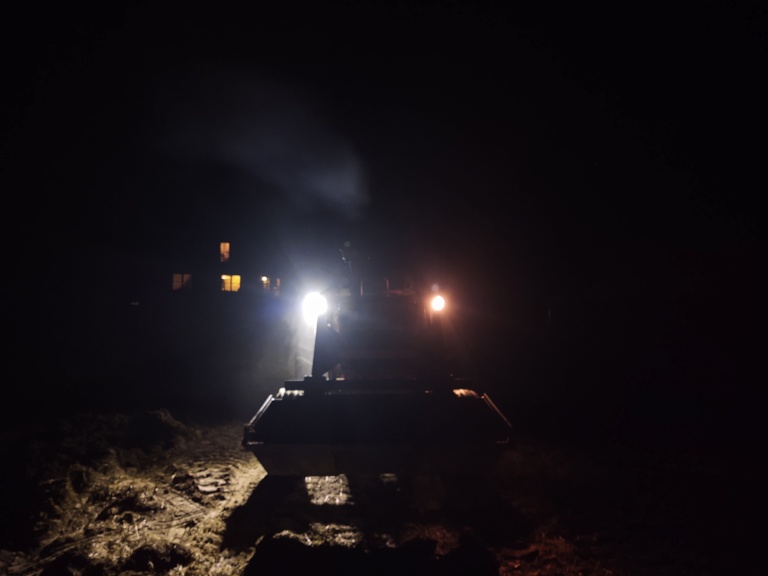
I took a picture before I replaced the second headlight on the fender. You can see the big difference. I have no idea how anyone farmed with those kind of lights back in the 60s. My guess is that they didn't do it a lot.
|
|
80 7010, 80 7020. 67 190XTD Series I w/500 Loader, AC 2000 Plow, AC 4 row Planter, AC 77G Rake, Member Indiana A-C Partners, Member TAC
|
 |
Steve in NJ 
Orange Level Access


Joined: 12 Sep 2009
Location: Andover, NJ
Points: 11788
|
 Post Options Post Options
 Thanks(0) Thanks(0)
 Quote Quote  Reply Reply
 Posted: 27 Feb 2023 at 5:15pm Posted: 27 Feb 2023 at 5:15pm |
The reason why that light's candlepower is low is because the system in your Tractor has a big load on it and those lights are not getting 14.2 volts as they should. That's a low voltage lamp if I ever seen one. Again, the heat in the system and the switch is caused by LOAD. With a couple relays down stream, its takes that load off the circuitry. The wiring as I mentioned before, is to light for the load it needs to carry. All those old Tractor systems are like that. That's why when I build new systems for these Tractors, I up the size of the wire a gauge or so depending on the load that it needs to handle. If that Tractor has a "DN" series Delco Alternator on it, the VR is probably in overload mode. Upgrading to a 3 wire system with an "SI" series Alternator doing the charging chores would take care of everything on board providing it's wired correctly. If it already has an "SI' series Delco Alternator on the Tractor, a good way to compensate for the load used is run the voltage sense circuit parallell with the output circuit of the Alternator and connect them together at a junction block near the Battery. Connect the Battery to that junction block as well. Any load that's put on the system, the voltage sense circuit will signal the Alternator to ramp up and compensate for that load at that junction block. Wiring the Headlight switch to that junction (Battery feed) will keep full power through the switch for all other accessories. Keeps the Battery "full" and keeps 14.2 volts throughout the Tractor without any low voltage, hot switches, dull incandescent bulbs, or circuitry cookin'. Low voltage cooks everything!... HTH
Steve@B&B
|
|
39'RC, 43'WC, 48'B, 49'G, 50'WF, 65 Big 10, 67'B-110, 75'716H, 2-620's, & a Motorhead wife
|
 |
calico190xt68 
Orange Level


Joined: 12 Jan 2017
Location: Frankton, IN
Points: 803
|
 Post Options Post Options
 Thanks(0) Thanks(0)
 Quote Quote  Reply Reply
 Posted: 28 Feb 2023 at 8:37am Posted: 28 Feb 2023 at 8:37am |
 Steve in NJ wrote: Steve in NJ wrote:
The reason why that light's candlepower is low is because the system in your Tractor has a big load on it and those lights are not getting 14.2 volts as they should. That's a low voltage lamp if I ever seen one. Again, the heat in the system and the switch is caused by LOAD. With a couple relays down stream, its takes that load off the circuitry.
|
Well, you raise many issues and I will have to get to the bottom of all of these. Don't know yet what kind of Alternator I have but will find out. I will see what the output is from a meter. I have two new batteries purchased a few months ago. I thought LEDs reduced the load when replaced for Incandescents. I am very interested in fixing the wiring circuitry for optimum benefit.
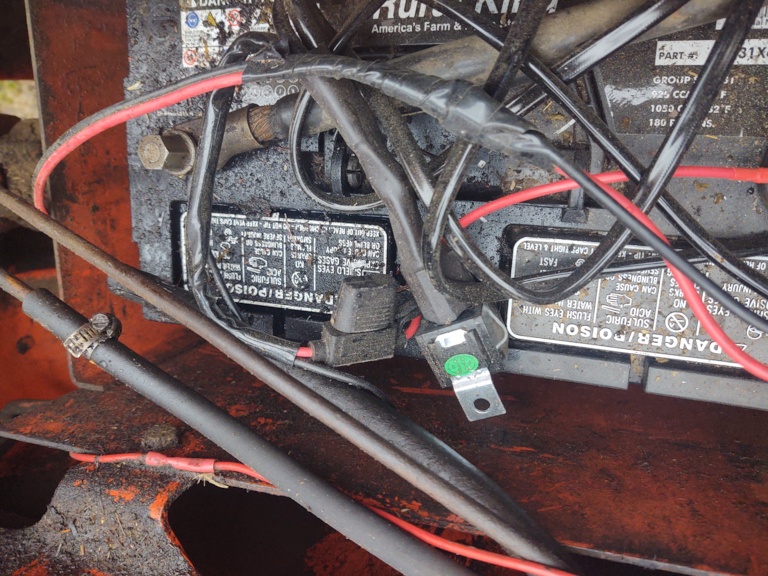
I have added a set of LEDs mounted on my front loader and also hooked in a rear light into that same circuit. I purchased a LED 14 ga wiring harness with fuse and relay for that circuit. That circuit is directly connected to the battery so it is not going through existing wiring.
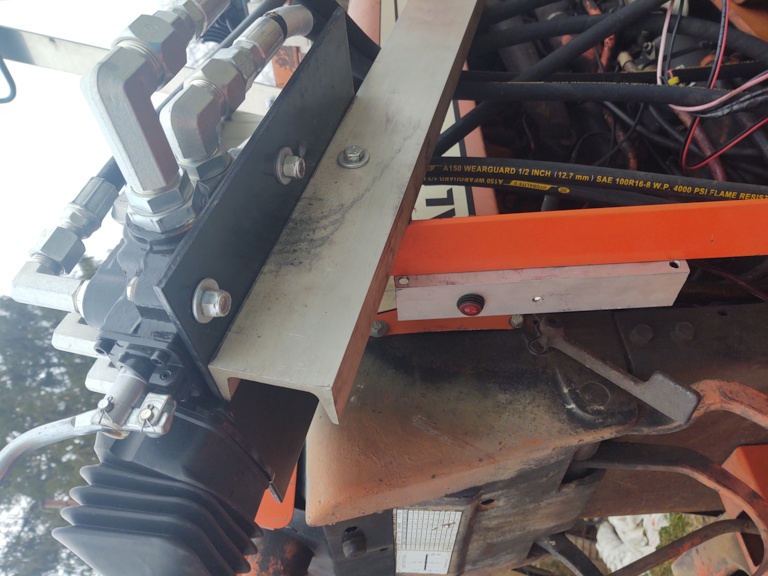
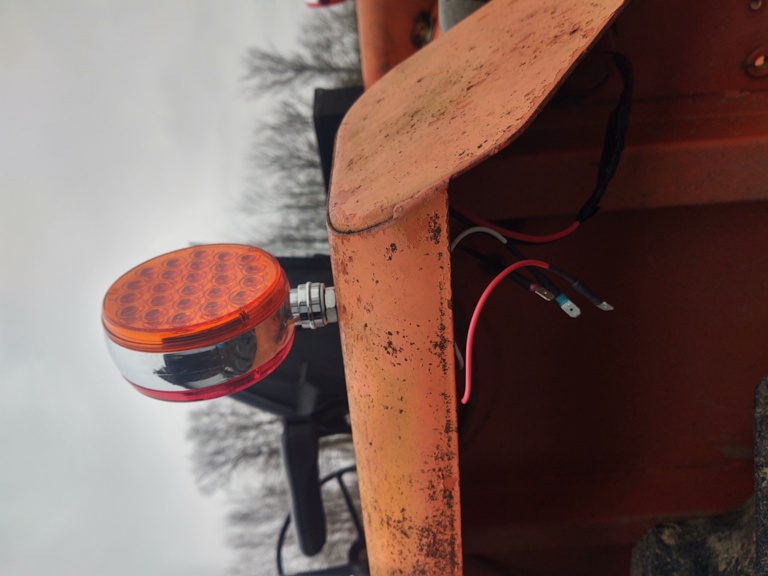
I am also in the process of hooking up flasher lights/turn signals but that was going to be a different circuit as well. I discovered that the early XTs could have one flasher light on the left fender but did not come stock with one on the right. I am guessing for visibility reasons when looking to the right. By having a separate circuit, I can turn off and on the flashers without the headlights being on. Going to place a toggle switch in the dash for turn signals since there is a hole there now. The flasher switch will be in the aluminum piece where you see the current switch for the front loader LEDs. I have a spot on left fender that is I believe original for a 4 way plug to run the flashers and turn signals to an implement or wagon. I will also wire the 4 way plug from the left fender wires. I can put an inline fuse and a relay into this circuit. Not sure what size relay I need for flashers/turn signals though.
That leaves the two fender headlights and one rear light as using the original wiring. The original wiring looks bad and was rerouted, spliced and rigged up. I have a roll of 12 gauge wire that I was going to run to the fender and rear light to start over. The ground for the fender lights is coming from the whole tractor and I am surprised they work since there is a fair amount of rust on the fender light housing. I have all LEDs in place of those 3 original lights. I can put an inline fuse and a relay into that circuit as well but not sure on size yet.
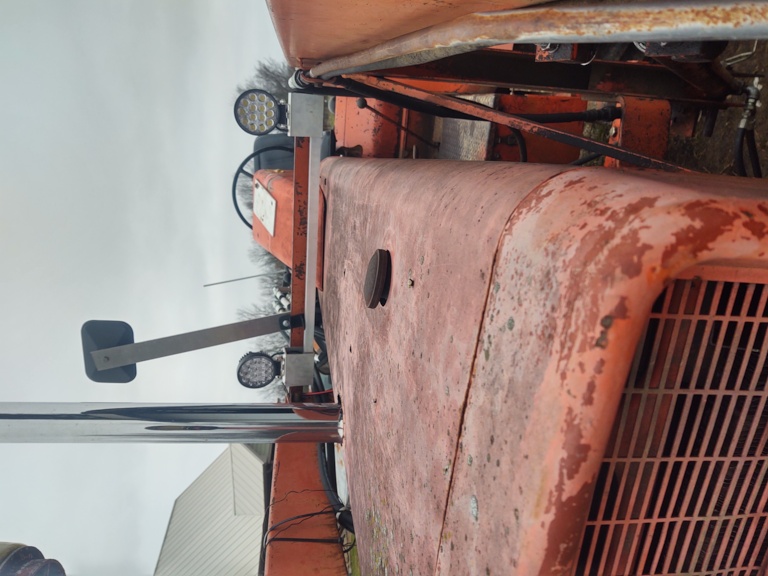
I haven't dressed up the wires yet as I am still working on them, although I did make an aluminum wiring channel for the front loader lights, so forgive the wires just hanging or dangling.
What else do you suggest? See pictures below.
New LED front loader light switch. The other red/black wires hanging are for power to a baler moisture tester that come off of the key switch.
New LED flasher/turn signals (not wired yet)
Wiring harness, fuse and relay yet to be permanently mounted.
Front loader lights. I had some scrap aluminum so rigged up a mounting system for LEDs. The aluminum plate on the dash cowl is for the baler moisture tester display.
|
|
80 7010, 80 7020. 67 190XTD Series I w/500 Loader, AC 2000 Plow, AC 4 row Planter, AC 77G Rake, Member Indiana A-C Partners, Member TAC
|
 |


 Topic Options

 Post Options
 Thanks(0)


 Steve in NJ wrote: