| Author |
 Topic Search Topic Search  Topic Options Topic Options
|
Yooper Smoker 
Bronze Level

Joined: 14 Dec 2022
Location: Lake Linden Mi.
Points: 27
|
 Post Options Post Options
") Thanks(0) Thanks(0)
 Quote Quote  Reply Reply
 Topic: Allis Chalmers ''C'' project Topic: Allis Chalmers ''C'' project
Posted: 14 Dec 2022 at 6:10pm |
Hi All
I acquired a model C tractor in a trade the previous owner drove it home and started to restore it sand blasting painting ect he did a nice job but cant get it started. not sure what all he removed and re assembled. any way looking at the top of the motor around the valves and rockers was blasting sand. so how far are we looking at tearing it down. current plans are removing manifolds, valve cover, oil pan and washing it down. hope that the head and pistons are ok.
It will be a handy tractor because it came with a under belly sickle bar for cutting hay and from what I hear that attachment is like ''hens teeth'' to find
any input will be welcomed Ive rebuilt truck engines in the past so not worried about the project
Mike
|
 |
|
Sponsored Links
|
|
|
steve(ill)
Orange Level Access


Joined: 11 Sep 2009
Location: illinois
Points: 78865
|
Post Options
Thanks(0)
Quote Reply
Posted: 14 Dec 2022 at 7:48pm |
if the tractor was sand blasted, then sand can go into the oil fill cap on the valve cover, and the exhaust pipe- to the manifold - to the valves....and the air cleaner to the carburetor..
You would assume the valve cover got the most. Any sand that got into the exhaust manifold is going back OUT when the motor starts, not going into the oil... Any sand that got into the air cleaner, probably stopped by the time it go to the carb.. Maybe take the hose off between air cleaner and carb and look for sand.
Once the oil go into the valve cover, it can float all over and fall into the crank case.. you oil is contaminated.. If you pump that oil around, it can get to the bearings and journals... a real good FLUSH is in order, oil change.. startup and run a few minutes to FLUSH everything into the pan and change the oil a second time.
The "OIL FILTER" is a bypass filter, so it is NOT CLEANING the oil from the pan , going into the bearingss / etc.
|
|
Like them all, but love the "B"s.
|
|
steve(ill)
Orange Level Access
Joined: 11 Sep 2009
Location: illinois
Points: 78865
|
Post Options
Thanks(0)
Quote Reply
Posted: 14 Dec 2022 at 7:53pm |
does it have a distributor and coil, or does it have a magneto.
If dist / mag was removed, then timing needs to be checked... at least clean point and check for spark.. You need 6 (12v) to the coil to get it to SPARK at the distrib. .. I would pull the carburetor and clean it out and make sure you have good gas flow to it... You may have sand in the gas tank, strainer , filter, etc to the carb.
|
|
Like them all, but love the "B"s.
|
|
Yooper Smoker
Bronze Level
Joined: 14 Dec 2022
Location: Lake Linden Mi.
Points: 27
|
Post Options
Thanks(0)
Quote Reply
Posted: 14 Dec 2022 at 9:14pm |
thank you for the input it has a magneto its firing on all 4 so the timing is off there was sand in the ventury of the carb so ill pull the manifold to see if he had sand up in the head if so ill have to pull the head too
Mike
|
|
steve(ill)
Orange Level Access
Joined: 11 Sep 2009
Location: illinois
Points: 78865
|
Post Options
Thanks(0)
Quote Reply
Posted: 14 Dec 2022 at 9:54pm |
|
the FIRE and TDC mark are on the flywheel and visible thru the 1 inch hole in the bell housing on the LEFT side of the tractor. The MAG should be timed at TDC to static fire ( you can install a hand crank thru the hole under the radiator, into the crankshaft pulley)... The MAG Impulse should "SNAP" when you get to the TDC point on the flywheel.. Once the motor starts, the IMPULSE will back off and you will FIRE at 30 degress BTDC... "FIRE MARK" on the flywheel.
|
|
Like them all, but love the "B"s.
|
|
Yooper Smoker
Bronze Level
Joined: 14 Dec 2022
Location: Lake Linden Mi.
Points: 27
|
Post Options
Thanks(0)
Quote Reply
Posted: 15 Dec 2022 at 9:11am |
OK so if he pulled the mag off the block is it possible to throw the timing off that way? like on a V 8 if you don't line up the gears correctly?
first purchase is going to be the shop manual for working on the Allis Chalmers
this is new and un charted territory for me
|
|
Dale (Stonelick)
Bronze Level

Joined: 13 Jun 2019
Location: Stonelick, Ohio
Points: 158
|
Post Options
Thanks(0)
Quote Reply
Posted: 15 Dec 2022 at 9:56am |
|
Mike: If you would PM me with your email address I can send you a pdf attachment of an Allis Chalmers Service manual for models G B C and CA that was posted by Gerald several years ago. This file is too large to attach to this message.
|
|
1951 CA - 1944 C - 1949 B - Kubota M6800
|
|
WF owner
Orange Level
Joined: 12 May 2013
Location: Bombay NY
Points: 4463
|
Post Options
Thanks(1)
Quote Reply
Posted: 15 Dec 2022 at 11:48am |
This link may help with magneto timing.
|
|
Yooper Smoker
Bronze Level
Joined: 14 Dec 2022
Location: Lake Linden Mi.
Points: 27
|
Post Options
Thanks(0)
Quote Reply
Posted: 15 Dec 2022 at 12:51pm |
|
|
|
Yooper Smoker
Bronze Level
Joined: 14 Dec 2022
Location: Lake Linden Mi.
Points: 27
|
Post Options
Thanks(0)
Quote Reply
Posted: 15 Dec 2022 at 12:52pm |
|
|
|
steve(ill)
Orange Level Access
Joined: 11 Sep 2009
Location: illinois
Points: 78865
|
Post Options
Thanks(0)
Quote Reply
Posted: 15 Dec 2022 at 1:14pm |
|
Yooper, those links should help.. Pulling the mag off is not like moving the timing gears... Its more like pulling the distributor off of a V8... You have to get #1 piston heading toward TDC as you install the distributor so that the rotor will be pointing at #1 spark plug wire as you rotate the motor........... Mag is basically the same theory for "timing"
|
|
Like them all, but love the "B"s.
|
|
Yooper Smoker
Bronze Level
Joined: 14 Dec 2022
Location: Lake Linden Mi.
Points: 27
|
Post Options
Thanks(0)
Quote Reply
Posted: 15 Dec 2022 at 5:44pm |
steve so I can set the timing with the plastic rotor gear in the mag once TDC is established I don't have to mess with anything between the block and mag.
Mike
|
|
steve(ill)
Orange Level Access
Joined: 11 Sep 2009
Location: illinois
Points: 78865
|
Post Options
Thanks(0)
Quote Reply
Posted: 15 Dec 2022 at 5:55pm |
the fiber gear is INTERNAL TIMING of the MAG itself... Hopefully that was not taken apart, but you can go thru the steps to time the gears INTERNAL...
Now your ready to install on the tractor... Crank by hand to get #1 coming up on compression.. stop about 30 degrees from the TOP TDC ( the FIRE mark)....follow the steps on Deweys post ( below)...
Note that this is how you INSTALL the mag....( near the fire mark)... snug the bolts on the mag and continue to rotate to the TDC mark.. The impulse will WIND UP and you will hear the SNAP and the plug will FIRE , when you get to the TDC on the crank.
Edited by steve(ill) - 15 Dec 2022 at 5:58pm
|
|
Like them all, but love the "B"s.
|
|
Yooper Smoker
Bronze Level
Joined: 14 Dec 2022
Location: Lake Linden Mi.
Points: 27
|
Post Options
Thanks(0)
Quote Reply
Posted: 15 Dec 2022 at 8:17pm |
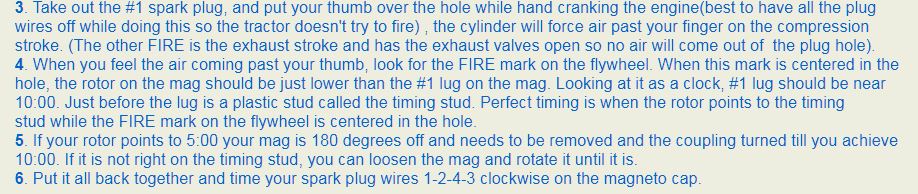
ok I am looking at the pictures [not matching up] is this for the Farbank Moris the mag I have is a wico is the set up info the same right now the #1 is at the 2:00 position and timing is 1243
Mike
|
|
steve(ill)
Orange Level Access
Joined: 11 Sep 2009
Location: illinois
Points: 78865
|
Post Options
Thanks(0)
Quote Reply
Posted: 15 Dec 2022 at 8:34pm |
|
the WICO may not have the lug like the FM does...... Another way to do it is to clamp the mag in a vise and install a spark plug wire and plug into the #1 hole and ground the plug... using your pliers, turn the impulse tangs and wind up the spring and then it will SNAP and SPARK... Turn until it sparks on #1... then turn 3 more SNAPS for 2 - 4 -3 .. now its ready to fire on #1 ....... go install it with the crank set at the FIRE mark or before .... snug up the bolts.. ... rotate to TDC and the #1 plug should FIRE ... if its off a little, loosen the bolts and roll the mag inward or outward a few degrees and retest.
|
|
Like them all, but love the "B"s.
|
|
steve(ill)
Orange Level Access
Joined: 11 Sep 2009
Location: illinois
Points: 78865
|
Post Options
Thanks(0)
Quote Reply
Posted: 15 Dec 2022 at 8:37pm |
|
you can make ANY mag hole the #1... normally you choose the 10 o'clock position as "factory original"... but it does not matter... which ever one fires for #1.. just put the wires 2 -4 -3 in the right order after that
|
|
Like them all, but love the "B"s.
|
|
WF owner
Orange Level
Joined: 12 May 2013
Location: Bombay NY
Points: 4463
|
Post Options
Thanks(0)
Quote Reply
Posted: 16 Dec 2022 at 6:11am |
He's right that the WICO mag's #1 plug wire port is in the 2 o'clock position. WICO has a "pointer" that comes up in a window for #1. It's been years since I worked on a WICO mag, so I don't remember how to time it internally, but it must be timed so the points are opening at the right time.
|
|