| Author |
 Topic Search Topic Search  Topic Options Topic Options
|
CA13414 
Bronze Level

Joined: 25 Feb 2024
Location: Nebraska
Points: 61
|
 Post Options Post Options
") Thanks(0) Thanks(0)
 Quote Quote  Reply Reply
 Posted: 21 Apr 2024 at 12:29am Posted: 21 Apr 2024 at 12:29am |
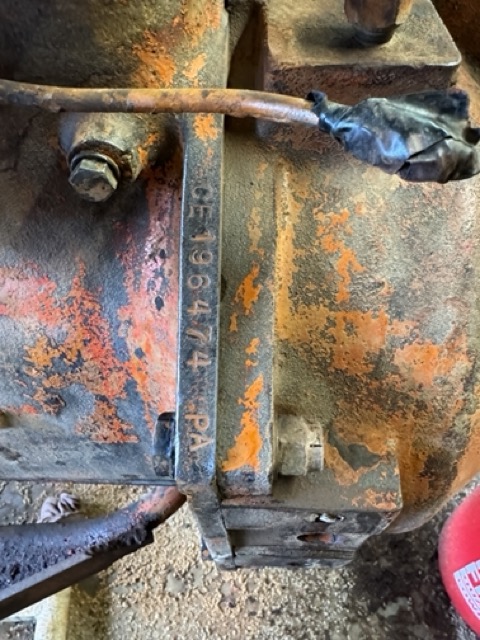
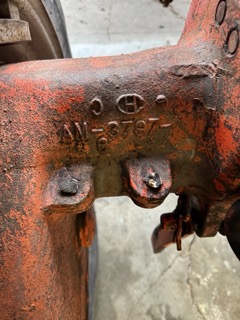
Also, any insight on this engine block number? Found it when cleaning. Mostly currious!!
< id="idg-io-safe-browsing-enabled" ="" oninit="true">
Edited by CA13414 - 21 Apr 2024 at 12:30am
|
|
Helping the aged survive and thrive! 1953 CA
|
 |
|
Sponsored Links
|
|
|
CA13414
Bronze Level
Joined: 25 Feb 2024
Location: Nebraska
Points: 61
|
Post Options
Thanks(0)
Quote Reply
Posted: 20 Apr 2024 at 11:54pm |
Paint!!
Thoughts on the following..... Planning Persian Orange #1 and black.
Black paint: Air filter, front wheel hubs and lug bolts (rims are orange), rear wheel power rims (inner to be orange), steering shaft, gear shifter, hand clutch lever, alternator and starter.
Orange: Everything else.
Thoughts???
< id="idg-io-safe-browsing-enabled" ="" oninit="true">
Edited by CA13414 - 20 Apr 2024 at 11:56pm
|
|
Helping the aged survive and thrive! 1953 CA
|
|
CA13414
Bronze Level
Joined: 25 Feb 2024
Location: Nebraska
Points: 61
|
Post Options
Thanks(0)
Quote Reply
Posted: 20 Apr 2024 at 11:45pm |
Spent the rest of the day replacing electronic hardware at the house after a lightning strike  . It took out our internet router, network switch, all the TV's, my Hubitat Hub, security cameras, smart switches and a few sound system amps. Thankfully, furnace and appliances are OK.
Thank goodness we didn't have a fire or anything more serious!!! < id="idg-io-safe-browsing-enabled" ="" oninit="true">
Edited by CA13414 - 20 Apr 2024 at 11:57pm
|
|
Helping the aged survive and thrive! 1953 CA
|
|
CA13414
Bronze Level
Joined: 25 Feb 2024
Location: Nebraska
Points: 61
|
Post Options
Thanks(0)
Quote Reply
Posted: 20 Apr 2024 at 10:33pm |
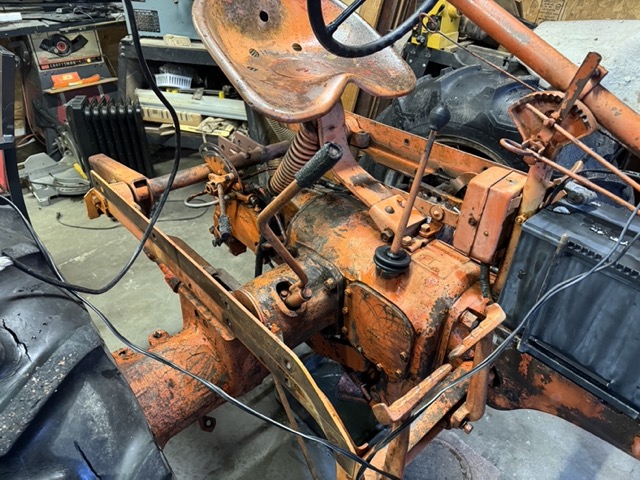
A bit slower progress this week.
Spent the day cleaning. With a putty knife, screwdriver and wire brush, took all the "chunks" off the engine, torque tube and part of the transmission and differential. Cleaned up the air filter and should be ready for a bit of sanding and then paint (planning black). You just gotta love "Brake and Parts Cleaner" for removing the oil and grease as well! Pretty much strips off everything which was awesome. Here is air filter, ready for sanding and then paint.
The engine and torque tube!
Torque tube and steering box!
Transmission, differential and PTO/hydraulics!!
A bit backwards, but before all the above, we spent a few hours cleaning. The results of the day were achieved by the right tools and as previously note...... brake and parts cleaner.
Notably the best kick ass tool of the day was..... a cordless Milwaukee Hand grinder. This was awesome to clean up the rest. The Milwaukee drill with a SS wire bur was also a huge thumbs up!!!
Replaced the gasket on the oil filter mount... which was leaking.
Also took off the radiator support to check out the front steering bearing cone and capscrew. There was oil present and no notable issues. Decided to leave it as is and not dig deeper. Thus, filled it with Lucas Hub Oil and made a new gasket with the ball ping hammer. Will watch and make sure there is no oil leak (if so replace the oil seal).
Also filled the steering box with Lucas Hub Oil and will check for leaks.
Still need to dig into the hydraulic system and find the suspected bad "O"-ring. Then the inner final drive seal need to be replaced!!
< id="idg-io-safe-browsing-enabled" ="" oninit="true">
Edited by CA13414 - 20 Apr 2024 at 11:45pm
|
|
Helping the aged survive and thrive! 1953 CA
|
|
Ted J
Orange Level


Joined: 05 Jul 2010
Location: La Crosse, WI
Points: 18727
|
Post Options
Thanks(1)
Quote Reply
Posted: 14 Apr 2024 at 12:41am |
|
You're doing great and the pics help immensely. Keep at it!! They are a real pleasure to work on and an even better one to drive!
|
|
"Allis-Express"
19?? WC / 1941 C / 1952 CA / 1956 WD45 / 1957 WD45 / 1958 D-17
|
|
CA13414
Bronze Level
Joined: 25 Feb 2024
Location: Nebraska
Points: 61
|
Post Options
Thanks(0)
Quote Reply
Posted: 13 Apr 2024 at 5:41pm |
A few more pictures.
Radiator is off, now need to pressurize and find any leaking spots. Hope to fix vs. buy a new one for ~$200. :'|
Wiring, generator and starter are now off. We set aside the wiring as a template when reassembling. I have new wire and connectors with heat resistant black wrap.
Was able to remove the front spindle bushings and clean up the spindles. Do need to use a bit of emory cloth to finalize before assembly.
Did find out the mid steering box is adjustable. An 8th of a turn took out almost all of the slack. Need to check/add oil grease.
This week we will pick up a new rear tire. One is in good shape the other has many cracks. Realized our center pivot tires on the farm are 11.2"X24" and plan to use one of those tires. I did find many on FaceBook for $50 or more which would also work. Ironically, when I was looking at the other rear tires to see if I should replace it I realized it was also an old pivot irrigation tire!
Next steps: Continue clean up!! Press in the new spindle bushings, reassemble the spindles, rebuild/repack the the front wheel hub bearings and with new seals reassemble. Then swap out the front end.
< id="idg-io-safe-browsing-enabled" ="" oninit="true">
Edited by CA13414 - 14 Apr 2024 at 1:23pm
|
|
Helping the aged survive and thrive! 1953 CA
|
|
CA13414
Bronze Level
Joined: 25 Feb 2024
Location: Nebraska
Points: 61
|
Post Options
Thanks(0)
Quote Reply
Posted: 10 Apr 2024 at 5:43am |
 dfwallis wrote: dfwallis wrote:
Steering play adjustment: That would be interesting. Mine seemed to be all related to gear teeth meshing. |
Indeed, after reading, this is not adjustable. Will make sure there is oil/grease and clean it up.
Will see what it looks like after we get the front put together. Overall it is not terrible, thus, maybe will just hold on anything else for the moment.
< id="idg-io-safe-browsing-enabled" ="" oninit="true">
Edited by CA13414 - 10 Apr 2024 at 5:47am
|
|
Helping the aged survive and thrive! 1953 CA
|
|
dfwallis
Silver Level

Joined: 09 Mar 2023
Location: DFW
Points: 333
|
Post Options
Thanks(0)
Quote Reply
Posted: 09 Apr 2024 at 8:50pm |
|
Steering play adjustment: That would be interesting. Mine seemed to be all related to gear teeth meshing.
|
|
CA13092
|
|
CA13414
Bronze Level
Joined: 25 Feb 2024
Location: Nebraska
Points: 61
|
Post Options
Thanks(0)
Quote Reply
Posted: 09 Apr 2024 at 8:10pm |
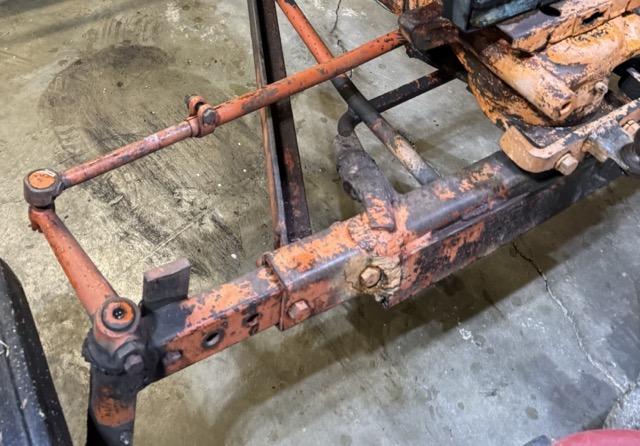
Removed the battery box, tool box and steering column/shaft.
Need to figure out how to tighten up the steering boxes to take out the extra play.
< id="idg-io-safe-browsing-enabled" ="" oninit="true">
Edited by CA13414 - 09 Apr 2024 at 8:12pm
|
|
Helping the aged survive and thrive! 1953 CA
|
|
CA13414
Bronze Level
Joined: 25 Feb 2024
Location: Nebraska
Points: 61
|
Post Options
Thanks(0)
Quote Reply
Posted: 07 Apr 2024 at 6:45am |
The last parts to remove for sand blasting are the steering shaft and tool box. Then we will clean the rest with wire brushes and cleaner. 
At this point the only other thing we have noticed is a small antifreeze leak from the upper seam of the radiator. Hope it is a quick fix with the MAP torch and solder.
< id="idg-io-safe-browsing-enabled" ="" oninit="true">
Edited by CA13414 - 09 Apr 2024 at 8:08pm
|
|
Helping the aged survive and thrive! 1953 CA
|
|
CA13414
Bronze Level
Joined: 25 Feb 2024
Location: Nebraska
Points: 61
|
Post Options
Thanks(0)
Quote Reply
Posted: 06 Apr 2024 at 5:11pm |
Stripped down a bit more..... almost as far as we go in that regard.
One of the major oil leaks is the hydraulic system. It is coming from the upper side. Not sure exactly what it will be but suspect an "O" ring is bad.
Here are a few of the last parts for sand blasting.
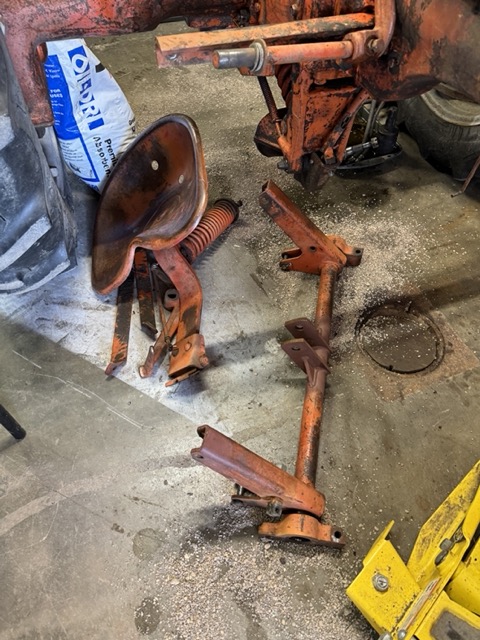
Was a bit of a pain, but removed the spindles out of the front end. Next to remove the old spindle bushings and press the new ones in after cleaning them up.
Overall a very productive day. I think we have found all but one oil leak. This is on the left side and leaking between the differential and final drive housing. I suspect it is the inner oil seal for the upper drive shaft which was leaking into the left housing. Here is the brake pad that was buried in dirt and leaves in the housing and soaked with oil.
< id="idg-io-safe-browsing-enabled" ="" oninit="true">
Edited by CA13414 - 07 Apr 2024 at 9:42am
|
|
Helping the aged survive and thrive! 1953 CA
|
|
CA13414
Bronze Level
Joined: 25 Feb 2024
Location: Nebraska
Points: 61
|
Post Options
Thanks(0)
Quote Reply
Posted: 02 Apr 2024 at 8:08pm |
Pulled the gas tank and will sand blast that with a bunch of other small parts.
Also took off the brakes. The pads were quite worn and broken up. "Drums" do look good, not 100% but reasonable for now.
Do appreciate the prior owners who drilled out the middle side of the pins. Was easy to remove after a couple of days of panther piss. However, there was a ton of dirt, oil and etc which made it a challenge to remove the pads due to the space being full of organic material. We prevailed.
Next is to remove all other sand blast-able parts including the tire rims.
< id="idg-io-safe-browsing-enabled" ="" oninit="true">
Edited by CA13414 - 07 Apr 2024 at 9:41am
|
|
Helping the aged survive and thrive! 1953 CA
|
|
wjohn
Orange Level

Joined: 19 Jan 2010
Location: KS
Points: 1812
|
Post Options
Thanks(0)
Quote Reply
Posted: 30 Mar 2024 at 11:14pm |
|
Agreed! It sounds like it's running well.
|
|
1939 B, 1940 B, 1941 WC, 1951 WD, 1952 CA, 1956 WD-45
|
|
Alberta Phil
Orange Level

Joined: 13 Sep 2009
Location: Alberta, Canada
Points: 3657
|
Post Options
Thanks(1)
Quote Reply
Posted: 30 Mar 2024 at 8:13pm |
|
That 'ol girl sound pretty healthy!!
|
|
CA13414
Bronze Level
Joined: 25 Feb 2024
Location: Nebraska
Points: 61
|
Post Options
Thanks(0)
Quote Reply
Posted: 30 Mar 2024 at 7:38pm |
Well at the end of the day it was a blast to hang and work on the tractor!! Here is a video of me driving up the hill in 4th gear..... Yes I definitely date myself with the tag line of a long ago sit-com. :')
Make sure you turn up the volume.
< id="idg-io-safe-browsing-enabled" ="" oninit="true">
Edited by CA13414 - 31 Mar 2024 at 9:26am
|
|
Helping the aged survive and thrive! 1953 CA
|
|
CA13414
Bronze Level
Joined: 25 Feb 2024
Location: Nebraska
Points: 61
|
Post Options
Thanks(0)
Quote Reply
Posted: 30 Mar 2024 at 7:29pm |
Took it out for a spin. Mostly to see if the clutch held tight. Was able to stall the engine with a quick release. http://youtube.com/shorts/RIyl1zqUqos
As well, in 4th gear and going up the hill, definitely did not slip as it overloaded the engine. Great news. http://youtube.com/shorts/8Xhocc4aG18
Thus, do not plan to break away the engine and put in a new clutch plate and disk.
< id="idg-io-safe-browsing-enabled" ="" oninit="true">
Edited by CA13414 - 30 Mar 2024 at 7:34pm
|
|
Helping the aged survive and thrive! 1953 CA
|
|
CA13414
Bronze Level
Joined: 25 Feb 2024
Location: Nebraska
Points: 61
|
Post Options
Thanks(0)
Quote Reply
Posted: 30 Mar 2024 at 4:40pm |
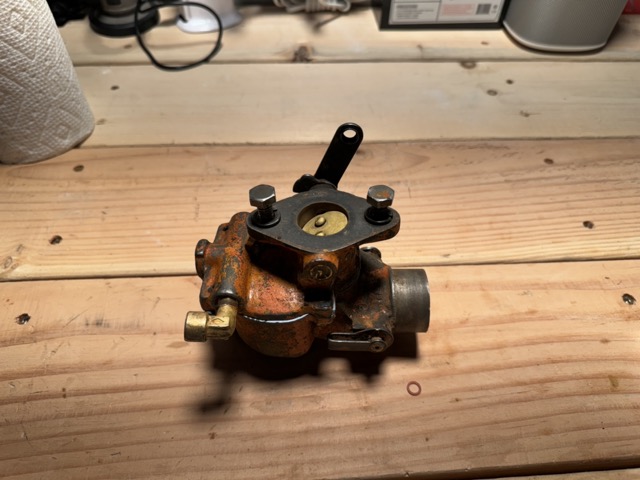
Still needed to change out the float valve needle and seat, however, after decades of fuel it took a screw extractor to remove the brass seat. Also had to tap out the threads to put n the new valve seat!! Re-attached the carb and it ran beautifully.
 .
Also was able to remove one of the front spindles arms and remove the spindle on my GP/Dads front end that was frozen up. Sprayed down the other one with Panther Piss. Yes that is what my Dad called it back in the 60's and it as stuck!! Will have to do the other one on another day. I already ordered new spindle bushings. Then need new front bearings and we will replace whole front end. I will add pics of this effort later.
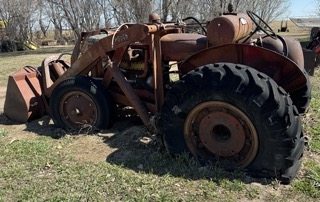
Replacing the front end with my GP/Dads CA........ Mostly to have parts from the family tractor and since the current front end is quite damaged with much artful welding of everything including angle-iron reinforcements.
< id="idg-io-safe-browsing-enabled" ="" oninit="true">
Edited by CA13414 - 30 Mar 2024 at 8:47pm
|
|
Helping the aged survive and thrive! 1953 CA
|
|
CA13414
Bronze Level
Joined: 25 Feb 2024
Location: Nebraska
Points: 61
|
Post Options
Thanks(0)
Quote Reply
Posted: 29 Mar 2024 at 8:27pm |
Thank you!!
I do love marine grade (316) since it is the only one who will not rust in harsh conditions. I use it all the time for that reason. Did not know it had that tensile strength.
If this is used, I would expect you would not "rust" to the manifold, and still have the strength to remove from the manifold years from now. If you did break it, it would be a pain to remove/drill out!
< id="idg-io-safe-browsing-enabled" ="" oninit="true">
Edited by CA13414 - 29 Mar 2024 at 8:28pm
|
|
Helping the aged survive and thrive! 1953 CA
|
|
dfwallis
Silver Level
Joined: 09 Mar 2023
Location: DFW
Points: 333
|
Post Options
Thanks(0)
Quote Reply
Posted: 29 Mar 2024 at 6:25pm |
SteveM C/IL wrote:
stainless bolts are usually not hard bolts. I would use grade 5 with antisieze. Grade 8 ok too. |
316 stainless has a tensile strength of 180000 psi which is higher than grade 8 of 150000 psi. Just don't use 314 or 18-8.
|
|
CA13092
|
|
CA13414
Bronze Level
Joined: 25 Feb 2024
Location: Nebraska
Points: 61
|
Post Options
Thanks(0)
Quote Reply
Posted: 29 Mar 2024 at 4:19pm |
Thanks Steve! Will do exactly that!!
< id="idg-io-safe-browsing-enabled" ="" oninit="true">
Edited by CA13414 - 29 Mar 2024 at 4:20pm
|
|
Helping the aged survive and thrive! 1953 CA
|
|
SteveM C/IL
Orange Level Access
Joined: 12 Sep 2009
Location: Shelbyville IL
Points: 8035
|
Post Options
Thanks(0)
Quote Reply
Posted: 29 Mar 2024 at 8:07am |
|
stainless bolts are usually not hard bolts. I would use grade 5 with antisieze. Grade 8 ok too.
|
|
CA13414
Bronze Level
Joined: 25 Feb 2024
Location: Nebraska
Points: 61
|
Post Options
Thanks(0)
Quote Reply
Posted: 29 Mar 2024 at 7:13am |
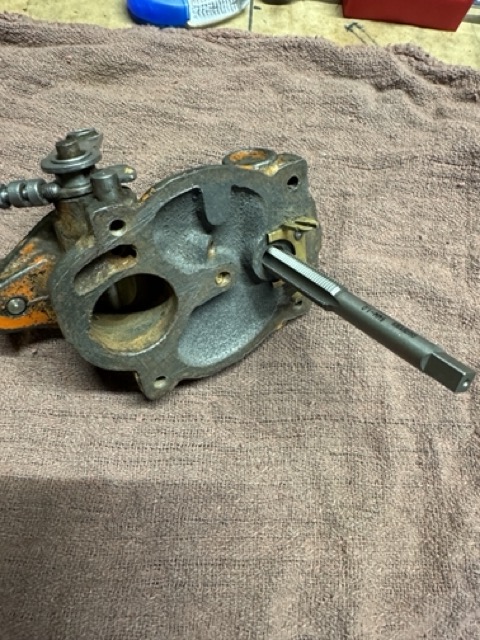
Reassembled and will put it back on tomorrow. I am always amazed how many little parts there are and yet quite simple overall!
< id="idg-io-safe-browsing-enabled" ="" oninit="true">
Edited by CA13414 - 29 Mar 2024 at 7:14am
|
|
Helping the aged survive and thrive! 1953 CA
|
|
CA13414
Bronze Level
Joined: 25 Feb 2024
Location: Nebraska
Points: 61
|
Post Options
Thanks(0)
Quote Reply
Posted: 28 Mar 2024 at 9:44pm |
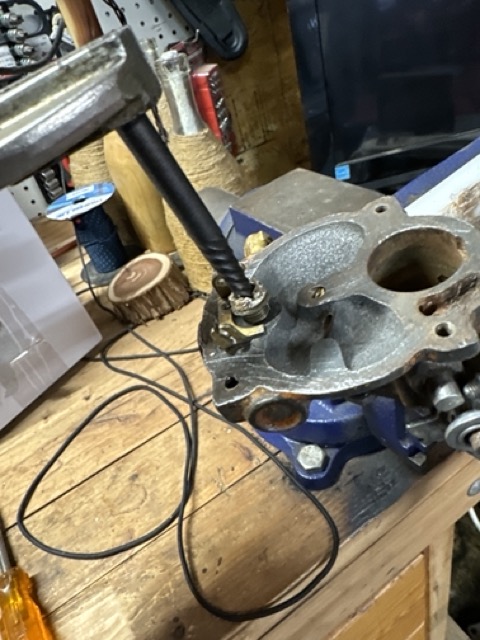
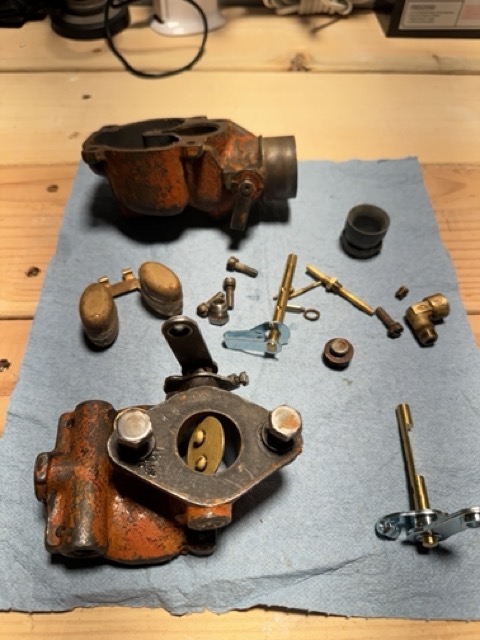
Pulled the carb and stripped it down. After a soak in the cleaner, it is now ready to reassemble.
 .
|
|
Helping the aged survive and thrive! 1953 CA
|
|
CA13414
Bronze Level
Joined: 25 Feb 2024
Location: Nebraska
Points: 61
|
Post Options
Thanks(0)
Quote Reply
Posted: 23 Mar 2024 at 9:42pm |
Power washed the whole unit. Took about 4 hours total with a ton of degreaser.
 . 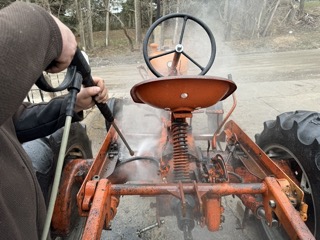
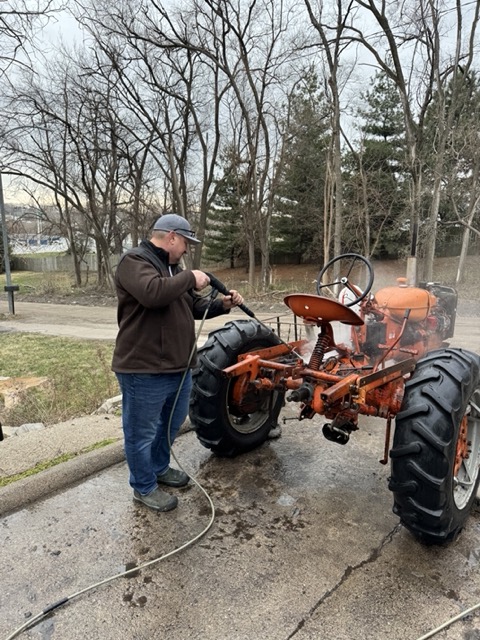
After power washing. Much better. Still needs a bit of "elbow grease" in a few spots.
Need to clean up the brake pad and drums within the axil. They both are are full of years of dirt, corn shucks and other. Weep holes are also plugged up!! Drums look Ok, and it looks the the pads have been replaced at some time. Will still replace them now since it is stripped down.
Also noted that all that the prior owner put wax plugs into each threaded hole in the chassis to prevent rusting. Someone who took care and thought ahead.
Before we tear it down to clean, repair and rebuild, and replace gaskets that are leaking, we did want to change out the muffler. OK, just wanted to put it on to see how it looked and sounded.
HOWEVER, as you might expect, I broke off the bolt in the exhaust manifold despite some heat. This was the bolt that passes completely into the manifold. The other one came out with a little heat from the torch.
Thus, our 5 min project became 90 min. We drilled out the bolt and retapped the manifold (used magnets to catch the shavings). Here it is with the new muffler which really changed the sound of the tractor. Sounds and looks awesome.
Has anyone ever used stainless steel bolts in the manifold to prevent future breakage?
Here is a link to the pre-wash and pre-"new muffler" run:
Here a link after we power washed and with the new muffler. Love the sound of the new muffler! Drove it outside and let it warm up! Is quite responsive and smooth, even with the governor, in increasing or decreasing throttle speed. :')
< id="idg-io-safe-browsing-enabled" ="" oninit="true">
Edited by CA13414 - 24 Mar 2024 at 1:25pm
|
|
Helping the aged survive and thrive! 1953 CA
|
|
CA13414
Bronze Level
Joined: 25 Feb 2024
Location: Nebraska
Points: 61
|
Post Options
Thanks(0)
Quote Reply
Posted: 23 Mar 2024 at 9:23pm |
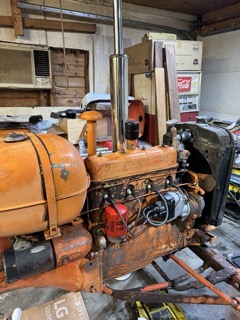
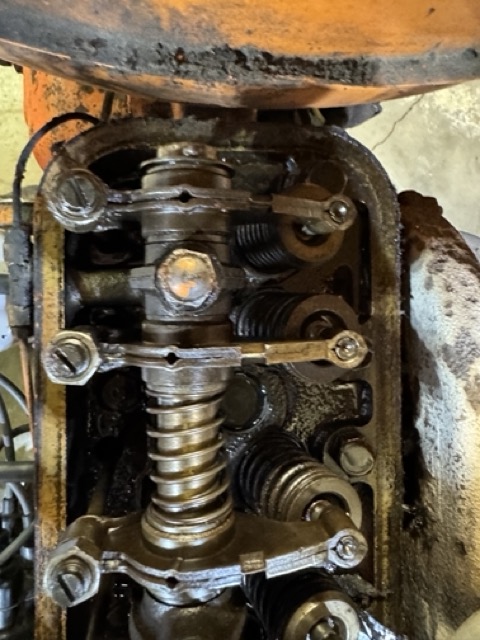
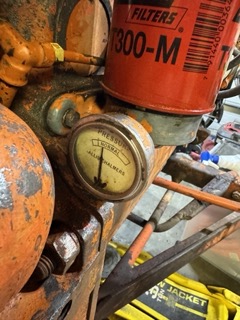
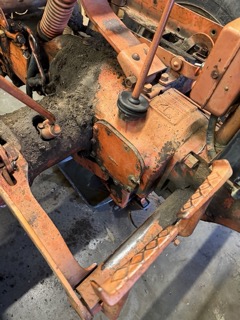
Changed the oil and filter today. Also took off the valve cover and was pleased to see this was very clean. Very easy to start and runs awesome.
After warming up the engine, the oil pressure at an idle was awesome! From others in the forum, would suspect this is 15 PSI.
We also checked the compression pressures in each cylinders. Cylinder #1: 130 PSI Cylinder #2: 135 PSI Cylinder #3: 135 PSI Cylinder #4: 130 PSI
These were awesome and better than expected. Great news!
I do not think we should do anything else with the engine but clean it up and work on the rest of the tractor.
I have no history on this unit, but I have to think this has been rebuilt with all the above. As well, I know the last owner did have the Mag rebuilt and put on a new water pump.
So overall excited about the condition of the engine.
< id="idg-io-safe-browsing-enabled" ="" oninit="true">
Edited by CA13414 - 25 Mar 2024 at 6:09am
|
|
Helping the aged survive and thrive! 1953 CA
|
|
CA13414
Bronze Level
Joined: 25 Feb 2024
Location: Nebraska
Points: 61
|
Post Options
Thanks(0)
Quote Reply
Posted: 17 Mar 2024 at 7:31pm |
Thanks you, appreciate the notion of sliding tires if too wide and being hard to stear. I do not want to tear up the grass, thus, maybe stick with a narrow flat profile tire vs. ribbed?
Thoughts on the rear tires?
< id="idg-io-safe-browsing-enabled" ="" oninit="true">
Edited by CA13414 - 17 Mar 2024 at 7:31pm
|
|
Helping the aged survive and thrive! 1953 CA
|
|
DiyDave
Orange Level Access

Joined: 11 Sep 2009
Location: Gambrills, MD
Points: 50660
|
Post Options
Thanks(0)
Quote Reply
Posted: 16 Mar 2024 at 4:11am |
I'd leave the front tires/rims stock. It has no PS, and the wider fronts are harder to steer with, and tend to skid more than turn... 
|
|
Source: Babylon Bee. Sponsored by BRAWNDO, its got what you need!
|
|
CA13414
Bronze Level
Joined: 25 Feb 2024
Location: Nebraska
Points: 61
|
Post Options
Thanks(0)
Quote Reply
Posted: 15 Mar 2024 at 8:58pm |
Questions for the group. Planning to use this not only for mowing, but also to grade/move sand. Any suggestions on tire size or type.
< id="idg-io-safe-browsing-enabled" ="" oninit="true">
Edited by CA13414 - 15 Mar 2024 at 9:47pm
|
|
CA13414
Bronze Level
Joined: 25 Feb 2024
Location: Nebraska
Points: 61
|
Post Options
Thanks(0)
Quote Reply
Posted: 15 Mar 2024 at 8:07pm |
Here is the unique Hough Farmall M that I rebuilt in HS. Not as nice as the prior post but the same model without the tin. Does need a little TLC from someone.
< id="idg-io-safe-browsing-enabled" ="" oninit="true">
Edited by CA13414 - 15 Mar 2024 at 8:34pm
|
|
Steve in NJ
Orange Level Access

Joined: 12 Sep 2009
Location: Andover, NJ
Points: 11569
|
Post Options
Thanks(0)
Quote Reply
Posted: 14 Mar 2024 at 7:32pm |
Sounds like a family affair goin' on there!! Keep us posted! We love pics to! When the time comes and you need wiring for that puppy, keep us in mind. Good Luck! Steve@B&B bb-customcircuits.com
|
|
39'RC, 43'WC, 48'B, 49'G, 50'WF, 65 Big 10, 67'B-110, 75'716H, 2-620's, & a Motorhead wife
|
|