| Author |
 Topic Search Topic Search  Topic Options Topic Options
|
55allis 
Orange Level

Joined: 30 Jun 2020
Location: Southwest IA
Points: 540
|
 Post Options Post Options
") Thanks(0) Thanks(0)
 Quote Quote  Reply Reply
 Posted: 07 Dec 2021 at 10:53am Posted: 07 Dec 2021 at 10:53am |
|
That’s a good idea with adding a grease fitting to the hand clutch lever, wonder why Allis didn’t do that?
Now it’s going to be better than new!!!
|
 |
|
Sponsored Links
|
|
|
Jtaylor
Bronze Level

Joined: 11 Oct 2021
Location: Barrie, Ontario
Points: 194
|
Post Options
Thanks(0)
Quote Reply
Posted: 10 Dec 2021 at 6:30am |
some more small progress.
I thought i would try to extract the brake pins on the rear of the tractor. I have soaked them in penatrating fluid for the last couple weeks. No such luck with the removal. Not only did my $75 tool from DJS break, i also ripped the head off the right side pin..
These are really stuck! Looks like i will be cutting it out with the plasma this weekend.. not entirely the way i wanted to have these done. but.. better now than later. I need to re-line the shoes regardless. lets see what else i can break!
on another note, The starter rod was extra bent, Did not resemble the loop anymore at the top and the lower 90* bend was 45*. so, I used a bit of heat and bent it back. now it matches the choke lever.
|
|
IBWD MIke
Orange Level

Joined: 08 Apr 2012
Location: Newton Ia.
Points: 3436
|
Post Options
Thanks(0)
Quote Reply
Posted: 10 Dec 2021 at 9:04am |
|
I have a puller I made very similar to yours, sad part is, that's what happens most of the time! I have cut them out with a torch a couple of times. Last one I did I drilled and tapped and pulled that way.
|
|
Sugarmaker
Orange Level

Joined: 12 Jul 2013
Location: Albion PA
Points: 8167
|
Post Options
Thanks(0)
Quote Reply
Posted: 13 Dec 2021 at 6:33am |
Justin, One of the tougher jobs on these tractors for sure. Most of them only come out once in the life of the tractor. I had to torch one and the other fell out. I used a mirror to not have hot parts falling on my head. Cut out a small section, drive the outside pin inboard, cut again till its out. Get a hold of the inside piece and it should slip right out. The pull handles look great! Its amazing how many details there are to getting one of these back to good working order! Thanks for the updates. Regards, Chris
|
|
D17 1958 (NFE), WD45 1954 (NFE), WD 1952 (NFE), WD 1950 (WFE), Allis F-40 forklift, Allis CA, Allis D14, Ford Jubilee, Many IH Cub Cadets, 32 Ford Dump, 65 Comet.
|
|
Jtaylor
Bronze Level
Joined: 11 Oct 2021
Location: Barrie, Ontario
Points: 194
|
Post Options
Thanks(0)
Quote Reply
Posted: 13 Dec 2021 at 6:52am |
This weekend was full of small items. Getting these small things checked off and put away until we are ready to reinstall them.
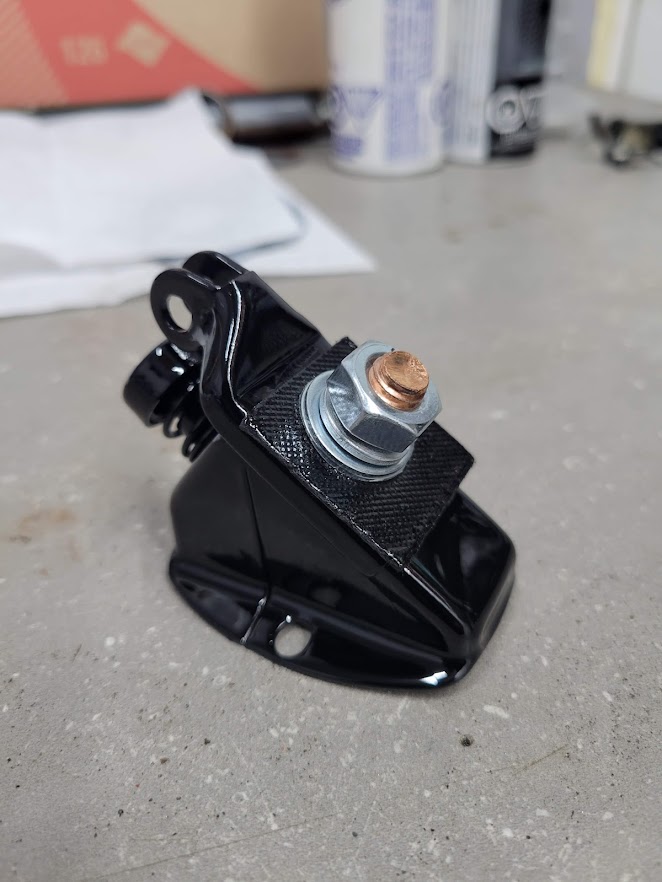
starter rebuild. New starter switch, cleaned the starter and fresh paint ( i know, it is not orange, but i thought a bit of contrast would look good here. may change it up if needed. )
Carb rebuild went better than expected. media blasted the carb and cleaned thoroughly. installed my platinum kit including shafts and it now is better than ever. I will be pulling it back apart at some point to paint it orange. but for now its super nice and clean!
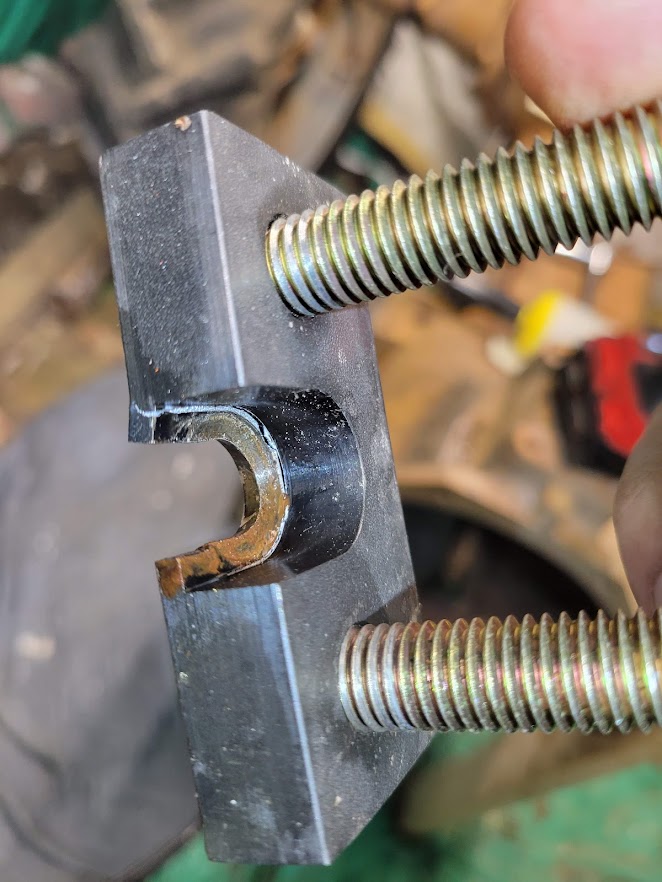
And the hand clutch is finished until paint. I got the last bushing fit into place (did not want to braze it back together and couldn't weld the cast correctly so i enlarged the hole and installed the bushing with a special metal bonding epoxy that will keep it in place for another 50+ years!
one of these days i will get the brake pins out. hopefully it goes smoother than it did saturday. will likely need oxy/acetylene to cut it out. my plasma cutter is only good for 1/2" unfortunately.
|
|
IBWD MIke
Orange Level
Joined: 08 Apr 2012
Location: Newton Ia.
Points: 3436
|
Post Options
Thanks(0)
Quote Reply
Posted: 13 Dec 2021 at 8:19am |
|
You're definitely going the extra mile with all the new bushings. I thought about that on mine but was lucky enough to find good used parts.
|
|
Eric B
Orange Level

Joined: 09 Feb 2012
Location: British Columbi
Points: 887
|
Post Options
Thanks(0)
Quote Reply
Posted: 13 Dec 2021 at 1:03pm |
Wow!! that has got to be the best looking carb I have ever seen, that was an at home refurbished job! Have you tried rattling the brake pin with an air chisel/hammer while and using penetrating spray between applications? It worked very well on my B.
|
|
Currently- WD,WC,3WF's,2 D14's B. Previously- I 600,TL745,200,FL9,FR12,H3,816 LBH. Earth has no sorrow that Heaven cannot heal!
|
|
Jtaylor
Bronze Level
Joined: 11 Oct 2021
Location: Barrie, Ontario
Points: 194
|
Post Options
Thanks(0)
Quote Reply
Posted: 13 Dec 2021 at 1:15pm |
 Eric B wrote: Eric B wrote:
Wow!! that has got to be the best looking carb I have ever seen, that was an at home refurbished job!Have you tried rattling the brake pin with an air chisel/hammer while and using penetrating spray between applications? It worked very well on my B. |
I was actually just doing some reading, A lot of guys mention to do that. I will be grabbing some tools likely tonight and see if i can get it to budge. I have penetrating spray on it now for the last couple weeks. I burnt out all the mouse nests and have pulled the tires off to get access. hopefully i can get it to wiggle. I was also thinking of a slide hammer to make it move.
currently it has pressure against it with a large socket and a 3/8" bolt pulling. maybe i can get it to move with the air hammer? definitely worth a try!
|
|
steve(ill)
Orange Level Access

Joined: 11 Sep 2009
Location: illinois
Points: 77638
|
Post Options
Thanks(0)
Quote Reply
Posted: 13 Dec 2021 at 3:22pm |
|
air hammers are great...The constant pounding is better than swinging a 5 pound sledge 100 times ! ..... the SHOCK load is the secret.
|
|
Like them all, but love the "B"s.
|
|
Jtaylor
Bronze Level
Joined: 11 Oct 2021
Location: Barrie, Ontario
Points: 194
|
Post Options
Thanks(0)
Quote Reply
Posted: 14 Dec 2021 at 7:31am |
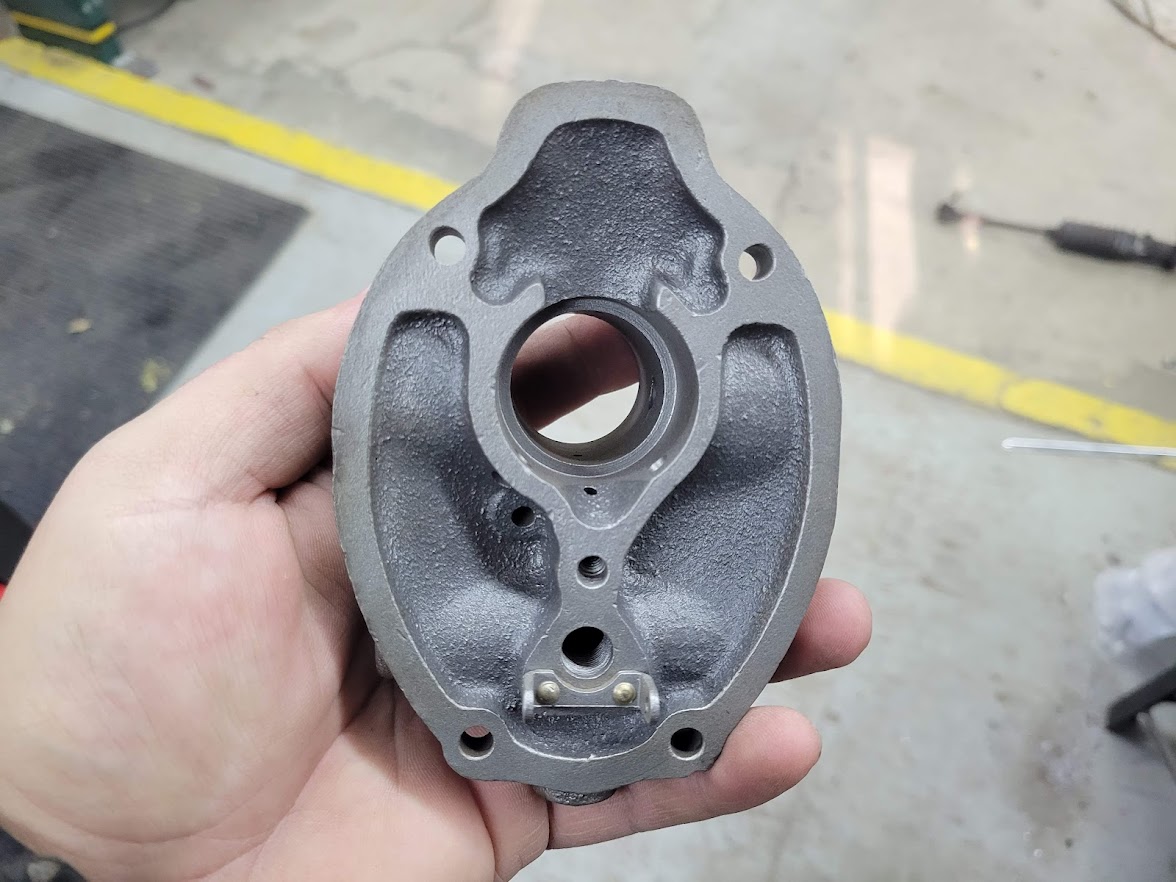
I cleaned up the throwout bearing including new bearing installation. shot some grease through the zerk and cleaned all the 20+ year old grease from it. turned out great! very easy to do.
I also cleaned the throwout fork and pivot rod as well. no pitting and is very clean. good for re-use.
|
|
Jtaylor
Bronze Level
Joined: 11 Oct 2021
Location: Barrie, Ontario
Points: 194
|
Post Options
Thanks(0)
Quote Reply
Posted: 17 Dec 2021 at 6:58am |
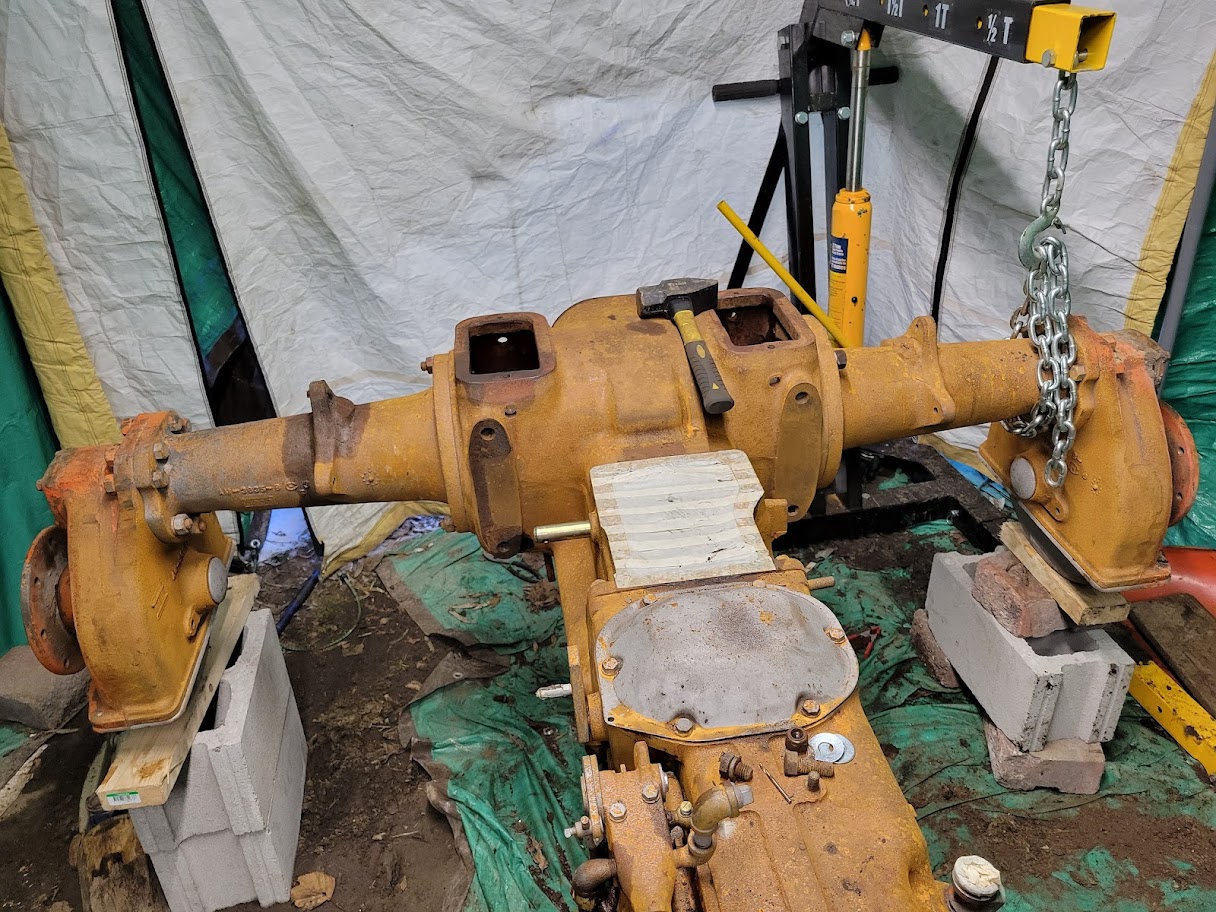
Made some progress on the rear brakes. not as much as i'd hope though. slow and steady.
I ended up cutting the brake pin very close to the shoes with a sawzall. The inside part of the pin came out with a set of needle nose pliers as many had mentioned. the outside is sure stuck! MAP gas and an air hammer will not touch it. it looks like i will need to pull the axle out and get a good smack with a sledge hammer to try and move the pin..
I was able to wiggle the brake shoes out of place with a bit of patience. The front brake shoe was seized to the pin but easily freed up this was 4 hours worth of work and the pin is still stuck in the cast housing.
here is some photo
|
|
Sugarmaker
Orange Level
Joined: 12 Jul 2013
Location: Albion PA
Points: 8167
|
Post Options
Thanks(0)
Quote Reply
Posted: 19 Dec 2021 at 6:34am |
Justin, Cleaned up parts and carb look good! You may need the extra heating ability of the oxy accetylene to heat that casting around the stuck lower pin. You are almost there. Regards, Chris
|
|
D17 1958 (NFE), WD45 1954 (NFE), WD 1952 (NFE), WD 1950 (WFE), Allis F-40 forklift, Allis CA, Allis D14, Ford Jubilee, Many IH Cub Cadets, 32 Ford Dump, 65 Comet.
|
|
Jtaylor
Bronze Level
Joined: 11 Oct 2021
Location: Barrie, Ontario
Points: 194
|
Post Options
Thanks(0)
Quote Reply
Posted: 19 Dec 2021 at 7:44pm |
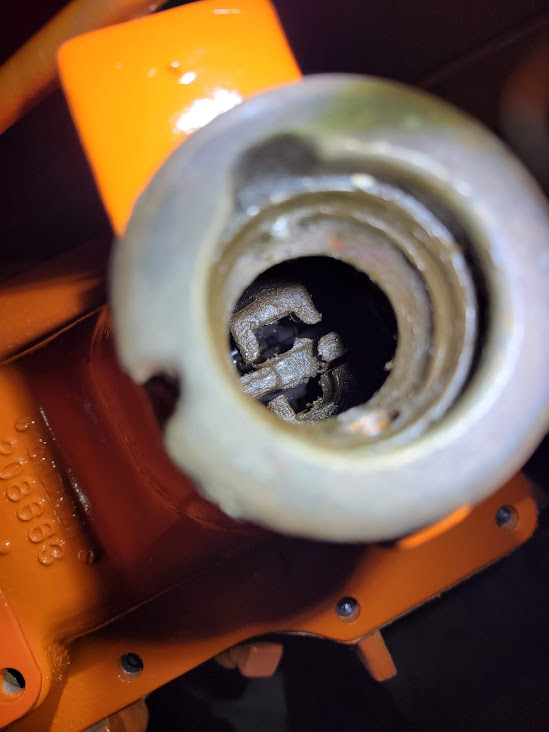
The weekend that never seemed to end!
here is some photos of the pin removal. Still ended up removing both left and right axle assemblies to complete the job. many, MANY broken bolts, swear words and all of 10 hours to complete. here is some photos of the journey. disregard the messy area. a bit fed up at the time of the photos to clean up anything. Also no photos of the pins removed.. they went straight into the garbage with no signs of ever returning.
I have one stubborn fender bolt to remove in the cast on the right side of the tractor. After that last bolt is removed i can do the final cleanup prior to primer. Looks like i have some brake pins to order up!
|
|
Jtaylor
Bronze Level
Joined: 11 Oct 2021
Location: Barrie, Ontario
Points: 194
|
Post Options
Thanks(0)
Quote Reply
Posted: 19 Dec 2021 at 7:48pm |
I also was able to make some progress on the carb. Take a look at the before and after photos here. on the shelf marked as complete. Nice to see something orange for once instead of rust color.
|
|
plummerscarin
Orange Level Access
Joined: 22 Jun 2015
Location: ia
Points: 3109
|
Post Options
Thanks(0)
Quote Reply
Posted: 19 Dec 2021 at 8:45pm |
|
Looking good. Keep it up
|
|
Eric B
Orange Level
Joined: 09 Feb 2012
Location: British Columbi
Points: 887
|
Post Options
Thanks(0)
Quote Reply
Posted: 20 Dec 2021 at 12:10pm |
You've got the best looking carb on the continent!!! 
|
|
Currently- WD,WC,3WF's,2 D14's B. Previously- I 600,TL745,200,FL9,FR12,H3,816 LBH. Earth has no sorrow that Heaven cannot heal!
|
|
Jtaylor
Bronze Level
Joined: 11 Oct 2021
Location: Barrie, Ontario
Points: 194
|
Post Options
Thanks(0)
Quote Reply
Posted: 20 Dec 2021 at 1:00pm |
Eric B wrote:
You've got the best looking carb on the continent!!! |
I appreciate that! Thank you!
|
|
Jtaylor
Bronze Level
Joined: 11 Oct 2021
Location: Barrie, Ontario
Points: 194
|
Post Options
Thanks(0)
Quote Reply
Posted: 27 Dec 2021 at 8:28pm |
We have some progress!
I was able to borrow a local friends cannon style heater (sorry for the off brand photos)
This bad boy was able to keep the tarp shed at a nice 80*f on low and pumped out almost 125*f when full blast. This made paint curing a dream considering the circumstances.
after 2 coats of primer in place, i was able to let it flash over for 2 hours on mild heat to cure it enough to top coat.
i also made a nice wire hanger for the pedals and other odds and sods
the frame rails were coated 2 layers on both sides, then i applied a glaze overtop to fill some blemishes. not looking for perfect but getting close. more photos on that later!
mixing some of that persian orange #1 prior to painting.
And........... We have paint!
After 3 coats (one light coat to the corners and edges, 2 over the complete chassis) we have some good progress. once the frame rails are complete, this will allow me to assemble the pedal assembly and install some other odds and sods that we can move out of the way. for the rear chassis side of things, it looks like we are just over the halfway point. Still lots of bolts to clean and paint.
|
|
Sugarmaker
Orange Level
Joined: 12 Jul 2013
Location: Albion PA
Points: 8167
|
Post Options
Thanks(0)
Quote Reply
Posted: 28 Dec 2021 at 5:49pm |
Aaaah Fresh Orange paint! I love it! Almost make me want to tear into another one! Maybe this summer?? Looking really good! Good detailing on the carb too. Stay at it. It will be spring before you know it! Regards, Chris
|
|
D17 1958 (NFE), WD45 1954 (NFE), WD 1952 (NFE), WD 1950 (WFE), Allis F-40 forklift, Allis CA, Allis D14, Ford Jubilee, Many IH Cub Cadets, 32 Ford Dump, 65 Comet.
|
|
55allis
Orange Level
Joined: 30 Jun 2020
Location: Southwest IA
Points: 540
|
Post Options
Thanks(0)
Quote Reply
Posted: 28 Dec 2021 at 8:14pm |
|
I’ve always thought the carbs were black, that what I painted all of mine.
I know the air cleaner is originally black, on the back side of my Wd one was/is black. But it looks sweet anyway!!!
|
|
Sugarmaker
Orange Level
Joined: 12 Jul 2013
Location: Albion PA
Points: 8167
|
Post Options
Thanks(0)
Quote Reply
Posted: 29 Dec 2021 at 5:06am |
Humm, Only black I know of was the light housings and maybe the starter? There is a picture of them spraying one in the factory and it looks like everything is orange to me. Keep cleaning and painting. Its going to look real good! Regards, Chris
|
|
D17 1958 (NFE), WD45 1954 (NFE), WD 1952 (NFE), WD 1950 (WFE), Allis F-40 forklift, Allis CA, Allis D14, Ford Jubilee, Many IH Cub Cadets, 32 Ford Dump, 65 Comet.
|
|
Jtaylor
Bronze Level
Joined: 11 Oct 2021
Location: Barrie, Ontario
Points: 194
|
Post Options
Thanks(0)
Quote Reply
Posted: 29 Dec 2021 at 5:49am |
55allis wrote:
I’ve always thought the carbs were black, that what I painted all of mine.
I know the air cleaner is originally black, on the back side of my Wd one was/is black. But it looks sweet anyway!!! |
I was curious on this as well. I watched a bunch of videos and talked with a lot of local farmers here before pulling the trigger on the orange. I did watch a dealer video last evening showing the whole kit and caboodle being painted orange aside from the headlights which were black.
|
|
Jtaylor
Bronze Level
Joined: 11 Oct 2021
Location: Barrie, Ontario
Points: 194
|
Post Options
Thanks(0)
Quote Reply
Posted: 29 Dec 2021 at 5:58am |
Some progress made on the frame rails and a few other odds and sods. some touchup to some pieces as well.
here is the frame rails after a sealer and a coat of dolphin glaze applied. my goal here was to smooth out some of the metal imperfections rather than level the frame rail completely. I also used a bit of leftover orange as a light mist over the glaze. when i sanded it allowed me to see how much i was taking off. left frame rail complete, right still to do.
I followed this with some 2k primer. The same as the chassis was done in. this built it up a bit more prior to the top coat of orange. Check out how smooth these look now!
and our final top orange coat. it looks much nicer in person to be honest. I am letting it outgas a bit more today then i will flip the rails and finish with a couple coats on the inside. should be headed back together in the next couple days.
|
|
Sugarmaker
Orange Level
Joined: 12 Jul 2013
Location: Albion PA
Points: 8167
|
Post Options
Thanks(0)
Quote Reply
Posted: 29 Dec 2021 at 1:57pm |
Justin, Very slick! Regards, Chris
|
|
D17 1958 (NFE), WD45 1954 (NFE), WD 1952 (NFE), WD 1950 (WFE), Allis F-40 forklift, Allis CA, Allis D14, Ford Jubilee, Many IH Cub Cadets, 32 Ford Dump, 65 Comet.
|
|
Jtaylor
Bronze Level
Joined: 11 Oct 2021
Location: Barrie, Ontario
Points: 194
|
Post Options
Thanks(0)
Quote Reply
Posted: 06 Jan 2022 at 10:32am |
not much of an update at the moment, waiting on parts and pieces to arrive before we continue with everything.
floating brake pedal and clutch pedal have been sent to the machine shop to get bored out for a couple of bushings to tighten things up.
Engine block is cleaned and ready to hit the machine shop today. we will get the liner height set and the deck cleaned first, then will send the head in for valve cleanup and checking it for flatness as well as the crankshaft turn. I will be putting in new camshaft bushings at the same time as well.
here is some photos of the engine block cleanup prior to the machine shop. as far as i can see, this is the original engine for the tractor.
|
|
JK in Pa
Bronze Level

Joined: 12 Sep 2009
Location: Dushore, Pa.
Points: 159
|
Post Options
Thanks(0)
Quote Reply
Posted: 06 Jan 2022 at 11:39am |
|
I agree with that being the original block. I have never seen a 40 series block cracked between liners. I hope the bottom is ok. You are doing a fantastic job.
|
|
Jtaylor
Bronze Level
Joined: 11 Oct 2021
Location: Barrie, Ontario
Points: 194
|
Post Options
Thanks(0)
Quote Reply
Posted: 06 Jan 2022 at 1:34pm |
JK in Pa wrote:
I agree with that being the original block. I have never seen a 40 series block cracked between liners. I hope the bottom is ok. You are doing a fantastic job. |
Bottom looks really good on this block. 2 top webs cracked on this one. Odd that you have never seen a 40 series block cracked like this. I have 2 40 series blocks here that are cracked. this one on the top, and the other one on the bottom causing water into the bottom end.
|
|
Jtaylor
Bronze Level
Joined: 11 Oct 2021
Location: Barrie, Ontario
Points: 194
|
Post Options
Thanks(0)
Quote Reply
Posted: 10 Jan 2022 at 8:38am |
A super large weekend update here!
got my new parts order in from DJS tractor supply. it was another $700. it included some odds and sods including the battery box. I figured I would start stripping the dash panel apart and get the dents beat back out and ready for paint. the powder coat job was nice on the battery box just the color was a bit off. I will need to fix that.
Also a comparison of the new gauges vs the old.
I also relined and cleaned up the brake shoes for reinstallation. Installed with new brake pins and left adjustment loose until we are ready to get everything back together.
lots of anti-seize here
I also was able to get a WD45 crankshaft from another local puller (Thanks Rick!) i just had to pull it from the original engine. After being a bit frozen, I was able to free it up and pull it for the machine shop. 4.5" stroke here we come!
just a bit of cleanup needed for the crankshaft. STD size to boot!
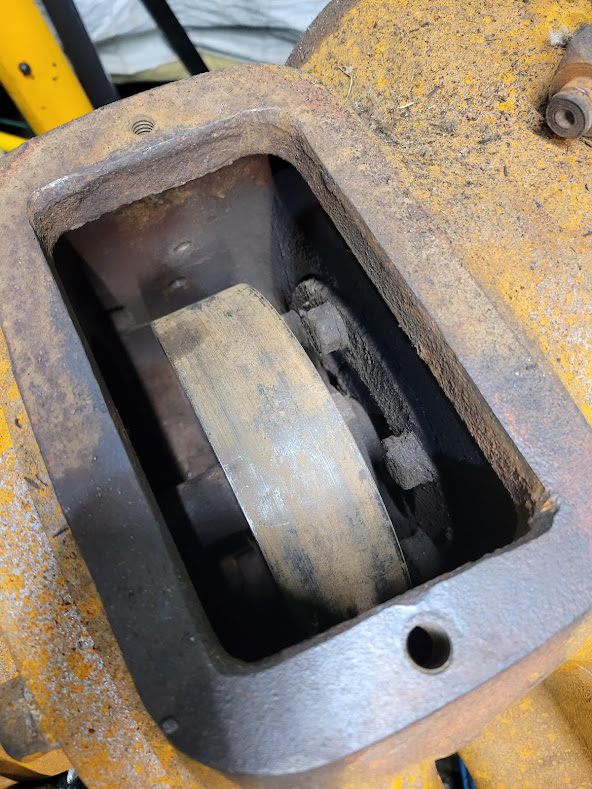
I also thought it would be a good idea to find out why the shifter would constantly shift past 2nd and reverse. So i pulled the transmission shifter assembly apart to find out. Those little detent balls sure have some force behind them! luckily no missing hardware on disassembly.
From above, it did not look all that bad aside from some minor wear here and there.
the forks themselves said otherwise once pulled apart. Lots of repairs to do here.
Stay tuned for more in the next few days.
|
|
Sugarmaker
Orange Level
Joined: 12 Jul 2013
Location: Albion PA
Points: 8167
|
Post Options
Thanks(0)
Quote Reply
Posted: 10 Jan 2022 at 9:13am |
For some reason I am getting the feeling that Justin has been holding out on us a little!:) This does not seem to be his first rodeo with these old orange tractors! Doing a great job bringing this WD back to better than new condition! 45 innards! Did you get a 45 head, carb and air cleaner to round out the breathing components, for the rebuild? Thanks for the updates! Your progress is good! The rebuild/ repair on the shifter items is key to improving the chance of finding a incorrect gear or getting stuck in neutral. I did some work to improve one of mine and it is way better. But it still got stuck once, where I had to pull the shifter. pop it in neutral and reinstall. Regards, Chris
Edited by Sugarmaker - 10 Jan 2022 at 9:18am
|
|
D17 1958 (NFE), WD45 1954 (NFE), WD 1952 (NFE), WD 1950 (WFE), Allis F-40 forklift, Allis CA, Allis D14, Ford Jubilee, Many IH Cub Cadets, 32 Ford Dump, 65 Comet.
|
|
Jtaylor
Bronze Level
Joined: 11 Oct 2021
Location: Barrie, Ontario
Points: 194
|
Post Options
Thanks(0)
Quote Reply
Posted: 10 Jan 2022 at 9:29am |
Sugarmaker wrote:
For some reason I am getting the feeling that Justin has been holding out on us a little!:) This does not seem to be his first rodeo with these old orange tractors! Doing a great job bringing this WD back to better than new condition! 45 innards! Did you get a 45 head, carb and air cleaner to round out the breathing components, for the rebuild? Thanks for the updates! Your progress is good! The rebuild/ repair on the shifter items is key to improving the chance of finding a incorrect gear or getting stuck in neutral. I did some work to improve one of mine and it is way better. But it still got stuck once, where I had to pull the shifter. pop it in neutral and reinstall. Regards, Chris
|
Chris, First time with orange tractors! lots of other builds in the past though. .
I have a complete 45 spare motor now that I pulled the crank from if needed. Although, my original engine had a tall head assembly, TSX464 carb is already on it and ready to go with the recent rebuild. just need to find an air cleaner and we are back to the races.
I will play with the shifter. Anything is better then it is currently.
|
|