| Author |
 Topic Search Topic Search  Topic Options Topic Options
|
Brian G. NY 
Orange Level


Joined: 12 Sep 2009
Location: 12194
Points: 2198
|
 Post Options Post Options
") Thanks(0) Thanks(0)
 Quote Quote  Reply Reply
 Posted: 15 Apr 2020 at 8:47pm Posted: 15 Apr 2020 at 8:47pm |
The "tall" head was introduced in 1951 with Engine #WD289001. I think the distributer drive housing with the newer oil filler cap was also changed shortly after that but I don't know exactly when. My '51 WD has the old style oil filler but my brother's '52 (Ser. #WD116619) had the newer oil flller cap. When my Dad and I rebuilt his WD back in 1958 we put the 4-1/8" overbore kit in it. Lots of people called that the WD-45 kit but that's far from the truth......without that extra 1/2" of stroke, a WD is no match for a WD-45.
|
 |
|
Sponsored Links
|
|
|
wjohn
Orange Level

Joined: 19 Jan 2010
Location: KS
Points: 1799
|
Post Options
Thanks(0)
Quote Reply
Posted: 15 Apr 2020 at 9:38am |
I was able to spend a couple more hours on this finally. Pulled the oil pan and didn't see anything obviously scary. I spent some time brushing up on Don's oil pan gasket installation instructions and making a list of parts I need to order. I'm planning on getting the Fel-Pro oil pan gasket kit.
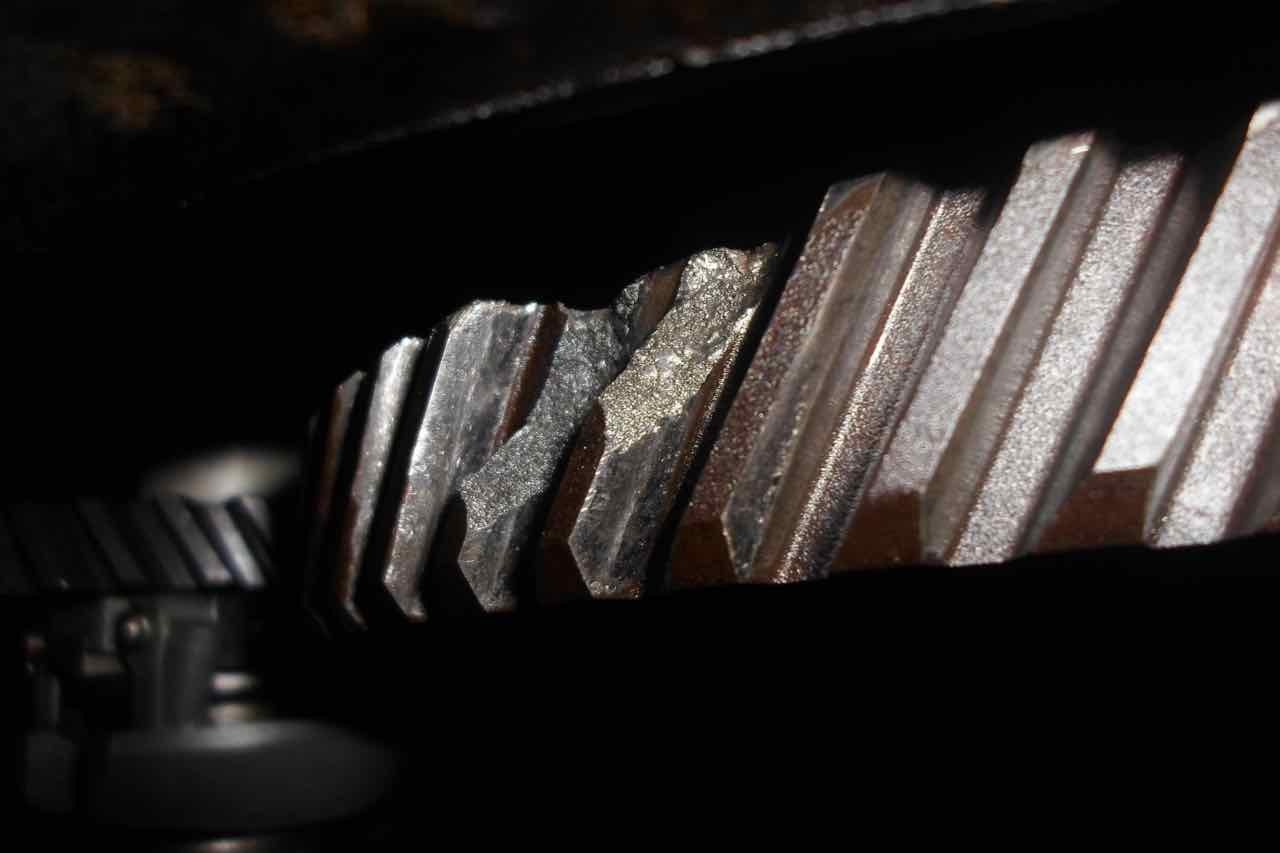
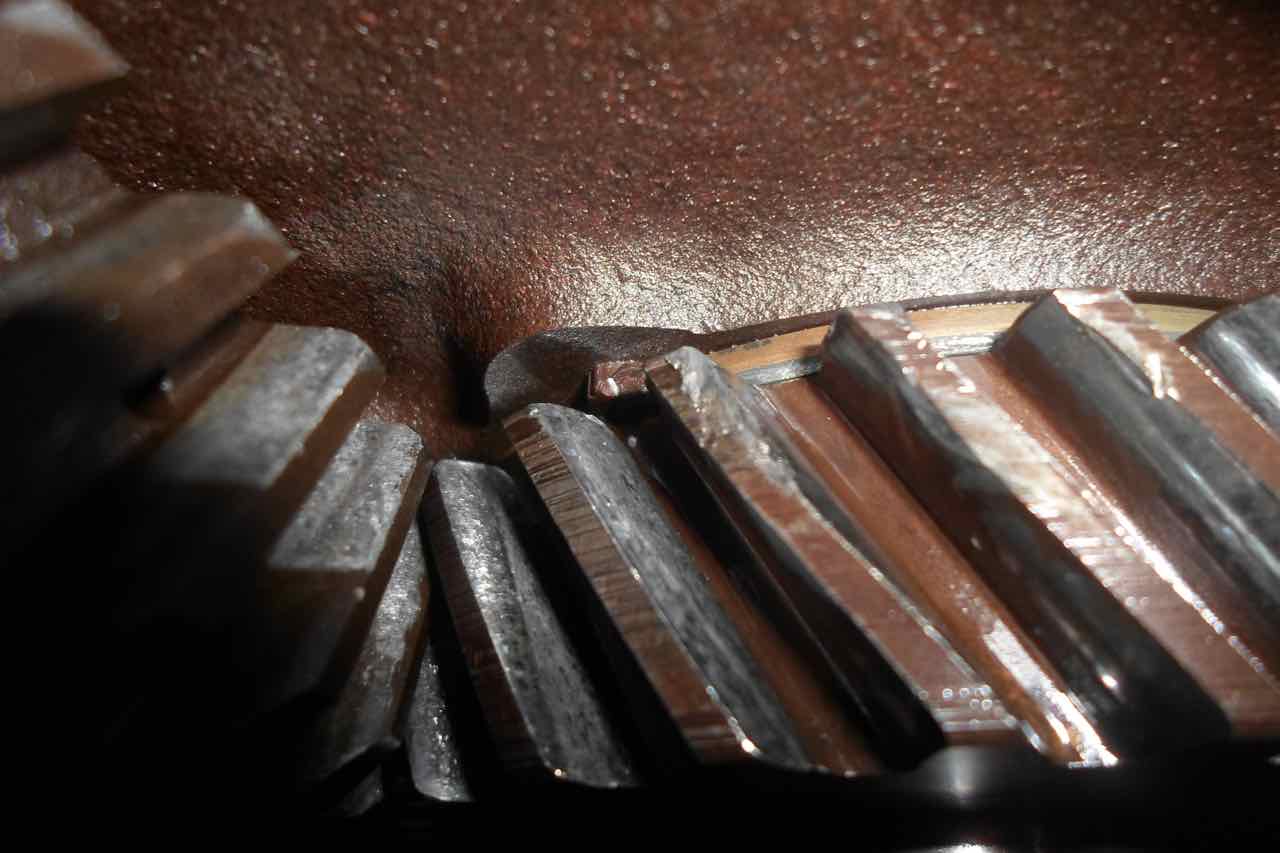
Pulled the timing cover up front and found some broken gear teeth. Those are probably from when the original governor fell apart. The camshaft gear seems to have borne the brunt of it and the crank drive gear just has minor damage.
Should I be worried about that camshaft gear? The tractor sounded great when I tore it apart to fix the rear engine oil leak, but I'd hate for the rest of those two teeth to shear off at a random time in the future. I'm leaning towards finding a replacement unless the experienced folks on here have seen worse.
|
|
1939 B, 1940 B, 1941 WC, 1951 WD, 1952 CA, 1956 WD-45
|
|
Sugarmaker
Orange Level

Joined: 12 Jul 2013
Location: Albion PA
Points: 8167
|
Post Options
Thanks(0)
Quote Reply
Posted: 29 Sep 2019 at 7:39pm |
wjohn, If the brass collar does have much wear you will be good to go. So saving money can be a factor in these project! It can get out of hand and every thing can be replaced!:)
One other thing some folks do is to run the same fluid in both compartments. Just have to check because one is at a different level. Cant remember which is higher?? Your moving right along! Regards, Chris
|
|
D17 1958 (NFE), WD45 1954 (NFE), WD 1952 (NFE), WD 1950 (WFE), Allis F-40 forklift, Allis CA, Allis D14, Ford Jubilee, Many IH Cub Cadets, 32 Ford Dump, 65 Comet.
|
|
wjohn
Orange Level
Joined: 19 Jan 2010
Location: KS
Points: 1799
|
Post Options
Thanks(0)
Quote Reply
Posted: 29 Sep 2019 at 7:28pm |
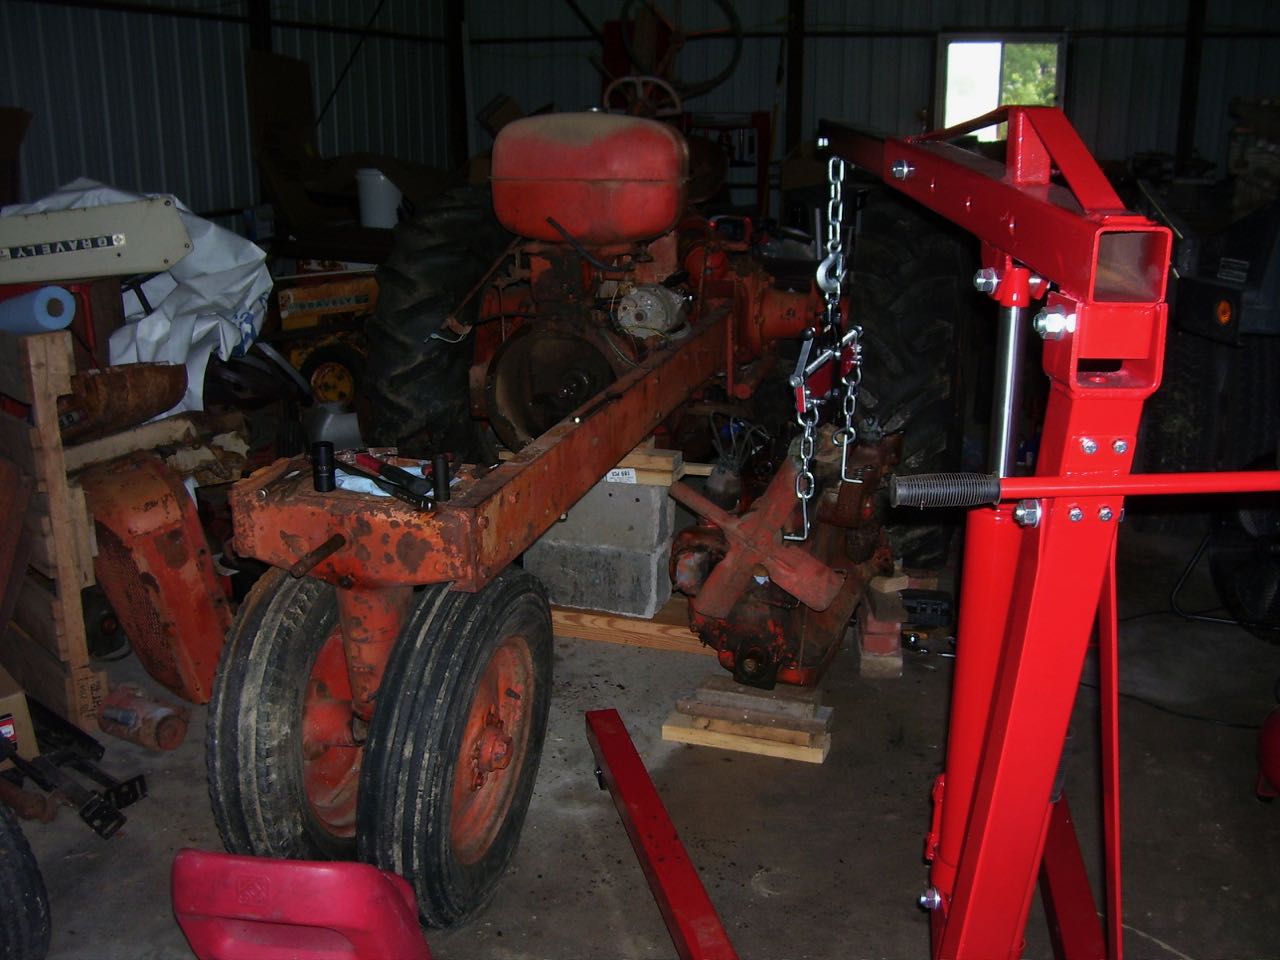
The only thing that kept me from mounting the stand and engine was that I need two more bolts 1" longer than what I have. I'll pick them up after work sometime next week. Then I'll pull the pan and crank seals. Pretty soon I'll need to actually order my list of parts that I keep adding to!
I can't get a useable picture of the grooves of the clutch disks but I took a rough eyeball/caliper measurement of the thickness and got 3 mm which is just slightly over your 0.10" measurement. I'm sure mine would measure out close to that if I took them apart and actually got the calipers on both surfaces. Regardless, they seem to be plenty thick plus the fact that I can still peek at the grooves.
Thanks for the tip on the brass collar. I checked and mine has some play in it but hopefully not so much that it might break anytime soon? It had oil in it, but it sat in a shed for several (maybe 10) years. $200 is enough to make me stop and think I can make it for quite awhile longer, and it looks like I don't have to split anything to replace it if I do get around to it later. Bad idea?
The hand clutch shaft came out today as well as the seal. Not too bad of a job since I already have the RH frame rail off.
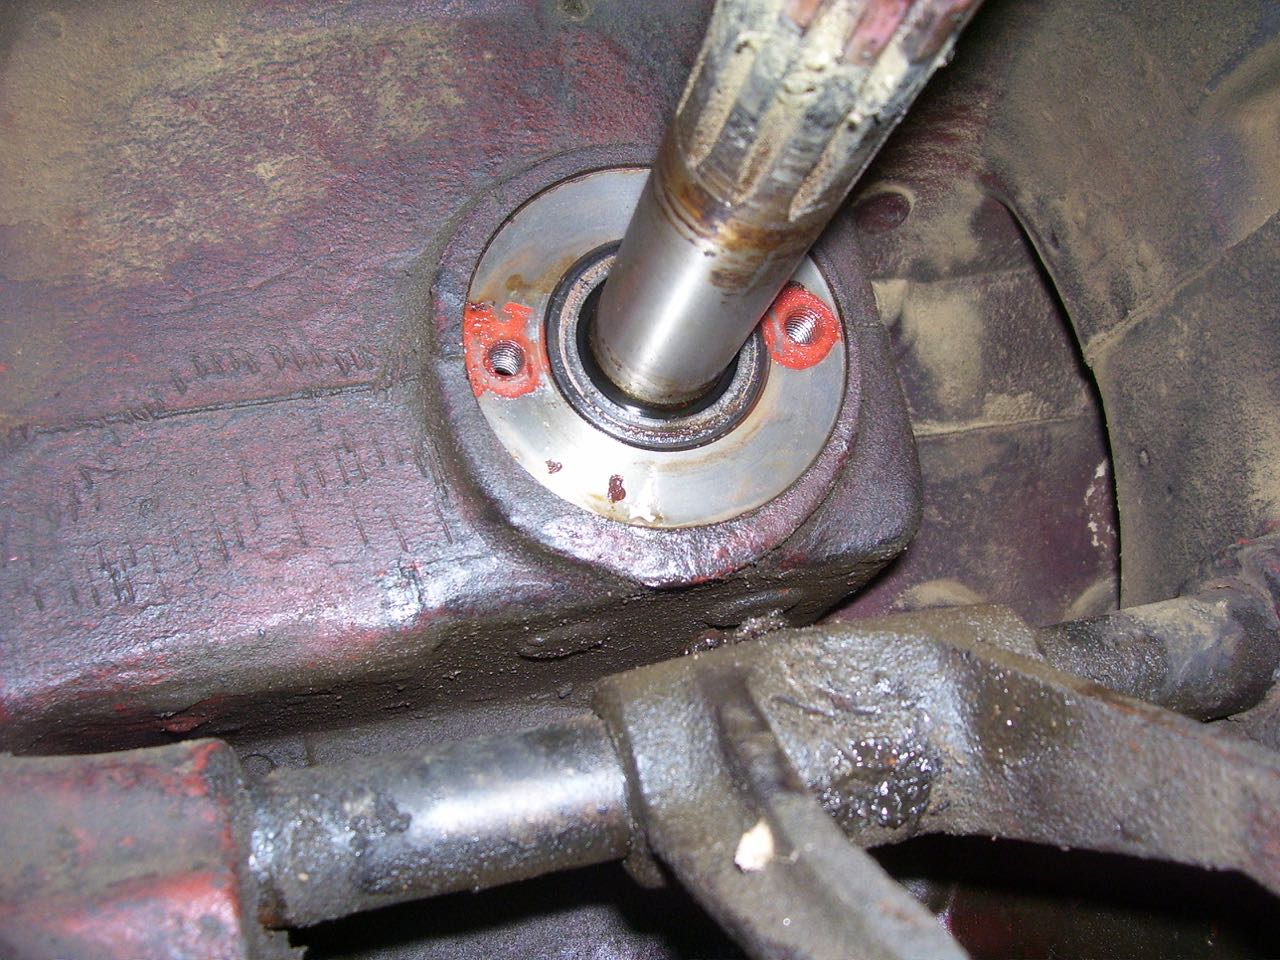
I also took a peek at the front input shaft seal and decided it's definitely leaking... Plenty wet with oil. Hopefully I can pull that out from the front and drive in a new seal over the shaft?
Although I also got to thinking the only other seal that would be easier to get to now is the one between the hydraulic oil chamber and the rest of the transmission that keeps the fluids from mixing... I think I should probably pull a few more things apart and replace those while I'm this far, unfortunately.
|
|
1939 B, 1940 B, 1941 WC, 1951 WD, 1952 CA, 1956 WD-45
|
|
Sugarmaker
Orange Level
Joined: 12 Jul 2013
Location: Albion PA
Points: 8167
|
Post Options
Thanks(0)
Quote Reply
Posted: 29 Sep 2019 at 12:28am |
wjohn,
A trick I learned on the engine mounting to the stand, which maybe your already doing? I took the pivoting head out of the stand and then worked with just it, on the back of the engine. When I got it fit and secured, then could just lift/ tilt the engine stand base to slide it on to the pivot portion. It was one of those Duh moments for me, but I have a lot of those! I have not had a WD clutch opened up recently. They are a 2 plate clutch vs a 3 plate in a WD45. Here is a picture of the 45 clutch I did last spring. This was before the rebuild I believe.
This was the worn plate, which was working when removed: ( Yes the grooves were about gone, and cleaning didn't improve them.)
Also what a new replacement hand clutch plate looks like. I think it was .100 thick? around $80.
Yours is a little bit rustier, but if the drive plates are Ok then it may be fine. Maybe snap open the hand clutch and take another picture of the plates of the hand clutch? Hard for me to see the drive plates in your picture? You have a lot of shims left so it has not been adjusted recently.
Check for play in the brass collar. Now is the time to replace if its worn bad. They get worn on the inside as that gets moved back and fourth. It looks like your hand clutch area may not have had oil in it for some time? Was it full? One of mine failed due to lack of oil or years of wear? Actually broke the brass and rendered that hand clutch inoperable. The new brass collars are not a cheap date either. Around $200.
While you have that frame fail off, is the time to service the oil seal on the hand clutch pivot rod if it needs it too.
Your doing good checking it out as you go.
I do know that Nic's old WD with a new brass collar and no clutch rebuild is still pulling strong against probably better fresher tractors. These clutches were pretty darn good units and worked for a long time!
That video of Dennis' on the WD45 hand clutch rebuild is good! I watched it several times.
How is the rear crank seal project coming along? Regards, Chris
Edited by Sugarmaker - 29 Sep 2019 at 12:50am
|
|
D17 1958 (NFE), WD45 1954 (NFE), WD 1952 (NFE), WD 1950 (WFE), Allis F-40 forklift, Allis CA, Allis D14, Ford Jubilee, Many IH Cub Cadets, 32 Ford Dump, 65 Comet.
|
|
wjohn
Orange Level
Joined: 19 Jan 2010
Location: KS
Points: 1799
|
Post Options
Thanks(0)
Quote Reply
Posted: 28 Sep 2019 at 8:25pm |
I snuck in a little bit of time with the WD again. I had snapped off one of the front pedestal mounting bolts, so I spent a long but successful time drilling it out.
I wrestled with the engine on the hoist trying to get it on the stand I just bought but quit once I realized that I need two more bolts just 1" longer. Then I popped the cover off of the hand clutch, which has some light rust from what was probably condensation over the years. I've never dealt with a hand clutch before. The service manual says if grooves are still visible on the clutch linings then they're okay. I can still see grooves but I think what's left of the shims is just one big one so I'm off to watch Dennis' video on the hand clutch rebuild.
EDIT: They're actually a lot of shims glued together. I'm probably okay.
I have also decided that the head of the pin I found when I drained the transmission oil was probably from the hand clutch linkage. It must have been replaced at some point because I don't see any missing (and someone's been in it before since there was silicone under the access cover).
Edited by wjohn - 28 Sep 2019 at 9:45pm
|
|
1939 B, 1940 B, 1941 WC, 1951 WD, 1952 CA, 1956 WD-45
|
|
Sugarmaker
Orange Level
Joined: 12 Jul 2013
Location: Albion PA
Points: 8167
|
Post Options
Thanks(0)
Quote Reply
Posted: 12 Sep 2019 at 8:33am |
wjohn, Clutch will probably work for a long long time! We ran the heck out of these in the old days and I don't remember ever having a clutch go out on a WD series. Regards, Chris
|
|
D17 1958 (NFE), WD45 1954 (NFE), WD 1952 (NFE), WD 1950 (WFE), Allis F-40 forklift, Allis CA, Allis D14, Ford Jubilee, Many IH Cub Cadets, 32 Ford Dump, 65 Comet.
|
|
wjohn
Orange Level
Joined: 19 Jan 2010
Location: KS
Points: 1799
|
Post Options
Thanks(0)
Quote Reply
Posted: 11 Sep 2019 at 8:39pm |
Measured the clutch today. The service manual says the lining on one side should be 1/8" thick and 5/32" thick on the other. This one is worn down not quite 1/32" on each side assuming it was the same thickness as what AC had specified. For better or worse that seems like it should be in good shape. If it goes out sometime in the future then maybe that's an excuse to paint and everything at that time, too. I would hope I have at least one of my other tractors here and running as a backup by then!
Turns out the pilot bearing being open on one side is probably intentional. After looking through the service manual, it mentions engines prior to W310920 have a wick through the center of the crankshaft to bring oil to the pilot bearing. After that they quit using a pilot bearing until later on in WD-45 production when they must have realized they should have kept it and went to using a bearing, but sealed. It mentions that you should install it on tractors that didn't have it as it will increase clutch life and decrease the chance of leakage at the clutch housing seal, which makes sense. Anyhow, this engine is a little over 1000 serial numbers before the change, so I'll plug the oil wick hole and find a sealed bearing for it.
I wonder if the rivet or pin head that I found when I drained the oil was from something in the hand clutch. I will be checking that out in a couple weeks when I get a chance to work on this again (getting a dumpster to clean up all the construction debris around my house for a couple weekends). Then I need to put in some parts orders.
|
|
1939 B, 1940 B, 1941 WC, 1951 WD, 1952 CA, 1956 WD-45
|
|
Steve in NJ
Orange Level Access

Joined: 12 Sep 2009
Location: Andover, NJ
Points: 11549
|
Post Options
Thanks(0)
Quote Reply
Posted: 10 Sep 2019 at 8:25am |
If that were me, I'd give Rick a call or e-mail him and have him fix you up with a new clutch/PP setup. Can't beat his prices, and man, he does a nice job. You have the Tractor all apart, and you plan on using your attachment. Put a new clutch set up in it so you don't have to split the Tractor again down the road. Why do twice the work? JMHO. Steve@B&B
|
|
39'RC, 43'WC, 48'B, 49'G, 50'WF, 65 Big 10, 67'B-110, 75'716H, 2-620's, & a Motorhead wife
|
|
Sugarmaker
Orange Level
Joined: 12 Jul 2013
Location: Albion PA
Points: 8167
|
Post Options
Thanks(0)
Quote Reply
Posted: 10 Sep 2019 at 7:37am |
wjohn, Yes that is a great tool for this work! I used it on the torque tube and the final drives too. I looked at the front seal and don't see much oil so maybe it decided to seal up a little!
I think the pedestals are formed metal on the short heads??? Cant remember? But I do believe they are different.
This would be the time for a fresh clutch/ pressure plate, if your in need or in doubt.
Hand clutch can be adjusted if the plates are good enough.
Regards, Chris
Edited by Sugarmaker - 28 Sep 2019 at 11:56pm
|
|
D17 1958 (NFE), WD45 1954 (NFE), WD 1952 (NFE), WD 1950 (WFE), Allis F-40 forklift, Allis CA, Allis D14, Ford Jubilee, Many IH Cub Cadets, 32 Ford Dump, 65 Comet.
|
|
wjohn
Orange Level
Joined: 19 Jan 2010
Location: KS
Points: 1799
|
Post Options
Thanks(0)
Quote Reply
Posted: 09 Sep 2019 at 9:41pm |
Are you talking about the same leveler I have hanging from the hoist in my last post? If so, yes, I wouldn't want to be without that. I was thinking if I had a different angle for one of the legs of the hoist I would've been able to slide in from the side, but shortening would be an option too. I'd prefer to not permanently alter the frame if possible. I was also wondering if I rotated the front wheels one way or another if that would let me sneak in as well... I may have to jack it up and play around with that just to see.
I haven't looked at the parts book yet but I'm assuming the pedestal differs between short and tall heads. Centering the timing cover might be interesting but I think I can wrap up a piece of PVC pipe to the right thickness as I've seen somewhere on here before! Your seeping front crank seal is a bummer for sure. Odd that it happened with the speedi sleeve and everything, too.
|
|
1939 B, 1940 B, 1941 WC, 1951 WD, 1952 CA, 1956 WD-45
|
|
Sugarmaker
Orange Level
Joined: 12 Jul 2013
Location: Albion PA
Points: 8167
|
Post Options
Thanks(0)
Quote Reply
Posted: 09 Sep 2019 at 7:52am |
wjohn, I believe I shortened one leg of the base of the engine hoist by the wheels and came in from the side of the tractor rather than the front. While your at Harbor freight getting the low cost engine stand, splurge and get the engine leveling unit too. You will thank me for both when your done! Your doing good! That front seal does look like its out more than normal? You will have that cover off so you can put in a new seal and check the crank grooves. I put a speedi sleeve and new seal and still have oil weeping a little. Geting the cover centered on the shaft is important.
Just poking you on the paint thing! It takes a lot of time for that process.
I bet someone on here has the good used pedestal that you need. Cant remember but I believe they are different from a WD to a 45?
Keep hittin at it! Thanks for the pictures and the updates.
Off to haul tractors to the local fair. Regards, Chris
Edited by Sugarmaker - 09 Sep 2019 at 7:59am
|
|
D17 1958 (NFE), WD45 1954 (NFE), WD 1952 (NFE), WD 1950 (WFE), Allis F-40 forklift, Allis CA, Allis D14, Ford Jubilee, Many IH Cub Cadets, 32 Ford Dump, 65 Comet.
|
|
wjohn
Orange Level
Joined: 19 Jan 2010
Location: KS
Points: 1799
|
Post Options
Thanks(0)
Quote Reply
Posted: 08 Sep 2019 at 8:31pm |
Success! Not a big deal to many of you veterans, but I'd never had to pull and engine out of an AC before. I think I'll have to remove the front wheels to get it back in because my hoist was up against the tires and wanted to pull the engine a good 5" forward to hang dead center the way I had it hooked up.
I found a cracked rocker shaft pedestal so I'll need to source a used one somewhere. I'd rather not rob parts off my other tractors yet since I still think they all have hope. The front crank seal wasn't seated all the way, so the only thing I can think of is either it wasn't installed properly or someone was trying to keep it out of a well worn groove in the crankshaft. Disassembly will tell all.
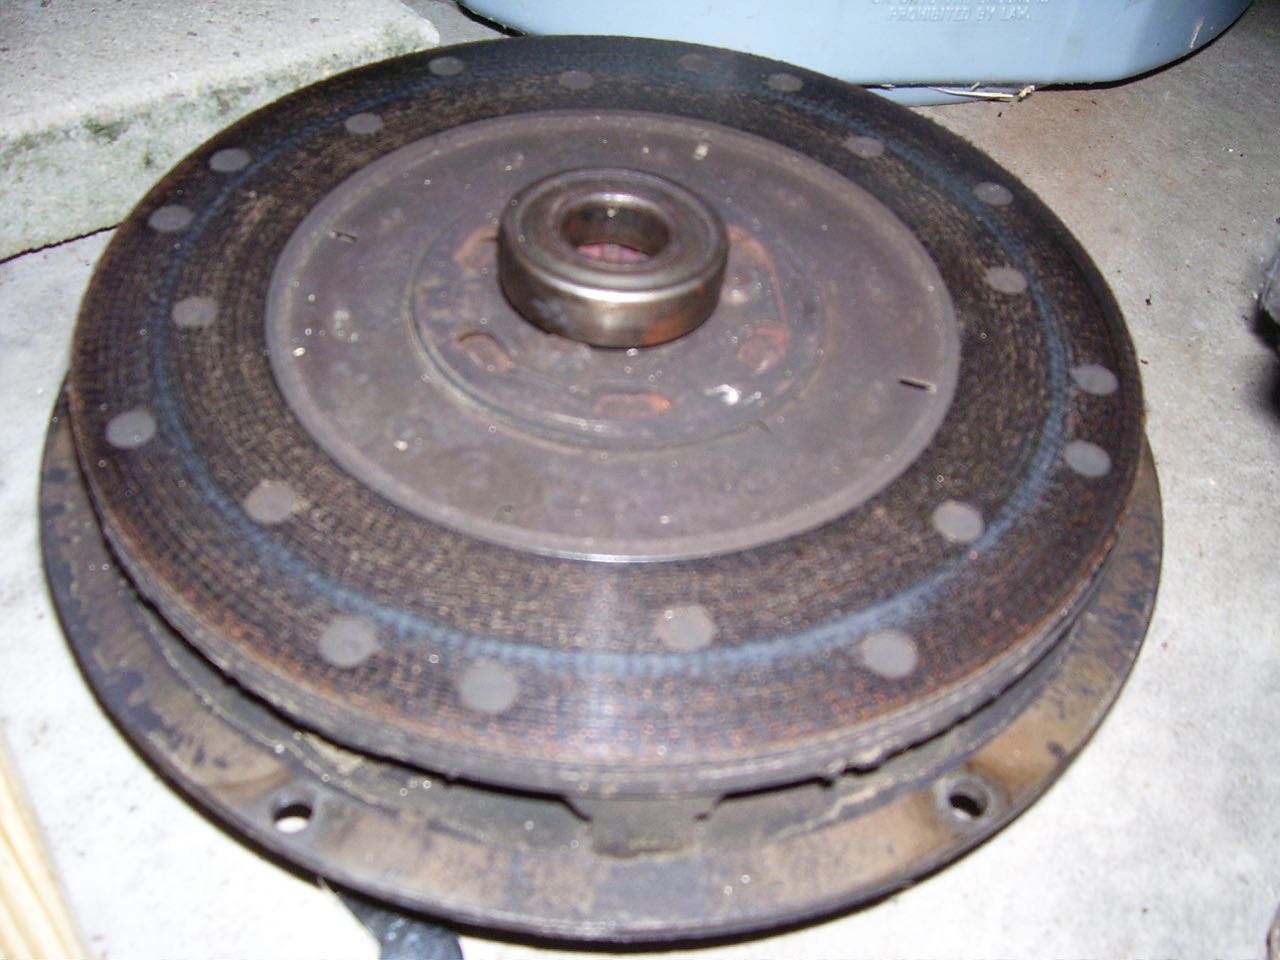
The clutch still has some life left. At least, there's a ways to go before it's hitting rivets. I'll check to see if there's a minimum thickness spec, but unless it's close to the bottom range of that then I'll plan on reusing it. Interestingly the pilot bearing had fallen out (I can only assume it tried to stay with the transmission input shaft during engine removal) and was missing the seal on one side of the bearing, so it didn't have long for the world. There was no lubricant left and it makes a nice loud rattle. Unfortunately I wasn't thinking and the "good" side of the bearing is showing in the pic with the clutch.
That flywheel is a suprisingly heavy chunk of metal, too. Who would've thunk?
|
|
1939 B, 1940 B, 1941 WC, 1951 WD, 1952 CA, 1956 WD-45
|
|
wjohn
Orange Level
Joined: 19 Jan 2010
Location: KS
Points: 1799
|
Post Options
Thanks(0)
Quote Reply
Posted: 08 Sep 2019 at 1:28pm |
Thanks for the confirmation on the part number, guys. Good to know about the clips. Chris, the hand clutch feels good but it might not be a bad idea for me to take a peek at it. Paint is definitely out of the question at this time. I don't have the time or the setup to do it for now.
I just got the pin in the hand crank shaft out. I realized I had a 2.5' piece of 1 1/4" round stock in my shop that was there when I moved in, so I tried to figure out how to hold it and hit the end of it... Then realized it was heavy enough I could probably just use it like a battering ram, and sure enough the pin started moving.
I think I'm ready to pull the engine off now. I don't have a stand so I'm either going to get creative or buy a cheap stand next week, haha. That sure would make doing the oil pan gasket job a lot easier as others have mentioned, so I may bite the bullet and buy one.
|
|
1939 B, 1940 B, 1941 WC, 1951 WD, 1952 CA, 1956 WD-45
|
|
Sugarmaker
Orange Level
Joined: 12 Jul 2013
Location: Albion PA
Points: 8167
|
Post Options
Thanks(0)
Quote Reply
Posted: 08 Sep 2019 at 12:54pm |
wjohn, That does sound like the right part from NAPA. Like Mike, I think I had to clean up some areas on the yokes to get the bearing caps retained properly. While you have it apart might as well do the seals in the torque tube, rebuild the hand clutch, and paint it! Just sayin!  Regards, Chris
|
|
D17 1958 (NFE), WD45 1954 (NFE), WD 1952 (NFE), WD 1950 (WFE), Allis F-40 forklift, Allis CA, Allis D14, Ford Jubilee, Many IH Cub Cadets, 32 Ford Dump, 65 Comet.
|
|
wjohn
Orange Level
Joined: 19 Jan 2010
Location: KS
Points: 1799
|
Post Options
Thanks(0)
Quote Reply
Posted: 08 Sep 2019 at 9:06am |
The parts book shows a cotter pin in the hole on the hand crank that I'm stuck on, but it definitely has a very rusty pin driven in it. I don't see any reason for it to be a solid pin (it's the one that sits against the back of the front pedestal casting when the hand crank is not being used and is pushed forward by the spring) so I'm planning on replacing it with a cotter pin if/when I get it knocked out. I'm worried that I'll have to take the front wheels off if I need to get access to drill it out.
I am pulling the engine entirely just for the rear main seal. I'll take a look at the clutch and some other things while I'm in there, of course, but hopefully it just needs that seal and the oil pan gasket set.
I did some searching on the forum and found NAPA part number NPJ P861 but I haven't checked measurements on it to make sure that's good info.
|
|
1939 B, 1940 B, 1941 WC, 1951 WD, 1952 CA, 1956 WD-45
|
|
IBWD MIke
Orange Level

Joined: 08 Apr 2012
Location: Newton Ia.
Points: 3445
|
Post Options
Thanks(0)
Quote Reply
Posted: 08 Sep 2019 at 8:55am |
Great idea pulling the frame rail! Wish I would have thought of that when I did the one on my narrow front. Getting ready to put (Char-Lynn) power steering on the wide front, will pull the rail.
The joint I used in mine came from Napa, box has 861 on it as part no. Here's a qualifier; I had to do some filing on the yokes to get the clips in if I remember correctly.
|
|
Sugarmaker
Orange Level
Joined: 12 Jul 2013
Location: Albion PA
Points: 8167
|
Post Options
Thanks(0)
Quote Reply
Posted: 08 Sep 2019 at 7:42am |
wjohn, I like your documentation: pictures and descriptions! Yes getting something soild under any of these pinned joints is the key to knocking them out. The steering u-joint may be the toughest. taking the frame rail off seems like a pain, but will save you much frustration putting that joint back together. And you now have all those bolts loose in case you need to do this again. Add never seize to the bolt threads. On that crank pin it is way easier to work on them with the front grill off, which you have done. I like a floor jack between the back of the tires and a piece of solid steel coming up from the jack to support the shaft. Then you can get a real solid whack on the stubborn cross pins. After changing them 3 or 4 times, like I tend to do the come right out!
Are you pulling the engine to do the rear seal? Don and I will tell you thats really the best way to fix that leak. Pulling the engine probably not much more work than the u joint rebuild.
By the way I had problems finding the new u joint (cross and bearing for these. Maybe they are more available now???
Regards, Chris
|
|
D17 1958 (NFE), WD45 1954 (NFE), WD 1952 (NFE), WD 1950 (WFE), Allis F-40 forklift, Allis CA, Allis D14, Ford Jubilee, Many IH Cub Cadets, 32 Ford Dump, 65 Comet.
|
|
wjohn
Orange Level
Joined: 19 Jan 2010
Location: KS
Points: 1799
|
Post Options
Thanks(0)
Quote Reply
Posted: 07 Sep 2019 at 9:44pm |
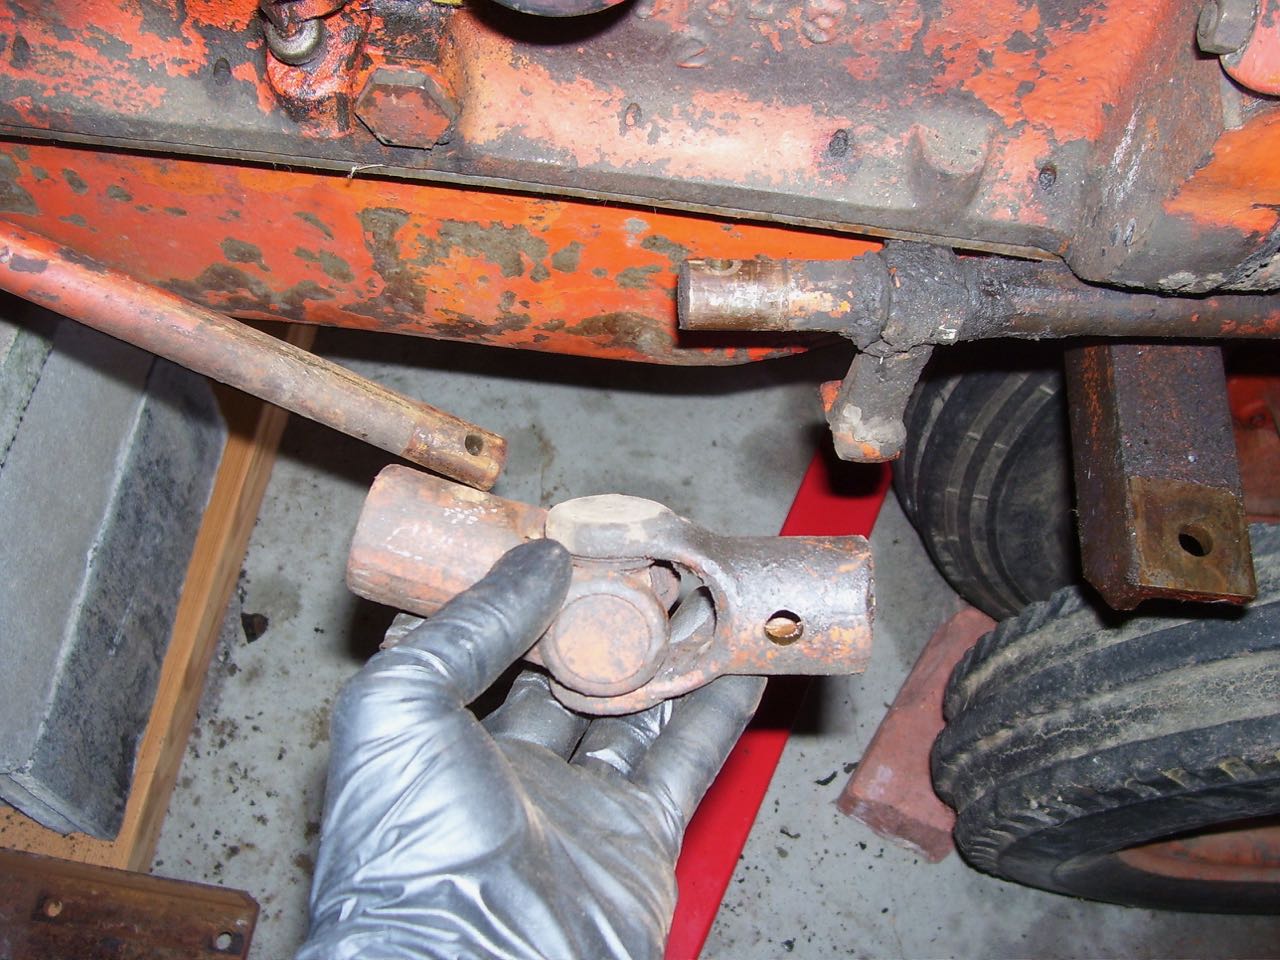
Small milestone: the steering shaft u joint is completely out. I removed the frame rail and the rear u-joint pin came out after some solid smacks. It's really helpful to be able to block it against the engine block so that you're transferring the entire force of the hammer blow solidly into it, instead of into all the slop of the shaft and supports.
The support around the clutch is totally egged out. It's bad enough I'm not sure if I can oversize it and put a bushing in, but we'll see. The shaft also needs material added in several spots. I may leave that for a project in the distant future. For now I think I'm just going to rebuild the u-joint since I have it out and it clearly has no lube and lots of play. Hopefully now that I've knocked the pins loose once they'll come out easier the next time.
Now onto the pin in the hand crank shaft. I know they're Sugarmaker's absolute favorite, and mine sure didn't want to budge at the end of the day today. I called it a night and made supper.
|
|
1939 B, 1940 B, 1941 WC, 1951 WD, 1952 CA, 1956 WD-45
|
|
Sugarmaker
Orange Level
Joined: 12 Jul 2013
Location: Albion PA
Points: 8167
|
Post Options
Thanks(0)
Quote Reply
Posted: 28 Jul 2019 at 5:31pm |
CTucker, Your probably more correct. They were supposed to last the life of the tractor which was to be about 20 years, not 3 times that!:) Regards, Chris
|
|
D17 1958 (NFE), WD45 1954 (NFE), WD 1952 (NFE), WD 1950 (WFE), Allis F-40 forklift, Allis CA, Allis D14, Ford Jubilee, Many IH Cub Cadets, 32 Ford Dump, 65 Comet.
|
|
CTuckerNWIL
Orange Level

Joined: 11 Sep 2009
Location: NW Illinois
Points: 22810
|
Post Options
Thanks(0)
Quote Reply
Posted: 28 Jul 2019 at 9:17am |
|
I don't believe those pins are tapered. What I believe they did, was chamfer both sides of the U joint, and peen the pin to swell out into that chamfer. Basically making a rivet with a small head on each end. They can be a real bugger to get out.
|
|
|
|
Sugarmaker
Orange Level
Joined: 12 Jul 2013
Location: Albion PA
Points: 8167
|
Post Options
Thanks(0)
Quote Reply
Posted: 27 Jul 2019 at 8:02pm |
I think the original pins are slightly tapered. They can be a bugger. Almost everything I touched on mine had some issue that kept me in a headlock. It did not like being apart and is still adjusting to being back together. Parts are just starting to play nice! Taking the frame rail off will help with a lot of issues. Steering and engine removal and installation too. Regards, Chris
|
|
D17 1958 (NFE), WD45 1954 (NFE), WD 1952 (NFE), WD 1950 (WFE), Allis F-40 forklift, Allis CA, Allis D14, Ford Jubilee, Many IH Cub Cadets, 32 Ford Dump, 65 Comet.
|
|
wjohn
Orange Level
Joined: 19 Jan 2010
Location: KS
Points: 1799
|
Post Options
Thanks(0)
Quote Reply
Posted: 27 Jul 2019 at 7:40pm |
Weeping I'm okay with on an old unrestored tractor like this one. Drip-drip-drip (like the rear main seal) not so much, but I'd be a little frustrated too if you had gone to all of that trouble and still had some weeping.
I finally got the front pin for the steering u-joint drilled out. That's quite the ordeal. I picked up a Harbor Freight air hammer for $13 because I figured "what the heck" at that price. It didn't have enough oomph to punch the pin out without a lot of drilling first, though. Once I drilled out enough it was really handy, though. Maybe I should've grabbed the slightly larger model and had better luck with that.
The u-joint is still stuck to the shaft after much turning and hammering, so I'm going to have to figure out how to drive it off of there. I may end up having to pull the frame rail.
Fingers crossed, the rest of the engine removal process looks more downhill after I get that out of the way.
|
|
1939 B, 1940 B, 1941 WC, 1951 WD, 1952 CA, 1956 WD-45
|
|
Sugarmaker
Orange Level
Joined: 12 Jul 2013
Location: Albion PA
Points: 8167
|
Post Options
Thanks(0)
Quote Reply
Posted: 24 Jul 2019 at 6:33am |
wjohn, You have a good plan. Even after taking a lot of my tractor apart to fix things like oil leaks I still have a few that have not sealed. One is the left rear final drive. I saw some oil in the rim yesterday!:( I even had these axles machined smooth and bought undersized seals! Also the front crankshaft seal is weeping a little too. Reminds me of a old Harley, They tended to leak on the showroom floor!:) Having the right tools is safer and you will get the job done much eaiser. Looking forward to your progress! Regards, Chris
|
|
D17 1958 (NFE), WD45 1954 (NFE), WD 1952 (NFE), WD 1950 (WFE), Allis F-40 forklift, Allis CA, Allis D14, Ford Jubilee, Many IH Cub Cadets, 32 Ford Dump, 65 Comet.
|
|
wjohn
Orange Level
Joined: 19 Jan 2010
Location: KS
Points: 1799
|
Post Options
Thanks(0)
Quote Reply
Posted: 23 Jul 2019 at 10:03pm |
 Sugarmaker wrote: Sugarmaker wrote:
wjohn,Well I see your right into this tractor. What are your plans? My plans took a bad turn when I found my engine was not good. |
The main thing I want to do right now is replace the rear main seal that's leaking more than I'll accept. I've been studying your threads and Don's video! I'm almost to the end of your WD-45 thread, haha. I don't plan on doing anything cosmetic with this tractor anytime soon... I want it to not leak tons of fluid and be a solid worker for the next couple years.
Everything I've read here on the eccentrics says lots of heat and/or soaking. They should be a good excuse to finally get a torch. I already bought an engine hoist for pulling the motor and I've been wanting one of those for awhile.
|
|
1939 B, 1940 B, 1941 WC, 1951 WD, 1952 CA, 1956 WD-45
|
|
wjohn
Orange Level
Joined: 19 Jan 2010
Location: KS
Points: 1799
|
Post Options
Thanks(0)
Quote Reply
Posted: 23 Jul 2019 at 9:57pm |
mhankins wrote:
I got 2 front tires for my WD45 from tireseasy.com. Free shipping,and the price was less than one locally.
|
Thanks for the tip - I actually got a quote for a pair of 5.50-16s from my local tire shop that was only $25 more than the cheapest tires on that site, and that included mounting and disposal of the old ones. I'm hoping they stay in business for a long time.
|
|
1939 B, 1940 B, 1941 WC, 1951 WD, 1952 CA, 1956 WD-45
|
|
Sugarmaker
Orange Level
Joined: 12 Jul 2013
Location: Albion PA
Points: 8167
|
Post Options
Thanks(0)
Quote Reply
Posted: 22 Jul 2019 at 9:52am |
wjohn, Well I see your right into this tractor. What are your plans? My plans took a bad turn when I found my engine was not good. Your doing a good job. When I attack the eccentrics: I take the wheel assembly off lay it on the ground and take out the 8 bolts holding the eccentric brackets to the wheel. Then gently tap out the center wheel with a 10 lb sledge and several big grunts! The I take each eccentric and bolt it to something very solid and heat and work it till free. Regards, Chris
|
|
D17 1958 (NFE), WD45 1954 (NFE), WD 1952 (NFE), WD 1950 (WFE), Allis F-40 forklift, Allis CA, Allis D14, Ford Jubilee, Many IH Cub Cadets, 32 Ford Dump, 65 Comet.
|
|
mhankins
Silver Level

Joined: 19 Feb 2019
Location: Arkansas
Points: 134
|
Post Options
Thanks(0)
Quote Reply
Posted: 22 Jul 2019 at 7:33am |
I got 2 front tires for my WD45 from tireseasy.com. Free shipping,and the price was less than one locally.
|
|
wjohn
Orange Level
Joined: 19 Jan 2010
Location: KS
Points: 1799
|
Post Options
Thanks(0)
Quote Reply
Posted: 21 Jul 2019 at 8:19pm |
Anyone have any thoughts on the mystery part?
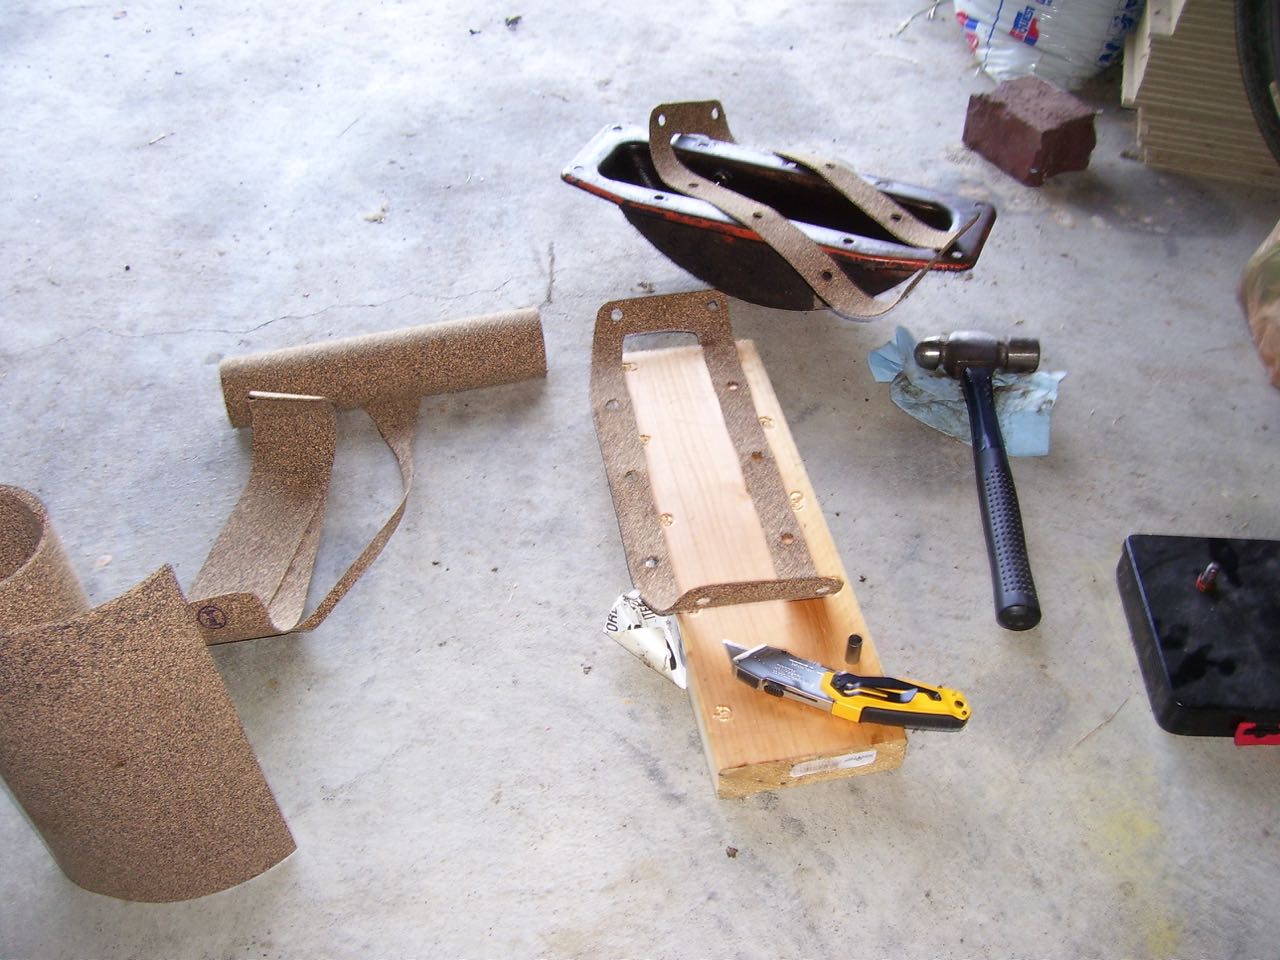
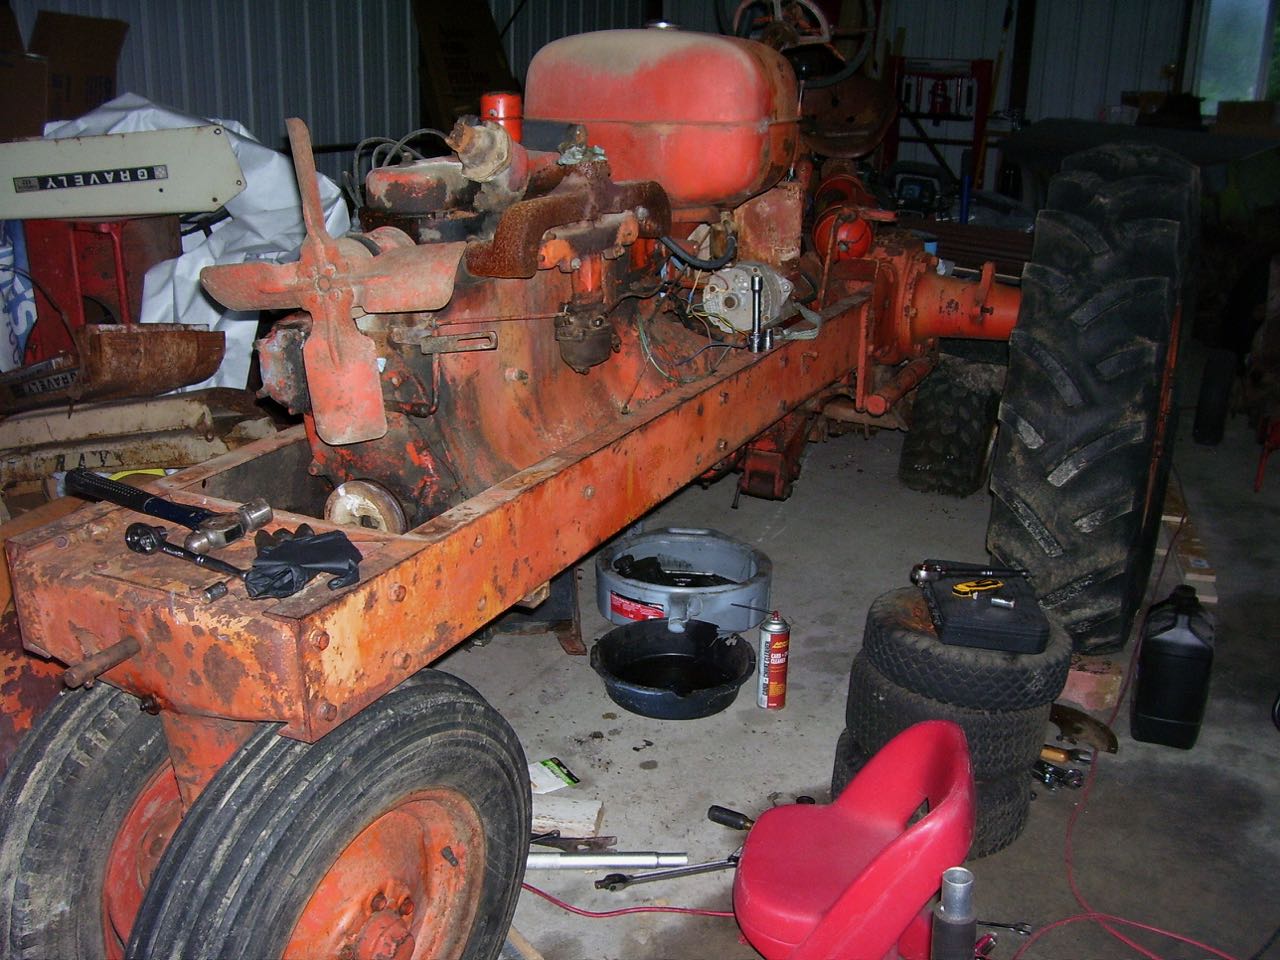
I got the right rear wheel off today. All the eccentrics came loose without much effort, but the left side ones are all rusted/painted solid. I broke off the bolt for the spinout stop and figured I'll have to soak/torch the eccentrics on that wheel someday. The fluid in the RH final drive wasn't as nasty as I expected. It definitely needed to be changed, but didn't seem to have much water or lumpy stuff in it. I made a couple of gaskets and got that side put back together.
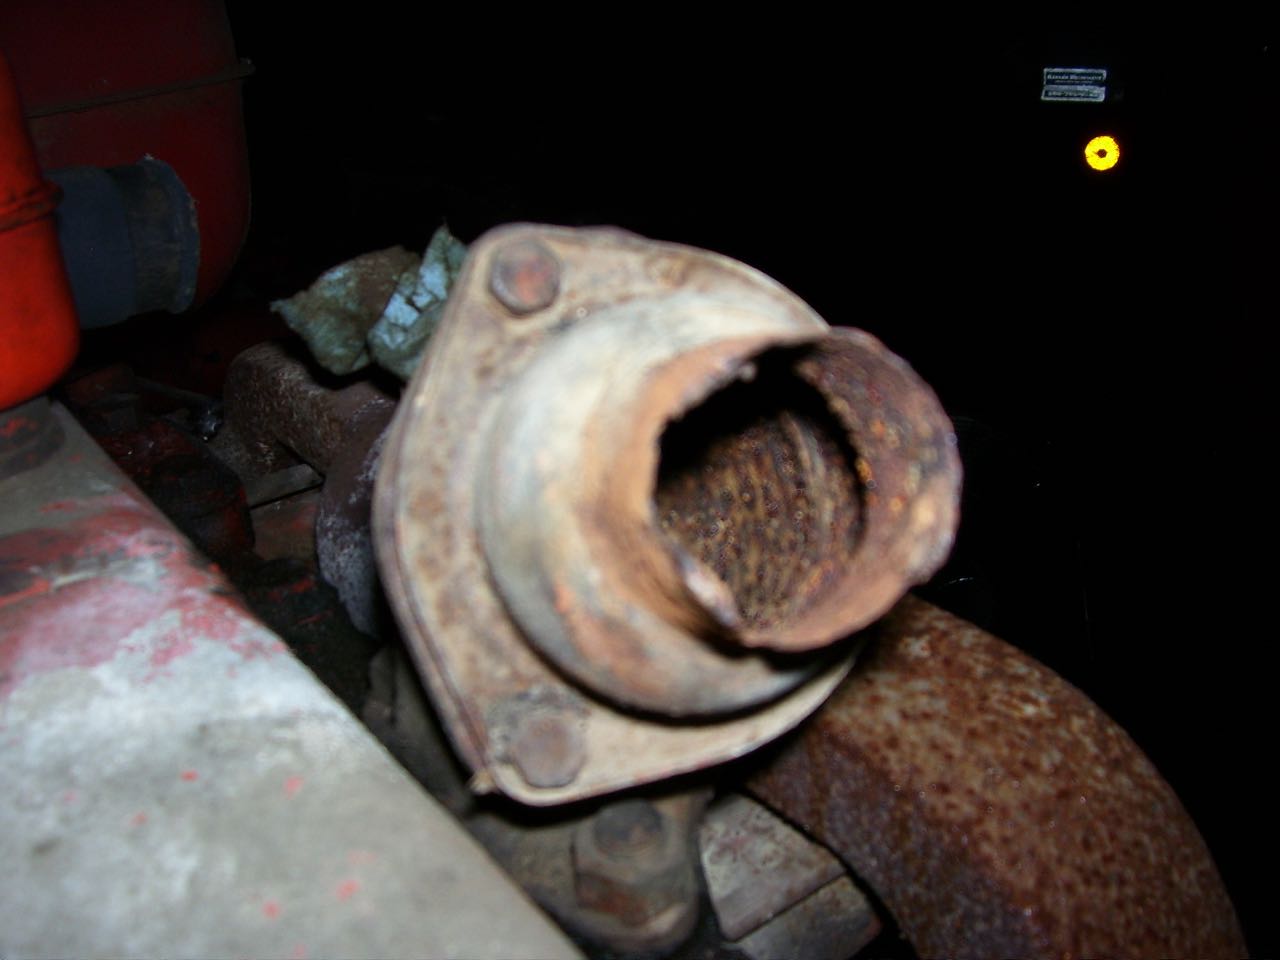
Then I moved on to the radiator/grille. Getting to those two larger bolts up under the frame was a pain until I found the perfect combination of extensions... And they still fought most of the way out. It also looks like the rusty thermostat housing was a problem waiting to happen, and there was no thermostat. All I'm seeing for replacement parts are the cast housings vs. this thin stamped steel housing that rusted through.
I spent a few minutes beating on the steering shaft pins and got nowhere, and called it a night. From looking at other threads it looks like I'll have to get the drill out.
|
|
1939 B, 1940 B, 1941 WC, 1951 WD, 1952 CA, 1956 WD-45
|
|
wjohn
Orange Level
Joined: 19 Jan 2010
Location: KS
Points: 1799
|
Post Options
Thanks(0)
Quote Reply
Posted: 07 Jul 2019 at 10:04am |
I put the carb and air cleaner back together last weekend. Now I'm draining fluids from the rear of the machine... The PTO/trans oil is pretty thin and definitely had water in it. I also got a quote on front tires and need to take those in to be replaced.
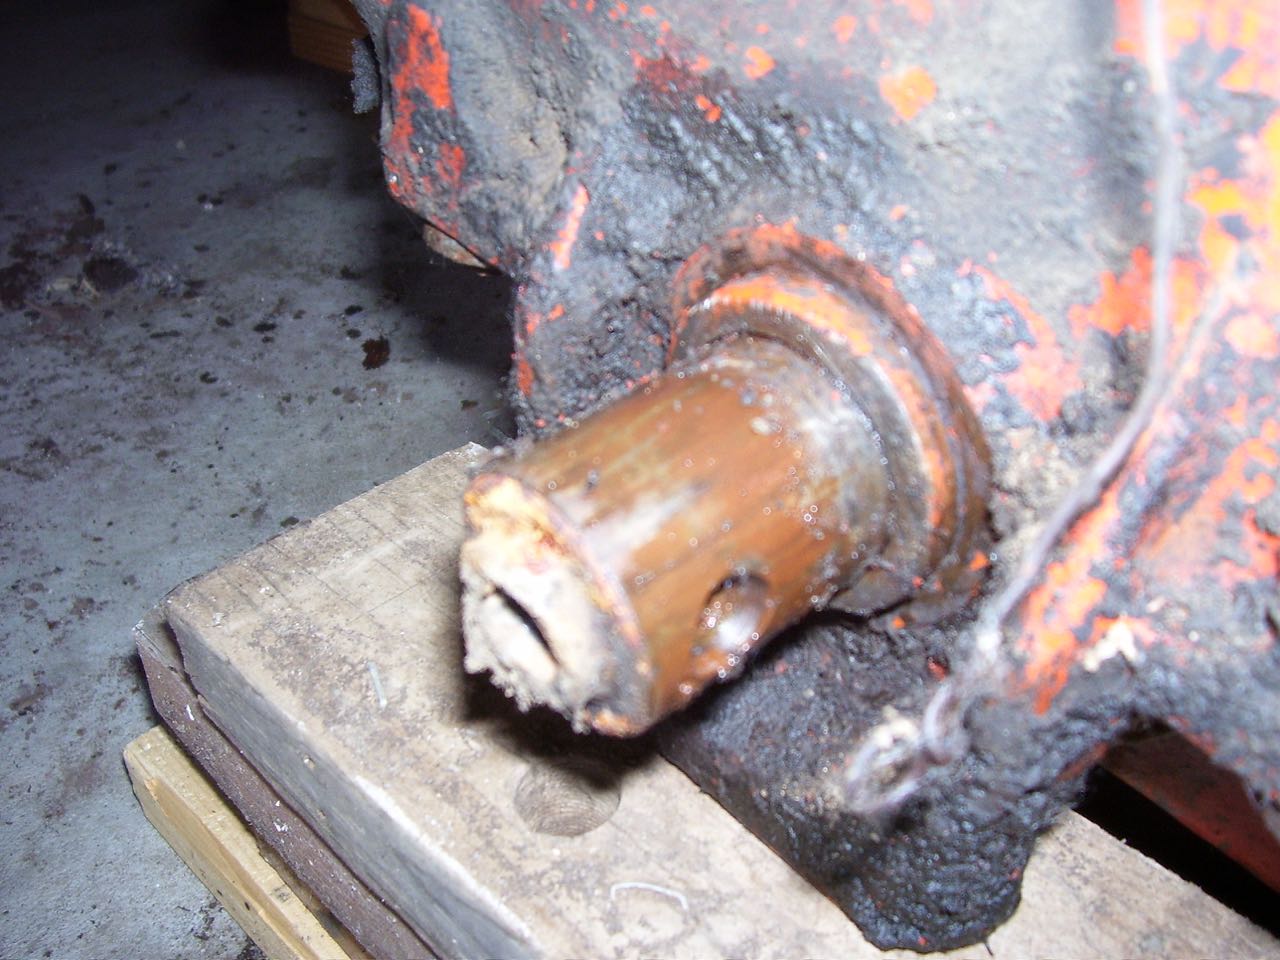
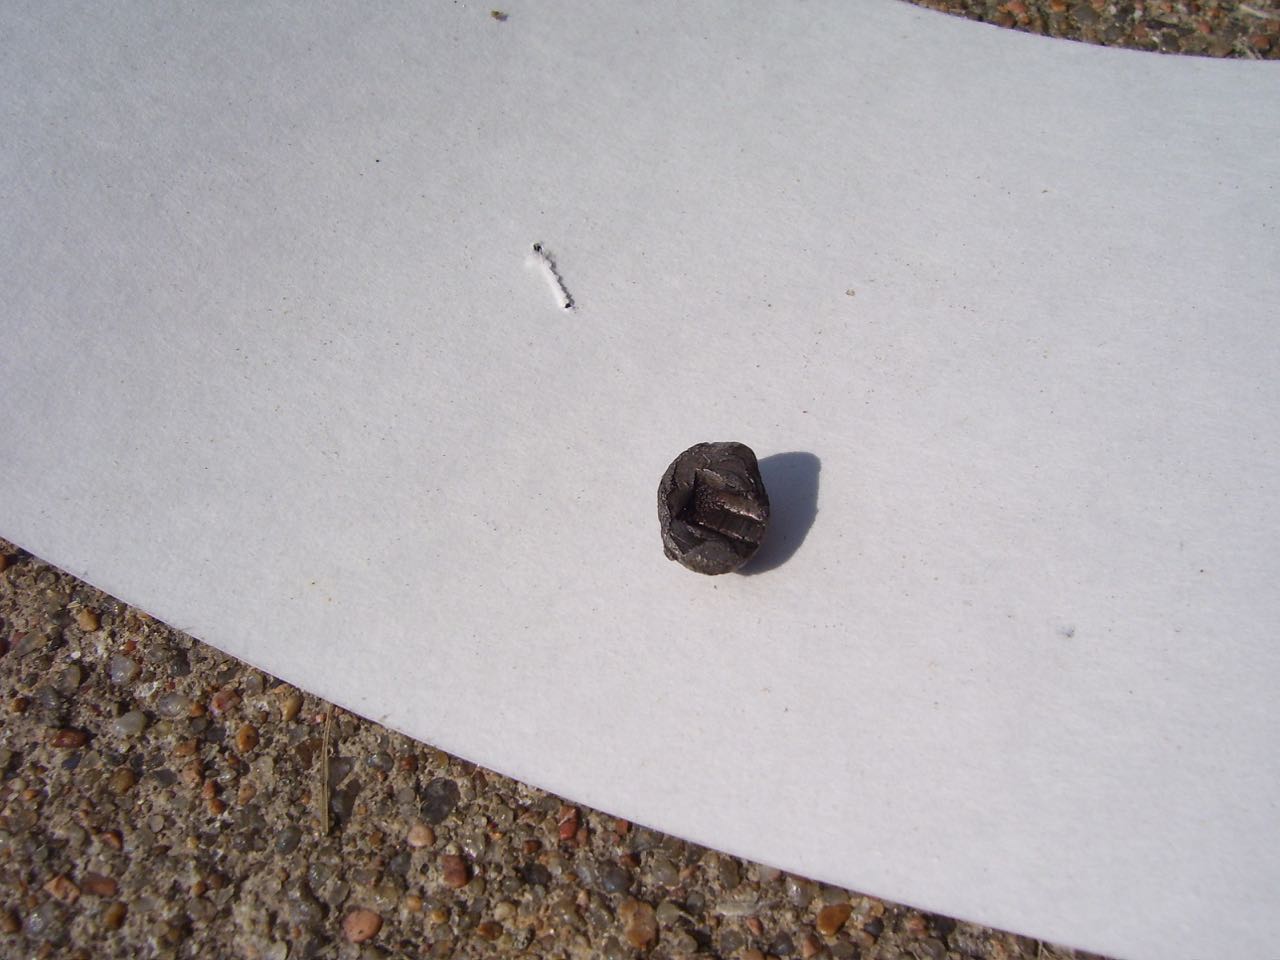
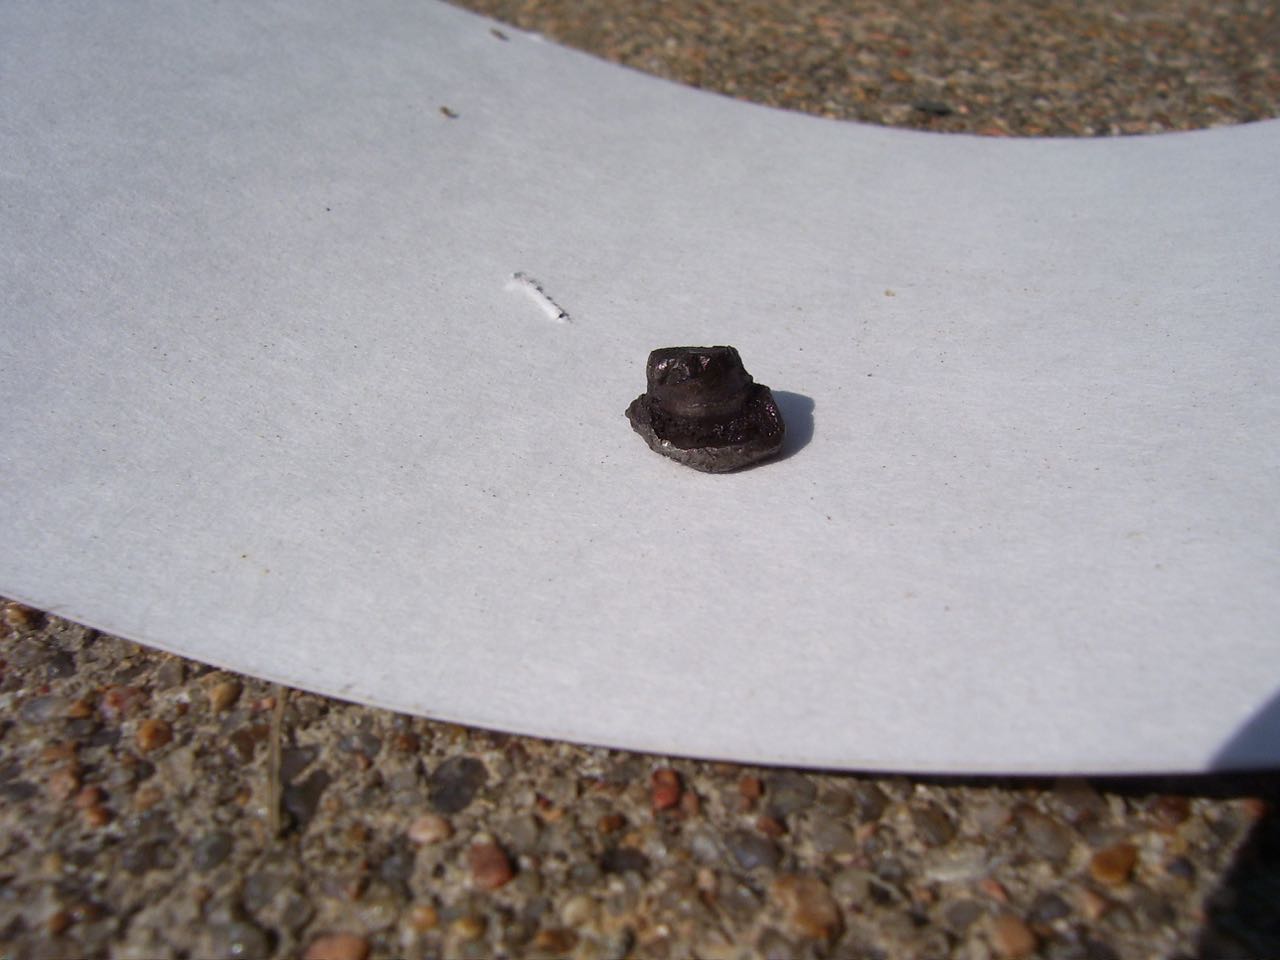
On a potentially scarier note - anyone know what this part is in my pics below? It was lodged inside the cavity in the drain plug for the PTO housing. It's small, round, and sort of mushroom-shaped, like the broken off end of a good-sized nail. Looks like it's been pushed between a set of gears at some point on its journey... The end of some kind of pin, maybe?
|
|
1939 B, 1940 B, 1941 WC, 1951 WD, 1952 CA, 1956 WD-45
|
|