| Author |
 Topic Search Topic Search  Topic Options Topic Options
|
wjohn 
Orange Level


Joined: 19 Jan 2010
Location: KS
Points: 1799
|
 Post Options Post Options
") Thanks(0) Thanks(0)
 Quote Quote  Reply Reply
 Posted: 06 Jul 2020 at 8:41pm Posted: 06 Jul 2020 at 8:41pm |
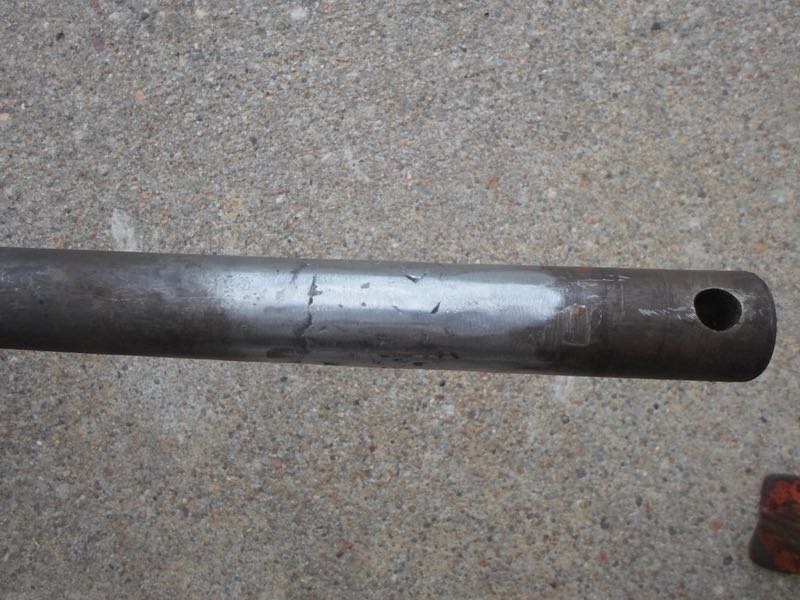
I was actually wondering if I can find a piece of tubing with close to the correct ID for the steering shaft (1" as I recall). I could cut off the current "round area/bushing" from the existing support so I could weld the new piece on there and drill and tap it for the zerk. Machining holes that large is probably outside of my shop's capabilities for a little while otherwise I would consider welding it up and doing that.
Chris, agreed on stampings usually being cheaper, but the fact that this appears to have a brazing operation too made me wonder. They made castings for so many other things that it just surprised me.
|
|
1939 B, 1940 B, 1941 WC, 1951 WD, 1952 CA, 1956 WD-45
|
 |
|
Sponsored Links
|
|
|
Sugarmaker
Orange Level

Joined: 12 Jul 2013
Location: Albion PA
Points: 8167
|
Post Options
Thanks(0)
Quote Reply
Posted: 06 Jul 2020 at 3:45pm |
John, I have one of those steering supports that is worn about the same amount. They never got greased!:) Also a stamping is almost always cheaper than a casting. That's a tough part to repair. Maybe find a good used one on a low hour junk tractor. Check with Brenda at Sandy Lake they might have a used one? I think you did good building up the worn rod. It will take another 70 years for it to be worn out again. Regards, Chris
Edited by Sugarmaker - 06 Jul 2020 at 9:26pm
|
|
D17 1958 (NFE), WD45 1954 (NFE), WD 1952 (NFE), WD 1950 (WFE), Allis F-40 forklift, Allis CA, Allis D14, Ford Jubilee, Many IH Cub Cadets, 32 Ford Dump, 65 Comet.
|
|
Dave(inMA)
Orange Level

Joined: 12 Sep 2009
Location: Grafton, MA
Points: 2395
|
Post Options
Thanks(0)
Quote Reply
Posted: 06 Jul 2020 at 9:59am |
|
wjohn, nice work on the steering rod. I'm amazed at the amount of wear on that bracket. I'm thinking it'd be hard to use tubing to replace the missing material as the wear is almost entirely on one side. Might it be possible to build up the lower half with weld, then bore it out to original diameter?
|
|
WC, CA, D14, WD45
|
|
wjohn
Orange Level
Joined: 19 Jan 2010
Location: KS
Points: 1799
|
Post Options
Thanks(0)
Quote Reply
Posted: 05 Jul 2020 at 11:21pm |
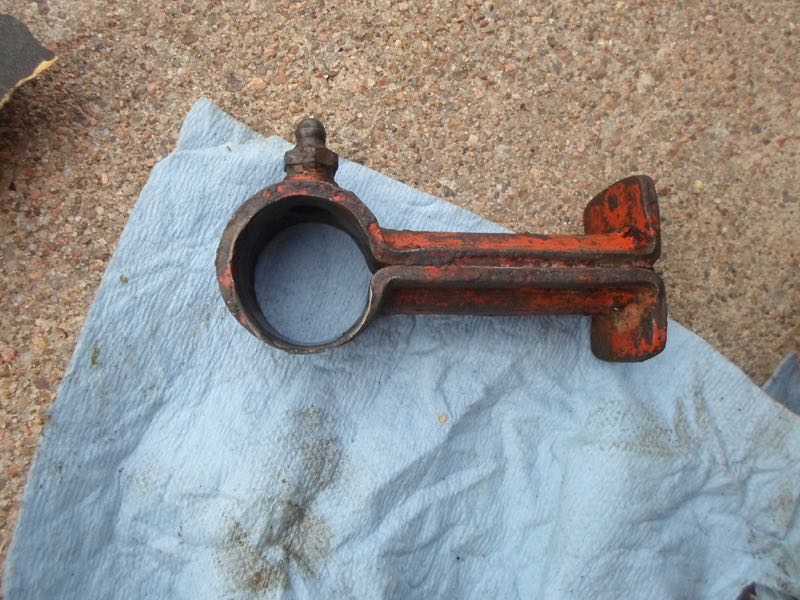
The worm gear steering shaft was severely worn where the frame support attaches, so I built it up as best as I could with my little Harbor Freight flux core welder and ground it down. It's ugly and I didn't consistently build up as much weld as I should have but I think it's no worse than before. I wanted to start by practicing with this piece before building up the vertical steering shaft in the front casting, where the bearing goes. I've never done a repair like this - thanks to Chris for covering that in his threads for his tractors!
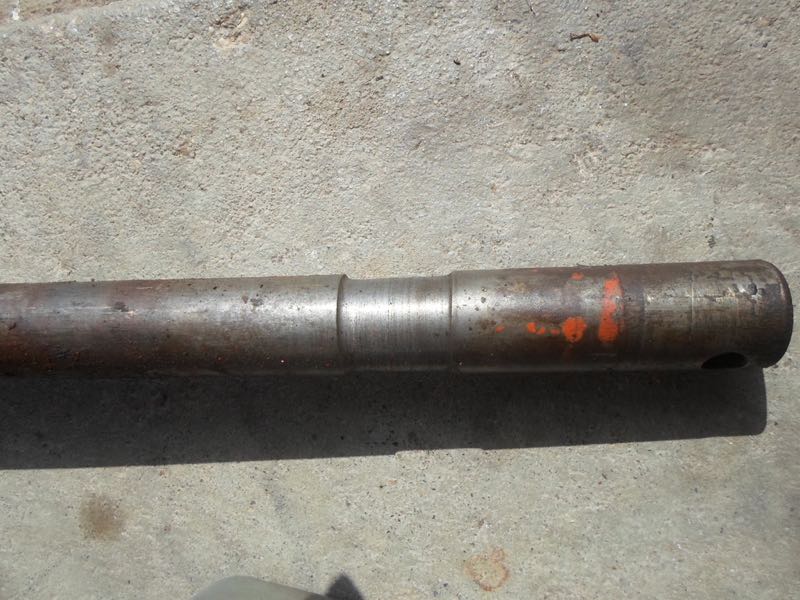
I'll also need to replace or maybe weld a piece of tubing in the support that bolts to the frame, which is the other half of the equation. It surprised me that this area was so worn out since the pedals etc. aren't that worn on this tractor. They must have forgotten to hit this zerk with grease over the years. It's kind of an interesting part since it appears to be a stamping that is then brazed together along the sides and threaded for the bolt. I wonder why AC didn't make it a casting.
|
|
1939 B, 1940 B, 1941 WC, 1951 WD, 1952 CA, 1956 WD-45
|
|
wjohn
Orange Level
Joined: 19 Jan 2010
Location: KS
Points: 1799
|
Post Options
Thanks(0)
Quote Reply
Posted: 30 Jun 2020 at 11:27pm |
I pulled the bushing back out, cleaned up the bore of the clutch shaft, and still had to take a fair amount of material out of the bushing after it was installed. The die grinder got a careful workout between lots of measuring of the ID. It definitely wasn't perfect without a reamer but I think it's much better than the old worn bushing.
Went to the machine shop with the head today only to learn that he can't do the intake/exhaust port surface with his equipment due to the casting sticking up for the water passages on that side of the head. His machine wouldn't be able to clear that. He suggested a couple of other shops and said basically they'd need a Bridgeport to reach in there, I guess. I will have to get in touch with them.
I did get the input shaft back in with new bearings, and made a new gasket for the shifter housing and bolted that back on. I think I even got everything lined up correctly since it seems to shift in and out of gears correctly.
|
|
1939 B, 1940 B, 1941 WC, 1951 WD, 1952 CA, 1956 WD-45
|
|
Sugarmaker
Orange Level
Joined: 12 Jul 2013
Location: Albion PA
Points: 8167
|
Post Options
Thanks(0)
Quote Reply
Posted: 27 Jun 2020 at 7:45am |
John, If you can pull it out easily and clean the bore I think I would try that first. The split ring style should allow it to open to the correct inside dimension. Maybe kicked up a burr. doesnt take much to get .012 reduction. I guess about any thing can happen on these old tractors. Keep your expectations low, and keep hitting at the project! I have a WD cam shaft setting here on the bench too!:) Just sayin. But you never know it may not be any better than the one you have. I have a whole pile of WD stuff that I need to go through in the vast warehouse and inventory and decide if I am keeping it or moving it down the road? Let me know. Sometimes its the little things that are missing or broken that help bring the project together. Lots of folks on here have helped me with good used parts for my Allis Addiction problem!
Regards, Chris
|
|
D17 1958 (NFE), WD45 1954 (NFE), WD 1952 (NFE), WD 1950 (WFE), Allis F-40 forklift, Allis CA, Allis D14, Ford Jubilee, Many IH Cub Cadets, 32 Ford Dump, 65 Comet.
|
|
wjohn
Orange Level
Joined: 19 Jan 2010
Location: KS
Points: 1799
|
Post Options
Thanks(0)
Quote Reply
Posted: 26 Jun 2020 at 9:05pm |
 Sugarmaker wrote: Sugarmaker wrote:
John,Ok I went back and looked at the pictures of my tussle with the pilot bushing. Correct me if I am wrong but is this a split bushing? Mine came out in two parts. I had cut a groove through it to try to remove it. If I did have to ream it it was with drill bit or just emory or a dremmel. Might have use the little drum sanding wheel on a dremmel?? Regards, Chris |
Yep, it's the split bushing. I saw your removal pictures but didn't see any mention of reaming it and neither did the manual, so I'm wondering if I have something wrong. The transmission input shaft is measuring right at .748-.749 in most spots and the bushing after installation is .738. Maybe I need to pull it back out and make sure I don't have any scratches or something in the bore of the clutch shaft that might cause the ID to be too tight when installed. Or I could just sand it a little with the die grinder, too.
|
|
1939 B, 1940 B, 1941 WC, 1951 WD, 1952 CA, 1956 WD-45
|
|
Sugarmaker
Orange Level
Joined: 12 Jul 2013
Location: Albion PA
Points: 8167
|
Post Options
Thanks(0)
Quote Reply
Posted: 26 Jun 2020 at 7:59pm |
John, Ok I went back and looked at the pictures of my tussle with the pilot bushing. Correct me if I am wrong but is this a split bushing? Mine came out in two parts. I had cut a groove through it to try to remove it. If I did have to ream it it was with drill bit or just emory or a dremmel. Might have use the little drum sanding wheel on a dremmel?? Regards, Chris |
|
D17 1958 (NFE), WD45 1954 (NFE), WD 1952 (NFE), WD 1950 (WFE), Allis F-40 forklift, Allis CA, Allis D14, Ford Jubilee, Many IH Cub Cadets, 32 Ford Dump, 65 Comet.
|
|
Sugarmaker
Orange Level
Joined: 12 Jul 2013
Location: Albion PA
Points: 8167
|
Post Options
Thanks(0)
Quote Reply
Posted: 26 Jun 2020 at 7:50pm |
wjohn wrote:
Sugarmaker wrote:
John, My last WD45 project, took way longer than I expected, and cost more than I had planned too. But when I fire it up, its all worth it! Keep the pictures coming too! Regards, Chris |
I'll get there eventually but I'm almost at the point where I'm keeping an eye out for another running tractor just to have something I can use right now. Once I have a couple of these fixed up and available it won't be so much of an issue.
Did have a question - do you remember having to ream out the new bushing that goes in the rear of the clutch/hyd pump/PTO drive shaft? I saw the pics of you cutting it out to remove it on your thread, but I'm curious if the transmission input shaft end fit inside the bushing with no reaming. |
John, I dont think I had to ream it. Let me think on that a little. I dont have a reamer for that job and I dont remember borrowing one either. So maybe I lucked out. I do remember cutting the old one out. and I ordered the wrong one with out the oil groove from McMaster Carr. Got the correct one from Sandy Lake I believe. Any way mine went together OK. I will go back and review my pictures Maybe something will jog my old memory? Regards, Chris
|
|
D17 1958 (NFE), WD45 1954 (NFE), WD 1952 (NFE), WD 1950 (WFE), Allis F-40 forklift, Allis CA, Allis D14, Ford Jubilee, Many IH Cub Cadets, 32 Ford Dump, 65 Comet.
|
|
wjohn
Orange Level
Joined: 19 Jan 2010
Location: KS
Points: 1799
|
Post Options
Thanks(0)
Quote Reply
Posted: 25 Jun 2020 at 10:34pm |
Sugarmaker wrote:
John, My last WD45 project, took way longer than I expected, and cost more than I had planned too. But when I fire it up, its all worth it! Keep the pictures coming too! Regards, Chris |
I'll get there eventually but I'm almost at the point where I'm keeping an eye out for another running tractor just to have something I can use right now. Once I have a couple of these fixed up and available it won't be so much of an issue.
Did have a question - do you remember having to ream out the new bushing that goes in the rear of the clutch/hyd pump/PTO drive shaft? I saw the pics of you cutting it out to remove it on your thread, but I'm curious if the transmission input shaft end fit inside the bushing with no reaming.
|
|
1939 B, 1940 B, 1941 WC, 1951 WD, 1952 CA, 1956 WD-45
|
|
wjohn
Orange Level
Joined: 19 Jan 2010
Location: KS
Points: 1799
|
Post Options
Thanks(0)
Quote Reply
Posted: 25 Jun 2020 at 10:32pm |
dr p wrote:
John, when you take that head in, I would see if your shop has a milling machine that can shave that mounting service down to flat. I had trouble not cracking China made heads when installing them. Planing that surface and finding a used Vinson head seemed to so the trick |
I have the head loaded up in my car. My manifold appears to be okay but I haven't fully gone over it yet (no clue if it's the original or not) but regardless I figured that pitting on the one exhaust port was bad enough that it needs quite a bit of material planed off.
|
|
1939 B, 1940 B, 1941 WC, 1951 WD, 1952 CA, 1956 WD-45
|
|
Sugarmaker
Orange Level
Joined: 12 Jul 2013
Location: Albion PA
Points: 8167
|
Post Options
Thanks(0)
Quote Reply
Posted: 25 Jun 2020 at 8:58pm |
John, My last WD45 project, took way longer than I expected, and cost more than I had planned too. But when I fire it up, its all worth it! Keep the pictures coming too! Regards, Chris
|
|
D17 1958 (NFE), WD45 1954 (NFE), WD 1952 (NFE), WD 1950 (WFE), Allis F-40 forklift, Allis CA, Allis D14, Ford Jubilee, Many IH Cub Cadets, 32 Ford Dump, 65 Comet.
|
|
dr p
Orange Level
Joined: 24 Feb 2019
Location: new york
Points: 1011
|
Post Options
Thanks(0)
Quote Reply
Posted: 25 Jun 2020 at 8:07pm |
|
John, when you take that head in, I would see if your shop has a milling machine that can shave that mounting service down to flat. I had trouble not cracking China made heads when installing them. Planing that surface and finding a used Vinson head seemed to so the trick
|
|
IBWD MIke
Orange Level

Joined: 08 Apr 2012
Location: Newton Ia.
Points: 3445
|
Post Options
Thanks(0)
Quote Reply
Posted: 25 Jun 2020 at 8:21am |
|
John, take your time. You will be glad you did.
|
|
wjohn
Orange Level
Joined: 19 Jan 2010
Location: KS
Points: 1799
|
Post Options
Thanks(0)
Quote Reply
Posted: 24 Jun 2020 at 10:59pm |
Chris, I may have to break down and do some welding on the shaft. I'm mostly dreading all of the grinding but that would likely be the most solid fix. I wish I could justify a lathe!
Mike, we'll see if it works. As long as the gap between the two sleeves doesn't catch the one seal as it passes through, it should be good.
Talked to the machine shop today and supposedly I might have my crank back next week. I snapped three manifold studs off but got the head stripped down for machining, so I'll drop that off soon. Also need to order a reamer for the bronze bushing in that input shaft as I don't have anything here that will work. Maybe I'll have the tractor done in September?
|
|
1939 B, 1940 B, 1941 WC, 1951 WD, 1952 CA, 1956 WD-45
|
|
IBWD MIke
Orange Level
Joined: 08 Apr 2012
Location: Newton Ia.
Points: 3445
|
Post Options
Thanks(0)
Quote Reply
Posted: 22 Jun 2020 at 8:36am |
|
I like the two speedy-sleave approach to the shaft repair. I have went through a couple of these torque-tube/hand clutch set-ups. That input shaft is a serious wear point, they had a repair kit for it, think it is NLA. Reed got me the correct seal for one with the repair sleeve for the second one, they are a little like hens teeth!
|
|
Sugarmaker
Orange Level
Joined: 12 Jul 2013
Location: Albion PA
Points: 8167
|
Post Options
Thanks(0)
Quote Reply
Posted: 21 Jun 2020 at 9:13pm |
John, Your doing very good. I think I welded and hand worked mine. See if I can find a picture. not perfect but still way better than it was.
Regards, Chris
|
|
D17 1958 (NFE), WD45 1954 (NFE), WD 1952 (NFE), WD 1950 (WFE), Allis F-40 forklift, Allis CA, Allis D14, Ford Jubilee, Many IH Cub Cadets, 32 Ford Dump, 65 Comet.
|
|
wjohn
Orange Level
Joined: 19 Jan 2010
Location: KS
Points: 1799
|
Post Options
Thanks(0)
Quote Reply
Posted: 21 Jun 2020 at 8:40pm |
Thanks Dave! It's taking way longer than I planned on but what doesn't. Like a lot of things the next tractor I tear apart should go faster since I've already spent my time figuring out what way is best to get the steering u-joint out, or how to pull the engine with my specific equipment here, etc. I love having the forum because I can go look at how someone else took something apart, and maybe someone can reference my thread someday for help.
I do have a few more questions:
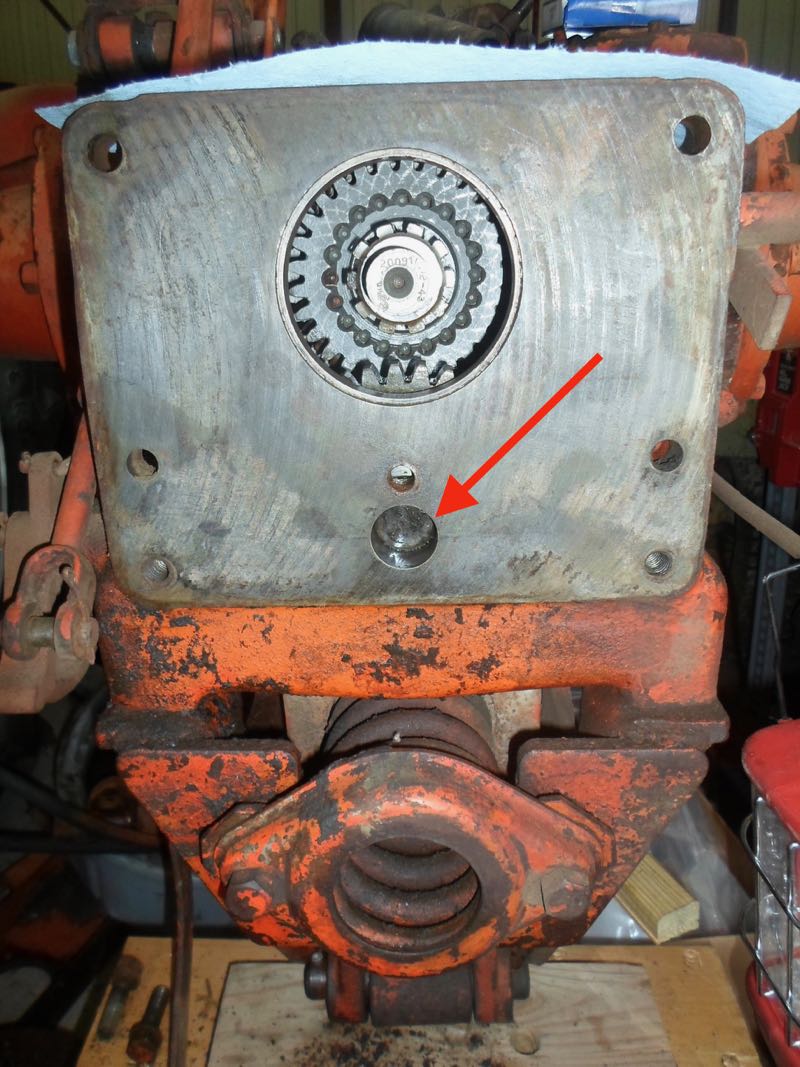
1. Hopefully an easy one - is the countershaft supposed to sit back this far from the front surface of the transmission?
2. I have one exhaust port in the head that looks pretty rough - I'm going to need to have the intake and exhaust ports machined at a shop, I think? I still don't have my crankshaft back so I'm dreading leaving the head there for who knows how long.
3. Last - any thoughts on what I should do with the vertical steering gear shaft... It has a ton of wear where the old bearing was locked up and was apparently spinning on the shaft. I have had the thought to JB weld it but I'm definitely open to better ideas.
|
|
1939 B, 1940 B, 1941 WC, 1951 WD, 1952 CA, 1956 WD-45
|
|
Dave(inMA)
Orange Level
Joined: 12 Sep 2009
Location: Grafton, MA
Points: 2395
|
Post Options
Thanks(0)
Quote Reply
Posted: 21 Jun 2020 at 10:53am |
|
Progress is good, wjohn! I'm enjoying reading about your project and seeing your pix.
|
|
WC, CA, D14, WD45
|
|
wjohn
Orange Level
Joined: 19 Jan 2010
Location: KS
Points: 1799
|
Post Options
Thanks(0)
Quote Reply
Posted: 21 Jun 2020 at 10:42am |
My AGCO order came in so I'm finally doing more putting things together than taking them apart. A couple of interesting notes - the fancy spherical/barrel bearing at the bottom of the front steering gear shaft is just a tapered roller bearing now when you order it from AGCO. I also did not realize that the intake valve guides are apparently knurled from the factory. My old ones were still worn but they must do this for oil control with no valve seals.
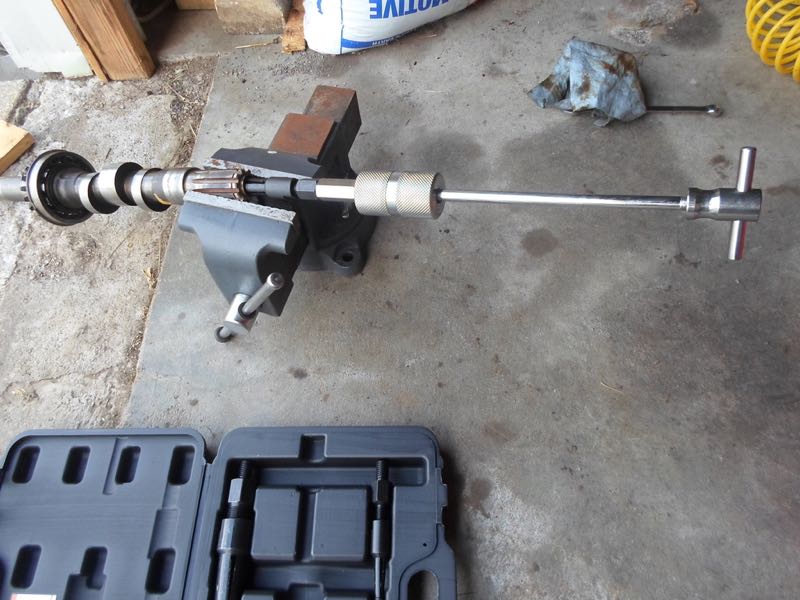
This is what I used to pull the bronze bushing out of the rear of the clutch shaft. It worked well. The new bushing is too tight for the trans input shaft, so I'll have to get a reamer to open it up a little.
I also put a couple of speedi sleeves in the spot where the seals that separate the hydraulic and hand clutch compartments go. I did not find one long enough to catch both seals so I put two 1/2" long ones on. I'm not thrilled about the gap between them, but I couldn't drive the second one on any farther without removing the driving lip. I'll have to be really careful when I install this shaft.
My new die grinder is a lot of fun and I cleaned up the worn front pedestal. My 6 gallon compressor is just enough to run it without too much resting and waiting.
|
|
1939 B, 1940 B, 1941 WC, 1951 WD, 1952 CA, 1956 WD-45
|
|
Sugarmaker
Orange Level
Joined: 12 Jul 2013
Location: Albion PA
Points: 8167
|
Post Options
Thanks(0)
Quote Reply
Posted: 04 Jun 2020 at 9:18pm |
John, Very interesting puller tool Never knew that had any thing like it. Thanks for the picture! Your doing great! Regards, Chris
|
|
D17 1958 (NFE), WD45 1954 (NFE), WD 1952 (NFE), WD 1950 (WFE), Allis F-40 forklift, Allis CA, Allis D14, Ford Jubilee, Many IH Cub Cadets, 32 Ford Dump, 65 Comet.
|
|
wjohn
Orange Level
Joined: 19 Jan 2010
Location: KS
Points: 1799
|
Post Options
Thanks(0)
Quote Reply
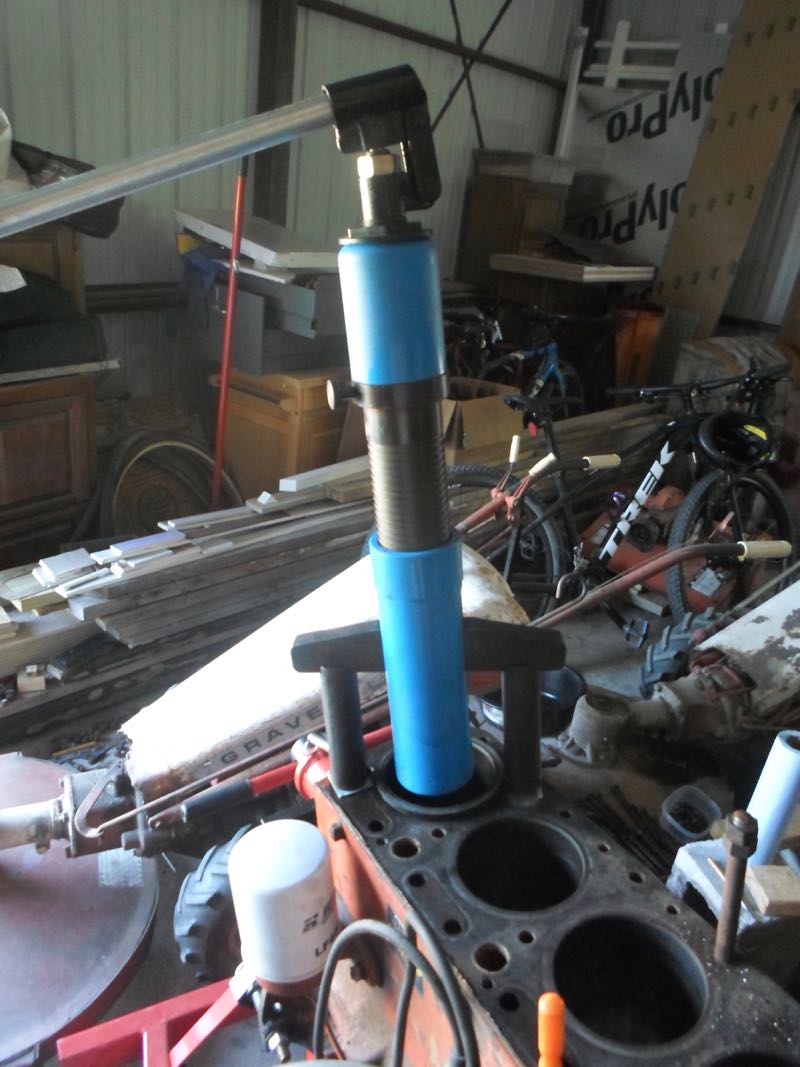
Posted: 03 Jun 2020 at 8:41pm |
I wound up buying this whopper of a deal hydraulic sleeve puller straight from China for half the price of the OTC tool that doesn't even come with any adapter plates. It's very Chinese and definitely overkill but it worked well, at least this one time. It came with a bunch of adapter plates for different cylinder bores so if it lasts I should be set for most engines.
My camshaft bearing driver is on the way. Hopefully after that I won't have to put too much more money in tools beyond a decent welder and drill press someday.
|
|
1939 B, 1940 B, 1941 WC, 1951 WD, 1952 CA, 1956 WD-45
|
|
Sugarmaker
Orange Level
Joined: 12 Jul 2013
Location: Albion PA
Points: 8167
|
Post Options
Thanks(0)
Quote Reply
Posted: 30 May 2020 at 8:50pm |
John, Maybe grind flat and add a washer as you mentioned. Should work. Regards, Chris
|
|
D17 1958 (NFE), WD45 1954 (NFE), WD 1952 (NFE), WD 1950 (WFE), Allis F-40 forklift, Allis CA, Allis D14, Ford Jubilee, Many IH Cub Cadets, 32 Ford Dump, 65 Comet.
|
|
wjohn
Orange Level
Joined: 19 Jan 2010
Location: KS
Points: 1799
|
Post Options
Thanks(0)
Quote Reply
Posted: 30 May 2020 at 7:59pm |
Sugarmaker wrote:
John,Sometimes I don't have the best ideas, and sometimes I am a little weld happy. But do you think that wear on the top of the front spindle assembly could be welded and ground flat? Another reason for the die grinder! You have this apart this far, might as well clean and paint too. Its going to be almost new! Regards, Chris |
Perhaps! It is part of the casting though, and to be honest my welding skills are about on par with most kids in a high school ag class. I am not sure that I could weld that casting well at all with my little Harbor Freight welder?
|
|
1939 B, 1940 B, 1941 WC, 1951 WD, 1952 CA, 1956 WD-45
|
|
Sugarmaker
Orange Level
Joined: 12 Jul 2013
Location: Albion PA
Points: 8167
|
Post Options
Thanks(0)
Quote Reply
Posted: 29 May 2020 at 6:38am |
John, Sometimes I don't have the best ideas, and sometimes I am a little weld happy. But do you think that wear on the top of the front spindle assembly could be welded and ground flat? Another reason for the die grinder! You have this apart this far, might as well clean and paint too. Its going to be almost new! Regards, Chris
|
|
D17 1958 (NFE), WD45 1954 (NFE), WD 1952 (NFE), WD 1950 (WFE), Allis F-40 forklift, Allis CA, Allis D14, Ford Jubilee, Many IH Cub Cadets, 32 Ford Dump, 65 Comet.
|
|
wjohn
Orange Level
Joined: 19 Jan 2010
Location: KS
Points: 1799
|
Post Options
Thanks(0)
Quote Reply
Posted: 28 May 2020 at 9:18pm |
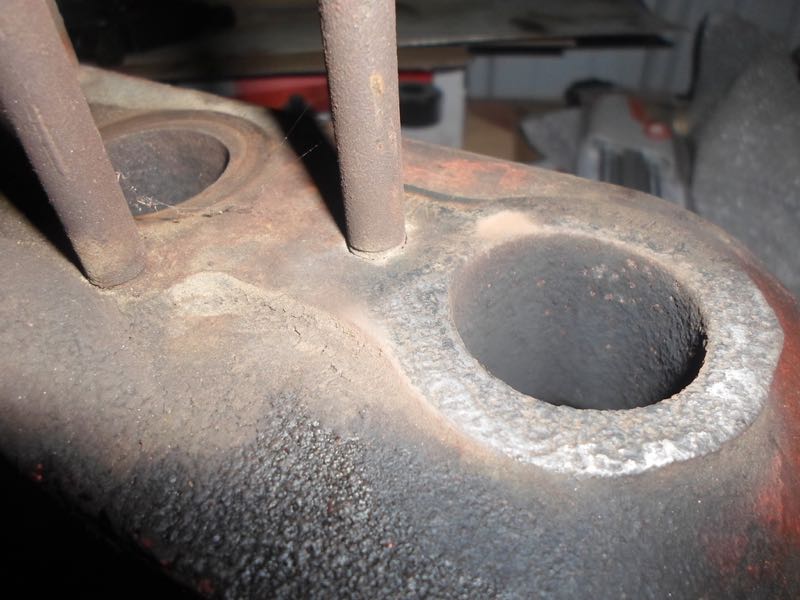
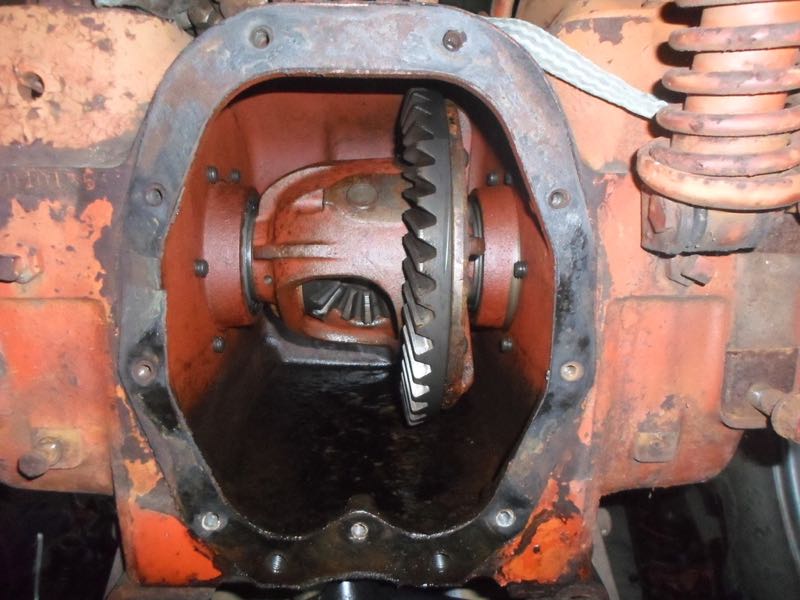
Thankfully there weren't any rusty surprises in the rear end - just the usual 1/2" of sludge at the bottom of most old tractors. The backlash was 0.020" and the manual specs .014" max, but I don't think it's worth touching that. It's worn in as-is and I doubt it will become an issue for the next several decades.
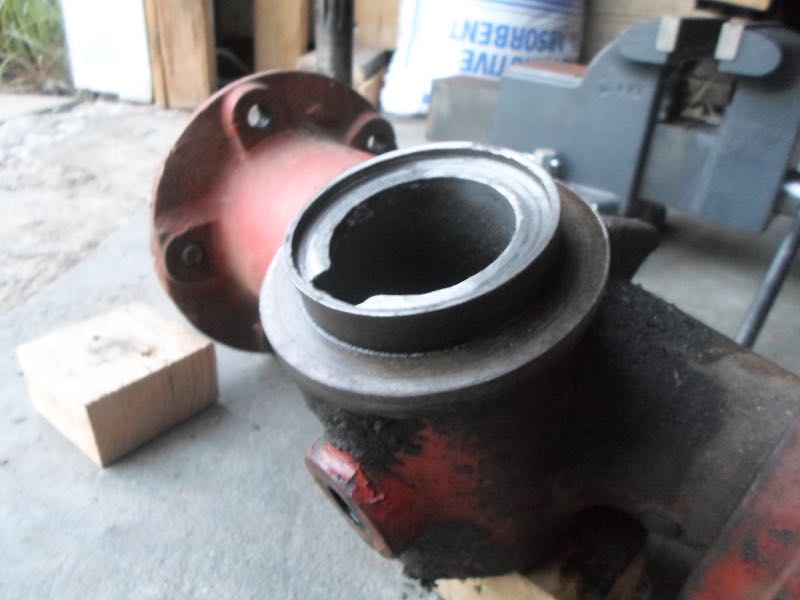
I did find that the front end pedestal is very worn. I see this wear on a lot of pedestals when I look at pictures on here. I think I saw one tractor that someone had added a washer to take this space up. Is that worth doing?
|
|
1939 B, 1940 B, 1941 WC, 1951 WD, 1952 CA, 1956 WD-45
|
|
wjohn
Orange Level
Joined: 19 Jan 2010
Location: KS
Points: 1799
|
Post Options
Thanks(0)
Quote Reply
Posted: 25 May 2020 at 1:44pm |
SteveM C/IL wrote:
#3rd gear is where that brg will get its biggest load....I'd run it. Even if you plowed 20A a year it will likely outlast you.... |
Thanks Steve. I think I smoothed the surfaces out enough to knock down any high spots. I never would have put a tapered roller bearing and cup that looked like this back in but I think this style may not be quite as precise to begin with... Plus long rollers with lots of area for wearing/loading.
I also wasn't too excited about pulling the diff out to replace the main shaft. If it does eventually go out years in the future I can split the back of the tractor and leave the engine etc. alone. It may be a good excuse to paint at that time as well.
|
|
1939 B, 1940 B, 1941 WC, 1951 WD, 1952 CA, 1956 WD-45
|
|
SteveM C/IL
Orange Level Access
Joined: 12 Sep 2009
Location: Shelbyville IL
Points: 7981
|
Post Options
Thanks(0)
Quote Reply
Posted: 25 May 2020 at 10:19am |
|
#3rd gear is where that brg will get its biggest load....I'd run it. Even if you plowed 20A a year it will likely outlast you....
|
|
wjohn
Orange Level
Joined: 19 Jan 2010
Location: KS
Points: 1799
|
Post Options
Thanks(0)
Quote Reply
Posted: 25 May 2020 at 8:38am |
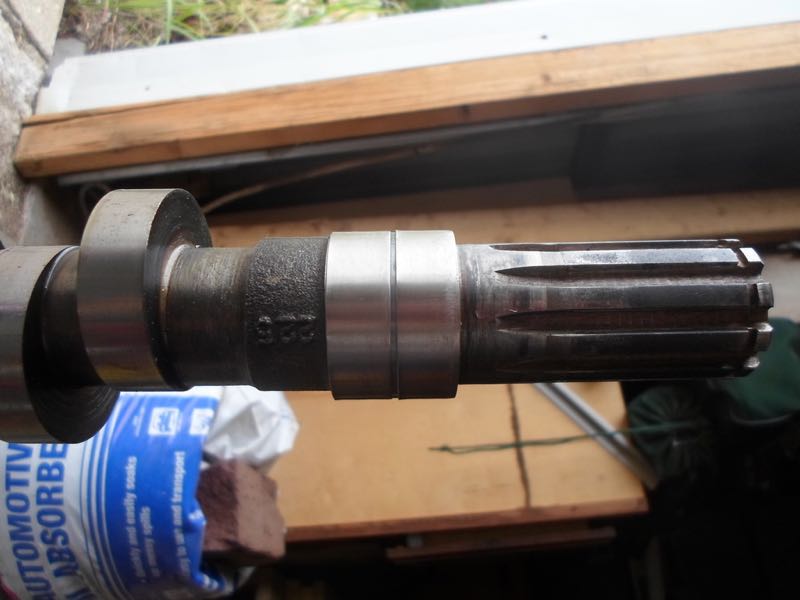
I cleaned up the surfaces where the input shaft roller bearing rides as much as I could stand. My fingers are still a little stiff from the 500 and 1200 grit sanding. It may be time to get a die grinder? There's still some shallow pitting and ugly looking staining but I also didn't want to take off too much material. Hopefully it'll last another decade or so with a new bearing.
|
|
1939 B, 1940 B, 1941 WC, 1951 WD, 1952 CA, 1956 WD-45
|
|
wjohn
Orange Level
Joined: 19 Jan 2010
Location: KS
Points: 1799
|
Post Options
Thanks(0)
Quote Reply
Posted: 23 May 2020 at 12:54pm |
DaveKamp wrote:
If you talk with your local bearing suppliers about it, you'll probably find that there's not many production runs of single-shielded bearings outside of factory-spec (OEM) production. This is because, at the replacement level, the application may require just one shield (or no shields) and it'd require three different parts inventory to satisfy all three possibilities, so instead, for field-replacement-application, the counter guy will order both shields, and simply remove the one (or let you remove) the one(s) to suit your application. This reduces inventory and manufacturing process cost, while giving the ability to cover all applications in one production run. |
Ah, that would make sense. Why stock 3 when you can just stock one, and pop the shield off as needed?
Once I get things going back together and confirm everything fits, I will post some of the bearing and seal part numbers on here for future reference.
|
|
1939 B, 1940 B, 1941 WC, 1951 WD, 1952 CA, 1956 WD-45
|
|