| Author |
 Topic Search Topic Search  Topic Options Topic Options
|
calico190xt68 
Orange Level


Joined: 12 Jan 2017
Location: Frankton, IN
Points: 907
|
 Post Options Post Options
") Thanks(0) Thanks(0)
 Quote Quote  Reply Reply
 Topic: Burnt Wiring Topic: Burnt Wiring
Posted: 26 Aug 2024 at 2:57pm |
Fortunately, it did not happen on any of my Allis Tractors, but it happened on my GMC General semi with a Cummins 855 motor (not original obviously). Great running truck but it doesn't run now. I wonder if it could happen on my tractors though. Regardless, I really want to understand how replacing a battery caused all of this. I also need to get a game plan on fixing it. I was hoping the electrical gurus on here could help me understand what went wrong and suggest an approach on splicing the wires.
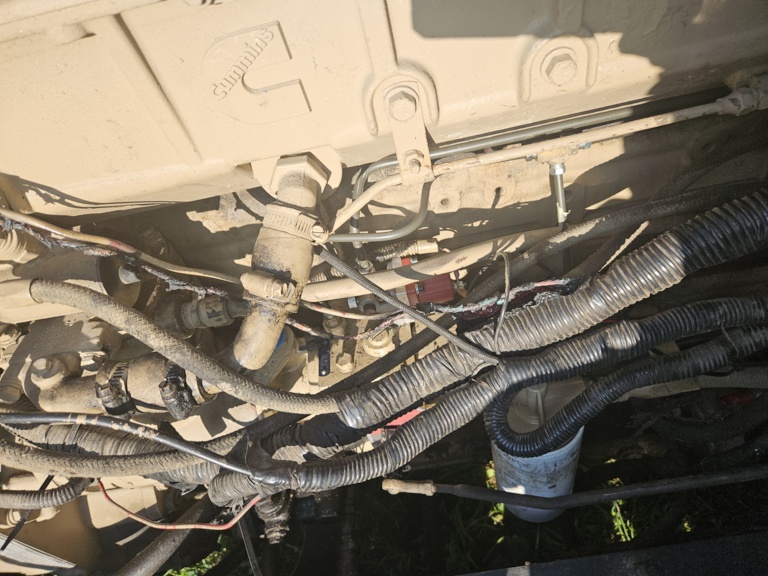
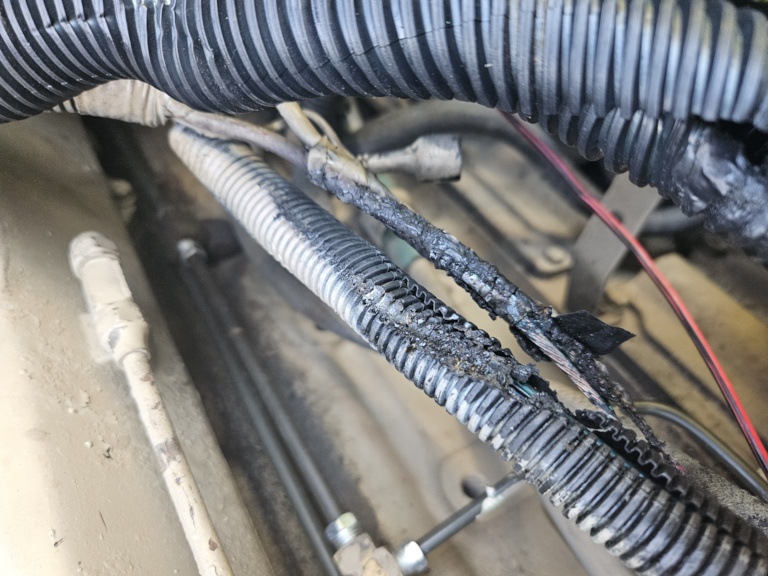
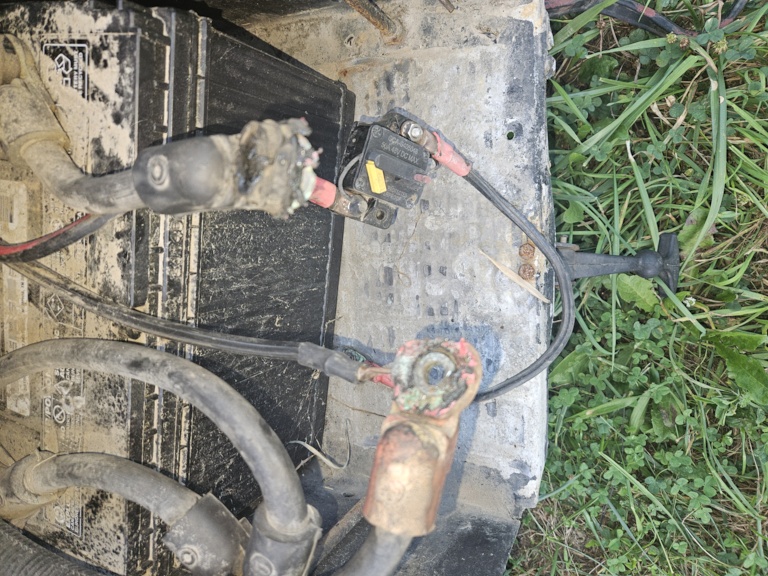
First, this truck has had a lot of rig wiring jobs done on it. The wiring harness picture shows the melting of the wires. It melted the wires at the battery terminals too in the other picture.
The big fat portion is where all of the smoke came from. Why did it melt in the center and not the ends?
I am supposed to have 3 batteries and there are three large capacity wires that go from positive to positive to positive and negative to negative to negative. I put a new battery in place and before I could remove the 2nd old battery, my wiring started to sizzle and melt. I never got the 3rd one in place. I tried to disconnect the two batteries from each other but before I could do that the cables melted on the terminals and made it very difficult to get cables off. By the time I did, my wiring harness melted in the center. I checked the voltage right after installing the 2nd battery and it showed 10 Volts so it was lower than it should have been. It is almost like the old battery was dragging it down but also causing it to heat up? Can anyone shed some light on this? I don't want to do it again.
My starter on this truck is a 12 volt starter. I assume I have to replace all of the wires and not just the burnt portions. I don't know how many I have in that casing yet. I am not an expert electrician but I think I can splice wires with the right gauge. Do I have to consider other things? Anybody had to do this before?
Thanks in advance for any insight.
|
|
80 7010, 80 7020, 68 190XTD, 67 190XTD, 500 Loader, AC 2000 Plow, Member Indiana A-C Partners, Member TAC
|
 |
|
Sponsored Links
|
|
|
DSeries4
Orange Level

Joined: 12 Sep 2009
Location: Ontario, Canada
Points: 7643
|
Post Options
Thanks(0)
Quote Reply
Posted: 26 Aug 2024 at 3:18pm |
I would start at the jury rigged wiring that you describe. That's usually where issues like this come from. A lot of people will say "It will work fine!" even though the job was sketchy as hell. If the wiring on your tractors are in good shape and not bodged together, you should be good. However, it never hurts to look things over now and then to check for any melting/scroching or insulation wearing off from rubbing against something.
I can't help with the wiring on your General, but that cable at the battery looks to be too small for the load it was carrying. You might have to go through that rigged wiring and remove what is not needed and redo what is needed.
|
|
'49 G, '54 WD45, '55 CA, '56 WD45D, '57 WD45, '58 D14, '59 D14, '60 D14, '63 D15D, '66 D15II, '66 D21II, '67 D17IV, '67 D17IVD, '67 190XTD, '73 620, '76 185, '77 175, '84 8030, '85 6080
|
|
Coke-in-MN
Orange Level Access

Joined: 12 Sep 2009
Location: Afton MN
Points: 42279
|
Post Options
Thanks(0)
Quote Reply
Posted: 26 Aug 2024 at 3:50pm |
|
Was the POLARITY right , + to + and such on 12 volt battery .
Many trucks with multipal batteries ere set up for 6 volt systems and + to - was how 2 batteries were set up .
|
|
Life lesson: If you’re being chased by a lion, you’re on a horse, to the left of you is a giraffe and on the right is a unicorn, what do you do? You stop drinking and get off the carousel.
|
|
steve(ill)
Orange Level Access

Joined: 11 Sep 2009
Location: illinois
Points: 90994
|
Post Options
Thanks(0)
Quote Reply
Posted: 26 Aug 2024 at 3:50pm |
3 batteries in PARALLEL is a LOT OF CURRENT... and a 855 Diesel pulls a LOT OF AMPS..
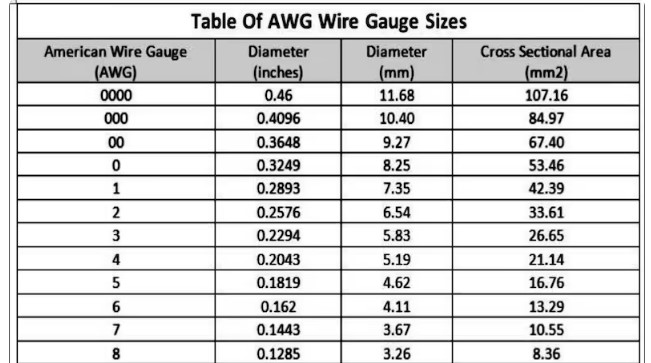
I would agree with Dseries4, that cable is WAY TOO SMALL... Dont know why it picked now to fail, but i would put a ALL NEW batterie cables on and make them BIGGER... your cable looks like a #4 .... a #2 would probably be to small .. #0 would be minimum....#00 would be better.
Edited by steve(ill) - 26 Aug 2024 at 3:59pm
|
|
Like them all, but love the "B"s.
|
|
steve(ill)
Orange Level Access
Joined: 11 Sep 2009
Location: illinois
Points: 90994
|
Post Options
Thanks(0)
Quote Reply
Posted: 26 Aug 2024 at 3:52pm |
talk to somebody like this...
wire size...
Edited by steve(ill) - 26 Aug 2024 at 3:57pm
|
|
Like them all, but love the "B"s.
|
|
PaulB
Orange Level
Joined: 12 Sep 2009
Location: Rocky Ridge Md
Points: 5283
|
Post Options
Thanks(0)
Quote Reply
Posted: 26 Aug 2024 at 3:59pm |
When I found my ASTRO, one of the first thing was to strip out the rats nest of wiring the previous owner had cobbled into the system for who knows what. Then repair what few problems were left. With a Cummings if you're need it right away, just turn the screw on top of the PT pump and use a screwdriver to short the starter and leave the key off and then unhook the batteries.
|
|
If it was fun to pull in LOW gear, I could have a John Deere.
Real pullers don't have speed limits.
If you can't make it GO... make it SHINY
|
|
jaybmiller
Orange Level Access
Joined: 12 Sep 2009
Location: Greensville,Ont
Points: 25296
|
Post Options
Thanks(0)
Quote Reply
Posted: 26 Aug 2024 at 4:08pm |
1st problem in the 1st picture is that homemade battery cable' ! The end is NOT properly crimped onto the cable. That alone could have easily burnt the truck down to the ground. 2nd problem, sounds like you have mismatched batteries. It's a BAD idea to just replace one of 4 or 1 of 3 in your case. The 'weak' battery WILL 'pull down' the others to it's lousy level. Smart truckers replace ALL and make sure ALL are same brand and model. best it to get from same batch if possible. When you replace the batteries you ALSO replace ,at the very least the MAIN fat power cable going to the starter. OK, so it costs a few bucks BUT you now KNOW you've got LOTS of amps AND the wires to HANDLE that power. Bodging or being frugal WILL leave you at the side of the road !
|
|
3 D-14s,A-C forklift, B-112
Kubota BX23S lil' TOOT( The Other Orange Tractor)
Never burn your bridges, unless you can walk on water
|
|
ekjdm14
Orange Level Access
Joined: 20 Aug 2024
Location: Alsager UK
Points: 987
|
Post Options
Thanks(0)
Quote Reply
Posted: 27 Aug 2024 at 9:37am |
Agreed that cable looks pretty wimpy, and also a bad battery/ies with one or more shorted cells would cause said batt's to pull down HARD on a fresh fully charged unit. It's possible that one of your connections inter-battery wasn't the greatest (likely a ground) which then caused the current to find it's own path back to the bad battery through whatever wires melted.
First order of business is as mentioned, pick up 3 new matched batteries & some suitable gauge power and ground wiring/properly crimped terminals but before installing those, open up the loom that smoked & identify how many wires you have melted & what they fed.
With that information you can probably find how big of a mess you have (hoping for your sake it's confined to under the hood & not into the cab anywhere), replace all burned wires and check insulation on the rest of the harness.
If it was mine, I'd then do an ohms check between your new + and - terminals with everything switched off. This is to check for any further shorts, a small resistance (somewhere down to maybe 250 ohms between + & - would be acceptable if you have alarms/clock etc on full time power) BEFORE attempting to connect the new batteries.
Also would 100% recommend a disconnect switch in line with the new batteries so you can quickly kill power in future if anything goes awry. And definitely attend to any rigged wiring as soon as you can!
Finally, if you watch Youtube check out Mr Hewes' recent video "fright night" as a reminder how lucky you got that the failure occured when you were there to kill it ;)
|
|
steve(ill)
Orange Level Access
Joined: 11 Sep 2009
Location: illinois
Points: 90994
|
Post Options
Thanks(0)
Quote Reply
Posted: 27 Aug 2024 at 10:28am |
|
You need to cut into the burnt harness and repair all the small wires first.. Look for OLD damage and NEW damage and fix everything... When you think you have it all repaired, connect ONE 12 v battery.. old or new... and test everything.. lights, radio, accessories ... Then bump the STARTER motor.. solenoid should CLICK, but wont turn over with only one small battery... IF everything looks good... THEN install the new batteries and cables and double check + to + to +...
|
|
Like them all, but love the "B"s.
|
|
calico190xt68
Orange Level
Joined: 12 Jan 2017
Location: Frankton, IN
Points: 907
|
Post Options
Thanks(0)
Quote Reply
Posted: 28 Aug 2024 at 7:59am |
I am going to post some more pictures and there is more to the story as I look at the wires and think through the event. I was lucky that I had the hood up while I was do this otherwise, I wouldn't have seen it and it would have burnt into the cab.
I have done some research and know that over capacity current is what melts wires, not voltage. The smaller wires melt first, which is what I saw happening. What caused the high current has to be a differential between the old battery and the new battery. Nothing else makes sense at this time so while I had the right idea to change all batteries, I should have disconnected all of the batteries before connecting up the new one. Then connected the next new one and the next. These all would have been on a equal voltage value and not caused the differential but I am not an electrical guy so I could still be wrong. I am definitely setting up a cutoff switch. However, there is a cutoff switch inthe battery compartment that I found and I do not yet know what it is for. I am going to track down and document all of my major wires. Maybe that will make it all clearer.
There may be another part to this story though. It seems that the fried cable I took a picture of does not go to the starter. It is a negative cable that I have to track down.
I do have the very large 0 cables going to the starter, but I didn't take a picture of them yet. They didn't burn because they were so large. They did melt and at the battery terminals.
It was a sickening feeling watch those cables melt and burn and realize I could not stop it because I couldn't disconnect the melted terminals. It was a frantic couple of minutes to say the least and I felt like it was headed to the cab too.
I am going to cut open the plastic protocter and see what I have inside. My guess is the smaller wires are melted. The larger wires are compromised.
|
|
80 7010, 80 7020, 68 190XTD, 67 190XTD, 500 Loader, AC 2000 Plow, Member Indiana A-C Partners, Member TAC
|
|
Steve in NJ
Orange Level Access

Joined: 12 Sep 2009
Location: Andover, NJ
Points: 12071
|
Post Options
Thanks(1)
Quote Reply
Posted: 28 Aug 2024 at 9:30am |
It's really tough to call what happened there without actually standing there looking over the situation and how you have things wired as well as the size cables for the application. People could come up with a hundred different possibilities of why such a thing could've happened and 98 outta' a hundred could be good explanations, but it's really hard to do looking at a couple pictures. Those types of situations need to be torn into and a lot of diagnosing is in order there. There is a lot of amperage when multiple Batteries are involved. I wouldn't even start guessing or suggesting what happened there. The only thing I would suggest is to start at the power source first and inspect and draw test each Battery individually to eliminate those as a possibility. Even if you did find a internal shorted Battery, you still need to thoughly inspect everything else there. Even the wiring that didn't get BBQ'd. Cable size and condition are important... Steve@B&B
|
|
39'RC, 43'WC, 48'B, 49'G, 50'WF, 65 Big 10, 67'B-110, 75'716H, 2-620's, & a Motorhead wife
|
|
calico190xt68
Orange Level
Joined: 12 Jan 2017
Location: Frankton, IN
Points: 907
|
Post Options
Thanks(0)
Quote Reply
Posted: 28 Aug 2024 at 9:35pm |
|
I appreciate what you say. It was a tough day for me. I have to get this semi running again. Going to be a challenge
|
|
80 7010, 80 7020, 68 190XTD, 67 190XTD, 500 Loader, AC 2000 Plow, Member Indiana A-C Partners, Member TAC
|
|
calico190xt68
Orange Level
Joined: 12 Jan 2017
Location: Frankton, IN
Points: 907
|
Post Options
Thanks(0)
Quote Reply
Posted: 29 Aug 2024 at 8:05pm |
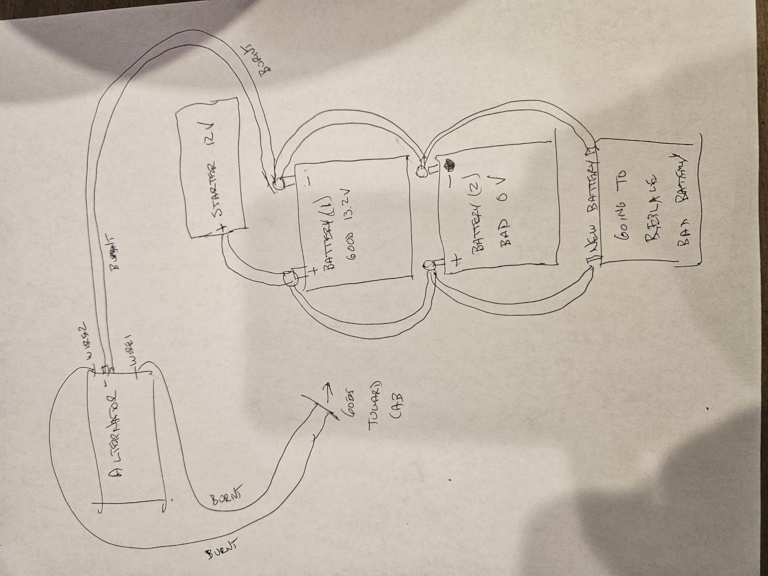
I think I might know what has happened. The fix may not be as bad as I thought.
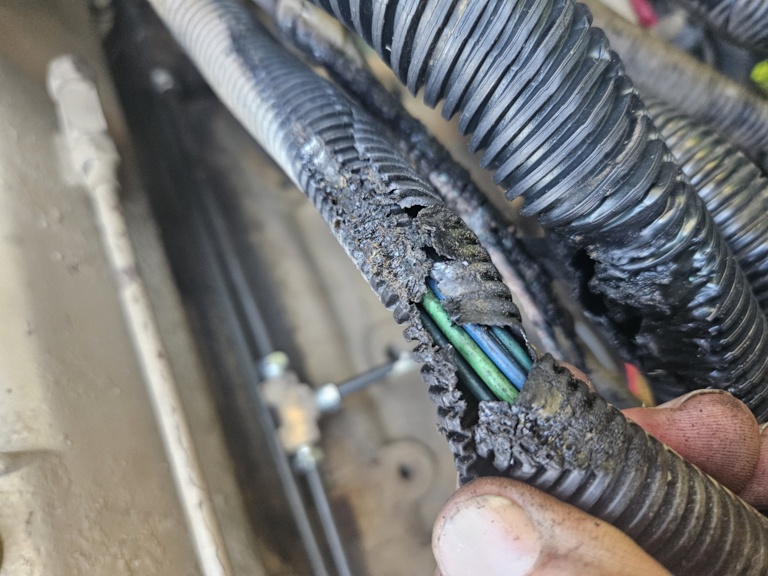
I pulled open the split wire plastic loom and found only two wires
were melted. Turns out that those two wires plus the wire I showed in
the picture were all
attached to the alternator. It appears that the burning started at the
alternator which was on the other side of the truck. Basically, after I
connected the new battery it probably started burning then and was
working it's way to the other side where I was at. By the time I saw
it, it had already burnt the other side. The large gauge wire did not
melt through like the smaller gauge wires but was on it's way. Here is a
picture of what I think I have. This fix may not be too bad. Not sure
if it fried the alternator though, but that is easy to figure out. I
missed showing the negative cable going to the truck frame in this
picture.
The one oddity is the cable going to
the alternator. It was attached to the negative ground on the battery.
That doesn't seem right. Normally, the alternator gets it's ground
from the engine and there isn't a special cable, I thought? So, I am
going to have to look closer at the alternator. I have a new suspicion
that maybe someone might have made a mistake when they put the battery into the top spot. I think that cable goes to the positive
terminal on the alternator and not the ground. The reason why it didn't
previously cause a problem is because the top battery was not connected
to the bottom two batteries. As I started to connect all 3, that is
when all hell broke loose.
If that negative
cable going to the alternator was really supposed to be the positive
cable and was criss-crossed incorrectly, would that have caused the
alternator connections to burn wiring? Possibly. It's really about the
only explanation. It really looks like the burning started on the
other side where the alternator was. I am going to have to look at that Alternator and try to figure
that large cable out.
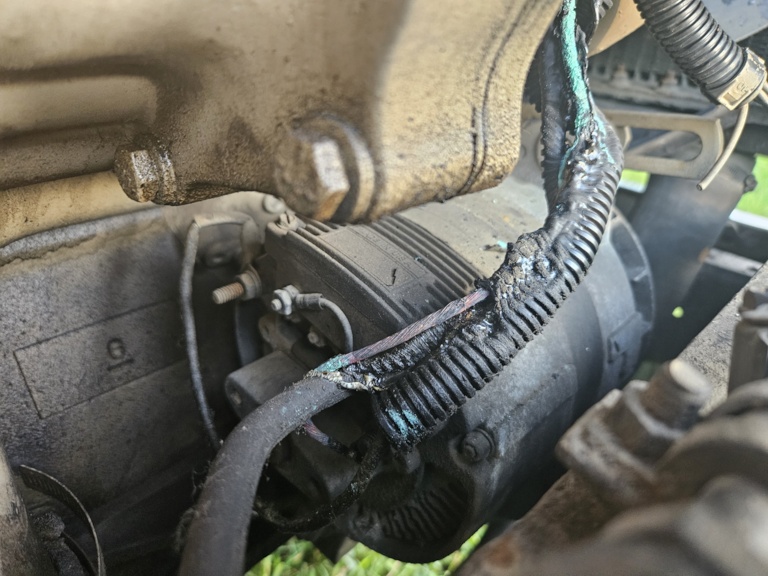
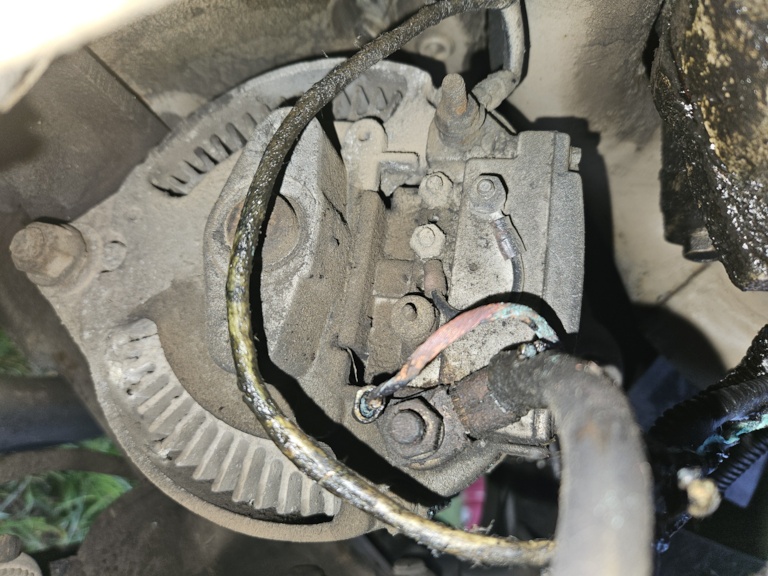
Here
is more of what happened. This is the alternator on the other side of
the engine. There are two small wires and the large wire, all are
burnt.
If
you look closely, those two wires going to alternator stopped melting,
right here. So that is going to be my splice point for those two.
while the loom is melted, these wires appear to be fine. The loom
melted but not the wires. There are a lot of wires in there so that is
good. I will pull the loom off just to be sure though.
you can see I have the big gauge battery cables. They are all fried so
they have to be replaced. They look expensive. You might be wondering
what that cutout switch is for? Me too. I think it may be cutoff
switch to the rear tail lights. They have a tendency to stay on but I
didn't realize this cutoff switch turned them off. I traced it to the
back of the semi but lost it without a light.
|
|
80 7010, 80 7020, 68 190XTD, 67 190XTD, 500 Loader, AC 2000 Plow, Member Indiana A-C Partners, Member TAC
|
|
steve(ill)
Orange Level Access
Joined: 11 Sep 2009
Location: illinois
Points: 90994
|
Post Options
Thanks(0)
Quote Reply
Posted: 29 Aug 2024 at 8:22pm |
YEA... BIG GROUND on the alternator terminal dont look right.... There should be an INSULATED LUG that is the power output ( positive cable)... If there is a ground wire, it will be just a 5/16 inch bolt screwed into the CASE... no insulator around it.
How could it ever run that way ? You just bought the truck and alternator was connected to a dead battery that was not part of the system ??
|
|
Like them all, but love the "B"s.
|
|
steve(ill)
Orange Level Access
Joined: 11 Sep 2009
Location: illinois
Points: 90994
|
Post Options
Thanks(0)
Quote Reply
Posted: 29 Aug 2024 at 8:25pm |
|
alternator wire makes a lot more sense than two batteries with a differential voltage... somehow you had to get the POSITIVE WIRE GROUNDED..... you may have a dead alternator regulator now !
|
|
Like them all, but love the "B"s.
|
|
calico190xt68
Orange Level
Joined: 12 Jan 2017
Location: Frankton, IN
Points: 907
|
Post Options
Thanks(0)
Quote Reply
Posted: 29 Aug 2024 at 9:11pm |
|
So, all 3 batteries were never really connected, but i wasn't aware of that when i started hooking up all 3. It became harder to start so i thought all 3 should be hooked up.
I will not be surprised that the alternator is fried. I just want to get it to start again.
I need to figure out the wiring on the alternator. I need to find out the model and then i will know if that wire is positive like i think.
Edited by calico190xt68 - 29 Aug 2024 at 9:11pm
|
|
80 7010, 80 7020, 68 190XTD, 67 190XTD, 500 Loader, AC 2000 Plow, Member Indiana A-C Partners, Member TAC
|
|
steve(ill)
Orange Level Access
Joined: 11 Sep 2009
Location: illinois
Points: 90994
|
Post Options
Thanks(0)
Quote Reply
Posted: 29 Aug 2024 at 9:36pm |
Leave the wires off the alternator and connect the batteries and it should start... Will not CHARGE with the alternator disconnected... The two smaller wires to the alternator are HOT POSITIVE... so if you connect the MAIN CHARGE WIRE from the alternator to GROUND ( negative bat terminal), you have a dead short and pull 1000 amps thru those wires.. So YES... all three will FRY.
Post the alternator model, or get a photo of the two small wire conections and LUG on the back... Does not look like a DELCO and it has a tack drive cable ?
Edited by steve(ill) - 29 Aug 2024 at 9:45pm
|
|
Like them all, but love the "B"s.
|
|
calico190xt68
Orange Level
Joined: 12 Jan 2017
Location: Frankton, IN
Points: 907
|
Post Options
Thanks(0)
Quote Reply
Posted: 30 Aug 2024 at 6:47am |
I am pretty sure your explanation of pulling 1000 amps is what caused this so that is good to have cleared up. Really appreciate your advice and clarification.
I will dig into the alternator this weekend and figure out what I have. I do not see a tach cable going to the Alternator. With the wires disconnected from the alternator, I can still test for output with a voltmeter, right? That will tell me if I need a new alternator.
Do you have an online source for those battery overmolded cables you can recommend? I see some on Amazon but not sure about quality. Although a 2/0 cable can't be that different from manufacturer to manufacturer as long as it is copper? I can have them in a day from Amazon.
Ironically, the truck was starting on one good battery but only because it was summer time. I suspect 3 batteries should be good enough. Need to find out what a Cummins 855 Big Cam normally requires? The original Detroit engine was replaced.
One last question. Where do the two small wires going to the alternator that burnt typically terminate? They disappear into the wiring harness. If they were fused, they would not have burnt.
I know this is probably never going to happen again since I now know the setup, but does it make sense to fuse the large cable? I looked at some typical wiring diagrams of the entire alternator circuits on other vehicles and it shows having a large fuse (maybe 200 AMP) that is in between the alternator cable and the battery. If I had that, I would not be dealing with this issue. I think I should put a fuse inline.
|
|
80 7010, 80 7020, 68 190XTD, 67 190XTD, 500 Loader, AC 2000 Plow, Member Indiana A-C Partners, Member TAC
|
|
steve(ill)
Orange Level Access
Joined: 11 Sep 2009
Location: illinois
Points: 90994
|
Post Options
Thanks(0)
Quote Reply
Posted: 30 Aug 2024 at 7:55am |
this is one site to buy cables... just pick the length and end lugs you want and they make to exact size...
the two small wires are normally a POWER wire from the key switch, and a signal wire that might go thru the idiot light on the dash or a small resistor.. the small differential between the two wires tells the alternator to CHARGE.
yes, the alternator charge has nothing to do with the engine START.. Just leave the 3 wires off (taped seperate) and you can start up the engine on 1-2-3 batteries for a test... With the two small wires connected, the BIG LUG should start putting out power with the voltmeter two leads touching the terminal and ground.
Edited by steve(ill) - 30 Aug 2024 at 8:14am
|
|
Like them all, but love the "B"s.
|
|
Steve in NJ
Orange Level Access
Joined: 12 Sep 2009
Location: Andover, NJ
Points: 12071
|
Post Options
Thanks(0)
Quote Reply
Posted: 30 Aug 2024 at 9:28am |
Looking at the back of that Alternator with its flat regulator and double posts, looks to me like it's a 12000 LC series Leece/Neville. Around 120-130 amp unit. If I were you, I would remove that Alternator and take it to a rebuilder to load test the unit first. That's a pretty expensive unit you're lookin' at there. If there was a fuse link in that OEM harness to the Alternator, that fuse link would have saved the Alternator from being shishkabob. That unit runs probably around $550.-$600 bucks. The last time I did one of those LC units, it was off a KW and the cost to rebuild that unit using OEM Prestolite components was around $400 bucks. So get it tested first. Might save you a lot of dough......Wires are cheap compared to that unit.  Steve@B&B
|
|
39'RC, 43'WC, 48'B, 49'G, 50'WF, 65 Big 10, 67'B-110, 75'716H, 2-620's, & a Motorhead wife
|
|
calico190xt68
Orange Level
Joined: 12 Jan 2017
Location: Frankton, IN
Points: 907
|
Post Options
Thanks(0)
Quote Reply
Posted: 30 Aug 2024 at 10:15am |
Does this picture give you a better idea of the model/make of the alternator?
I like your idea of taking it off and having it tested.
Thanks for the link to making the cable whatever size I need.
I have two follow up questions. One, I tested the voltage on the one good battery and it showing 12.47. Is it safe to use that battery? The terminals got hot but they didn't melt like the cable ends.
Second, those two burnt small wires, I would like to find their location coming out of the wiring harness to the wiring block. Is it possible to excite one end and test for current to the wiring block under the hood? There is this big long wiring block on the engine firewall where I think these wires terminate. Then they go from that wiring block back under the dash. Due to the gauge of the wire, I have about 4 possible choices as to which wires these are. I also don't think the idiot light was really working on the semi. It should have been on a long time ago. I also don't think the one wire that should be going to the ignition is making it there. The ignition key switch is a total rats nest but I could be wrong.
Thanks as always for our help! Learned a lot the hard way.
|
|
80 7010, 80 7020, 68 190XTD, 67 190XTD, 500 Loader, AC 2000 Plow, Member Indiana A-C Partners, Member TAC
|
|
steve(ill)
Orange Level Access
Joined: 11 Sep 2009
Location: illinois
Points: 90994
|
Post Options
Thanks(0)
Quote Reply
Posted: 30 Aug 2024 at 12:53pm |
i know nothing about that brand of alternator, but STEVE seems to be on the right track.. Here is a photo of that "brand"... model might be other.
|
|
Like them all, but love the "B"s.
|
|
steve(ill)
Orange Level Access
Joined: 11 Sep 2009
Location: illinois
Points: 90994
|
Post Options
Thanks(0)
Quote Reply
Posted: 30 Aug 2024 at 12:56pm |
Personally i would move to a Delco alternator.. Cheaper and readily available.
YES, you can test the WIRES by using an OHM meter and touching one lead to each end of the wires and check for continuity.... Basically that is a meter that runs a 6v signal thru the wire and see which wire on the terminal block is connected to it.
YES... if a battery tests at 12.4 volts it SHOULD be acceptable for testing and possibly starting the engine.. You will know when you try to crank it, if the battery has enough power / charge to spin the engine.
Edited by steve(ill) - 30 Aug 2024 at 1:13pm
|
|
Like them all, but love the "B"s.
|
|
steve(ill)
Orange Level Access
Joined: 11 Sep 2009
Location: illinois
Points: 90994
|
Post Options
Thanks(0)
Quote Reply
Posted: 30 Aug 2024 at 1:10pm |
|
Many of the "new type" alternators use the same 3 wire system. I would be interested in seeing what STEVE @ B&B thinks about using the DELCO on a truck ( may be a smaller body/ case depending on the model you choose) ..... Another option is that some alternators now are "1 WIRE" .. meaning you only connect the BIG WIRE from the Alternator to the Battery.. You just eliminate the two small wires and dont care where they go...... Lets get STEVES opinion on that... Works on Hot Rods and tractors.. should be OK for a truck... and you can get 130- 140 amp models.
|
|
Like them all, but love the "B"s.
|
|
calico190xt68
Orange Level
Joined: 12 Jan 2017
Location: Frankton, IN
Points: 907
|
Post Options
Thanks(0)
Quote Reply
Posted: 30 Aug 2024 at 1:38pm |
The last time I took a big tractor starter in for rebuild it cost me about $250 so a new one from the link you sent is about the same price. I think this alternator is between 130 and 160 AMPs but they have 3 different versions of that. I will wait and see what he says.
I changed my 190xt to be a 3 wire system. I think the 3 wire charges at lower RPMs, if I am not mistaken. Is this one I have for the truck a 3 wire system?
That's a good point about the two smaller wires. As long as the batteries gets charged, I don't have to worry about them. Although, I would like for my alternator light to actually work.
Edited by calico190xt68 - 30 Aug 2024 at 4:33pm
|
|
80 7010, 80 7020, 68 190XTD, 67 190XTD, 500 Loader, AC 2000 Plow, Member Indiana A-C Partners, Member TAC
|
|
steve(ill)
Orange Level Access
Joined: 11 Sep 2009
Location: illinois
Points: 90994
|
Post Options
Thanks(0)
Quote Reply
Posted: 30 Aug 2024 at 3:57pm |
yes... if you have two small wires ( possibly one) and the one BIG WIRE, that is called a 3 wire system. They do normally kick in at a lower rpm. The SINGLE wire just uses the BIG #6 ( maybe #8) wire to the battery + cable.
IF you can get your checked and repaired for a reasonable cost , then you know it will fit without modification of the brackets..... but you also will need to repair those 2 little wires.
|
|
Like them all, but love the "B"s.
|
|
Steve in NJ
Orange Level Access
Joined: 12 Sep 2009
Location: Andover, NJ
Points: 12071
|
Post Options
Thanks(0)
Quote Reply
Posted: 30 Aug 2024 at 6:25pm |
The big L/N's are found on Fire Trucks, over the road Trucks, Bucket trucks, Busses etc. Personally, I wouldn't move to a Delco unless for some reason that particular model L/N is gonna be phased out. You would first need to see what model L/N that is and see if there is an equivilent Delco that would be a direct replacement. This way you eliminate the need to fab or alter any bracketry. Who want's to make more work? Some of the 22 "SI" series/150 amp version Delco's can replace some of the L/N's. Like I said, before you start changing things, have that unit load tested to see if it's still okay yet.
Depending on the model of that unit, a lot of those L/N's work the same way as the smaller Alternators. Usually, one wire runs to the ignition switch, and the other voltage sense wire runs to a junction block or circuit breaker near the Batteries. There should be a circuit breaker in that system possibly on the frame rail under the cab. Depending on how the truck is wired, in some cases there is a main junction block on the firewall the voltage sense wire runs too. IH & Freightliners are wired that way. When it comes to heavy trucks, a lot of them are wired differently depending on the mfr. of the truck and the engine it's equipped with. Getting back to the circuit breaker, when you find it, it would be wise to change that out as well because apparently it didn't kick out fast enough and caused the mess that happened..... HTH
Steve@B&B
I was just rolling back up and the circuit breaker I'm referring to is right in your picture! I didn't see it the first time. My old eyes aren't catchin' things to fast anymore.. LOL!
Edited by Steve in NJ - 30 Aug 2024 at 6:28pm
|
|
39'RC, 43'WC, 48'B, 49'G, 50'WF, 65 Big 10, 67'B-110, 75'716H, 2-620's, & a Motorhead wife
|
|
calico190xt68
Orange Level
Joined: 12 Jan 2017
Location: Frankton, IN
Points: 907
|
Post Options
Thanks(0)
Quote Reply
Posted: 30 Aug 2024 at 8:45pm |
|
Thanks for the info! That cicuit breaker does not have anything to do with alternator wire. It goes to the rear. There is a problem with the rear taillights staying on and i believe that cutout switch is used to turn off the taillights. When i fix the alternator wire, going to put a fuse in place.
Edited by calico190xt68 - 30 Aug 2024 at 8:58pm
|
|
80 7010, 80 7020, 68 190XTD, 67 190XTD, 500 Loader, AC 2000 Plow, Member Indiana A-C Partners, Member TAC
|
|
calico190xt68
Orange Level
Joined: 12 Jan 2017
Location: Frankton, IN
Points: 907
|
Post Options
Thanks(0)
Quote Reply
Posted: 31 Aug 2024 at 4:36pm |
I removed the two small wires from the alternator and the large
wire. Ordered new wires. I hooked up two batteries and they are showing
12.83 volts when connected in parallel. I definitely have power to the
key switch as I saw some dash lights come on. When I turn the key, the
solenoid clicks but it won't turn over the engine. If I try the key
again, the solenoid will not always click. If I wait awhile, it will
click once. Is it possible that the solenoid was damaged or was going
bad before I fried the wires? Would one of those small wires that melted have been
terminated at the solenoid and damaged it or be making a difference? Could the
starter have been damaged? I know how to jump start my tractors with a
screw driver but not sure how to do that with this semi. Here is a
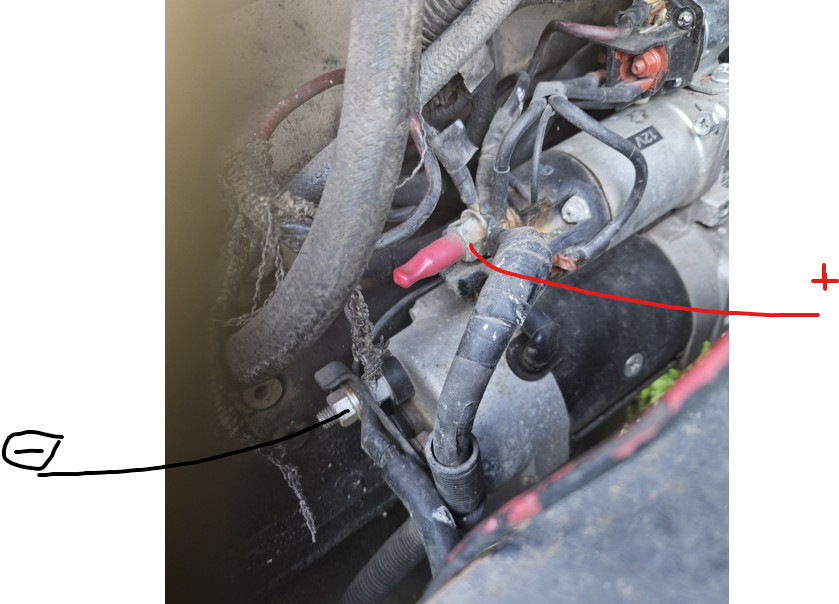
picture of the starter, in case anyone knows.
I cannot add the 3rd battery yet due to waiting on cables but I think it was previously starting on one good battery so I don't think I need it.
Just would like to see it turnover and then start. I will deal with the alternator later.
|
|
80 7010, 80 7020, 68 190XTD, 67 190XTD, 500 Loader, AC 2000 Plow, Member Indiana A-C Partners, Member TAC
|
|
steve(ill)
Orange Level Access
Joined: 11 Sep 2009
Location: illinois
Points: 90994
|
Post Options
Thanks(0)
Quote Reply
Posted: 31 Aug 2024 at 4:44pm |
Clicking of the solenoid says you have POWER.. but does not guarantee the wire is GOOD SHAPE and can carry 1000 amps... Wire could be bad.. terminal could be bad... Solenoid could have crapped out ... but solenoid should not have been engaged when wires burnt, so no effect on it..
YES. you can jump it as you said... I would be looking at the BIG CABLES from the battery to the battery to the STARTER... and the GROUND cables for all.
|
|
Like them all, but love the "B"s.
|
|