| Author |
 Topic Search Topic Search  Topic Options Topic Options
|
Dave(inMA) 
Orange Level


Joined: 12 Sep 2009
Location: Grafton, MA
Points: 2395
|
 Post Options Post Options
") Thanks(0) Thanks(0)
") Quote Quote  Reply Reply
 Topic: CA Brake Mystery - UPDATE #5 Topic: CA Brake Mystery - UPDATE #5
Posted: 25 Feb 2019 at 4:01pm |
Update - see post dated 3-8-19.
Update 3-6-19. See post dated today.
Update 3-4-19. See post dated today about 7pm.
Update 3-3-19. See post dated today.
Here's an UPDATE on 2-26-19. I tested the brakes without the platform on the tractor. In 2nd gear, each brake would nearly stall the engine. I believe that this means that the platform is preventing the brakes from coming on fully. More when I know more.
The brake bands in my CA were replaced a number of years ago. They are essentially still new. The adjusting screws are tightened to the point where the ends of the screws are hitting the bottom of the the openings in the brake bands and cannot be tightened further. When I apply the brakes, I'm getting almost no stopping power. Today I pulled the platform and disconnected one of the brake rods from the toggle/actuator. I jacked up the tractor final and applied the brake by hand by pushing on the toggle/actuator while turning the rear wheel. The wheel instantly stopped and I couldn't move it. I realize that I'm applying much less turning power than the engine, but this seems like a clue! I repeated the experiment with the other side but this time leaving the brake linkage connected and applying the brake using the pedal. Same result - the brake instantly locked up the wheel. I checked the brake drum surfaces - both are tarnished and show no indication of a brake band slipping on the drum.
The question is: what could be causing the brakes to work with the platform removed but not when it's in place? Or is the test I did meaningless?
Thanks for any advice on this. Dave
Edited by Dave(inMA) - 08 Mar 2019 at 1:33pm
|
|
WC, CA, D14, WD45
|
 |
|
Sponsored Links
|
|
|
Jim.ME
Orange Level
Joined: 19 Nov 2016
Location: Maine
Points: 941
|
Post Options
Thanks(0)
Quote Reply
Posted: 25 Feb 2019 at 4:42pm |
|
I've had to pull the linings out of my CA a couple times and clean/deglaze them. The were filled with rust and dust, no oil. Cleaned them with brake cleaner and a wire brush, then lightly scuffed them with a coarse emery cloth, then cleaned again before reinstalling. I cleaned the drums as well. Brakes were always fine after. Got to do it again before spring.
|
|
Dave(inMA)
Orange Level
Joined: 12 Sep 2009
Location: Grafton, MA
Points: 2395
|
Post Options
Thanks(0)
Quote Reply
Posted: 25 Feb 2019 at 4:58pm |
|
Thanks, Jim. I may pull one of them and see what it looks like. But I'm still really puzzled about the test I described in my OP.
|
|
WC, CA, D14, WD45
|
|
Dakota Dave
Orange Level

Joined: 12 Sep 2009
Location: ND
Points: 3912
|
Post Options
Thanks(0)
Quote Reply
Posted: 25 Feb 2019 at 5:08pm |
|
Put the platform back on and see if it stoping full movement of the brake lever. On dads C when we put it together th slots in the cover wouldn't let the levers engage far enough to actuact the brake. We cut the slots longer instead of finding out what we did. It has worked that way for 40 years.
|
|
Dave(inMA)
Orange Level
Joined: 12 Sep 2009
Location: Grafton, MA
Points: 2395
|
Post Options
Thanks(0)
Quote Reply
Posted: 25 Feb 2019 at 5:57pm |
Very interesting, Dave. Glad to hear that I may not have lost my mind after all! I'm thinking that, before I put that goofy platform back on, I will reassemble enough to be able to drive the tractor and see if I really do have brakes w/o the platform.
Thanks! Dave
|
|
WC, CA, D14, WD45
|
|
GregLawlerMinn
Orange Level

Joined: 11 Sep 2009
Location: Lawler, Mn
Points: 1226
|
Post Options
Thanks(0)
Quote Reply
Posted: 26 Feb 2019 at 9:35am |
|
Ditto on checking if the pan is interfering. Happened to me.
|
|
What this country needs is more unemployed politicians-and lawyers.
Currently have: 1 D14 and a D15S2.
With new owners: 2Bs,9CAs,1WD,2 D12s,5D14s,3D15S2s, 2D17SIVs,D17D,1D19D;1 Unstyled WC
|
|
Dave(inMA)
Orange Level
Joined: 12 Sep 2009
Location: Grafton, MA
Points: 2395
|
Post Options
Thanks(0)
Quote Reply
Posted: 26 Feb 2019 at 12:48pm |
Thanks, Greg.
I've also thought of another possible cause. Both drums are scored - someone let the brake linings wear to the point that the rivets scored the drums. Perhaps the scoring has led to some wear of the drum surfaces, thus requiring the toggle to move further to apply braking power but the platform design doesn't allow the added travel?
Comments welcome! |
|
WC, CA, D14, WD45
|
|
Ted in NE-OH
Orange Level

Joined: 12 Nov 2009
Location: Austinburg OH
Points: 1703
|
Post Options
Thanks(0)
Quote Reply
Posted: 26 Feb 2019 at 1:19pm |
|
Stopping the wheel with the tractor stationary and jacked up is one thing whereas stopping 2000 lbs of momentum is another.
|
|
CA, WD, C, 3 Bs, 2 Gs, WC, I-400, 914
|
|
Dave(inMA)
Orange Level
Joined: 12 Sep 2009
Location: Grafton, MA
Points: 2395
|
Post Options
Thanks(0)
Quote Reply
Posted: 26 Feb 2019 at 1:40pm |
Totally agree, Ted. That's why I decided to run another today to see if the brakes would stall the engine with all 4 wheels on the shop floor. They would have done so if I let the clutch out fully. While not quite as good as testing on a slope with a loaded wagon on behind, this should be a lot more useful than the first test.
Dave
|
|
WC, CA, D14, WD45
|
|
bradley6874
Orange Level
Joined: 05 Sep 2010
Location: salisbury md
Points: 1344
|
Post Options
Thanks(0)
Quote Reply
Posted: 26 Feb 2019 at 3:28pm |
|
Brake drums were so wore out from planting on our d17 that new shoes were almost out of adjustment as soon as installed replaced the drums adjustments were all the wAy out to keep from dragging might be time for drums on yours
Edited by bradley6874 - 26 Feb 2019 at 3:29pm
|
|
Dave(inMA)
Orange Level
Joined: 12 Sep 2009
Location: Grafton, MA
Points: 2395
|
Post Options
Thanks(0)
Quote Reply
Posted: 26 Feb 2019 at 4:48pm |
Worn drums makes a lot of sense - thanks.
Though I've owned this CA for 10+ years, I don't know how it was used before I bought her. I know that I replaced the brake bands because the old ones were worn badly, so could have had a lot of wear and tear on the drums. so I am going to suck it up and replace them! Just ordered a drum for the left side. I've got a rhs drum on the shelf. It's used but you'd never know it....can't buy them new but this one was advertised on here years ago so I bought it thinking I might need it. My bride says that it's good to think ahead.....you never know when you'll need one. 
Thanks for the help thus far. I'll post some updates as I get into this. I'm sure it's harder than it looks - nothing simple is ever easy!
Dave
Edited by Dave(inMA) - 26 Feb 2019 at 4:48pm
|
|
WC, CA, D14, WD45
|
|
Dave(inMA)
Orange Level
Joined: 12 Sep 2009
Location: Grafton, MA
Points: 2395
|
Post Options
Thanks(0)
Quote Reply
Posted: 03 Mar 2019 at 5:11pm |
Got into the left side today. I now know why that brake wasn't working very well!
Removed the tire, including the center, then pulled the final drive unit off. [Note to file - next time, drain the rear end before blocking access to the drain plug with dunnage! Ended up draining it through one of the lower final drive stud holes, thereby avoiding dumping oil all over the floor.]
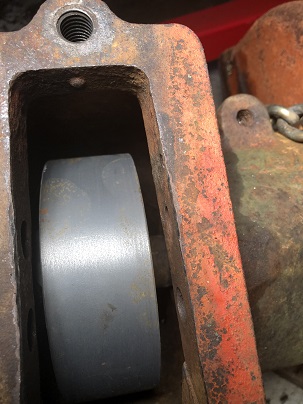
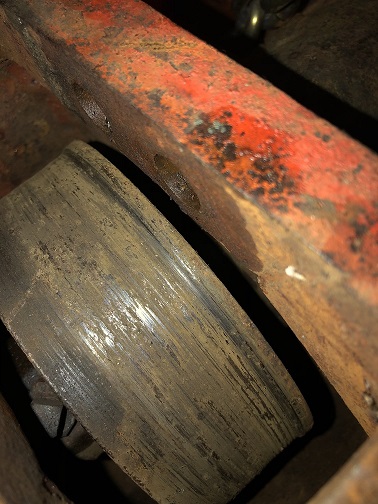
Here are a couple of pictures of what I found. Look closely at the drum, especially the 1/4" or so closest to the housing which is the part of the drum NOT worn by the brake band. Not only is the drum scored but the area scored by the brake band is worn down close to 1/8". The brake band is trash - the hinge was frozen and the lining was broken in a couple of places - more now that I wrestled it out of the housing!
The next step was to try to pull the drum. Hah! No good way to get a wrench in there to loosen the lock nut on the locking bolt. Decided to consult with Don(MO) who advised me to destroy the drum with a good sized bar and a BFH if I can't get the bolt loose. This will give me room to get at the lock nut and bolt. He warned me to be careful to not hit the final drive housing while destroying the drum. I will need to find both tools before proceeding!
Edited by Dave(inMA) - 03 Mar 2019 at 6:00pm
|
|
WC, CA, D14, WD45
|
|
DennisA (IL)
Orange Level
Joined: 11 Sep 2009
Location: Ridott IL.
Points: 2064
|
Post Options
Thanks(0)
Quote Reply
Posted: 03 Mar 2019 at 5:35pm |
|
Sorry I seen this so late. On my CA the drums were worn down . I take them to a fab shop where they spayed welded them and turned them true. Been working great ever since.
|
|
Thanks & God Bless
Dennis
|
|
Dave(inMA)
Orange Level
Joined: 12 Sep 2009
Location: Grafton, MA
Points: 2395
|
Post Options
Thanks(0)
Quote Reply
Posted: 03 Mar 2019 at 5:39pm |
Nice idea, Dennis. Thanks.
If only I could get at the *&%#$ lock nut to remove it! If you have a magic way to do that, please let me know!!
|
|
WC, CA, D14, WD45
|
|
steve(ill)
Orange Level Access

Joined: 11 Sep 2009
Location: illinois
Points: 78868
|
Post Options
Thanks(0)
Quote Reply
Posted: 03 Mar 2019 at 5:44pm |
|
Is the CA different than the C and B ?? On the others, there is a 1 inch hole ON THE BOTTOM OF THE CASE, that you can use an extension and 8 point socket to get onto the retainer bolt / lock nut for the drum ??
|
|
Like them all, but love the "B"s.
|
|
Dave(inMA)
Orange Level
Joined: 12 Sep 2009
Location: Grafton, MA
Points: 2395
|
Post Options
Thanks(0)
Quote Reply
Posted: 03 Mar 2019 at 5:51pm |
Steve - I think you are right! I'll check tomorrow (once we clear away the latest snow storm). That would be a happy result.  Now, why didn't I think of that?!!?
Edited by Dave(inMA) - 03 Mar 2019 at 5:57pm
|
|
WC, CA, D14, WD45
|
|
jaybmiller
Orange Level Access
Joined: 12 Sep 2009
Location: Greensville,Ont
Points: 21787
|
Post Options
Thanks(0)
Quote Reply
Posted: 03 Mar 2019 at 5:53pm |
HMM.. thinking out loud here.. about the nut. I don't have my CA anymore to look but..humour me... Can you get some kind of wrench,or bar, or 'locking device' onto the nut, firmly ? Then rotate the pto or starter ,in gear , to spin the axle ? Obviously you gotta plug the plug wires , well the main coil one !!!
My idea is to keep the nut solid or fixed, then turn the shaft.... think 'backwards'. I've done this trick on other stuff.
Maybe someone will see if it's possible. Jay
|
|
3 D-14s,A-C forklift, B-112
Kubota BX23S lil' TOOT( The Other Orange Tractor)
Never burn your bridges, unless you can walk on water
|
|
Dave(inMA)
Orange Level
Joined: 12 Sep 2009
Location: Grafton, MA
Points: 2395
|
Post Options
Thanks(0)
Quote Reply
Posted: 03 Mar 2019 at 5:59pm |
|
Jay, this bolt (and its locking nut) are perpendicular to the pinion shaft - and the final drive is off the tractor. But nice thinking outside the box!
|
|
WC, CA, D14, WD45
|
|
jaybmiller
Orange Level Access
Joined: 12 Sep 2009
Location: Greensville,Ont
Points: 21787
|
Post Options
Thanks(0)
Quote Reply
Posted: 03 Mar 2019 at 7:13pm |
OK....any pictures?
Now I'm thinking HD mode.. can you get a socket onto the nut and bolt ? If so ,great... make this adapter.. socket is on 3" extension that has a sproket welded on. It turns on a long piece of 1by1 tubing. Chain couples that sprocket to another mounted the 'top end', It works as follow you put rachet on top sprocket, when you turn the rachet, the sproket turns the chain that turns the lower sprockt that turns the socket that turns the nut, and it falls off. HD guys us them to build the engines, seen that on TV ! If you put a piece of maget in the socket, the nut will stay in the socket.
Jay
|
|
3 D-14s,A-C forklift, B-112
Kubota BX23S lil' TOOT( The Other Orange Tractor)
Never burn your bridges, unless you can walk on water
|
|
Grwhthunter
Bronze Level

Joined: 30 Aug 2018
Location: Randolph Ohio
Points: 107
|
Post Options
Thanks(0)
Quote Reply
Posted: 03 Mar 2019 at 8:07pm |
|
Dave I just did one a couple weeks ago. Did use a socket and extension through the hole. Slow steady even pressure and it came out. I soaked it with penetrating oil first. Since it is impossible to remove the drum without damaging it even with the long puller(trust me I tried) I used a cutoff wheel and carefully cut it. Had to finagle it around as you don’t have a lot of room. DIDNT cut all the way through then spun it and cut almost through again opposite of first cut. I cut all the way through until there was a paper thickness left. Broke off outer drum as I went. Then used a chisel to break it off. Might not be the correct way but that’s how I did it without damaging anything else. Wasn’t as bad as I thought. I wish you luck on it. Ray
|
|
Dave(inMA)
Orange Level
Joined: 12 Sep 2009
Location: Grafton, MA
Points: 2395
|
Post Options
Thanks(0)
Quote Reply
Posted: 03 Mar 2019 at 9:03pm |
Jay, I think you oughta make one and post pictures!
Ray, I've been thinking about how I will convince that drum to move on the pinion shaft once I get the bolt out. I don't have any sort of puller that could reach all the way from the end of the shaft to the drum, so if the drum won't move with some leverage applied through the holes in the housing, I'll still have to destroy the drum to get it out. Don(MO) mentioned using a cutoff wheel, too. So that may be the way I go. We'll see!
|
|
WC, CA, D14, WD45
|
|
Gerald J.
Orange Level
Joined: 12 Sep 2009
Location: Hamilton Co, IA
Points: 5636
|
Post Options
Thanks(0)
Quote Reply
Posted: 03 Mar 2019 at 9:08pm |
|
|
|
Grwhthunter
Bronze Level
Joined: 30 Aug 2018
Location: Randolph Ohio
Points: 107
|
Post Options
Thanks(0)
Quote Reply
Posted: 04 Mar 2019 at 5:32am |
|
|
|
jaybmiller
Orange Level Access
Joined: 12 Sep 2009
Location: Greensville,Ont
Points: 21787
|
Post Options
Thanks(0)
Quote Reply
Posted: 04 Mar 2019 at 6:10am |
gee Ray that's really,really sad it came out that way... even sadder is it sounds like MOST of them come out the same.... Can't a 'puller' be attached? If so I'm thinking of 2 half moons of 1/2" thick plate with 3 , 1/2" threaded holes to go 'behind'. then insert 6 allthreaded rods , then slide the 'pulling disc' on and add 2 washers and a nut to each rod. tighten the nuts 1-4-2-5-3-6 (like replacing a rim),evenly. The trick is the 2 halfmoons must fit agin the inner boss next to shaft, for max pulling pressure. Also having SIX rods keeps the pulley from deforming as it does with a 2 or 3 'jaw' puller
Sure looks like a nasty job and ,sigh, there's the OTHER one to do afterwards. Can you use 'neverseize' on them during the install ? I do that with drive pulleys/ E-PTOs of riders cause there is ZERO clearance to get ANY kind of puller to get them off !!
|
|
3 D-14s,A-C forklift, B-112
Kubota BX23S lil' TOOT( The Other Orange Tractor)
Never burn your bridges, unless you can walk on water
|
|
Dick L
Orange Level
Joined: 12 Sep 2009
Location: Edon Ohio
Points: 5082
|
Post Options
Thanks(0)
Quote Reply
Posted: 04 Mar 2019 at 6:19am |
I have pressed the pinion shaft out of the drums with this setup on B's and C's. I have not pressed any pinions out of the CA's. I would think it would be the same as the C's on the inside. 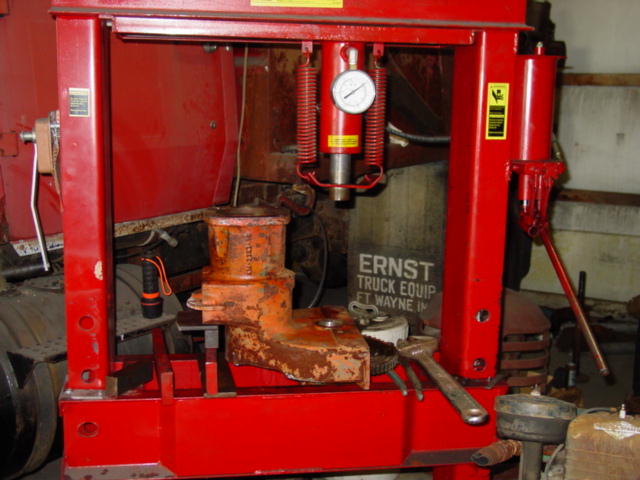
Edited by Dick L - 04 Mar 2019 at 6:20am
|
|
Grwhthunter
Bronze Level
Joined: 30 Aug 2018
Location: Randolph Ohio
Points: 107
|
Post Options
Thanks(0)
Quote Reply
Posted: 04 Mar 2019 at 6:41am |
|
Jay I did try to use a long puller but was only a 3 rod. It didn’t even budge it only started cracking the drum where it was attached. The drum was I think a original from 1955. I read somewhere on here it wouldn’t come out that way. They said don’t use heat as it would ruin seals. I did use some heat with map gas and tried to soak it too. That’s when I broke it as was suggested on here from a previous post. Dick the ca is the same I just don’t have a press setup at work like that. Just a small one. I seen your setup on that other post I think and wished I had that. I did never-seize everything when I put it back together including those big pins. People think these brakes are hard to do and I agree. The ford 800 series with the heat collar seals are about the same pain if you ask me. The have to be drilled out and broken to be removed also when doing a complete brake and seal job. But that’s how the book and dealers tell you to do it. Ray
|
|
Dave(inMA)
Orange Level
Joined: 12 Sep 2009
Location: Grafton, MA
Points: 2395
|
Post Options
Thanks(0)
Quote Reply
Posted: 04 Mar 2019 at 6:52am |
Thanks for all the suggestions, guys. This forum is indeed the best!
Carnage would certainly be the right word for it, Ray! Thanks for your pm's and the photos. I expect that I'll end up with a similar result. I'll take some pictures. Jay, your idea sounds like it should work. It'd have to pull against the inboard end of the pinion shaft, though, and maintaining alignment might be tricky. BTW, the good news is that the drum is part of the clutch assembly on the rhs. I've had that out before....all I gotta do is remember how I did it, but I know the method was different from the lhs! Yup - I decided to start with this one cause it'd be easier, ya know.......
Dick - thanks for the photo and suggestion. Yes - this is the same as the B or C on the lhs. Did you pull the bearing before starting erto press the shaft out, or did the bearing pop out as you pressed the shaft?
Gerald, thanks. I read that section before starting on this project. Unfortunately it doesn't explain how to pull the drum!
|
|
WC, CA, D14, WD45
|
|
Sugarmaker
Orange Level

Joined: 12 Jul 2013
Location: Albion PA
Points: 8173
|
Post Options
Thanks(0)
Quote Reply
Posted: 04 Mar 2019 at 7:56am |
Wow, This site brings out the best and worst in maintaining these old tractors! I am sure this will help many others avoid hours of frustration on projects like this. Havent attempted brakes yet on the WD45. Regards, Chris
|
|
D17 1958 (NFE), WD45 1954 (NFE), WD 1952 (NFE), WD 1950 (WFE), Allis F-40 forklift, Allis CA, Allis D14, Ford Jubilee, Many IH Cub Cadets, 32 Ford Dump, 65 Comet.
|
|
Dick L
Orange Level
Joined: 12 Sep 2009
Location: Edon Ohio
Points: 5082
|
Post Options
Thanks(0)
Quote Reply
Posted: 04 Mar 2019 at 10:56am |
|
The tapered bearing just sets in the tapered cup. You tighten that bearing by removing shims behind the cover to let the cover push the bearing tighter in the cup..
|
|
Dave(inMA)
Orange Level
Joined: 12 Sep 2009
Location: Grafton, MA
Points: 2395
|
Post Options
Thanks(0)
Quote Reply
Posted: 04 Mar 2019 at 5:55pm |
I have won the battle! Old drum is off, new one on.
I created carnage as have others - broke off enough of the drum to give me access to drive it off with an air hammer. Discovered something that made the job a lot easier: the pinion shaft diameter between the drum and the end that engages the differential is smaller than the diameter where the drum sits. So, once it's driven off that section of the shaft, the drum is loose and can be removed with one finger.
I haven't measured the old drum diameter to see how much material had been lost. Will do that tomorrow.
Here are a couple of pictures. First, the old drum out of the housing: 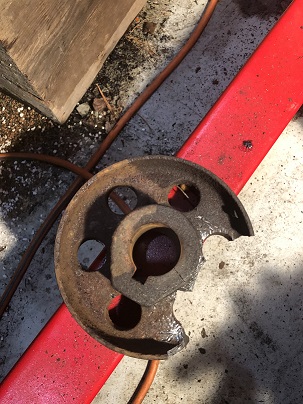
And the new drum in place on the shaft. I used a piece of oak stake (1"x1") to drive it on:
Thanks to all of you who have contributed to this happy outcome!
Dave
|
|
WC, CA, D14, WD45
|
|


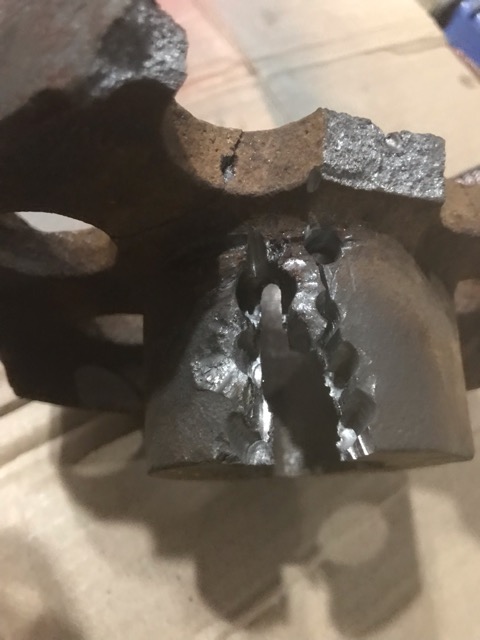

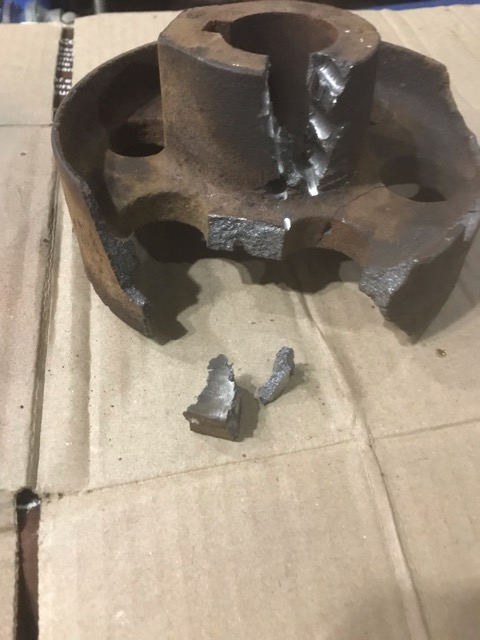
 ok so I got to work and I remembered that after I had cut some relief cuts I also had to drill some holes to get the air chisel started. Here are some pics of my carnage. I then used a 1 inch dowel rod 2 feet long to start to pound it out. I hope this helps you. Ray