| Author |
 Topic Search Topic Search  Topic Options Topic Options
|
waw1962 
Bronze Level

Joined: 11 May 2024
Location: PA
Points: 29
|
 Post Options Post Options
") Thanks(0) Thanks(0)
 Quote Quote  Reply Reply
 Topic: D17 push rods Topic: D17 push rods
Posted: 25 Jun 2024 at 4:32pm |
|
I recently had the head worked on my D17 Series IV. Put it back together today, and #3 and #8 (from front to back) pushrods are sticking up about 1/4". No other work was performed on the engine. Suggestions please as to what the issue is and is there a resolution? Hopefully, a resolution which doesn't require pulling the head again. Thanks.
|
 |
|
Sponsored Links
|
|
|
JK in Pa
Bronze Level

Joined: 12 Sep 2009
Location: Dushore, Pa.
Points: 164
|
Post Options
Thanks(0)
Quote Reply
Posted: 25 Jun 2024 at 5:10pm |
|
Cam lobes are holding them up!
|
|
waw1962
Bronze Level
Joined: 11 May 2024
Location: PA
Points: 29
|
Post Options
Thanks(0)
Quote Reply
Posted: 25 Jun 2024 at 5:51pm |
|
Okay... how do I correct that?
|
|
steve(ill)
Orange Level Access


Joined: 11 Sep 2009
Location: illinois
Points: 88225
|
Post Options
Thanks(0)
Quote Reply
Posted: 25 Jun 2024 at 6:12pm |
loosen up the lock nut and screw on top of the follower... pull thet rocker arm down with the bolts... then redo the valve adjustment...
OR you can use the rocker shaft bolts to SLOWLY pull down the arms on top of the push rod and should slowly open the valves untill the BOLTS are seated... just make sure you dont bind anything........ your going to RESET the valve clearance anyway, so just as easy to back off on the lock nuts and screws.
|
|
Like them all, but love the "B"s.
|
|
steve(ill)
Orange Level Access
Joined: 11 Sep 2009
Location: illinois
Points: 88225
|
Post Options
Thanks(0)
Quote Reply
Posted: 25 Jun 2024 at 6:22pm |
make sure the pushrod is seated into the cam follower..... adjustment screws on the rocker arm on top..
|
|
Like them all, but love the "B"s.
|
|
waw1962
Bronze Level
Joined: 11 May 2024
Location: PA
Points: 29
|
Post Options
Thanks(0)
Quote Reply
Posted: 25 Jun 2024 at 6:25pm |
|
Thanks for the info. I tried tightening the rocker arm shaft down and it didn't seat the push rod. I'll try what you suggest, but not sure how that adjustment allows the two push rods to seat evenly with the other 6. I'll youtube it to understand better what you're saying. Thanks again.
|
|
steve(ill)
Orange Level Access
Joined: 11 Sep 2009
Location: illinois
Points: 88225
|
Post Options
Thanks(0)
Quote Reply
Posted: 25 Jun 2024 at 6:29pm |
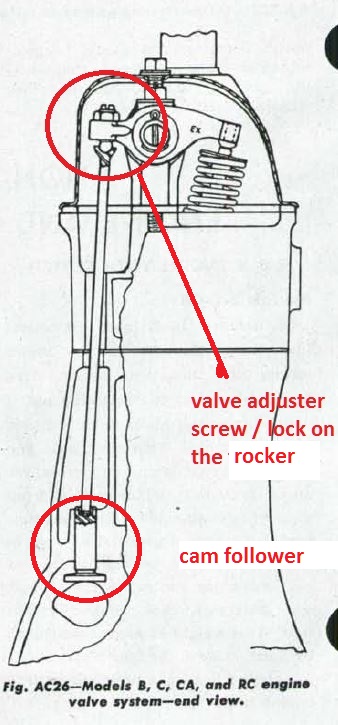
the photo above shows the CAM LOBE off to the side, so the VALVE IS CLOSED... Picture a couple of the lobes sticking STRAIGHT UP and the follow is ALL THE WAY UP and the VALVE IS CLOSED... That makes it look like the push rod is 1/4 inch too long... loosening the ADJUSTERS will allow the rocker shaft to drop down into position... BUT, you have to ADJUST ALL the valvess when you are done.
you might be able to rotate the crank shaft and the cam will move and those two pushrods will start to DROP... But others will start to RISE... you might find a happy spot that is easier to install the shaft.
Edited by steve(ill) - 25 Jun 2024 at 6:31pm
|
|
Like them all, but love the "B"s.
|
|
steve(ill)
Orange Level Access
Joined: 11 Sep 2009
Location: illinois
Points: 88225
|
Post Options
Thanks(0)
Quote Reply
Posted: 25 Jun 2024 at 6:49pm |
|
|
|
Like them all, but love the "B"s.
|
|
waw1962
Bronze Level
Joined: 11 May 2024
Location: PA
Points: 29
|
Post Options
Thanks(0)
Quote Reply
Posted: 25 Jun 2024 at 6:52pm |
|
I didn't realize those would adjust the rocker shaft into position. I'll try that, then follow up with the valve adjustment. Thank you again. Was my Dad's D17, I worked on it a few times with him, but nothing to this extent. Good learnings along the way.
|
|
DrAllis
Orange Level Access
Joined: 12 Sep 2009
Points: 22049
|
Post Options
Thanks(0)
Quote Reply
Posted: 25 Jun 2024 at 7:30pm |
|
Set valve lash/valve tappets at .015" for all valves COLD. Crankshaft pulley setscrew must be pointing straight up and straight down to have pistons on TDC. Firing order is 1-2-4-3.
|
|
waw1962
Bronze Level
Joined: 11 May 2024
Location: PA
Points: 29
|
Post Options
Thanks(0)
Quote Reply
Posted: 25 Jun 2024 at 7:51pm |
|
Gotcha... thanks again.
|
|
waw1962
Bronze Level
Joined: 11 May 2024
Location: PA
Points: 29
|
Post Options
Thanks(0)
Quote Reply
Posted: 25 Jun 2024 at 8:01pm |
|
Last question, I think... how do I get the crankshaft setscrew straight up/down to insure TDC of the pistons?
|
|
steve(ill)
Orange Level Access
Joined: 11 Sep 2009
Location: illinois
Points: 88225
|
Post Options
Thanks(0)
Quote Reply
Posted: 25 Jun 2024 at 8:09pm |
|
you need to rotate the crank shaft so that each piston goes to the TOP... and the valves will be CLOSED... then you can adjust those two valves... the set screw was put in the pulley relative to the pistons being at the TOP of their stroke... Look in the end of the pulley and see if there is a hex bolt that you can put a socket / ratchet on.. rotate slowly till the set screw is UP... check which piston is at the TOP as both valves will be closed..
|
|
Like them all, but love the "B"s.
|
|
DrAllis
Orange Level Access
Joined: 12 Sep 2009
Points: 22049
|
Post Options
Thanks(0)
Quote Reply
Posted: 25 Jun 2024 at 8:24pm |
|
Remove all four spark plugs. Stand on the left side of the tractor with the left hood removed. Gently pull on the fan blades at the top (right hand) while pushing the fan belt tighter with your left hand and you can turn the engine over. Transmission in Neutral.
|
|
waw1962
Bronze Level
Joined: 11 May 2024
Location: PA
Points: 29
|
Post Options
Thanks(0)
Quote Reply
Posted: 26 Jun 2024 at 5:13am |
|
So rotate the crank for each valve individually? In other words, not all 8 can be adjusted at the same time? Thanks again to you both.
|
|
Ed (Ont)
Orange Level
Joined: 08 Nov 2009
Location: New Lowell, Ont
Points: 1504
|
Post Options
Thanks(0)
Quote Reply
Posted: 26 Jun 2024 at 5:29am |
|
One cylinder at a time - both valves. Start with number 1 and follow the firing order. Do you have anyone to guide you a bit? May be worth it as you seem lacking in experience.
Edited by Ed (Ont) - 26 Jun 2024 at 5:33am
|
|
waw1962
Bronze Level
Joined: 11 May 2024
Location: PA
Points: 29
|
Post Options
Thanks(0)
Quote Reply
Posted: 26 Jun 2024 at 6:07am |
|
I do have someone who can lend a hand, and yes, have never done this before. Everyone has a first time, I'll get through it. Once i look at it, it'll make sense. Thanks again.
|
|
waw1962
Bronze Level
Joined: 11 May 2024
Location: PA
Points: 29
|
Post Options
Thanks(0)
Quote Reply
Posted: 26 Jun 2024 at 8:06am |
|
I cannot get the crankshaft to move. Not one bit...
|
|
Alberta Phil
Orange Level

Joined: 13 Sep 2009
Location: Alberta, Canada
Points: 3930
|
Post Options
Thanks(0)
Quote Reply
Posted: 26 Jun 2024 at 8:43am |
|
Did the crankshaft turn before you removed the head? Why did you have to remove the head in the first place?
|
|
steve(ill)
Orange Level Access
Joined: 11 Sep 2009
Location: illinois
Points: 88225
|
Post Options
Thanks(0)
Quote Reply
Posted: 26 Jun 2024 at 8:51am |
the crank will be HARD to move... Did you take the spark plugs out ? ... you can also BUMP the starter to rotate 1/2 a revolution to verify that it moves... pulling on the fan / belt will work, but you need a lot of effort.
determine which valve is the INTAKE and which is EXHAUST for each cylinder.. Rotate the engine untill the INTAKE valve closes, then continue to rotate as it comes up on COMPRESSION and you get the setscrew to the top - or bottom ( another 90 degrees).... at that point you can adjust the TWO valves on that cylinder ( the one the INTAKE just closed and you rotated another 90 degrees) ...... now do that 4 times.
as DR said ... it fires 1-2-4--3... so if you get #1 first ( you dont have to).. then rotate 180 degrees, your ready for #2 ... etc.
|
|
Like them all, but love the "B"s.
|
|
waw1962
Bronze Level
Joined: 11 May 2024
Location: PA
Points: 29
|
Post Options
Thanks(0)
Quote Reply
Posted: 26 Jun 2024 at 8:55am |
|
Yes, it moved. Tractor was operable, but leaking coolant into the oil. Head was warped. Had it cut .010, now to reassembly.
|
|
HudCo
Orange Level

Joined: 29 Jan 2013
Location: Plymouth Utah
Points: 3932
|
Post Options
Thanks(0)
Quote Reply
Posted: 26 Jun 2024 at 9:16am |
|
hope you tested for a sleave o ring leak
|
|