| Author |
 Topic Search Topic Search  Topic Options Topic Options
|
Luke114 
Bronze Level

Joined: 27 Aug 2019
Location: Washington
Points: 109
|
 Post Options Post Options
 Thanks(0) Thanks(0)
 Quote Quote  Reply Reply
 Topic: B rebuild progress Topic: B rebuild progress
Posted: 01 Sep 2020 at 9:45am |
Been picking away at this motor rebuild forever. Still have all the little time consuming bits to finish, but at least its back on wheels again. Makes the rest of the tractor look a bit dingy though.
|
 |
|
Sponsored Links
|
|
 |
mdm1 
Orange Level


Joined: 12 Sep 2009
Location: Onalaska, WI
Points: 2635
|
 Post Options Post Options
 Thanks(0) Thanks(0)
 Quote Quote  Reply Reply
 Posted: 01 Sep 2020 at 10:52am Posted: 01 Sep 2020 at 10:52am |
Hope you don't mind but I resized the photo. Good start. 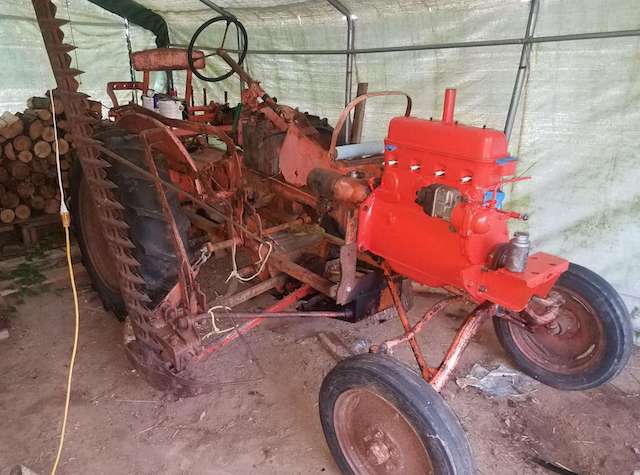
Edited by mdm1 - 01 Sep 2020 at 10:53am
|
|
Everything is impossible until someone does it! WD45-trip loader 1947 c w/woods belly mower, 1939 B, #3 sickle mower 1944 B, 2 1948 G's. Misc other equipment that my wife calls JUNK!
|
 |
Luke114 
Bronze Level

Joined: 27 Aug 2019
Location: Washington
Points: 109
|
 Post Options Post Options
 Thanks(0) Thanks(0)
 Quote Quote  Reply Reply
 Posted: 01 Sep 2020 at 11:16am Posted: 01 Sep 2020 at 11:16am |
|
thank you. Couldn't figure out that darn photo. My photo app has an option for "reduce file size" but apparently it keeps it the same size and just gets worse quality.
|
 |
Bill Long 
Orange Level

Joined: 12 Sep 2009
Location: Bel Air, MD
Points: 4556
|
 Post Options Post Options
 Thanks(0) Thanks(0)
 Quote Quote  Reply Reply
 Posted: 01 Sep 2020 at 11:17am Posted: 01 Sep 2020 at 11:17am |
Coming along fine. Looks like the engine is ready for use. Thanks for taking your time to restore another of my favorites Keep us apprised of how it is progressing. Good Luck! Bill Long
|
 |
HoughMade 
Orange Level


Joined: 22 Sep 2017
Location: Valparaiso, IN
Points: 691
|
 Post Options Post Options
 Thanks(0) Thanks(0)
 Quote Quote  Reply Reply
 Posted: 01 Sep 2020 at 11:26am Posted: 01 Sep 2020 at 11:26am |
|
Looks great!
|
|
1951 B
|
 |
Luke114 
Bronze Level

Joined: 27 Aug 2019
Location: Washington
Points: 109
|
 Post Options Post Options
 Thanks(0) Thanks(0)
 Quote Quote  Reply Reply
 Posted: 01 Sep 2020 at 11:26am Posted: 01 Sep 2020 at 11:26am |
|
Started out intending a bare minimum rebuild. This was a "pasture find", which is like a barn find if you had gone and dumped a cup of water down the exhaust pipe every month. Two cylinders were heavily corroded. Ended up with a complete rebuild kit and had the crank ground and the head surfaced and valve seats ground. Carb is in surprisingly good condition. Crank pulley was seized in place and broke that early in the process, but found a replacement. Have a donor C that is in worse condition to rob a few parts from also. This is getting the mini one wire alternator upgrade since the generator would have needed a rewind.
|
 |
Sugarmaker 
Orange Level


Joined: 12 Jul 2013
Location: Albion PA
Points: 8283
|
 Post Options Post Options
 Thanks(0) Thanks(0)
 Quote Quote  Reply Reply
 Posted: 01 Sep 2020 at 7:39pm Posted: 01 Sep 2020 at 7:39pm |
Luke, I like what you have done! These are the tractors that need to be brought back. Pasture finds, I might use that! Keep going, its a lot of moves to make. Regards, Chris
|
|
D17 1958 (NFE), WD45 1954 (NFE), WD 1952 (NFE), WD 1950 (WFE), Allis F-40 forklift, Allis CA, Allis D14, Ford Jubilee, Many IH Cub Cadets, 32 Ford Dump, 65 Comet.
|
 |
T-bone_indy 
Silver Level

Joined: 06 Sep 2018
Location: Indiana
Points: 68
|
 Post Options Post Options
 Thanks(0) Thanks(0)
 Quote Quote  Reply Reply
 Posted: 02 Sep 2020 at 4:10am Posted: 02 Sep 2020 at 4:10am |
great progress! I'm also starting a B project can wait to hear the tractor run. Good luck with the rest of the job, may the bolts come off easy.
TP
|
|
D19-AC916-Kubota B2150- Wheel Horse charger 12
|
 |
Luke114 
Bronze Level

Joined: 27 Aug 2019
Location: Washington
Points: 109
|
 Post Options Post Options
 Thanks(0) Thanks(0)
 Quote Quote  Reply Reply
 Posted: 08 Sep 2020 at 11:22am Posted: 08 Sep 2020 at 11:22am |
Got this one running again over the weekend. Other than embarassingly forgetting the 1/4" plug in the manifold which made it not want to start right away, it ran great and was glad to hear some life in the old beast.
However, I have what I think might be a pilot bushing problem. Can't get the main shaft to stop with the clutch engaged. The clutch itself does not seem to be dragging, as the main shaft spins freely from the PTO with the clutch engaged and I cannot see, feel or hear any dragging from the disc. I replaced the pilot bushing, and test fit the flywheel separately first. The bushing was snug, but still spun by hand easily. I've tried letting it run in with the clutch pressed while in gear. That has helped slightly, but still can't shift out of neutral.
Any other ideas before I split it again?
|
 |
C in Concord 
Bronze Level


Joined: 26 Sep 2019
Location: Concord, WI
Points: 109
|
 Post Options Post Options
 Thanks(0) Thanks(0)
 Quote Quote  Reply Reply
 Posted: 08 Sep 2020 at 12:41pm Posted: 08 Sep 2020 at 12:41pm |
Glad to hear it's back running! Can't wait to hear mine again, been many moons... If I'm following, sounds like the clutch works OK without the engine running, but not doing it's job with the engine running... (spitballing from here down) Only thought I have before re-splitting is backing out the clutch rod a turn or two. Should give it a little more travel. Just have to make sure the clutch pedal still hits the torque tube stop at full travel (per the manual). Otherwise its binding up elsewhere. A tight bushing that is not spinning true enough is a possible explanation. Ben
Edited by C in Concord - 08 Sep 2020 at 1:27pm
|
|
Leave things better than you found them.
1941 Model C (restored 2020)
|
 |
steve(ill) 
Orange Level Access


Joined: 11 Sep 2009
Location: illinois
Points: 81177
|
 Post Options Post Options
 Thanks(0) Thanks(0)
 Quote Quote  Reply Reply
 Posted: 08 Sep 2020 at 1:23pm Posted: 08 Sep 2020 at 1:23pm |
|
only time i had that was when the rear seal was leaking and dripping slightly oil onto the clutch ( dont take much to make it drag).... i pull the starter motor and push the clutch in and lock it... get a weed sprayer and soak the clutch thru the hole with dish washer soap and water mix... soak it good, then spray out with garden hose.... dont know if you did any clutch cleaning or not.... i have seen this several times, but not on a NEW rebuild.
|
|
Like them all, but love the "B"s.
|
 |
KMAG 
Orange Level Access

Joined: 26 May 2020
Location: Elizabethtown,
Points: 669
|
 Post Options Post Options
 Thanks(0) Thanks(0)
 Quote Quote  Reply Reply
 Posted: 08 Sep 2020 at 1:31pm Posted: 08 Sep 2020 at 1:31pm |
|
I need more info.
I doubt pilot bearing itself is the problem from your testing.
Did the torque tube resist being snugged to engine for last 3/8" when reassembling?
If yes,overpacking crank pilot bearing recess causes a problem like you describe. It prevents trans input shaft from fully inserting into crankshaft and puts lots of rearward stress on input shaft (killing trans front input bearing) and causes the input shaft to act like its seized to pilot bearing - which may have been partially pressed out of the crank by hydraulic pressure when torque tube was bolted up. Unbolting torque tube 1/4" may drastically improve things to indicate overpacked crank recess is the culprit. (Use method below to spin trans/engine -starter won't get proper flywheel ring gear mesh with torque tube moved back).
Otherwise...with engine not running,does the trans shift into gear?
No? Note, may have to jack rear wheels off ground and rotate wheels slightly to help slide into gear (old trans not fine mesh). Figure out trans problem(s) to see if cures shifting problem.
Yes?
Good. Put trans in 3rd gear, pull spark plugs, jack up rear and see what sound/resistance you have rotating trans/engine spinning wheels.
Now repeat while pushing in clutch. Engine should stay still. If not, clutch adjustment wrong, clutch wrong size, clutch rusted to flywheel, and/or pressure plate somehow pinched clutch disc to flywheel(disc od too big).
Edited by KMAG - 08 Sep 2020 at 1:34pm
|
 |
Luke114 
Bronze Level

Joined: 27 Aug 2019
Location: Washington
Points: 109
|
 Post Options Post Options
 Thanks(0) Thanks(0)
 Quote Quote  Reply Reply
 Posted: 08 Sep 2020 at 4:03pm Posted: 08 Sep 2020 at 4:03pm |
Thanks for the suggestions, guys. Sounds like I didn't do a very good job of describing, so I'll try to clarify. I'm almost certain that the clutch disc isn't the problem. I even tightened the 3 release lever adjusting bolts on the pressure plate all the way in, which should be at max "open" when the clutch is pressed in. With the clutch pressed, transmission in neutral and the PTO engaged I can spin the PTO freely by hand while watching the clutch disc through the inspection hole. I cannot detect any dragging of the clutch disc on the flywheel or pressure plate.
Clutch disc is new. Flywheel and pressure plate were reused and cleaned, but not resurfaced.
This leaves the pilot bushing as suspect (I think??).
I did plug the rear crank hole that lubricates the bushing. I used silicone and I'm fairly confident I kept it down inside the hole and it was fully cured before assembly. The other thought I had was if the new pilot bushing was not pressed into the flywheel all the way, and so it was binding by thrust on the input shaft splines. I didn't measure this clearance before assembly and didn't expect it to be within thousandths.
I didn't detect any unusual resistance when bolting the motor to the torque tube.
The transmission shifts great when not running. The transmission main shaft just keeps turning when the engine is running. You can hear it slow down a bit when presssing the clutch, but it won't ever stop. The drag is slight enough that you can stop the PTO pulley with your hand (ok...foot), but in a couple seconds its back up to engine speed again. If you have it in second gear, you can shift quickly into third before things start spinning.
So if you start it in gear, the clutch works great, starts and stops with the clutch in all gears. The drag is not significant enough that the tractor tries to keep moving with the clutch pressed, but its enough drag to keep the transmission main shaft spinning if you shift to neutral. I would have to really crash the gears to shift out of neutral with the motor running.
In spite of this issue, I am still pleasantly surprised with how quiet the transmission is after so many years of sitting in the rain. I pulled the side cover and flushed as much of the sludge out as I could and will flush the new oil again soon. Hydraulics even worked!
|
 |
steve(ill) 
Orange Level Access


Joined: 11 Sep 2009
Location: illinois
Points: 81177
|
 Post Options Post Options
 Thanks(0) Thanks(0)
 Quote Quote  Reply Reply
 Posted: 08 Sep 2020 at 4:07pm Posted: 08 Sep 2020 at 4:07pm |
|
are you doing this at full throttle or 800 rpm ? There are many tractors that will have a "SLIGHT" drag if your running at a high speed.. I always drop down under 1000 rpm to shift.
|
|
Like them all, but love the "B"s.
|
 |
Luke114 
Bronze Level

Joined: 27 Aug 2019
Location: Washington
Points: 109
|
 Post Options Post Options
 Thanks(0) Thanks(0)
 Quote Quote  Reply Reply
 Posted: 08 Sep 2020 at 4:16pm Posted: 08 Sep 2020 at 4:16pm |
|
This is at idle speed.
|
 |
steve(ill) 
Orange Level Access


Joined: 11 Sep 2009
Location: illinois
Points: 81177
|
 Post Options Post Options
 Thanks(0) Thanks(0)
 Quote Quote  Reply Reply
 Posted: 08 Sep 2020 at 4:26pm Posted: 08 Sep 2020 at 4:26pm |
|
not a FIX, but sometimes you can pull up on the hydraulic lever ( pto engaged) to LOAD the pump and the shaft will stop so you can shift..
Edited by steve(ill) - 08 Sep 2020 at 4:27pm
|
|
Like them all, but love the "B"s.
|
 |
Dick L 
Orange Level


Joined: 12 Sep 2009
Location: Edon Ohio
Points: 5087
|
 Post Options Post Options
 Thanks(0) Thanks(0)
 Quote Quote  Reply Reply
 Posted: 08 Sep 2020 at 9:07pm Posted: 08 Sep 2020 at 9:07pm |
Hers is what you do to stop the transmission from continuing to turn after you push in the clutch if the drive shaft is not tight in the pilot bushing.
|
 |
Boss Man 
Orange Level

Joined: 03 Mar 2018
Location: Greenleaf, WI
Points: 616
|
 Post Options Post Options
 Thanks(0) Thanks(0)
 Quote Quote  Reply Reply
 Posted: 09 Sep 2020 at 9:15am Posted: 09 Sep 2020 at 9:15am |
|
Sometimes when you install a bushing it distorts in the process. May be a high spot because of it. Only fix is to pull the motor and look. Your adjustment of the pressure plate fingers could be an issue all so. Might be adjusted so tight they bind before completely releasing. Are the tips of all 3 fingers the same height? if one is doing less travel than the others that pressure plate by that finger isn't opening as wide.
|
 |
Luke114 
Bronze Level

Joined: 27 Aug 2019
Location: Washington
Points: 109
|
 Post Options Post Options
 Thanks(0) Thanks(0)
 Quote Quote  Reply Reply
 Posted: 09 Sep 2020 at 9:16am Posted: 09 Sep 2020 at 9:16am |
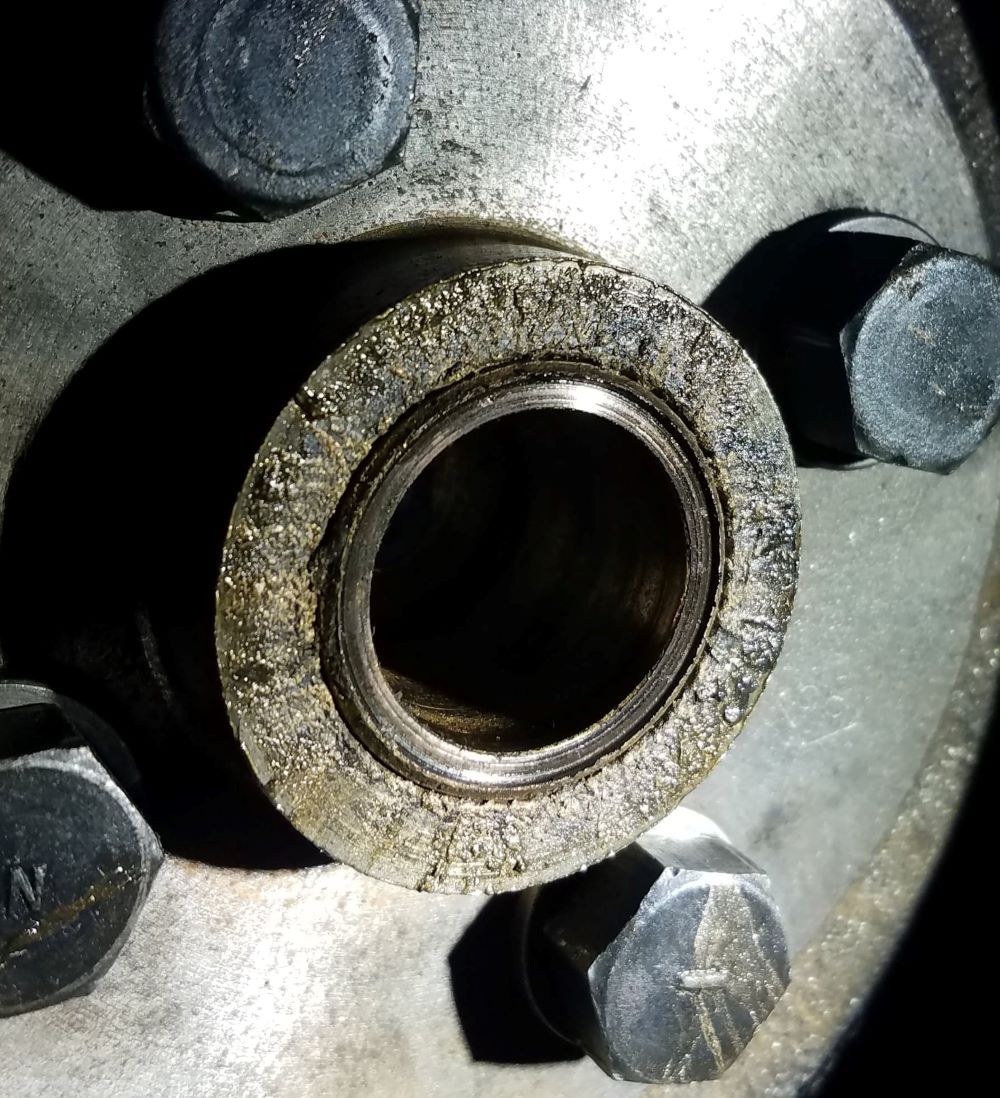
Well I figured it out. The pilot bushing wasn't driven all the way flush with the flywheel and was pushing on the spline shoulder of the input shaft. Maybe .015" interference. It might have worn itself in if I'd continued to run it, but the thrust on the main shaft isn't good, and its an easy fix other than splitting the tractor. In hindsight I should have tried spinning the input via the PTO immediately after mounting the motor. I'm sure it would have showed up as some tight resistance then. Live and learn.
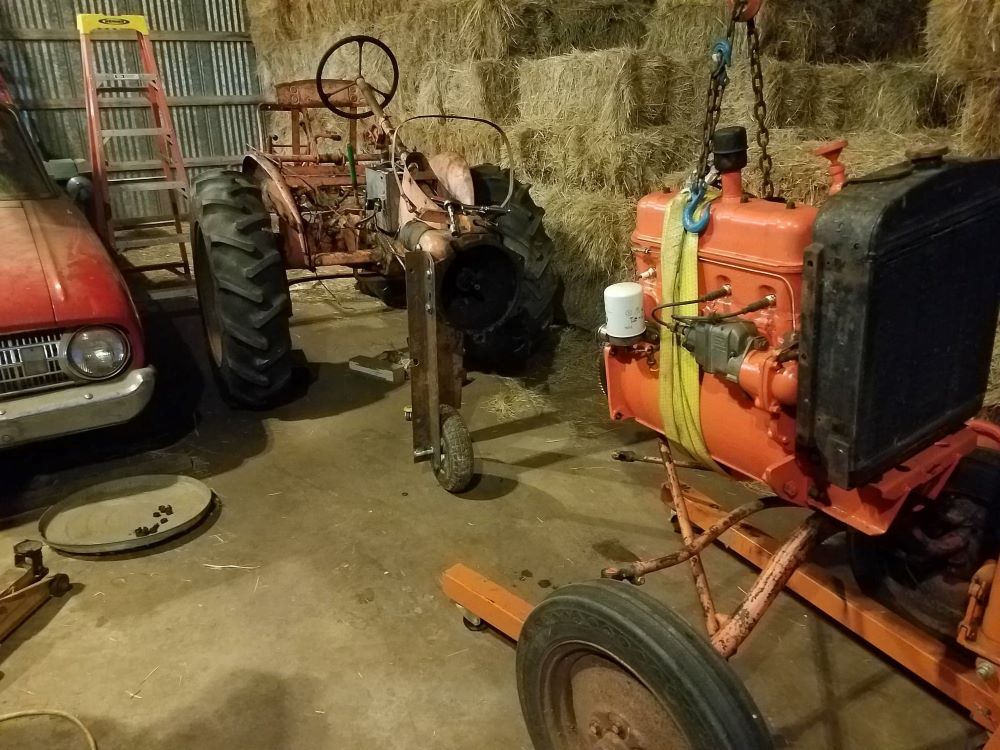
I might have to do some more cleaning and painting on that back half anyhow.
|
 |
Luke114 
Bronze Level

Joined: 27 Aug 2019
Location: Washington
Points: 109
|
 Post Options Post Options
 Thanks(0) Thanks(0)
 Quote Quote  Reply Reply
 Posted: 10 Sep 2020 at 11:20am Posted: 10 Sep 2020 at 11:20am |
I figured since it was split it should be cleaned up a little more. Probably just get the next third, up to the tranny. The toolbox sheet metal has some rust on the bottom that will need to be cut out and replaced. At some point the brakes and fenders will be a project, so I'll save the last third for later.
Or maybe I'll just lash a Briggs & Stratton to the front and keep it as a stubby tricycle B.

|
 |
Wispitfiremike 
Bronze Level

Joined: 28 Mar 2017
Location: Milwaukee, WI
Points: 183
|
 Post Options Post Options
 Thanks(0) Thanks(0)
 Quote Quote  Reply Reply
 Posted: 10 Sep 2020 at 11:33am Posted: 10 Sep 2020 at 11:33am |
|
Really well thought out support for splitting the tractor. Looks very user friendly.
|
 |
Luke114 
Bronze Level

Joined: 27 Aug 2019
Location: Washington
Points: 109
|
 Post Options Post Options
 Thanks(0) Thanks(0)
 Quote Quote  Reply Reply
 Posted: 05 Nov 2020 at 9:16am Posted: 05 Nov 2020 at 9:16am |
Ok, last pic for the season. This is as far as I will go until tackling the back end, including the dreaded brake pins, next year. Just finished up replacing the front spindle bushings, which was a little more of a chore than expected, but not terrible. Made my own hub seal out of felt which worked well. Also repaired a badly rusted front rim and put new rubber on them both. 5x15 tires, slightly larger and taller than what was on it, but I think they give the front end a beefier look that is good.
One annoyance was, after converting to 12 volt, I went to the trouble of adding a charge indicator lamp, but that terminal in the Denso alternator is always open. Charges fine in the one wire configuration, so maybe in internal issue, but not sure. Also added a solenoid and key switch to start.
Certainly wouldn't call it a restoration. But considering it was pulled out of a bramble patch, full of rain water, completly seized and unlikely to ever run again, its at least been given some new life. Winter will give me time to start plotting a 3 point conversion as well.
|
 |
C in Concord 
Bronze Level


Joined: 26 Sep 2019
Location: Concord, WI
Points: 109
|
 Post Options Post Options
 Thanks(0) Thanks(0)
 Quote Quote  Reply Reply
 Posted: 05 Nov 2020 at 12:17pm Posted: 05 Nov 2020 at 12:17pm |
Looks like an excellent start to a great project! Thank you for sharing! Start spraying the brake pins now. You'll be glad you did when the battle begins... Ben
Edited by C in Concord - 05 Nov 2020 at 12:39pm
|
|
Leave things better than you found them.
1941 Model C (restored 2020)
|
 |
MotorCityBear 
Bronze Level

Joined: 27 Jul 2013
Location: N. E. Georgia
Points: 84
|
 Post Options Post Options
 Thanks(0) Thanks(0)
 Quote Quote  Reply Reply
 Posted: 05 Nov 2020 at 3:58pm Posted: 05 Nov 2020 at 3:58pm |
|
Luke what year is that old Falcon ?
|
|
Rob
1953 AC B
Kubota L3901
Blairsville, GA
|
 |
Luke114 
Bronze Level

Joined: 27 Aug 2019
Location: Washington
Points: 109
|
 Post Options Post Options
 Thanks(0) Thanks(0)
 Quote Quote  Reply Reply
 Posted: 05 Nov 2020 at 4:51pm Posted: 05 Nov 2020 at 4:51pm |
|
haha...good eye! That's a '61. Put a 289 and an 8" rear end from a Mustang in it over 25 years ago. Its been sitting a long time now. My son is anxious to get it back on the road.
|
 |
Bill Long 
Orange Level

Joined: 12 Sep 2009
Location: Bel Air, MD
Points: 4556
|
 Post Options Post Options
 Thanks(0) Thanks(0)
 Quote Quote  Reply Reply
 Posted: 06 Nov 2020 at 9:31pm Posted: 06 Nov 2020 at 9:31pm |
Luke, Thanks for what you are doing to keep my favorite alive and well. Great Job Good Luck! Bill Long
ps: LOVE! the wheel support when split. Why didn't I think of that in the 40's
Edited by Bill Long - 06 Nov 2020 at 9:33pm
|
 |


 Topic Options

 Post Options
 Thanks(0)


