| Author |
 Topic Search Topic Search  Topic Options Topic Options
|
calico190xt68 
Orange Level


Joined: 12 Jan 2017
Location: Frankton, IN
Points: 871
|
 Post Options Post Options
") Thanks(0) Thanks(0)
 Quote Quote  Reply Reply
 Topic: 190XT Fuel Line Configuration Topic: 190XT Fuel Line Configuration
Posted: 31 Aug 2017 at 1:38pm |
I decided to eliminate the fuel lines as being the culprit to the tractor not running. A prior owner decided to run a rubber fuel line from the right-hand sediment bowl into a T fitting right before the engine. I think I have uploaded the image from Agco parts book that shows an original metal line running from right-hand sediment bowl to the left-hand sediment bowl, then onto the engine. I don't think it matters where the lines intersect but I don't like the use of the rubber line, so my question is should I run a metal fuel line to the existing T fitting or should I remove this and run a metal line to the sediment bowl as original? It is a lot easier to run it to the existing T fitting though rather than doing it as original setup. 
|
 |
|
Sponsored Links
|
|
|
AC720Man
Orange Level

Joined: 10 Oct 2016
Location: Shenandoah, Va
Points: 5307
|
Post Options
Thanks(0)
Quote Reply
Posted: 31 Aug 2017 at 7:51pm |
|
I went out and looked at my 190XT just to verify mine was routed from the left side, cross over at the rear. It is, just wanted to be for sure. Not sure why it wouldn't work going around the right side, it wouldn't have to cross over the transmission and would be a relatively straight shot. There is quite a bit of hydraulic stuff to get thru. Unsure if heat from the hydraulics would be an issue. Also, are the bowl mounts the same? The left has 2 ports for fuel lines, only see 1 on the right. I hope I am understanding your question correctly,
|
|
1968 B-208, 1976 720 (2 of them)Danco brush hog, single bottom plow,52" snow thrower, belly mower,rear tine tiller, rear blade, front blade, 57"sickle bar,1983 917 hydro, 1968 7hp sno-bee, 1968 190XTD
|
|
calico190xt68
Orange Level
Joined: 12 Jan 2017
Location: Frankton, IN
Points: 871
|
Post Options
Thanks(0)
Quote Reply
Posted: 01 Sep 2017 at 8:26am |
|
Thanks for looking at yours and you understood my question exactly. Thanks for verifying the fuel line configuration. Mine appears to have the original sediment bowls but after inspecting them, I decided to replace them. With the valve screwed all the way out, the opening was still quite small and partially blocked with the stopper that got moved in. I think the last guy had some leaks and he moved the valves nuts in to stop it, but he also restricted the fuel and gunk flow. One of the bowls was completely blocked when I cleaned it because the gunk couldn't drop into the sediment bowl due to the small opening. I have two new bowls with stopper going all the way back and plenty of flow now. So, sediment bowls should work as designed.
Even though I had the original sediment bowls, the dual port fitting on the one bowl is gone. I never thought about the heat from the hydraulics but that rubber line is running right by that stuff. So, while a bit of a pain, I am going to route the lines back to original. Sometimes the small stuff can matter in the long run.
I have drained the tank twice of about 10 gallons of fuel, I replaced the sediment bowls and some of the fuel lines, I also blew out the lines up to the Fuel Filter canister to make sure there was no gunk left. Hopefully the rebuild of the injector pump will fix it. I don't know how to insure that the return fuel line isn't clogged. I suppose I could shoot some air into that last fitting back towards the tank? Would that do any good?
|
|
Dakota Dave
Orange Level

Joined: 12 Sep 2009
Location: ND
Points: 3973
|
Post Options
Thanks(0)
Quote Reply
Posted: 01 Sep 2017 at 3:51pm |
|
Left side sediment bowl is exactly the same as the right side bowl. It has a T fitting on the fwd side of it. I had mine off several times I finally gave up and removed the tank.and cleaned it out. When I got the tractor I pulled the right one that wouldn't turn off and leaked. Previously it had a 3" stand pipe added to keep from sucking down gunk. Adding a stand pipe just means the gunk needs to get deeper before it plugs up. I drained 3 gallons of water flushed the tank the best I could put it back together with a new valve and fought with it for several months. Finally I romoved the tank and cleaned it out. There was a steel gas can spout in the bottom rusting away. If you don't have a cab the fuel tank is real easy to remove. I have a cab and was able to remove it clean it and reinstall in about 6 hours. The left sediment bowl is hard to get out just sit under the tractor with your head up between the wheel and platform and work blind. Taking the floor panel off will get a little light in there but is a waste of time.the metal line that crosses from the left to the right is in the very back by the hyd connections. It come out a right angle fitting in the valve bends around the ect base above the shutoff valve crosses over to the left side it should be above the hyd lines but you can't get it there without removing the tank. Goes between the left valve and connects to a "T" screwed in the front side of the right valve.
|
|
AC720Man
Orange Level
Joined: 10 Oct 2016
Location: Shenandoah, Va
Points: 5307
|
Post Options
Thanks(0)
Quote Reply
Posted: 01 Sep 2017 at 9:00pm |
|
I dont see a problem with blowing air back thru the return line. The bowls are suppose to catch some of the dirt, but the main filter should catch the rest as long as it is changed at the recommended intervals. Lol, such a pain to do and what a mess. But it needs to be done at the recommended intervals to protect the pump. A filter is only good if it has done its job and changed before the pleats become clogged. A steady fuel flow to the pump is key to good performance. I think your wise for following the factory route. The engineers that designed them did so for a reason.
|
|
1968 B-208, 1976 720 (2 of them)Danco brush hog, single bottom plow,52" snow thrower, belly mower,rear tine tiller, rear blade, front blade, 57"sickle bar,1983 917 hydro, 1968 7hp sno-bee, 1968 190XTD
|
|
calico190xt68
Orange Level
Joined: 12 Jan 2017
Location: Frankton, IN
Points: 871
|
Post Options
Thanks(0)
Quote Reply
Posted: 08 Sep 2017 at 9:54am |
|
Dakota Dave, thanks for this information. I guess I feel lucky considering what you went through with your tank. Yikes! A 3 inch stand pipe would require that you always have at least 1/3 of tank of fuel, otherwise, it wouldn't flow through that fitting. Gunk buildup would be forced to the other sediment bowl. That sounds like a ridiculous modification but they happen all too often.
I guess I now know why the last guy ran the line from the right sediment bowl to a T in the center of the tractor.
Mine also has a cab and if the cab has to come off and the tank removed, then this will be a big job. I am going to postpone this fuel line fix for a few months.
|
|
calico190xt68
Orange Level
Joined: 12 Jan 2017
Location: Frankton, IN
Points: 871
|
Post Options
Thanks(0)
Quote Reply
Posted: 08 Sep 2017 at 9:59am |
|
Ac720Man,
I should have probably changed those filters as soon as I bought it, but it ran so good and they looked new, so I didn't. I have changed all of the filters I can find now.
|
|
Dakota Dave
Orange Level
Joined: 12 Sep 2009
Location: ND
Points: 3973
|
Post Options
Thanks(0)
Quote Reply
Posted: 08 Sep 2017 at 11:46am |
|
You dont have to remove the cab just the seat assembly and rear filler panel below the window. dissconnect the rear woirk light and fuel sensor. disconnect the fuel lines and remove both sediment bowls. there are four bolts that hold it down and two in each fender. lift it up about 2" and slide it back. when you get back to where the work light attaches to the left fender pyr it slightly its a little to wide to slide straight back. get a extra hand even empty its pretty heavy. I had to get my wife to help me get it back it.
|
|
Keith E
Silver Level

Joined: 15 Oct 2014
Location: oklahoma
Points: 73
|
Post Options
Thanks(0)
Quote Reply
Posted: 22 Oct 2017 at 3:54am |
I just bought a 190 XT, had a few bad fuel leaks under the tank, so I have the tank off, it appears that everything is original just like the pic in the above posting, I cleaned the tank out and 2 new sediment bowls, now I am having a real hard time getting the rubber grommet's in the nuts far enough to start the threading them on, there has to be a trick to it. Any help would be greatly appreciated, thanks in advance. 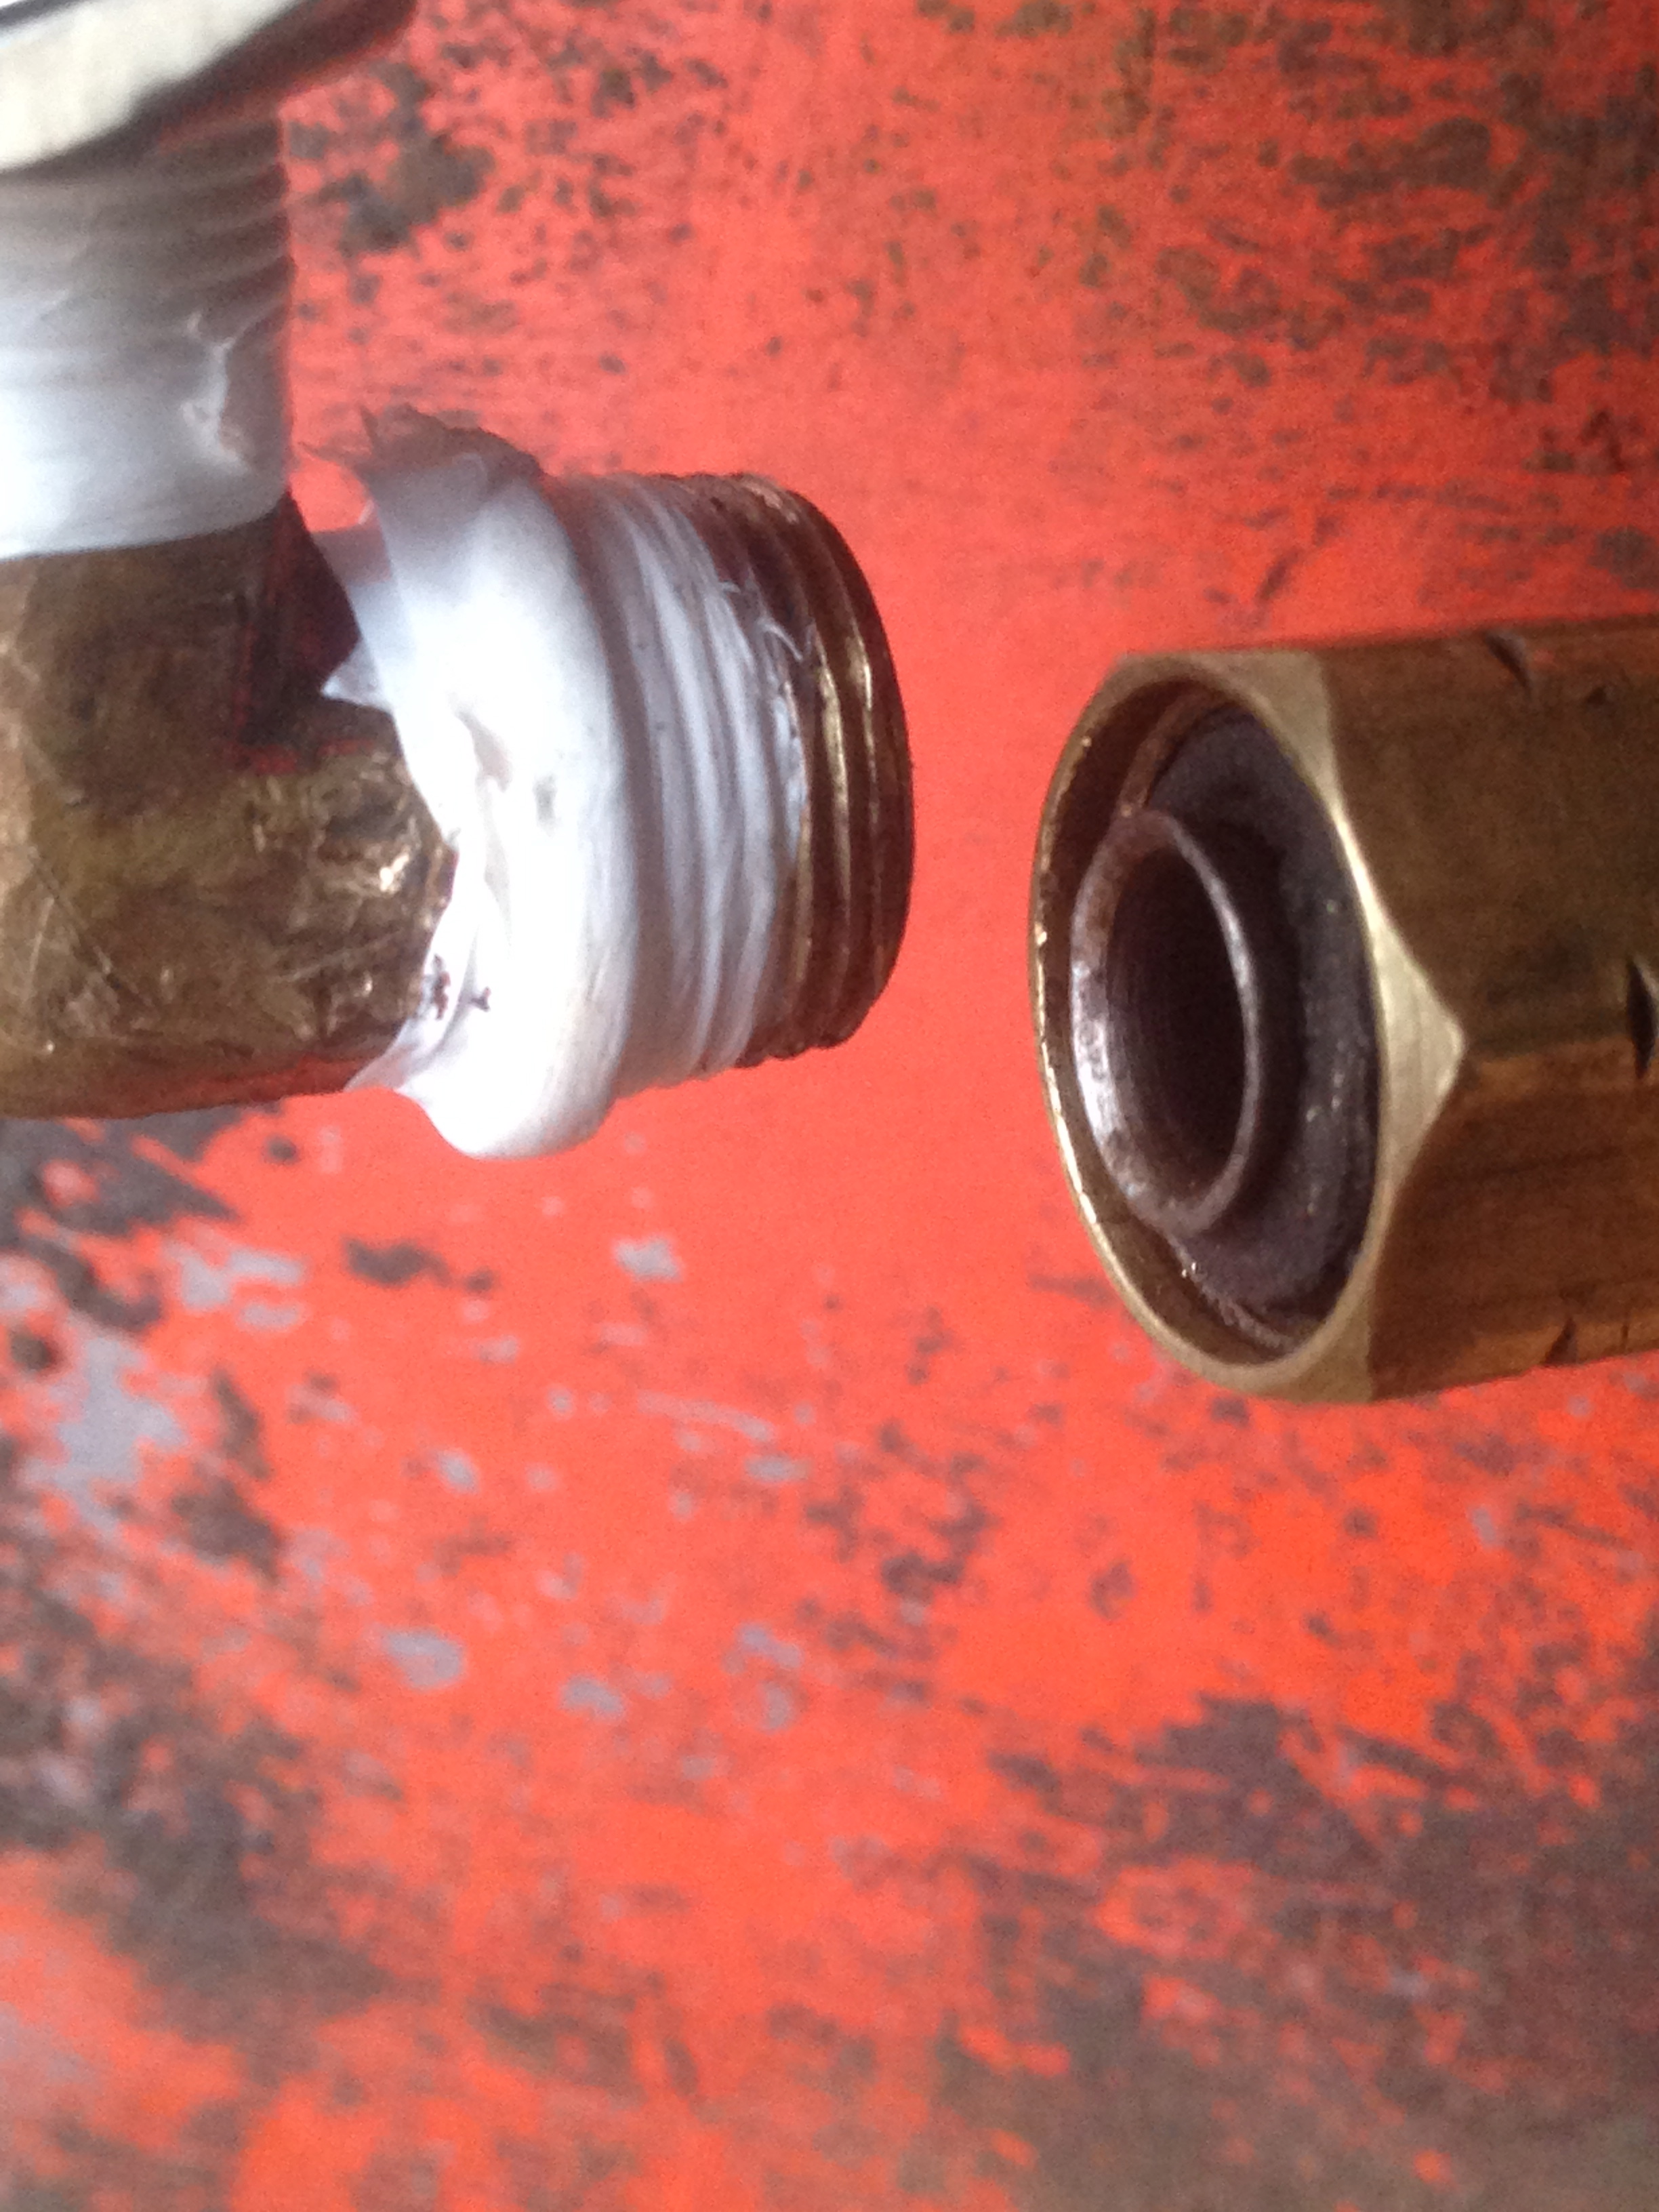 
|
|
WD 45 peddle tractor2 WC speed patrols D 12, D12 sires3, 3 D17's 2 r diesel 1 gas sires 4, 2 200's 1 is for parts, JD 1020
4 WD's in the weeds
|
|
Dakota Dave
Orange Level
Joined: 12 Sep 2009
Location: ND
Points: 3973
|
Post Options
Thanks(0)
Quote Reply
Posted: 22 Oct 2017 at 5:17am |
|
The but with a rubber deal in it is a compression fitting it'll always leak of you put Teflon tape on it take the tape off. It has to be perfectly aligned to get it to start. I fought with mine have up climbed out from under the tractor took a break and went back under a couple times. The line needs to be perfectly aligned in all directions. I wound up tweaking it and the valve directions a couple times. Oddly the left side that I couldn't see went together East the first try the right one drove me crazy.
|
|
Keith E
Silver Level
Joined: 15 Oct 2014
Location: oklahoma
Points: 73
|
Post Options
Thanks(0)
Quote Reply
Posted: 22 Oct 2017 at 8:13am |
|
Thanks Dakota Dave, but the problem is I can't get the rubber inside the nut far enough to start the threads, I worked about 3 hours yesterday just on the cross over line with the tank on saw horses. Thanks for the tip on the tape, was always told brass on brass don't need tape.
|
|
WD 45 peddle tractor2 WC speed patrols D 12, D12 sires3, 3 D17's 2 r diesel 1 gas sires 4, 2 200's 1 is for parts, JD 1020
4 WD's in the weeds
|
|
injpumpEd
Orange Level Access
Joined: 13 Sep 2009
Location: Walnut IL
Points: 5146
|
Post Options
Thanks(0)
Quote Reply
Posted: 22 Oct 2017 at 9:05am |
|
teflon tape is for pipe threads, not oring or ferrule fittings. Did you replace the rubber ferrules inside the nuts? Those are readily available, and should be replaced any time it's opened up. I've seen people try to make their own out of hose and it just doesn't work right.
|
|
210 "too hot to farm" puller, part of the "insane pumpkin posse". Owner of Guenther Heritage Diesel, specializing in fuel injection systems on heritage era tractors. stock rebuilds to all out pullers!
|
|
Keith E
Silver Level
Joined: 15 Oct 2014
Location: oklahoma
Points: 73
|
Post Options
Thanks(0)
Quote Reply
Posted: 22 Oct 2017 at 9:14am |
|
Thanks injpumpEd, yes I have new rubbers and can't seem to get them in the nut fare enough to show the threads in the nut, and just can't get the nut started. I have the tank sitting on saw horses and was working on the cross over line first, what do I have to do to get the new rubber ferules deeper in to the nut so it will start?
|
|
WD 45 peddle tractor2 WC speed patrols D 12, D12 sires3, 3 D17's 2 r diesel 1 gas sires 4, 2 200's 1 is for parts, JD 1020
4 WD's in the weeds
|
|
injpumpEd
Orange Level Access
Joined: 13 Sep 2009
Location: Walnut IL
Points: 5146
|
Post Options
Thanks(0)
Quote Reply
Posted: 22 Oct 2017 at 10:56am |
|
makes sure all the pieces of the old ferrules are cleaned out of the nut? You sure you have the correct ferrules? They will usually be about 3 threads down. Looks to me like something is keeping the nut from sliding all the way over the ferrule. Those are usually pretty forgiving in getting them started even when not perfectly straight.
|
|
210 "too hot to farm" puller, part of the "insane pumpkin posse". Owner of Guenther Heritage Diesel, specializing in fuel injection systems on heritage era tractors. stock rebuilds to all out pullers!
|
|
rodnil
Silver Level

Joined: 15 Sep 2009
Location: illinois
Points: 247
|
Post Options
Thanks(0)
Quote Reply
Posted: 22 Oct 2017 at 11:32am |
|
I have an early gas 190. I bought it at an auction. I started it to load onto my gooseneck trailer and it ran almost to the trailer then died. I found that the valve on the sediment bowl was closed so I opened it and was able to get it loaded. I never gave it a thought to close the sediment bowl valve. When I got home I had gasoline on the deck of the trailer. I never could stop it from leaking. I removed the fuel line and found that the rubber seals on the line were shot. I was able to find a NOS line and attempted to remove the old line and install the new line. What a job that turned into. I'm not a small guy and room under that tractor was a challenge for me . I decided to change both sediment bowls at the same time. That move has proven to be a ongoing problem with leaks. The bowls have to be in PERFECT alinement to get the fuel line connected to avoid cross threading but doing that would mean that the sediment bowls were not tight. I purchased ( twice) new sediment bowls that were advertised and sold as being correct replacements for a 190 gas. Anyway getting that line installed was a long job. I still have leaks. I've now found STUFF in the tank which I'm sure is causing it not to start. I'm going to what I should have none to start with, remove the tank, have cleaned and maybe lined install the sediment bowls and fuel line while it's off and re-install the fuel tank and hope and pray it works. Our Dad always had a saying about things like this " boy's if the engineer that designed such a thing had to work on it or repair it their would be some changes".
|
|
DougG
Orange Level
Joined: 20 Sep 2009
Location: Mo
Points: 8390
|
Post Options
Thanks(0)
Quote Reply
Posted: 22 Oct 2017 at 12:05pm |
|
Spray lube in the nut and get a visegrip and twist them over the rubber, I worked on an XT recently and bought a few rubber pieces from Agco at 4.80 a piece, the lines are were differ sizes and ended up going to diesel shop got some that fit for .30 cents a piece, they are aggrivating
|
|
Keith E
Silver Level
Joined: 15 Oct 2014
Location: oklahoma
Points: 73
|
Post Options
Thanks(0)
Quote Reply
Posted: 23 Oct 2017 at 5:50am |
|
Okay, thanks for all the help and tips DougG, injpumpEd and rodnil, I spent all day yesterday working on this and getting all the old rubbers out was a chore, ended up removing the fuel line up to the middle of the tractor, at least I could get both hands on it to remove the old rubbers with a small pic, but was still a time consuming pain, they came out in little pieces, and still had a hard time getting the new ones in fare enough to see threads, even had another fitting to assure they would start when I set the tank back in place, but not ready for that yet, got to go get 1/4" rubbers for the return line. I recently bought a parts tractor from a neighbor for the good injector pump for my 200, my tank had a big dent in it so I swapted tanks and the new tank was the cleaner of the 2, and the 190 and 200 tanks are almost the same as the whole tractors are almost, only some one had removed the sediment bowls on both 200 tank and had different lines, they were much easier to mess with, but not original, the 200 has the square glass fuel filter and almost the same on the water separator just before the filter, some one had removed the water separator on my 200 but the mounts for that were still on the parts tractor, I haven't found the right nuts for that fitting to put it back on, and my 190 has a spin on fuel filter, is that original for the 190, or has some one changed that? And on the 190 they have added a small fuel pump, and I see why, they didn't drain the tank or even look at the sediment bowls, both had that black gunk from todays fuel, inside the tank on top of the sediment bowls was full of it restocking the flow. At the end of hay season last year my 200 would die, I could use the hand primer a bit and would start right back up and run for a while, did that more than a couple times, so talking around I figured the governor in the injector pump was out, so I let it set all winter then when I had to I bought the parts tractor (200) from the neighbor, he said it had a newly rebuilt pump on it, and his hired hand run it for 2 weeks and didn't check the water or oil and burned up the motor. Thanks for all the help guys, maybe today I will get the tank back on and have it running again.
|
|
WD 45 peddle tractor2 WC speed patrols D 12, D12 sires3, 3 D17's 2 r diesel 1 gas sires 4, 2 200's 1 is for parts, JD 1020
4 WD's in the weeds
|
|
calico190xt68
Orange Level
Joined: 12 Jan 2017
Location: Frankton, IN
Points: 871
|
Post Options
Thanks(0)
Quote Reply
Posted: 23 Oct 2017 at 12:21pm |
|
KeithE,
I might be a bit late but I had a similar problem on reconnection. I removed both of my Sediment bowls but I also replaced the fuel line with 18 inches of new lines from auto parts store that already had the flares. I then connected the new lines to the old lines via a compression fitting. I had to use a flared fitting into the sediment bowl to connect these new lines.
In looking at the picture above, it looks like that is not a true flared fitting coming out of the sediment bowl? Like yours, mine seem to have that non-flared fitting that would not screw into anything. With the new lines, I had no choice but to use a flared fitting on the bowl from what I could see. It took minutes to get them connected once I bought the flared fitting, not hours. My tractor has been jacked with enough, I can't tell what is original and what is not.
I have no leaks now and all future repairs should be easier. So, you might try a flared fitting to see if that helps get it started easier.
I also had to reseat my sediment bowl on the left side. It leaked the first time. After undoing it, I placed gas pipe thread on the sediment bowl threads going into the tank and it stopped leaking. I saw no other solution on the sediment bowl leak.
I got into all of this because I tried to eliminate the easy stuff before I repaired the injection pump. Turns out it wasn't that easy, and it was the injection pump after all! However, I am glad I cleaned up the fuel lines and sediment bowls. What a mess they were and I am sure they would have created future issues!
|
|
Dakota Dave
Orange Level
Joined: 12 Sep 2009
Location: ND
Points: 3973
|
Post Options
Thanks(0)
Quote Reply
Posted: 23 Oct 2017 at 3:50pm |
|
Had you not cleaned it out your new injection pump wouldn't last long. they don't survive on old fuel and gunk.
|
|
Keith E
Silver Level
Joined: 15 Oct 2014
Location: oklahoma
Points: 73
|
Post Options
Thanks(0)
Quote Reply
Posted: 24 Oct 2017 at 7:56am |
Okay, sorry I didn't reply last night. Yesterday morning I ran to the city 1/4" rubber ferules for return line in to the tank and it just fell in to the nut, was told maybe different manufacturer's might very is size. Had the cross over line on the tank when I set it up on 4 1" boards so I could let it down a little at a time to make sure not to damage any thing, it wouldn't go, had to take it off and lay it under my wood, and thought I might have to take the tee fitting out of the left sediment bowl, but just give it a 1/8 turn to clear. So worked on the right side cross over line first, no luck so worked on the left side a while and it fit right up, finally got the right side, put fuel in it and opened the valves and the right side leaked at the bowl, took it apart and flipped the rubber over, every thing looks good with no leaks
Thanks for all the help and advice, calico190xt68, never to late to learn from the ones that have been there and done it, thanks to you and Dakota Dave, DougG, rodnil, injpumpEd and the rest with their stories and info!
Oh, and I did spend the money on some stuff to eat that algee/black gunk, and was told it will break it up and leave the tank some day, glad I put new sediment bowls on it as the old ones had no screens in them, and it has a spin on filter just before the injector pump, not sure if it is original or been changed out from square glass filters like on my 200?
So, on to the next fix, the guy I got it from said the low side of pd don't work, but the agco dealer told him it was an adjustment some where. And have some new gages on the way, and hope to get the lights working on this one, and it dose jump out of 4th gear. I will try to find some of the answers from other and older post.
Once again, THANKS FOR ALL THE HELP GUYS, this is a great web site!! 
Edited by Keith E - 24 Oct 2017 at 7:58am
|
|
WD 45 peddle tractor2 WC speed patrols D 12, D12 sires3, 3 D17's 2 r diesel 1 gas sires 4, 2 200's 1 is for parts, JD 1020
4 WD's in the weeds
|
|
calico190xt68
Orange Level
Joined: 12 Jan 2017
Location: Frankton, IN
Points: 871
|
Post Options
Thanks(0)
Quote Reply
Posted: 24 Oct 2017 at 9:20am |
|
I believe the spinon fuel filter is original. The spinon filter part number is listed in the parts book. Many of the auto parts suppliers also listed a compatible spinon fuel filter. I have seen quite a few 190XTs in pictures and they seem to all have spinon fuel filters. Glad to know that you got it fixed and are moving onto the next problem. I wish I had all of the gas money I have spent going back and forth getting the right part, as I am sure you do too.
|
|
80 7010, 80 7020. 67 190XTD Series I w/500 Loader, AC 2000 Plow, Member Indiana A-C Partners, Member TAC
|
|


