| Author |
 Topic Search Topic Search  Topic Options Topic Options
|
Lewischaz1092 
Bronze Level


Joined: 16 Jul 2017
Location: Mo
Points: 20
|
 Post Options Post Options
") Thanks(0) Thanks(0)
 Quote Quote  Reply Reply
 Topic: Hd6g Topic: Hd6g
Posted: 16 Jul 2017 at 9:08pm |
|
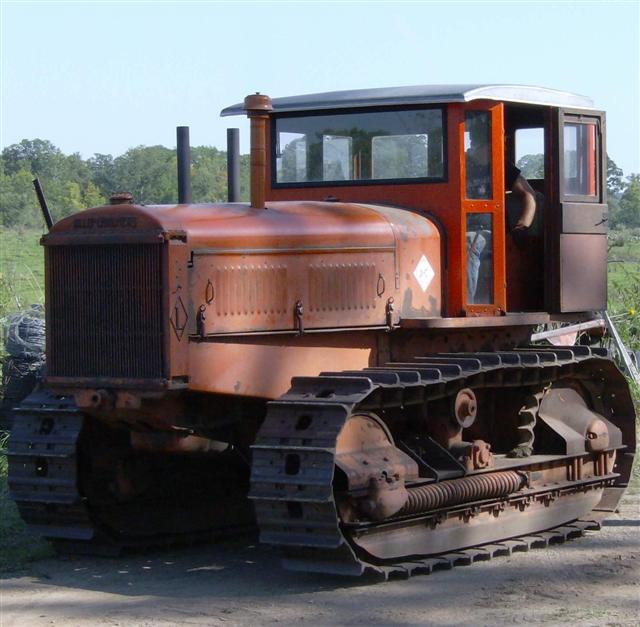
Was curious to if anyone can tell me the year off my crawler and if anyone has a diagram for the engine belt routing it's a hd6g tractoshovel serial 298 or 290 depending if you look at the one in the rear housing or on the loader arm
|
 |
|
Sponsored Links
|
|
|
Dozer
Orange Level

Joined: 16 Aug 2011
Location: SW New York
Points: 689
|
Post Options
Thanks(0)
Quote Reply
Posted: 17 Jul 2017 at 7:26am |
|
The number on the final drive housing "HD6G 290" is a 1955
If it has the original HD344 motor with crankshaft driven belts, the rear belt is powered by the upper 3v pulley and drives the water pump and generator. The front (2) belts are driven by the crankshaft and drive the upper pulley. The later motors are different.
|
|
Lewischaz1092
Bronze Level
Joined: 16 Jul 2017
Location: Mo
Points: 20
|
Post Options
Thanks(0)
Quote Reply
Posted: 17 Jul 2017 at 8:23am |
|
It has a the original motor what I was looking at on the routing is once I go around the generator and water pump back up to the fan it rubs the tensioner also is there a way to get the other two off without taking apart the nose
|
|
Lewischaz1092
Bronze Level
Joined: 16 Jul 2017
Location: Mo
Points: 20
|
Post Options
Thanks(0)
Quote Reply
Posted: 17 Jul 2017 at 12:30pm |
|
Also 290 is the one on the arm 298 is the housing
|
|
Dozer
Orange Level
Joined: 16 Aug 2011
Location: SW New York
Points: 689
|
Post Options
Thanks(0)
Quote Reply
Posted: 17 Jul 2017 at 3:21pm |
|
The radiator shell tips forward pivoting on the forward pins with the square hole. Remove the bumper and rear hard nose bolts, pry and wedge the area outward before tipping. There is a locking mechanism that is relieved by this.
|
|
Lewischaz1092
Bronze Level
Joined: 16 Jul 2017
Location: Mo
Points: 20
|
Post Options
Thanks(0)
Quote Reply
Posted: 17 Jul 2017 at 3:51pm |
|
Ok thanks I'll give it a shot
|
|
Lewischaz1092
Bronze Level
Joined: 16 Jul 2017
Location: Mo
Points: 20
|
Post Options
Thanks(0)
Quote Reply
Posted: 17 Jul 2017 at 9:39pm |
|
Ok got the belts on running like a champ now any body know where I can find grouser pads reasonable
|
|
Coke-in-MN
Orange Level Access

Joined: 12 Sep 2009
Location: Afton MN
Points: 42276
|
Post Options
Thanks(0)
Quote Reply
Posted: 17 Jul 2017 at 11:00pm |
Do like I did on my HD5 - Pads were straight but worn - so i welded rebar onto them using 7024 drag rod - I put 2 bars on each pad - leaving the center bar stock . Has held up well over the years - spend a few days out in shop welding them on and many pounds of rod .
|
|
Life lesson: If you’re being chased by a lion, you’re on a horse, to the left of you is a giraffe and on the right is a unicorn, what do you do? You stop drinking and get off the carousel.
|
|
Dozer
Orange Level
Joined: 16 Aug 2011
Location: SW New York
Points: 689
|
Post Options
Thanks(0)
Quote Reply
Posted: 18 Jul 2017 at 6:13am |
|
Where did you find "V" belts? I was unable to locate the correct length.
|
|
Lewischaz1092
Bronze Level
Joined: 16 Jul 2017
Location: Mo
Points: 20
|
Post Options
Thanks(0)
Quote Reply
Posted: 18 Jul 2017 at 12:02pm |
|
I plan to weld some rebar on for now actually but would like to put new ones on in the next couple years cause the rest of the pads are worn too not just the bat, and as far as the belts I jusst used string line to measure the length and called O'Reilly the generator belt was a b49 for mine don't know on the other 2 didn't have to replace them but get them off to replace the one
|
|
Lewischaz1092
Bronze Level
Joined: 16 Jul 2017
Location: Mo
Points: 20
|
Post Options
Thanks(0)
Quote Reply
Posted: 18 Jul 2017 at 12:04pm |
|
Also on the belts Napa is usually good for equipment they may have to order it but can usually get them in a couple days that's where I have to get the belt for my sickle mower
|
|
Ian Beale
Orange Level
Joined: 03 Oct 2011
Location: New South Wales
Points: 1009
|
Post Options
Thanks(0)
Quote Reply
Posted: 18 Jul 2017 at 4:59pm |
 Dozer wrote: Dozer wrote:
Where did you find "V" belts? I was unable to locate the correct length. |
If it is the same setup for the two on fan drive as on a 516 then C 60 fits our AC 45 grader. That has C section for the waterpump and generator though and I'm running an alternator not a generator.
Edited by Ian Beale - 18 Jul 2017 at 5:01pm
|
|
Lewischaz1092
Bronze Level
Joined: 16 Jul 2017
Location: Mo
Points: 20
|
Post Options
Thanks(0)
Quote Reply
Posted: 18 Jul 2017 at 8:55pm |
|
Correction go with the b48 49 was a tad long but works, also anybody got any ideas why the hydraulics would be surging and the vavle getting hot? And yes they are at the proper fluid level
|
|
JC-WI
Orange Level Access
Joined: 11 Sep 2009
Location: wisconsin
Points: 34642
|
Post Options
Thanks(0)
Quote Reply
Posted: 18 Jul 2017 at 10:36pm |
|
Sounds like something is not relieving.
Or a third valve stuck in a load position or some thing like that...
or maybe plumbed in wrong...
Just how hot is it?
|
|
He who says there is no evil has already deceived himself
The truth is the truth, sugar coated or not. Trawler II says, "Remember that."
|
|
DiyDave
Orange Level Access

Joined: 11 Sep 2009
Location: Gambrills, MD
Points: 55318
|
Post Options
Thanks(0)
Quote Reply
Posted: 19 Jul 2017 at 5:04am |
Did this loader once have a hoe, on the back? If so, it may have a selector valve button, on the valve bank. push (or pull) the selector, and you went from driving the hoe to loader, and vice versa. if the knob is lulled (or pushed) slightly, it can cause the heating/surging problem...
IIRR, the knob was on a separate valve bank, in such a position as to hit your knee, as you get on or off the machine...  |
|
Lewischaz1092
Bronze Level
Joined: 16 Jul 2017
Location: Mo
Points: 20
|
Post Options
Thanks(0)
Quote Reply
Posted: 19 Jul 2017 at 9:42am |
|
It's getting hot enough you don't want to bump it with you arm. The arm vavle for the arm is stays in whatever position you put it in not just neutral and float. To the best of my knowledge it never had a hoe unit as much as I would like to have one. But I have only had this machine a few days trying to work all the previous bugs out.
|
|
Lewischaz1092
Bronze Level
Joined: 16 Jul 2017
Location: Mo
Points: 20
|
Post Options
Thanks(0)
Quote Reply
Posted: 19 Jul 2017 at 9:53am |
|
Is it possible could be clogged up in the suction line fro. The tank to the pump
|
|
Lewischaz1092
Bronze Level
Joined: 16 Jul 2017
Location: Mo
Points: 20
|
Post Options
Thanks(0)
Quote Reply
Posted: 05 Aug 2017 at 8:41pm |
|
Any body have a diagram of the lift cylinders
|
|
doctorcorey
Orange Level

Joined: 17 Jul 2011
Location: S. KC Missouri
Points: 589
|
Post Options
Thanks(0)
Quote Reply
Posted: 06 Aug 2017 at 8:25am |
|
You're looking for a hydraulic schematic or a diagram of the actual cylinder?
|
|
Lewischaz1092
Bronze Level
Joined: 16 Jul 2017
Location: Mo
Points: 20
|
Post Options
Thanks(0)
Quote Reply
Posted: 06 Aug 2017 at 8:39am |
|
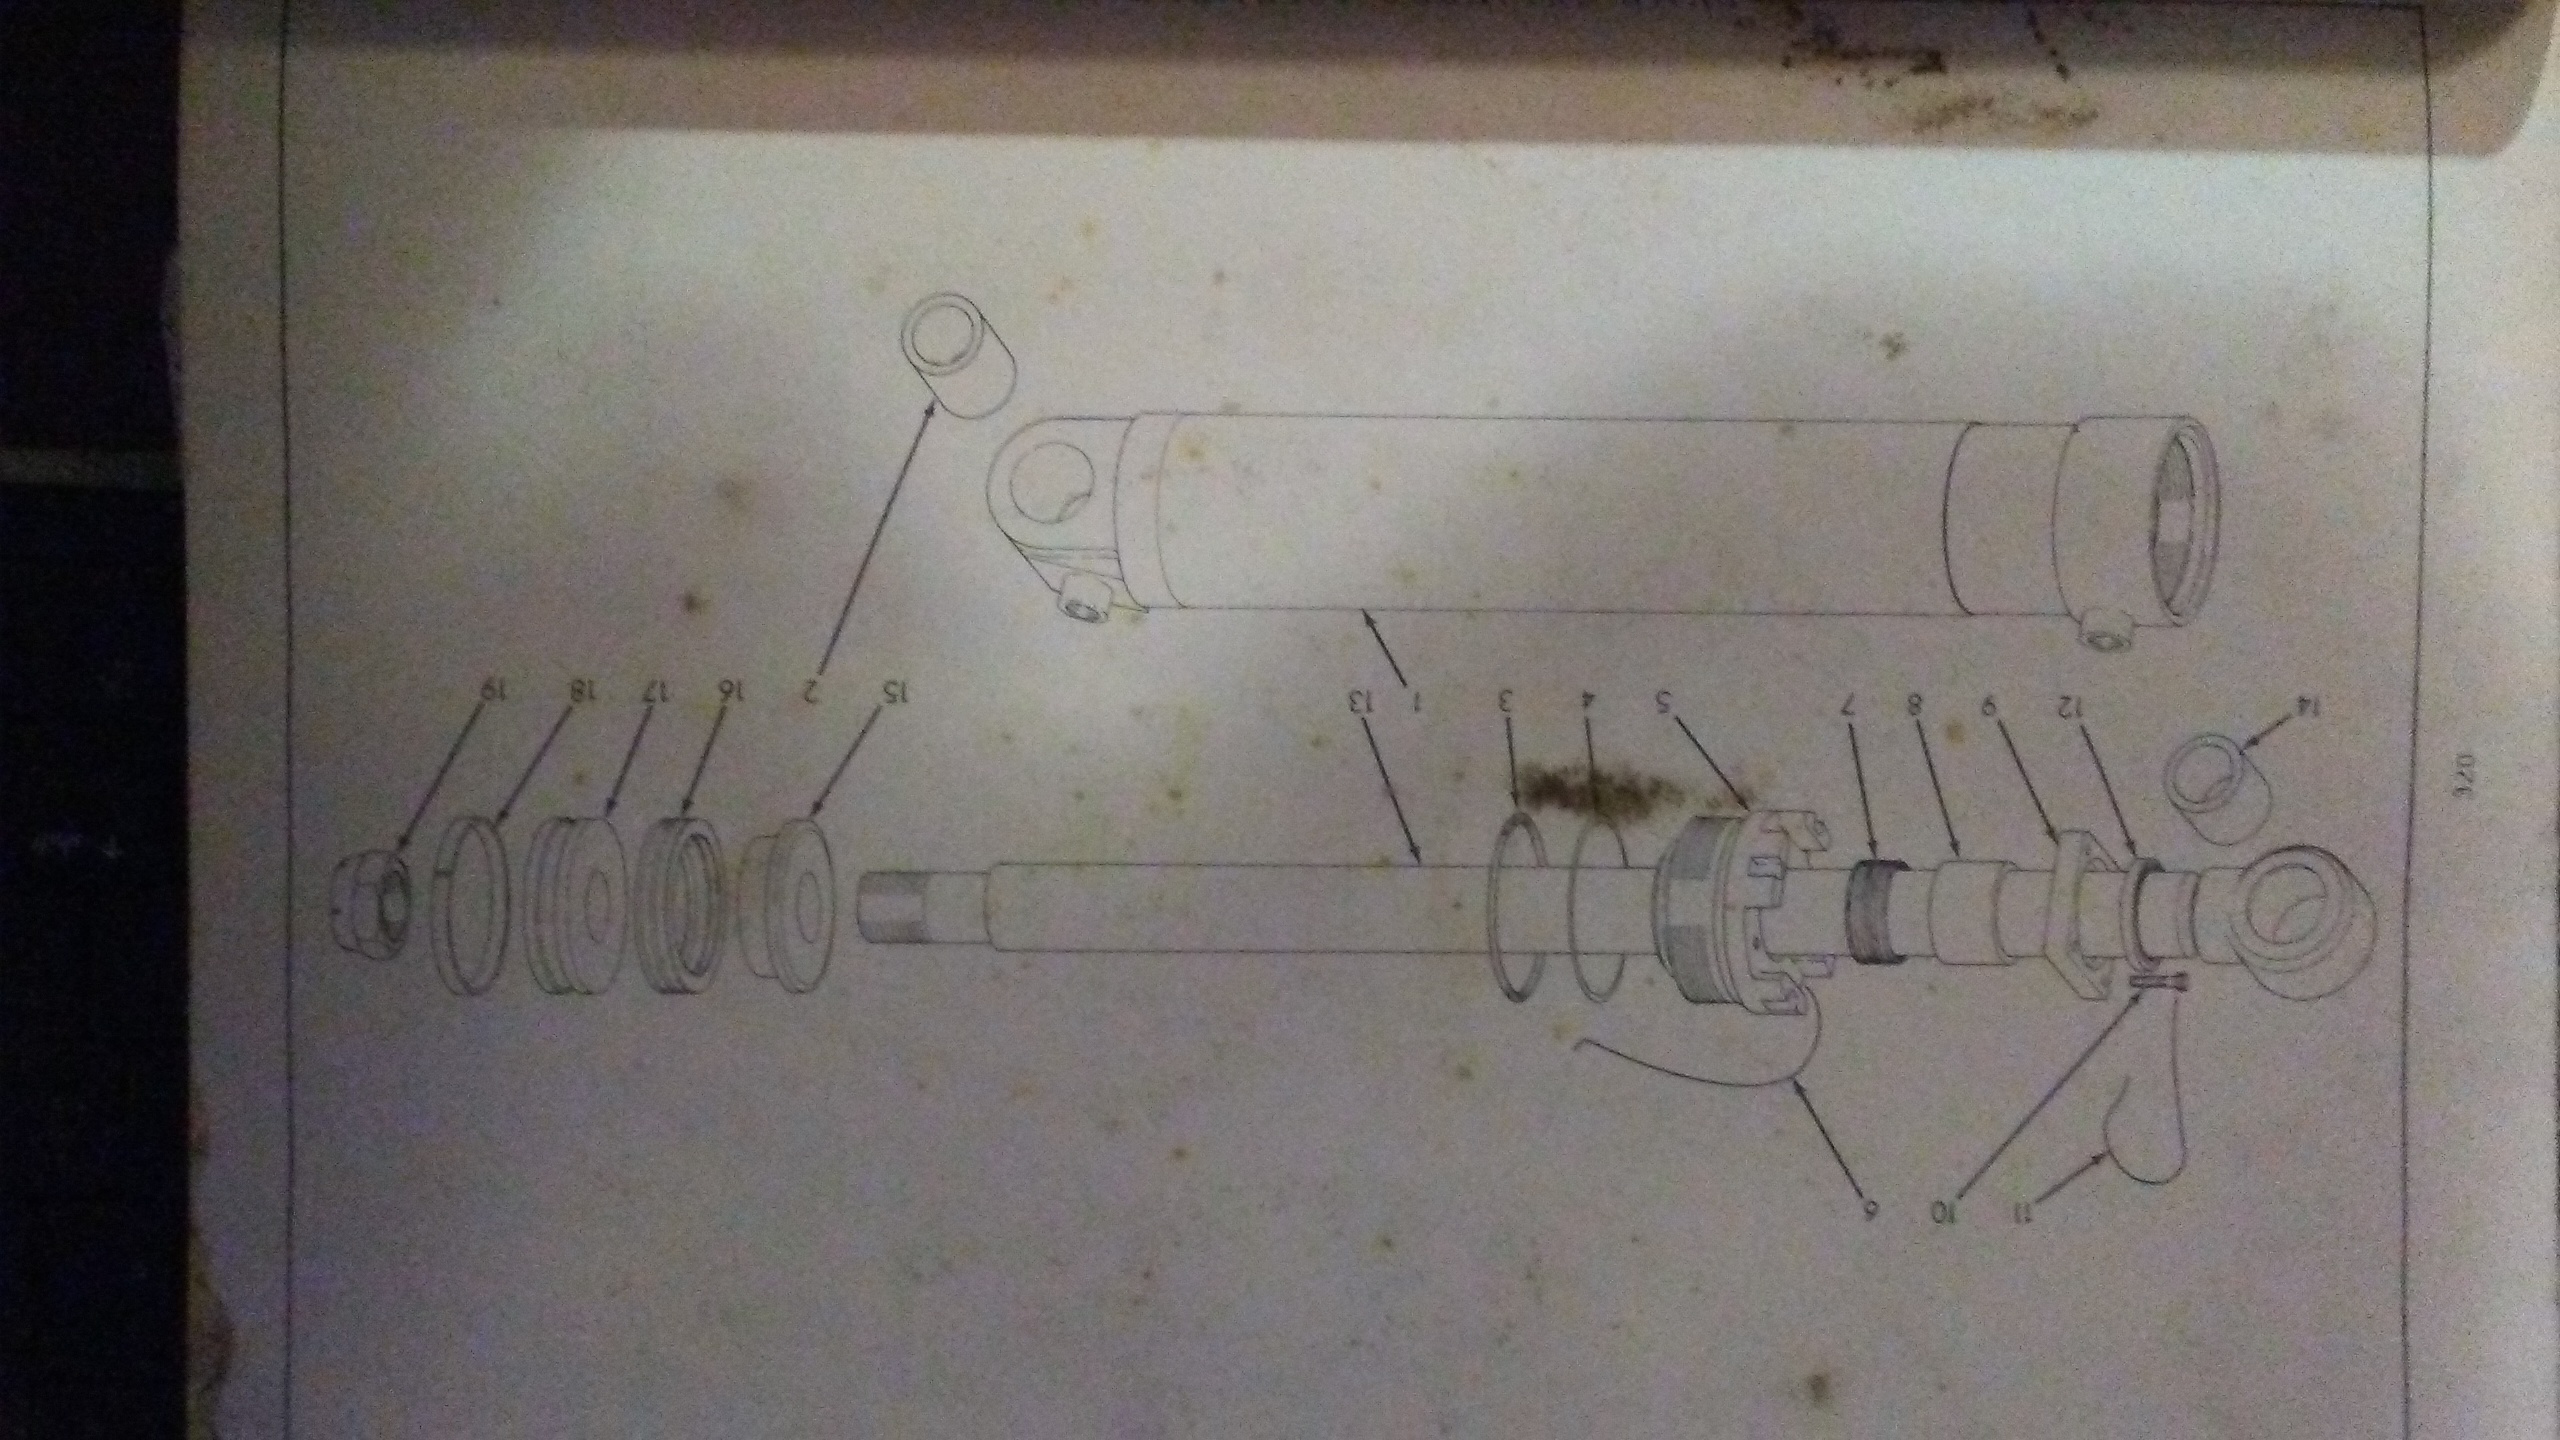
Diagram of the cylinder itself got a seal leaking
|
|
doctorcorey
Orange Level
Joined: 17 Jul 2011
Location: S. KC Missouri
Points: 589
|
Post Options
Thanks(0)
Quote Reply
Posted: 06 Aug 2017 at 12:26pm |
Lewischaz1092 wrote:
Diagram of the cylinder itself got a seal leaking |
|
|
Dozer
Orange Level
Joined: 16 Aug 2011
Location: SW New York
Points: 689
|
Post Options
Thanks(0)
Quote Reply
Posted: 06 Aug 2017 at 12:30pm |
|
The rod seal has (4) chevron seals. Tighten the (4) 3/8-16 cap screws to reduce the leak. If that doesn't stop the leak replace the seals and the rod bearing.
|
|
doctorcorey
Orange Level
Joined: 17 Jul 2011
Location: S. KC Missouri
Points: 589
|
Post Options
Thanks(0)
Quote Reply
Posted: 06 Aug 2017 at 12:30pm |
|
|
|
doctorcorey
Orange Level
Joined: 17 Jul 2011
Location: S. KC Missouri
Points: 589
|
Post Options
Thanks(0)
Quote Reply
Posted: 06 Aug 2017 at 12:32pm |
|
|
|
doctorcorey
Orange Level
Joined: 17 Jul 2011
Location: S. KC Missouri
Points: 589
|
Post Options
Thanks(0)
Quote Reply
Posted: 06 Aug 2017 at 12:33pm |
doctorcorey wrote:
Is your leak internal or external?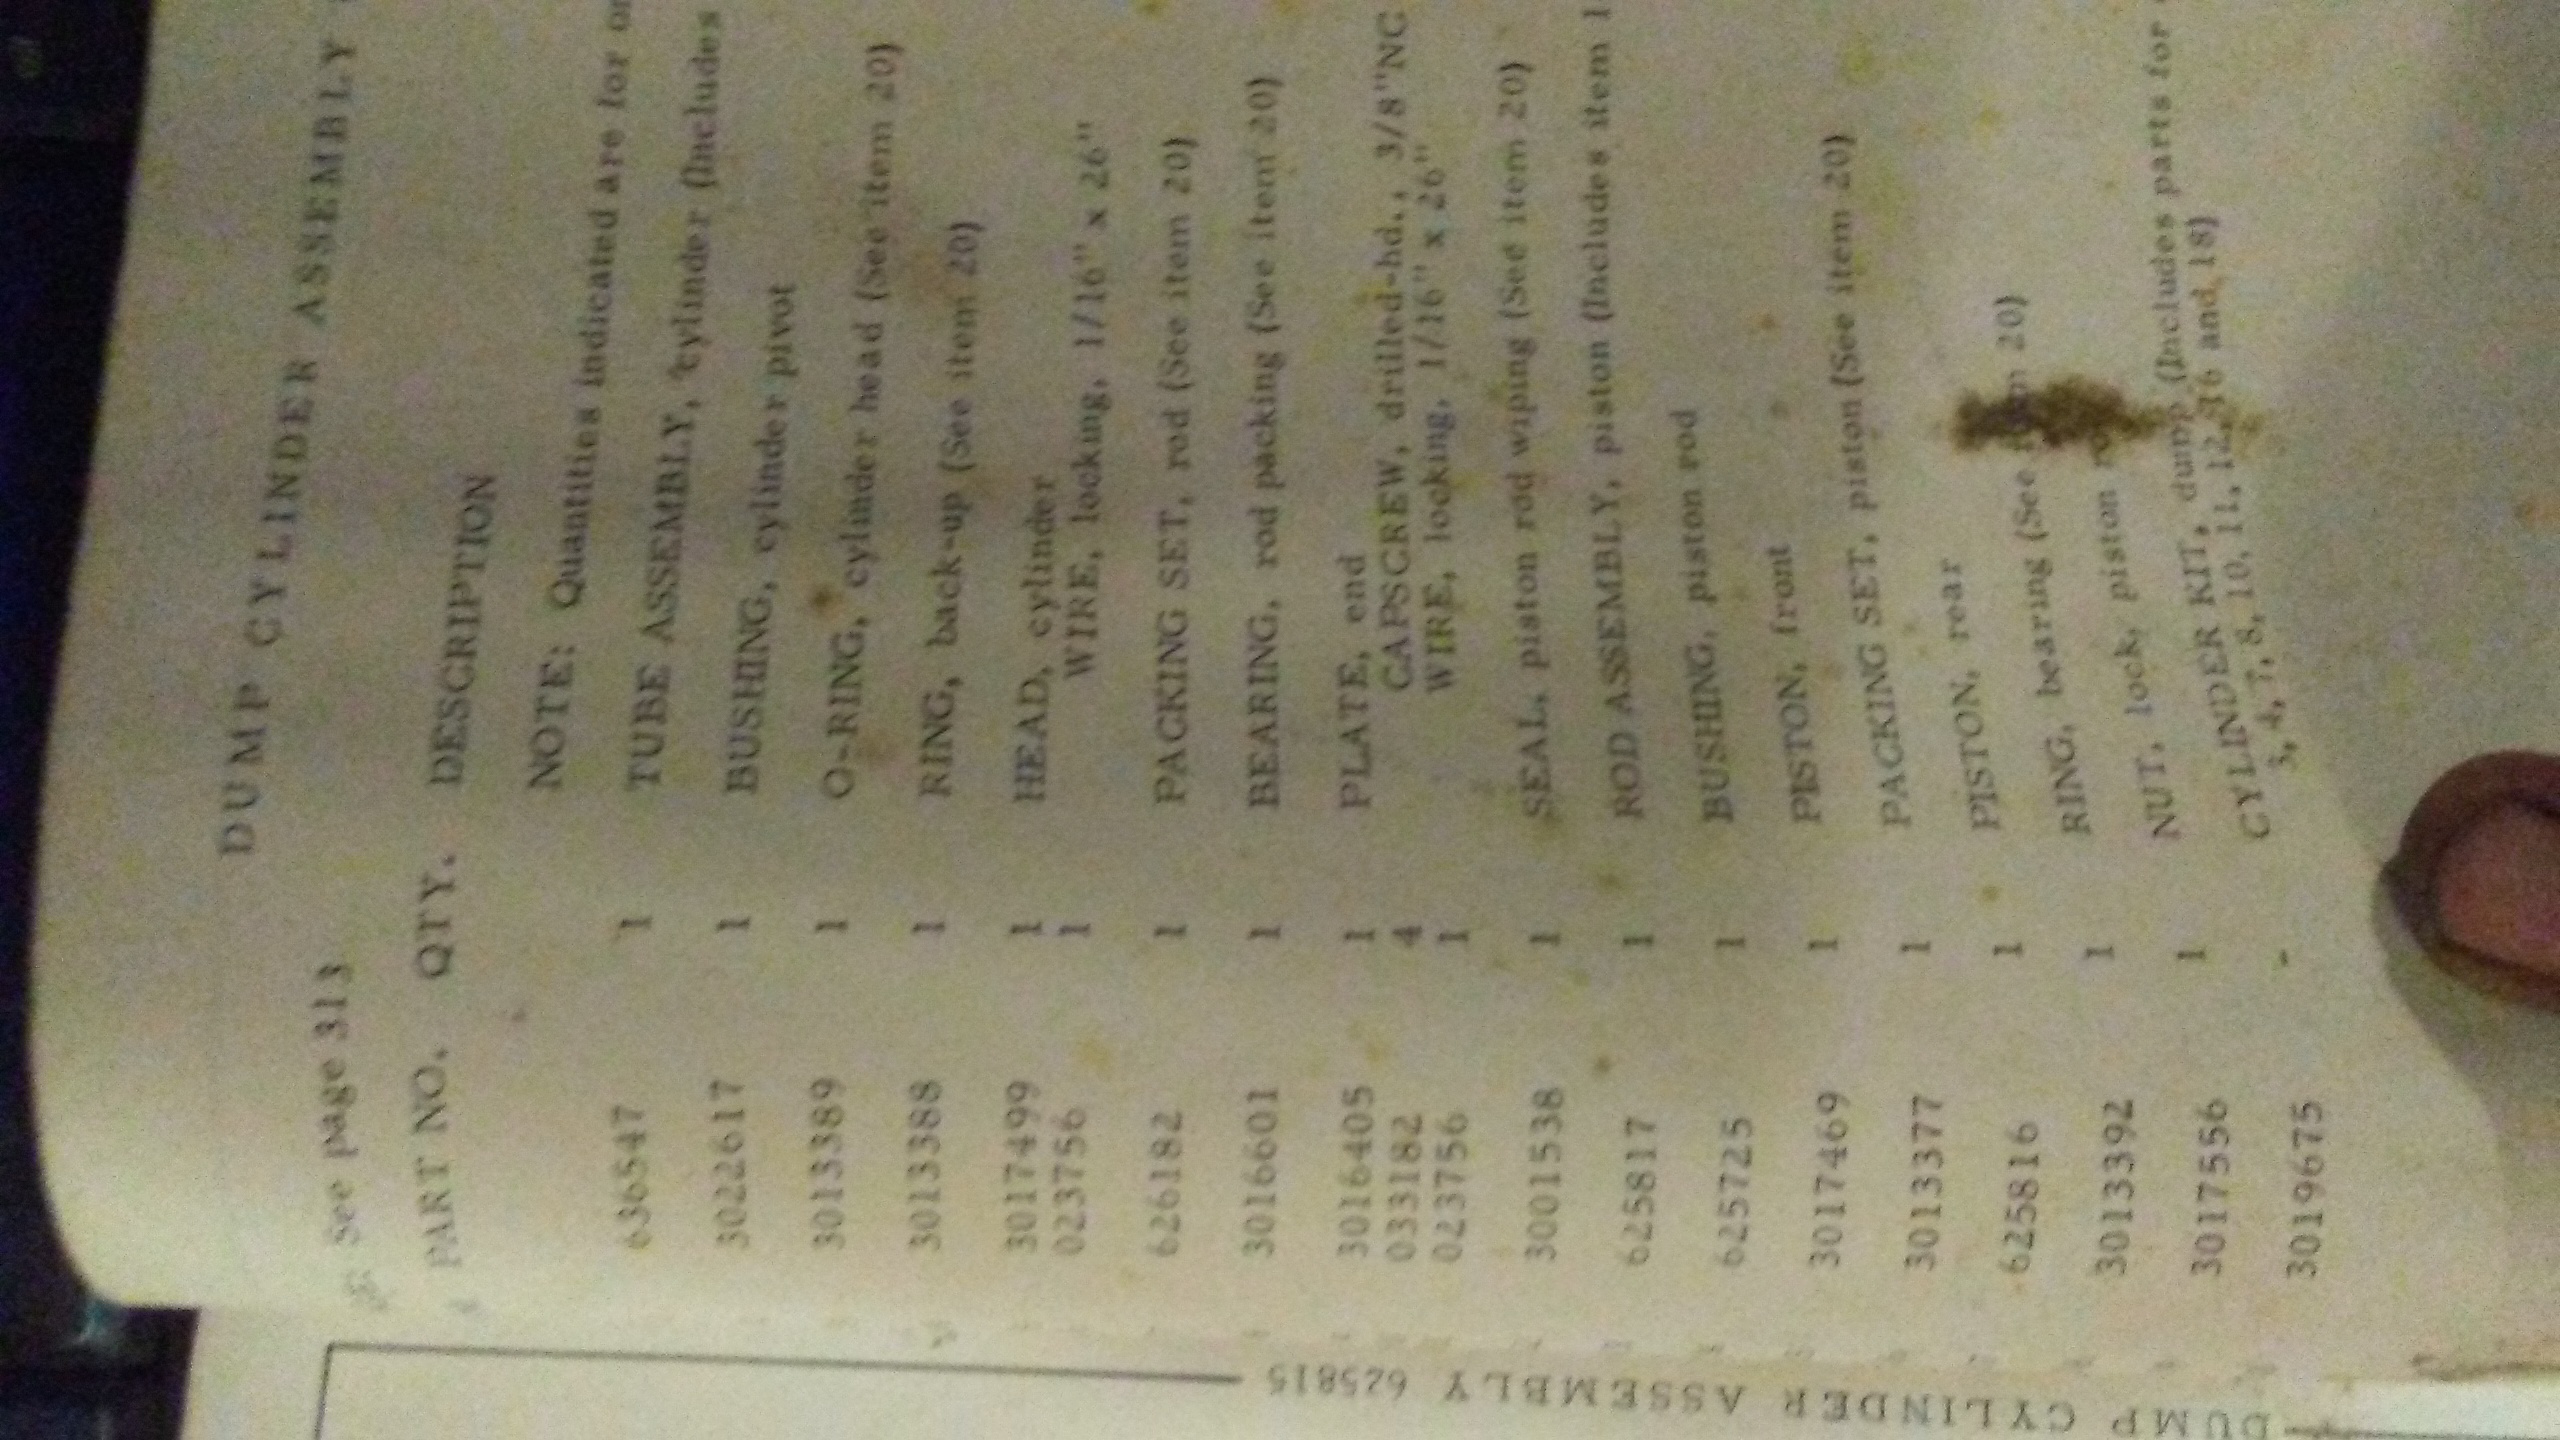
|
|
|
Lewischaz1092
Bronze Level
Joined: 16 Jul 2017
Location: Mo
Points: 20
|
Post Options
Thanks(0)
Quote Reply
Posted: 06 Aug 2017 at 12:44pm |
|
Thanks for the pic it's right were number 5 is in the diagram previous owner over torqued it an pushed the seal out
|
|
Lewischaz1092
Bronze Level
Joined: 16 Jul 2017
Location: Mo
Points: 20
|
Post Options
Thanks(0)
Quote Reply
Posted: 06 Aug 2017 at 1:08pm |
|
Do you have a part number for pieces 3/4
|
|
doctorcorey
Orange Level
Joined: 17 Jul 2011
Location: S. KC Missouri
Points: 589
|
Post Options
Thanks(0)
Quote Reply
Posted: 06 Aug 2017 at 1:15pm |
sorry wrong part list. #3 is 3013389 Oring, cylinder head. #4 is 301338 Ring-Back up. 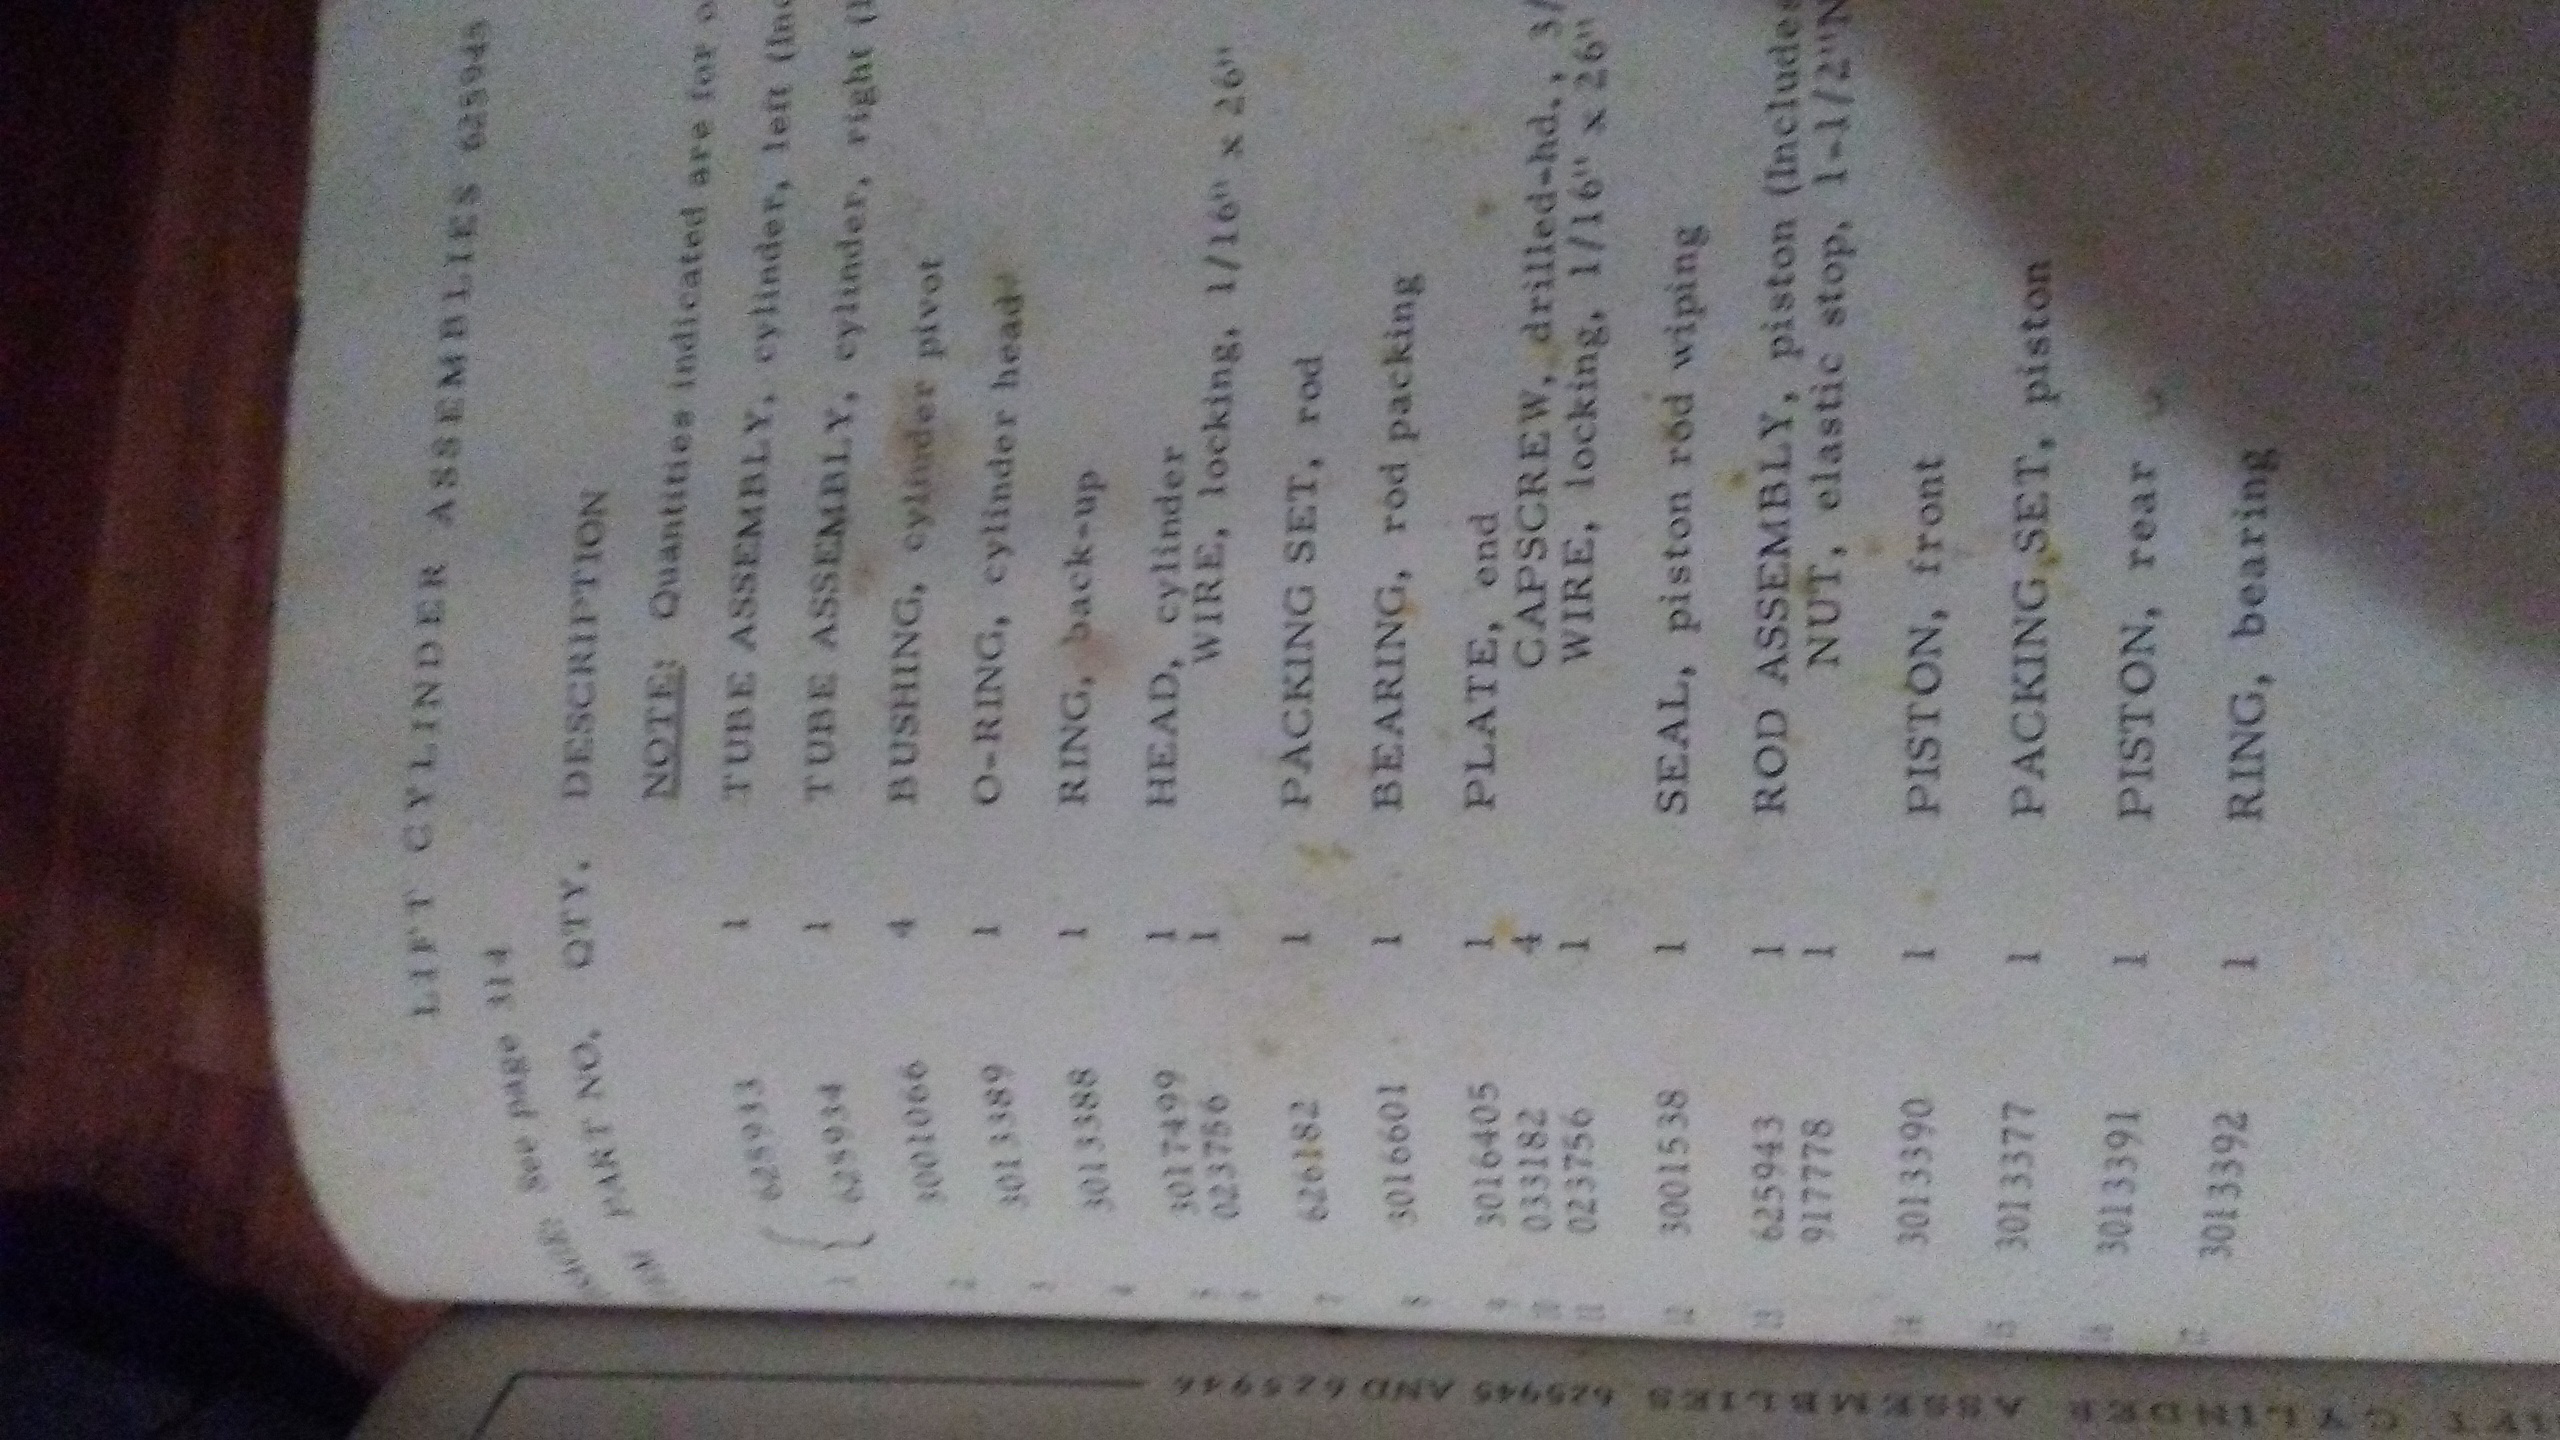
|
|
Lewischaz1092
Bronze Level
Joined: 16 Jul 2017
Location: Mo
Points: 20
|
Post Options
Thanks(0)
Quote Reply
Posted: 06 Aug 2017 at 2:21pm |
|
Thanks really appreciate it I'll see if can get them ordered
|
|


