| Author |
 Topic Search Topic Search  Topic Options Topic Options
|
Scott in MA 
Bronze Level

Joined: 25 Apr 2010
Points: 40
|
 Post Options Post Options
") Thanks(0) Thanks(0)
 Quote Quote  Reply Reply
 Topic: Carburetor woes Topic: Carburetor woes
Posted: 15 Aug 2010 at 7:34pm |
|
I've been whining here about my non-running B, and I need some more help with a carb question. I posted photos of my Marvel Schebler carb some time ago and was told it wasn't original to my B. I bought a crusty Zenith through eBay that the seller claimed was from a B. I scrubbed it clean inside and out, boiling it in lemon juice (which smells really bad). I timed the tractor once again and now it will run for a second or two on starting fluid. I'm guessing I've narrowed the problem down to the carb, even though it responds the same way with either the Zenith or Marvel Schebler in place. I replaced the F-M magneto with a later distributor and new coil. The distributor puts out enough juice to cause a lot of pain, which I take as a good thing.
My owners manual indicates there are just two adjustments for the carb - idle and air/fuel mixture. My "new" Zenith also has what looks like an adjustable main jet. Does anyone know the baseline adjustment for that? I adjusted the air/fuel screw 1.5 turns out and left the idle alone.
Also, can anyone tell me if my reasoning about the no-start problem being carb related makes sense? I bought this as a non-runner from an old man who claimed he had it in storage and started it once per year, and it wouldn't start the year I bought it. I'm guessing it was sitting around a lot longer than he claimed. It still won't start after a starter motor rebuild, overhauled distributor, and cleaned up Zenith carburetor (without use of ether).
Thanks gentlemen.
|
 |
|
Sponsored Links
|
|
|
JohnThomas
Orange Level


Joined: 14 Sep 2009
Location: Traverse City
Points: 332
|
Post Options
Thanks(0)
Quote Reply
Posted: 15 Aug 2010 at 7:41pm |
|
Well Scott..I know just how you feel. I went thru almost the same senario with my WD and it too has a Marvel on it. I looked into everything I could imagine too. So one day someone on here..(thanks someone)..told me to check the distributor and points. I thought it unneccessary as I'd already been in there. I did take off the cover tho and wiped everything with fine emory tape and wiped it all out super clean.
I hit the starter and it scared the Bee Jesus outta me cos it roared to life so quick!
It's probably some simple lil thing like that...you just gotta keep at it.
|
|
Life is short...Make haste to be kind
|
|
norm [ind]
Orange Level
Joined: 16 Sep 2009
Location: BOURBON,IN.
Points: 667
|
Post Options
Thanks(0)
Quote Reply
Posted: 15 Aug 2010 at 7:42pm |
|
re clean carb again if it runs with ether it will run on gas also try it no fuel
|
|
BennyLumpkin
Orange Level

Joined: 22 Mar 2010
Location: Centre Hall, PA
Points: 2657
|
Post Options
Thanks(0)
Quote Reply
Posted: 15 Aug 2010 at 8:05pm |
|
yeah you didnt mention if you are def. getting fuel....I know it sounds dumb but my WC seemed good to go when I got it running....found a small hole in the fuel line...it wasnt leaking because it rusted on the upper side of the hole and blocked itself but it was up under the tank where I couldnt see it. Triple check your fuel system, your ignition system....when it fires for a few seconds does it sound right or does it pop and sputter?
|
|
Central PA Allis Express
1934 WC254
1945 WF
1945 WC135755
1951 WD68085
1953 WD45-150217
1957 WD45D-230744D
B110
|
|
Dick L
Orange Level

Joined: 12 Sep 2009
Location: Edon Ohio
Points: 5093
|
Post Options
Thanks(0)
Quote Reply
Posted: 15 Aug 2010 at 8:34pm |
If this is the Zenith carburetor you bought and the adjustment screw is at the top it would be the idle adjustment only. With this carburetor you have only an orifice in the power jet at the bottom that meters the proper amount of fuel. If this is your carburetor did you remove the plug at the front bottom, then remove the brass power jet along with the brass feeder tube/discharge jet on a slant in the neck before you boiled it? If not you would not have done any cleaning behind the power jet and below the feeder tube. After the fuel is metered at the jet it must have free flow from the jet and up the feeder tube into the engine. If it has a adjustment needle in the front you still need to remove the power jet and feeder tube before boiling. 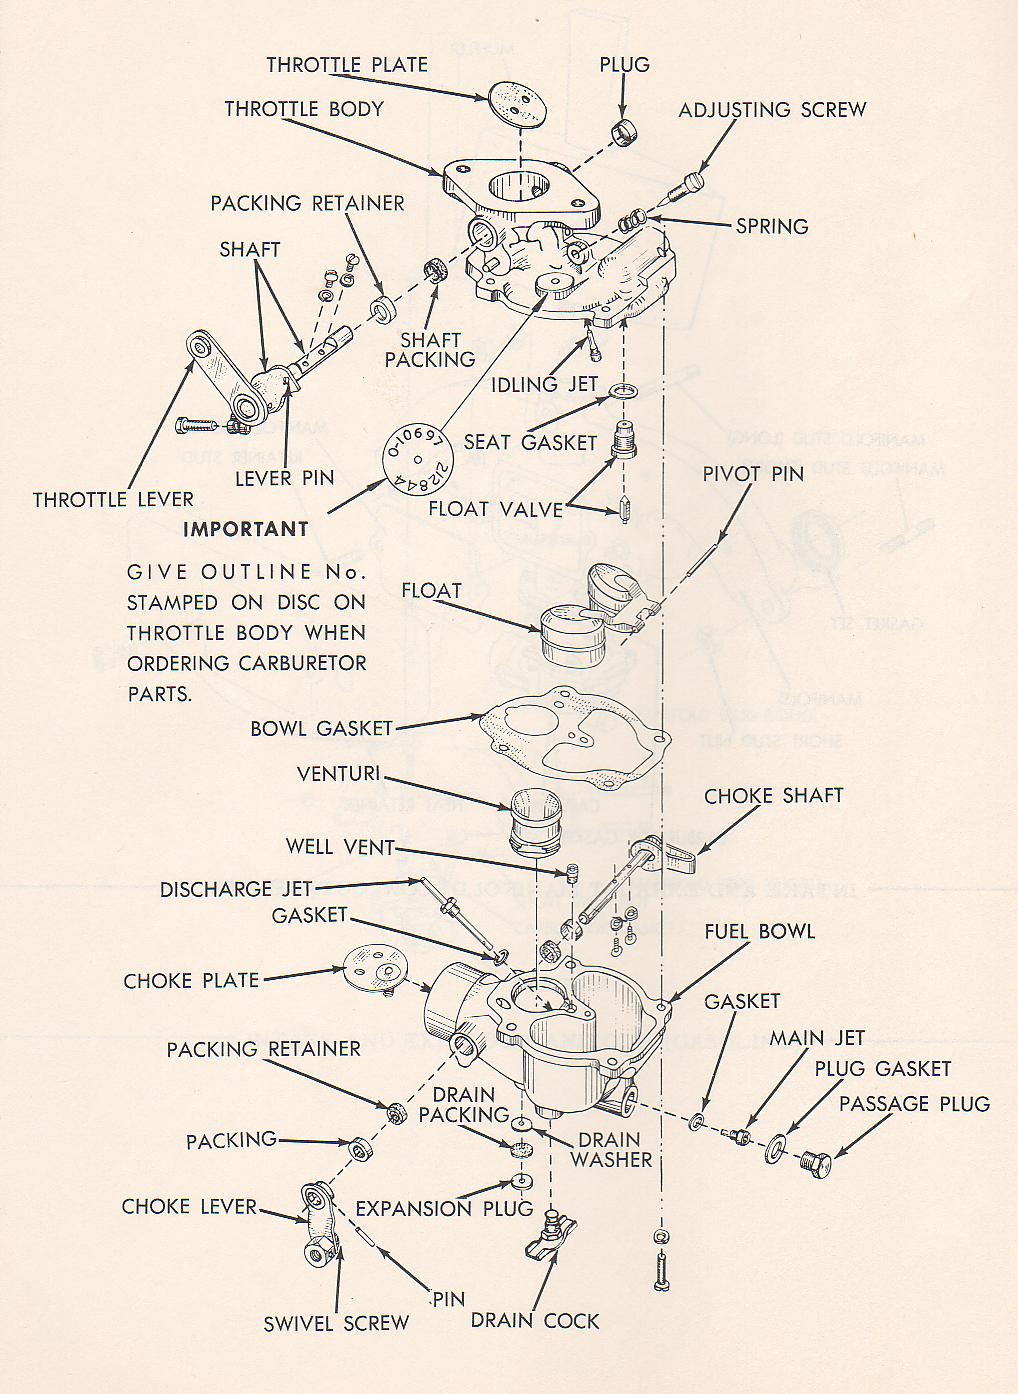
Edited by Dick L - 15 Aug 2010 at 8:35pm
|
|
Scott in MA
Bronze Level
Joined: 25 Apr 2010
Points: 40
|
Post Options
Thanks(0)
Quote Reply
Posted: 15 Aug 2010 at 8:57pm |
|
Thanks for the diagram, Dick. I have an adjustment knob/screw where the drawing is labeled "passage plug." I didn't take that apart because I didn't know what the stock setting is. Can anyone tell me how many turns out that knob/screw should be? I only need to get it finely tuned enough to start.
Is the power jet the same as the main jet?
|
|
Dick L
Orange Level
Joined: 12 Sep 2009
Location: Edon Ohio
Points: 5093
|
Post Options
Thanks(0)
Quote Reply
Posted: 15 Aug 2010 at 9:16pm |
|
Power jet main jet all the same thing different words from a different area.
Setting is simple. you turn it out a coupla turns or so. I think the book calls for 2 1/2 turns. Same with the idle screw at the top. You first set the idle after you get it running. The butterfly stop screw on the back sets the idle rpm (amount the butterfly is open) and the air/fuel mixture (idle) screw is set to run the engine smooth at that butterfly setting. You have to work back and fourth between the two to get it set to idle.
After the idle is set you open up the throttle wide open and adjust the power/main jet to run the fastest RPM and then turn the needle back in until you detect a slight slowing of the RPM's. that is it.
|
|
Gerald J.
Orange Level
Joined: 12 Sep 2009
Location: Hamilton Co, IA
Points: 5636
|
Post Options
Thanks(0)
Quote Reply
Posted: 16 Aug 2010 at 2:26am |
|
Then you go back and readjust the idle because unless the throttle plate is tightly closed a bit of fuel gets in from the power jet and the two adjustments interact. Three or four alternations usually are enough. One each isn't enough.
Gerald J.
|
|
Texas B
Silver Level

Joined: 04 Aug 2010
Location: Pointblank, TX
Points: 99
|
Post Options
Thanks(0)
Quote Reply
Posted: 16 Aug 2010 at 8:09am |
Scott,
In trying to get my 38 B running this information everyone provided will be invaluable. My biggest issue was in the sediment bowl. It was 3/4's full of junk. I had to remove the shut off coming out of the boel to get it clean properly. No the problem has move futher - either the carb or ignition.
|
|
Texas B 39
|
|
gcalent
Bronze Level

Joined: 19 May 2010
Location: Willards, Md
Points: 179
|
Post Options
Thanks(0)
Quote Reply
Posted: 16 Aug 2010 at 8:44am |
If you are getting fuel in the carb bowl, maybe it`s not the carb, but a lack of vaccum in the engine not pulling the fuel mixture into the cylinders. With the air intake off, and the engine cranking see if you have a good vaccum at the carb inlet, it should suck your hand tight to the carb. If you do not you may have a leak at the intake gasket, or at the engine valves, either sticking or improperly adjusted. Also if the engine hasent been run is a long time, stuck piston rings will also cause low vaccum, but uasaly not enough that it won`t run at all. Engines will some times run on either because as a vapor it will rise up the intake to the cylinders.
Just some food for thought, hope they may help.
|
|
Pullin With AC
|
|
Texas B
Silver Level
Joined: 04 Aug 2010
Location: Pointblank, TX
Points: 99
|
Post Options
Thanks(0)
Quote Reply
Posted: 16 Aug 2010 at 8:48am |
|
good input - wished I could work on this full time - will wait and apply advice this weekend. I like getting back to the basics where you can work on something.
|
|
Texas B 39
|
|
Bee
Orange Level
Joined: 14 Jun 2010
Location: NC
Points: 201
|
Post Options
Thanks(0)
Quote Reply
Posted: 16 Aug 2010 at 9:13am |
|
Scott- What a coincidence, went through the same thing last week with my 49 B. Had the engine torn apart for several months replacing gaskets, painting, blah blah. Went to fire it up and nothing. Set the timing more times than I care to remember, tore the carb apart and cleaned the entire thing. Still would only sputter and occasional fuel out the carb intake side. Figured I would pop the valve cover off and make sure I timed on the compression TDC and as I was hand cycling the engine noticed both valves sticking open on cylinder 4. Dumped some oil on the rocker support shaft, valves, they freed up with hand cycling- closed it up and it fired right off. Ran a can of seafoam through for about thirty mins and changed the oil and runs great now. As info, Dick L always has good advice! Not saying this is your problem! Good luck!
|
|
Bob, North Carolina
1949 B
|
|
DaveKamp
Orange Level Access
Joined: 12 Apr 2010
Location: LeClaire, Ia
Points: 6089
|
Post Options
Thanks(0)
Quote Reply
Posted: 16 Aug 2010 at 9:14pm |
|
Last, but not least...
Check the intake path, and exhaust path... for blockages.
I bought a CJ-7 once... guy was frustrated-to-heck, 'cause it'd run find for about a half block, then die.
I ran into same problem with my B last winter... ran for about three seconds, then die.
CJ: Mouse built next in muffler... using trash from garage... paper cups, plastic baggies... found it 'cause I unhooked the header Y-pipe, and it ran fine...
B: Oil-bath Air filter... full of water... frozen water... not Black Gold... not Texas Tea.
And always, always, always... pull the fuel line, let it drain into a jar, and see how fast it flows... then remove the fuel tank cap... if it flows faster, the cap isn't venting properly. If it flows slow regardless, blow a little compressed air backwards, then see if it flows faster. If it does, you've got crud in the tank, line, and/or sediment bowl.
If you have the latter, drain it all. Yank the line, blow it out 'till it's super clean. Thorougly clean or replace the sediment bowl. Drain the tank, plug the sediment bowl port, throw in two handfulls of 3/8" hex nuts, and tumble the tank... ratchet-strap it to a tractor wheel and go for a nice, leisurely drive... and rotate the tank, so that it gets scraped clean. Then dump the crud and hardware, hose it out (water) then use a shop vac with a piece of 1" conduit taped to the inlet (as an extension nozzle) to suck out any remaining debris... then reverse the hose and blow lots of warm air through it to dry it out... reassemble and enjoy.
|
|
Scott in MA
Bronze Level
Joined: 25 Apr 2010
Points: 40
|
Post Options
Thanks(0)
Quote Reply
Posted: 16 Aug 2010 at 10:01pm |
|
Thanks for all the input. The diagnosis about a valve sticking in the guide makes a lot of sense, as I know this tractor has been siting longer than the ol' man was letting on. First I'm going to disassemble the carb around the adjustable jet and thoroughly clean it. If that doesn't work, the valve cover is coming off to be sure the valves are doing the right thing.
|
|
Steve in NJ
Orange Level Access

Joined: 12 Sep 2009
Location: Andover, NJ
Points: 12024
|
Post Options
Thanks(0)
Quote Reply
Posted: 16 Aug 2010 at 10:35pm |
|
Whenever you purchase anything that's been sitting for years, the fuel tank and the fuel system is the first thing you want to clean out top to bottom. Old gasoline turns to muck when it sits for years, especially at the bottom of the tank! Put fresh gas in it, and it starts to loosen all that muck! I think you see where I'm going with this. In your case with your Tractor, ( as with many others) pull the tank, get it cleaned out at a radiator shop, and have them seal coat the inside. While they have the tank, disassemble the rest of the fuel system and clean everything up. Fuel line, sediment bulb, & carburetor. After that is done, yank the valve cover and roll the engine over by hand watching that ALL valves are moving up n' down like they should. If you been cranking on that engine with the valves stuck, you could have some bent pushrods, and or valves stuck open. Once you know for sure everything in the valve train is working, oil it up, re-install the valve cover and wait for your tank. Once your tank is back in place, install fresh fuel and give it a whirl. If you have spark, and you know you have fuel, it should fire right up. Its rare that anything that's been sitting for years that's had old separated fuel sitting in it's tank starts right up and runs nicely.... HTH
Steve@B&B
|
|
Texas B
Silver Level
Joined: 04 Aug 2010
Location: Pointblank, TX
Points: 99
|
Post Options
Thanks(0)
Quote Reply
Posted: 16 Aug 2010 at 10:50pm |
Dave - it is going to funny tied to the small garden tractor wheel - might have to attach the front of the tank so it will not hit the ground.
Can you get a gas tank neck replaced? This one is so loose, the cap almost falls off if you bump it.
As anyone run Seafoam in the oil?
|
|
Texas B 39
|
|
Scott in MA
Bronze Level
Joined: 25 Apr 2010
Points: 40
|
Post Options
Thanks(0)
Quote Reply
Posted: 17 Aug 2010 at 9:41pm |
|
Good call for those who mentioned stuck valves. Only the rear four rocker arms (cylinders 3 & 4) move when turning the engine over by hand. Rockers on the front two cylinders don't move. I hit the valve end of the rockers with a big old hammer, only to have the pushrods come flying out. I'm guessing they should be replaced. The four of them look less-than-straight.
I've learned that just dropping the pushrod into the hole doesn't work. You have to wiggle it around before you hit cam lobes and it will rise and fall normally. That, or my pushrods are just badly bent. Am I doing anything wrong, other than trying to reuse bent rods that I straightened with my hands and eyes? It seems like you shouldn't have to do anything fancier than drop the rod in the hole - right?
I'm slowly learning that just because I seller says the tractor started last year with no problem, I shouldn't necessarily believe him.
Edited by Scott in MA - 17 Aug 2010 at 9:45pm
|
|
gcalent
Bronze Level
Joined: 19 May 2010
Location: Willards, Md
Points: 179
|
Post Options
Thanks(0)
Quote Reply
Posted: 18 Aug 2010 at 6:40am |
I would pull the rocker arms off, make they move freely on the shaft, then "TAP" on the top of the valves with a hammer you should be able to feel them bounce a little. I you can`t feel them move, you need to get them free before you go any further, if not you will just bend more push rods. Some times a good penetrating oil sprayed around the valve stems and tapping the top will work. After the valves are free reinstall the push rods and rockers, adjust the clearance. Leave them a little loose to start whith, turn over the engine by hand and check movement of the valve train. I wouldn`t recomend leaving the push rods that you straigtened in the engine but they will work to see if it will run. After that a compression test will give you a better idea of the condition of the engine and if the valves are seating.
Arn`t old tractors fun? Hope this helps
|
|
Pullin With AC
|
|
Scott in MA
Bronze Level
Joined: 25 Apr 2010
Points: 40
|
Post Options
Thanks(0)
Quote Reply
Posted: 18 Aug 2010 at 8:34am |
Thanks for the info on reinstalling the rods. I only have the owners manual, not the repair manual for this B. Can anyone tell me what the valve/rocker clearance should be and what mark on the flywheel I should use the adjust the valves?
It's nice to actually find the problem. Two non-functioning cylinders explains why the engine will sputter but not start.
Thanks again for everyone's advice.
|
|
Gerald J.
Orange Level
Joined: 12 Sep 2009
Location: Hamilton Co, IA
Points: 5636
|
Post Options
Thanks(0)
Quote Reply
Posted: 18 Aug 2010 at 10:33am |
|
The bottom ends of the pushrods have to fit in sockets on the tops of the lifters or cam followers that ride on the cam shaft. The push rods don't ride on the cams directly. Those lifters are considerably larger than the cam shaft. Look down the push rod holes, you should see a shiny spot in the middle where the push rod is to sit.
Gerald J.
|
|
Dave(inMA)
Orange Level

Joined: 12 Sep 2009
Location: Grafton, MA
Points: 2399
|
Post Options
Thanks(0)
Quote Reply
Posted: 18 Aug 2010 at 11:35am |
|
Scott, I didn't spot this point above so will add it. Check your push rods for straightness. Easy way to do that is to lay the rod on a flat metal surface and roll it back and forth - your fingers will quickly tell you if the rod is straight or not. You can straighten a bent rod by TAPPING on it with a ball peen hammer - locate the high spots (as above) and give the rod a tap or two until all the high spots are gone. Keep working at it until the rod will roll smoothly with no high spots. Doesn't take long - probably taking me longer to type all this than it will for you to check and straighten one!
|
|
WC, CA, D14, WD45
|
|
GlenninPA
Orange Level

Joined: 11 Sep 2009
Location: Ashley, PA
Points: 5054
|
Post Options
Thanks(0)
Quote Reply
Posted: 18 Aug 2010 at 12:40pm |
A head gasket is a cheap insurance policy if you have stuck valves. Pull the head and actually visually inspect the valve stems on the fat end. Sometimes they are mite near rusted or corroded to the point they will be ready to break off and dump a nice chunk of metal into the cylinder.
That usually cost a lot more than the $20-$30 for the head gasket.
Good luck.
|
|
Scott in MA
Bronze Level
Joined: 25 Apr 2010
Points: 40
|
Post Options
Thanks(0)
Quote Reply
Posted: 18 Aug 2010 at 9:20pm |
|
The B started tonight after I unstuck the valves and rockers in number one and two cylinders. The valves must have been opening slightly because I was able to time it from compression on number one (before taking it apart). Thanks for all the advice.
It made a beautiful, yet very loud sound (no muffler). I went up and down the driveway many times before stopping for the night.
|
|
GlenninPA
Orange Level
Joined: 11 Sep 2009
Location: Ashley, PA
Points: 5054
|
Post Options
Thanks(0)
Quote Reply
Posted: 19 Aug 2010 at 9:49am |
|
I love the sound of that 125 ci engine............
|
|


