| Author |
 Topic Search Topic Search  Topic Options Topic Options
|
Dave(inMA) 
Orange Level


Joined: 12 Sep 2009
Location: Grafton, MA
Points: 2400
|
 Post Options Post Options
") Thanks(0) Thanks(0)
") Quote Quote  Reply Reply
 Topic: CA Pump and Drawbar Control Repairs Topic: CA Pump and Drawbar Control Repairs
Posted: 24 Mar 2020 at 7:21pm |
I've updated the title of this thread now that I'm into the hydraulic pump - following Hunt4Allis's footsteps there. Original post follows:
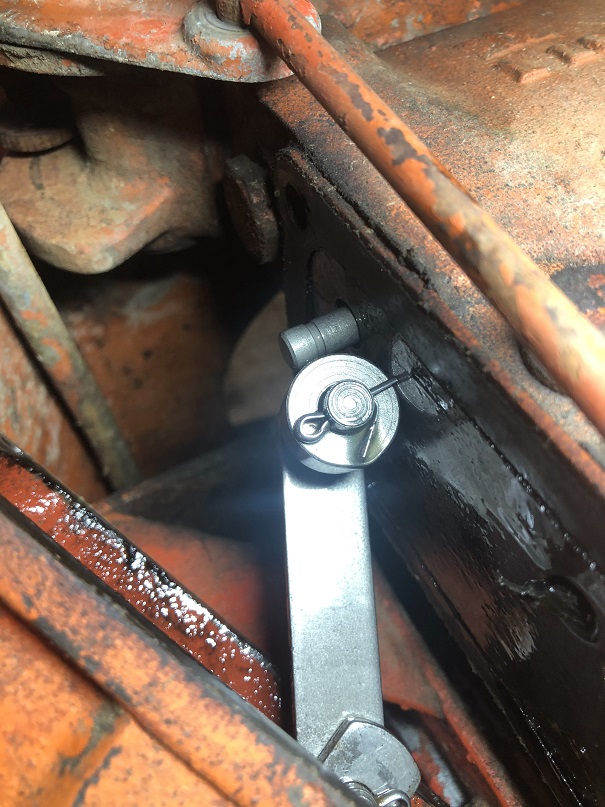
I previously posted about a leak in the hydraulic pump on my CA. After studying the parts diagrams, I realized that the leak is in the hydraulic pump drawbar control - similar but different. It's leaking at the inner side regulating shaft oil seal, #3 in the diagram found on p120 of the Agco CA Parts Book. [I haven't figured out how to post a screen shot of the online parts book yet.] The photo below shows the leak at the oil seal:
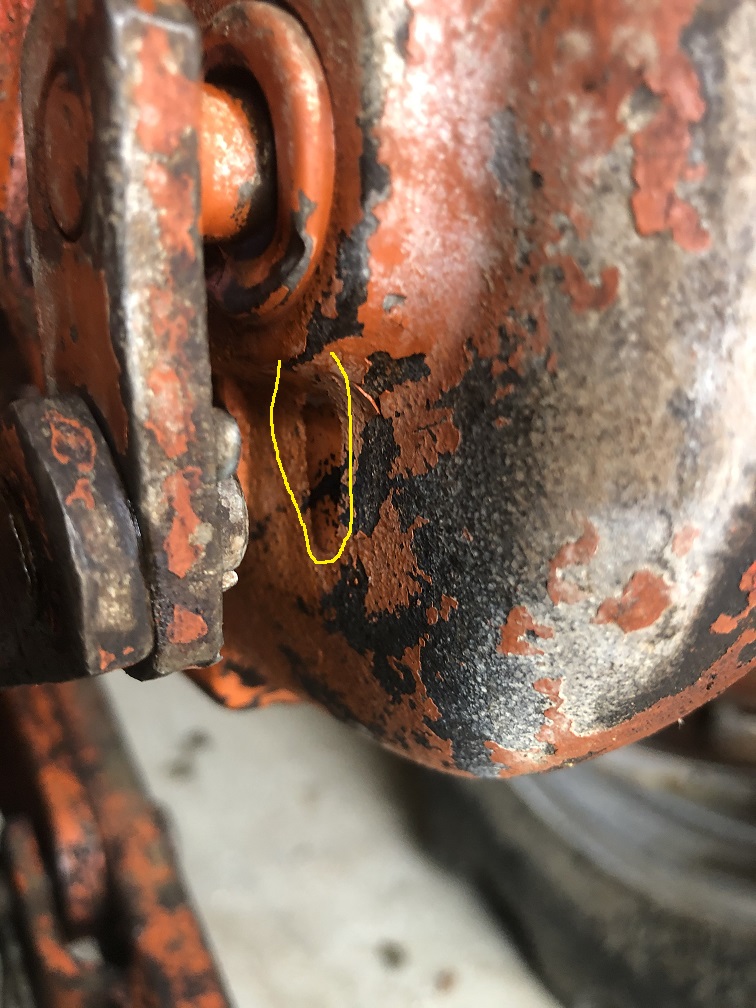
The area circled in yellow shows the oil on the housing shortly after the leak appeared. The metal casing of the seal appears to have been damaged - possibly the cause of the leak? New seal is on order from Sandy Lake. Interesting that oil doesn't leak when the pump is running - finally saw it start after I shut off the tractor.
More to come. Dave
Edited by Dave(inMA) - 28 Mar 2020 at 5:49pm
|
|
WC, CA, D14, WD45
|
 |
|
Sponsored Links
|
|
|
Dave(inMA)
Orange Level
Joined: 12 Sep 2009
Location: Grafton, MA
Points: 2400
|
Post Options
Thanks(0)
Quote Reply
Posted: 25 Mar 2020 at 7:58pm |
Today's project was to remove the Control unit from the tractor.
Started by removing the plug from the bottom of the control housing. Nasty glop oozed out into the pail:
I hope the inside of the pump is in better shape!
There are two arms attached to the control: the arm that reaches down to the Snap Coupler and the raise/lower arm. Removed the two cotter pins attaching them to the control. There are six bolts that attach the control to the hydraulic pump - 3 pairs - easy to tell each pair apart.
The control is attached to the pump via the control valve lever which is secured to an arm from the pump with another cotter pin.
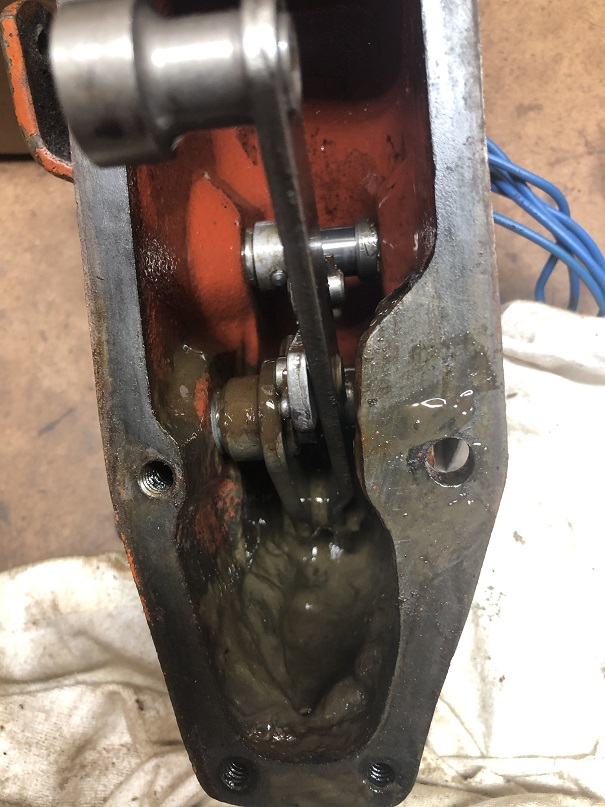
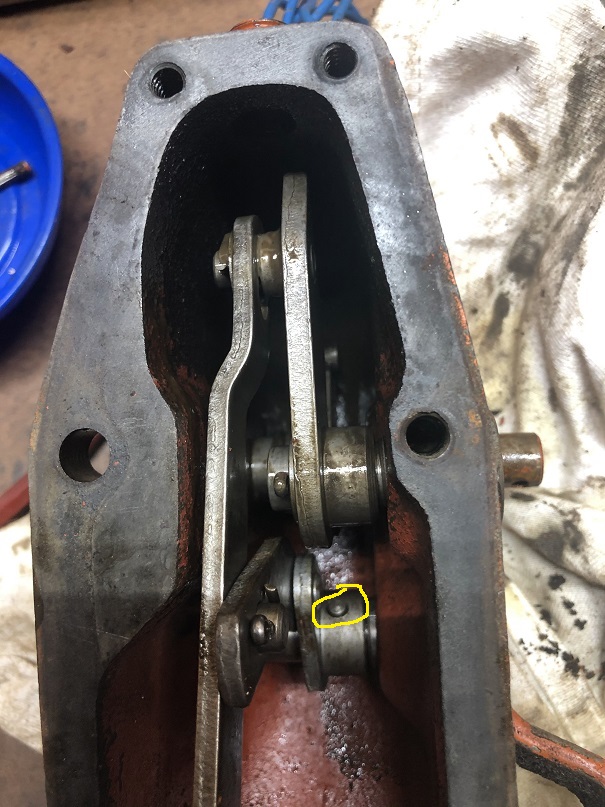
And here's what I found inside the housing:
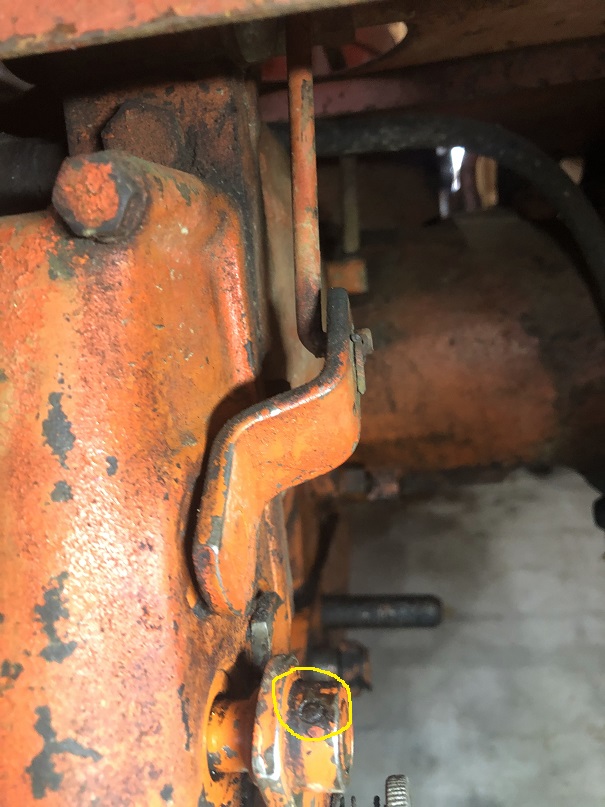
Had to remove the lockout arm - drove the pin circled in yellow out:
And then this pin in the regulating shaft:
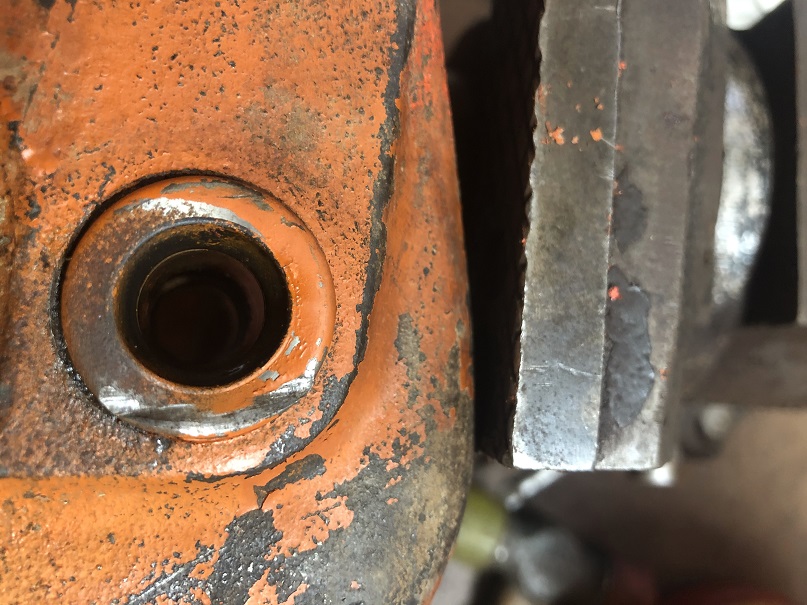
Which allowed me to drive the regulating shaft out of the housing so I could remove the oil seal. Here's a shot of the dinged seal:
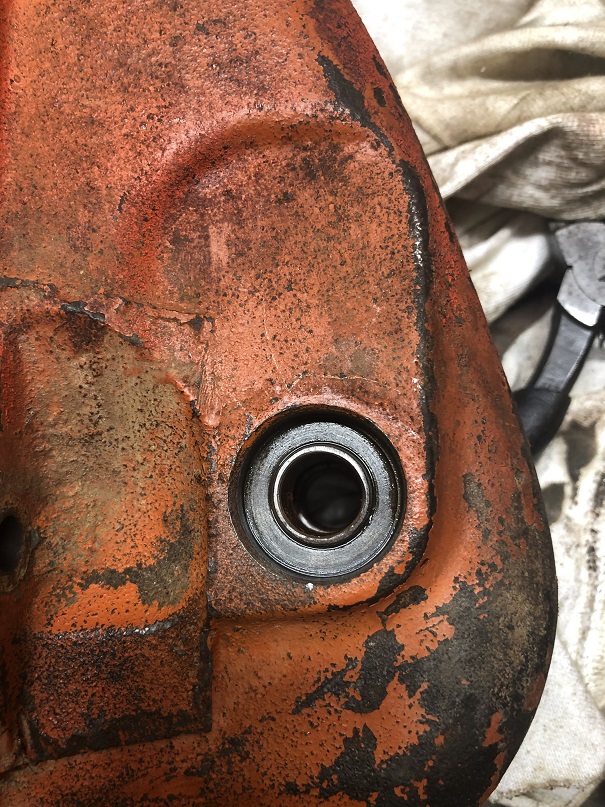
With the seal removed, here's the recess in the housing:
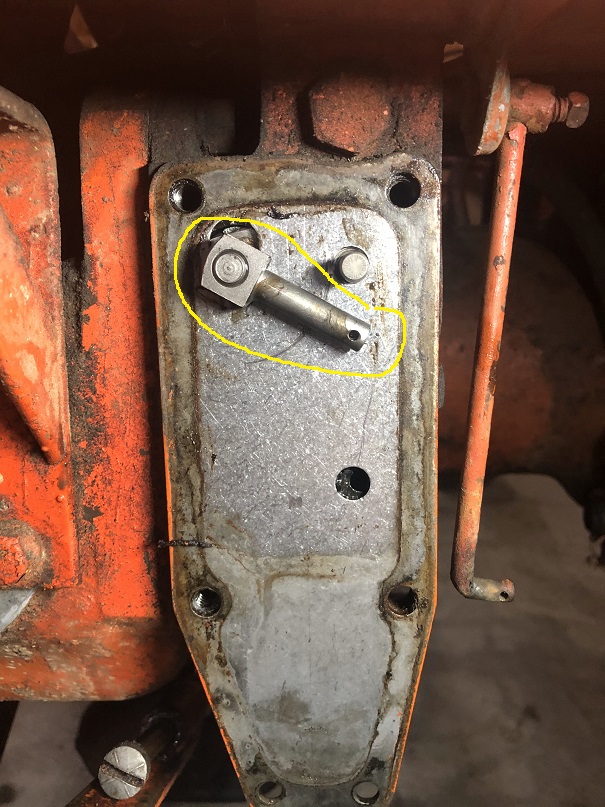
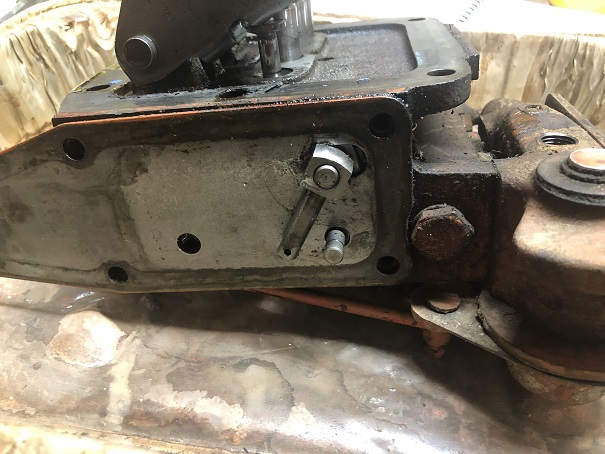
Here is a picture of the arm from the pump that engages the control unit. There's no pin holding it in place. Anyone know if/how it comes off or what secures it to the shaft? Maybe a key?
Now waiting for the new seal to arrive from Sandy Lake. Stay tuned!
Dave
|
|
WC, CA, D14, WD45
|
|
Dave(inMA)
Orange Level
Joined: 12 Sep 2009
Location: Grafton, MA
Points: 2400
|
Post Options
Thanks(0)
Quote Reply
Posted: 27 Mar 2020 at 8:50pm |
New seal arrived today - thanks, Sandy Lake!
Here's the parts diagram that I'm referring to below:
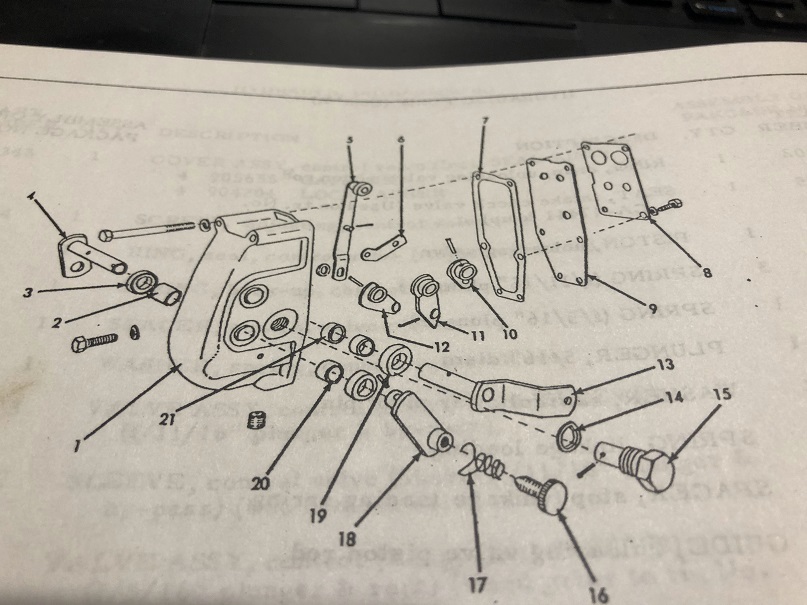
I gently drove the new seal (#3) into place, reinstalled the regulating shaft (#4), sliding the regulating lever (#12) on as I did so and pinned it in place. Pinned the lockout arm assembly (#18) onto the other end of the shaft. Reinserted the pivot screw (#15) and the cotter pin that secures the hand control lever (#10) onto the screw. Done....
....until I started to wonder whether I'd installed the regulating lever the right way (orientation to the regulating shaft) or the wrong way - 180 degrees around the shaft. While it's hard to know if it'd actually fit into the housing if installed wrong, this was not a good moment. While I had taken a bunch of pictures, I didn't have one that showed me enough to know that I had the lever installed right. With the excellent help of Hunt4Allis who's rehabbing his CA hydraulic pump and sent me some pictures, I found that I'd installed it correctly. Whew!
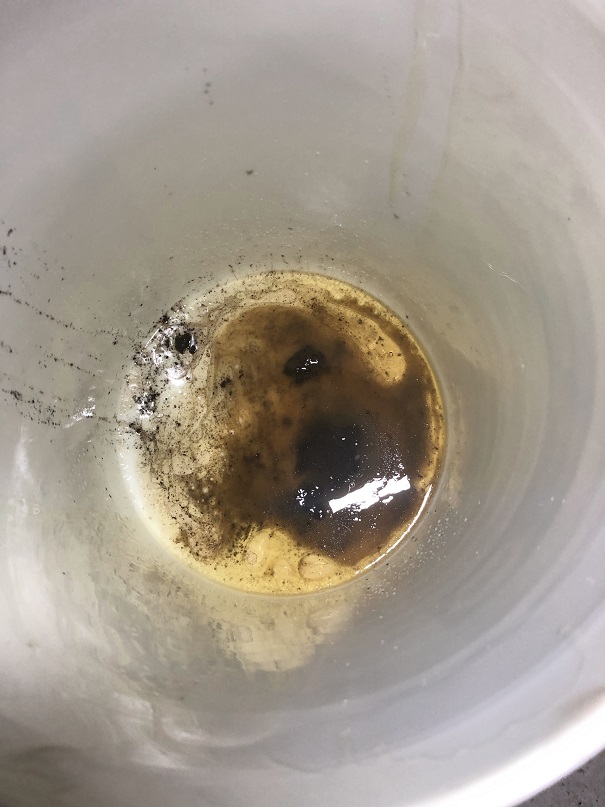
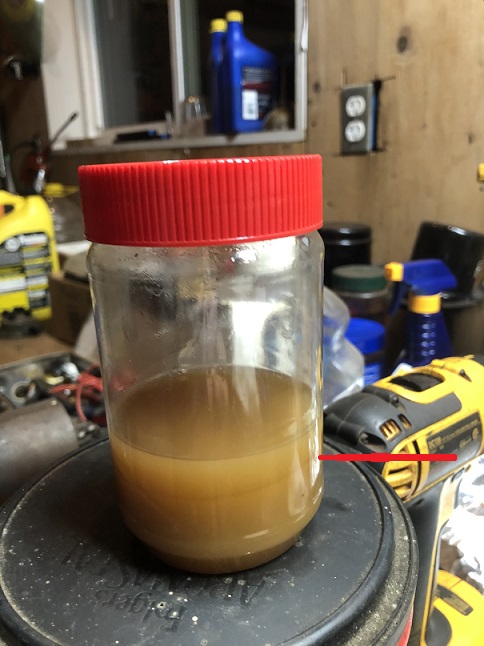
Decided that I would pull the hydraulic pump and check it out to see why it is so slow to raise the arms first time around in the day. Drained the oil. Ugh. Not as bad as it could be, but I'm seeing evidence of water mixed in there. Here's a picture of a sample after sitting a few hours - you can see the liquids starting to separate at the line about 0.5" below the surface - at the red line. More fun to come!
Edited by Dave(inMA) - 28 Mar 2020 at 9:58am
|
|
WC, CA, D14, WD45
|
|
Sugarmaker
Orange Level

Joined: 12 Jul 2013
Location: Albion PA
Points: 8662
|
Post Options
Thanks(0)
Quote Reply
Posted: 28 Mar 2020 at 8:10am |
Dave, Aren't these pumps just fun to work on? :) I would much rather tear into a engine than these pumps. I always think I am going to get them back together wrong too. But each one has worked so far. Good documentation and pictures. Regards, Chris
|
|
D17 1958 (NFE), WD45 1954 (NFE), WD 1952 (NFE), WD 1950 (WFE), Allis F-40 forklift, Allis CA, Allis D14, Ford Jubilee, Many IH Cub Cadets, 32 Ford Dump, 65 Comet, 66 F100.
|
|
Dave(inMA)
Orange Level
Joined: 12 Sep 2009
Location: Grafton, MA
Points: 2400
|
Post Options
Thanks(0)
Quote Reply
Posted: 28 Mar 2020 at 9:58am |
Thanks, Chris. I'm going to pull the pump this afternoon. Or maybe tomorrow...not like I have places to go. 
I completely get the fear of it not going back together properly - that's what's holding me back, I think. That and the thought of a spring or check ball flinging itself across the shop!
Does anyone know whether having water in the oil could cause the sluggish behavior I'm seeing after the tractor has been sitting a while? I've read that water in the oil can increase cavitation, but I'd think that the effect of that would be continuous, and in my case the sluggishness goes away after the arms have been raised once. Just wondering! |
|
WC, CA, D14, WD45
|
|
Hunt4Allis
Orange Level
Joined: 13 Mar 2018
Location: Ohio
Points: 1172
|
Post Options
Thanks(0)
Quote Reply
Posted: 28 Mar 2020 at 10:22am |
Pretty soon your bench will look like this🤪good luck( lots of pictures and keep everything layed out in order of how it came apart... 
|
|
Dave(inMA)
Orange Level
Joined: 12 Sep 2009
Location: Grafton, MA
Points: 2400
|
Post Options
Thanks(0)
Quote Reply
Posted: 28 Mar 2020 at 11:33am |
Matt - that is impressive! I'll try to be as organized.  I gather that you were able to drive out the cam follower pin?
Dave
|
|
WC, CA, D14, WD45
|
|
Hunt4Allis
Orange Level
Joined: 13 Mar 2018
Location: Ohio
Points: 1172
|
Post Options
Thanks(0)
Quote Reply
Posted: 28 Mar 2020 at 1:19pm |
|
Yes once I talk to guy at Sandy lake that works on them and he told me that they come out easily it was no big deal, thanks Bill 👍
|
|
Dave(inMA)
Orange Level
Joined: 12 Sep 2009
Location: Grafton, MA
Points: 2400
|
Post Options
Thanks(0)
Quote Reply
Posted: 28 Mar 2020 at 5:46pm |
Removed the hydraulic pump from the CA today. It went pretty well - here 'tis sitting in an old roasting pan waiting for dissection:
Having read Hunt4Allis's posts, I removed the housing cover plate and found that the gasket between the plate and the pump has had a hard life. At least two of the pump openings were partly blocked, and parts of the gasket are gone. I've circled the blocked spots in yellow and the missing material areas in red; the larger area marked in red looks as though oil could get from one opening to another - not sure that this is a serious issue, but it's not supposed to be that way!
The gasket was glued to the pump surface - came off HARD! Here's the surface cleaned up:
I'm thinking that polishing it so the darker "stains" are gone would be good, but then I'll really need to take everything apart to get all the grit out.
Here are the plungers before any cleanup. I don't see or feel any scratches or dings, but others may see some!
Here are discharge valve plugs. Anyone know what the small allen screw plug at the left is about? It is in the parts diagram but w/o any description:
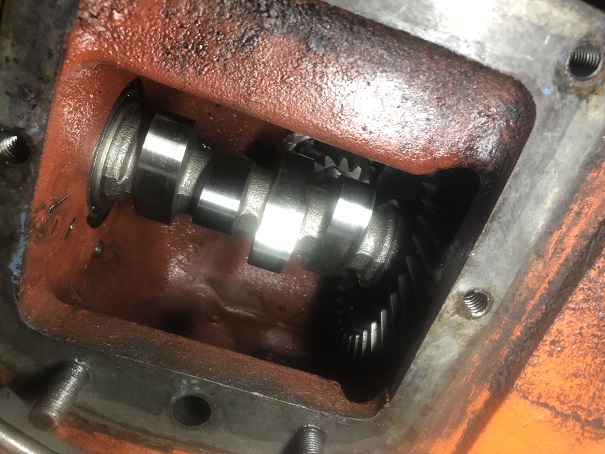
Last step today was to dung out the cavity that drives the pump. Actually wasn't too gunky in there. Some carb cleaner, compressed air and a rag helped a lot.
The big question of the day: is the gasket between the housing cover and pump body supposed to be glued in place?
Comments and suggestions welcome!!
|
|
WC, CA, D14, WD45
|
|
Hunt4Allis
Orange Level
Joined: 13 Mar 2018
Location: Ohio
Points: 1172
|
Post Options
Thanks(0)
Quote Reply
Posted: 28 Mar 2020 at 6:02pm |
|
It's probably better than my gasket which was never installed which is probably why there was so much oil/ crud everywhere at the back of my tractor all the time(I thought I had found the problem when I fixed one of the hydraulic cylinder hoses a while back but now I'm questioning if it was the lack of a gasket the whole time...)
|
|
jaybmiller
Orange Level Access
Joined: 12 Sep 2009
Location: Greensville,Ont
Points: 25274
|
Post Options
Thanks(0)
Quote Reply
Posted: 28 Mar 2020 at 6:17pm |
|
The allan grub plug screw 'might' be a port to install a pressure gauge ? Just a guess, been 15-20 years since I did my CA.....sigh WHERE did the time go ?
|
|
3 D-14s,A-C forklift, B-112
Kubota BX23S lil' TOOT( The Other Orange Tractor)
Never burn your bridges, unless you can walk on water
|
|
Dave(inMA)
Orange Level
Joined: 12 Sep 2009
Location: Grafton, MA
Points: 2400
|
Post Options
Thanks(0)
Quote Reply
Posted: 28 Mar 2020 at 6:53pm |
Matt, I can see where missing that gasket would lead to a mess. After all, that pump is generating serious PSI. Were you able to order the gasket from Sandy Lake, or are you planning to make one?
Jay, your idea sounds likely to me. Thanks. Do you remember whether you glued that gasket to the pump when you rehabbed yours?
|
|
WC, CA, D14, WD45
|
|
Hunt4Allis
Orange Level
Joined: 13 Mar 2018
Location: Ohio
Points: 1172
|
Post Options
Thanks(0)
Quote Reply
Posted: 28 Mar 2020 at 7:47pm |
|
Yes, SL had all the parts I needed( even a used plunger that had broken!)
I should get the parts Monday so more info to come after I fix re- install pump...
Big thanks to Brenda and Bill at SL👍(they both spent time over the phone actually talking/ sending me exploded view of pump/ parts beyond what I expected.
Matt
|
|
Dave(inMA)
Orange Level
Joined: 12 Sep 2009
Location: Grafton, MA
Points: 2400
|
Post Options
Thanks(0)
Quote Reply
Posted: 28 Mar 2020 at 8:12pm |
Great to hear. I should know by Monday what else I need. Or at least what questions I need answered. And it sounds as though Bill at Sandy Lake might know whether the answers.
BTW, there's actually a cover that was used when the hydraulic pump wasn't installed on the CA. Part # 70225195.
Dave
|
|
WC, CA, D14, WD45
|
|
Gerald J.
Orange Level
Joined: 12 Sep 2009
Location: Hamilton Co, IA
Points: 5636
|
Post Options
Thanks(0)
Quote Reply
Posted: 28 Mar 2020 at 8:31pm |
|
|
|
Hunt4Allis
Orange Level
Joined: 13 Mar 2018
Location: Ohio
Points: 1172
|
Post Options
Thanks(0)
Quote Reply
Posted: 28 Mar 2020 at 9:47pm |
|
Man I'd love to get one of those covers!!!
|
|
Dave(inMA)
Orange Level
Joined: 12 Sep 2009
Location: Grafton, MA
Points: 2400
|
Post Options
Thanks(0)
Quote Reply
Posted: 28 Mar 2020 at 9:53pm |
|
I'll ask when I call SL on Monday. Or maybe someone out there has a parts CA with the cover!
|
|
WC, CA, D14, WD45
|
|
Hunt4Allis
Orange Level
Joined: 13 Mar 2018
Location: Ohio
Points: 1172
|
Post Options
Thanks(0)
Quote Reply
Posted: 28 Mar 2020 at 10:10pm |
|
I can make one, not like you need it fancy or even metal for that matter ( just needs to seal off long enough to slosh some oil around in transmission to dislodge any remaining junk so hopefully once pump goes on its not getting contaminated with leftover junk...)
|
|
jaybmiller
Orange Level Access
Joined: 12 Sep 2009
Location: Greensville,Ont
Points: 25274
|
Post Options
Thanks(0)
Quote Reply
Posted: 29 Mar 2020 at 6:27am |
Gaskets went on dry as I couldn't find my bottle of 'gasket sealer' until 3-4 days later, abought same time my favorite 1/2" deep, 3/8 drive went missing....sigh. It showed up about 5 years ago for 2-3 days, then, yup, went 'walkabout' IN the garage again....
Jay
|
|
3 D-14s,A-C forklift, B-112
Kubota BX23S lil' TOOT( The Other Orange Tractor)
Never burn your bridges, unless you can walk on water
|
|
Hunt4Allis
Orange Level
Joined: 13 Mar 2018
Location: Ohio
Points: 1172
|
Post Options
Thanks(0)
Quote Reply
Posted: 29 Mar 2020 at 6:44am |
|
I found what I believe to be copper never sieze between the pump and tractor rear end instead of a gasket🙄?
|
|
Dave(inMA)
Orange Level
Joined: 12 Sep 2009
Location: Grafton, MA
Points: 2400
|
Post Options
Thanks(0)
Quote Reply
Posted: 29 Mar 2020 at 6:57am |
Jay - what they say: "necessity is the mother of invention". Maybe that gasket is supposed to be glued on, but it sure makes disassembly a challenge!
Matt - that is weird...someone with imagination did that!!
|
|
WC, CA, D14, WD45
|
|
Hunt4Allis
Orange Level
Joined: 13 Mar 2018
Location: Ohio
Points: 1172
|
Post Options
Thanks(0)
Quote Reply
Posted: 29 Mar 2020 at 7:37am |
|
Right, so all gaskets ok to be dry?( No sealer?)
My only fear is if another problem arises with pump disassembly would be easier if put in dry...
|
|
DrAllis
Orange Level Access
Joined: 12 Sep 2009
Points: 22836
|
Post Options
Thanks(0)
Quote Reply
Posted: 29 Mar 2020 at 7:46am |
|
No sealer on those paper gaskets will insure that you will have oil leaks. If this is OK, go right ahead.
|
|
jaybmiller
Orange Level Access
Joined: 12 Sep 2009
Location: Greensville,Ont
Points: 25274
|
Post Options
Thanks(0)
Quote Reply
Posted: 29 Mar 2020 at 8:03am |
The gasgek material I used wasn't 'paper thin', maybe 50-60 thou thick and said 'oil proof'. I can see needing glue if paper thin. I did 'polish' the surfaces real good with fine wire brush in angle grinder. if you have glue, I'd use it though...
|
|
3 D-14s,A-C forklift, B-112
Kubota BX23S lil' TOOT( The Other Orange Tractor)
Never burn your bridges, unless you can walk on water
|
|
Hunt4Allis
Orange Level
Joined: 13 Mar 2018
Location: Ohio
Points: 1172
|
Post Options
Thanks(0)
Quote Reply
Posted: 29 Mar 2020 at 8:40am |
|
Dr Allis
What is recommended to use as a sealer for all 4 gaskets that are required to rebuild the pump and associated components?
Is it readily available at auto parts stores or is it something special...
Edited by Hunt4Allis - 29 Mar 2020 at 8:41am
|
|
sparky
Orange Level Access

Joined: 13 May 2011
Location: So. Indiana
Points: 1838
|
Post Options
Thanks(0)
Quote Reply
Posted: 29 Mar 2020 at 11:37am |
I personally use aviation gasket sealer from Permatex. Won’t use silicone. A guy had me work on his CA pump once when he said it worked fine one day and the next day wouldn’t work. I pulled the pump and found 3 little globs of silicone in the pick up tube. I still have those globs of silicone on the bench as a reminder.
|
|
It's the color tractor my grandpa had!
|
|
Hunt4Allis
Orange Level
Joined: 13 Mar 2018
Location: Ohio
Points: 1172
|
Post Options
Thanks(0)
Quote Reply
Posted: 29 Mar 2020 at 11:43am |
 I ended up with this
|
|
sparky
Orange Level Access
Joined: 13 May 2011
Location: So. Indiana
Points: 1838
|
Post Options
Thanks(0)
Quote Reply
Posted: 29 Mar 2020 at 11:46am |
|
I use the dark brown sealant in a can with a cap brush.
|
|
It's the color tractor my grandpa had!
|
|
SteveM C/IL
Orange Level Access
Joined: 12 Sep 2009
Location: Shelbyville IL
Points: 8989
|
Post Options
Thanks(0)
Quote Reply
Posted: 29 Mar 2020 at 12:54pm |
|
I understand all the concern about silicon but the biggest problem is everyone uses WAAAAYYY too much.
|
|
frnkeore
Silver Level


Joined: 07 May 2019
Location: Southern Oregon
Points: 362
|
Post Options
Thanks(0)
Quote Reply
Posted: 29 Mar 2020 at 2:27pm |
 SteveM C/IL wrote: SteveM C/IL wrote:
I understand all the concern about silicon but the biggest problem is everyone uses WAAAAYYY too much. |
Yes!!! Although it is hard to not use to much. As a old mechanic, I dislike "sealers" that harden. I only use wheel bearing type grease on gaskets. It seals well and will actually expand a gasket, if it embeds into it. As a machinist, I don't use gaskets to much, unless there are end play issues to be aware of. 2 machined surfaces, that are flat and have a smooth surface (a must), won't leak. They can't leak because there is no space for the fluid to migrate. If the surface has visible machine marks and is still flat, a VERY small amount of silicon will seal the machined surface. It doesn't even have to be gasket type silicon. Run a file over the surface, to make sure that there are no raised spots. Start with a amount of silicon, that you know is NOT enough and add small amounts to it. Spread it as thin as possible. Try to leave a space on the oil side of the part, for it to expand into and completely around any bolt holes. Again, a very thin coat.
|
|
Frank
1959 D17 Series I #24001+, '59 D14
'55 & '59 Ford 850 & 861
Ferguson TO 35 Deluxe, Oliver 70 and 5 more.
|
|