| Author |
 Topic Search Topic Search  Topic Options Topic Options
|
steve(ill) 
Orange Level Access


Joined: 11 Sep 2009
Location: illinois
Points: 88431
|
 Post Options Post Options
") Thanks(0) Thanks(0)
") Quote Quote  Reply Reply
 Posted: 02 Sep 2022 at 7:51pm Posted: 02 Sep 2022 at 7:51pm |
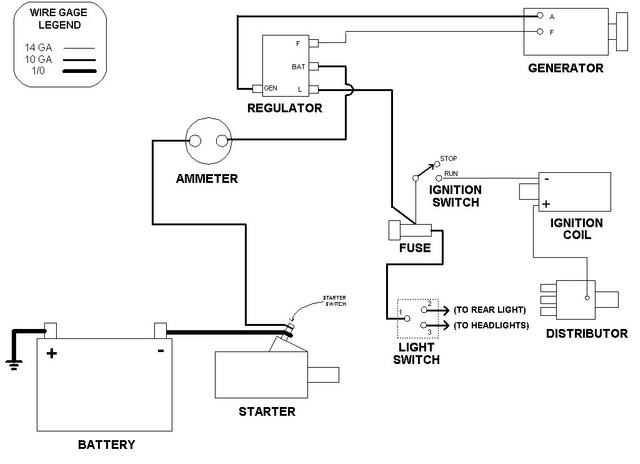
This shows the regulator you have... I dont know if it works or not... FIRST you have to show that the generator works... then check or clean the regulator.... contacts inside can be dirty / stuck / etc.....
|
|
Like them all, but love the "B"s.
|
 |
|
Sponsored Links
|
|
|
84 prospector
Bronze Level


Joined: 30 Aug 2022
Location: California
Points: 65
|
Post Options
Thanks(0)
Quote Reply
Posted: 02 Sep 2022 at 8:04pm |
|
When I bought the tractor it had no battery and the coil didn’t have a positive or negative marking on it so I hooked it all up as a positive ground, how old tractors like this would be with the positive side of the coil on ground and the positive pole of the battery on ground and the negative side with the starter hooked up and the negative side of the coil hooked up as the “hot” side
|
|
steve(ill)
Orange Level Access
Joined: 11 Sep 2009
Location: illinois
Points: 88431
|
Post Options
Thanks(0)
Quote Reply
Posted: 02 Sep 2022 at 8:07pm |
|
YES... if it uses a 6 volt battery it will be POSITIVE GROUND.
|
|
Like them all, but love the "B"s.
|
|
84 prospector
Bronze Level
Joined: 30 Aug 2022
Location: California
Points: 65
|
Post Options
Thanks(0)
Quote Reply
Posted: 02 Sep 2022 at 8:09pm |
I can’t find a light switch on the tractor, but the second wire on the generator that is black is hooked up underneath the regulator on a terminal 
|
|
steve(ill)
Orange Level Access
Joined: 11 Sep 2009
Location: illinois
Points: 88431
|
Post Options
Thanks(0)
Quote Reply
Posted: 02 Sep 2022 at 8:13pm |
The wires should be in the same order as the drawing above.. The CENTER terminal is HOT and goes to the battery NEG terminal or starter terminal... You dont need the "L" terminal... the "F" on the corner should go to the "F" terminal of the generator ( ground)... The "G" terminal is on the BACK and goes to the "A" on the generator.
Photo from AMAZON ............. CENTER (BAT) goes to the battery... "G" and "F" go straight to the generator.
Edited by steve(ill) - 02 Sep 2022 at 8:16pm
|
|
Like them all, but love the "B"s.
|
|
84 prospector
Bronze Level
Joined: 30 Aug 2022
Location: California
Points: 65
|
Post Options
Thanks(0)
Quote Reply
Posted: 02 Sep 2022 at 8:16pm |
|
The g terminal goes to a terminal on the under side of the regulator, there’s no terminal on the back like that one so I’m going to assume that terminal on the bottom is the A terminal. I am going to try that test procedure you just sent and see if it’s any good
|
|
steve(ill)
Orange Level Access
Joined: 11 Sep 2009
Location: illinois
Points: 88431
|
Post Options
Thanks(0)
Quote Reply
Posted: 02 Sep 2022 at 8:24pm |
With the reg setting on the generator, the easy test is to connect your volt meter with alagator clips on the A and F terminals of the gen.... Run a jumper from the "F" to ground..
Start tractor and look at volt meter.. If nothing, use a small jumper wire to touch the "G" and "B" terminals ( so the G or A terminal will see the battery)... and read the meter.. If less than 6.8 volts , the generator is bad.
|
|
Like them all, but love the "B"s.
|
|
84 prospector
Bronze Level
Joined: 30 Aug 2022
Location: California
Points: 65
|
Post Options
Thanks(0)
Quote Reply
Posted: 02 Sep 2022 at 9:05pm |
|
I got 5.9 so the generator must be bad
|
|
steve(ill)
Orange Level Access
Joined: 11 Sep 2009
Location: illinois
Points: 88431
|
Post Options
Thanks(0)
Quote Reply
Posted: 02 Sep 2022 at 9:11pm |
|
YEP... long term you can remove disassemble and clean the commutator and brushes if you are up to that... Short term, just charge the battery once a week.
|
|
Like them all, but love the "B"s.
|
|
WF owner
Orange Level
Joined: 12 May 2013
Location: Bombay NY
Points: 5051
|
Post Options
Thanks(0)
Quote Reply
Posted: 03 Sep 2022 at 7:19am |
I saw nowhere that you polarized (flashed) the generator.
|
|
84 prospector
Bronze Level
Joined: 30 Aug 2022
Location: California
Points: 65
|
Post Options
Thanks(0)
Quote Reply
Posted: 03 Sep 2022 at 8:39pm |
|
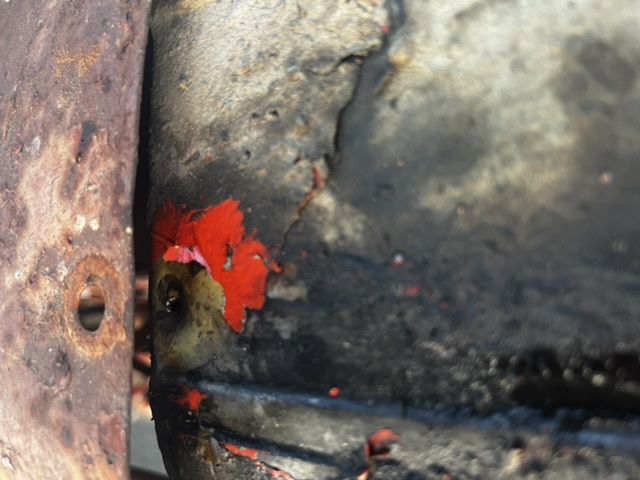
Well I’ve got a new problem. The radiator is pretty clean now, but I came out to it today and there was a puddle of water under it. I looked at where the leak was coming from and it was coming from the top tank. So I took the hood and grille off the front and to my surprise there are two holes in the top tank where the hood and grille screw together. The previous owner must have put too long of screws on there. Those holes aren’t supposed to be there right? I cleaned the area pretty well, how can I fix these holes?
|
|
plummerscarin
Orange Level Access
Joined: 22 Jun 2015
Location: ia
Points: 3975
|
Post Options
Thanks(0)
Quote Reply
Posted: 03 Sep 2022 at 8:53pm |
|
Would think you could solder them if you have the talent for that
|
|
84 prospector
Bronze Level
Joined: 30 Aug 2022
Location: California
Points: 65
|
Post Options
Thanks(0)
Quote Reply
Posted: 03 Sep 2022 at 9:02pm |
|
|
|
84 prospector
Bronze Level
Joined: 30 Aug 2022
Location: California
Points: 65
|
Post Options
Thanks(0)
Quote Reply
Posted: 03 Sep 2022 at 9:02pm |
|
These holes are good size, do you think solder could patch those?
|
|
steve(ill)
Orange Level Access
Joined: 11 Sep 2009
Location: illinois
Points: 88431
|
Post Options
Thanks(0)
Quote Reply
Posted: 03 Sep 2022 at 9:18pm |
clean it up real good.. wire brush, small grinder, etc.... cut a little piece of sheet metal about 1/2 - 3/4 inch diameter and lay over it... then solder it together..... has to be REAL CLEAN !!
if you had a small piece of copper pipe, you could split it, pound it out flat, then cut out the small covers.
Edited by steve(ill) - 03 Sep 2022 at 9:21pm
|
|
Like them all, but love the "B"s.
|
|
84 prospector
Bronze Level
Joined: 30 Aug 2022
Location: California
Points: 65
|
Post Options
Thanks(0)
Quote Reply
Posted: 03 Sep 2022 at 9:48pm |
|
Plumbing solder is what I use right?
|
|
steve(ill)
Orange Level Access
Joined: 11 Sep 2009
Location: illinois
Points: 88431
|
Post Options
Thanks(0)
Quote Reply
Posted: 03 Sep 2022 at 10:16pm |
|
that should be fine..
|
|
Like them all, but love the "B"s.
|
|
Jim.ME
Orange Level
Joined: 19 Nov 2016
Location: Maine
Points: 963
|
Post Options
Thanks(0)
Quote Reply
Posted: 04 Sep 2022 at 6:24am |
|
Deleted
Edited by Jim.ME - 04 Sep 2022 at 6:27am
|
|
SteveM C/IL
Orange Level Access
Joined: 12 Sep 2009
Location: Shelbyville IL
Points: 8667
|
Post Options
Thanks(0)
Quote Reply
Posted: 04 Sep 2022 at 11:13am |
|
Good old acid core solder for me. Wash it all down good when done to flush the acid away.
|
|
84 prospector
Bronze Level
Joined: 30 Aug 2022
Location: California
Points: 65
|
Post Options
Thanks(0)
Quote Reply
Posted: 04 Sep 2022 at 1:34pm |
|
Ok lead free acid core is cheapest so I’ll go with that. Is tinning flux alright to use with it?
Edited by 84 prospector - 04 Sep 2022 at 1:35pm
|
|
steve(ill)
Orange Level Access
Joined: 11 Sep 2009
Location: illinois
Points: 88431
|
Post Options
Thanks(0)
Quote Reply
Posted: 04 Sep 2022 at 4:02pm |
lead free / acid core is plumbing solder .... lead base / rosin core is for soldering wires together... you dont want the ACID on the WIRES... and you dont want the LEAD in your WATER PIPES..
Most "FLUX" will work with either... some are water base, some are not.. if its "lead free flux" it was designed to work with acid core solder.
|
|
Like them all, but love the "B"s.
|
|
84 prospector
Bronze Level
Joined: 30 Aug 2022
Location: California
Points: 65
|
Post Options
Thanks(0)
Quote Reply
Posted: 04 Sep 2022 at 6:02pm |
 First hole done
|
|
plummerscarin
Orange Level Access
Joined: 22 Jun 2015
Location: ia
Points: 3975
|
Post Options
Thanks(0)
Quote Reply
Posted: 04 Sep 2022 at 9:31pm |
|
Well that looks pretty good
|
|
84 prospector
Bronze Level
Joined: 30 Aug 2022
Location: California
Points: 65
|
Post Options
Thanks(0)
Quote Reply
Posted: 04 Sep 2022 at 10:12pm |
|
Got all the holes sealed up, the bolts holding the radiator down were sheared off by the previous owner so I’m going to heat them up and Try to get them out and out of new ones on. All the hoses were junk so I am going to need to get new ones. What’s the inside diameter of the radiator hoses? 1 1/4?
|
|
steve(ill)
Orange Level Access
Joined: 11 Sep 2009
Location: illinois
Points: 88431
|
Post Options
Thanks(0)
Quote Reply
Posted: 04 Sep 2022 at 10:21pm |
|
yes 1-1/4 inch hose ID.
|
|
Like them all, but love the "B"s.
|
|
Brian G. NY
Orange Level

Joined: 12 Sep 2009
Location: 12194
Points: 2269
|
Post Options
Thanks(0)
Quote Reply
Posted: 05 Sep 2022 at 9:14am |
 plummerscarin wrote: plummerscarin wrote:
Well that looks pretty good |
I second that....especially considering the original condition!
|
|
84 prospector
Bronze Level
Joined: 30 Aug 2022
Location: California
Points: 65
|
Post Options
Thanks(0)
Quote Reply
Posted: 05 Sep 2022 at 5:07pm |
|
Well both bolts holding the radiator in from the bottom sheared off when I took it off, I tried heating the studs up and turning them with vice grips but had no luck. So instead I ground them down and welded new studs on them and put new nuts on. Putting it back on now hopefully no leaks!
Edited by 84 prospector - 05 Sep 2022 at 5:09pm
|
|
plummerscarin
Orange Level Access
Joined: 22 Jun 2015
Location: ia
Points: 3975
|
Post Options
Thanks(0)
Quote Reply
Posted: 05 Sep 2022 at 5:53pm |
|
Dang, sounds like one of my days. Keep plugging. I'm rootin for ya
|
|
84 prospector
Bronze Level
Joined: 30 Aug 2022
Location: California
Points: 65
|
Post Options
Thanks(0)
Quote Reply
Posted: 05 Sep 2022 at 10:57pm |
|
Before I put the hood and everything back on I would like to adjust the valves and make sure none are sticking. The tractor backfires and smokes it seems when a certain cylinder fires. How do I adjust the valves on one of these engines?
Edited by 84 prospector - 05 Sep 2022 at 11:28pm
|
|
DiyDave
Orange Level Access

Joined: 11 Sep 2009
Location: Gambrills, MD
Points: 54378
|
Post Options
Thanks(0)
Quote Reply
Posted: 06 Sep 2022 at 4:11am |
Pull the valve cover and you'll find the rocker shaft, at the push rod side, you will see the adjusting hardware. I would recommend you acquire the shop manual, it has the procedure in it. While you have the VC off, look at the freeze plugs and check for leaks... 
|
|
Source: Babylon Bee. Sponsored by BRAWNDO, its got what you need!
|
|