| Author |
 Topic Search Topic Search  Topic Options Topic Options
|
Les Kerf 
Orange Level

Joined: 08 May 2020
Location: Idaho
Points: 1622
|
 Post Options Post Options
") Thanks(0) Thanks(0)
 Quote Quote  Reply Reply
 Posted: 09 Jul 2025 at 4:22pm Posted: 09 Jul 2025 at 4:22pm |
 dfwallis wrote: dfwallis wrote:
The parts manual seems to show two NPT ports on the manifold. It shows 70912725 1/2 NPT at the left/front flat of the intake manifold and it shows 70901651 1/8 NPT at the flat just above the carburetor. I purchased a vacuum gauge. If I decide to modify the manifold, do I need both ports for a complete test? |
No. A 1/8" NPT port at the flat above the carburetor is perfect. Bigger just means more drilling than necessary (unless you plan to run a milking machine like we do on occasion).
|
 |
|
Sponsored Links
|
|
|
dfwallis
Orange Level
Joined: 09 Mar 2023
Location: DFW
Points: 926
|
Post Options
Thanks(0)
Quote Reply
Posted: 09 Jul 2025 at 3:56pm |
|
The parts manual seems to show two NPT ports on the manifold. It shows 70912725 1/2 NPT at the left/front flat of the intake manifold and it shows 70901651 1/8 NPT at the flat just above the carburetor. I purchased a vacuum gauge. If I decide to modify the manifold, do I need both ports for a complete test?
|
|
1952 CA13092
|
|
Les Kerf
Orange Level
Joined: 08 May 2020
Location: Idaho
Points: 1622
|
Post Options
Thanks(0)
Quote Reply
Posted: 08 Jul 2025 at 9:53pm |
dfwallis wrote:
...On the list. We did verify TDC matched valve position/state (I/E), piston at top, and rotor pointing in the correct direction. Doesn't hurt to look again. |
|
|
dfwallis
Orange Level
Joined: 09 Mar 2023
Location: DFW
Points: 926
|
Post Options
Thanks(0)
Quote Reply
Posted: 08 Jul 2025 at 8:35pm |
Les Kerf wrote:
dfwallis wrote:
... if there's anything wrong in the valve train, it would most likely be that 0.012 was not maintained. The misfiring symptoms were immediate after the rebuild. It doesn't seem to have changed since then (and of course occurred before the rebuild). He also milled the head, cleaned and polished cam and installed new cam bearings, cleaned the block, ground crankshaft to spec (took several attempts to get the end play acceptable)... |
We have all been doing a heap of guessing and spinning our wheels  There is something fundamentally wrong here, so it's time to get back to the basics.
If that were my engine, I would pull the valve cover, re-torque the head, and re-set the valves.
Then, I would verify TDC by actually measuring it (not by merely assuming the marks to be correct).
Next, with the valve cover still off, bring #1 to TDC on compression. Now observe the valves on #4, which will be at the tail end of the exhaust stroke and the beginning of the intake stroke. Both valves should be open the same amount at this point or at least almighty close to the same amount. If not, then rock the engine back and forth past TDC until they are open the same amount, and then decide if it is off far enough to matter, and why (or why not).
Now check #1 the same way with #4 at TDC compression. If both #1 and #4 check good you can probably skip #2 and #3, but I would still put my dial indicator on the rocker arms and check the lift on all eight cam lobes.
I have actually found incorrectly assembled engines that refused to behave using the above technique; it is also possible to have incorrectly manufactured components.
This may seem like a lot of fiddling, but this is a long-standing problem with with this engine that dates back prior to the overhaul; something is clearly amiss, and none of the usual remedies has cured it.
Have fun 
|
On the list. We did verify TDC matched valve position/state (I/E), piston at top, and rotor pointing in the correct direction. Doesn't hurt to look again.
|
|
1952 CA13092
|
|
Les Kerf
Orange Level
Joined: 08 May 2020
Location: Idaho
Points: 1622
|
Post Options
Thanks(0)
Quote Reply
Posted: 08 Jul 2025 at 8:28pm |
dfwallis wrote:
... if there's anything wrong in the valve train, it would most likely be that 0.012 was not maintained. The misfiring symptoms were immediate after the rebuild. It doesn't seem to have changed since then (and of course occurred before the rebuild). He also milled the head, cleaned and polished cam and installed new cam bearings, cleaned the block, ground crankshaft to spec (took several attempts to get the end play acceptable)... |
We have all been doing a heap of guessing and spinning our wheels There is something fundamentally wrong here, so it's time to get back to the basics.
If that were my engine, I would pull the valve cover, re-torque the head, and re-set the valves.
Then, I would verify TDC by actually measuring it (not by merely assuming the marks to be correct).
Next, with the valve cover still off, bring #1 to TDC on compression. Now observe the valves on #4, which will be at the tail end of the exhaust stroke and the beginning of the intake stroke. Both valves should be open the same amount at this point or at least almighty close to the same amount. If not, then rock the engine back and forth past TDC until they are open the same amount, and then decide if it is off far enough to matter, and why (or why not).
Now check #1 the same way with #4 at TDC compression. If both #1 and #4 check good you can probably skip #2 and #3, but I would still put my dial indicator on the rocker arms and check the lift on all eight cam lobes.
I have actually found incorrectly assembled engines that refused to behave using the above technique; it is also possible to have incorrectly manufactured components.
This may seem like a lot of fiddling, but this is a long-standing problem with with this engine that dates back prior to the overhaul; something is clearly amiss, and none of the usual remedies has cured it.
Have fun
|
|
dfwallis
Orange Level
Joined: 09 Mar 2023
Location: DFW
Points: 926
|
Post Options
Thanks(0)
Quote Reply
Posted: 08 Jul 2025 at 6:31pm |
Brother spoke with the guy that rebuilt the head. He bought a complete valve train kit for it. He checked all valves, seats, and guides and replaced anything that was not to spec. It was rebuilt several times before, so not everything was 72 years old. Does not mean that something wasn't missed, but if there's anything wrong in the valve train, it would most likely be that 0.012 was not maintained. The misfiring symptoms were immediate after the rebuild. It doesn't seem to have changed since then (and of course occurred before the rebuild). He also milled the head, cleaned and polished cam and installed new cam bearings, cleaned the block, ground crankshaft to spec (took several attempts to get the end play acceptable).
I went ahead and bought a new knockoff zenith carburetor. That should help me quickly eliminate that as an issue. It didn't come with the adapter for the breather so I'll have to make one if I leave it installed :( That will leave me time to decide whether to follow up with a repair or replacement TSX 486 or attempt to locate a 670, 701, or 815. They all seem to be scarce as hens teeth.
|
|
1952 CA13092
|
|
dfwallis
Orange Level
Joined: 09 Mar 2023
Location: DFW
Points: 926
|
Post Options
Thanks(0)
Quote Reply
Posted: 03 Jul 2025 at 3:15pm |
Straanger wrote:
I’m more of a shade tree mechanic, so I’d be looking for a big shade tree with a cool breeze, and take a tool box with the tractor out there. I’m to lazy for that kind of heat. |
I live in Texas. I'm mostly used to heat, but not usually that much humidity. Was more Houstonesque than Dallas. It's regularly > 105 in my TX workshop. I just keep a fan on me, drink water, go inside once in a while.
|
|
1952 CA13092
|
|
Straanger
Bronze Level


Joined: 10 Dec 2019
Location: Michigan
Points: 62
|
Post Options
Thanks(0)
Quote Reply
Posted: 03 Jul 2025 at 1:48pm |
|
I’m more of a shade tree mechanic, so I’d be looking for a big shade tree with a cool breeze, and take a tool box with the tractor out there. I’m to lazy for that kind of heat.
|
|
Les Kerf
Orange Level
Joined: 08 May 2020
Location: Idaho
Points: 1622
|
Post Options
Thanks(0)
Quote Reply
Posted: 02 Jul 2025 at 3:47pm |
dfwallis wrote:
...The delco rotor has a very long curved section trailing the front edge. From the spark wear, it looks like it has been firing very close to the leading edge where I would expect it to be. I have considered sacrificing one of the caps to instrument it... |
It's a long shot for sure, but there is a slim possibility that there was a manufacturing defect affecting the rotor phasing that has plagued this since time immemorial.
dfwallis wrote:
... The caliper shows it now spaces 5/16 inch consistently all around but I don't know what it should be. The dust cap does behave as a spacer... |
Is it practicable to remove the dust cap as a test to minimize the rotor/terminal gap? Do you know how large that gap actually is?
dfwallis wrote:
Yes, it is difficult to tell if the signal dropouts are just because it lost sync or if the signal really went away. There is no trigger level adjustment. |
This is the major flaw I see with this gadget
dfwallis wrote:
However, the timing light appears to miss signals in the same pattern as the GTC505 (when it shows one miss, the timing light shows one miss, two, timing light shows two misses (roughly)). The RPM view with pulse count view shows this correlation best. The long duration voltage recording charts are difficult to interpret without a timescale and knowing where one sequence begins and ends. The instantaneous voltage chart shows the signal missing periodically, but again, it's hard to tell if it's just a sync issue. |
The high level of noise from the non-resistor wires/plugs seems to give this gadget fits
dfwallis wrote:
I'm hoping that the new scope will allow me to trigger on the points signal and more unambiguously show the spark pulse in relation to it. |
I am most curious to see what develops, please keep us posted 
dfwallis wrote:
I'm trying to work up the strength to recheck the valves next month. But if it's 100+f again in the barn, it'll be mighty difficult to make myself do it...( |
It's been mid-90's here in northern Idaho and less humidity than your area, and this old hillbilly pretty much shuts down above 80 degrees nowadays 
|
|
dfwallis
Orange Level
Joined: 09 Mar 2023
Location: DFW
Points: 926
|
Post Options
Thanks(0)
Quote Reply
Posted: 02 Jul 2025 at 10:47am |
CA13414 wrote:
This has been a great discussion. Very much appreciate everyone's insights and ideas and has been fun to read, as much as it has been a thorn your the side trying to solve the problem.
Dan |
Definitely been a thorn in my side :(
|
|
1952 CA13092
|
|
dfwallis
Orange Level
Joined: 09 Mar 2023
Location: DFW
Points: 926
|
Post Options
Thanks(0)
Quote Reply
Posted: 02 Jul 2025 at 10:46am |
Les Kerf wrote:
dfwallis wrote:
...It draws 195 amps when cranking. Is that about right?
|
That's plenty high but if it gets the job done it's ok; does it seem to drag?
|
It spins quite fast when the engine is timed right. If not timed right though, it does struggle a bit (engine firing too soon).
|
|
1952 CA13092
|
|
DiyDave
Orange Level Access

Joined: 11 Sep 2009
Location: Gambrills, MD
Points: 55195
|
Post Options
Thanks(0)
Quote Reply
Posted: 01 Jul 2025 at 8:38pm |
This thread reminds me of about 30 some years ago, was working on a turf farm, and they needed a big Ford truck started, sounded to me like it wasn't getting any spark, big gas 4V V8, had a (then) newfangled ignition on it, had a rotor that the business end was made outta a loop of wire, instead of a solid piece, like AC's had. The wire had broken so insteada a loop, there were 2 stubs sticking out, arcing all over the place... Took a copper penny, cut it half and soldered, and melted it into the plastic, and that's the rotor it had, when I stopped working there... 
|
|
Source: Babylon Bee. Sponsored by BRAWNDO, its got what you need!
|
|
dfwallis
Orange Level
Joined: 09 Mar 2023
Location: DFW
Points: 926
|
Post Options
Thanks(0)
Quote Reply
Posted: 01 Jul 2025 at 8:32pm |
Les Kerf wrote:
jvin248 wrote:
.
If everything but the distributor cap (and likely the rotator), I'd really check that out for carbon buildup or cracks/shorts.
My WD had a wrong sized cap when it came to me, and the rotator had spots it hit the pole flanges. Ran a lot better after replacing the pair with correct parts, and uncracked.
. |
I'm also thinking there must be something amiss in that area as well. It is the only place that affects the high-tension delivery to all four cylinders.
I would start by measuring the length of the rotor to see if there is excessive gap to the terminals, and then I would sacrifice a distributor cap by drilling holes in it to see if the phasing is off (i.e. is the rotor actually pointing at the terminal when it fires).
I watched those videos several times and I am not quite ready to run out and buy one of those gadgets just yet |
I tried 3 different distributor caps and 3 different rotors. Two were new and one each of the old (delco branded) ones. The delco rotor has a very long curved section trailing the front edge. From the spark wear, it looks like it has been firing very close to the leading edge where I would expect it to be. I have considered sacrificing one of the caps to instrument it.
I also added a thin gasket under the dust cap to get the distributor cap up just a hair higher since the old rubber seal is crunchy and I had to grind it in spots to get the cap to sit perfectly flat. The caliper shows it now spaces 5/16 inch consistently all around but I don't know what it should be. The dust cap does behave as a spacer, but adding the thin gasket made no difference.
Yes, it is difficult to tell if the signal dropouts are just because it lost sync or if the signal really went away. There is no trigger level adjustment. However, the timing light appears to miss signals in the same pattern as the GTC505 (when it shows one miss, the timing light shows one miss, two, timing light shows two misses (roughly)). The RPM view with pulse count view shows this correlation best. The long duration voltage recording charts are difficult to interpret without a timescale and knowing where one sequence begins and ends. The instantaneous voltage chart shows the signal missing periodically, but again, it's hard to tell if it's just a sync issue.
I'm hoping that the new scope will allow me to trigger on the points signal and more unambiguously show the spark pulse in relation to it.
I'm trying to work up the strength to recheck the valves next month. But if it's 100+f again in the barn, it'll be mighty difficult to make myself do it. I spent thousands to have the head professionally rebuilt (among other things). I'll be extremely upset if that turns out to be a problem (other than gap setting, which we did)...:(
I'll give the carburetor one last hurrah with the screw extractors and replacing the last jet, but I have doubts that will help...unless someone had bored (gouged) the jet out or something. I guess I could figure out the spec and check the size. I might also try lowering the float even though it shows to be in spec at 9/32 inch. I was going to try some things like that last trip, but it was 100+f and 65% and I was loosing mojo. :(
Edited by dfwallis - 01 Jul 2025 at 8:40pm
|
|
1952 CA13092
|
|
Les Kerf
Orange Level
Joined: 08 May 2020
Location: Idaho
Points: 1622
|
Post Options
Thanks(0)
Quote Reply
Posted: 01 Jul 2025 at 8:02pm |
dfwallis wrote:
...It draws 195 amps when cranking. Is that about right?
|
That's plenty high but if it gets the job done it's ok; does it seem to drag?
|
|
CA13414
Silver Level


Joined: 25 Feb 2024
Location: Nebraska
Points: 385
|
Post Options
Thanks(0)
Quote Reply
Posted: 01 Jul 2025 at 8:02pm |
|
This has been a great discussion. Very much appreciate everyone's insights and ideas and has been fun to read, as much as it has been a thorn your the side trying to solve the problem.
Dan
|
|
Helping the aged survive and thrive! 1953 CA
|
|
Les Kerf
Orange Level
Joined: 08 May 2020
Location: Idaho
Points: 1622
|
Post Options
Thanks(0)
Quote Reply
Posted: 01 Jul 2025 at 7:55pm |
jvin248 wrote:
.
If everything but the distributor cap (and likely the rotator), I'd really check that out for carbon buildup or cracks/shorts.
My WD had a wrong sized cap when it came to me, and the rotator had spots it hit the pole flanges. Ran a lot better after replacing the pair with correct parts, and uncracked.
. |
I'm also thinking there must be something amiss in that area as well. It is the only place that affects the high-tension delivery to all four cylinders.
I would start by measuring the length of the rotor to see if there is excessive gap to the terminals, and then I would sacrifice a distributor cap by drilling holes in it to see if the phasing is off (i.e. is the rotor actually pointing at the terminal when it fires).
I watched those videos several times and I am not quite ready to run out and buy one of those gadgets just yet |
|
jvin248
Orange Level

Joined: 17 Jan 2022
Location: Detroit
Points: 503
|
Post Options
Thanks(0)
Quote Reply
Posted: 01 Jul 2025 at 7:10pm |
|
.
If everything but the distributor cap (and likely the rotator), I'd really check that out for carbon buildup or cracks/shorts.
My WD had a wrong sized cap when it came to me, and the rotator had spots it hit the pole flanges. Ran a lot better after replacing the pair with correct parts, and uncracked.
.
Edited by jvin248 - 01 Jul 2025 at 7:11pm
|
|
dfwallis
Orange Level
Joined: 09 Mar 2023
Location: DFW
Points: 926
|
Post Options
Thanks(0)
Quote Reply
Posted: 01 Jul 2025 at 12:18pm |
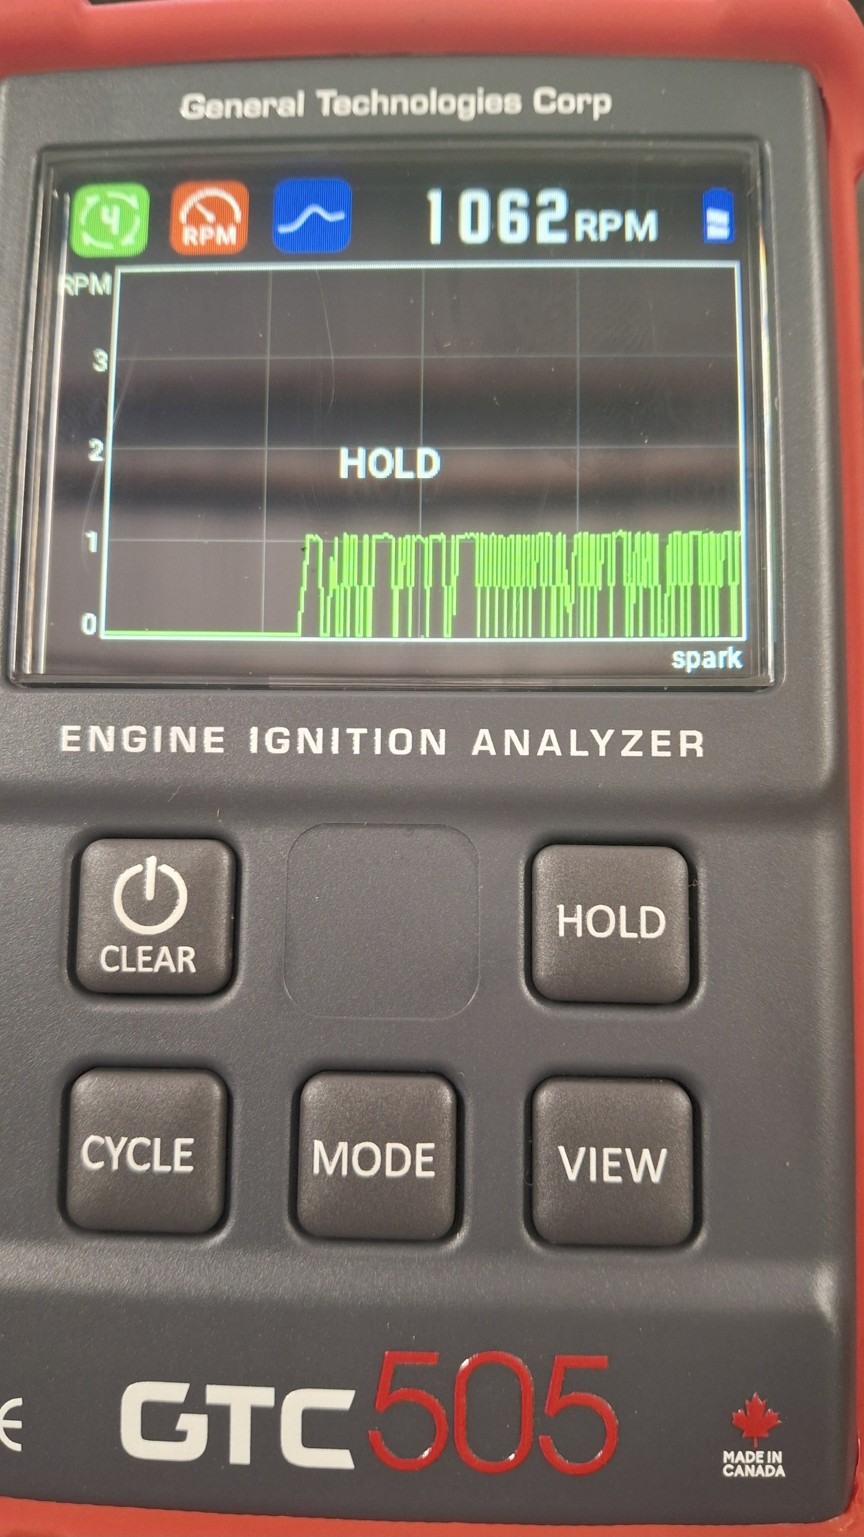
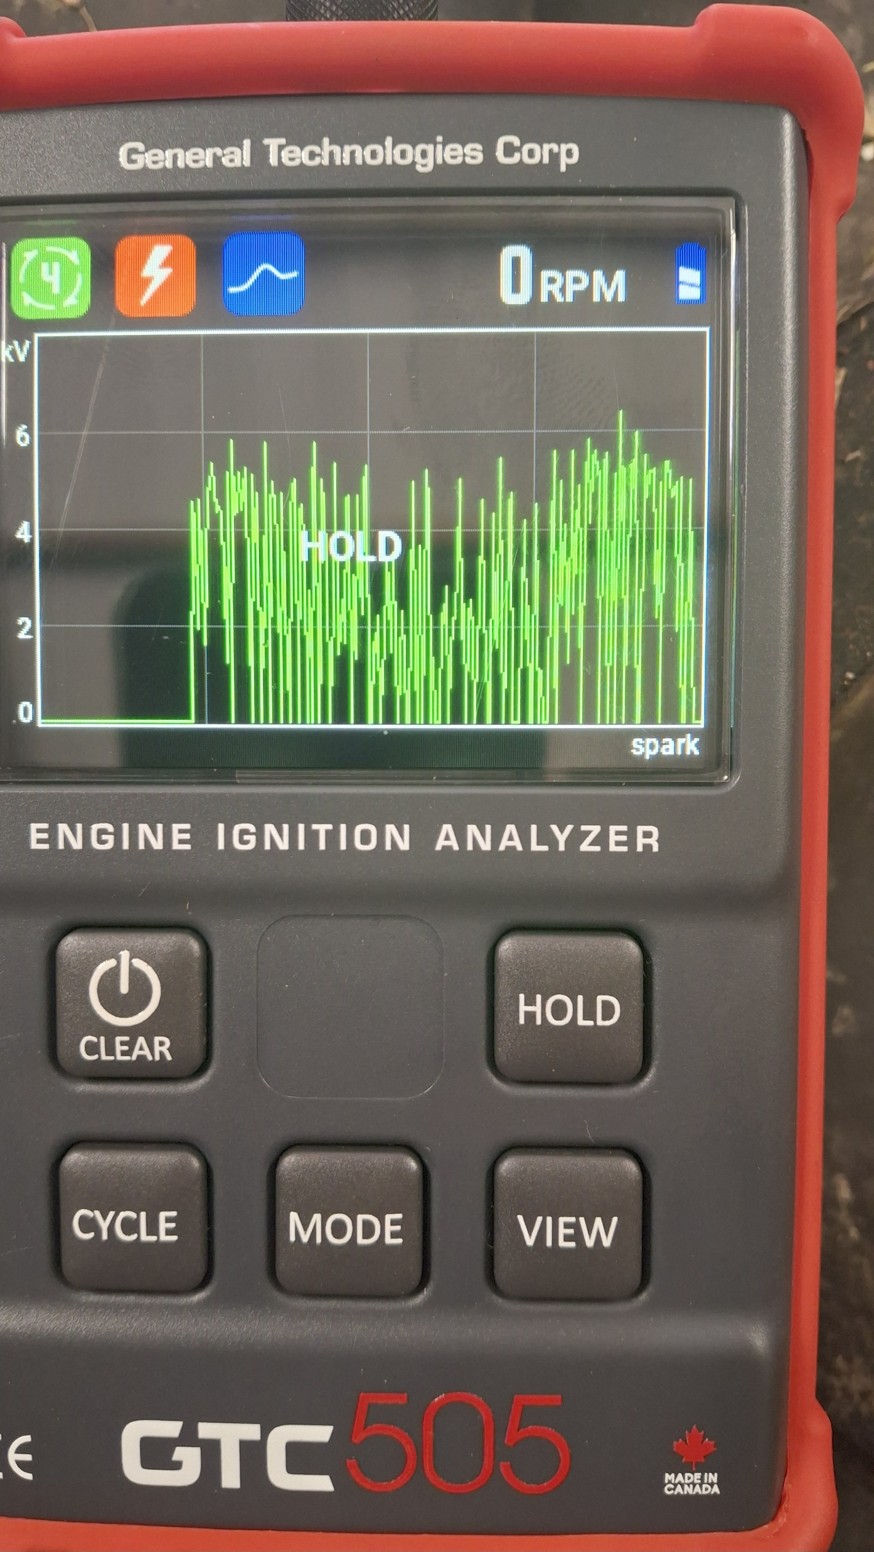
I've not found many good clean signal views due to wire proximity interference. These two images are the best I could locate. Unfortunately they are before the distributor rebuild:
Both cylinder 4. These are both before the distributor rebuild, the signals are now much more consistent, but still show these "apparent" dropouts. All cylinders look similar to each other if you get rid of the proximity interference:
RPM (pulse count):
Every one of those "wide" pulses seems to correlate with a misfire. These appear on all 4 cylinders. It also correlates with the meter having difficulty reading the correct RPM rate (cause or symptom of the instrumentation??).
Voltage (Again, before the dist rebuild, it's now much more consistently around 6KV):
I selected "hold" during a period when it couldn't read the RPM rate.
|
|
1952 CA13092
|
|
dfwallis
Orange Level
Joined: 09 Mar 2023
Location: DFW
Points: 926
|
Post Options
Thanks(0)
Quote Reply
Posted: 01 Jul 2025 at 10:12am |
steve(ill) wrote:
.The new 6V coil has no external resistor. I switched it out and it made no difference. I've switched everything out related to the distributor, wires, plugs, points, rotor (3 different ones), cap (3 different ones), distributor partial rebuild (not the dust cap).
so this is the original 6v system... I guess i assumed you had updated to 12v... Dont see a problem, but im not a fan of the 6v coils.. |
I'm keeping it as original as I can stand. I did add a regulator to the generator. I had to drill one hole in the drawbar to attach my new bail. I bought a new PTO guard off ebay and modified it (original straightened and stored away) to clear the rockshaft mounted top link bracket. I used the second light switch detent to turn on the rear spotlight. Everything else is bolt on additions using existing mounting points. I'm not a fan of 12V conversions. 6V works great if you have good wiring/connections and the engine timed.
It draws 195 amps when cranking. Is that about right?
Edited by dfwallis - 01 Jul 2025 at 10:23am
|
|
1952 CA13092
|
|
steve(ill)
Orange Level Access

Joined: 11 Sep 2009
Location: illinois
Points: 90549
|
Post Options
Thanks(0)
Quote Reply
Posted: 01 Jul 2025 at 9:50am |
.The new 6V coil has no external resistor. I switched it out and it made no difference. I've switched everything out related to the distributor, wires, plugs, points, rotor (3 different ones), cap (3 different ones), distributor partial rebuild (not the dust cap).
so this is the original 6v system... I guess i assumed you had updated to 12v... Dont see a problem, but im not a fan of the 6v coils..
|
|
Like them all, but love the "B"s.
|
|
dfwallis
Orange Level
Joined: 09 Mar 2023
Location: DFW
Points: 926
|
Post Options
Thanks(0)
Quote Reply
Posted: 01 Jul 2025 at 9:39am |
The videos are now live. I need to search for one more that shows the long duration recording better. I changed one of the settings and never got it back to the same view :(
I also found some fire resistant fiberglass braid tubing that should help me better isolate the spark plug wires and eliminate the interference between plug wires. 25KV breakdown voltage. Hopefully it will allow a more accurate view of what's happening. I received my new oscope/dmm/signal generator and ignition probe. It's quite nice for the price.
Edit: I only find stills of the long duration recording showing the apparent dropouts, no video.
Edited by dfwallis - 01 Jul 2025 at 10:21am
|
|
1952 CA13092
|
|
dfwallis
Orange Level
Joined: 09 Mar 2023
Location: DFW
Points: 926
|
Post Options
Thanks(0)
Quote Reply
Posted: 30 Jun 2025 at 4:41pm |
Steve in NJ wrote:
That wouldn't have Champion Spark Plugs in it would it? I've seen and heard of so many goofy issues with them things. Screw in a real set of plugs like NGK's or Autolites and all the Gremlins go away..... Black carbon specs on the hood? Hmmmm.... Steve@B&B
|
Theyre autolite. I know there is a carburetor issue. GTC 505 was showing electrical issues, that's where I started first. I still haven't ruled electrical out. GTC 505 and timing light still show electrical dropouts. You can see them better on the long duration recording than on the single trigger waveform. But they happen at all 4 cylinders, not just one. But the analyzer is easily confused by proximity of other HV wires so I'm not 100% confident in my interpretation. I plan to try to find some high impedance tubing to wrap the wires in to improve it a bit. It says you need 2 inches of clearance, but that's hard to do coming right out of the distributor.
|
|
1952 CA13092
|
|
dfwallis
Orange Level
Joined: 09 Mar 2023
Location: DFW
Points: 926
|
Post Options
Thanks(0)
Quote Reply
Posted: 30 Jun 2025 at 4:33pm |
jvin248 wrote:
.
Leaks at the manifold to motor interface can cause fuel to air mixture leaks.
My WD ran better after I replaced the factory manifold it came to me with with a new one plus new seals as two exhaust leaked and I think one intake with a slight leak.
I bought one of the small harbor freight ultrasonic cleaners and have run at least four antique carbs through it for much improved operation. Split the carb and open sides down. That may be better than the easy out game.
Verify the coil you have uses an internal resistor not external block and is the correct coil for the voltage you are set at. External resistor blocks and wiring makes for more connections that can go bad/corrode.
Are you getting intermittent shorts in wiring?
Are the misses frequent enough you can pull a plug wire and isolate the cylinder it happens to?
. |
It isn't a single cylinder misfiring. It is all of them at different times. I've searched for intermittent shorts, intermittent opens, gremlins...The new 6V coil has no external resistor. I switched it out and it made no difference. I've switched everything out related to the distributor, wires, plugs, points, rotor (3 different ones), cap (3 different ones), distributor partial rebuild (not the dust cap). No manifold leaks (and brand new).
|
|
1952 CA13092
|
|
dfwallis
Orange Level
Joined: 09 Mar 2023
Location: DFW
Points: 926
|
Post Options
Thanks(0)
Quote Reply
Posted: 30 Jun 2025 at 4:26pm |
Six videos have been uploaded to https://www.youtube.com/@OrangeAcres-h2k
These are under the playlist "misfire analysis". They will go public around midnight 1 July (CST).
|
|
1952 CA13092
|
|
jvin248
Orange Level
Joined: 17 Jan 2022
Location: Detroit
Points: 503
|
Post Options
Thanks(0)
Quote Reply
Posted: 30 Jun 2025 at 6:03am |
|
.
Leaks at the manifold to motor interface can cause fuel to air mixture leaks.
My WD ran better after I replaced the factory manifold it came to me with with a new one plus new seals as two exhaust leaked and I think one intake with a slight leak.
I bought one of the small harbor freight ultrasonic cleaners and have run at least four antique carbs through it for much improved operation. Split the carb and open sides down. That may be better than the easy out game.
Verify the coil you have uses an internal resistor not external block and is the correct coil for the voltage you are set at. External resistor blocks and wiring makes for more connections that can go bad/corrode.
Are you getting intermittent shorts in wiring?
Are the misses frequent enough you can pull a plug wire and isolate the cylinder it happens to?
.
|
|
Steve in NJ
Orange Level Access

Joined: 12 Sep 2009
Location: Andover, NJ
Points: 12071
|
Post Options
Thanks(0)
Quote Reply
Posted: 30 Jun 2025 at 12:49am |
That wouldn't have Champion Spark Plugs in it would it? I've seen and heard of so many goofy issues with them things. Screw in a real set of plugs like NGK's or Autolites and all the Gremlins go away..... Black carbon specs on the hood? Hmmmm.... Steve@B&B
|
|
39'RC, 43'WC, 48'B, 49'G, 50'WF, 65 Big 10, 67'B-110, 75'716H, 2-620's, & a Motorhead wife
|
|
Les Kerf
Orange Level
Joined: 08 May 2020
Location: Idaho
Points: 1622
|
Post Options
Thanks(0)
Quote Reply
Posted: 29 Jun 2025 at 11:52pm |
dfwallis wrote:
...We set valve clearance at .012. Doesn't mean it stayed at .012. We had plans to recheck it at some point. Maybe when it cools down a bit in the fall. Needs to be done, regardless... |
I just re-read this whole thread to try to cipher out what we have all missed
dfwallis wrote:
... the engine probably hasn't run more than 4 hours since rebuild...
dfwallis - 14 Jun 2025 at 1:53pm |
I found no mention in this thread of re-torquing the head, re-setting the valves, replacing spark plugs, or re-tightening the manifold bolts since the rebuild; you have added a few hours since that post
dfwallis wrote:
...The timing mark was also bouncing around quite a lot, completely out of the viewing window...
dfwallis - 22 Jun 2025 at 12:06pm |
This one is somewhat puzzling. At what RPM was this noted? At low idle there should be no advance, and at high idle it should be at full advance. I can see it bouncing around at mid-range while it is still partway advanced though.
|
|
Les Kerf
Orange Level
Joined: 08 May 2020
Location: Idaho
Points: 1622
|
Post Options
Thanks(0)
Quote Reply
Posted: 29 Jun 2025 at 10:08pm |
dfwallis wrote:
New manifold looks like it has a flat that could be drilled/tapped to provide a vacuum gauge attachment point. Don't think I want to do that. Not finding a good attachment option. |
Bummer. A vacuum gauge is a valuable troubleshooting tool.
I put a new manifold on my Model C a couple years ago and it had a small pipe plug that we pulled out to run the old Surge milking machine.
|
|
dfwallis
Orange Level
Joined: 09 Mar 2023
Location: DFW
Points: 926
|
Post Options
Thanks(0)
Quote Reply
Posted: 29 Jun 2025 at 8:30pm |
New manifold looks like it has a flat that could be drilled/tapped to provide a vacuum gauge attachment point. Don't think I want to do that. Not finding a good attachment option.
Edit: I found a pic of an original manifold and it appears to have a pipe plug at that same flat spot. If I were to drill and tap it I'd want to take it off so that I could clamp it to the drill press to drill a nice straight hole. Not ready to do that at this point.
Edited by dfwallis - 29 Jun 2025 at 10:22pm
|
|
1952 CA13092
|
|
dfwallis
Orange Level
Joined: 09 Mar 2023
Location: DFW
Points: 926
|
Post Options
Thanks(0)
Quote Reply
Posted: 29 Jun 2025 at 7:28pm |
Les Kerf wrote:
dfwallis wrote:
...Seems doubtful that it would be valves. It had a complete, professional shop valve job. Compression seems reasonably good... |
dfwallis wrote:
Additional info Compression 1 - 4 130, 129, 132, 129 ... |
Those are excellent compression numbers; this does not eliminate the possibility of sticky valve guides though, or too tight valve lash, thus the recommendation for vacuum gauge testing.
dfwallis wrote:
The operating symptoms date back to the 80s or 90s ... it is again blowing black specks of carbon onto the hood... |
Assuming the correct size of jet(s) then the fuel level in the float bowl must be too high; perhaps the float isn't floating? A crack somewhere inside the carburetor leaking excess fuel in where it shouldn't? I certainly dunno why, but if it has been blowing black specks onto the hood since the 1980's it must be getting too much fuel from somewhere  |
We set valve clearance at .012. Doesn't mean it stayed at .012. We had plans to recheck it at some point. Maybe when it cools down a bit in the fall. Needs to be done, regardless. I don't know that it was blowing carbon specks in the 80s. He only said it was misfiring similarly. It did not misfire the last I used it before then, but started at some point and continues to this day, regardless of nearly everything being overhauled to spec to the best of our and the machine shops ability. I checked float level this week. It was as close to 9/32s as I could measure. The float does not leak. It is dry as a bone. I've checked it a dozen times. I inspected the carburetor pretty carefully. I saw no obvious cracks or leaks beside the one I sealed that was leaking fuel from the bowl at a very slow rate (the screw (plug) at the bottom front of the bowl). I've ordered some tiny easy outs to try to fix it correctly. All jets were replaced except the one at the bottom rear of the bowl. There was no screwdriver slot material left to latch on to.
But, just because I express doubts about a particular cause, it does not mean that I've ruled ANYTHING out. Until it's resolved, everything is suspect.
I've ordered a new portable oscope that should allow me to actually correlate the points signal with the resulting spark of the secondary, Ch1 vs Ch2 (10000x reduction probe).
Edited by dfwallis - 29 Jun 2025 at 8:56pm
|
|
1952 CA13092
|
|