| Author |
 Topic Search Topic Search  Topic Options Topic Options
|
Grwhthunter 
Bronze Level

Joined: 30 Aug 2018
Location: Randolph Ohio
Points: 107
|
 Post Options Post Options
") Thanks(0) Thanks(0)
 Quote Quote  Reply Reply
 Posted: 04 Mar 2019 at 6:33pm Posted: 04 Mar 2019 at 6:33pm |
|
Good job !! I’m glad you got it done. Yeah I forgot that part to about the tapered shaft. I was relieved when I hit that point too and it just slid off. Ray
|
|
1949 B 1949 WD 1950 WD 1953 WD45 1955 CA 1957 D17 1975 Gleaner K corn & soybean special 1959 D14 1970 160 assortment of snap coupler implements and my best friend my beautiful Wife Linda
|
 |
|
Sponsored Links
|
|
|
DennisA (IL)
Orange Level

Joined: 11 Sep 2009
Location: Ridott IL.
Points: 2075
|
Post Options
Thanks(0)
Quote Reply
Posted: 04 Mar 2019 at 6:47pm |
|
Wow, I must have been very fortunate. Both of mine came off with a fight but they came off in one piece.
|
|
Thanks & God Bless
Dennis
|
|
Dave(inMA)
Orange Level

Joined: 12 Sep 2009
Location: Grafton, MA
Points: 2399
|
Post Options
Thanks(0)
Quote Reply
Posted: 04 Mar 2019 at 7:45pm |
Ray - thanks for sharing your methodology. Dennis, I think there's a chance that I could have gotten the drum off without the carnage. Had I known about the tapered shaft, I might have given it a try. But I was thinking that I would have to drive the drum all the way off - I was really surprised when it came loose once off its location on the shaft. The key, either way, is being able to drive the drum toward the rear end with the air hammer. In this case it's not a real loss as the drum was so badly damaged by the worn out brake band that was on the tractor when I bought it. We'll see how the next side goes!
Dave
|
|
WC, CA, D14, WD45
|
|
DennisA (IL)
Orange Level
Joined: 11 Sep 2009
Location: Ridott IL.
Points: 2075
|
Post Options
Thanks(0)
Quote Reply
Posted: 04 Mar 2019 at 8:35pm |
|
You might want to put on some anti-seize. You may need to remove it again sometime down the road
|
|
Thanks & God Bless
Dennis
|
|
Dave(inMA)
Orange Level
Joined: 12 Sep 2009
Location: Grafton, MA
Points: 2399
|
Post Options
Thanks(0)
Quote Reply
Posted: 06 Mar 2019 at 9:06pm |
Took some measurements of the old drum. The original diameter was 6"; the wear is about 1/16" all around the drum. So the diameter under the brake band was 5.875". The 0.125" reduction in diameter equates to about a 0.4" reduction in the circumference of the drum. The only way to compensate for that was to tighten the brake band. It seems to me that offsetting the lost 0.4" would soak up a fair amount of the available adjustment. I'd be interested in other opinions!
The left final drive housing and tire are back on the tractor. I'm waiting for new brake bands to arrive to see how much tighter the band is with the new drum. I'm set up to start working on the right side.
Stay tuned! Dave
Edited by Dave(inMA) - 06 Mar 2019 at 9:06pm
|
|
WC, CA, D14, WD45
|
|
Dick L
Orange Level
Joined: 12 Sep 2009
Location: Edon Ohio
Points: 5093
|
Post Options
Thanks(0)
Quote Reply
Posted: 07 Mar 2019 at 6:40am |
I would have to see what was going on with my own eyes to understand what is/was going on. I have turned/sanded the drums until the grooves were gone and the brakes with new bands worked as well as the brakes work on this setup. They are never going to lock down like your car. It might be in the pin in the band end. When you put new bands on the tightening screw will seem to be to short until the bands take on the shape of the drum. They then will need tightening again. To get the band down thru the top they get straightened out quite a bit. Another reason I liked to change the brake bands thru the big hole with the final drive off. More room to work and you don't have to flatten the old rusty bands or the new bands. I wonder the condition of the toggle? 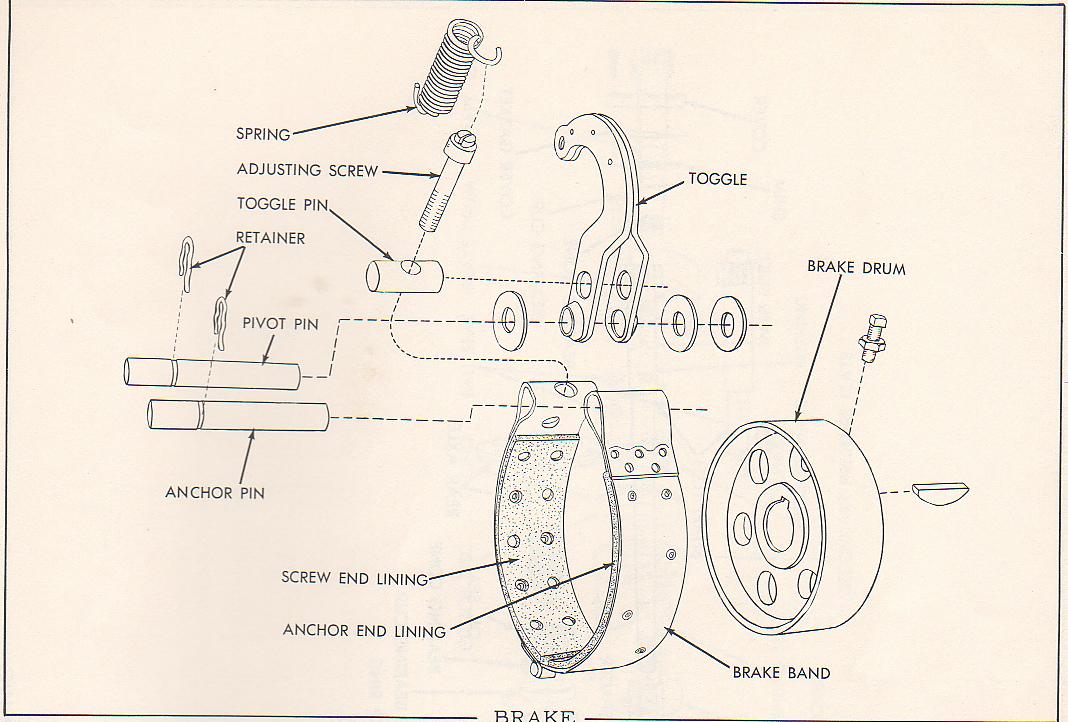
|
|
Dave(inMA)
Orange Level
Joined: 12 Sep 2009
Location: Grafton, MA
Points: 2399
|
Post Options
Thanks(0)
Quote Reply
Posted: 07 Mar 2019 at 7:34am |
Dick, the braking power on this tractor was almost non-existent. I couldn't hold the tractor on a slight grade. It's flat dangerous, especially here in New England. I think the lack of braking power is a combination of factors: the drum surface was scored noticeably, dating back to the bands that were on the tractor when I got it; worn drum surface; hinge in brake band frozen. The toggle seems to be fine - no slop on pivot pin nor the toggle pin. The brake band lining wasn't worn much, though it was cracked in a couple of spots - perhaps from being straightened to insert it? I like your idea of installing the band with the housing off the tractor. Wish I'd thought to do that! I could always pull it off again......the challenge is handling the tire which is loaded.
Thanks for your questions and suggestions. I really appreciate having your experience on this project!
Dave
|
|
WC, CA, D14, WD45
|
|
Steve in NJ
Orange Level Access

Joined: 12 Sep 2009
Location: Andover, NJ
Points: 12027
|
Post Options
Thanks(0)
Quote Reply
Posted: 07 Mar 2019 at 7:37am |
Dave, Hope you antiseized the shaft and the drum before installing the drum just in case ya need to get back in there in the future. When I did my B, I antiseized everything that went together and or had threads on it! LOL! In my case, I don't have enough a$$ to get some of this stuff apart!  |
|
39'RC, 43'WC, 48'B, 49'G, 50'WF, 65 Big 10, 67'B-110, 75'716H, 2-620's, & a Motorhead wife
|
|
Dave(inMA)
Orange Level
Joined: 12 Sep 2009
Location: Grafton, MA
Points: 2399
|
Post Options
Thanks(0)
Quote Reply
Posted: 07 Mar 2019 at 9:28am |
Steve, should have done so but I didn't. However, I'm expecting this drum to last for way longer than the modest wear and tear I'll put on it. So maybe I just created a problem for the next guy that owns this tractor?!!? I'll do better on the other side.
Dave
|
|
WC, CA, D14, WD45
|
|
Dick L
Orange Level
Joined: 12 Sep 2009
Location: Edon Ohio
Points: 5093
|
Post Options
Thanks(0)
Quote Reply
Posted: 07 Mar 2019 at 5:00pm |
|
If I remember right there might have been two lengths of the screws or different lengths of threads on the screws.
I am so dang old and the memory is getting so bad. At one time I could have knew quite a it about this stuff. Or not! I have forgot so much lately it is hard to tell how much I might have known.
|
|
Dave(inMA)
Orange Level
Joined: 12 Sep 2009
Location: Grafton, MA
Points: 2399
|
Post Options
Thanks(0)
Quote Reply
Posted: 08 Mar 2019 at 1:30pm |
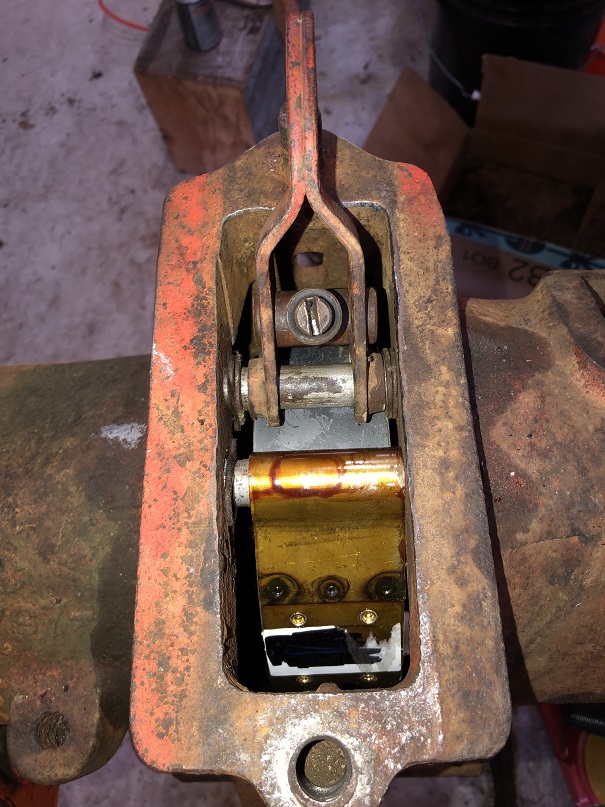
I'm happy to report that the left hand side brake is done. The band slid right in, assisted by a length of wire I ran around the drum and attached to the pin bore at the end of the band. I didn't have to deform the band at all. Here's a shot of both ends of the band pinned to the housing and the toggle, respectively:
Installing the retracting spring was lots of fun, but it got done.
I haven't done final adjustment on the band yet - need to be able to drive the tractor for that. But with the adjusting screw set much looser I can barely turn the wheel, suggesting that braking power should be much improved.
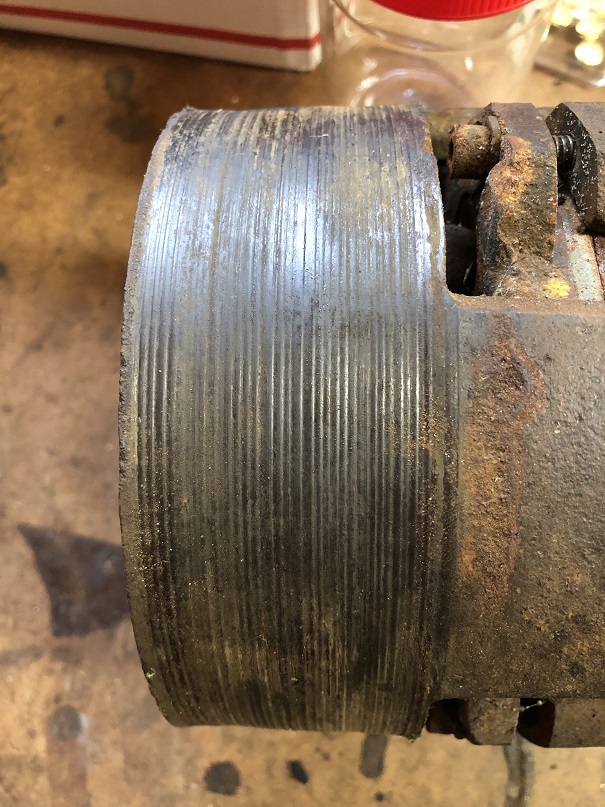
So, on to the right hand side! Contrary to my experience 10+ years ago, the drum slid right off the drive shaft so that the housing was easy to remove. And the clutch came off the pinion shaft with no work! I'm including a shot of the drum so you can see how scored it is. The replacement drum isn't perfect, but it's a ton better than this one!
Thank you to everyone who chimed in on this project. Everyone's experiences helped. Dick, I have no evidence as to whether there were two different adjusting screws, but the ones in my tractor are not threaded all the way to the head.
I'm going to start a new thread on the clutch repair as this one is getting a little long - though it can't hold a candle to Chris's WD45 project thread! 
Edited by Dave(inMA) - 08 Mar 2019 at 1:31pm
|
|
WC, CA, D14, WD45
|
|
Dick L
Orange Level
Joined: 12 Sep 2009
Location: Edon Ohio
Points: 5093
|
Post Options
Thanks(0)
Quote Reply
Posted: 08 Mar 2019 at 4:58pm |
|
Fantastic!
|
|
Grwhthunter
Bronze Level
Joined: 30 Aug 2018
Location: Randolph Ohio
Points: 107
|
Post Options
Thanks(0)
Quote Reply
Posted: 08 Mar 2019 at 7:24pm |
|
That thing looks threaded !! Good job on getting the right side off. Glad it went easy for you. That spring is a real test to get on. I haven’t started my right side yet got a couple things that needed fixed pronto. Will be doing it in a couple days. I hope it comes off easier. Keep us updated when you do get it going and do final adjusting. Ray
|
|
1949 B 1949 WD 1950 WD 1953 WD45 1955 CA 1957 D17 1975 Gleaner K corn & soybean special 1959 D14 1970 160 assortment of snap coupler implements and my best friend my beautiful Wife Linda
|
|
Dave(inMA)
Orange Level
Joined: 12 Sep 2009
Location: Grafton, MA
Points: 2399
|
Post Options
Thanks(0)
Quote Reply
Posted: 08 Mar 2019 at 7:36pm |
Yup, the drum took quite a beating at some point. I'll report back after I get the brakes adjusted. Thanks again, everyone.
Dave |
|
WC, CA, D14, WD45
|
|
Ted J
Orange Level

Joined: 05 Jul 2010
Location: La Crosse, WI
Points: 18943
|
Post Options
Thanks(0)
Quote Reply
Posted: 09 Mar 2019 at 5:04pm |
|
There HAS to be some kind of a trick to putting that spring on. When I do mine this summer, maybe I'll find one,,,,,,,,,,,,,,,unless someone else HAS a trick to it. I've got the brain cells spinning already thinking about it........
ANYBODY??
|
|
"Allis-Express"
19?? WC / 1941 C / 1952 CA / 1956 WD45 / 1957 WD45 / 1958 D-17
|
|
pickup
Bronze Level

Joined: 18 Nov 2011
Location: New Prague
Points: 9
|
Post Options
Thanks(0)
Quote Reply
Posted: 09 Mar 2019 at 7:06pm |
On my CA. I doubled the brake lining on brake bands. To take up the wear on the brake drum.
|
|
Dave(inMA)
Orange Level
Joined: 12 Sep 2009
Location: Grafton, MA
Points: 2399
|
Post Options
Thanks(0)
Quote Reply
Posted: 09 Mar 2019 at 9:21pm |
Ted, i did the spring this way: inserted it through the toggle and hooked it over the the adjusting screw. Then I reached down inside the front of the brake housing with a long thin screwdriver and pushed the hook end out into the slot. Finally, I pried the hook the rest of the way through the slot.
If there's a better way, I'd love to hear it!
Dave
|
|
WC, CA, D14, WD45
|
|
Theriault
Bronze Level
Joined: 03 Jul 2024
Location: Montreal
Points: 1
|
Post Options
Thanks(0)
Quote Reply
Posted: 03 Jul 2024 at 9:11am |
|
The issue is that the break lining is approximately 1/4 of an inch too long around the circumference of brake drum as new. It gets worst as the lining and drum worn-out. The excessive length reduces the usable life of liner and drum. When reachimg wear limit, the screw end of the band is touching the toggle, preventing the lining to clamp the drum.
|
|
PaulB
Orange Level
Joined: 12 Sep 2009
Location: Rocky Ridge Md
Points: 5164
|
Post Options
Thanks(0)
Quote Reply
Posted: 03 Jul 2024 at 3:14pm |
|
Over the years I've come across a few NOS B,C,CA brake reline kits that the lining was extra thick. I know I've never used them as the normal ones always worked just fine for any brake job I ever did. Now the question is: where are they stashed?
|
|
If it was fun to pull in LOW gear, I could have a John Deere.
Real pullers don't have speed limits.
If you can't make it GO... make it SHINY
|
|