This site is not affiliated with AGCO Inc., Duluth GA., Allis-Chalmers Co., Milwaukee, WI., or any surviving or related corporate entity. All trademarks remain the property of their respective owners. All information presented herein should be considered the result of an un-moderated public forum with no responsibility for its accuracy or usability assumed by the users and sponsors of this site or any corporate entity.
The Forum Parts and Services Unofficial Allis Store Tractor Shows Serial Numbers History
Forum Home Forum Home > Allis Chalmers > Farm Equipment
  New Posts New Posts
  FAQ FAQ  Forum Search   Events   Register Register  Login Login


Alliis Chalmers CA Wiring

 Post Reply Post Reply Page  12>
Author
Message Reverse Sort Order
pudi211 View Drop Down
Bronze Level
Bronze Level


Joined: 02 Sep 2023
Location: Delaware
Points: 36
Post Options Post Options   Thanks (0) Thanks(0)   Quote pudi211 Quote  Post ReplyReply Direct Link To This Post Topic: Alliis Chalmers CA Wiring
    Posted: 10 Feb 2025 at 7:39pm
Well, the good news is I got the CA running. In a Hail Mary attempt, I hooked up a 12v battery and got it running , set the timing and tuned the carb.   I’m going to rebuild the generator now. Hopefully will get that back in working order.
Back to Top
Sponsored Links


Back to Top
pudi211 View Drop Down
Bronze Level
Bronze Level


Joined: 02 Sep 2023
Location: Delaware
Points: 36
Post Options Post Options   Thanks (0) Thanks(0)   Quote pudi211 Quote  Post ReplyReply Direct Link To This Post Posted: 31 Jan 2025 at 4:37pm
Hi Steve, I do plan on using the old cutout assuming it works.   Assuming it works like an on/off I should see voltage on the terminals with the tractor running? I can tell you that I bench tested the generator and well, it didn’t generate. Goal is to rebuild it and go from there.
Back to Top
steve(ill) View Drop Down
Orange Level Access
Orange Level Access
Avatar

Joined: 11 Sep 2009
Location: illinois
Points: 87947
Post Options Post Options   Thanks (0) Thanks(0)   Quote steve(ill) Quote  Post ReplyReply Direct Link To This Post Posted: 31 Jan 2025 at 8:03am
are you using the OLD Cutout ? ..... It is basically an ON- OFF switch... the two terminals should be OPEN ( no continuity between them) when the motor is OFF and the switch will CLOSE and allow generator current / voltage to go to the amp meter when the motor is RUNNING.
Like them all, but love the "B"s.
Back to Top
pudi211 View Drop Down
Bronze Level
Bronze Level


Joined: 02 Sep 2023
Location: Delaware
Points: 36
Post Options Post Options   Thanks (0) Thanks(0)   Quote pudi211 Quote  Post ReplyReply Direct Link To This Post Posted: 30 Jan 2025 at 8:17pm
Yeah the jumper was connecting the cutout to the A terminal.  The wiring was a complete mess.  Tractor does not have lights, the belt was shredded and it was wired for negative ground. I'm just trying to take it back to the original.  

I should be good from here.  I still need to rebuild the generator.  That should be pretty straight forward if it's anything like rebuilding a starter.


Edited by pudi211 - 30 Jan 2025 at 8:20pm
Back to Top
pudi211 View Drop Down
Bronze Level
Bronze Level


Joined: 02 Sep 2023
Location: Delaware
Points: 36
Post Options Post Options   Thanks (0) Thanks(0)   Quote pudi211 Quote  Post ReplyReply Direct Link To This Post Posted: 30 Jan 2025 at 8:14pm
Thanks Steve.  You've been helpful through this process.
Back to Top
Les Kerf View Drop Down
Orange Level
Orange Level


Joined: 08 May 2020
Location: Idaho
Points: 1305
Post Options Post Options   Thanks (0) Thanks(0)   Quote Les Kerf Quote  Post ReplyReply Direct Link To This Post Posted: 30 Jan 2025 at 9:05am
Originally posted by pudi211 pudi211 wrote:

Looking at the above photo I posted, you can see the previous owner had a wire going to the voltage regulator or cut out (still not sure what I have)...

Looks like a cutout to me


Originally posted by pudi211 pudi211 wrote:

...  He then had a jumper going to the A terminal...

If that jumper is connecting the A terminal to the F terminal this is not good. I cannot see it clearly enough in the photo to be sure.


Originally posted by pudi211 pudi211 wrote:

...and he had two wires going to the F terminal...

Dunno where the two wires go but this cannot be good either. There needs to be only one wire going to the light switch for controlling the field current.

Originally posted by pudi211 pudi211 wrote:

None of this lined up with the wiring diagram...

The diagram posted by Steve is correct for a stock application.


Edited by Les Kerf - 30 Jan 2025 at 9:18am
Back to Top
steve(ill) View Drop Down
Orange Level Access
Orange Level Access
Avatar

Joined: 11 Sep 2009
Location: illinois
Points: 87947
Post Options Post Options   Thanks (0) Thanks(0)   Quote steve(ill) Quote  Post ReplyReply Direct Link To This Post Posted: 29 Jan 2025 at 10:29pm
wire #9 in the drawing  looks like a HOT WIRE from the amp gauge to the distributor / mag.... that wire is NOT NEEDED on the magneto... The Mag only needs a GROUND SWITCH to kill the spark... the HOT WIRE is needed for a distributor since it is Battery Ignition with a COIL and POINT..

Edited by steve(ill) - 29 Jan 2025 at 10:30pm
Like them all, but love the "B"s.
Back to Top
steve(ill) View Drop Down
Orange Level Access
Orange Level Access
Avatar

Joined: 11 Sep 2009
Location: illinois
Points: 87947
Post Options Post Options   Thanks (0) Thanks(0)   Quote steve(ill) Quote  Post ReplyReply Direct Link To This Post Posted: 29 Jan 2025 at 10:21pm
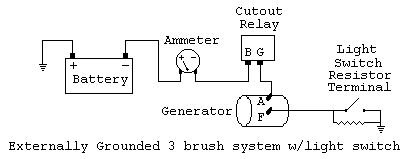
A CUTOUT was original... It has two wires.. the "A" goes to the relay - then amp meter and the "F" is the GROUND WIRE that goes to the light switch resistor.... If you had a VOLTAGE REGULATOR, you would not need the light switch resistor and the reg would have 3 wires..


Edited by steve(ill) - 29 Jan 2025 at 10:24pm
Like them all, but love the "B"s.
Back to Top
pudi211 View Drop Down
Bronze Level
Bronze Level


Joined: 02 Sep 2023
Location: Delaware
Points: 36
Post Options Post Options   Thanks (0) Thanks(0)   Quote pudi211 Quote  Post ReplyReply Direct Link To This Post Posted: 29 Jan 2025 at 6:30pm
Looking at the above photo I posted, you can see the previous owner had a wire going to the voltage regulator or cut out (still not sure what I have).  He then had a jumper going to the A terminal and he had two wires going to the F terminal. None of this lined up with the wiring diagram, so I wanted to get an answer from someone here before I start cutting, crimping and heat shrinking.  

Head and front end are back on BTW.  I also bench tested the generator and that is not producing voltage.  Planning to rebuild that, but I want to see this thing run.

Thanks!  

-Andrew


Edited by pudi211 - 29 Jan 2025 at 6:42pm
Back to Top
pudi211 View Drop Down
Bronze Level
Bronze Level


Joined: 02 Sep 2023
Location: Delaware
Points: 36
Post Options Post Options   Thanks (0) Thanks(0)   Quote pudi211 Quote  Post ReplyReply Direct Link To This Post Posted: 29 Jan 2025 at 6:26pm
Back to Top
pudi211 View Drop Down
Bronze Level
Bronze Level


Joined: 02 Sep 2023
Location: Delaware
Points: 36
Post Options Post Options   Thanks (0) Thanks(0)   Quote pudi211 Quote  Post ReplyReply Direct Link To This Post Posted: 29 Jan 2025 at 6:12pm
So the weather has been cold in Delaware and I don't have heat in the pole barn.  I know whaaaahhhh, and holding tools was like holding ice cubes.  In the meantime, I went ahead and bought a rebuild kit for the carb.  Then while rebuilding, I broke one of the small parts so I'm waiting for a replacement.

As far as wiring is concerned, PO had the tractor wired for a negative ground.  I am in the process of switching it back.  Also when I inspected the wires, most of them were worn down and exposed.  So I figured I would re-wire everything.

After consulting this thread, I have purchased the appropriate gauge wires ring terminals, and I'm ready to run wires.  I'll post photos of the mess the previous owner had for context. 

Now for the questions:

Using the diagram, there is a wire that goes from the light switch to the generator.  Does it go to the F or A terminal?

Using the photo I posted, do I have a voltage regulator or cut out?

Using the diagram, there are three wires that appear to go to the negative post on the ammeter, but I want to confirm.  One wire from the key switch, one to the voltage regulator or cut out and one to the light switch.  Is that correct?


Edited by pudi211 - 29 Jan 2025 at 6:36pm
Back to Top
pudi211 View Drop Down
Bronze Level
Bronze Level


Joined: 02 Sep 2023
Location: Delaware
Points: 36
Post Options Post Options   Thanks (0) Thanks(0)   Quote pudi211 Quote  Post ReplyReply Direct Link To This Post Posted: 29 Jan 2025 at 6:02pm
Back to Top
pudi211 View Drop Down
Bronze Level
Bronze Level


Joined: 02 Sep 2023
Location: Delaware
Points: 36
Post Options Post Options   Thanks (0) Thanks(0)   Quote pudi211 Quote  Post ReplyReply Direct Link To This Post Posted: 04 Jan 2025 at 8:34pm
Thanks Steve. Right now I’m dead in the water waiting for a new key switch and ammeter. I decided to re-wire the whole thing before trying to fire it. Cranking was the original issue with and was solved with a higher quality battery.   

Now I’m in the process of re-wiring, hoping to be able to check for spark soon.
Back to Top
Steve in NJ View Drop Down
Orange Level Access
Orange Level Access
Avatar

Joined: 12 Sep 2009
Location: Andover, NJ
Points: 12002
Post Options Post Options   Thanks (0) Thanks(0)   Quote Steve in NJ Quote  Post ReplyReply Direct Link To This Post Posted: 03 Jan 2025 at 10:51am
One major item to check is the Starter motor. If you have a local rebuilder, have him check it out for you. If he has an 881 machine or something equiivilent to see what amperage the Starter is pulling, the culprit could be the Starter.  HTH
Steve@B&B
39'RC, 43'WC, 48'B, 49'G, 50'WF, 65 Big 10, 67'B-110, 75'716H, 2-620's, & a Motorhead wife
Back to Top
pudi211 View Drop Down
Bronze Level
Bronze Level


Joined: 02 Sep 2023
Location: Delaware
Points: 36
Post Options Post Options   Thanks (0) Thanks(0)   Quote pudi211 Quote  Post ReplyReply Direct Link To This Post Posted: 31 Dec 2024 at 2:17pm
Absolutely
Back to Top
steve(ill) View Drop Down
Orange Level Access
Orange Level Access
Avatar

Joined: 11 Sep 2009
Location: illinois
Points: 87947
Post Options Post Options   Thanks (0) Thanks(0)   Quote steve(ill) Quote  Post ReplyReply Direct Link To This Post Posted: 31 Dec 2024 at 12:25pm
I have a B with a Sickle and another with a Belly mower.. They share the same 12v battery . I move it back and forth 4-5 times during the summer.. I have notice a  BLACK corrosion on the inside surface of the battery clamp terminals once or twice a year.. This is not the green/ white CRUD that seems to GROW on some terminals.. This is a very think BLACK coating that looks almost like it was spray painted on ??? ..... I use a sandpaper on a dowel to clean both clamps when i see it.... Few years ago one tractor would not start and i fought it a long time till i figured out the clamp was CLEAN to the eye, but had that black coating... Make sure everything is SHINNY SILVER..
Like them all, but love the "B"s.
Back to Top
pudi211 View Drop Down
Bronze Level
Bronze Level


Joined: 02 Sep 2023
Location: Delaware
Points: 36
Post Options Post Options   Thanks (0) Thanks(0)   Quote pudi211 Quote  Post ReplyReply Direct Link To This Post Posted: 31 Dec 2024 at 10:31am
Correct 6V positive ground.  I'll do that later on.  Thanks!
Back to Top
Les Kerf View Drop Down
Orange Level
Orange Level


Joined: 08 May 2020
Location: Idaho
Points: 1305
Post Options Post Options   Thanks (0) Thanks(0)   Quote Les Kerf Quote  Post ReplyReply Direct Link To This Post Posted: 31 Dec 2024 at 10:19am
Step #1. Check voltage at battery terminals while cranking. If it cranks slowly and the voltage barely drops, then you probably have a poor connection (high resistance) somewhere in the circuit.

If it cranks slowly and the voltage drops WAY down, like to ~3 Volts (assuming a 6 Volt battery) then you have a very heavy load such as a dragging starter or excessive friction inside the engine. Or a bad battery.

2. With meter lead on negative battery terminal (NOT on the cable terminal) and the other lead on the starter terminal, crank the engine and observe the voltage drop through the cable. Ideally it should be 0.0 Volts (zero) but there will be a slight drop. Less than 0.2 Volts is ok.

3. Do the same on the positive battery terminal to ground.

4. Do a voltage drop from the positive battery terminal to ground on the starter housing itself to test if there is a high resistance in the chassis.

I am assuming a 6 Volt Positive ground system.


Edited by Les Kerf - 31 Dec 2024 at 10:20am
Back to Top
pudi211 View Drop Down
Bronze Level
Bronze Level


Joined: 02 Sep 2023
Location: Delaware
Points: 36
Post Options Post Options   Thanks (0) Thanks(0)   Quote pudi211 Quote  Post ReplyReply Direct Link To This Post Posted: 31 Dec 2024 at 9:13am
Good advice on the battery connectors and crimping.  I recently melted solder inside of a connector and inserted the wire which made a tight connection.  I'll check with the battery store I was at yesterday to see if they'll make cables up for me. I did notice the - post to be smaller which was a concern as that wire goes to the starter and needs a tight connection.  Mine was tight, but I could twist it loose with minimal effort.  The + side was locked on tight.  
Back to Top
pudi211 View Drop Down
Bronze Level
Bronze Level


Joined: 02 Sep 2023
Location: Delaware
Points: 36
Post Options Post Options   Thanks (0) Thanks(0)   Quote pudi211 Quote  Post ReplyReply Direct Link To This Post Posted: 31 Dec 2024 at 9:06am
Appreciate it.  I'll be replacing all of the wiring and ring terminals.  I put a Deka battery on it yesterday and the cranking was slightly better.  
Back to Top
pudi211 View Drop Down
Bronze Level
Bronze Level


Joined: 02 Sep 2023
Location: Delaware
Points: 36
Post Options Post Options   Thanks (0) Thanks(0)   Quote pudi211 Quote  Post ReplyReply Direct Link To This Post Posted: 31 Dec 2024 at 9:02am
I'll be honest, I checked current with a light as my multi-meter was lost in my last move.  Went to store and replaced it yesterday and will check voltage today.  
Back to Top
pudi211 View Drop Down
Bronze Level
Bronze Level


Joined: 02 Sep 2023
Location: Delaware
Points: 36
Post Options Post Options   Thanks (0) Thanks(0)   Quote pudi211 Quote  Post ReplyReply Direct Link To This Post Posted: 31 Dec 2024 at 8:59am
Thanks Steve.  I appreciate the good advice and hopefully others will benefit from those specs.
Back to Top
steve(ill) View Drop Down
Orange Level Access
Orange Level Access
Avatar

Joined: 11 Sep 2009
Location: illinois
Points: 87947
Post Options Post Options   Thanks (0) Thanks(0)   Quote steve(ill) Quote  Post ReplyReply Direct Link To This Post Posted: 31 Dec 2024 at 8:41am
It takes a given amount of  POWER to turn over an engine.. POWER is volts x amps... when you double the volts from 6 to 12, it takes HALF as many amps to get the same POWER to turn the engine over..

That means that older cables, smaller cables, old starters, old battery get their problems somewhat COVERED UP as they dont have to work as hard.... If your using 6 volts EVERYTHING has to be perfect to get  it to rotate.
Like them all, but love the "B"s.
Back to Top
AC720Man View Drop Down
Orange Level
Orange Level
Avatar

Joined: 10 Oct 2016
Location: Shenandoah, Va
Points: 5238
Post Options Post Options   Thanks (0) Thanks(0)   Quote AC720Man Quote  Post ReplyReply Direct Link To This Post Posted: 31 Dec 2024 at 8:21am
The battery may be new but does it have high enough cranking amps? Our CA rolled over slowly on 6V and required a really good battery but usually fired up within a rotation or 2. Eventually we changed it over to 12V. I’m like Alvin, I use 2/0 welding cable, also good quality crimp connectors. Make sure you use + and - size connectors for the battery, they are different sizes. Positive is a larger connector and most parts stores only sell the larger size. Doesn’t work well on negative post of the battery as it can’t provide the clamping force because of its large size. Our local battery supply store crimps the connectors for you if you purchase the cable and connectors from them. I have my own crimp tool which will crimp 12 different size connectors. It’s a $600 tool but was tired of getting crap cables from auto parts stores. It makes a huge difference in how a starter will spin an engine over. Money well spent and have crimped a lot of cables with it over the years for myself and my friends.
1968 B-208, 1976 720 (2 of them)Danco brush hog, single bottom plow,52" snow thrower, belly mower,rear tine tiller, rear blade, front blade, 57"sickle bar,1983 917 hydro, 1968 7hp sno-bee, 1968 190XTD
Back to Top
Les Kerf View Drop Down
Orange Level
Orange Level


Joined: 08 May 2020
Location: Idaho
Points: 1305
Post Options Post Options   Thanks (0) Thanks(0)   Quote Les Kerf Quote  Post ReplyReply Direct Link To This Post Posted: 30 Dec 2024 at 10:12pm
Originally posted by pudi211 pudi211 wrote:

...
I checked all of the wires for current ...

Please elaborate.
Or did you actually check for Voltage? They are related (sorta like cousins, but they behave differently).

If you have an accurate voltmeter you take voltage drop readings of each part of the circuit; this will give you a better idea as to where the actual trouble lies.

I have found that corrosion in the tractor framework (castings) can cause poor continuity in the ground return path, a dedicated ground cable all the way to the starter was the cure.


Back to Top
steve(ill) View Drop Down
Orange Level Access
Orange Level Access
Avatar

Joined: 11 Sep 2009
Location: illinois
Points: 87947
Post Options Post Options   Thanks (0) Thanks(0)   Quote steve(ill) Quote  Post ReplyReply Direct Link To This Post Posted: 30 Dec 2024 at 5:58pm
lights, ignition, distributor, coil.. etc... can all be 18 gauge.... Might use 16 guage to make it more BEFFY and rigid... Too much bigger and you cant get the wires into the switch box..

Generator wire to the amp guage should be 10 gague... and 10 gauge from amp to the battery.. 10 gague is good for about 30 amps... more than the generator can put out.


Edited by steve(ill) - 30 Dec 2024 at 6:00pm
Like them all, but love the "B"s.
Back to Top
pudi211 View Drop Down
Bronze Level
Bronze Level


Joined: 02 Sep 2023
Location: Delaware
Points: 36
Post Options Post Options   Thanks (0) Thanks(0)   Quote pudi211 Quote  Post ReplyReply Direct Link To This Post Posted: 30 Dec 2024 at 5:19pm
Got it.  Purchased a Deka battery and will hook it up tonight.  For all other wiring, is there a specification?  Previous owner has a variety of different gauges.  The shop manual didn't specify either.  
Back to Top
steve(ill) View Drop Down
Orange Level Access
Orange Level Access
Avatar

Joined: 11 Sep 2009
Location: illinois
Points: 87947
Post Options Post Options   Thanks (0) Thanks(0)   Quote steve(ill) Quote  Post ReplyReply Direct Link To This Post Posted: 30 Dec 2024 at 4:43pm
Cables do make a big difference..  #1  is .065 square inches cross section.  00 has a  .1054 square inch cross section or 60% larger. ........... but im still not convinced thats your problem.. but would make a difference in current carry.


Edited by steve(ill) - 30 Dec 2024 at 4:51pm
Like them all, but love the "B"s.
Back to Top
Alvin M View Drop Down
Orange Level
Orange Level


Joined: 24 Jun 2018
Location: PA
Points: 802
Post Options Post Options   Thanks (0) Thanks(0)   Quote Alvin M Quote  Post ReplyReply Direct Link To This Post Posted: 30 Dec 2024 at 2:23pm
For 6v I use 2/0  fine wire copper welding cable
Back to Top
pudi211 View Drop Down
Bronze Level
Bronze Level


Joined: 02 Sep 2023
Location: Delaware
Points: 36
Post Options Post Options   Thanks (0) Thanks(0)   Quote pudi211 Quote  Post ReplyReply Direct Link To This Post Posted: 30 Dec 2024 at 1:04pm
Ok, I disconnected all wires except for the battery/ground cables. Same slow intermittent lope.  Not a steady crank.  I purchased the battery over the weekend, and I am charging it now.  Starter is new and the battery is new.  I also tried two different grounding points. I installed the old starter, which probably wasn't bad to begin with, and the result is the same as with the new one.  The old starter actually cranked better than the new one.  Thinking it just could be a crappy battery.    
Back to Top
 Post Reply Post Reply Page  12>
  Share Topic   

Forum Jump Forum Permissions View Drop Down

Forum Software by Web Wiz Forums® version 11.10
Copyright ©2001-2017 Web Wiz Ltd.

This page was generated in 0.094 seconds.


Help Support the
Unofficial Allis Forum